10Managing Pharma Samples
Managing Pharma Samples
This chapter covers the following topics:
About Managing Pharma Samples
Most pharmaceutical manufacturers provide free samples to health care professionals in an effort to influence the prescribing habits of physicians across the United States and the world. In the United States, samples distribution is regulated by the FDA and must be reconciled at least once a year.
This chapter describes how to manage and maintain an electronic inventory of samples and promotional items using Siebel Pharma Samples Management. Using the procedures given in this chapter, you will be able to perform the administrator tasks of setting up and maintaining a home-office master inventory (optional) and monitoring samples disbursements, orders, transfers, receipts, discrepancies, adjustments, and inventory counts. End users use the Samples screen and the Sample Management screen to track an electronic inventory of samples stock, create samples request order and transfers, acknowledges receipt of samples transfers, and adjust inventory balances for reconciliation purposes.
Siebel Samples Management allows sales representatives and administrators to measure and monitor sample disbursements at every level throughout the organization. For more information on the differences between administrator and end-user tasks, see Scenarios for Managing Samples.
About Samples Transactions
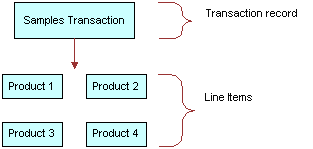
Siebel Samples Management maintains a samples transaction record for every sample transfer, receipt, disbursement, order, and inventory adjustment. The application assigns each samples transaction record a unique identifier for tracking purposes. Depending on the type of transaction, you can display this identifier as a transaction number, an order number, an invoice number, or a transfer number.
Each samples transaction record represents a single transaction consisting of one or more line items. As shown in the following, the application tracks a transfer of multiple samples as a single transaction record with multiple corresponding line item records—one line item for each type of product transferred. These line item records are child records of the parent transaction record.
If the approval process is enabled in your application, every transaction must be tracked through the approval process so that the correct transaction status is displayed.
Inventory Reconciliation
In the United States, pharmaceutical companies can request that sales representatives perform an inventory reconciliation from one to twelve times a year to remain compliant with the Prescription Drug Marketing Act (PDMA). Sampling regulations vary significantly in North America, Europe, Asia, and Latin America. If sales representatives’ physical sample inventories do not match their disbursement and transaction histories, they can perform inventory adjustments to justify the discrepancies. For more information, see Reconciling an Inventory Period.
It is also possible to create sample products by lot numbers and to disburse samples to contacts by lot numbers and yet not reconcile by lot numbers. For more information, see Reconciling an Inventory Period.
PDMA Compliance and Lot Numbers
Companies in the United States might need to perform additional tasks to meet PDMA requirements. According to the Food and Drug Administration’s Final Ruling of December 3, 1999 (21 CFR Part 203 and 205), samples must also be tracked by lot number to the level of disbursement. Siebel Samples Management provides additional functionality that allows you to meet this lot number tracking requirement. For more information on using lot numbers, see Managing Samples Transactions.
Inventory Periods
Because samples inventory reconciliation can happen as often as once a month, Siebel Samples Management allows you to reconcile as often as you like and provides three types of inventory periods for maximum flexibility. These period types are described in the following table.
Table Samples Inventory Periods
| Period Type | Description |
|---|---|
Active |
The current period; it shows no end date and it is not reconciled. You can enter any type of samples transaction, including adding new products; inventory counts will be adjusted accordingly. |
Inactive |
A past, unreconciled period; it shows an end date but has not been reconciled yet. Except for adding new products into inventory, you can enter any type of samples transaction; inventory counts will be affected accordingly. The default application configuration provides one inactive period, but can be configured for multiple instances. |
Reconciled |
A past, inactive period; it shows an end date and has been reconciled. Although you can enter samples disbursements for a reconciled period, the inventory counts for the active period will not be affected. |
The default Siebel Samples Management configuration provides three unreconciled periods: one active period and two inactive periods. The Siebel administrator can control the number of unreconciled periods allowed. For more information, see Reconciling an Inventory Period.
How Siebel Samples Management Works with Calls
This topic describes how Siebel Samples Management works with the Contact Call Detail and Account Call Detail views. For more information on recording calls, see Completing Contact and Account Call Activities.
When you click the Submit button in either the Contact Call Detail and Account Call Detail views, the application verifies that:
At least one product has been recorded and detailed.
This requirement can be changed by the administrator. For more information, see Siebel Pharma Developer’s Reference.
The call’s date and time is the same as or earlier than the current date and time. A call cannot be submitted with a future date.
If dropped samples are recorded for the call, the application checks that:
A valid paper or electronic signature has been obtained.
The Ref# field is not empty.
The samples exist in the inventory for the period indicated by the call’s date and time.
The period into which the samples will be recorded is an unreconciled period. If it is a reconciled period, a warning message appears.
A valid lot number has been specified for dropped samples tracked by lot number.
If the call passes these checks, the application:
Creates a samples disbursement transaction, with a line item for each dropped sample recorded for the call.
Creates a samples disbursement transaction, with a line item for each dropped sample recorded for the call when Signature is saved for Electronic Signature Calls.
Submits a disbursement transaction to update the samples inventory. If the submission of the disbursement transaction is successful, the application changes the call’s Status field to Submitted.
Sets the Last Call Date field for the contact or account to the date of the submitted call, and many fields in the call record become read-only.
As an administrator, you can change the fields that become read-only after a call is submitted (or synchronized with the Siebel Mobile application for Siebel Pharma on a mobile device). For information, see Siebel Pharma Developer’s Reference.
About Samples and Lot Numbers
The use of product samples for product promotion by pharmaceutical companies around the world is governed by local country legislations. Siebel Samples Management maintains a samples transaction record for every sample transfer, receipt, disbursement, order, and inventory adjustment.
The following three options are available to customers who are implementing Siebel Samples Management:
Use Lot numbers for samples creation, transfer, adjustment, order, disbursement, inventory, and reconciliation.
This option is the default setting. Set the system preferences as shown in the following table:
System Preference Value Lots for Disperse Only
FALSE
Sample Lots Enabled
TRUE
Note: An administrator sets the system preferences by navigating to the Administration - Application screen, then the System Preferences view.
Use Lot numbers for samples creation, transfer, adjustment, order, disbursement, but do not use lot numbers for inventory and reconciliation.
Set the system preferences as shown in the following table:
System Preference Value Lots for Disperse Only
TRUE
Sample Lots Enabled
TRUE
In addition to these system preference changes, a Siebel administrator must use Siebel Web Tools to control product visibility associated with this behavior. For more information, see Siebel Pharma Developer’s Reference.
Note: The Lot# Tracking flag on the Administration - Product screen must be checked.Do not use lot numbers for samples management.
Set the system preferences as shown in the following table:
System Preference Value Lots for Disperse Only
FALSE
Sample Lots Enabled
FALSE
The Lot# Tracking flag on the Administration - Product screen does not have to be checked.
Scenarios for Managing Samples
This topic outlines three scenarios that are examples of workflows performed by a samples administrator and the sales representatives who distribute samples to health care professionals. Your company might follow a different process according to its business requirements.
A pharmaceutical company has new products to bring to market. To set up a samples inventory, the samples administrator adds the products to the database, associates any lot numbers (optional), and allocates and transfers samples to the sales representatives in the field. Once sales representatives acknowledge them, the samples are available during call execution. The sales representatives then visit the doctors in their territories and drop the new samples. After a month goes by, each sales representative is required to reconcile his or her inventory. One sales representative realizes there are some discrepancies in her inventory. After she makes the needed adjustments, she reconciles her inventory and starts a fresh inventory period.
Scenarios discussed in this chapter include:
Scenario 1: Administrator Establishes a Master Inventory. The Siebel samples administrator establishes and transfers inventory to end users.
Scenario 2: Administrator and End Users Establish a Master Inventory. The Siebel samples administrator and the end user establish an initial inventory and then reconcile it before they disburse any samples.
Scenario 3: Users Transfer Samples to One Another. Describes the basic process of how users can exchange samples inventory within Siebel CRM.
Using the procedures described in this chapter, sales representatives can track their samples inventories, record inventory transfers, and track lost or damaged inventory. However, to record samples disbursements, sales representative should use the procedures described in Completing Contact and Account Call Activities.
Scenario 1: Administrator Establishes a Master Inventory
In this scenario, samples administrators are responsible for their company’s samples inventory and making sure it complies with regulatory rules and regulations. In this role, they take the responsibility for establishing a master samples inventory and then transferring samples to each end user.
Having the samples administrator establish a master inventory and then transfer samples to each end user is a simpler process from the end user’s perspective. Once the samples administrator establishes the master samples inventory, the next step is to transfer inventory to each end user. When each recipient electronically receives the shipment, they acknowledge the application which automatically enters the received samples into their inventory counts.
In this process, the representative, the representative’s manager, and the samples administrator can monitor discrepancies between shipped quantities and received quantities.
Administrator Procedures
The samples administrator requires administrative responsibilities in Siebel Samples Management to:
Define samples as products. For more information, see Managing Products for Life Sciences.
Define lot numbers (optional). For more information, see Defining Lot Numbers for Samples.
Set up and reconcile initial master inventory. For more information, see Establishing an Initial Inventory.
Allocate samples to sales representatives. For more information, see Allocating Samples.
Transfer inventory to end users. For more information, see Creating a Samples Transfer.
Monitor samples activities. Activities for samples include disbursements, orders, transfers between employees, user inventory counts, and inventory adjustments. For more information, see Monitoring Samples Activities.
Manage electronic signatures. For more information, see Checking Electronic Signatures.
Identify sample locations in the event of recalls. Follow your company’s guidelines for managing sample recalls.
End-User Procedures
The end users are the sales representatives who distribute samples to health care professionals. They enter information to:
Acknowledge receipt of the inventory transfers. For more information, see Acknowledging Full Receipt of a Samples Transfer.
Use the new samples in regular call reporting. For more information, see Completing Contact and Account Call Activities
Transfer samples to other end users. Sales representatives exchange samples among themselves. For more information, see Creating a Samples Transfer.
Request more samples. For more information, see Creating a Samples Order.
Perform inventory adjustments. For more information, see Adjusting a Past Samples Transaction.
Reconcile inventory periods as needed. For more information, see Reconciling an Inventory Period.
Scenario 2: Administrator and End Users Establish a Master Inventory
In this scenario, both the samples administrator and the end user establish a master samples inventory or inventory count. Samples administrators are again responsible for their company’s samples inventory and making sure it complies with regulatory rules and regulations.
From a process perspective, this process requires more steps for the end user because they must first establish an initial inventory and then reconcile it before they can disburse any samples.
Administrator Procedures
Samples administrators require administrative responsibilities in Siebel Samples Management to:
(Optional) Define lot numbers. Samples can be tracked by lot numbers For more information, see Defining Lot Numbers for Samples.
Set up and reconcile initial master inventory. This step is required only if you are not using a third-party system to populate the samples inventory. For more information, see Establishing an Initial Inventory.
Monitor samples activities. Samples activities that are monitored include disbursements, orders, transfers between employees, user inventory counts, and inventory adjustments. For more information, see Monitoring Samples Activities.
Check electronic signatures. Regularly check Signature Audit Administration to verify that signatures collected from contacts are consistent. For more information, see Checking Electronic Signatures.
Identify sample locations in the event of recalls. Follow your company’s guidelines for managing sample recalls.
End-User Procedures
The end users are the sales representatives who distribute samples to health care professionals. They enter information to:
Set up and reconcile initial master inventory. For more information, see Acknowledging Full Receipt of a Samples Transfer.
Use the new samples in regular call reporting. For more information, see Completing Contact and Account Call Activities.
Transfer samples to other end users. Sales representatives exchange samples among themselves. For more information, see Creating a Samples Transfer.
Acknowledge receipt of the inventory transfers. End users must acknowledge receipt of a samples transfer transaction before the transfer can be completed. For more information, see Acknowledging Full Receipt of a Samples Transfer.
Perform counts and adjustments. For more information, see Adjusting a Past Samples Transaction.
Reconcile inventory periods as needed. For more information, see Reconciling an Inventory Period.
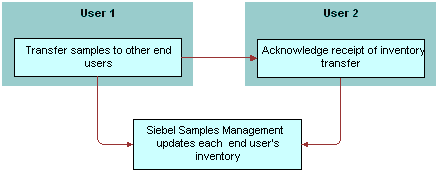
Scenario 3: Users Transfer Samples to One Another
This scenario describes the basic process for exchanging inventory with other users within Siebel CRM. This process can be used by both the administrator and end users to exchange samples. When a user creates a samples transfer to move inventory to another user, the recipient electronically receives a shipment of samples. Once the recipient submits a receipt for that shipment, the application automatically enters the received samples into their inventory counts.
The following illustrates this process.
Managing Samples Transactions
In the default configuration, Siebel Samples Management supports two open inventory periods. The samples administrator can override this default behavior by adding additional open periods in the Siebel runtime repository. When users click the Submit button for a samples transaction, the system checks the transaction date and time to determine the inventory period into which the transaction should be entered.
For all transactions except receipts, the application enters the transaction into the inventory period that includes the transaction’s date and time. If no such period exists, the transaction submission fails.
If the situation involves samples receipts (that is, received samples transactions displayed in the Received Samples view) and no inventory period exists that includes the transaction’s date and time, Siebel Samples Management creates a new inventory period.
For example, this situation might occur during initial deployment, before any inventory periods have been opened. The new period’s start date and time are set to the invoice receipt’s date and time. However, the application first checks whether any pending transaction has an earlier transaction date than the one being submitted. This is done to prevent any impasse that might occur if a second invoice receipt is later submitted with an earlier transaction date.
Submitted samples transactions impact inventory counts in the following ways:
Samples orders are independent of inventory periods because they have no effect on inventory counts.
Received Samples (transactions whose Type field is Transfer In) are added to the submitter’s inventory counts.
Sent Samples (transactions whose Transfer Type or Transaction Type field is Transfer Out or Return) are subtracted from the submitter’s current inventory counts. In addition, a corresponding invoice receipt is created for the receiving party.
Note: Typically, samples returns (samples transfers whose Transfer Type field is Return) are expired products that are sent back to the home office to be destroyed. Samples returns are not added back into the home office’s master inventory counts. The samples administrator can track samples returns by using the Sent Samples administration view or the Samples History administration views and querying for those samples transactions with a type equal to Return.Samples adjustments (transactions whose Transaction Type field is Inventory Adjustment) are either added to or subtracted from the submitter’s inventory counts. Samples adjustments are the only type of samples transaction in which negative quantities are allowed.
In the Transactions view, the Add, Adjust, and Submit buttons are enabled or disabled as follows:
If the transaction’s Status field is set to Submitted, the Adjust button, and the New button in the Line Items Applet and Submit buttons are disabled.
If the transaction’s Status field is set to Adjusted, all the buttons are disabled.
If the transaction’s Status field is set to In Progress, the Submit button and the New Button in Line Items Applet are enabled and the Adjust button is disabled.
Managing Pharma Samples
The following topics describe the key tasks required to manage pharma samples:
Prerequisites for Managing Samples
Administrators. Before you can set up Siebel Samples Management, you must first define your products. For more information, see Managing Products for Life Sciences.
End-users. Before end-users can drop samples, they must acknowledge received samples if allocation functionality is enabled.
Defining Lot Numbers for Samples
Siebel Samples Management allows you to define your samples and promotional items according to a number of different implementation scenarios. By specifying certain product settings, you can make Siebel Samples Management suit your company’s strategy for inventory tracking and distribution of samples. You can implement samples using lot numbers in the following ways:
Tracking samples for inventory purposes at a lot level or a sample product level.
Disbursing some products with lots and others without lots.
Managing existing samples that have already been distributed and tracked without lot numbers in Siebel Samples Management.
Using lot numbers for samples creation, transfers, adjustments, orders, and call reporting, but not using lot numbers for inventory and reconciliation. For more information, see Managing Inventory Tracking and Reconciliation Without Lot Numbers.
Before you can track samples by lot number, you must:
Verify that the Samples Lots Enabled system preference is set to TRUE (the default setting). For more information, see Disabling Lot Number Tracking.
Define the products that will be disbursed as samples. For more information, see Defining Internal Products.
Define the lot numbers for each product. For more information, see the procedure in this topic.
If you track disbursements at the lot number level, you can track inventory with or without using lot numbers. For more information on disabling lot number tracking see Disabling Lot Number Tracking. For more information on reconciliation without lot numbers, see Managing Inventory Tracking and Reconciliation Without Lot Numbers and Enabling Inventory Reconciliation Without Lot Numbers.
If you are implementing either full or partial lot number tracking for samples use the following procedure to define the lot numbers associated with those samples. This procedure creates lot number records that are children of the parent sample product record. For more information setting up lot tracking, see Defining Internal Products.
Existing products (that is, products that were previously defined without lot number tracking specified) cannot be tracked by lot number if they exist in any user inventory. To begin tracking lot numbers for an existing product, you must create a new product record with a product name indicating that this product will be tracked by lot number. For example, if the existing product is named Aracid 200, you could name the new product Aracid 200 (Lot).
To define lot numbers
Verify that you have specified the correct settings for the products to be disbursed as samples.
For more information on setting up lot tracking, see Defining Internal Products paying specific attention to the table in the topic Product Categorization Settings and the table in the topic About Samples and Promotional Items Settings.
Navigate to the Sample Management screen, then the Lot Setup view.
In the Lot Setup list, create a new record and complete the necessary fields.
Some fields are described in the following table.
Field Comments Cut Off Date
This is non editable field and works in conjunction with the Short Days field. The initial value is calculated based on the expiration date and short days (if present). If the short days is not present, then expiration date will be the cut off date. Cut Off Date is Expiration Date - Short Days.
At the time of sampling, this date helps the sales representative in disbursing the products based on the number of days from expiry.
Expiration Date
This information can be used for recalls of expired products.
Effective Start Date
The date of manufacture, the date on which the product was received, or another date defined by your company.
Lot #
Enter an unique value that corresponds to the lot number printed on the label of the product.
Inventory By Lot
Check this field if inventory tracking by lot number is required
For more information, see Defining Internal Products paying specific attention to the table in the topic Product Categorization Settings and the table in the topic About Samples and Promotional Items Settings.
Sample
The name of the product for which this lot number will be affiliated. This field should indicate both product name and dosage. Only products that are set up for lot number tracking appear in the dialog box.
For more information, see Defining Internal Products paying specific attention to the table in the topic Product Categorization Settings and the table in the topic About Samples and Promotional Items Settings.
Short Days
Indicates the number of days before expiration from which the lot becomes short dated.
If the sampling product has Short Days defined in the Administration - Product setup, then the Short Days value becomes the default value for this field. It can be modified by the administrator.
Products which have passed the expiration date are not available to the sales representative at the time of sampling.
Status
This is a read-only field which indicates whether the lot can be fulfilled. Possible values are:
Good (if current date is less than cut off date)
Expired (if current date is greater than expiration date)
Short Dated (if current date is in between expiration date and cut off date)
Repeat Step 3 to define other lot numbers.
Note: Multiple lot numbers can be defined for a sample product, as long as each lot number is unique.
You can also include the lot number in the product name when defining the product. For more information, see Defining Internal Products. However, using this method can make the drop-down lists that users select from very long. Only use this method if the number of products that will be disbursed is small.
Disabling Lot Number Tracking
Lot number tracking for sample products is enabled by default. With lot number tracking enabled, the constraints and data checks described in How Siebel Samples Management Works with Calls and Defining Internal Products become active.
Regardless of whether you have set the Samples Lots Enabled system preference to TRUE or FALSE, samples dispersed with lot numbers should appear in both the Samples History and the Inventory Count views. Thus, even if you decide not to use lot numbers, your samples history is fully recorded.
To disable lot number tracking for samples
Set the Samples Lots Enabled system preference to FALSE.
For general information about setting system preferences, see Siebel Applications Administration Guide.
Setting the Lots for Disperse Only system preference to TRUE allows you to ship samples to users by lot numbers and allows sales representatives to disburse the samples by lot numbers while maintaining and reconciling inventory without lot numbers. To retain sample product visibility, the samples administrator must reconfigure the Siebel repository. For more information, see Managing Inventory Tracking and Reconciliation Without Lot Numbers.
Establishing an Initial Inventory
Establishing an initial master inventory is only necessary if you are manually entering and tracking samples. If you are populating your samples inventory from a third-party system, it is not recommended that you establish an initial master inventory.
As outlined in Scenarios for Managing Samples, either an administrator or an end user can establish an inventory. However, because Siebel Samples Management routes and maintains transactions by Employee ID, only the user who creates an inventory (the initial inventory count) can create or manipulate that inventory.
Before adding products to the master inventory, you must verify that the products are correctly defined for inventory tracking. For more information, see Defining Internal Products paying specific attention to the tables in the topics Product Categorization Settings and About Samples and Promotional Items Settings.
In particular, in the Products form, you must select one of the following fields:
Orderable
Either Inventory or the Lot# Tracking
When neither Inventory nor Lot # Tracking are checked, the sample is not tracked in inventory.
For more information, see Defining Internal Products and Managing Samples Transactions.
To establish an initial master inventory:
Count products on-hand. Establish an inventory count by physically counting the products currently on-hand. This process creates a list of the products in your inventory and an inventory period solely for your initial count.
Add products. Add products to the inventory.
For more information, see Adding Products to an Inventory.
Submit count. Submit an initial count.
For more information, see Submitting an Initial Count.
Submit adjustments. Create and submit adjustments for the initial count.
For more information, see Creating and Submitting an Initial Count Adjustment.
Reconcile. Reconcile the initial inventory period.
For more information, see Reconciling the Initial Inventory Period.
Adding Products to an Inventory
The following procedure shows you how to add a product to an inventory.
To add products to an inventory
Navigate to the Samples screen, then the Inventory Count view.
Create a new inventory count record and complete the following fields on the form that appears:
Sample. Select a product from the Sample list.
Lot #. (Optional) Select a lot number from the Lot # list.
Submitting an Initial Count
The following procedure shows you how to submit an initial count.
To submit an initial count
Navigate to the Samples screen, then the Inventory Count view.
The LS Pharma Inventory Periods list applet should display only the currently active inventory period.
Click Closeout Count.
This button may be disabled if there are no quantities present in the Physical Count column.
Click the History tab.
The Samples History view appears.
The inventory period into which you entered your initial counts becomes inactive—a date and time appear in the End Date field, and there is no check mark in the Active field. In addition, a new active period has been opened.
(Optional). Create adjustment transactions for the period, as described in Creating and Submitting an Initial Count Adjustment.
You cannot submit an adjustment transaction if the product is not currently active. Siebel Samples Management considers a product inactive if:
The administrator has made the product inactive
The product does not exist in the inventory count list (product might have been deleted if the on-hand quantity was zero)
The product does not have an active allocation period
About Establishing an Initial Inventory Count
End users only need to establish an initial inventory count when their initial counts contain records that they manually entered into Siebel Samples Management. If that is the case, they must set up an initial master inventory, make adjustments, and then reconcile it as described in Establishing an Initial Inventory.
If their initial counts only contain samples routed to them by their samples administrator, they simply need to acknowledge the receipt of those shipments. For more information, see Acknowledging Full Receipt of a Samples Transfer.
Managing Inventory Tracking and Reconciliation Without Lot Numbers
Siebel Samples Management supports using lot numbers for samples creation, shipment, receipt, transfers, adjustment, ordering, and disbursement without using lot numbers for inventory and reconciliation.
To support this behavior, you must make three changes:
Set the value of two system preferences—Samples Lots Enabled and Lots for Disperse Only—to “True."
Check the Lot# Tracking flag in the Administration - Product screen.
Implement product visibility. For more information, see Retaining Sample Product Visibility.
When this behavior has been enabled, the Lot No. field is available but not required for samples creation, shipment, receipt, transfers, adjustment, ordering and call reporting. In addition, the Lot No. field is disabled in the Inventory Count and Reconciliation views.
Tracking and Reconciling Inventory Without Lot Numbers
The following procedure shows you how to track and reconcile the inventory (without lot numbers).
To track and reconcile inventory without lot numbers
Set the Samples Lots Enabled system preference to TRUE.
Set the Lots for Disperse Only system preference to TRUE.
For general information about setting system preferences, see Siebel Applications Administration Guide.
Creating and Submitting an Initial Count Adjustment
The following procedure shows you how to create and submit an initial count adjustment.
To create and submit initial count adjustments
Navigate to the Samples screen, then the Transaction view.
From the view drop-down list, select Inventory Adjustments.
In the Inventory Adjustments list, create a new record and complete the necessary fields.
Some fields are described in the following table.
Field Comments Adjustment Reason
Select Initial Count from the drop-down list.
Inventory Period
Selecting an Inventory Period automatically enters a validated date in the Transaction Date (Txn Date) field, making sure that the adjustment is entered into the appropriate inventory period.
Transaction #
The application automatically generates an unique identifier. You cannot change this value.
Transaction Date
It is recommended that you complete the Inventory Period field to auto-fill this field so that the adjustment is entered into the correct period.
Transaction Status
The application automatically changes this field value to Submitted when you submit the adjustment.
In the Line Items list, create a new record and complete the necessary fields.
Some fields are described in the following table.
Field Comments Item #
The application automatically generates this value. If you want to have the items appear in a particular order, edit this value in the Administration - Product screen.
Item Status
The application automatically changes this field value to Submitted when you submit the transaction.
Lot Name
The lot number for this sample.
Quantity
The amount of your initial inventory. This quantity should be the same as the value you entered in the Count field in the Inventory Count view. For more information, see Submitting an Initial Count).
Sample
The sample to be adjusted.
Repeat Step 3 and Step 4 to enter a line item for each sample needing adjustment.
Click Submit.
The values in the Transaction Status field (in the Samples Adjustment form) and the Item Status fields (in the Line Items list) are changed to Submitted.
Reconciling the Initial Inventory Period
The following procedure shows you how to reconcile the initial inventory period.
To reconcile the initial inventory period
Navigate to the Samples screen, then the Reconciliation view.
The Reconciliation view contains the following applets.
Applet Description Inventory Periods (Unreconciled)
Shows all inactive (past, unreconciled) inventory periods. An active period becomes inactive once you submit an inventory count for the period (as described in Submitting an Initial Count).
Inventory Count (Unreconciled)
Shows the products in your inventory, their physical and electronic counts, and the difference between the two counts (if any). The Difference field must be zero for all products before you can reconcile the period.
Samples History
Shows samples transactions entered for the currently selected product in the Inventory Count list. If no transactions were entered for the selected product during the inactive inventory period, this list is empty.
In the Inventory Count applet, verify that the Difference field shows zero for the products listed.
If a product shows a value other than zero, you must make an adjustment to correct the difference. For more information, see Adjusting a Past Samples Transaction.
In the Inventory Periods applet, click Reconcile.
The lists in the view are cleared.
Click the History tab.
The Samples History view appears. In the Inventory Periods list, a check mark appears in the Reconciled field of the inactive period that you just reconciled.
Allocating Samples
Administrators assign samples to sales representatives through the allocation process. The sales representatives deliver the samples to the health care professionals. The application provides the ability to display products for a sales representative and updates them as they become active or inactive. Allocation is applicable to samples, promotional items, and detailing products. Allocation records can either be manually entered, or loaded into the application using EIM.
Using the allocation process, if a sales representative has a product in inventory, and the product does not have an active allocation for a certain period, then the product will not be available for selection, and cannot be added as part of a New call or a Smart call. Products available for selection are filtered based on start and end dates from the Allocation screen.
To allocate samples
Navigate to the Sample Management screen, then the Allocations view.
Select Samples from the view drop-down list.
In the Samples list, create a new record and complete the necessary fields.
Some fields are described in the following table:
Field Comments Owner Last Name
This is an MVG field. The last name of the sales representative to whom the sample should be allocated.
Owner First Name
This is an MVG field. The first name of the sales representative to whom the sample should be allocated.
Start Date
Start Date of the allocation period. Sales representatives cannot access the samples before this date.
End Date
End Date of the allocation period. Sales representatives cannot access the samples after this date
Active
This is a read-only check box which is populated based on the Start Date and End Date. The check box is disabled for an inactive period and is enabled l be for an active period (current date is a date between the Start Date and End Date).
Sample
This is a drop-down field. Administrator can select the sample which will be allocated to the sales representative.
Max Quantity
This is the maximum quantity a sales representative can allocate in one call. If the sales representative samples more than this quantity to the doctor, a message is displayed to indicate that the user has exceeded the limit.
If a change is made to this value, it is reflected only on the mobile device after the sales representative performs a synchronization.
Allocated Quantity
The number of samples allocated for this allocation period.
Stop Sampling
If this flag is checked, the sales representative cannot sample this drug anymore. This behavior is noticed only after the sales representative synchronizes their mobile device.
Product Type
Read-only field of Sample product type.
Creating a Samples Transfer
You create a samples transfer whenever product samples are exchanged within your company. This procedure can be used by:
A samples administrator to send shipments to end users in the field
End users to exchange samples between themselves
End users to return samples to the home office
Once the samples transfer has been submitted into the system, the recipient receives a samples transfer. After the recipient acknowledges the receipt of the transaction, the application enters the new inventory into his or her inventory count. For more information, see Acknowledging Full Receipt of a Samples Transfer.
To create a samples transfer
Navigate to the Samples screen, then the Transaction view.
Select Sent Samples from the view drop-down list.
In the Sent Samples list, create a new record and complete the necessary fields.
Some fields are described in the following table.
Field Comments Transfer #
The application automatically generates an unique identifier. You can change this value.
Transfer Date
The application automatically generates a date and time value that falls in the active period.
Transfer Status
The application automatically changes this field value to Submitted when you submit the transaction.
Transfer to
The employee to whom you are transferring the samples. If the value of the Transfer Type field is Transfer Out, you must complete this field. Leave this field empty if the value of the Transfer Type field is Return.
Transfer Type
Select the appropriate value:
Transfer Out - Indicates you are transferring samples to another employee.
Return - Indicates you are returning samples to the home office. Samples are typically returned because they are expired or damaged products that should be destroyed. Transfers with the Transfer Type field set to Return do not generate shipment transactions, and they are not added to the master inventory counts. However, the samples administrator can see returned samples transactions in the Sample Compliance views. For more information, see Monitoring Samples Activities.
Inventory Period with Comments
Inventory period restricts the available products and Lot #'s for selection when adding line items. Also ensures that only valid product and Lot # for the selected inventory period are available for selection and that the Transfer Txn is entered for the appropriate inventory period.
In the Line Items applet, create a new record and complete the necessary fields.
Some fields are described in the following table.
Field Comments Item #
The application automatically generates an unique identifier. Edit this value to have the items appear in a particular order.
Item Status
The application automatically changes this field value to Submitted when you submit the transaction.
Lot #
The lot number for this samples transfer.
Quantity
The quantity that you are transferring.
Sample
The samples being transferred.
Repeat Step 4 to enter a line item for each product or promotional item you are transferring.
Click Submit.
Note: A transfer transaction cannot be modified or deleted after it has been submitted. If the approval process in enabled, then the transaction must be approved before the correct status is reflected.The value of the Transfer Status field (in the Sent Samples list) and the Item Status field (in the Line Items list) changes to Submitted.
Click the History tab.
When you select a product that has been transferred in Inventory List, the line items of the transfer transaction appear in the Samples History list.
Monitoring Samples Activities
As the samples administrator you are responsible for your company’s samples inventory and making sure it complies with regulatory rules and regulations. Use the views described in the following table to monitor samples activity across the enterprise.
To monitor samples activities
Navigate to the Sample Management screen, then one of the following views as required:
Inventory Count view
Reconciliation view
Transaction view (then Sent Samples, Received Samples, or Sample Discrepancies)
Samples Orders view
Location Audit Reports view
These views are described in the following table, are read-only, and appear only when you are connected to the server.
Table Administrator Views for Monitoring Samples Activity
| View | Description |
|---|---|
Inventory Count |
Shows samples inventory counts that have been submitted within the enterprise. |
Reconciliation |
This view allows the administrator to view and reconcile inventory periods for any sales representative in the application. |
Transaction |
Shows inventory adjustments for the organization. Adjustment transactions can be submitted by end users or by the samples administrator to resolve discrepancies between physical and electronic inventory counts. Adjustment and disbursement transactions provide a clear audit trail of samples inventory adjustments. |
Sent Samples |
Shows samples transfer transactions submitted. The Line Items list shows the line items of the samples transfer currently selected in the Sent Samples list. This view allows the administrator to review samples returns or shipments sent between end users. |
Received Samples |
Shows samples receipt transactions submitted by end user. The Line Item list shows the line items of the samples receipt currently selected in the Samples Receipts list. This view allows the administrator to review sent shipments between end users. |
Sample Discrepancies |
Shows samples receipts submitted by users in which the received quantity did not match the shipped quantity. The Line Items list shows the line items for the receipt currently selected in the Sample Discrepancies list. This view allows the administrator to make sure that samples are not being diverted. |
Samples Orders |
Shows samples order transactions submitted by end users or their managers. The Line Items list shows the line items of the samples order currently selected in the Samples Orders list. This view allows the administrator to review samples order sent from end users. |
Location Audit Reports |
Lists all the location audit reports submitted. |
Adjusting a Past Samples Transaction
The samples administrator and end users can adjust inventory counts of samples stock by making adjustments to past samples transactions. Common reasons for adjusting past transactions include product loss or expiration, counting mistakes, or data entry errors. You can add products or adjust quantities for any type of samples transaction (disbursement, transfer, order, and so on).
You adjust a past samples transaction in the Disbursements view.
When you select a product in the Inventory List, the Samples History list shows samples transactions entered for that product. For example, if a sales representative dropped multiple samples on a call, the Samples History list would display one line-item record for each sample. Also, if an adjustment has been made to an item in the transaction, an additional row (corresponding to the adjustment) will appear in this view.
Adding Additional Samples
The following procedure shows you how to add additional samples.
To add additional samples
Navigate to the Samples screen, then the History view.
In the Inventory List applet, select a product.
When you select a product in the Inventory List, the Samples History applet shows all samples transactions entered for that product. You can identify the transaction record in the Samples History list by the Transaction Date, Last Name, or Transaction # field values.
Once you identify the transaction, click on the hyperlink.
The Call Details view opens.
In the Call Details view, click the New Samples Drop to create a new activity.
Fill in all the details and either get a paper signature or an electronic signature.
If you receive an electronic signature, ensure that you save the signature.
Submit the activity.
Adjusting the Quantity in a Samples Transaction
The following procedure shows you how to adjust the quantity in a samples transaction.
To adjust a quantity in a samples transaction
Navigate to the Samples screen, then the Transactions view.
Select Disbursements from the view drop-down list.
Select a record which is processed, and click Adjust.
The application creates a new record.
Modify the quantity in the line items.
Submit the adjusted transaction.
Checking Electronic Signatures
End users can use Siebel Pharma (desktop application) or the Siebel Mobile application for Siebel Pharma to electronically capture signatures. The Signature Audit Administration view lists all the electronically captured signatures of a contact to whom samples were dropped in a linear format.
As the samples administrator, be sure to check Signature Audit Administration regularly and perform signature capture verification to make sure that signatures collected from each contact are consistent.
The signature capture verification determines if the call information has been modified by comparing the information captured from the signature (the signature event string) with the current call information (the current call string). Reasons for call information modification include:
Recreation of a sample receipt
Sample adjustments
Fraud
Signature capture verification is launched from the Verify button on the Signature Audit.
As the samples administrator you are responsible for your company’s samples inventory and making sure it complies with regulatory rules and regulations. Use the views described in the table in the topic Monitoring Samples Activities to monitor samples activity across the enterprise.
Performing Signature Audit
Sales representatives capture electronic signatures from doctors when drugs are sampled. Signature Audit is the process by which the sample compliance teams periodically audit the signatures in the application to check that they are authentic.
To perform signature audit
Navigate to the Sample Compliance screen, then the Signature Audit view.
Perform a query based on a doctor's name.
Click Verify to compare signatures. Alternatively, you can manually compare the signatures.
(Optional) Generate an incident for a signature, relate the incident to a case, and track all activities as follows:
Navigate to the Sample Compliance screen.
Select the Signature Audit view
Select a record from the Signature list applet.
Select one or more signatures from the Signatures applet and click Generate Incidents.
The application creates incidents for each of the selected signatures.
- View incidents from the Incidents screen, then the Incidents List view.
Generating a Receipt for Calls with Electronic Signatures
The Sample Events and Receipts view shows an entire sample transaction as it was recorded at the time the signature was captured. Sales representatives can submit electronically captured signatures using the Siebel Pharma desktop application or the Siebel Mobile application for Siebel Pharma.
To display Sample Events and Receipts
Navigate to the Sample Compliance screen, then the Sample Events and Receipts view.
Managing Disclaimers
There are two types of disclaimers as follows:
Static disclaimers: The Disclaimer Management view shows the static disclaimer information that appears in the LS Pharma Call Signature Form Applet (in the Siebel Pharma desktop application) or the Siebel Signature Capture display (in the Siebel Mobile application for Siebel Pharma).
Dynamic disclaimers: Dynamic disclaimers control disclaimer text during signature capture based on a number of parameters, such as physican type, state where the sampling is being done, and the sample.
Creating and Activating a New Static Disclaimer
The following procedure shows you how to create and activate a new static disclaimer.
To create and activate a new static disclaimer
Navigate to the Sample Management screen, then the Disclaimer Management view.
In the Disclaimers list, create a new record and complete the necessary fields.
The new disclaimer becomes active immediately. Only one disclaimer can be active at a time. Some fields are described in the following table.
Field Comments Disclaimer
The actual text for the disclaimer.
Apply to
Apply disclaimer text to one of the following:
Inventory Audit
- Pharma Call
- Transaction Adjustment
Status
Valid values include Active and Expired. There can only be one active text displayed for all the products.
Select the record and click Activate.
The selected record becomes active and any previously active static disclaimers expire.
Creating a New Dynamic Disclaimer
The following procedure shows you how to create a new dynamic disclaimer.
To create a new dynamic disclaimer
Navigate to the Sample Management screen, then the Disclaimer Management view.
From the view drop-down list, select Disclaimer Text to create a new dynamic disclaimer text record.
From the view drop-down list, select Dynamic Disclaimer Rule Set.
Create a new dynamic disclaimer rule set record and complete the necessary fields as required.
Some fields are described in the following table.
Field Comments Name
The name of the rule.
Apply to
Apply the rule to one of the following:
Inventory Audit
- Pharma Call
- Transaction Adjustment
Status
Valid values for the rule set include Active and Expired. There can only be one rule set active at any one time.
In the Rules applet, create rules for the dynamic disclaimer rule set and complete the necessary fields.
Some fields are described in the following table.
Field Comments Name
The name of the rule.
Rule Type
Apply the rule as one of the following:
Expression
- Invoke Method
- Business Service (not supported)
Sequence
The sequence in which to apply the rule when multiple rules are present.
In the More Info applet, add rule expressions and conditions to the dynamic disclaimer rule set and complete the necessary fields.
Some fields are described in the following table.
Field Comments Name
Name of the rule set (automatically populated).
Rule Type
This field is automatically populated by either the Expression or Invoke Method rule type.
Conditional Expression
A pop-up field which can be used to build an expression based on the underlying business components.
Disclaimer Text
The text for which the rule set is applied.
Method Name
Specifies the method to invoke.
Description
Brief description of the rule.
Creating a Samples Order
End users can request additional samples by creating a samples order. Once submitted, the application routes the samples order to the samples administrator. The samples administrator then creates a samples transfer that is routed back to the requestor. Once the requestor acknowledges receipt of the transfer, Siebel Samples Management automatically enters the new inventory into their inventory counts.
To create a samples order
Navigate to the Samples screen, then the Samples Orders view.
In the Samples Orders list, create a new record and complete the necessary fields.
The application creates a new record and automatically sets the Order Date field to a date and time in the active period.
Note: It is not necessary to change the Order Type field. You can include both samples and promotional items in a single order.In the Line Items list, create a new record and complete the necessary fields.
Some fields are described in the following table.
Field Comments Item Status
Initially set to In Process. The application automatically changes this field value to Submitted when you submit the transaction.
Sample
The product to be ordered.
Repeat Step 3 to enter a line item for each product or promotional item you want to order.
Click Submit.
The values of the Order Status field (in the Samples Order list) and the Item Status field (in the Line Items list) change to Submitted.
Acknowledging Full Receipt of a Samples Transfer
Siebel Samples Management supports two ways of electronically moving samples inventory:
By creating a samples transfer, see Creating a Samples Transfer
.By creating a samples order, see Creating a Samples Order
.
In either case, the application creates a samples transfer transaction and routes it to the recipient for acknowledgement. Once the recipient submits a receipt, the application transfers the new inventory into their active inventory period. End users can then view the new inventory in the Samples History screen. For more information on displaying the Samples History view, see Adjusting a Past Samples Transaction.
To acknowledge full receipt of a samples transfer
Navigate to the Samples screen, then the Transaction view.
From the view drop-down list, select Received Samples.
In the Received Samples list, select the transfer that you want to acknowledge and complete the necessary fields.
Some fields are described in the following table.
Field Comments Invoice #
The application automatically generates an unique identifier. You cannot change this value.
Transfer From
User who originated the transfer.
Reason
Reason for the transaction. Values include:
Lost
- Found
- Request
- Initial Count
Expected Delivery Date
Expected delivery date of the transfer.
Comments
Any comments entered by the sender.
Transaction Status
Automatically generated. If no action is taken by the user, value is In Transit.
Samples transfers that have not been acknowledged as received show an Invoice Status value of In Progress. Those that have been acknowledged as received show an Invoice Status value of Processed (after approval, if approval flow is enabled).
In the Transfer In Item List, enter values for the acknowledged quantities to reflect the quantity received.
Field Comments Lot #
Number of the lot as defined by the administrator.
Product
Name of the product.
Shipped Qty.
Number of the items shipped.
Acknowledged Qty.
Number of items acknowledged.
Received Qty.
Number of items received.
Click Submit.
If there is no difference between the received and acknowledged quantities, then the status of the transaction is set to Processed. If the approval process is enabled for transactions, then the status becomes Processed after the approval.
Note: The samples transfer quantities do not appear in end users inventory counts until they submit a samples receipt. However, once the samples receipt has been submitted, it cannot be modified or deleted.
Acknowledging Partial Receipt of a Samples Transfer
If there is a difference in the received and acknowledged quantities, you have the option either to close the transaction with a discrepancy, or keep the transaction open and mark the transaction as Partially Received.
To acknowledge partial receipt of a samples transfer
Navigate to the Samples screen, then the Transaction view.
From the view drop-down list, select Received Samples.
In the Received Samples list, select the transfer that you want to acknowledge.
Samples transfers that have not been acknowledged as received show an Invoice Status value of In Progress. Those that have been acknowledged as received show an Invoice Status value of Processed (after approval, if approval flow is enabled).
In Transfer In Item List, modify the Received Qty. field.
If the quantities (received and acknowledged) are different, a pop-up message displays indicating that there is a difference in the transfer amounts.
Click OK to close out the transfer to generate a discrepancy report or click Cancel to leave the transfer report open by acknowledging partial transfer. If you click OK, a report is generated. If you click Cancel, the report is open and the status changes to Partially Received.
Adjusting an Inventory Count
The administrator and end users can adjust inventory counts of samples stock by making adjustments to past samples transactions. Common reasons for adjusting past transactions include product loss or expiration, counting mistakes, or data entry errors. When adjusting an inventory account, users can add products or adjust quantities for any type of samples transaction (disbursement, transfer, order, and so on). For more information on adjusting inventory counts, see Adjusting a Past Samples Transaction.
Recording Thefts and Losses
End users record sample thefts or losses in the Samples Adjustments view.
To record a sample theft or loss
Navigate to the Samples screen, then the Transactions view.
From the view drop-down list, select Inventory Adjustments or Samples Lost
Create a new inventory adjustment or samples lost record and complete the necessary fields.
In the Adjustment Reason field, select Lost.
In the Line Items applet, create a new record and complete the necessary fields.
Click Submit.
Reconciling an Inventory Period
At least once a year, end users are required to perform an inventory reconciliation to remain in PDMA compliance. Users might also need to perform an inventory reconciliation if they are receiving a promotion or leaving the company. For more information on reconciliation, see Inventory Reconciliation.
Prior to starting inventory reconciliation, users must perform the steps outlined in the following figure.

These inventory reconciliation prerequisites must be performed in the following order:
Verify previous inventory periods are reconciled. End users must reconcile previous inventory periods in chronological order. This is only a concern if a company’s configuration allows more than one inactive, unreconciled period. For more information, see Acknowledging Full Receipt of a Samples Transfer.
Acknowledge receipt of inventory transfers. End users must send acknowledgements for all received sample inventory shipments. For more information, see Acknowledging Full Receipt of a Samples Transfer.
Create transfer transactions for transferred samples. End users must create transfer transactions for any samples transferred to another representative or returned to the home office. For more information, see Creating a Samples Transfer.
Mobile users synchronize with server database. Mobile end users must synchronize their local database with the server database before submitting an inventory count. This is especially important if they are recording samples received in a prior period or to be received in a future period. For more information on synchronizing a local database, check with your Siebel administrator.
Note: Counts for transferred and received samples are not reflected in the inventory count until their records have been submitted.
An inventory period cannot be reconciled if any discrepancy exists between the physical and electronic counts. If a discrepancy exists, it must be corrected before a user can reconcile the period. For more information, see the procedure Identifying Discrepancies in Inventory Counts.
The reconciliation process consists of the steps outlined in the following figure.

These reconciliation steps must be performed in the following order:
Create and submit a closeout inventory count. End users must create and submit an inventory count (either by product or lot number) of the products currently on-hand. For more information, see the procedure Creating and Submitting a Closeout Inventory Count.
End users cannot submit a count differently from the way they submitted the previous period’s count unless the previous period has been reconciled. For example, if they submitted the previous period’s count by product name, they must reconcile that period before they can submit a subsequent count by lot number.
Correct physical and electronic count discrepancies. End users must correct any discrepancies between the physical counts and the electronic counts by:
Creating and submitting a sample adjustment transaction with one or more line items. For more information, see the procedure Adjusting Multiple Quantities with a New Adjustment Transaction.
This method allows end users to adjust the inventory counts of multiple products with a single adjustment transaction (containing multiple line items). However, they might want to use this method if they need to adjust more than two or three counts.
- Adjusting previous transactions. Adjusting line-item records of previously entered transactions. For more information, see the procedure Adjusting the Quantity in a Samples Transaction.
This method allows end users to adjust the quantity of a selected line item in a previously entered transaction. However, they might want to use this method if they only need to adjust one or two counts.
Reconcile the inventory period. For more information, see the procedure Reconciling an Inventory Period.
Creating and Submitting a Closeout Inventory Count
The following procedure shows you how to create and submit a closeout inventory count.
To create and submit a closeout inventory count
Physically count all samples currently on-hand.
Navigate to the Samples screen, then the Inventory Count view.
The Inventory Count list lists records for every product in your inventory.
Note: Records in the Inventory Count view can be deleted only if the value of the On Hand Quantity field is zero. Do not delete records from this view unless you are certain that you will not need to enter adjustments to any transactions containing the product in the future or in a past unreconciled period.In the Inventory Count list, enter a value in the Count field for all records.
The Difference field in some records can show a value other than zero.
Proceed in one of the following ways:
If the Difference field in any record shows a value other than zero, click Interim and follow the procedures:Identifying Discrepancies in Inventory Counts.
If the Difference field in all records is equal to zero, click Submit and follow the procedure Reconciling an Inventory Period.
Identifying Discrepancies in Inventory Counts
The following procedure shows you how to identify discrepancies in inventory counts.
To identify discrepancies in inventory counts
Navigate to the Samples screen, then the Reconciliation view.
In the Inventory Periods list, select the period that you want to reconcile.
In the Inventory Count list, review the list to determine how many product records show a value other than zero in the Difference field.
For every record in the Inventory Count list whose Difference field does not equal zero, write down the sample name, the lot number, and the value displayed in the Difference field.
A positive value in the Difference field means that your electronic count (the Stock Quantity field) is greater than your physical count (the Counted Quantity field). A negative value in the Difference field means that your electronic count (the Stock Quantity field) is less than your physical count (the Counted Quantity field).
Proceed in one of the following ways:
If only a small number of records require adjustments, enter individual line-item adjustments for those transactions. In this case, write down the transaction numbers of the transactions you plan to adjust.
The Samples History list displays all transactions corresponding to the product selected in the Unreconciled Inventory List. You can find the transaction number in the Transaction # field of the Samples History list. Then use the following procedure: Adjusting the Quantity in a Samples Transaction.
If multiple records require adjustments, enter a single adjustment transaction, with multiple line items, that adjusts all the quantities. To do this use the following procedure: Adjusting Multiple Quantities with a New Adjustment Transaction.
Adjusting Multiple Quantities with a New Adjustment Transaction
The following procedure shows you how to adjust multiple quantities with a new adjustment transaction.
To adjust multiple quantities with a new adjustment transaction
Navigate to the Samples screen, then the Transaction view.
From the view drop-down list, select Inventory Adjustments.
In the Transaction # view, create a new record and complete the necessary fields.
Some fields are described in the following table.
Field Comments Adjustment Reason
Follow your company’s guidelines for what to select for this field.
Transaction #
The application automatically generates an unique identifier. You can change this value.
Transaction Date
The application automatically generates an unique identifier for this field.
Transaction Status
The value will be changed to Submitted when you submit the transaction.
In the Line Items list, create a new record and complete the necessary fields.
Some fields are described in the following table.
Field Comments Expiration Date
This field is automatically filled when you complete the Lot # field.
Item Status
The application changes value in this field changes to Submitted when you submit the transaction.
Item #
The number of this item in the transaction. Line numbers are automatically generated but can be edited. You might want to edit this value to have the items appear in a particular order (other than the order in which you entered them).
Lot Name
The lot number for this sample.
Quantity
The amount of the sample adjustment. The quantity you enter can be positive or negative, depending on the value you recorded in Step 4 in the topic Identifying Discrepancies in Inventory Counts:
If the value that you recorded was positive, enter a negative quantity.
If the value that you recorded was negative, enter a positive quantity.
Sample
The product for which you want to enter a quantity adjustment.
Repeat Step 4 until you have entered a line item for each needed adjustment.
In the Transaction # view, click Submit.
The values of the Transaction Status field (in the Inventory Adjustments list) and the Item Status field (in the Line Items list) change to Submitted.
Reconcile the inventory period, as described in Reconciling an Inventory Period.
Reconciling an Inventory Period
The following procedure shows you how to reconcile an inventory period.
To reconcile an inventory period
Navigate to the Samples screen, then the Reconciliation view.
In the Inventory Period list, select the inventory period that you want to reconcile.
Review the records in general.
In the Inventory Count list, review the records and verify that the value of the Difference field for each record is zero.
Click Reconcile.
If the approval process is enabled in your application, the approver receives an Inbox item in their Inbox. If the approval process is not enabled, then the Samples Reconciliation view is cleared immediately.
You can reconcile a period only if there is no difference between the physical count and the amount displayed by the application, and if there are no pending transactions in the approval period.
Submitting a Location Audit Report
Location audit s are periodically done so that the place where samples are stored by the sales representatives is in accordance with the company policies and access is provided only to authorized users. An administrator or a sales representative can create location audit reports, associate a location assessment template with the report, capture responses to the questionnaire, and submit the report for approval.
To submit a location audit report
Navigate to the Samples screen, then the Location Audit Report view.
In the Location Audits list, create a new record, and complete the necessary fields.
Some fields are described in the following table.
Field Comments Type
Read-only field. Defaults to Location Inspection.
Inspection Complete Date
Defaults to the current date and time by default.
Owned By
Owner of this report.
Submit To
Administrator can select a person to who this report should be submitted for approval.
Status
Shows a status of In Progress when a new record is created. When the user submits the record for approval, the status changes to Submitted and at which stage none of the values can be modified. The status changes to Approved after the person in the Submit To field approves the record.
Reason
Select a reason for submitting this report. Possible values are:
Weekly-Interim
Special-Interim
Annual
Annual - Close Out
For Cause
For Cause - Close Out
Termination - Close Out
(Optional) Associate a sales assessment template of type Location Audit.
Note: Administrators can create Location Audit templates from the Administration-Date screen, then the Sales Assessment Templates view.(Optional) Associate attachments to the report.
Some fields are described in the following table.
Field Comments Expiration Date
This field is automatically filled when you complete the Lot # field.
Item Status
The application changes the value in this field. Changes to Submitted when you submit the transaction.
Item #
The number of this item in the transaction. Line numbers are automatically generated but can be edited. You might want to edit this value to have the items appear in a particular order (other than the order in which you entered them).
Lot Name
The lot number for this sample.
Quantity
The amount of the sample adjustment. The quantity you enter can be positive or negative, depending on the value you recorded in Step 4 in the topic Identifying Discrepancies in Inventory Counts:
If the value that you recorded was positive, enter a negative quantity.
If the value that you recorded was negative, enter a positive quantity.
Sample
The product for which you want to enter a quantity adjustment.
Sign and submit the report.
If the approval process is enabled, then signature will be needed. If not, the report can be directly submitted.
Submitting an Interim Count
Sales representative can submit interim reports frequently so that there is no major sample count difference between what the Siebel Business Application reports and what the sales representative reports. The period remains open if an interim sample count is submitted.
To submit an interim count report
Navigate to the Samples screen, then the Inventory Count view.
The LS Pharma Inventory Periods List Applet should display only the currently active inventory period. Some fields are described in the following table.
Field Comments Last Count Conducted By
The person who conducted the count last time.
Last Count Date
Date which the physical count was conducted.
Reviewed By
User who reviewed the last inventory report.
Start Date
Start date of the inventory period.
Submit To
Defaults to the setting in the Sample Compliance screen. You can edit this setting, if required.
Enter values for each of the samples in the Physical Count column in the LS Pharma Inventory Count List applet.
Some fields are described in the following table.
Field Comments Sample
Name of the sample.
Lot #
Lot number of the sample, if applicable.
Expiration Date
Expiration date of the sample.
Cut Off Date
Automatically calculated based on the field expiration date and short days
Opening Balance
Opening balance of the sample in the current inventory period.
Last Count
Sales representatives manually count the number of samples they have. This column represents the number of samples counted prior to submitting an interim count or closeout count.
Physical Count
Sales representatives can count the number of samples and enter values for each record.
Click Interim Count to create an interim count report.
The Interim Count button is enabled if you are a primary auditor and you have selected an active inventory period.
Note: If a report is submitted but not yet approved, then you cannot submit a new report. Also, if a closeout count is approved but not acknowledged, then both the Interim Count and Closeout Count buttons are disabled. Both the buttons will be disabled if there is no value entered in the count column.If signature and approval flows are enabled, then the person who is submitting the interim report must sign and the report goes through an approval process. For more information about the approval process, see Enabling Approval and Signature Processes.
Submitting a Closeout Count
An administrator or a sales representative can periodically submit closeout counts to close the current inventory period, mark the period as inactive, and open a new inventory period.
To submit a closeout count
Navigate to the Samples screen, then the Inventory Count view.
The LS Pharma Inventory Periods List Applet should display only the currently active inventory period.
Click Closeout Count.
The Closeout Count button is enabled if you are a primary auditor and you have selected an active inventory period. If a report is submitted but not yet approved, then you cannot submit a new report.
If a closeout count is approved but not acknowledged, then the Closeout Count button is disabled. Also, if Owned By and Submit To values are the same, then the Closeout Count option is not available and the button is disabled.
Note: Products with expired lots and no physical inventory are not copied into the next inventory period when a closeout count is performed.If the Report is approved, the Current Physical Count values are copied to the Last Physical Count field. The Last Count Conducted By, and Last Count Date fields are updated by the employee name who submitted the report and the date when the count was conducted. The Current Physical Count field is cleared.
If the Report is rejected, the Current Physical Count field is cleared. No updates are made to the Last Physical Count, Last Count Conducted By, and Last Count Date fields.
Viewing Inventory Audit Report
Inventory audit reports are automatically generated by the system when an interim or a closeout count occurs. Users cannot create inventory audit reports. Administrators and sales representatives can view previously submitted inventory counts (interim and closeouts) as reports. Administrators can accept or reject those reports.
To view an inventory report
Navigate to the Samples screen, then the Inventory Audit Report view.
Select any report from the list applet.
Child applets display information relevant to the previously submitted counts.
Some fields are described in the following table.
Field Comments Type
Read-only field that contains either:
Interim Inventory Count
- Closeout Inventory Count
Count Completed By
Name of person who performed the manual count.
Created By
Name of person who created report.
Owned By
name of person who owns the report.
Status
Values include:
In Progress
- Submitted
- Rejected
- Approved
Comments
Additional comments entered while submitting the report.
View the items in the inventory count applet.
(Optional) Associate attachments with the report.
You can also update the Reason and Comment fields after the report is signed and submitted.
Placing Sample Orders Request
You can place a request for sample orders if your inventory stock runs low. If you attempt to place an order for a product for a quantity greater than the maximum allowable orderable quantity (in Allocations), the application displays a warning message. If you continue to submit an order, an exception flag is set so that the order can be tracked.
To place sample orders
Navigate to the Samples screen, then the Samples Orders view.
From the view drop-down list, select Sample Orders.
In the Samples Order list, create a new record and complete the necessary fields.
In the Line Items list, create line items for the samples that you want to order and complete the necessary fields.
Viewing Sample History
End users and administrators can select a specific period and view the sample history and sample counts for the period.
To view sample history
Navigate to Samples screen, then the History view.
In the Inventory Periods list, select a period and review the history for the specified period.
Viewing Sample History by Allocation
End users and administrators can view samples by allocation using the Samples History by Allocation view.
To view sample history by allocation
Navigate to Samples screen, then the Samples History by Allocation view.
In the Product Allocations list, select any record.
For information about the Product Allocations view, see Allocating Samples.
In the Samples History list, review the information.
Some fields are described in the following table.
Field Comments Sample
Name of the sample.
Lot #
Lot number corresponding to the sample.
Quantity
Number of items in the transaction.
Expiration Date
Expiration date of the lot.
Item Status
Status of the transaction.
Transaction Date
Date on which the transaction happened. This date is linked to the actual transaction.
Transaction Type
Possible values include Disbursement, Loss, Report and so on.
Transaction #
Transaction number for tracking purposes.
Transaction Status
Possible values include Adjusted, Processed, Submitted and so on.
Setting Compliance Thresholds
Employee's compliance against certain thresholds can be checked periodically.
To set thresholds
Navigate to Sample Compliance screen, then the Employee Based Tracking view.
Query for a sales representative (employee).
Set thresholds for the sales representative as follows:
Field Comments Transfer Discrepancies
The maximum amount for transfer discrepancies.
Reported Loss
Number of times the employee reported loss within a specified number of days.
Overdue Inventory Check
Shows the number of days where the sample inventory, or audit/reconciliation has not been recorded. (Threshold)
Overdue Acknowledgement
Number of sales representatives who have not recorded receipt of sample shipment within a specified period from the shipment date or who have not recorded receipt of transfer within a specified period from the transfer date.
Overdue Certification/Training
Number of days where the annual sample testing/certification has not been completed within the specified time.
OK to Sample
Enable if the selected employee is ok to sample.
Disable Adjustment
If enabled, the employee cannot make any adjustments to the transactions.
Viewing Compliance Reports
Users can view compliance reports periodically to monitor any violations of threshold values. A number of reports for example, show employees who reported loss, are overdue for training, who recreated receipts, who made adjustments to their transactions, and so on.
To view compliance report
Navigate to the Sample Compliance screen, then the Compliance Report view.
A list of all the employees who have violated the thresholds is displayed.
Enabling Approval and Signature Processes
All transactions can be associated with an approval flow. Approval flows are enabled by default but you can disable them through the user properties in the LS Pharma Inventory Administration Service. For more information about user properties in the LS Pharma Inventory Administration Service, see Siebel Pharma Developer’s Reference.
The approval process is the standard Siebel approval process and provides appropriate fields to route the approvals to the various users and use Inbox for approvals. If the approval process is enabled, all transactions occur after final approval is received. If the approval process is disabled, the process is initiated on submission of a transaction.
All transactions by default also need the user's signatures before submitting them. However, similar to the approval flows, signature requirement can be disabled by setting the user properties in the LS Pharma Inventory Administration Service.
Viewing Orderable Items
End users and administrators can view orderable items using the Orderable Items view.
To view orderable items
Navigate to Samples screen, then the Orderable Items view.
View the list of orderable items, if any.
Viewing My Product Focus
End users can view the products (samples, promotional items, details, and Samples Request items) they need to focus on from the My Product Focus view. You can query by product, start date of a product allocation, end date of a product allocation.
To view My Product Focus
Navigate to the Call Activities screen, then the My Product Focus view.
Perform your query.