4Setting Up Siebel Loyalty Programs
Setting Up Siebel Loyalty Programs
This chapter discusses loyalty programs and how to set them up. It includes the following topics:
About Siebel Loyalty Programs
Loyalty programs give members points as rewards for their purchases or for other behavior. Examples of loyalty programs are:
-
Airline frequent flyer programs that give members bonus miles or that give members discounts on hotel stays or car rentals.
-
Supermarket programs that give bonus points to shoppers.
-
Programs that give bonus points to retailers based on their sales of a manufacturer’s products.
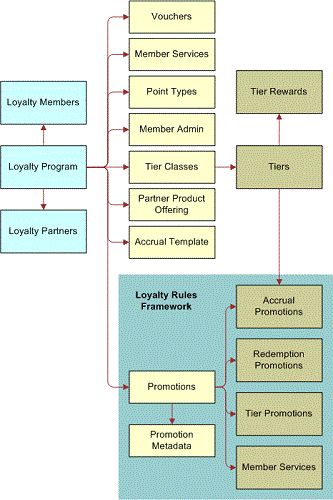
A program is the highest level entity in Siebel Loyalty. Members, tiers, promotions, point values, and so on are all specific to a single program. Some entities such as contacts, accounts, and products can be used across multiple programs. The key elements of a loyalty program, as shown in the following image, are as follows:
-
A Loyalty Program can have Loyalty Members and Loyalty Partners.
-
A Loyalty Program contains the following elements: Vouchers, Member Services, Point Types, Member Admin, Tier Classes, Partner Product Offering, Accrual Template, and Promotions (the loyalty rules framework).
-
The Tier Classes element contains Tiers and Tier Rewards.
The Tiers element is linked to Accrual Promotions.
-
The Promotions element contains Promotion Metadata and the following elements: Accrual Promotions, Redemption Promotions, Tier Promotions, and Member Services.
-
Most companies have one loyalty program. A company can have multiple programs if it has two very different sets of memberships bases, accrual and redemption rules, tiers, and so on. For example, a company could have one program targeted at individuals, and another one targeted at corporate accounts.
How programs are set up depends on each company's specific requirements. For example, if you want individual members to be able to transfer points to corporate members (such as when an individual flies, and the corporate parent earns some or all of the points), then you would set up one loyalty program with two different types of memberships - individual and account - and probably with different accrual and redemption rules based upon the membership type.
This chapter describes how to set up loyalty programs.
Before you set up a loyalty program, you must analyze your customer base to see which customers the program must be designed to appeal to. For example, if an airline finds that half of its revenues come from 10 percent of its customers, then it would design the program to appeal to these frequent flyers. For more information, see Roadmap to Working with Siebel Loyalty.
After setting up a program, you can set up promotions for that program, which give members bonus rewards beyond the usual program rewards for behavior that you want to encourage. For more information, see Setting Up Siebel Loyalty Promotions
About Loyalty Program Points, Tiers, and Rewards
Loyalty programs give members points for purchases or for other behavior. Members benefit from earning points in these ways:
Redeeming points for rewards
Qualifying for tier status
Using points to pay for some member services
Redeeming Points for Rewards
Members can redeem these points for rewards, such as products. For example, a program can give members frequent flyer miles that they can redeem for airplane flights.
When you define products, you specify how many points members can earn by purchasing the products. You also define how many points the members must redeem to purchase the product.
Qualifying for Tier Status
Members can also qualify for tier statuses, such as Silver Member, Gold Member, or Platinum Member, by earning a specified number of qualifying points in a specified time.
Most loyalty programs give members two types of points:
Qualifying points. Count toward earning tier status, but cannot be redeemed for rewards.
Nonqualifying points. Can be redeemed for rewards and do not count toward earning tier status.
Members can only redeem their nonqualifying points.
Using Points to Pay for Some Member Services
You can set up some member services, such as giving gift points and reactivating points, so members can pay for them using cash, points, or a combination of cash or points. For more information, see Setting Prices for Member Services.
Expiration of Points
Points that are given to members might or might not have an expiration date depending on the expiration level defined. The point expiration basis is set at the program level and can be defined at these levels:
Tier. If the expiration basis field is defined as Tier level, then the expiration date is calculated according to what is specified at the tier level. The expiration date is calculated based on the member’s tier.
Point Type. The expiration basis field can also be defined as Point Type Level. At the point level, point expiration can be based on either:
Member account activity
A fixed date
A fixed period of time
A point’s expiration date is usually maintained at the point level, except expiration for dates based on member activity. However, if the expiration level value defined at the program level is set to Tier Level and Expire Points check box is not selected for a tier, then points do not expire for any member who is part of that tier, even if the points are past their expiration date. The points keep their original expiration date, but they do not expire until the member becomes part of a tier that expires points.
If an accrual transaction is canceled, then the points that were given are returned to the original point block. If a point expires, then it is not added back to the point block. An expired point can no longer be used, just as if the member had used it for a redemption award.
About Admin Promotions and Tier Promotions
When you set up a loyalty program, you must create tier promotions and admin promotions. These are not promotions that give members rewards. Both these types of promotions use the actions of promotions to perform necessary administrative tasks for the program.
Tier promotions move members to the appropriate tier level based on the member's points or behavior. For example, tier promotions can upgrade, downgrade, or requalify members. For more information, see About Tier Promotions.
Admin promotions perform other necessary administrative tasks. For more information, see Creating Admin Promotions.
About Promotion Calculation Rules for Loyalty Programs
When loyalty administrators create loyalty programs, they must define a promotion bonus calculation rule for each program. This rule decides how the point bonus is calculated if several promotions are in effect at the same time.
If several promotions apply to one transaction, then loyalty programs can give the member the points for all the promotions, or they can reduce the number of points they give away by giving the member points for one or some of the promotions.
To define the promotion calculation rule, you select one of four options:
Maximize by Promotion. Only one promotion applies, which is the promotion that is most beneficial for the member. If all promotions generate the same type of points, then the one with the largest number of points applies. If the promotions generate different types of points, some qualifying and some nonqualifying, then the program decides which is most beneficial to the member by calculating a weighted average of the points awarded by different promotions; loyalty administrators determine the weighting when they define the point types.
Maximize by Point Type. Only one promotion applies for each point type awarded. Multiple promotions can apply, if they generate points of different types. The program decides which promotion is used to generate points for each point type using the qualifying and nonqualifying weight rules by calculating which promotion is most beneficial to the member for each point type.
Maximize by Point Type - Qual/Non-Qual. Only one promotion applies to generate qualifying or nonqualifying points of each type. The calculation is similar to Maximize by Point Type, except that qualifying and nonqualifying points for each type are calculated and awarded separately.
All Promotions Apply. The member receives the combined total of all points from all applicable promotions. All promotions are calculated on the base points, not compounded. For example, if one promotion gives 50 percent bonus points, and another promotion gives 100 percent bonus points, then the customer gets a total of 150 percent bonus points.
Example of Promotion Calculation Rules
As an example of how these different rules affect promotion calculations, consider a case where a transaction qualifies for four promotions. In this example, Promotion 1 is of the type Always Apply, so accruals generated by this promotion apply regardless of which rule is followed. The promotion calculation rules determine how the other promotions apply. The weighting used by these rules is shown in the following table.
| Point Type | Qualifying Weight | Nonqualifying Weight |
|---|---|---|
Base |
1.0 |
0.5 |
Bonus |
0.8 |
0.4 |
The last three columns in the following table show which points the member receives if you use different promotion calculation rules. In addition to Promotion 1, which always applies, the following promotions apply:
Maximize by Promotion. Promotion 4 applies, because it has the maximum weighted average for Base points and Bonus points.
Maximize by Point Type. Promotion 4 applies for Base points, because it has the maximum weighted value for that type, and Promotion 4 applies for Bonus points, because it has the maximum weighted value for that type. The weighted value is applied separately for the two different point types. Even though Promotion 2 generated 700 NQ Bonus points, these points were not applied, because the 550 Q Bonus points generated by Promotion 4 have a higher weighted value due to the difference in the qualifying and nonqualifying weights.
Maximize by Point Type Q/NQ. Promotion 2 and Promotion 4 apply for both Base points and Bonus points. For each point type and qualifying/nonqualifying combination, the one with the maximum weighted value is applied. That is four combinations in this example.
| Promo | Point Type | Amount | Weighted | Weighted Promo | By Promo | By Point Type | By Point Type Q/NQ |
|---|---|---|---|---|---|---|---|
1 |
Base |
250 Q |
250.0 |
390.0 | Yes | Yes | Yes |
1 |
Bonus |
350 NQ |
140.0 |
None |
Yes | Yes | Yes |
2 |
Base |
225 NQ |
112.5 |
392.5 | None | None | Yes |
2 |
Bonus |
700 NQ |
280.0 |
None | None | None | Yes |
3 |
Base |
125 NQ |
62.5 |
102.5 | None | None | None |
3 |
Bonus |
100 NQ |
40.0 |
None | None | None | None |
4 |
Base |
225 Q |
225.0 |
665.0 | Yes | Yes | Yes |
4 |
Bonus |
550 Q |
440.0 |
None | Yes | Yes | Yes |
Process of Setting Up Loyalty Programs
To set up a loyalty program, the loyalty administrator performs the following tasks:
Creating Loyalty Programs
As the first step in setting up a loyalty program, the loyalty administrator creates a new Loyalty Program record and enters general information about the program.
To create a loyalty program
Navigate to the Loyalty Program Administration screen.
Add a new record to the Programs list, completing the necessary fields in the list and in the form. Some fields are described in the following table.
Field Description Hosted By
Brings up the Pick Channel Partner list. Select the company that is implementing this program. If the program is implemented by the brand owner company, then select the brand owner company.
If programs are implemented by business units of the brand owner company, then you can create an account for each business unit and select the appropriate one.
For information about setting up partner companies, see the chapter on working with new partners in Siebel Partner Relationship Management Administration Guide.
Partner Flag
Select this check box if the program is implemented by a partner. Clear it if the program is implemented by your own company.
Points Conversion
Select this check box to enable conversion of insufficient points for redemption, during any services payment process, to a currency payment. The conversion is based the cost defined for the product in the product points view.
Note: This check box is a one-time selection for the program. If this check-box is selected, then members do not get the points-plus pay-option in any redemption.Promotion Calculation Rule
Select the method used to calculate points when multiple promotions are in effect. For more information, see About Promotion Calculation Rules for Loyalty Programs.
Start Date
Enter the date and time when the program goes into effect.
End Date
Enter the date and time when the program is no longer in effect. If this field is blank, then the program remains in effect indefinitely.
Transfer/Gift Start Date
Enter the day and month used to calculate restrictions on how many points a member can transfer or give for a one year period. The one year period starts on the day and month entered in this field.
Purchase Start Date
Enter the day and month to calculate restrictions on how many points a member can purchase for one year. The one year period starts on the day and month entered in this field.
Point Expiry Basis
Select the point expiration basis. Options are:
Tier Level. Expiration of points must be defined for each Tier.
.Point Type Level. The Tier level definition of points expiration is disabled and point expiration can only be defined at the point type level.
Defining Program Level Attributes for Loyalty
Attributes can be used when you create promotions.
You can define program level attributes that are available to all promotions in a program by using the Program Level Attributes view of the Loyalty Program Administration screen.
When you create a promotion, you can also define promotion-specific attributes that are available to only one promotion.
You can define program level attributes while you are setting up the program, or you can wait until you are planning promotions for the program. For more information about defining attributes for promotions, see Creating Attributes for Loyalty Programs.
This task is a step in Process of Setting Up Loyalty Programs.
Defining Point Types and Subtypes for Loyalty Programs
When you set up a loyalty program, you must define the point types available for the program, whether there are multiple types or just one.
This task is a step in Process of Setting Up Loyalty Programs.
Each point type can have both:
Qualifying Points. Count toward a member's tier status.
Nonqualifying Points. Do not count toward tier status.
It is recommended that you have separate point types in the program to represent both qualifying and nonqualifying points. However, only nonqualifying points can be used for redemptions.
If a loyalty program allows members to qualify for a tier through some action, such as the number of flight segments completed or the number of hotel stays, then that action must be represented by another point type. For example, if an airline allows members to qualify for the Silver tier either by earning a given number of points or completing a given number of flight segments, then its loyalty program must have two point types: one to track the number of points, the other to track the number of flight segments.
Other programs can use loyalty point types to link specific actions more tightly with specific rewards. If a loyalty program tracks some member action, then you must create a specific point type for that action. For example, if an airline gives rewards to both individual and corporate members, then you must create two point types, one to track miles for individual members, and one to track corresponding corporate points.
You can define point expiration at the point type level only if the point expiry basis set at the program level is defined at Point Type level. Options include:
Expire points of members based on account activity.
Expire points after a period of time.
Expire points on a fixed day.
For more information about point expiration, see About Loyalty Program Points, Tiers, and Rewards.
In addition to point types, you can also define point subtypes, which are used purely for administrative purposes. For example, you might use different point subtypes to keep track of the different reasons that the points are given out. Points can be given out as an incentive with purchases or as a bonus, and you can create point subtypes named Incentive and Bonus to track these two different uses of points.
The Point Sub Types you create apply to all the different Point Types. For example, if you create point subtypes named Incentive and Bonus, then they can be used to track whether all your different Point Types are given out as an incentive or as a bonus.
You define which point types and subtypes are given to members as a reward for purchases when you create the Admin - Accruals promotion, as described in Creating the Admin - Accruals Promotion.
When you define the Point Sub Types, select one as the default that is given out if no subtype is specified in the Admin - Accruals promotion.
Defining Point Types
The following procedure describes how to define point types.
To define point types
Navigate to the Loyalty Program Administration screen.
In the Programs list view, select the program that uses the point types you want to define, and click its Program Id hyperlink.
Click the Point Types view tab, then add a new record to the Point Types list for each point type. Complete the necessary fields described in the following table.
Field Description Name
Enter a name for the point type.
Active
Select this check box to make this point type available to the program.
Field to Use
Select the field in the Members screen used to display the number of points a member has of this point type. You can select options ranging from Point 1 through Point 8.
There can be other options if you configure the product as described in Creating Point Types for Loyalty Programs.
Qualifying Weight
Enter a weight used to calculate which promotion applies if multiple promotions are available. For more information, see About Promotion Calculation Rules for Loyalty Programs.
Non-Qualifying Weight
Enter a weight used to calculate which promotion applies if multiple promotions are available. For more information, see About Promotion Calculation Rules for Loyalty Programs.
Accrual Effectivity
Select this check box if the accrued points are not available for redemption until a future date. For more information on the setup for effectivity date calculation, see Setting Up Loyalty Terms for Precalculated Accruals.
Note: Accrual Effectivity and Qualifying Flag are mutually exclusive.Qualifying Flag
Select this check box if this point type is a qualifying type, to be used for tier assessment rather than only for redemption.
Note: If you select Qualifying Flag, then the remaining fields - Expiry Basis, Period, Period UOM, Activity, Expiry Month, Expiry Day and Expiration Snap To - become read-only, because they apply only to nonqualifying points.Expiry Basis
Select an expiration basis. Options are:
Account Activity. If this option is selected, then points expire if there is no activity of the type and in the period specified for the point type.
Period. If this option is selected, then points expire on the day specified in the Expiration Snap To field, after the minimum period of time specified in the Period and Period UOM fields, counting from the Transaction Date.
Fixed Day and Fixed Month. Use these two fields to specify the day and month when points expire.
Period
Enter a period of time. This field and the Period UOM field determine the life of points.
Period UOM
Select the Period UOM. Options are:
Days
Months
Quarters
Years
Activity
Select an Activity. Options include:
Accrual
Redemption
(Both of) Accrual/Redemption
The start date for calculating the expiration date of points, earned by the member for accrual transactions that update promotion attributes, can be either one of the following:
The processing date of the last transaction for the member that updated the promotion attribute (default value)
The creation date of the last transaction for the member that updated the promotion attribute
To change the default value so that the creation date of the last transaction is used to assess member activity, set the value of the user property Enable Bucket Expiry - Txn Date for the LOY Promotion Bucket Transaction business component to Y.
Note: This field is activated only if Expiry Basis is Account Activity.Expiry Month
Enter the month that the points expire.
Note: If Fixed Day is selected as the Expiry Basis, then this field is enabled.Expiry Day
Enter the day the points expire.
Note: If Fixed Day is selected as the Expiry Basis, then this field is enabled.Expiration Snap To
Select the Expiration Snap To. Options include:
Transaction Date
Member Anniversary Date
1st Day of Month
1st Day of Quarter
1st Day of Year
-
Note: If Period is selected as the Expiry Basis, then this field is enabled. However, if Fixed Day is selected as the Expiry Basis, then this field is disabled.
Reactivation Enabled
Select this checkbox to make it possible to reactivate members’ points after they have expired.
Note: If the Qualifying checkbox is selected, then this field is disabled, because qualifying points cannot be reactivated.Point Reactivation Duration
Point Reactivation UOM
Use these two fields to define the amount of time after their expiration that points can be reactivated.
Enter a number in the Point Reactivation Duration field, and select a unit of measure in the Point Reactivation UOM field.
For example, if you enter 6 as the Point Reactivation Duration and months as the Point Reactivation UOM, then points can be reactivated for six months after they expired.
Minimum Reactivation
Enter the minimum number of points that can be reactivated.
Defining Point Subtypes
The following procedure describes how to define point subtypes.
To define point subtypes
Navigate to the Loyalty Program Administration screen.
In the Programs list, select the program that uses the point subtypes you want to define, and click its Program Id hyperlink.
Click the Point Sub Types view tab, then add a new record to the Point Sub Types list for each point subtype. Complete the necessary fields described in the following table.
Field Description Name
Enter a name for the point subtype.
Default
Select the checkbox for one subtype in the list, to indicate that it is the default subtype that is given if no subtype is specified.
Creating Point Blocks for Loyalty Programs
A point block is a set of points, which can be assigned to the host company or a partner. Point blocks must be used so a host company or partner can give reward points to members. Whenever a member accrues points, those points come from a point block associated with that host company or partner. In the event that a host company or partner’s point block has insufficient points to reward members, then a partner or host could allocate more points or allow point credits according to the terms of their agreement.
To make points available for use, point blocks must be sold to prepaid partners or to the host company. Point blocks can be created when you set up the program and periodically during the life of the program Once a point block is created, it must be submitted for approval.
This task is a step in Process of Setting Up Loyalty Programs.
Each point block is created for use by the host company or by a prepaid partner company. Partner companies buy points, as described in About Selling Loyalty Points to Partners.
A single point block can apply to multiple point types. The conversion rate defined for each point type determines the relationship between member points and partner points.
For example, a program can have the point types Miles, Status Credit and Regular. Rather than defining a partner point block for each point type, you define a single point block with a conversion rate for each point type, such as 1 for Miles, no conversion rate for Status Credits, and 0.1 for Regular points. See Setting Up Unified Point Type for Partner Account Debit.
Creating Point Blocks
The loyalty administrator creates the point blocks and submits them to a manager for approval.
To create point blocks
Navigate to the Loyalty Program Administration screen.
In the Programs list, select the program that uses the points and click its Program Id hyperlink.
Click the Point Blocks view tab, then add a new record to the Point Blocks list. Complete the necessary fields. Some fields are described in the following table.
Field Description Status
When you are finished filling out the record, select Submitted to submit the new point block for approval.
Partner
Select this checkbox to make it possible to select a partner as the company that uses the points. If you do not select this checkbox, then the point block is automatically created for the host company.
Partner/Host
Select the company that uses these points, which can be the host company or a partner company. When an accrual transaction is processed from a company, it uses points from a point block associated with that same company.
Original Number (#) of Points
Enter the total number of points in this point block.
Remaining Points
Displays the number of points remaining in the block after subtracting those that have been used in transactions.
Cost Per Point
Enter your internal cost of the points. This value is useful for calculating margin and calculating outstanding liability for tax purposes.
Sales Price Per Point
Enter the amount charged to a partner for each point in this point block. For more information about selling points to partners, see About Selling Loyalty Points to Partners.
Submit To
Select the approver for creation of this point block. This field is not required, and if it is not entered, then points are created without going though approval.
Approving Point Blocks
After the loyalty manager creates the point block, another manager might have to approve it.
To approve point blocks
Navigate to the Loyalty Program Administration screen.
In the Programs list, select the program whose point blocks you want to approve and click its Program Id hyperlink.
Click the Point Blocks view tab.
In the Point Blocks list, use a query to find all point blocks with the value Submitted in the Status field.
To approve a point block, select Approved in the Status field.
Checking the Points Remaining in a Block
When it has been approved, all the fields in the mint block become read-only, so they cannot be edited.
In the Points Remaining field, users can see the calculated value of the number of points in the block that have not been distributed. Loyalty administrators must check periodically to see which blocks have few points remaining, so they can create new point blocks as replacements. To avoid checking in this way and creating new point blocks manually, you can set up auto-creation of point blocks for prepaid partners, as described in Setting Up Auto-Creation of Point Blocks.
To check the points remaining in blocks
Navigate to the Loyalty Program Administration screen.
In the Programs list, select the program whose point blocks you want to approve and click its Program Id hyperlink.
Click the Point Blocks view tab.
In the Point Blocks list, use a query to find all point blocks with a small value in the Remaining Points field.
Setting Up Auto-Creation of Point Blocks
This topic describes how to set up auto-creation of point blocks for prepaid partners so that you do not have to create new point blocks manually whenever a partner is running out of points in a point block.
This task is a step in Process of Setting Up Loyalty Programs.
You can auto-create a new point block for a partner by clicking the Replenish Point Block button in the Loyalty Terms view. If the number of points remaining in a point block reaches a value you have previously specified in the Reorder Limit field in the Loyalty Terms view, then pressing the Replenish Point Block button creates a new point block.
You must set up several features for point blocks that are auto-created for a partner, including the pricing rule that is used to price the point block and the Reorder Limit, that is, the point at which a new block of points can be auto-created. To define pricing and terms for a partner, perform the following tasks:
Defining Partner Pricing Rules.
Define all the pricing rules for a program in the Partner Pricing Rules view for the program.
Entering Loyalty Terms for Auto-Creation of Point Blocks.
Associate the appropriate rule with each partner in the Loyalty Terms view for that partner.
Defining Partner Pricing Rules
Define pricing rules for different currencies used in each program. For example, if you have a program named High Miles, then you might define a number of pricing rules named High Miles USDollar, High Miles Yen, and so on.
For each pricing rule, there is a Pricing Range view where you enter a list of prices for purchases of different sizes. In this view, enter a list of nonoverlapping ranges of points, with the cost per point for each. The auto-point block created for the partner charges the partner based on the price of the range defined here.
To define a partner pricing rule
Navigate to the Loyalty Programs Administration screen.
Drill down on the Program Id of the appropriate program.
Click the Partner Pricing Rules view tab, then add a new record in the Partner Pricing Rules list. Complete the necessary fields. Some fields are described in the following table.
Field Description Name
Enter a unique name for the rule.
Currency Code
Select the currency code this rule applies to.
In the Pricing Range list, add new records. Complete the necessary fields described in the following table.
Note: Ranges must not overlap, and a cost must be entered for each range.Field Description Minimum
Enter the minimum number of points in this pricing range.
Maximum
Enter the maximum number of points in this pricing range.
Cost Per Point
Enter the price per point for purchases in this pricing range.
Entering Loyalty Terms for Auto-Creation of Point Blocks
Use the Loyalty Terms view to specify several features of auto-creation of points for each partner, including which pricing rule is used for this partner.
To enter loyalty terms for auto-creation of point blocks for a partner
Navigate to the Partners screen, then the Partner List view.
Drill down on the Partner Name of the appropriate partner company.
In the Loyalty Terms list, add a new record if required and complete the necessary fields. Some fields are described in the following table.
Field Description Pricing Rule
Select the pricing rule used to price this point block.
Reorder Limit
Enter the number of points remaining in the existing block for a a new block to be auto-created. For example, if you enter 10,000, then a new block is auto-created when the existing block for this partner has less than or equal to 10,000 points remaining.
Minimum Order Quantity
Enter the number of points in the auto-created point block.
Approving and Billing for Auto-Created Point Blocks
After the point block is auto-generated, it can be approved and the partner must be billed for it in the same way as manually created points. For more information, see Creating Point Blocks for Loyalty Programs.
If you selected the Skip Validations check box when defining terms for the point block, as described in Entering Loyalty Terms for Auto-Creation of Point Blocks, then the point block does not require approval in order for the points to become available. Be aware, however, that selecting the Skip Validations check box does not affect the status of the point block, which remains as Pending.
Defining Tier Classes and Tiers
While creating a new program, the loyalty administrator defines tier classes and tiers for the program:
Tier Classes. Multiple tier classes can be specified in order to divide members based on different criteria. For example, an airline frequent flyer program can define two tier classes, one to divide members based on the number of miles flown during a qualifying period or another tier could be based on program-to-date activity.
Tiers. In most loyalty programs, members earn the right to be in certain tiers, such as Gold Member or Platinum Member, based on how much they purchase. Members get rewards for being in higher tiers, so tiers are an important incentive in loyalty programs.
You must define at least one tier for each tier class. If the tier class is not one that applies to all members, then make the default tier a tier with the Show Flag unchecked.
When there are multiple tier classes in a program, the program decides which is the dominant tier for a member by querying for all tiers for the member that have the Show Flag set to Y and that were active at the time of the transaction date. Of these tiers, the one whose tier class has the lowest sequence number is the dominant tier for the member. If multiple tiers are found for the same tier class, then the one that was approved the last is considered, as it is deemed to be the most recent valid tier. If there were no tiers active at the time of the transaction date, then the current active tiers are used. You can change the behavior to always use the current active tiers if desired, by defining a System Preference with the name LOYUseTransactionDateTier and the value N.
This task is a step in Process of Setting Up Loyalty Programs.
To become a member of a tier, members must earn a specified number of qualifying points within a specified time. This time is called the qualifying period. When you define tiers, you specify the number of qualifying points needed to qualify for the each tier and the qualifying period that members have to earn those points.
A tier also defines if and when points expire if the point expiry basis is defined as Tier Level. Tier expiration rules are the default. If a promotion’s action is to assign points, then the promotion expiration rules override tier expiration rules. For the promotion expiration rules to override the tier expiration rules, you must enter the Expiration Snap To, Expiration Length and UoM fields for the promotion; these fields are described in the following procedure.
Because many loyalty programs send statements more frequently to members in higher tiers, you also use tier definitions to specify when statements are sent.
To define tier classes and tiers
Navigate to the Loyalty Program Administration screen.
In the Loyalty Programs list, select the program that the tiers are used by and click its Program Id hyperlink.
Click the Tier Classes view tab, then add a new record to the Tier Classes list. Complete the necessary fields. Some fields are described in the following table.
Field Description Sequence
Enter a number indicating how high the status of this tier class is compared with other tier classes. For example, a frequent flyer program might include standard set to 1, business class set to 2, first class set to 3.
Primary Tier Name
Select the lowest tier in this tier class, which is the tier that members are in when they first enroll. This value can only be specified after the tiers have been created for this class, and it must be specified before activating the tier class.
Start Qual Period
Select when the qualifying period starts. This option determines the tier assessment model. The options are:
Enrollment Date/Anniversary Date. The qualifying period starts on the day the member enrolls and continues for the length of time specified in the Tiers list.
First Day of Month. The qualifying period starts on the day the member enrolls and continues for the specified time after the first day of the following month. For example, if the member enrolls on March 17 and the specified length of time is one year, then the qualifying period lasts from March 17 until April 1 of the next year.
Fixed Date. The qualifying period starts on a specified date and continues for the length of time specified in the Tiers list.
Rolling. The qualifying period starts on the day the member enrolls and continues for a specified period.
Note: If you want a tier class to be based on the lifetime points a member has earned, then leave the fields Start Qualifying Period and Restart Qualifying Period blank for that tier class, which essentially creates one qualifying period for the member's entire time as a member.Restart Qual Period
Select when the length of time for the new qualifying period starts after a tier status change.
The options are:
Qualifying Period Expiration. The length of time for the new qualifying period starts at the expiration of the current qualifying period. For example, the qualifying period for a member to qualify for the Gold tier ended on December 31, 2003, the member actually qualified for the Gold tier on August 17, 2003, and the length of time to qualify for Platinum tier is one year. Then the member has from August 17, 2003 until December 31, 2004 to qualify for the Platinum tier.
Tier Status Change. The length of time for the new qualifying period starts immediately when the tier changes. For example, if a member changes from Silver tier to Gold tier on August 17, 2003, and if the length of time to qualify for the Platinum tier is one year, then the member has from August 17, 2003 until August 17, 2004 to qualify for the Platinum tier.
Note: Do not choose Tier Status Change if you choose Jan. 1 or First Day of Month in the Start Qualifying Period field. These two combinations do not make sense logically. Choose Tier Status Change only if you choose Enrollment Date in the Start Qualifying Period field.Qual Period Length and Qual Period UoM
Enter the length and unit of measurement for the initial qualifying period for this tier. For example, if the qualifying period is one year, then the length is 1 and UoM is Year. If the qualifying period is six months, then length is 6 and UoM is Month.
These fields are also available at the tier level. However, even if these values are specified at the tier level, Siebel Loyalty uses values specified at the tier class level.
Note: These fields are mandatory if Start Qual Period is set to Rolling.Start Tier Date
This field is enabled only if Start Tier Period is Fixed Date. Enter the day and month that the tier starts.
End Tier Date
This field is enabled only if Start Tier Period is Fixed Date. Enter the day and month that the tier ends.
Min Tier Length and Min Tier Length Period
Enter the minimum period of time that a member is guaranteed membership in any tier within this tier class. For example, if the minimum period is six months, length is 6 and Period is Month.
The Tier End date is calculated based on the value of these fields.
Approver
Select the user who approves tier downgrades.
Assessment Schedule Date
Enter the day and month to schedule a tier assessment for a tier class.
Recurring Period
Select how frequently the assessment schedule is repeated. Options are:
Monthly
Yearly
Requal Period Length and Requal Period UoM
Enter the length and unit of measurement for the requalifying period for this tier. For example, if the requalifying period is one year, then the length is 1 and UoM is Year. If the qualifying period is six months, then length is 6 and UoM is Month.
Note: These fields are enabled only when the requalifying period is same for all the tiers in the tier class.Add a new record to the Tiers list and complete the necessary fields. Some fields are described in the following table.
Field Description Sequence
Enter a number indicating how high the status of this tier is compared with other tiers. For example, a program might include standard set to 1, Silver set to2, Gold set to 3, Platinum set to 4.
Qual Period Length and Qual Period UoM
Enter the length and unit of measurement for the initial qualifying period for this tier. For example, if the qualifying period is one year, then the length is 1 and UoM is Year. If the qualifying period is six months, then length is 6 and UoM is Month.
It is recommended that you define Qual Period Length at the tier class level. Values specified for Qual Period Length at the tier class level take precedence over Qual Period Length values specified at the tier level.
Requal Period Length and Requal Period UoM
Enter the length and unit of measurement for the qualifying period for existing members to remain in this tier. Usually, this period is the same as the initial qualifying period.
Note: The Expiry Basis must be defined as Tier Level at the program level in order for the tier level point expiry set up to be applicable.Expire Extension in Days
Enter the extension in days before points expire. Typical extensions are 30, 60, 365.
Note: The Expiry Basis must be defined as Tier Level at the program level in order for the tier level point expiry set up to be applicable.For example, if you enter 365, then points do not expire if you earn or redeem any amount of points at least once every 365 days. If you have not earned or redeemed any points for over 365 days, then the Loyalty Engine expires all accrued points.
If you do not want to use this feature, then enter a value of 0 for each tier. Do not leave the field blank (null). Entering 0 makes the members points expire according to the tier and promotion point expiration rules regardless of whether the member has had any activity.
Qual Point Expiration Length and Qual Points Expiration UoM
Enter the length and unit of measurement when qualifying points expire for members of this tier. For example, if qualifying points expire two years after they are earned, then the length is 2 and UoM is Year. After points expire, the member can no longer exchange them for rewards.
If points never expire, then clear the Expire Points check box.
Non-Qual Point Expiration Length and Non-Qual Point Expiration UoM
Enter the length and unit of measurement when nonqualifying points expire for members of this tier.
If points never expire, then clear the Expire Points check box.
Expiration Snap To
Select when the period starts that is used to determine whether points expire. Select Calculated date to start on the date when the points are earned. Select 1st Day of Next Month, Quarter, or Year to start on the specified date after the points are earned.
Statement Frequency
Select how frequently statements are sent to members of this tier. Many loyalty programs send statements more frequently to members of higher tiers. For more information about statements, see Generating, Viewing, and Printing Loyalty Members’Statements.
Note: You can generate loyalty statements manually from the Statement Administration view. To generate statements automatically based on frequency, you must build a workflow rule that takes the Statement Frequency field value into account, along with any other tier-specific parameters that are necessary. For information about building workflow rules, see Siebel Business Process Framework: Workflow Guide.Only If Activity
If this check box is selected, then a statement can only be sent if an accrual or redemption activity has occurred since the last one was sent.
Show Flag
Select this check box to display the tier on the Web site.
Note: To display this field, right-click on the list and use the Columns Displayed feature.Expire Points
Clear this check box if points never expire for members of this tier. This field overrides the specifications in the fields that indicate when points expire.
Note: To display this field, right-click on the list and use the Columns Displayed feature.Lounge
Select the lounge that members of this tier are allowed to use. This field is used by airlines that give members of their frequent flyer plans the permission to use special lounges.
Note: To display this field, right-click on the list and use the Columns Displayed feature.Card Type
Select the membership card type for this tier.
Note: To display this field, right-click on the list and use the Columns Displayed feature.Demotion Tier
Select the tier that members are demoted to if they fail to earn enough points to requalify for this tier during the requalifying period. If no value is selected here, then members are demoted to the tier that they qualify for based on the number of points they earned during the requalifying period.
Note: To display this field, right-click on the list and use the Columns Displayed feature.Lowest Demotion Tier
Select the lowest tier that members of this tier can ever be demoted to, if applicable. For example, you might have a rule saying that if members have reached the Platinum tier, then they can never be demoted to lower than the Silver tier.
Note: To display this field, right-click on the list and use the Columns Displayed feature.Grace Period Length and Grace Period UoM
These fields apply only if points never expire for this tier. Enter values to specify the period that members have to use their points after they are demoted to a tier where points do expire.
Note: To display this field, right-click on the list and use the Columns Displayed feature.Downgrade Approval Required
Select this check box to flag members for batch downgrade tier processing. If enabled, then the member’s tier downgrade is subject to approval from the approver specified at the Tier Class level.
To enter notes about the tiers in this tier class, click the Tier Notes view tab, add a new record to the Tier Notes list, and complete the necessary fields.
If your loyalty prog4ram has different sets of tiers for different customers, then repeat step 4, step 5, and step 6 until you have defined all of the sets of tiers in the program.
Creating Tier Promotions
You must set up tier promotions, which contain the rules that move members to the appropriate tier based on the number of points they have.
Before you create tier promotions, you must have a general understanding of how to create promotions, described in Setting Up Siebel Loyalty Promotions
Tier promotions are created like reward promotions, as described in Process of Creating Loyalty Promotions but they differ in the following ways:
Promotion record created automatically. When you create a tier record in the Loyalty Program Administration screen, a tier promotion is automatically created for that tier in the Loyalty Promotions Administration screen and is given a name with the following form: Tier Promotion: <name of tier>. There can only be one tier promotion for each tier. You cannot create a tier promotion record and must use this record that is automatically created.
Creating the rule for the promotion. In the Loyalty Promotions Administration screen, you create the rules for the promotion, by creating the Rule, Criteria, Attribute, and Action records as needed to change the tier level of members in this tier. For an overview of how to use these records to create rules, see About Creating Loyalty Promotions.
The rule criteria. When you create the rule, create the criteria as follows:
If you select Is Automatic as the first criterion, then this rule triggers an automatic tier change. The tier changed whenever the member meets the rest of the criteria.
If you do not select Is Automatic as the first criterion, then this rule triggers a manual tier change. The tier changes only when the user clicks the Approve button in the Member Tier for Approval list. When all the criteria for the tier change are met, the change is queued in this list to wait for manual approval.
Apart from Is Automatic, the criteria check to see whether the user has the appropriate number of points to qualify for this tier or to be upgraded or downgraded.
If you want to create a rule criterion that compares dates, then you must use the following date format: mm/dd/yyyy.
The rule action. When you create the rule, create the Action record as follows:
Add a new record to the Actions list, and in the Type field, select Tier Change. This option in the Type field is only available for tier promotions.
In the record’s Detail form, select Upgrade Tier, Downgrade Tier, Qualify Tier, or Re-qualify Tier.
If you selected Upgrade Tier or Downgrade Tier, then specify the tier to upgrade or downgrade to.
If you selected Qualify Tier or Re-qualify Tier, then you do not have to specify any other values. These selections keep the user in the current tier, based on points required.
Specify products. Use the Product Inclusion field of the Promotion record to include all products, since the tier promotion applies to all products.
Do not use the Point Blocks or Tier views. The Point Blocks view of the Loyalty Promotions Administration screen specifies which point blocks reward points come from, and this view does not apply to tier promotions, because they do not give points as rewards. The Tier view specifies which tiers the promotion applies to, and this information does not apply to tier promotions, because the tier was already specified when the promotion was created.
For detailed examples of how to create the tier promotions using a variety of tier assessment models, see About Tier Promotions.
Creating Vouchers for Loyalty Members
You must create vouchers in the following situations:
Create vouchers if you are setting up a loyalty program that gives members vouchers as rewards when they enter a new tier. For more information, see Defining Vouchers as Tier Rewards.
Create vouchers if you create reward promotions that assign vouchers as the reward. For more information, see Creating an Assign Voucher Action.
Create vouchers if member service representatives give vouchers to members, for example to compensate them for missed flights. For more information, see Giving Vouchers to Members.
If you create vouchers, then you must also set up the redemption of the vouchers. For more information, see Setting Up Siebel Loyalty Redemptions You create vouchers as products. For more information about creating products, see Siebel Product Administration Guide.
This task is a step in Process of Setting Up Loyalty Programs.
To create a voucher
Navigate to the Administration - Product screen.
Create a new Product record, and complete the necessary fields.
In the Type field, select Electronic Voucher.
Navigate to the Loyalty Product Attributes view.
In the Voucher Attributes area, complete the fields described in the following table.
Field Description Sequence Type
Define the numbering scheme. The possible values are Standard and Custom.
If you choose the Custom option, then you must create a method to configure the numbering logic you want to use. The method must be implemented on the LOY Customer Action Business Service using Siebel eScript code. To implement the logic, create a method named GenCustomVchrNum, specifying Voucher Type as the input parameter to the method and Voucher Number as the output parameter. The Voucher Number value that is output is then stamped on to the voucher record being generated.
For information on creating Siebel eScript code, see Siebel eScript Language Reference.
Expiry Basis
Select the expiry basis. Options are:
Period. The voucher expires after some specific time period. For example, the voucher might expire after one year.
Date. The voucher expires on a specific date. For example, the voucher might expire on December 31, 2011.
Start Day and Start Month
Optionally, you can use these fields to specify the month and day when the voucher becomes valid. If you do not use this field, then the voucher becomes valid on the date of the transaction.
If you use these fields, then they determine the dates when the voucher is valid:
Period. If the expiry basis is period, then the voucher becomes valid on the start day and start month you specify and it ends after the period you specify. For example, if the start month is February, the start day is 1, and the period is one month, then the voucher expires on March 1 (one month after February 1). If you do not specify the start date and end date, then the voucher starts on the transaction date and expires one month after the transaction date.
Date. If the expiry basis is date, then the voucher becomes valid on the on the start day and start month you specify and it ends on the expiry date you specify. If you do not enter a start day and month, then the voucher becomes valid on the date of the transaction and it ends on the expiry date you specify.
Period and Period Type
If you selected Period as the Expiry Basis, then use these fields to specify the period
Period Type. Select Days, Months, or Years.
Period. Enter the number of days or months or years after which the voucher expires.
For example, if you select Period of 6 and a Period Type of Months, then the voucher expires after six months.
Expiry Day, Expiry Month, and Years After
If you selected Date as the Expiry Basis, then use these fields to specify the date
Expiry Month. Select the month when the voucher expires.
Expiry Day. Select the day of the month when the voucher expires.
Years After. Select the number of years after which the voucher expires.
For example, if you select February as the Expiry Month, 28 as the Expiry Day, and 1 as Years After, then the voucher expires on February 28 of the next year.
Defining Vouchers as Tier Rewards
When members reach a new tier, you can reward them by giving them vouchers. A voucher entitles a member to a specific product. For example, a voucher might entitle a member to an upgrade on an airline flight or on an automobile rental. A voucher can also be issued for a prespecified discount on certain transactions, a free gift (such as a music headset) or a gift certificate with a predefined dollar value.
First, the loyalty administrators must create the vouchers, as described in Creating Vouchers for Loyalty Members.
After creating these vouchers, the loyalty administrator must associate them with tiers. When a member enters a tier, the member automatically receives the voucher associated with that tier.
You do not have to create a promotion to assign the voucher as a tier reward. Just associate the voucher with the tier, as described in the following procedure.
This task is a step in Process of Setting Up Loyalty Programs.
To associate vouchers with tiers
Navigate to the Loyalty Program Administration screen.
In the Loyalty Programs list, select the program that uses the tier rewards and click its Program Id hyperlink.
Click the Tier Rewards view tab.
The upper Tier Rewards list includes all of the tiers that were defined for this program in the Tier Classes view. In the lower Tier Rewards list, you specify one or more vouchers associated with each of these tiers.
In the upper Tier Rewards list, select a tier.
Add one or more new record to the lower Tier Rewards list, and complete the necessary fields to specify one or more vouchers associated with this tier.
Repeat step 4 and step 5 to associate rewards with all the tiers.
Configuring Loyalty Vouchers
You can configure the product to change the behavior of vouchers.
Making Vouchers Expire in Days Rather than Months or Years
Without configuration, the Unit of Measure (UOM) for a voucher's expiration length is months or years.
You can configure the product so the UOM also includes days. This configuration enables users to set expiration based on days, for example, to create a voucher that expires in 5 days.
To add days to the UOM for a voucher’s expiration date
Add a new LOV type called Days.
Update the configuration of the Expiration field in the LOY Voucher business component to calculate the expiration date based on the new LOV, using the following formula:
IIF([Expiration UOM] = LookupValue("LOY_LEAD_TIME_CD", "Days"), [Created] + 1, [Created] + [Expiration In Days])
Giving Members a Voucher for Registering
If you want to give members vouchers when they register, then add as a step to the Registration Action-Base Bonus workflow to create a voucher record for the member.
Giving Members a Voucher for a Tier Upgrade
Without configuration, vouchers are not automatically given to members when they upgrade to a new tier. You can configure the product to automatically give members vouchers when they upgrade to a new tier.
To give members a voucher for a tier upgrade
In the business component LOY Member Tier, enter Y in the value field of the Update Tier Reward user property.
Defining Loyalty Product Offerings
The loyalty product offering is used to create time-limited Partner offerings by associating one or more products with partners for accrual and redemption. The loyalty program host enters into contracts with one or more partners. When a partner offers products for accrual or redemption to a loyalty program, it can be for a time-bound period. For example, a hotel partner might specify that users can get double points during certain months. The product is not available for the members of the loyalty program before or after such dates. If a partner sends an accrual record for an activity beyond such offering dates, then it must be rejected.
For example, a loyalty manager for an airline company, entrusted to maintain the Partnership Agreements and allied setups, adds one new product, Hotel Stay, which is offered by a new partner starting January 1, 2008. The agreement also states that the partner cannot send any transaction that is more than six months old for accrual. The following occurs:
The partner sends an accrual transaction which was made December 15, 2007, before the offering date. Siebel Loyalty rejects the transaction by looking at the partnership agreement date, stating the appropriate reason.
The partner starts a Car Rental division starting from March 1, 2008 and offers the same for accrual to the loyalty program Flyer members from June 1, 2008.
The partner sends an accrual record for a car rental taken on May 15, 2008. Siebel Loyalty rejects the transaction, because Car Rental is not offered for accrual until June 1, 2008.
The partner on September 10, 2008 sends accrual records in which there is a transaction for a hotel stay taken on January 7, 2008. Siebel Loyalty rejects the transaction, as the partner cannot send a transaction that is more than six months old.
You use the Loyalty Product Offering to define these terms with the partner. You associate the product with the program partner in the Loyalty Product Offering view in the Loyalty Program Administration screen. You can select the program for which the product is being offered by the partner, the effective dates within which the product is available to the members, the offer type and the pricing type (either Points, Points by Distance or Points by Zone). The pricing type field is used exclusively for redemption offerings.
This task is a step in Process of Setting Up Loyalty Programs.
Related Topic
Integrating Siebel Loyalty with Business Intelligence Publisher
Siebel Loyalty can be integrated with Oracle Business Intelligence Publisher (Oracle BI Publisher).
Oracle BI Publisher allows you to design reports using Microsoft Word, Microsoft Excel, Adobe Acrobat, and other familiar design tools. It includes the ability to create charts, cross-tabs, multiple table formats, conditional formatting, dynamic content, interactive reports. It generates reports in PDF, HTML, Microsoft Excel, Microsoft PowerPoint, and other formats. For information on setting up Oracle BI Publisher, see Siebel Reports Guide.
To integrate Siebel Loyalty with Oracle Business Intelligence Publisher
Register the report templates:
Navigate to Administration - BIP Reports screen, Report Template Registration view.
Create a new record, enter the desired report name, and select the corresponding integration object.
Navigate to the Translations view, select the language, and enter the report name.
For the given report name and integration object, select the name of the Template file (which is stored in the local computer).
Select the desired report format.
Options are PDF, RTF, HTML, and Excel.
Click the Generate Xliff button.
The xliff file is generated.
Click the Upload File button.
Associate the report templates with the appropriate statement types for this program:
- Navigate to the Loyalty Program Administration screen.
In the Loyalty Programs list, click the Program Id hyperlink for the appropriate program.
Click the Statement Templates view tab.
Add a new record to the Statement Templates list, and complete the necessary fields. Some fields are described in the following table.
Field Description Statement Type
Select the type of report that this template is used for, such as Accrual Dispute, Member Gift Points, or Partner Billing.
Template Name
Select the Oracle BI Publisher template used for this report.
Defining Loan Setup
When a member does not have sufficient points to obtain a redemption product, they might be eligible to take out a loan, to borrow the extra points. Loans are associated with tier levels. For detailed information on how to set up loans, see Redemption Loans.
This task is a step in Process of Setting Up Loyalty Programs.
Defining Point Transfer Setup
When a member wants to transfer points to another member of the same program, the member can call the customer service representative to transfer these points.
In addition to the steps defined here, you must create a product named Point Transfer, set a price for this product, and associate the product with the program. For more information, see Setting Prices for Member Services.
This task is a step in Process of Setting Up Loyalty Programs.
To define point transfer setup
Navigate to the Loyalty Program Administration screen.
In the Programs list, select the program that uses the point transfer you want to define, and click its Program Id hyperlink.
Click the Points Transfer Setup view tab.
Add a new record to the Point Transfer Setup list for point transfer type. Complete the necessary fields described in the following table.
Field Description Limit On
Select the Limit On. Options are:
Transferor
- Transferee
Point Type
Select the Point Type.
Membership Type
Select the Membership Type. Options are:
Account
- Household
- Individual
- Partner
Tier
Select the Tier.
Minimum Transaction Quantity
Enter the Minimum Transaction Quantity.
Maximum Transaction Quantity
Enter the Maximum Transaction Quantity.
Transfer Limit
Enter the Transfer Limit.
Defining Point Purchase Setup
When a member discover that there are not enough points to redeem, the member can call the customer service representative to purchase the required points.
In addition to the steps defined here, you must create a point purchase product, set a price for this product, and associate the product with the program. For more information, see Setting Prices for Member Services.
This task is a step in Process of Setting Up Loyalty Programs.
To define point purchase setup
Navigate to the Loyalty Program Administration screen.
In the Programs list, select the program that uses the point types you want to define, and click its Program Id hyperlink.
Click the Points Purchase Setup view tab.
Add a new record to the Point Purchase Setup list for each point purchase type, and complete the necessary fields, described in the following table.
Field Description Point Type
Select the Point Type.
Membership Type
Select the Membership Type. Options are:
Account
- Household
- Individual
- Partner
Tier
Select the Tier.
Minimum Transaction Quantity
Enter the Minimum Transaction Quantity.
Maximum Transaction Quantity
Enter the Maximum Transaction Quantity.
Purchase Period Limit
Enter the Purchase Period Limit.
Defining Point Gift Setup
You can allow active members of a program to give points as gifts to other active members of the same program.
You restrict the number of points that can be given or received to prevent members from abusing this feature. For example, if a platinum member can buy points at a 10% discount, then you might want to restrict platinum members so they can give only a limited amount of points, so they do not give too many discounted points to members in other tiers.
You must enter limits on both the giver and the recipient of a specific point type, membership type and tier for gift points to be enabled for that combination of point type, membership type, and tier.
Alternatively, you might want to restrict members in other tiers so they can receive only a limited number of points from platinum members.
In addition to the steps defined here, you must create a point gift product, set a price for this product, and associate the product with the program. For more information, see Setting Prices for Member Services.
To define point gift setup
Navigate to the Loyalty Program Administration screen.
In the Programs list, select the appropriate program, and click its Program Id hyperlink.
Click the Point Gift Setup view tab.
Add a new record to the Point Purchase Gift list for each combination of point type, membership type, tier, and gift from or gift to. Complete the necessary fields described in the following table.
Field Description Limits On
Select Gift From or Gift To to specify whether this record is limiting the number of points that can be given or the number of points that can be received for this point type by members with this membership type and tier.
Point Type
Select the point type that this limit applies to.
Membership Type
Select the membership type that this limit applies to.
Tier
Select the tier that this limit applies to.
Minimum Transaction
Enter the minimum number of points that can be given or received in one transaction for this point type by members of this membership type and tier.
Maximum Transaction
Enter the maximum number of points that can be given or received in one transaction for this point type by members of this membership type and tier.
Gift Period Limit
Enter the maximum number of points that can be given or received during the entire gift period for this point type by members of this membership type and tier.
The gift period begins at the date specified in the Transfer/Gift Start Date field in the Program form, and it ends on the date of the transaction.
Setting Prices for Member Services
Siebel Loyalty includes the following member services that you can charge members for:
Member Enrollment
Redemption Cancellation
Membership Renewal
Gift Points
Lounge Purchase
Point Purchase
Promotion Enrollment (for opt-in promotions)
Transfer Points
Voucher Reissue
Points Reactivation
In order to charge members for one of these services, you must set up the pricing for the service in the program.
For each member service, you must:
Define a product of type Loyalty Service.
Set a price for the product. If you want the service to be free, then set a price of zero.
Associate the product with the program as a service product in the Service Product Association view for the Program. Service product association is required for the following services:
Gift Points
Points purchase
Lounge purchase
Points adjustment
Points transfer
Promotion Enrollment
Voucher Reissue
All promotions associated with member services use this product to determine the base price for the service. The pricing of all member services can be further manipulated by the promotion.
Exceptions to this method of pricing are the Member Enrollment, Membership Renewal, and Points Reactivation service, which use a product of a different type:
Member Enrollment and Membership Renewal. The product is defined with the type Individual Membership, Account Membership, or Household Membership, depending on which sort of membership you are pricing. This determines the base prices for these two membership services, which can be further manipulated by the associated promotion.
Points Reactivation. The product has to be defined with the type Points Reactivation and does not have to be associated with the program as a Service product. This determines the base price for the Points Reactivation service, which can be further manipulated by the associated promotion.
You might want to charge different prices for the same member service within a program. For example, you could charge platinum members a lower price than other members for the same service. To charge different prices, you modify the price for the service by creating rules in Loyalty Promotions Administration view. These rules would have the member tier or some other attribute as one of their criteria, and the service price is changed accordingly
This task is a step in Process of Setting Up Loyalty Programs.
To set up pricing for member services, perform the following tasks:
Creating the Product for the Member Service
For complete information about creating products, see the chapter on basic product administration in Siebel Product Administration Guide.
To create the product for the member service
Navigate to the Administration - Product screen, then the Products view.
Create a new product that includes the following field values:
Field Description Name
Enter a name for the product.
Note: For the promotion enrollment service, the name must be Promotion Enrollment and the type must be Loyalty Service.Type
For most services, select Loyalty Service.
For memberships, select Individual Membership, Household Membership, or Account Membership.
For Points Reactivation, select Points Reactivation.
For Voucher Reissue or Redemption, select Electronic Voucher.
Click the More Info view tab, and click the Loyalty Product Attributes subtab, and complete the necessary fields.
If the service is Membership Enrollment or Points Reactivation, then complete the following fields in the Loyalty Product Attributes subtab for the product.
Field Description Period Type
Select the period type for the membership or points. Options are months, years, or lifetime.
Duration
Enter the number of months or years that the membership or reactivated point remain in effect.
If the service is Voucher Reissue, then complete the following fields in the Loyalty Product Attributes subtab for the product.
Field Description Sequence Type
Options are Custom and Standard.
A standard sequence is generated automatically.
For a custom sequence, you must create an eScript to provide the custom voucher number.
Expiry Basis
Select one of the two bases for the voucher expiring:
Period. The voucher expires after a period of time.
Date. The voucher expires on a specific date.
Period
If the Expiry Basis is Period, then enter the number of days, months, or years before the period expires.
Period Type
If the Expiry Basis is Period, then select Days, Months, or Years to specify what the number in the Period field applies to.
Expiry Day
If the Expiry Basis is Date, then enter the day of the month when the voucher expires.
Expiry Month
If the Expiry Basis is Date, then enter the month when the voucher expires.
Years After
If the Expiry Basis is Date, then enter the number of years after the voucher is issued that the voucher expires.
Creating the Price for the Member Service Product
You can create prices for services using three different payment modes. Members can be charged in points, in money payment, or in a combination of points and money payment. You add pricing records for the payment modes that you want to accept for this member service.
To create the price for the member service product
Navigate to the Administration - Product screen.
Drill down on the Name field hyperlink for this price list.
Click the More Info view tab.
Click the Points view tab under the More Info tab.
Add a record for each payment mode you want to accept for this service and complete the necessary fields. Some fields are described in the following table.
Field Description Payment Mode
Select the payment mode specified by this record. Options are Pay, Points, and Points plus Pay.
Pay
Enter the amount of money charged for the service. This applies if the payment mode is Pay or Points plus Pay.
Points
Enter the number of points charged for the service. This applies if the payment mode is Points or Points plus Pay.
Program
Select the program this pricing applies to.
Transaction Type
Select Service.
Associating the Product with the Member Service
After you have defined the product and its price, you associate it in the Loyalty Program Administration screen with the appropriate member service. Then members of the program are charged this price for this member service.
To define a service product association
Navigate to the Loyalty Program Administration screen.
In the Programs list, select the appropriate program and then click its Program Id hyperlink.
Click the Service Product Association tab and add a new record. Complete the necessary fields described in the following table.
Field Description Service Product
Select the product you created.
Service Type
Select the member service type that you are using this product to price.
Restricting the Redemption Period to Prevent Fraud
Siebel Loyalty allows you to prevent redemption of points until after the goods can no longer be returned, in order to prevent fraud.
For example, a customer might purchase a product that can be returned within 30 days and get loyalty points for the purchase. The customer might redeem all the loyalty points for a reward immediately. Then the customer might return the product and get a full refund, in order to get the redemption reward without actually buying for the product.
You avoid this sort of fraud by entering a value in the Accrual Effectivity in Days field of the Loyalty Terms view, to determine when the accrued points become effective. For example, if the product can be returned in 30 days, then enter 31 days in the field, so a member cannot redeem the points until after the member is no longer allowed to return the product.
This task is a step in Process of Setting Up Loyalty Programs.
To restrict the redemption period
Navigate to the Loyalty Program Administration screen.
Locate the program you want, and click its Program Id field.
Click the Partners view tab.
In the Partner’s list, select the partner that you want or select the host company.
In the Loyalty Terms view for that partner or host company, complete the necessary fields. Some fields are described in the following table.
Field Description Program
Select the program that the restriction applies to.
Accrual Effectivity in Days
Enter the number of days after purchase when the points become effective.
Creating Base Loyalty Promotions
Base promotions are designed to simplify the process of setting up complex promotions. They are used to calculate base points, based on any of the transaction attributes, member attributes, promotion attributes and so on.
Each program can have only one base promotion. It is created, with no rules, as soon as the program is saved. Users cannot manually create this promotion, nor can they delete it, but they can add rules to calculate the base points for accrual, based on the transaction attributes.
The base promotion can calculate the value of base accrual from the following:
Points associated at the product level, based on the airport codes, booking class, or zones.
The distance table for the origin destination pairs.
Lookup values from any lookup table in Siebel Loyalty.
Calculated fields, such as age of member or days and nights of a hotel stay based on check-in and check-out dates.
The fields can be used for criteria as well as in actions, for example:
Points based on the distance table for air products, using product type, product and partner as criteria.
Hotel stay accrual, based on the nights stayed where the partner sends only check-in and check-out dates.
For the same hotel, if you stay in Australia then the accruals are based on amount spent, but if you stay outside Australia then the accruals are based on nights stayed. However, the partner sends the same data for both transactions, and Siebel Loyalty has to calculate accruals based on the location code in the transaction.
If a member takes a flight on a weekend then he gets 10% additional bonus.
Senior Citizens (if the member has completed 65 years on the activity date) get double points on all Credit Card transactions.
The base points calculated, based on one of the these methods, can then be used as a basis for rewarding a bonus and incentives. This basis is achieved by making the base points available for all the promotions. The base points calculated are not allocated to the members directly.
The points are allocated to members using another action, Assign Points. This action can only be part of another promotion. A program can have only one active base promotion.
The Action type, Calculate Base Price, must be selected, then select either Custom or Distance Table in the Object field. In the Attribute field, select the attribute to be used to give the points from one of the following options:
Transaction attributes
Member attributes
Promotion Attributes
Partner Attributes
Product Attributes
This task is a step in Process of Setting Up Loyalty Programs.
Distance Table
The distance table is found after the Loyalty Programs tab. You can use it to add airport code pairs and specify the distance between them. These distances can be used by the base promotion to give points to a member. For more information, see Defining the Distance Between Two Airports.
For example, a member, John, flies with King Air. John flies between New York and Paris. The distance between the two airports has been entered as 5000 miles in the distance table. The base promotion calculates the base points as 5000, based on the distance table. An accrual admin promotion gives the 5000 points to the member. In addition, John is a Gold tier member and has traveled in Class A. Based on these facts, the member recognition promotion gives 10% of the base points, and the cabin reward promotion gives another 500 points, to the member. John gets a total of 6000 points.
Custom Calculation
Custom calculation involves calling a custom business service to calculate the points and return a value. The custom business service can use data, by means of custom look-up tables outside of Siebel Loyalty, to calculate base points. This option is relevant when the base point calculation involves complex mathematical operations involving data stored outside of Siebel Loyalty.
Example of Custom Calculation
For example, VoiceMobile loyalty program rewards members with base points based on the following criteria:
One point for each dollar billed on Local calls
Two points for each dollar billed on Long distance calls
Four points for each dollar billed on VAS to the members.
A member of VoiceMobile loyalty program, has:
$100 bill amount on local calls
$250 on Long distance calls
$75 on VAS
This member is rewarded (100 plus 500 plus 300) 900 base points.
These base points can then be used as a basis for rewarding bonus and incentives. The base points are available for all the promotions.
For example, VoiceMobile loyalty program rewards 25% of base points as bonus to members in Gold tier. This member, who is a Gold member, earns 175 points as bonus (that is, 900 times 0.25 equals 175 points).
Code Example for Custom Calculation
The value used in the custom calculation is sourced from the custom attribute defined in Program Level Attributes view. This custom attribute calls a custom function to derive this value. This function must be written as part of the LOY Customer Action Business Service.
The following example of the code for a custom function shows how to read Input parameters and return output arguments.
function GetValuesCustomAttribute(inputs, outputs)

{
   try{

   //  All the field values would be in the format Object.Field.Field Name. All the
   //  values would be passed to custom attributes.
   // Using transaction Id and querying transaction BC must be avoided because in
   // simulation mode the attributes passed in transaction are passed to simulation.
   // Always use the values from the Transaction.Field.Field Name.

   var strOrgAirPort   =  inputs.GetProperty ("Transaction.Field.Origination Airport");
   var strDestAirPort  =  inputs.GetProperty ("Transaction.Field.Destination Airport");
   var customCoeff    =  inputs.GetProperty ("Transaction.Field.Custom Coeff Factor");

      var points = 0;

      if(strOrgAirPort == "SFO" &&strDestAirPort ="BOS")
         points = 200 * customCoeff ;

   outputs.SetProperty("Field Value",points);
   }
   catch(e)
   {
      TheApplication().RaiseErrorText(e.toString());
   }
   finally
   {
   }
}
Creating Admin Promotions
When you create a new program, you must create admin promotions to assign the points that are calculated by the base promotion to perform the basic processing for the program, such as:
Adding points to members’ balances when they perform accrual transactions.
Subtracting points from members’ balances when they perform redemption transactions.
Updating vouchers when members perform transactions that use vouchers.
These admin promotions apply to every transaction of every member of the program. You must not make them visible to members as promotions. The admin promotions perform processing in the background.
You must create a transaction attribute, which is used by the admin promotion that processes the cancellations. Then you must create and activate the admin promotions.
This task is a step in Process of Setting Up Loyalty Programs.
Perform the following tasks:
Creating the Transfer Member Id Transaction Attribute
Use this procedure to create the attribute.
To create the Transfer Member Id transaction attribute
Navigate to Administration - Data screen, then the List of Values view.
Add an LOV value record with field values as shown in the following table.
Field Value Type
LOY_ATTRIB_FIELDS_TXN
Display Value
Transfer Member Id
Parent LIC
Transfer Member Id
Order
19
Translate
False
For information about adding an LOV value, see the chapter on working with lists of values in Siebel Applications Administration Guide.
Navigate to the Loyalty Program Administration screen.
Select the program for which you want to create the admin promotions and clear the program’s Active check box.
Click the hyperlink in the Program Id field.
Click the Program Level Attributes view tab and click Transaction Attributes on the link bar.
Create a new transaction attribute record with field values as shown in the following table.
Field Value Name
Transfer Member Id
Field
Transfer Member Id
Active
Selected
In the loyalty program form in the upper part of the screen, select the program’s Active check box and click Update Cache.
Creating the Admin - Accruals Promotion
Use this procedure to create the promotion.
To create the Admin - Accruals promotion
Navigate to the Loyalty Promotions Administration screen.
Add a new record to the Promotions list, entering the values shown in the following table.
Field Value Name
Admin - Accruals.
Always Apply
Y.
Apply To
Accrual-Product.
Admin
Select the Admin check box.
Program
Enter the name of the program.
Partner
Enter the partners for the program.
Product Inclusion
All Products.
Point Limit Type
Unlimited.
Promotion Start
Enter one day before today’s date.
Promotion End
Leave this field blank, because you do not want the admin promotion to expire.
Click the Promotion Number (#) field’s hyperlink.
Click the Rules view tab.
Create the rule for this promotion:
- Add a new record to the Rules list, entering the values shown in the following table.
Field Value Sequence
1
Name
Check Points
Apply To
Transactions
- Click the Name field’s hyperlink.
- Add a new record to the Criteria list, entering the values shown in the following table.
Field Value Sequence
1
Name
Check Points
Type of Comparison
Compare to Values
- In the Compare to Values Detail form, enter the values in the following table.
Field Value Object
Transaction
Attribute
Transaction Points
Condition
Is Greater Than
- Add a new record to the Values list and enter 0 in the Value field.
Click the Actions view tab.
- Add a new record to the Actions list, entering the values shown in the following table.
Field Value Sequence
1.
Name
Give Points.
Type
Assign Points.
Use From Transaction
Y.
Point Type
Enter the point type given.
Qualifying
If the points are qualifying, then select the check box.
Point Sub Type
Enter The point subtype given.
Object
Transaction.
Attribute
Transaction Points.
- Add a new record to the Rules list, entering the values shown in the following table.
Creating the Admin - Cancellation Promotion
Use this procedure to create the promotion.
To create the Admin - Cancellation promotion
Navigate to the Loyalty Promotions Administration screen.
Add a new record to the Promotions list, entering the values in the following table.
Field Value Name
Admin - Cancellation.
Always Apply
Y.
Apply To
Cancellation.
Admin
Select the Admin check box.
Program
Enter the name of the program.
Partner
Enter the partners for the program.
Product Inclusion
All Products.
Point Limit Type
Unlimited.
Promotion Start
Enter one day before today’s date.
Promotion End
Leave this field blank, because you do not want the admin promotion to expire.
Click the Promotion Number (#) field’s hyperlink.
Click the Rules view tab.
Create a rule for this promotion:
- Add a new record to the Rules list, entering the values in the following table.
Field Value Sequence
1
Name
Invoke Cancel Action
Apply To
Transactions
- Click the Name field’s hyperlink.
Click the Actions view tab.
Add a new record to the Actions list, entering the values in the following table.
Field Description Sequence
1
Name
Invoke Cancel
Type
Cancel Transaction
- Add another new record to the Actions list, entering the values in the following table.
Field Description Sequence
2
Name
CancelTxnAttributes
Type
Invoke Custom Action
Method
CancelTxnAttributes
- Add another new record to the Actions list, and enter the values in the following table.
Note: This step is required if your loyalty program receives retroactive transactions.
Field Description Sequence
3
Name
RTC Manual
Type
RTC Manual
- Add a new record to the Rules list, entering the values in the following table.
Creating the Admin - Gift Promotion
Use this procedure to create the promotion.
To create the Admin - Gift promotion
Navigate to the Loyalty Promotions Administration screen.
Copy the Admin - Accruals promotion created in the earlier procedure.
In the new Loyalty Promotions record, change the following values from the values in the Admin - Accruals promotion.
Field Value Name
Admin - Gift
Apply To
Accrual-Gift
Leave all other field values the same as in the Admin - Accruals promotion record.
When you copy the Admin - Accruals promotion, Siebel Loyalty also copies its associated Rule. In the Rule copy, leave all values the same.
Creating the Admin - Loan Promotion
Use this procedure to create the promotion.
To create the Admin - Loan promotion
Navigate to the Loyalty Promotions Administration screen.
Add a new record to the Promotions list, entering the values in the following table.
Field Value Name
Admin - Loan.
Always Apply
Y.
Apply To
Loan.
Admin
Select the Admin check box.
Program
Enter the name of the program.
Partner
Enter the partners for the program.
Promotion Start
Enter one day before today’s date.
Promotion End
Leave this field blank, because you do not want the admin promotion to expire.
Click the Promotion Number (#) field’s hyperlink.
Click the Rules view tab.
Create the first rule for this promotion, which assigns points when the loan is made:
- Add a new record to the Rules list, entering the values in the following table.
Field Value Sequence
1
Name
Loan
Apply To
Transactions
Click the Name field’s hyperlink.
Add a new record to the Criteria list, entering the values in the following table.
Field Value Sequence
1
Name
Loan
Type of Comparison
Compare to Values
- In the Compare to Values Detail form, enter the values in the following table.
Field Value Object
Transaction
Attribute
Transaction Sub Type
Condition
Equals
- Add a new record to the Values list and enter Loan in the Value field.
Click the Actions view tab.
- Add a new record to the Actions list, entering the values in the following table.
Field Value Sequence
1
Name
Loan
Type
Assign Points
Use From Transaction
Y
Object
Transaction
Attribute
Transaction Points
- Add a new record to the Rules list, entering the values in the following table.
Create the second rule for this promotion, which redeems points when the loan is repaid:
- In the thread bar, click Promotion:Admin - Loan.
Add a new record to the Rules list, entering the values in the following table.
Field Value Sequence
2
Name
Loan Repayment
Rule Applies To
Transactions
Click the new rule’s Name hyperlink.
Add a new record to the Criteria list, entering the values in the following table.
Field Value Sequence
1
Name
Loan Repayment
Type of Comparison
Compare to Values
In the Compare to Values Detail form, enter the values in the following table.
Field Value Object
Transaction
Attribute
Transaction Sub Type
Condition
Equals
Add a new record to the Values list and enter Loan Repayment in the Value field.
Click the Actions view tab.
Add a new record to the Actions list, entering the values in the following table.
Field Value Sequence
1
Name
Loan Repayment
Type
Redeem Points
Use From Transaction
Y
Object
Transaction
Attribute
Transaction Points
Add another new record to the Actions list, entering the values in the following table.
Field Value Sequence
2
Name
SetLoanBalance
Type
Invoke Custom Action
Method
SetLoanBalance
Creating the Admin - Point Transfer Promotion
Use this procedure to create the promotion.
To create the Admin - Point Transfer promotion
Navigate to the Loyalty Promotions Administration screen.
Add a new record to the Promotions list, entering the values in the following table.
Field Value Name
Admin - Point Transfer.
Always Apply
Y.
Apply To
Point Transfer.
Admin
Select the Admin check box.
Program
Enter the name of the program.
Partner
Enter the partners for the program.
Product Inclusion
All Products.
Promotion Start
Enter one day before today’s date.
Promotion End
Leave this field blank, because you do not want the admin promotion to expire.
Click the Promotion Number (#) field’s hyperlink.
Click the Rules view tab.
Create the first rule for this promotion:
- Add a new record to the Rules list, entering the values in the following table.
Field Value Sequence
1
Name
Points Transfer
Apply To
Transactions
Click the Name field’s hyperlink.
Add a new record to the Criteria list, entering the values in the following table.
Field Value Sequence
1
Name
Check Points
Type of Comparison
Compare to Values
In the Compare to Values Detail form, enter the values in the following table.
Field Value Object
Transaction
Attribute
Transaction Points
Condition
Is Greater Than
Add a new record to the Values list and enter 0 (zero) in the Value field.
Add another new record to the Criteria list, entering the values in the following table.
Field Value Sequence
2
Name
Check Type
Type of Comparison
Compare to Values
In the Compare to Values Detail form, enter the values in the following table.
Field Value Object
Transaction
Attribute
Transaction Type
Condition
Equals
Add a new record to the Values list and enter Redemption in the Value field.
Click the Actions view tab.
- Add a new record to the Actions list, entering the values in the following table.
Field Value Sequence
1
Name
Redeem Points
Type
Redeem Points
Use from Transaction
Y
Object
Transaction Points
Attribute
Transaction Points
- Add another new record to the Actions list, entering the values in the following table.
Field Value Sequence
2
Name
Create an Accrual Txn
Type
Invoke Custom Action
Method
PointTransfer
- Add a new record to the Rules list, entering the values in the following table.
Create the second rule for this promotion:
- In the thread bar, click Promotion:Admin - Point Transfer.
- Add a new record to the Rules list, entering the values in the following table.
Field Value Sequence
2
Name
Assign Points
Rule Applies To
Transactions
- Click the new rule’s Name hyperlink.
- Add a new record to the Criteria list, entering the values in the following table.
Field Value Sequence
1
Name
Check Points
Type of Comparison
Compare to Values
- In the Compare to Values Detail form, enter the values in the following table.
Field Value Object
Transaction
Attribute
Transaction Points
Condition
Is Greater Than
- Add a new record to the Values list and enter 0 (zero) in the Value field.
- Add another new record to the Criteria list, entering the values in the following table.
Field Value Sequence
2
Name
Check Type
Type of Comparison
Compare to Values
- In the Compare to Values Detail form, enter the values in the following table.
Field Value Object
Transaction
Attribute
Transaction Type
Condition
Equals
- Add a new record to the Values list and enter Accrual in the Value field.
Click the Actions view tab.
- Add a new record to the Actions list, entering the values in the following table.
Field Value Sequence
1
Name
Assign Points
Type
Assign Points
Use From Transaction
Y
Object
Transaction
Attribute
Transaction Points
Creating the Admin - Redemptions Promotion
Use this procedure to create the promotion.
To create the Admin - Redemptions promotion
Navigate to the Loyalty Promotions Administration screen.
Add a new record to the Promotions list, entering the values in the following table.
Field Value Name
Admin - Redemption.
Always Apply
Y.
Apply To
Redemption-Product.
Admin
Select the Admin check box.
Program
Enter the name of the program.
Partner
Enter the partners for the program.
Product Inclusion
All Products.
Product Limit Type
Unlimited.
Promotion Start
Enter one day before today’s date.
Promotion End
Leave this field blank, because you do not want the admin promotion to expire.
Click the Promotion Number (#) field’s hyperlink.
Click the Rules view tab.
Create the rule for this promotion:
- Add a new record to the Rules list, entering the values in the following table.
Field Value Sequence
1
Name
Check Points
Apply To
Transactions
Click the Name field’s hyperlink.
- Add a new record to the Criteria list, entering the values in the following table.
Field Value Sequence
1
Name
Check Points
Type of Comparison
Compare to Values
- In the Compare to Values Detail form, enter the values in the following table.
Field Value Object
Transaction
Attribute
Transaction Points
Condition
Is Greater Than
- Add a new record to the Values list and enter 0 in the Value field.
Click the Actions view tab.
- Add a new record to the Actions list, entering the values in the following table.
Field Value Sequence
1
Name
Redeem the Points
Type
Redeem Points
Use From Transaction
Y
Object
Transaction
Attribute
Transaction Points
- Add a new record to the Rules list, entering the values in the following table.
Creating the Admin - Voucher Promotion
Use this procedure to create the promotion.
To create the Admin - Voucher promotion
Navigate to the Loyalty Promotions Administration screen.
Add a new record to the Promotions list, entering the values in the following table.
Field Value Name
Admin - Voucher.
Always Apply
Y.
Apply To
Voucher.
Program
Enter the name of the program.
Partner
Enter the partners for the program.
Product Inclusion
All Products.
Promotion Start
Enter one day before today’s date.
Promotion End
Leave this field blank, because you do not want the admin promotion to expire.
Click the Promotion Number (#) field’s hyperlink.
Click the Rules view tab.
Create the first rule for this promotion:
- Add a new record to the Rules list, entering the values in the following table.
Field Value Sequence
1
Name
Debit Voucher
Apply To
Transactions
- Click the Name field’s hyperlink.
- Add a new record to the Criteria list, entering the values in the following table.
Field Value Sequence
1
Name
Debit Voucher Transaction
Type of Comparison
Compare to Values
- In the Compare to Values Detail form, enter the values in the following table.
Field Value Object
Transaction
Attribute
Transaction Sub Type
Condition
Does Not Equal
Add a new record to the Values list and enter Cancellation in the Value field.
Click the Actions view tab.
- Add a new record to the Actions list, entering the values in the following table.
Field Value Sequence
1
Name
Update Voucher Status
Type
Invoke Custom Transaction
Method
DebitVoucher
- Add a new record to the Rules list, entering the values in the following table.
Create the second rule for this promotion:
- In the thread bar, click Promotion:Admin - Voucher.
- Add a new record to the Rules list, entering the values in the following table.
Field Value Sequence
2
Name
Cancel Redeemed Voucher
Rule Applies To
Transactions
- Click the new rule’s Name hyperlink.
- Add a new record to the Criteria list, entering the values in the following table.
Field Value Sequence
1
Name
Cancel Voucher Transaction
Type of Comparison
Compare to Values
- In the Compare to Values Detail form, enter the values in the following table.
Field Value Object
Transaction
Attribute
Transaction Sub Type
Condition
Equals
- Add a new record to the Values list and enter Cancellation in the Value field.
- Click the Actions view tab.
- Add a new record to the Actions list, entering the values in the following table.
Field Value Sequence
1
Name
Cancel Redeemed Voucher
Type
Invoke Custom Transaction
Method
CancelRedeemedVoucher
Creating the Admin - Points Purchase Promotion
Use this procedure to create the promotion.
To create the Admin - Points Purchase promotion
Navigate to the Loyalty Promotions Administration screen.
Add a new record to the Promotions list, entering the values in the following table.
Field Value Name
Admin - Points Purchase.
Always Apply
Y.
Apply To
Point Purchase.
Admin
Select the Admin check box.
Program
Enter the name of the program.
Partner
Enter the partners for the program.
Product Inclusion
All Products.
Promotion Start
Enter one day before today’s date.
Promotion End
Leave this field blank, because you do not want the admin promotion to expire.
Click the Promotion Number (#) field’s hyperlink.
Click the Rules view tab.
Create the first rule for this promotion:
- Add a new record to the Rules list, entering the values in the following table.
Field Value Sequence
1
Name
Override Payment & Payment Mode are PAY
Apply To
Transactions
- Click the Name field’s hyperlink.
- Add a new record to the Criteria list, entering the values in the following table.
Field Value Sequence
1
Name
Check Override Flag
Type of Comparison
Compare to Values
- In the Compare to Values Detail form, enter the values in the following table.
Field Value Object
Transaction
Attribute
Override Price Flag
Condition
Equals
- Add a new record to the Values list and enter “Y" in the Value field.
- Click the Actions view tab.
- Add a new record to the Actions list, entering the values in the following table.
Field Value Sequence
1
Name
Update Pay
Type
Update Attribute
Object
Transaction
Attribute
Transaction Amount
- Add another record to the Actions list, entering the values in the following table.
Field Value Sequence
2
Name
Purchase Points
Type
Invoke Custom Action
Method
PurchasePoints
- Add a new record to the Rules list, entering the values in the following table.
Create the second rule for this promotion:
- In the thread bar, click Promotion:Admin - Points Purchase.
- Add a new record to the Rules list, entering the values in the following table.
Field Value Sequence
2
Name
Payment Mode is PAY
Rule Applies To
Transactions
- Click the new rule’s Name hyperlink.
- Add a new record to the Criteria list, entering the values in the following table.
Field Value Sequence
1
Name
Check Payment Type
Type of Comparison
Compare to Values
- In the Compare to Values Detail form, enter the values in the following table.
Field Value Object
Transaction
Attribute
Payment Type Code
Condition
Equals
- Add a new record to the Values list and enter Pay in the Value field.
- Click the Actions view tab.
- Add a new record to the Actions list, entering the values in the following table.
Field Value Sequence
1
Name
Update Pay
Type
Update Attribute
Object
Transaction
Attribute
Transaction Amount
- Add a new record to the Actions list, entering the values in the following table.
Field Value Sequence
2
Name
Purchase Points
Type
Invoke Custom Transaction
Method
PurchasePoints
Creating the Admin - Transfer Points Promotion
Use this procedure to create the promotion.
To create the Admin - Transfer Points promotion
Navigate to the Loyalty Promotions Administration screen.
Add a new record to the Promotions list, entering the values in the following table.
Field Value Name
Admin - Transfer Points.
Always Apply
Y.
Apply To
Transfer Points.
Admin
Select the Admin check box.
Program
Enter the name of the program.
Partner
Enter the partners for the program.
Product Inclusion
All Products.
Promotion Start
Enter the promotion start date.
Promotion End
Leave this field blank, because you do not want the admin promotion to expire.
Click the Promotion Number (#) field’s hyperlink.
Click the Rules view tab.
Create the first rule for this promotion:
- Add a new record to the Rules list, and enter the values in the following table.
Field Value Sequence
1
Name
Override Payment & Payment Mode are PAY
Apply To
Transactions
- Click the Name field’s hyperlink.
- Add a new record to the Criteria list, and enter the values in the following table.
Field Value Sequence
1
Name
Check Overide Flag
Type of Comparison
Compare to Values
- In the Compare to Values Detail form, enter the values in the following table.
Field Value Object
Transaction
Attribute
Overide Price Flag
Condition
Equals
- Add a new record to the Values list and enter “Y" in the Value field.
- Click the Actions view tab.
- Add a new record to the Actions list, and enter the values in the following table.
Field Value Sequence
1
Name
Update Pay
Type
Update Attribute
Object
Transaction
Attribute
Transaction Amount
- Add a new record to the Actions list, and enter the values in the following table.
Field Value Sequence
2
Name
Transfer Points
Type
Invoke Custom Action
Method
TransferPoints
- Add a new record to the Rules list, and enter the values in the following table.
Create the second rule for this promotion:
- In the thread bar, click Promotion:Admin - Transfer Points.
- Add a new record to the Rules list, and enter the values in the following table.
Field Value Sequence
2
Name
Payment Mode is PAY
Rule Applies To
Transactions
- Click the new rule’s Name hyperlink.
- Add a new record to the Criteria list, and enter the values in the following table.
Field Value Sequence
1
Name
Check Payment Type
Type of Comparison
Compare to Values
- In the Compare to Values Detail form, enter the values in the following table.
Field Value Object
Transaction
Attribute
Payment Type Code
Condition
Equals
- Add a new record to the Values list and enter Pay in the Value field.
- Click the Actions view tab.
- Add a new record to the Actions list, and enter the values in the following table.
Field Value Sequence
1
Name
Update Pay
Type
Update Attribute
Object
Transaction
Attribute
Transaction Amount
- Add a new record to the Actions list, and enter the values in the following table.
Field Value Sequence
2
Name
Transfer Points
Type
Invoke Custom Action
Method
TransferPoints
Creating the Admin - Gift Points Promotion
Use this procedure to create the promotion.
To create the Admin - Gift Points promotion
Navigate to the Loyalty Promotions Administration screen.
Add a new record to the Promotions list, and enter the values in the following table.
Field Value Name
Admin - Gift Points.
Always Apply
Y.
Apply To
Gift Points.
Admin
Select the Admin check box.
Program
Enter the name of the program.
Partner
Enter the partners for the program.
Product Inclusion
All Products.
Promotion Start
Enter the promotion start date.
Promotion End
Leave this field blank, because you do not want the admin promotion to expire.
Click the Promotion Number (#) field’s hyperlink.
Click the Rules view tab.
Create the first rule for this promotion:
-
Add a new record to the Rules list, and enter the values in the following table.
Field Value Sequence
1
Name
Pay without OV-Points 1-500
Apply To
Transactions
-
Click the Name field’s hyperlink.
-
Add a new record to the Criteria list, and enter the values in the following table.
Field Value Sequence
1
Name
OV N
Type of Comparison
Compare to Values
-
In the Compare to Values Detail form, enter the values in the following table.
Field Value Object
Transaction
Attribute
Overide Price Flag
Condition
Equals
-
Add another new record to the Criteria list, and enter the values in the following table.
Field Value Sequence
2
Name
Payment Mode is Pay
Type of Comparison
Compare to Values
-
In the Compare to Values Detail form, enter the values in the following table.
Field Value Object
Transaction
Attribute
Payment Type Code
Condition
Equals
-
Add a new record to the Values list and enter Pay in the Value field.
-
Add another new record to the Criteria list, and enter the values in the following table.
Field Value Sequence
3
Name
Compare points Range -Min
Type of Comparison
Compare to Values
-
In the Compare to Values Detail form, enter the values in the following table.
Field Value Object
Transaction
Attribute
Transaction Points
Condition
Is Greater Than or Equal To
-
Add a new record to the Values list and enter 1 in the Value field.
-
Add another new record to the Criteria list, and enter the values in the following table.
Field Value Sequence
4
Name
Compare points Range-Max
Type of Comparison
Compare to Values
-
In the Compare to Values Detail form, enter the values in the following table.
Field Value Object
Transaction
Attribute
Transaction Points
Condition
Is Less Than or Equal To
-
Add a new record to the Values list and enter 500 in the Value field.
-
Click the Actions view tab.
-
Add a new record to the Actions list, and enter the values in the following table.
Field Value Sequence
1
Name
Amount
Type
Update Attribute
Update this attribute: Object
Transaction
Update this attribute: Attribute
Amount
Update this attribute: Action
Set
With this attribute: Object
Transaction
With this attribute: Attribute
Amount
And/or this value: Operator
Multiply
And/or this value: Value
.5
-
Add another new record to the Actions list, and enter the values in the following table.
Field Value Sequence
2
Name
Gift Points Action Type
Type
Invoke Custom Action
Method
GiftPoints
-
Create the second rule for this promotion:
-
In the thread bar, click Promotion:Admin - Gift Points.
-
Add a new record to the Rules list, and enter the values in the following table.
Field Value Sequence
2
Name
Pay With OV
Rule Applies To
Transactions
-
Click the new rule’s Name hyperlink.
-
Add a new record to the Criteria list, and enter the values in the following table.
Field Value Sequence
1
Name
OV N
Type of Comparison
Compare to Values
-
In the Compare to Values Detail form, enter the values in the following table.
Field Value Object
Transaction
Attribute
Override Price Flag
Condition
Equals
-
Add a new record to the Values list and enter Y in the Value field.
-
Add another new record to the Criteria list, and enter the values in the following table.
Field Value Sequence
2
Name
Payment Mode is Pay
Type of Comparison
Compare to Values
-
In the Compare to Values Detail form, enter the values in the following table.
Field Value Object
Transaction
Attribute
Payment Type Code
Condition
Equals
-
Add a new record to the Values list and enter Pay in the Value field.
-
Click the Actions view tab.
-
Add a new record to the Actions list, and enter the values in the following table.
Field Value Sequence
1
Name
Amount
Type
Update Attribute
Update this attribute: Object
Transaction
Update this attribute: Attribute
Amount
Update this attribute: Action
Set
With this attribute: Object
Transaction
With this attribute: Attribute
Amount
And/or this value: Operator
Multiply
And/or this value: Value
1
-
Add another new record to the Actions list, and enter the values in the following table.
Field Value Sequence
2
Name
Gift Points Action Type
Type
Invoke Custom Action
Method
GiftPoints
-
Create the third rule for this promotion:
-
In the thread bar, click Promotion:Admin - Gift Points.
-
Add a new record to the Rules list, and enter the values in the following table.
Field Value Sequence
3
Name
Pay without OV-Base Member
Rule Applies To
Transactions
-
Click the new rule’s Name hyperlink.
-
Add a new record to the Criteria list, and enter the values in the following table.
Field Value Sequence
1
Name
OV N
Type of Comparison
Compare to Values
-
In the Compare to Values Detail form, enter the values in the following table.
Field Value Object
Transaction
Attribute
Override Price Flag
Condition
Equals
-
Add a new record to the Values list and enter N in the Value field.
-
Add another new record to the Criteria list, and enter the values in the following table.
Field Value Sequence
2
Name
Payment Mode is Pay
Type of Comparison
Compare to Values
-
In the Compare to Values Detail form, enter the values in the following table.
Field Value Object
Transaction
Attribute
Payment Type Code
Condition
Equals
-
Add a new record to the Values list and enter Pay in the Value field.
-
Add another new record to the Criteria list, and enter the values in the following table.
Field Value Sequence
2
Name
Member Tier
Type of Comparison
Compare to Values
-
In the Compare to Values Detail form, enter the values in the following table.
Field Value Object
Member
Attribute
HM Tier Class 1
Condition
Equals
-
Add a new record to the Values list and enter Base in the Value field.
-
Click the Actions view tab.
-
Add a new record to the Actions list, and enter the values in the following table.
Field Value Sequence
1
Name
Amount
Type
Update Attribute
Update this attribute: Object
Transaction
Update this attribute: Attribute
Amount
Update this attribute: Action
Set
With this attribute: Object
Transaction
With this attribute: Attribute
Amount
And/or this value: Operator
Multiply
And/or this value: Value
1
-
Add another new record to the Actions list, and enter the values in the following table.
Field Value Sequence
2
Name
Gift Points Action Type
Type
Invoke Custom Action
Method
GiftPoints
-
Creating the Admin - Availment Promotion
Use this procedure to create the promotion.
To create the Admin - Availment promotion
Navigate to the Loyalty Promotions Administration screen.
Add a new record to the Promotions list, and enter the values in the following table.
Field Value Name
Admin - Availment.
Always Apply
Y.
Apply To
Redemption-Availment.
Admin
Select the Admin check box.
Program
Enter the name of the program.
Partner
Enter the partners for the program.
Product Inclusion
All Products.
Promotion Start
Promotion start date.
Promotion End
Leave this field blank, because you do not want the admin promotion to expire.
Click the Promotion Number (#) field’s hyperlink.
Click the Rules view tab.
-
Create the first rule for this promotion:
-
Add a new record to the Rules list, and enter the values in the following table.
Field Value Sequence
1
Name
Avail Voucher
Apply To
Transactions
-
Click the Name field’s hyperlink.
-
Click the Actions view tab.
-
Add a new record to the Actions list, and enter the values in the following table.
Field Value Sequence
1
Name
Avail Voucher
Type
Invoke Custom Action
Method
AvailVoucher
-
Creating the Admin - Voucher Reissue Promotion
Use this procedure to create the promotion.
To create the Admin - Voucher Reissue promotion
Navigate to the Loyalty Promotions Administration screen.
Add a new record to the Promotions list, and enter the values in the following table.
Field Value Name
Admin - Voucher Reissue.
Always Apply
Y.
Apply To
Voucher Reissue.
Admin
Select the Admin check box.
Program
Enter the name of the program.
Partner
Enter the partners for the program.
Product Inclusion
All Products.
Promotion Start
Enter the promotion start date.
Promotion End
Leave this field blank, because you do not want the admin promotion to expire.
Click the Promotion Number (#) field’s hyperlink.
Click the Rules view tab.
Create the first rule for this promotion:
-
Add a new record to the Rules list, and enter the values in the following table.
Field Value Sequence
1
Name
Override Price Case
Apply To
Transactions
-
Click the Name field’s hyperlink.
-
Add a new record to the Criteria list, and enter the values in the following table.
Field Value Sequence
1
Name
Check Override Flag
Type of Comparison
Compare to Values
-
In the Compare to Values Detail form, enter the values in the following table.
Field Value Object
Transaction
Attribute
Override Price Flag
Condition
Equals
-
Add a new record to the Values list and enter “Y" in the Value field.
-
Add a new record to the Criteria list, and enter the values in the following table.
Field Value Sequence
2
Name
Check Transaction Points
Type of Comparison
Compare to Values
-
In the Compare to Values Detail form, enter the values in the following table.
Field Value Object
Transaction
Attribute
Transaction Points
Condition
Is Greater Than
-
Add a new record to the Values list and enter 0 (zero) in the Value field.
-
Click the Actions view tab.
-
Add a new record to the Actions list, and enter the values in the following table.
Field Value Sequence
1
Name
Redeem Points
Type
Redeem Points
Object
Transaction
Attribute
Transaction Points
-
Add another new record to the Actions list, and enter the values in the following table.
Field Value Sequence
2
Name
Reissue Voucher
Type
Invoke Custom Action
Method
ReissueVoucher
-
Create the second rule for this promotion:
-
In the thread bar, click Promotion:Admin - Voucher Reissue.
-
Add a new record to the Rules list, and enter the values in the following table.
Field Value Sequence
2
Name
Check Points and Reissue Voucher
Rule Applies To
Transactions
-
Click the new rule’s Name hyperlink.
-
Add a new record to the Criteria list, and enter the values in the following table.
Field Value Sequence
1
Name
Check Transaction Points
Type of Comparison
Compare to Values
-
In the Compare to Values Detail form, enter the values in the following table.
Field Value Object
Transaction
Attribute
Transaction Points
Condition
Is Greater Than
-
Add a new record to the Values list and enter 0 (zero) in the Value field.
-
Click the Actions view tab.
-
Add a new record to the Actions list, and enter the values in the following table.
Field Value Sequence
1
Name
Redeem Points
Type
Redeem Points
Point Type
Use From Transaction
Object
Transaction
Attribute
Transaction Points
-
Add another new record to the Actions list, and enter the values in the following table.
Field Value Sequence
2
Name
Reissue Voucher
Type
Invoke Custom Action
Method
ReissueVoucher
-
Create the third rule for this promotion:
-
In the thread bar, click Promotion:Admin - Voucher Reissue.
-
Add a new record to the Rules list, and enter the values in the following table.
Field Value Sequence
3
Name
Reissue Voucher
Rule Applies To
Transactions
-
Click the new rule’s Name hyperlink.
-
Add a new record to the Actions list, and enter the values in the following table.
Field Value Sequence
1
Name
Reissue Voucher
Type
Invoke Custom Action
Method
ReissueVoucher
-
Creating the Admin - Bonus Promotion
Use this procedure to create the promotion.
To create the Admin - Bonus promotion
Navigate to the Loyalty Promotions Administration screen.
Add a new record to the Promotions list, and enter the values in the following table.
Field Value Name
Admin - Bonus.
Always Apply
Y.
Apply To
Accrual Bonus.
Admin
Select the Admin check box.
Program
Enter the name of the program.
Partner
Enter the partners for the program.
Product Inclusion
All Products.
Promotion Start
Enter the promotion start date.
Promotion End
Leave this field blank, because you do not want the admin promotion to expire.
Click the Promotion Number (#) field’s hyperlink.
Click the Rules view tab.
Create the first rule for this promotion:
-
Add a new record to the Rules list, and enter the values in the following table.
Field Value Sequence
1
Name
Assign Points
Apply To
Transactions
-
Click the Name field’s hyperlink.
-
Add a new record to the Criteria list, and enter the values in the following table.
Field Value Sequence
1
Name
Check Product
Type of Comparison
Compare to Values
-
In the Compare to Values Detail form, enter the values in the following table.
Field Value Object
Transaction
Attribute
Product Name
Condition
Equals
-
Add a new record to the Values list and enter Product ID in the Value field.
-
Click the Actions view tab.
-
Add a new record to the Actions list, and enter the values in the following table.
Field Value Sequence
1
Name
Assign Point
Type
Assign Points
Point Type
Use from Transaction
Object
Transaction
Attribute
Transaction Points
-
Creating the Admin - Lounge Purchase Promotion
Use this procedure to create the promotion.
To create the Admin - Lounge Purchase promotion
Navigate to the Loyalty Promotions Administration screen.
Add a new record to the Promotions list, and enter the values in the following table.
Field Value Name
Admin - Lounge Purchase.
Always Apply
Y.
Apply To
Lounge Purchase.
Admin
Select the Admin check box.
Program
Enter the name of the program.
Partner
Enter the partners for the program.
Product Inclusion
All Products.
Promotion Start
Enter the promotion start date.
Promotion End
Leave this field blank, because you do not want the admin promotion to expire.
Click the Promotion Number (#) field’s hyperlink.
Click the Rules view tab.
Create the first rule for this promotion:
-
Add a new record to the Rules list, and enter the values in the following table.
Field Value Sequence
1
Name
Override Payment and Payment Mode are PAY
Apply To
Transactions
-
Click the Name field’s hyperlink.
-
Add a new record to the Criteria list, and enter the values in the following table.
Field Value Sequence
1
Name
Check Overide Flag
Type of Comparison
Compare to Values
-
In the Compare to Values Detail form, enter the values in the following table.
Field Value Object
Transaction
Attribute
Override Price Flag
Condition
Equals
-
Add a new record to the Values list and enter Y in the Value field.
-
Add a new record to the Criteria list, and enter the values in the following table.
Field Value Sequence
2
Name
Check Payment Type
Type of Comparison
Compare to Values
-
In the Compare to Values Detail form, enter the values in the following table.
Field Value Object
Transaction
Attribute
Payment Type Code
Condition
Equals
-
Add a new record to the Values list and enter Pay in the Value field.
-
Click the Actions view tab.
-
Add a new record to the Actions list, and enter the values in the following table.
Field Value Sequence
1
Name
Update Pay
Type
Update Attribute
Object
Transaction
Attribute
Transaction Amount
-
Add another new record to the Actions list, and enter the values in the following table.
Field Value Sequence
2
Name
Lounge Purchase
Type
Invoke Custom Action
Method
LoungePurchase
-
Create the second rule for this promotion:
-
In the thread bar, click Promotion:Admin - Lounge Purchase.
-
Add a new record to the Rules list, and enter the values in the following table.
Field Value Sequence
2
Name
Override Payment and Payment Mode are Points
Rule Applies To
Transactions
-
Click the new rule’s Name hyperlink.
-
Add a new record to the Criteria list, and enter the values in the following table.
Field Value Sequence
1
Name
Check Overide Flag
Type of Comparison
Compare to Values
-
In the Compare to Values Detail form, enter the values in the following table.
Field Value Object
Transaction
Attribute
Override Price Flag
Condition
Equals
-
Add a new record to the Values list and enter Y in the Value field.
-
Add a new record to the Criteria list, and enter the values in the following table.
Field Value Sequence
2
Name
Check Payment Type
Type of Comparison
Compare to Values
-
In the Compare to Values Detail form, enter the values in the following table.
Field Value Object
Transaction
Attribute
Payment Type Code
Condition
Equals
-
Add a new record to the Values list and enter Points in the Value field.
-
Click the Actions view tab.
-
Add a new record to the Actions list, and enter the values in the following table.
Field Value Sequence
1
Name
Update Points
Type
Redeem Points
Object
Transaction
Attribute
Transaction Points
-
Add another new record to the Actions list, and enter the values in the following table.
Field Value Sequence
2
Name
Lounge Purchase
Type
Invoke Custom Action
Method
LoungePurchase
-
Create the third rule for this promotion:
-
In the thread bar, click Promotion:Admin - Lounge Purchase.
-
Add a new record to the Rules list, and enter the values in the following table.
Field Value Sequence
3
Name
Override Payment and Payment Mode are POINTS plus PAY
Rule Applies To
Transactions
-
Click the new rule’s Name hyperlink.
-
Add a new record to the Criteria list, and enter the values in the following table.
Field Value Sequence
1
Name
Check Override Flag
Type of Comparison
Compare to Values
-
In the Compare to Values Detail form, enter the values in the following table.
Field Value Object
Transaction
Attribute
Override Price Flag
Condition
Equals
-
Add a new record to the Values list and enter Y in the Value field.
-
Add a new record to the Criteria list, and enter the values in the following table.
Field Value Sequence
2
Name
Check Payment Type
Type of Comparison
Compare to Values
-
In the Compare to Values Detail form, enter the values in the following table.
Field Value Object
Transaction
Attribute
Payment Type Code
Condition
Equals
-
Add a new record to the Values list and enter Points_Pay in the Value field.
-
Click the Actions view tab.
-
Add a new record to the Actions list, and enter the values in the following table.
Field Value Sequence
2
Name
Update Pay
Type
Update Attribute
Object
Transaction
Attribute
Transaction Amount
-
Add another new record to the Actions list, and enter the values in the following table.
Field Value Sequence
3
Name
Lounge Purchase
Type
Invoke Custom Action
Method
LoungePurchase
-
Create the fourth rule for this promotion:
-
In the thread bar, click Promotion:Admin - Lounge Purchase.
-
Add a new record to the Rules list, and enter the values in the following table.
Field Value Sequence
4
Name
Payment Mode is PAY
Rule Applies To
Transactions
-
Click the new rule’s Name hyperlink.
-
Add a new record to the Criteria list, and enter the values in the following table.
Field Value Sequence
1
Name
Check Payment Type
Type of Comparison
Compare to Values
-
In the Compare to Values Detail form, enter the values in the following table.
Field Value Object
Transaction
Attribute
Payment Type Code
Condition
Equals
-
Add a new record to the Values list and enter PAY in the Value field.
-
Click the Actions view tab.
-
Add a new record to the Actions list, and enter the values in the following table.
Field Value Sequence
1
Name
Update Pay
Type
Update Attribute
Object
Transaction
Attribute
Transaction Amount
-
Add another new record to the Actions list, and enter the values in the following table.
Field Value Sequence
2
Name
Lounge Purchase
Type
Invoke Custom Action
Method
LoungePurchase
-
Create the fifth rule for this promotion:
-
In the thread bar, click Promotion:Admin - Lounge Purchase.
-
Add a new record to the Rules list, and enter the values in the following table.
Field Value Sequence
5
Name
Payment Mode is POINTS
Rule Applies To
Transactions
-
Click the new rule’s Name hyperlink.
-
Add a new record to the Criteria list, and enter the values in the following table.
Field Value Sequence
1
Name
Check Payment Type
Type of Comparison
Compare to Values
-
In the Compare to Values Detail form, enter the values in the following table.
Field Value Object
Transaction
Attribute
Payment Type Code
Condition
Equals
-
Add a new record to the Values list and enter Points in the Value field.
-
Click the Actions view tab.
-
Add a new record to the Actions list, and enter the values in the following table.
Field Value Sequence
1
Name
Update Points
Type
Redeem Points
Object
Transaction
Attribute
Transaction Points
-
Add another new record to the Actions list, and enter the values in the following table.
Field Value Sequence
2
Name
Lounge Purchase
Type
Invoke Custom Action
Method
LoungePurchase
-
Create the sixth rule for this promotion:
-
In the thread bar, click Promotion:Admin - Lounge Purchase.
-
Add a new record to the Rules list, and enter the values in the following table.
Field Value Sequence
6
Name
Payment Mode are POINTS plus PAY
Rule Applies To
Transactions
-
Click the new rule’s Name hyperlink.
-
Add a new record to the Criteria list, and enter the values in the following table.
Field Value Sequence
1
Name
Check Payment Type
Type of Comparison
Compare to Values
-
In the Compare to Values Detail form, enter the values in the following table.
Field Value Object
Transaction
Attribute
Payment Type Code
Condition
Equals
-
Add a new record to the Values list and enter Points_Pay in the Value field.
-
Click the Actions view tab.
-
Add a new record to the Actions list, and enter the values in the following table.
Field Value Sequence
1
Name
Update Points
Type
Redeem Points
Object
Transaction
Attribute
Transaction Points
-
Add a new record to the Actions list, and enter the values in the following table.
Field Value Sequence
2
Name
Update Pay
Type
Update Attribute
Object
Transaction
Attribute
Transaction Amount
-
Add another new record to the Actions list, and enter the values in the following table.
Field Value Sequence
3
Name
Lounge Purchase
Type
Invoke Custom Action
Method
LoungePurchase
-
Creating the Admin - Membership Renewal Promotion
Use this procedure to create the promotion.
To create the Admin - Membership Renewal promotion
Navigate to the Loyalty Promotions Administration screen.
Add a new record to the Promotions list, and enter the values in the following table.
Field Value Name
Admin - Membership Renewal.
Always Apply
Y.
Apply To
Membership Renewal.
Admin
Select the Admin check box.
Program
Enter the name of the program.
Partner
Enter the partners for the program.
Product Inclusion
All Products.
Promotion Start
Enter the promotion start date.
Promotion End
Leave this field blank, because you do not want the admin promotion to expire.
Click the Promotion Number (#) field’s hyperlink.
Click the Rules view tab.
Create the first rule for this promotion:
-
Add a new record to the Rules list, and enter the values in the following table.
Field Value Sequence
1
Name
Overide Payment and Payment Mode are PAY
Apply To
Transactions
-
Click the Name field’s hyperlink.
-
Add a new record to the Criteria list, and enter the values in the following table.
Field Value Sequence
1
Name
Check Override Flag
Type of Comparison
Compare to Values
-
In the Compare to Values Detail form, enter the values in the following table.
Field Value Object
Transaction
Attribute
Overide Price Flag
Condition
Equals
-
Add a new record to the Values list and enter Y in the Value field.
-
Add a new record to the Criteria list, and enter the values in the following table.
Field Value Sequence
1
Name
Check Payment Type
Type of Comparison
Compare to Values
-
In the Compare to Values Detail form, enter the values in the following table.
Field Value Object
Transaction
Attribute
Payment Type Code
Condition
Equals
-
Add a new record to the Values list and enter Pay in the Value field.
-
Click the Actions view tab.
-
Add a new record to the Actions list, and enter the values in the following table.
Field Value Sequence
1
Name
Update Pay
Type
Update Attribute
Object
Transaction
Attribute
Transaction Amount
-
Add another new record to the Actions list, and enter the values in the following table.
Field Value Sequence
2
Name
Membership Renewal
Type
Invoke Custom Action
Method
RenewMember
-
Create the second rule for this promotion:
-
In the thread bar, click Promotion:Admin - Membership Renewal.
-
Add a new record to the Rules list, and enter the values in the following table.
Field Value Sequence
2
Name
Override Payment and Payment Mode are POINTS
Rule Applies To
Transactions
-
Click the new rule’s Name hyperlink.
-
Add a new record to the Criteria list, and enter the values in the following table.
Field Value Sequence
1
Name
Check Override Flag
Type of Comparison
Compare to Values
-
In the Compare to Values Detail form, enter the values in the following table.
Field Value Object
Transaction
Attribute
Override Price Flag
Condition
Equals
-
Add a new record to the Values list and enter Y in the Value field.
-
Add a new record to the Criteria list, and enter the values in the following table.
Field Value Sequence
2
Name
Check Payment Type
Type of Comparison
Compare to Values
-
In the Compare to Values Detail form, enter the values in the following table.
Field Value Object
Transaction
Attribute
Payment Type Code
Condition
Equals
-
Add a new record to the Values list and enter Points in the Value field.
-
Click the Actions view tab.
-
Add a new record to the Actions list, and enter the values in the following table.
Field Value Sequence
1
Name
Update Points
Object
Transaction
Attribute
Transaction Points
-
Click the Actions view tab.
-
Add another new record to the Actions list, and enter the values in the following table.
Field Value Sequence
2
Name
Membership Renewal
Type
Invoke Custom Action
Method
RenewMember
-
Create the third rule for this promotion:
-
In the thread bar, click Promotion:Admin - Membership Renewal.
-
Add a new record to the Rules list, and enter the values in the following table.
Field Value Sequence
1
Name
Override Payment and Payment Mode are POINTS plus PAY
Rule Applies To
Transactions
-
Click the new rule’s Name hyperlink.
-
Add a new record to the Criteria list, and enter the values in the following table.
Field Value Sequence
1
Name
Check Override Flag
Type of Comparison
Compare to Values
-
In the Compare to Values Detail form, enter the values in the following table.
Field Value Object
Transaction
Attribute
Override Price Flag
Condition
Equals
-
Add a new record to the Values list and enter Y in the Value field.
-
Add a new record to the Criteria list, and enter the values in the following table.
Field Value Sequence
2
Name
Check Payment Type
Type of Comparison
Compare to Values
-
In the Compare to Values Detail form, enter the values in the following table.
Field Value Object
Transaction
Attribute
Payment Type Code
Condition
Equals
-
Add a new record to the Values list and enter Points_Pay in the Value field.
-
Click the Actions view tab.
-
Add a new record to the Actions list, and enter the values in the following table.
Field Value Sequence
1
Name
Update Points
Type
Redeem Points
Object
Transaction
Attribute
Transaction Points
-
Click the Actions view tab.
-
Add another new record to the Actions list, and enter the values in the following table.
Field Value Sequence
2
Name
Update Pay
Type
Update Attribute
Object
Transaction
Attribute
Transaction Amount
-
Add another new record to the Actions list, and enter the values in the following table.
Field Value Sequence
3
Name
Membership Renewal
Type
Invoke Custom Action
Method
RenewMember
-
Create the fourth rule for this promotion:
-
In the thread bar, click Promotion:Admin - Membership Renewal.
-
Add a new record to the Rules list, and enter the values in the following table.
Field Value Sequence
4
Name
Payment Mode is PAY
Rule Applies To
Transactions
Click the new rule’s Name hyperlink
.-
Add a new record to the Criteria list, and enter the values in the following table.
Field Value Sequence
1
Name
Check Payment Type
Type of Comparison
Compare to Values
-
In the Compare to Values Detail form, enter the values in the following table.
Field Value Object
Transaction
Attribute
Payment Type Code
Condition
Equals
-
Add a new record to the Values list and enter Pay in the Value field.
-
Click the Actions view tab.
-
Add a new record to the Actions list, and enter the values in the following table.
Field Value Sequence
1
Name
Update Pay
Type
Update Attribute
Object
Transaction
Attribute
Transaction Amount
-
Add another new record to the Actions list, and enter the values in the following table.
Field Value Sequence
2
Name
Membership Renewal
Type
Invoke Custom Action
Method
RenewMember
-
Create the fifth rule for this promotion:
-
In the thread bar, click Promotion:Admin - Membership Renewal.
-
Add a new record to the Rules list, and enter the values in the following table.
Field Value Sequence
5
Name
Payment Mode is POINTS
Rule Applies To
Transactions
-
Click the new rule’s Name hyperlink.
-
Add a new record to the Criteria list, and enter the values in the following table.
Field Value Sequence
1
Name
Check Payment Type
Type of Comparison
Compare to Values
-
In the Compare to Values Detail form, enter the values in the following table.
Field Value Object
Transaction
Attribute
Payment Type Code
Condition
Equals
-
Add a new record to the Values list and enter Points in the Value field.
-
Click the Actions view tab.
-
Add a new record to the Actions list, and enter the values in the following table.
Field Value Sequence
1
Name
Update Points
Type
Redeem Points
Object
Transaction
Attribute
Transaction Points
-
Add another new record to the Actions list, and enter the values in the following table.
Field Value Sequence
2
Name
Membership Renewal
Type
Invoke Custom Action
Method
RenewMember
-
Create the sixth rule for this promotion:
-
In the thread bar, click Promotion:Admin - Membership Renewal.
-
Add a new record to the Rules list, and enter the values in the following table.
Field Value Sequence
6
Name
Payment Mode is POINTS plus PAY
Rule Applies To
Transactions
-
Click the new rule’s Name hyperlink.
-
Add a new record to the Criteria list, and enter the values in the following table.
Field Value Sequence
1
Name
Check Payment Type
Type of Comparison
Compare to Values
-
In the Compare to Values Detail form, enter the values in the following table.
Field Value Object
Transaction
Attribute
Payment Type Code
Condition
Equals
-
Add a new record to the Values list and enter Points_Pay in the Value field.
-
Click the Actions view tab.
-
Add a new record to the Actions list, and enter the values in the following table.
Field Value Sequence
1
Name
Update Points
Type
Redeem Points
Object
Transaction
Attribute
Transaction Points
-
Add another new record to the Actions list, and enter the values in the following table.
Field Value Sequence
2
Name
Update Pay
Type
Update Attribute
Object
Transaction
Attribute
Transaction Amount
-
Add another new record to the Actions list, and enter the values in the following table.
Field Value Sequence
3
Name
Membership Renewal
Type
Invoke Custom Action
Method
RenewMember
-
Creating the Admin - Member Enrollment Promotion
This promotion allows members to enroll in programs. Use this procedure to create the promotion.
To create the Admin - Enrollment promotion
Navigate to the Loyalty Promotions Administration screen.
Add a new record to the Promotions list, and enter the values in the following table.
Field Value Name
Admin - Enrollment.
Always Apply
Y.
Apply To
Enrollment.
Admin
Select the Admin check box.
Program
Enter the name of the program.
Partner
Enter the partners for the program.
Product Inclusion
All Products.
Promotion Start
Enter the promotion start date.
Promotion End
Leave this field blank, because you do not want the admin promotion to expire.
Click the Promotion Number (#) field’s hyperlink.
Click the Rules view tab.
Create the first rule for this promotion:
-
Add a new record to the Rules list, and enter the values in the following table.
Field Value Sequence
1
Name
Payment Mode is PAY
Apply To
Transactions
-
Click the Name field’s hyperlink.
-
Add a new record to the Criteria list, and enter the values in the following table.
Field Value Sequence
1
Name
Check Payment Type
Type of Comparison
Compare to Values
-
In the Compare to Values Detail form, enter the values in the following table.
Field Value Object
Transaction
Attribute
Payment Type Code
Condition
Equals
-
Add a new record to the Values list and enter Pay in the Value field.
-
Click the Actions view tab.
-
Add a new record to the Actions list, and enter the values in the following table.
Field Value Sequence
1
Name
Update Pay
Type
Update Attribute
Object
Transaction Amount
-
Creating the Admin - Manual Credit Promotion
Use this procedure to create the promotion.
To create the Admin - Manual Credit promotion
Navigate to the Loyalty Promotions Administration screen.
Add a new record to the Promotions list, and enter the values in the following table.
Field Value Name
Admin - Manual Credit.
Always Apply
Y.
Apply To
Manual Credit.
Admin
Select the Admin check box.
Program
Enter the name of the program.
Partner
Enter the partners for the program.
Product Inclusion
All Products.
Promotion Start
Enter the promotion start date.
Promotion End
Leave this field blank, because you do not want the admin promotion to expire.
Click the Promotion Number (#) field’s hyperlink.
Click the Rules view tab.
Create the first rule for this promotion:
-
Add a new record to the Rules list, and enter the values in the following table.
Field Value Sequence
1
Name
Enter the name of the rule.
Apply To
Transactions
-
Click the Name field’s hyperlink.
-
Click the Actions view tab.
-
Add a new record to the Actions list, and enter the values in the following table.
Field Value Sequence
1
Name
Give Points
Type
Assign Points
Point Type
Use from Transaction
Object
Transaction
Attribute
Transaction Points
-
Creating the Admin - Manual Debit Promotion
Use this procedure to create the promotion.
To create the Admin - Manual Debit promotion
Navigate to the Loyalty Promotions Administration screen.
Add a new record to the Promotions list, and enter the values in the following table.
Field Value Name
Admin - Manual Debit.
Always Apply
Y.
Apply To
Manual Debit.
Admin
Select the Admin check box.
Program
Enter the name of the program.
Partner
Enter the partners for the program.
Product Inclusion
All Products.
Promotion Start
Enter the promotion start date.
Promotion End
Leave this field blank, because you do not want the admin promotion to expire.
Click the Promotion Number (#) field’s hyperlink.
Click the Rules view tab.
Create the first rule for this promotion:
-
Add a new record to the Rules list, and enter the values in the following table.
Field Value Sequence
1
Name
Enter the name of the rule.
Apply To
Transactions
-
Click the Name field’s hyperlink.
-
Click the Actions view tab.
-
Add a new record to the Actions list, and enter the values in the following table.
Field Value Sequence
1
Name
Redeem Points
Type
Redeem Points
Point Type
Use from Transaction
Object
Transaction
Attribute
Transaction Points
-
Creating the Admin - Promotion Enrollment Promotion
Use this procedure to create the promotion.
To create the Admin - Promotion Enrollment promotion
Navigate to the Loyalty Promotions Administration screen.
Add a new record to the Promotions list, and enter the values in the following table.
Field Value Name
Promotion Enrollment.
Always Apply
N.
Apply To
Promotion Enrollment.
Admin
Select this checkbox.
Program
Enter the name of the program.
Partner
Enter the name of the partner.
Product Inclusion
All Products.
Point Limit Type
Unlimited.
Promotion Start
Enter one day before today's date.
Promotion End
Leave this field blank, because you do not want the admin promotion to expire.
Click the Promotion Number (#) field’s hyperlink.
Click the Rules view tab.
Create the first rule for this promotion:
-
Add a new record to the Rules list, and enter the values in the following table.
Field Value Sequence
1
Name
Override Payment & Payment Mode are Pay for (include Promotion name here)
Apply To
Transactions
-
Click the Criteria view tab.
-
Add a new record to the Criteria list, and enter the values in the following table.
Field Value Sequence
1
Name
Check Payment Mode
Type
Compare to Values
-
In the Compare to Values Detail form, enter the values in the following table.
Field Value Object
Transaction
Attribute
Payment Type Code
Condition
Equals
-
Add a new record to the Values list and enter Pay in the Value field.
-
Add another new record to the Criteria list, and enter the values in the following table.
Field Value Sequence
2
Name
Check Override Price Flag
Type
Compare to Values
-
In the Compare to Values Detail form, enter the values in the following table.
Field Value Object
Transaction
Attribute
Override Price Flag
Condition
Equals
-
Add a new record to the Values list and enter Y in the Value field.
-
Add another new record to the Criteria list, and enter the values in the following table.
Field Value Sequence
3
Name
Enroll Promotion
Type
Compare to Values
-
In the Compare to Values Detail form, enter the values in the following table.
Field Value Object
Transaction
Attribute
Enrolled Promotion Id
Condition
Equals
-
Add a new record to the Values list and enter the enrolled promotion Id in the Value field.
Note: You can display the enrolled promotion Id by pressing Ctrl-Alt-K while highlighting the promotion in Promotions view. -
Click the Actions view tab.
-
Add a new record to the Actions list, and enter the values in the following table.
Field Value Sequence
1
Name
Update Amount.
Type
Update Attribute.
Update this attribute: Object
Transaction.
Update this attribute: Attribute
Amount.
Update this attribute: Action
Set.
With this attribute: Object
Transaction.
With this attribute: Attribute
Amount.
And/Or this value
Leave this section blank.
-
Add another new record to the Actions list, and enter the values in the following table.
Field Value Sequence
2
Name
Enroll to Promotion
Type
Promotion Enrollment
Note: No additional detail is needed for this action. -
Add another new record to the Actions list, and enter the values in the following table.
Field Value Sequence
3
Name
Update Incentive choice.
Type
Update Attribute.
Update this attribute: Object
Member.
Update this attribute: Attribute
Select the Member attribute for the incentive choice. There are as many member attributes for incentive choices as the number of promotions that require enrollment. You must select the Member attribute for the incentive choice that contains the promotion number for the current promotion.
Update this attribute: Action
Set.
With this attribute: Object
Transaction.
With this attribute: Attribute
Select the Transaction attribute for the Promotion Incentive Choice.
And/Or this value
Leave this section blank.
-
Click the Rules view tab.
Create the second rule for this promotion:
-
Add a new record to the Rules list, and enter the values in the following table.
Field Value Sequence
2
Name
Override payment & Payment mode are Points
Apply To
Transactions
-
Click the Criteria view tab.
-
Add a new record to the Criteria list, and enter the values in the following table.
Field Value Sequence
1
Name
Check Payment mode
Type
Compare to Values
-
In the Compare to Values Detail form, enter the values in the following table.
Field Value Object
Transaction
Attribute
Payment Type Code
Condition
Equals
-
Add a new record to the Values list and enter Points in the Value field.
-
Add a new record to the Criteria list, and enter the values in the following table.
Field Value Sequence
2
Name
Check Override Flag
Type
Compare to Values
-
In the Compare to Values Detail form, enter the values in the following table.
Field Value Object
Transaction
Attribute
Override Price Flag
Condition
Equals
-
Add a new record to the Values list and enter Y in the Value field.
-
Add a new record to the Criteria list, and enter the values in the following table.
Field Value Sequence
3
Name
Enroll Promotion
Type
Compare to Values
-
In the Compare to Values Detail form, enter the values in the following table.
Field Value Object
Transaction
Attribute
Enrolled Promotion Id
Condition
Equals
-
Add a new record to the Values list and enter the enrolled promotion Id in the Value field.
-
Click the Actions view tab.
-
Add another new record to the Actions list, and enter the values in the following table.
Field Value Sequence
1
Name
Enroll to Promotion
Type
Promotion Enrollment
Note: No additional detail is needed for this action. -
Add another new record to the Actions list, and enter the values in the following table.
Field Value Sequence
2
Name
Redeem Points.
Type
Redeem Points.
Point Type: Use From Transaction
Select this checkbox.
Point Type: Point Type
Leave this field blank.
From this attribute: Object
Transaction.
From this attribute: Attribute
Transaction Points.
And/Or this value
Leave this section blank.
-
Add another new record to the Actions list, and enter the values in the following table.
Field Value Sequence
3
Name
Update Incentive Choice.
Type
Update Attribute.
Update this Attribute: Object
Member.
Update this attribute: Attribute
Select the Member attribute for the incentive choice. There are as many member attributes for incentive choices as the number of promotions that require enrollment. You must select the Member attribute for the incentive choice that contains the promotion number for the current promotion.
Update this attribute: Action
Set.
With this attribute: Object
Transaction.
With this attribute: Attribute
Select the Transaction attribute for the Promotion Incentive Choice.
And/Or this value
Leave this section blank.
-
Click the Rules view tab.
Create the third rule for this promotion:
-
Add a new record to the Rules list, and enter the values in the following table.
Field Value Sequence
3
Name
Override payment & Payment mode are Points plus Pay
Apply To
Transactions
-
Click the Criteria view tab.
-
Add a new record to the Criteria list, and enter the values in the following table.
Field Value Sequence
1
Name
Check Payment Mode
Type
Compare to Values
-
In the Compare to Values Detail form, enter the values in the following table.
Field Value Object
Transaction
Attribute
Payment Type Code
Condition
Equals
-
Add a new record to the Values list and enter Points plus (+) Pay in the Value field.
-
Add a new record to the Criteria list, and enter the values in the following table.
Field Value Sequence
2
Name
Check Override Flag
Type
Compare to Values
-
In the Compare to Values Detail form, enter the values in the following table.
Field Value Object
Transaction
Attribute
Override Price Flag
Condition
Equals
-
Add a new record to the Values list and enter Y in the Value field.
-
Add a new record to the Criteria list, and enter the values in the following table.
Field Value Sequence
3
Name
Enroll Promotion
Type
Compare to Values
-
In the Compare to Values Detail form, enter the values in the following table.
Field Value Object
Transaction
Attribute
Enrolled Promotion Id
Condition
Equals
-
Add a new record to the Values list and enter the enrolled promotion Id in the Value field.
-
Click the Actions view tab.
-
Add a new record to the Actions list, and enter the values in the following table.
Field Value Sequence
1
Name
Update Amount.
Type
Update Attribute.
Update this attribute: Object
Transaction.
Update this attribute: Attribute
Amount.
Update this attribute: Action
Set.
With this attribute: Object
Transaction.
With this attribute: Attribute
Amount.
And/Or this value
Leave this section blank.
-
Add another new record to the Actions list, and enter the values in the following table.
Field Value Sequence
2
Name
Enroll to Promotion
Type
Promotion Enrollment
Note: No additional detail is needed for this action. -
Add another new record to the Actions list, and enter the values in the following table.
Field Value Sequence
3
Name
Redeem Points.
Type
Redeem Points.
Point Type: Use From Transaction
Select this checkbox.
Point Type: Point Type
Leave this field blank.
From this attribute: Object
Transaction.
From this attribute: Attribute
Transaction Points.
And/Or this value
Leave this section blank.
-
Add another new record to the Actions list, and enter the values in the following table.
Field Value Sequence
4.
Name
Update Incentive choice.
Type
Update Attribute.
Update this attribute: Object
Member.
Update this attribute: Attribute
Select the Member attribute for the incentive choice. There are as many member attributes for incentive choices as the number of promotions that require enrollment. You must select the Member attribute for the incentive choice that contains the promotion number for the current promotion.
Update this attribute: Action
Set.
With this attribute: Object
Transaction.
With this attribute: Attribute
Select the Transaction attribute for the Promotion Incentive Choice.
And/Or this value
Leave this section blank.
-
Click the Rules view tab.
Create the fourth rule for this promotion:
-
Add a new record to the Rules list, and enter the values in the following table.
Field Value Sequence
4
Name
Payment Mode is Pay
Apply To
Transactions
-
Click the Criteria view tab.
-
Add a new record to the Criteria list, and enter the values in the following table.
Field Value Sequence
1
Name
Check Payment Mode
Type
Compare to Values
-
In the Compare to Values Detail form, enter the values in the following table.
Field Value Object
Transaction
Attribute
Payment Type Code
Condition
Equals
-
Add a new record to the Values list and enter Pay in the Value field.
-
Add a new record to the Criteria list, and enter the values in the following table.
Field Value Sequence
2
Name
No override
Type
Compare to Values
-
In the Compare to Values Detail form, enter the values in the following table.
Field Value Object
Transaction
Attribute
Override Price Flag
Condition
Equals
-
Add a new record to the Values list and enter N in the Value field.
-
Add a new record to the Criteria list, and enter the values in the following table.
Field Value Sequence
3
Name
Enroll Promotion
Type
Compare to Values
-
In the Compare to Values Detail form, enter the values in the following table.
Field Value Object
Transaction
Attribute
Enrolled Promotion Id
Condition
Equals
-
Add a new record to the Values list and enter the enrolled promotion Id in the Value field.
-
Click the Actions view tab.
-
Add a new record to the Actions list, and enter the values in the following table.
Field Value Sequence
1.
Name
Update Amount.
Type
Update Attribute.
Update this attribute: Object
Transaction.
Update this attribute: Attribute
Amount.
Update this attribute: Action
Set.
With this attribute: Object
Transaction.
With this attribute: Attribute
Amount.
And/Or this value
Leave this section blank.
-
Add another new record to the Actions list, and enter the values in the following table.
Field Value Sequence
2
Name
Enroll to Promotion
Type
Promotion Enrollment
Note: No additional detail is needed for this action. -
Add another new record to the Actions list, and enter the values in the following table.
Field Value Sequence
3.
Name
Update Incentive Choice.
Type
Update Attribute.
Update this attribute: Object
Member.
Update this attribute: Attribute
Select the Member attribute for the incentive choice. There are as many member attributes for incentive choices as the number of promotions that require enrollment. You must select the Member attribute for the incentive choice that contains the promotion number for the current promotion.
Update this attribute: Action
Set.
With this attribute: Object
Transaction.
With this attribute: Attribute
Select the Transaction attribute for the Promotion Incentive Choice.
And/Or this value
Leave this section blank.
-
Click the Rules view tab.
Create the fifth rule for this promotion:
-
Add a new record to the Rules list, and enter the values in the following table.
Field Value Sequence
5
Name
Payment mode is Points
Apply To
Transactions
-
Click the Criteria view tab.
-
Add a new record to the Criteria list, and enter the values in the following table.
Field Value Sequence
1
Name
Check Payment mode
Type
Compare to Values
-
In the Compare to Values Detail form, enter the values in the following table.
Field Value Object
Transaction
Attribute
Payment Type Code
Condition
Equals
-
Add a new record to the Values list and enter Points in the Value field.
-
Add another new record to the Criteria list, and enter the values in the following table.
Field Value Sequence
2
Name
No Override
Type
Compare to Values
-
In the Compare to Values Detail form, enter the values in the following table.
Field Value Object
Transaction
Attribute
Override Price Flag
Condition
Equals
-
Add a new record to the Values list and enter N in the Value field.
-
Add another new record to the Criteria list, and enter the values in the following table.
Field Value Sequence
3
Name
Enroll Promotion
Type
Compare to Values
-
In the Compare to Values Detail form, enter the values in the following table.
Field Value Object
Transaction
Attribute
Enrolled Promotion Id
Condition
Equals
-
Add a new record to the Values list and enter the enrolled promotion Id in the Value field.
-
Click the Actions view tab.
-
Add a new record to the Actions list, and enter the values in the following table.
Field Value Sequence
1
Name
Enroll to Promotion
Type
Promotion Enrollment
Note: No additional detail is needed for this action. -
Add another new record to the Actions list, and enter the values in the following table.
Field Value Sequence
2.
Name
Redeem Points.
Type
Redeem Points.
Point Type: Use From Transaction
Select this checkbox.
Point Type: Point Type
Leave this field blank.
From this attribute: Object
Transaction.
From this attribute: Attribute
Transaction Points.
And/Or this value: Value
Leave this section blank.
-
Add another new record to the Actions list, and enter the values in the following table.
Field Value Sequence
3.
Name
Update Incentive Choice.
Type
Update Attribute.
Update this attribute: Object
Member.
Update this attribute: Attribute
Select the Member attribute for the incentive choice. There are as many member attributes for incentive choices as the number of promotions that require enrollment. You must select the Member attribute for the incentive choice that contains the promotion number for the current promotion.
Update this attribute: Action
Set.
With this attribute: Object
Transaction.
With this attribute: Attribute
Select the Transaction attribute for the Promotion Incentive Choice.
And/Or this value
Leave this section blank.
-
Click the Rules view tab.
Create the sixth rule for this promotion:
-
Add a new record to the Rules list, and enter the values in the following table.
Field Value Sequence
6
Name
Payment mode is Points plus Pay
Apply To
Transactions
-
Click the Criteria view tab.
-
Add a new record to the Criteria list, and enter the values in the following table.
Field Value Sequence
1
Name
Check Payment Mode
Type
Compare to Values
-
In the Compare to Values Detail form, enter the values in the following table.
Field Value Object
Transaction
Attribute
Payment Type Code
Condition
Equals
-
Add a new record to the Values list and enter Points plus (+) Pay in the Value field.
-
Add a new record to the Criteria list, and enter the values in the following table.
Field Value Sequence
2
Name
No override
Type
Compare to Values
-
In the Compare to Values Detail form, enter the values in the following table.
Field Value Object
Transaction
Attribute
Override Price Flag
Condition
Equals
-
Add a new record to the Values list and enter N in the Value field.
-
Add another new record to the Criteria list, and enter the values in the following table.
Field Value Sequence
3
Name
Enroll Promotion
Type
Compare to Values
-
In the Compare to Values Detail form, enter the values in the following table.
Field Value Object
Transaction
Attribute
Enrolled Promotion Id
Condition
Equals
-
Add a new record to the Values list and enter the enrolled promotion Id in the Value field.
-
Click the Actions view tab.
-
Add a new record to the Actions list, and enter the values in the following table.
Field Value Sequence
1.
Name
Update Amount.
Type
Update Attribute.
Update this attribute: Object
Transaction.
Update this attribute: Attribute
Amount.
Update this attribute: Action
Set.
With this attribute: Object
Transaction.
With this attribute: Attribute
Amount.
And/Or this value
Leave this section blank.
-
Add another new record to the Actions list, and enter the values in the following table.
Field Value Sequence
2
Name
Enroll to Promotion
Type
Promotion Enrollment
Note: No additional detail is needed for this action. -
Add another new record to the Actions list, and enter the values in the following table.
Field Value Sequence
3.
Name
Redeem Points.
Type
Redeem Points.
Point Type: Use From Transaction
Select this checkbox.
Point Type: Point Type
Leave this field blank.
From this attribute: Object
Transaction.
From this attribute: Attribute
Transaction Points.
And/Or this value
Leave this section blank.
-
Add another new record to the Actions list, and enter the values in the following table.
Field Value Sequence
3.
Name
Update Incentive Choice.
Type
Update Attribute.
Update this attribute: Object
Member.
Update this attribute: Attribute
Select the Member attribute for the incentive choice. There are as many member attributes for incentive choices as the number of promotions that require enrollment. You must select the Member attribute for the incentive choice that contains the promotion number for the current promotion.
Update this attribute: Action
Set.
With this attribute: Object
Transaction.
With this attribute: Attribute
Select the Transaction attribute for the Promotion Incentive Choice.
And/Or this value
Leave this section blank.
-
Creating the Admin - Points Reactivation Promotion
Use this procedure to create the promotion.
To create the Admin - Points Reactivation promotion
Navigate to the Loyalty Promotions Administration screen.
Add a new record to the Promotions list, and enter the values in the following table.
Field Value Name
Points Reactivation.
Always Apply
N.
Apply To
Reactivation.
Admin
Select the Admin checkbox.
Program
Enter the name of the program.
Partner
Enter the name of the partner.
Product Inclusion
All Products.
Point Limit Type
Unlimited.
Promotion Start
Enter one day before today's date.
Promotion End
Leave this field blank.
Click the Promotion Number (#) field’s hyperlink.
Click the Rules view tab.
-
Create the first rule for this promotion:
-
Add a new record to the Rules list, and enter the values in the following table.
Field Value Sequence
1
Name
Pay without override
Apply To
Transactions
-
Click the Criteria view tab.
-
Add a new record to the Criteria list, and enter the values in the following table.
Field Value Sequence
1
Name
Override flag is N
Type
Compare to Values
-
In the Compare to Values Detail form, enter the values in the following table.
Field Value Object
Transaction
Attribute
Override Price Flag
Condition
Equals
-
Add a new record to the Values list and enter N in the Value field.
-
Click the Actions view tab.
-
Add a new record to the Actions list, and enter the values in the following table.
Field Value Sequence
1
Name
Update Amount
Type
Update Attribute.
Update this attribute: Object
Transaction.
Update this attribute: Attribute
Amount.
Update this attribute: Action
Set.
With this attribute: Object
Transaction.
With this attribute: Attribute
Amount.
And/Or this value
Leave this section blank.
-
Add another new record to the Actions list, and enter the values in the following table.
Field Value Sequence
2
Name
Reactivate Points
Type
Points Reactivation
Note: No additional detail is needed for this action.
-
Create the second rule for this promotion:
-
Add a new record to the Rules list, and enter the values in the following table.
Field Value Sequence
2
Name
Pay with override
Apply To
Transactions
-
Click the Name field’s hyperlink.
-
Click the Criteria view tab.
-
Add a new record to the Criteria list, and enter the values in the following table.
Field Value Sequence
1
Name
Override flag is y
Type
Compare to Values
-
In the Compare to Values Detail form, enter the values in the following table.
Field Value Object
Transaction
Attribute
Override Price Flag
Condition
Equals
-
Add a new record to the Values list and enter Y in the Value field.
-
Click the Actions view tab.
-
Add a new record to the Actions list, and enter the values in the following table.
Field Value Sequence
1.
Name
Update Amount.
Type
Update Attribute.
Update this attribute: Object
Transaction.
Update this attribute: Attribute
Amount.
Update this attribute: Action
Set.
With this attribute: Object
Transaction.
With this attribute: Attribute
Amount.
And/Or this value
Leave this section blank.
-
Add another new record to the Actions list, and enter the values in the following table.
Field Value Sequence
2
Name
Reactivate Points
Type
Points Reactivation
Note: No additional detail is needed for this action.-
Activating the Admin Promotions
Use this procedure to activate the promotions.
To activate the admin promotions
Navigate to the Loyalty Promotions Administration screen.
Select the promotions with the following names:
Admin - Accruals
Admin - Cancellation
Admin - Gift
Admin - Loan
Admin - Point Transfer
Admin - Redemptions
Admin - Voucher
Admin - Points Purchase
Admin - Transfer Points
Admin - Gift Points
Admin - Availment
Admin - Voucher Reissue
Admin - Bonus
Admin - Lounge Purchase
Admin - Membership Renewal
Admin - Enrollment
Admin - Manual Credit
Admin - Debit
Admin - Promotion Enrolment
Admin - Reactivating Points
Click Activate.
Modifying Loyalty Programs
Before you can modify a Loyalty Program, you must deactivate it.
To modify a loyalty program
Navigate to the Loyalty Program Administration screen, Programs view.
In the Programs list, in the record for the program you want to modify, clear the Active check box.
Modify the program as needed, using the same methods described in Process of Setting Up Loyalty Programs.
When you have made all needed changes, select the Active check box to activate the program again.
Click Update Cache.
About Tier Promotions
You must create tier promotions when you set up a loyalty program with tiers. Tier promotions place members in the appropriate tier, based on attributes or on the number of points they have.
The following examples assume that you have already set up a loyalty program with appropriate tiers. When you created these tiers, the Siebel Loyalty application automatically created the tier promotion record for them. For more information about creating tiers, see Defining Tier Classes and Tiers.
Tier promotions can use tier assessment models to specify the period of time used to assess a member’s activities and determine whether or not a member is eligible for a tier change at the specified time.
Though it is possible for tier promotions to use tier assessment models to determine the qualifying period, it is also possible to use the older form of tier promotion that does not use tier assessment models.
The following topics include information about how to create tier promotions that use different tier assessment models and about how to create tier promotions that do not use tier assessment models:
Example of Creating an Anniversary Based Tier Assessment Model
Example of Creating a Fixed Date Based Tier Assessment Model
Example of Creating a Rolling Period Based Tier Assessment Model
Example of Creating Tier Promotions without Tier Assessment Models
-
Note: Retroactive tier processing is not supported for the tier assessment models introduced in Siebel CRM 8.1, that is, the Anniversary Date, Fixed Date, and Rolling Period models. Retroactive tier processing is supported only for the older form of tier assessment models introduced in Siebel CRM version 8.0 and earlier releases.
About Tier Assessment Processes and Models
Members of loyalty programs earn qualifying and nonqualifying points based on their activities. Members can qualify for tier statuses, such as Silver Member, Gold Member, or Platinum Member, by earning a specified number of qualifying points in a specified time.
Tier Assessment is a process that assesses member’s activities during a given qualifying period of time and determines whether or not a member is eligible for a tier change.
Tier assessment can be based on the following models:
Anniversary. In this model, the qualifying period starts on the date that a member joins the loyalty program. The member’s point balance is always reset to zero every year on the membership anniversary date.
Fixed date. In this model, the qualifying period starts on a fixed date each year for all loyalty program members. The tier end dates are also fixed for all members. The balance of all the members in the loyalty program is reset to zero at the end of the qualifying period.
Rolling period. In this model, the qualifying period of a member starts when the member enrolls into the program. The member is not assigned a qualifying period length. Once a member attains a higher tier, the member’s tier is effective for a specified period from the date of attaining the new tier even if the rolling balance is not sufficient for the member to remain in the current tier. The member’s point balance is never reset to zero in this model. Rather, the balance is calculated based on the past qualifying period.
Relationship Tier Assessment. In this model, the relative of a member changes tiers when the member attains a specific tier. For example, if a member attains a Platinum Tier, then the member’s relative automatically receives a Gold Tier.
Example of Creating an Anniversary Based Tier Assessment Model
You can create an anniversary based tier assessment model. In this model, the qualifying period starts on the date that a member joins the loyalty program. The member’s point balance is always reset to zero every year on the membership anniversary date.
When you are creating an anniversary based tier assessment model, consider the following:
All rules defined for this model are based on the current qualifying period balance and other member attributes.
During the tier period, a member is allowed to upgrade to another tier. However, when the tier expires, the member can either remain in the same tier or be downgraded to another tier.
Member’s balances are reset only on a member’s anniversary date.
For member assessment purposes, point type balances are derived from the current active tier of the tier class.
The new tier end date is always aligned with the enrollment date and takes into account the minimum tier length setup defined at the Tier Class level. The New Tier Start date is always the same as the tier change date.
The qualifying period end date is maintained at the member’s tier level in order to identify which qualifying period the current member’s balance belongs to. This value is calculated based on attributes defined at the Tier Class level.
To create an anniversary based tier assessment model
Navigate to the Loyalty Program Administration screen.
In the Loyalty Programs list, select the program that the tiers are used by and click its Program Id hyperlink.
Click the Tier Classes view tab.
Add a new record to the Tier Classes list and complete the necessary fields. Some fields are described in the following table.
Field Description Sequence
Enter a number indicating how high the status of this tier class is compared with other tier classes. For example, a frequent flyer program might include standard set to 1, business class set to 2, first class set to 3.
Primary Tier Name
Select the lowest tier in this tier class, which is the tier that members are in when they first enroll. This value can only be specified after the tiers have been created for this class, and it must be specified before activating the tier class.
Start Qual Period
Select Enrollment Date/Anniversary Date for the Start Qual Period.
Restart Qual Period
Select when the length of time for the new qualifying period starts after a tier status change.
Qualifying Period Expiration. The length of time for the new qualifying period starts at the expiration of the current qualifying period. For example, the qualifying period for a member to qualify for the Gold tier ended on December 31, 2003, the member actually qualified for the Gold tier on August 17, 2003, and the length of time to qualify for Platinum tier is one year. Then the member has from August 17, 2003 until December 31, 2004 to qualify for the Platinum tier.
Start Tier Period
Select Enrollment/Anniversary Date for the Start Tier Period.
Min Tier Length and Min Tier Length Period
Enter the length and unit of measurement for this tier. For example, if the qualifying period is six months, then length is 6 and Period is Month.
Assessment Schedule Date
Enter the day and month to schedule a tier assessment for a tier class.
Recurring Period
Select how frequently the assessment schedule is repeated.
Options are:
Monthly
- Yearly
Note: The following steps are examples of some tier assessment rules.Create a new rule for this Tier.
-
In the Rules list, add a new record and enter the values in the following table.
Field Value Sequence
1
Name
Upgrade Rule
Apply To
Tiers
-
Click the Rule Name.
-
To create the first criterion, add a new record in the Criteria list, then complete the necessary fields in the Criteria list and the Compare to Values Details and Values forms, as shown in the following table.
Field Value Sequence
1
Name
Current QP Balance > 150000
Type of Comparison
Compare to Values
Object
Member Tier
Attribute
Points
Condition
Is Greater Than
Value
150000
-
Click the Actions view tab, then add a new record in the Actions list and complete the necessary fields in the Actions list and form as shown in the following table.
Field Value Sequence
1
Name
Upgrade Tier
Type
Upgrade Tier
New Tier
Enter the name of the new tier after the upgrade.
-
To create the second criterion, add a new record in the Criteria list, then complete the necessary fields in the Criteria list and the Compare to Values Details form and the Values form, as shown in the following table.
Field Value Sequence
2
Name
Is Expired
Type of Comparison
Compare to Values
Object
Member Tier
Attribute
Is Expired
Condition
Equals
Value
N
-
Click the Actions view tab and add a new record in the Actions list, then complete the necessary fields in the Actions list and form as shown in the following table.
Field Value Sequence
2
Name
Upgrade Tier
Type
Upgrade Tier
New Tier
Enter the name of the new tier after the upgrade.
-
Create another rule for this Tier.
-
In the Rules list, add a new record and enter the values in the following table.
Field Value Sequence
3
Name
Retain Rule
Apply To
Tiers
-
Click the Rule Name.
-
To create the first criterion, add a new record in the Criteria list, then complete the necessary fields in the Criteria list and the Compare to Values Details and Values forms, as shown in the following table.
Field Value Sequence
1
Name
Current QP Balance > 25000
Type of Comparison
Compare to Values
Object
Member Tier
Attribute
Points
Condition
Is Greater Than
Value
25000
-
Click the Actions view tab, add a new record in the Actions list, then complete the necessary fields in the Actions list and form as shown in the following table.
Field Value Sequence
1
Name
Requalify
Type
Requalify
-
To create the second criterion, add a new record in the Criteria list, then complete the necessary fields in the Criteria list and the Compare to Values Details and Values forms, as shown in the following table.
Field Value Sequence
2
Name
Is Expired
Type of Comparison
Compare to Values
Object
Member Tier
Attribute
Is Expired
Condition
Equals
Value
Y
-
Click the Actions view tab and add a new record in the Actions list, then complete the necessary fields in the Actions list and form as shown in the following table.
Field Value Sequence
2
Name
Requalify
Type
Requalify
-
Create another rule for this Tier.
-
In the Rules list, add a new record and enter the values in the following table.
Field Value Sequence
3
Name
Downgrade Rule
Apply To
Tiers
-
Click the Rule Name.
-
To create the first criterion, add a new record in the Criteria list, then complete the necessary fields in the Criteria list and the Compare to Values Details and Values forms, as shown in the following table.
Field Value Sequence
1
Name
Current QP Balance < 25000
Type of Comparison
Compare to Values
Object
Member Tier
Attribute
Points
Condition
Is Less Than
Value
25000
-
Click the Actions view tab and add a new record in the Actions list, tjem complete the necessary fields in the Actions list and form as shown in the following table.
Field Value Sequence
1
Name
Downgrade
Type
Downgrade
New Tier
Enter the name of the new tier after the downgrade.
-
To create the second criterion, add a new record in the Criteria list, then complete the necessary fields in the Criteria list and the Compare to Values Details and Values forms, as shown in the following table.
Field Value Sequence
2
Name
Is Expired
Type of Comparison
Compare to Values
Object
Member Tier
Attribute
Is Expired
Condition
Equals
Value
Y
-
Click the Actions view tab and add a new record in the Actions list, then complete the necessary fields in the Actions list and form as shown in the following table.
Field Value Sequence
2
Name
Downgrade
Type
Downgrade
New Tier
Enter the name of the new tier after the downgrade.
-
Example of Creating a Fixed Date Based Tier Assessment Model
You can create a fixed date based tier assessment model. In this model, the qualifying period starts on a fixed date each year for all loyalty program members. The tier end dates are also fixed for all members. The balance of all the members in the loyalty program is reset to zero at the end of the qualifying period.
When you are creating a fixed date based tier assessment model, consider the following:
Upgrade rules are based on current qualifying period balances, while other rules are based on the last qualifying period balances.
While a tier is valid, a member can be either upgraded or assessed. After the tier has expired, the member can either remain in the existing tier or be downgraded to a different tier.
Current qualifying period balances are derived from the member’s current active tier, while the last qualifying period balance is derived from the qualifying period balance history.
The Stamp Future Tier flags future tier details if it is likely that a member will be downgraded based on the Tier Effective Period End Date.
The New Tier End Date is always aligned with the Fixed Date attribute specified at the Tier Class level and considers the minimum tier period that is defined. New Tier Start Date is always the Tier Change Date.
The Qual Period End Date is updated at the member’s tier level in order to identify which qualifying period the member belongs to. This date is a fixed date that is calculated based on attributes defined at the Tier Class level.
A member’s balance for this tier class is reset in the new tier record if the record has been flagged either “Requalify Tier" or “Downgrade Tier." The balance is reset on every Qual Period End date as part of the update balance process.
To create a fixed date based tier assessment model
Navigate to the Loyalty Program Administration screen.
In the Loyalty Programs list, select the program that the tiers are in, and click its Program Id.
Click the Tier Classes view tab.
Add a new record to the Tier Classes list and complete the necessary fields. Some fields which are relevant for the fixed date model are described in the following table.
Field Description Sequence
Enter a number indicating how high the status of this tier class is compared with other tier classes. For example, a frequent flyer program might include standard set to 1, business class set to 2, first class set to 3.
Primary Tier Name
Select the lowest tier in this tier class, which is the tier that members are in when they first enroll. This value can only be specified after the tiers have been created for this class, and it must be specified before activating the tier class.
Start Qual Period
Select the following Start Qual Period:
Fixed Date. The qualifying period starts on a specified date and continues for the length of time specified in the Tiers list.
Start Tier Period
Select Fixed Date.
Restart Qual Period
Select when the length of time for the new qualifying period starts after a tier status change.
Qualifying Period Expiration. The length of time for the new qualifying period starts at the expiration of the current qualifying period. For example, the qualifying period for a member to qualify for the Gold tier ended on December 31, 2003, the member actually qualified for the Gold tier on August 17, 2003, and the length of time to qualify for Platinum tier is one year. Then the member has from August 17, 2003 until December 31, 2004 to qualify for the Platinum tier.
Qual Period Length and Qual Period UoM
Enter the length and unit of measurement for the initial qualifying period for this tier. For example, if the qualifying period is one year, then the length is 1 and UoM is Year. If the qualifying period is six months, then the length is 6 and UoM is Month.
Start Tier Date
This field is enabled only if Start Tier Period is Fixed Date. Enter the day and month that the tier starts.
End Tier Date
This field is enabled only if Start Tier Period is Fixed Date. Enter the day and month that the tier ends.
Min Tier Length and Min Tier Length Period
Enter the length and unit of measurement for this tier. For example, if the qualifying period is six months, then length is 6 and Period is Month.
Assessment Schedule Date
Enter the day and month to schedule a tier assessment for a tier class.
Recurring Period
Select how frequently the assessment schedule is repeated.
Options are:
Monthly
- Yearly
Note: The following steps are examples of some tier assessment rules.Create a new rule for this Tier.
-
In the Rules list, add a new record and enter the values in the following table.
Field Value Sequence
1
Name
Upgrade Rule
Apply To
Tiers
-
Click the Rule Name.
-
To create the first criterion, add a new record in the Criteria list, then complete the necessary fields in the Criteria list and the Compare to Values Details and Values forms, as shown in the following table.
Field Value Sequence
1
Name
Current QP Balance > 150000
Type of Comparison
Compare to Values
Object
Member Tier
Attribute
Points
Condition
Is Greater Than
Value
150000
-
Click the Actions view tab and add a new record in the Actions list, then complete the necessary fields in the Actions list and form as shown in the following table.
Field Value Sequence
1
Name
Upgrade Tier
Type
Upgrade Tier
New Tier
Enter the name of the new tier after the upgrade.
-
To create the second criterion, add a new record in the Criteria list, then complete the necessary fields in the Criteria list and the Compare to Values Details and Values forms, as shown in the following table.
Field Value Sequence
2
Name
Is Expired
Type of Comparison
Compare to Values
Object
Member Tier
Attribute
Is Expired
Condition
Equals
Value
N
-
Click the Actions view tab and add a new record in the Actions list, then complete the necessary fields in the Actions list and form as shown in the following table.
Field Value Sequence
2
Name
Upgrade Tier
Type
Upgrade Tier
New Tier
Enter the name of the new tier after the upgrade.
-
Create another rule for this Tier.
-
In the Rules list, add a new record and enter the values in the following table.
Field Value Sequence
1
Name
Future Downgrade Rule
Apply To
Tiers
-
Click the Rule Name.
-
To create the first criterion, add a new record in the Criteria list, then complete the necessary fields in the Criteria list and the Compare to Values Details and Values forms, as shown in the following table.
Field Value Sequence
1
Name
Last QP Balance < 25000
Type of Comparison
Compare to Values
Object
Member Tier
Attribute
Point
Condition
Is Less Than
Value
25000
-
Click the Actions view tab and add a new record in the Actions list, then complete the necessary fields in the Actions list and form as shown in the following table.
Field Value Sequence
1
Name
Assess Next Tier
Type
Assess Next Tier
New Tier
Enter the name of the future tier.
-
To create the second criterion, add a new record in the Criteria list, then complete the necessary fields in the Criteria list and the Compare to Values Details and Values forms, as shown in the following table.
Field Value Sequence
2
Name
Tier End Date - system date < 45 days
Type of Comparison
Compare to Values
Object
Member Tier
Attribute
Point
Condition
Is Less Than
Value
45
-
Click the Actions view tab and add a new record in the Actions list, then complete the necessary fields in the Actions list and form as shown in the following table.
Field Value Sequence
2
Name
Assess Next Tier
Type
Assess Next Tier
New Tier
Enter the name of the future tier.
-
Create another rule for this Tier.
-
In the Rules list, add a new record and enter the values in the following table.
Field Value Sequence
3
Name
Retain Rule
Apply To
Tiers
-
Click the Rule Name.
-
To create the first criterion, add a new record in the Criteria list, then complete the necessary fields in the Criteria list and the Compare to Values Details and Values forms, as shown in the following table.
Field Value Sequence
1
Name
Last QP Balance > 25000
Type of Comparison
Compare to Values
Object
Member Tier
Attribute
Points
Condition
Is Greater Than
Value
25000
-
Click the Actions view tab and add a new record in the Actions list, then complete the necessary fields in the Actions list and form as shown in the following table.
Field Value Sequence
1
Name
Requalify Tier
Type
Requalify Tier
-
To create the second criterion, add a new record in the Criteria list, then complete the necessary fields in the Criteria list and the Compare to Values Details and Values forms, as shown in the following table.
Field Value Sequence
2
Name
Is Expired
Type of Comparison
Compare to Values
Object
Member Tier
Attribute
Is Expired
Condition
Equals
Value
Y
-
Click the Actions view tab and add a new record in the Actions list, then complete the necessary fields in the Actions list and form as shown in the following table.
Field Value Sequence
2
Name
Requalify Tier
Type
Requalify Tier
-
Example of Creating a Rolling Period Based Tier Assessment Model
You can create a rolling period based tier assessment model. In this model, the qualifying period of a member starts when the member enrolls into the program. The member is not assigned a qualifying period length. Once a member attains a higher tier, the member’s tier is effective for a specified period from the date of attaining the new tier even if the rolling balance is not sufficient for the member to remain in the current tier. The member’s point balance is never reset to zero in this model. Rather, the balance is calculated based on the past qualifying period.
When you are creating a rolling period based tier assessment model, consider the following:
When you are defining attributes at the Tier Class level, the Qualifying Period length, which is used to display the balance on the member user interface, is same as the Rolling Period length.
All rules in this model are based on the running balance and member attributes.
While a Tier is valid, a member can be upgraded. After the tier has expired, a member can either remain in the existing tier or be downgraded to another tier.
While running balances be loaded into Siebel Loyalty, a separate API calculates and sources running balances by extracting data from Accrual Items.
The New Tier End Date is calculated based on the Rolling period attribute defined at the Tier Class level. The New Tier Start Date is always the same as the Tier Change Date.
The Qual Period End Date attribute is not maintained in this model.
Balances are not maintained at the Tier Class level in this model.
To create a rolling period based tier assessment model
Navigate to the Loyalty Program Administration screen.
In the Loyalty Programs list, select the program that the tiers are used by and click its Program Id hyperlink.
Click the Tier Classes view tab.
Add a new record to the Tier Classes list and complete the necessary fields. Some fields relevant to Rolling Period Model are described in the following table.
Field Description Sequence
Enter a number indicating how high the status of this tier class is compared with other tier classes. For example, a frequent flyer program might include standard set to 1, business class set to 2, first class set to 3.
Primary Tier Name
Select the lowest tier in this tier class, which is the tier that members are in when they first enroll. This value can only be specified after the tiers have been created for this class, and it must be specified before activating the tier class.
Start Qual Period
Select when the qualifying period starts. The options is:
Rolling. The qualifying period starts on the day the member enrolls and continues for a specified period.
Qual Period Length and Qual Period UoM
Enter the length and unit of measurement for the initial qualifying period for this tier. For example, if the qualifying period is one year, then the length is 1 and UoM is Year. If the qualifying period is six months, then length is 6 and UoM is Month.
Assessment Schedule Date
Enter the day and month to schedule a tier assessment for a tier class.
Recurring Period
Select how frequently the assessment schedule is repeated.
Options are:
Monthly
- Yearly
Note: The following steps are examples of some tier assessment rules.Create a new rule for this tier.
-
In the Rules list, add a new record and enter the values in the following table.
Field Value Sequence
1
Name
Upgrade Rule
Apply To
Tiers
-
Click the Rule Name.
-
To create the first criterion, add a new record in the Criteria list, and complete the necessary fields in the Criteria list and the Compare to Values Details, and Values forms, as shown in the following table.
Field Value Sequence
1
Name
Running balance of last n days > 150000
Type of Comparison
Compare to Values
Object
Member Tier
Attribute
Points
Condition
Is Greater Than
Value
150000
-
Click the Actions view tab and add a new record in the Actions list, and complete the necessary fields in the Actions list and form, as shown in the following table.
Field Value Sequence
1
Name
Upgrade Tier
Type
Upgrade Tier
-
To create the second criterion, add a new record in the Criteria list, and complete the necessary fields in the Criteria list and the Compare to Values Details, and Values forms, as shown in the following table.
Field Value Sequence
2
Name
Is Expired
Type of Comparison
Compare to Values
Object
Member Tier
Attribute
Is Expired
Condition
Equals
Value
N
-
Click the Actions view tab and add a new record in the Actions list, and complete the necessary fields in the Actions list and form, as shown in the following table.
Field Value Sequence
2
Name
Upgrade Tier
Type
Upgrade Tier
New Tier
Enter the name of the new tier after the upgrade.
-
Create another rule for this tier.
-
In the Rules list, add a new record and enter the values in the following table.
Field Value Sequence
2
Name
Retain Rule
Apply To
Tiers
-
Click the Rule Name.
-
To create the first criterion, add a new record in the Criteria list, and complete the necessary fields in the Criteria list and the Compare to Values Details, and Values forms, as shown in the following table.
Field Value Sequence
1
Name
Running Balance of last n days > 150000
Type of Comparison
Compare to Values
Object
Member Tier
Attribute
Points
Condition
Is Greater Than
Value
150000
-
Click the Actions view tab and add a new record in the Actions list, and complete the necessary fields in the Actions list and form, as shown in the following table.
Field Value Sequence
1
Name
Requalify
Type
Requalify
-
To create the second criterion, add a new record in the Criteria list, and complete the necessary fields in the Criteria list and the Compare to Values Details, and Values forms, as shown in the following table.
Field Value Sequence
2
Name
Is Expired
Type of Comparison
Compare to Values
Object
Member Tier
Attribute
Is Expired
Condition
Equals
Value
Y
-
Click the Actions view tab and add a new record in the Actions list, and complete the necessary fields in the Actions list and form, as shown in the following table.
Field Value Sequence
1
Name
Requalify
Type
Requalify
-
Create another rule for this tier.
-
In the Rules list, add a new record and enter the values in the following table.
Field Value Sequence
3
Name
Downgrade Rule
Apply To
Tiers
-
Click the Rule Name.
-
To create the first criterion, add a new record in the Criteria list, and complete the necessary fields in the Criteria list and the Compare to Values Details, and Values forms, as shown in the following table.
Field Value Sequence
1
Name
Running Balance of last n days < 150000
Type of Comparison
Compare to Values
Object
Member Tier
Attribute
Points
Condition
Is Less Than
Value
150000
-
Click the Actions view tab and add a new record in the Actions list, and complete the necessary fields in the Actions list and form, as shown in the following table.
Field Value Sequence
1
Name
Downgrade Tier
Type
Downgrade Tier
New Tier
Enter the name of the new tier after the downgrade.
-
To create the second criterion, add a new record in the Criteria list, and complete the necessary fields in the Criteria list and the Compare to Values Details, and Values forms, as shown in the following table.
Field Value Sequence
2
Name
Is Expired
Type of Comparison
Compare to Values
Object
Member Tier
Attribute
Is Expired
Condition
Equals
Value
Y
-
Click the Actions view tab and add a new record in the Actions list, and complete the necessary fields in the Actions list and form, as shown in the following table.
Field Value Sequence
1
Name
Downgrade Tier
Type
Downgrade Tier
New Tier
Enter the name of the new tier after the downgrade.
-
Example of Creating Tier Promotions without Tier Assessment Models
This example shows you how to create the rules for tier promotions that do not use tier assessment models. It shows one possible use of tier promotions. Your use of these promotions can differ, depending on your business model.
Siebel Loyalty supports tier assessment models that let you determine the period of time used to assess tier changes. For more information, see About Tier Promotions. It is also possible to use the older form of tier assessment promotion that does not use tier assessment models. This topic gives an example of that older form of promotion.
In this airline example, the customer can qualify for a tier change in two ways:
By accumulating 250,000 regular points.
By completing 60 flight segments.
To track this customer behavior, you use two different point types, one representing the regular points that members earn based on their purchases and one representing the number of flight segments that members take.
You can add more qualification criteria by using additional point types.
To create a tier promotion, perform the following tasks:
Creating Two Types of Points
Start by creating two types of points, one to represent the standard points that customers get based on their purchases, the other to represent the number of flight segments that customers have completed.
To create two types of points
Navigate to the Loyalty Program Administration screen.
Click the Program Id field of the desired program.
Click the Point Types view tab.
In the Point Types list, create the standard points by adding a new record entering the values in the following table.
Field Value Name
Regular
Active
Y
Field to Use
Point 1 Value
Qualifying Weight
0.5
Non-Qualifying Weight
0.4
In the Point Types list, create the points used to track flight segments completed by adding a new record entering the values in the following table.
Field Value Name
Tier Qualification
Active
Y
Field to Use
Point 2 Value
Qualifying Weight
1
Non-Qualifying Weight
1
Creating a Rule for the Base Tier for One Type of Point
The first rule promotes members from the base tier to the platinum tier if they earn the required number of regular points.
To create rules for the base tier for one type of point
Navigate to the Loyalty Promotions Administration screen.
Click the Promotion Number (#) field of the tier promotion that was created automatically when you created the tier.
In the Rules List, add a new record, and complete the necessary fields. Some fields are shown in the following table.
Field Value Sequence
1
Name
250,000 Points & Not Expired - Upgrade to Platinum
Apply To
Tiers
Click the Rule Name.
To create the first criterion, add a new record in the Criteria list, and complete the necessary fields in the Criteria list and the Compare to Values Details and Values forms as shown in the following table.
Note: This first criterion means that the rule applies if the member has over 250,000 regular points.Field Value Sequence
1
Name
Greater Than or Equal To 250,000 Regular Points
Type of Comparison
Compare to Values
Object
Member Tier
Attribute
Regular Points
Condition
Is Greater Than or Equal To
Value
250000
To create the second criterion, add a new record in the Criteria list, and complete the necessary fields in the Criteria list and the Compare to Values Details, and Values forms, as shown in the following table.
Field Value Sequence
2
Name
Not Expired
Type of Comparison
Compare to Values
Object
Member Tier
Attribute
Is Expired
Condition
Equals
Value
N
Note: This criterion means the rule applies only if the active Tier has not yet expired.To enter the action for this rule, click the Actions view tab.
Add a new record in the Actions list, and complete the necessary fields in the Actions list and form, as shown in the following table.
Field Value Sequence
1
Name
Upgrade to Platinum
Type
Upgrade Tier
New Tier
Platinum
Creating a Rule for the Base Tier for the Second Type of Point
The second rule promotes members from the base tier to the platinum tier if they have completed the required number of flight segments. Remember that you created the point type named Tier Qualification Points to track the flight segments that members complete.
To create rules for the base tier for another type of point
Navigate to the Loyalty Promotions Administration screen and click the Promotion # field of the tier promotion.
In the Rules List, add a new record, and complete the necessary fields. Some fields are shown in the following table.
Field Value Sequence
2
Name
60 Flight Segments - Upgrade to Platinum
Apply To
Tiers
Click the Rule Name.
To create the first criterion, add a new record in the Criteria list, and complete the necessary fields in the Criteria list and the Compare to Values Details, and Values forms, as shown in the following table.
Field Value Sequence
1
Name
Greater Than or Equal To 60 Tier Qualification Points
Type of Comparison
Compare to Values
Object
Member Tier
Attribute
Tier Qualification Points
Condition
Is Greater Than or Equal To
Value
60
Note: This first criterion means that the rule applies if the member has over 250,000 regular points.To create the second criterion, add a new record in the Criteria list, and complete the necessary fields in the Criteria list and the Compare to Values Details, and Values forms, as shown in the following table. This criterion is the same as the third criterion for the previous rule.
Field Value Sequence
2
Name
Not Expired
Type of Comparison
Compare to Values
Object
Member Tier
Attribute
Is Expired
Condition
Equals
Value
N
Note: This criterion means the rule applies only if the active tier has not yet expired.To enter the action for this rule, click the Actions view tab.
Add a new record in the Actions list, and complete the necessary fields in the Actions list and form, as shown in the following table. This action is the same action as the previous rule.
Field Value Sequence
3
Name
Upgrade to Platinum
Type
Upgrade Tier
New Tier
Platinum
Creating Additional Rules for the Base Tiers
Now that you have finished creating two rules to upgrade members to the platinum tier, you must also create additional rules to automatically Upgrade to other tiers, manually upgrade to other tiers and manually Qualify for Base.
For example, if your loyalty program’s tier class has 4 tiers Base, Silver, Gold and Platinum, Base tier being the lowest tier, then you must additionally create the following rules for the base tier, in the following sequence:
120k Points & Not Expired - Upgrade to Gold, sequence 3
40 Flight Segments - Upgrade to Gold, sequence 4
60k Points & Not Expired - Upgrade to Silver, sequence 5
20 Flight Segments - Upgrade to Silver, sequence 6
Base Expired, Qualify Base, sequence 7
Manual Upgrade to Silver, sequence 8
Manual Upgrade to Gold, sequence 9
Manual Upgrade to Platinum, sequence 10
Manual Qualify Base, sequence 11
Creating Additional Rules for the Other Tiers
Additional rules are needed for other tiers that are not the lowest tier.
For example, the Silver Tier requires the following types of rules:
Automatic Upgrade
Qualify for same tier
Requalify
Downgrade
Manual Upgrade
Manual downgrade
Manual Qualify Tier
Following would be the sequence of setting up these rules (assuming points and flights as criteria for tier qualification):
250,000 Points & Not Expired - Upgrade to Platinum
60 flight segments - Upgrade to Platinum
120,000 Points & Not Expired - Upgrade to Gold
40 flight segments - Upgrade to Gold
60,000 Points and Not expired - Qualify for Silver
In Qual Period and Expire - Requalify Silver
Downgrade to Base
Manual Upgrade to Gold
Manual Upgrade to Platinum
Manual Downgrade to Base
Manual Qualify Tier
If you are not sure about the details for all of these rules, then see the Loyalty demonstration application.
Creating a Relationship Assessment Rule
You can optionally create a relationship assessment rule that allows the relative of a member to automatically receive a new tier whenever the member attains a specific tier.
The relationship between members can exist at the contact level before the referral enrollment or can be created during the referral enrollment.
To create a relationship assessment rule
Navigate to the Loyalty Promotions Administration screen and click the Promotion Number (#) field of the tier promotion.
Click the Actions view tab.
Add a new record in the Actions list, and complete the necessary fields in the Actions list and form, as shown in the following table. This action is the same action as the previous rule.
Field Value Sequence
Enter the sequence number.
Name
Upgrade Relationship Tier
Type
Upgrade Relationship Tier
Relationship Type
Select the relationship type.
New Tier
Select the new Tier.
About Retroactive Tier Changes
There are circumstances where member transactions are not immediately received or processed by a loyalty program. During this period of time, a member’s qualifying period might have ended and the member might have been downgraded to a lower tier, or the late transaction could have upgraded the member to a higher tier. Retroactive tier changes optionally allow processing of late transactions to give points and, if needed, change a member’s tier status, thereby enabling Siebel Loyalty to accurately calculate the member's future accruals.
For example, say that a loyalty program requires 60,000 points for a member to retain a silver tier status. However, by the end of the qualifying period, the member only has 55,000 points officially recorded. After downgrading the member, it turns out that there was an unprocessed transaction for 10,000 points dated within the qualifying period. If it had been processed according to the transaction date, then the member would have accumulated 65,000 points by the end of the qualifying period. This would have been sufficient to maintain the silver tier. Instead, the points would have been processed too late, and so the member would be credited with having 10,000 points in the base tier.
Now, a late transaction can be processed in the same way as if it was processed during the qualifying period. In this example, this late transaction increased the qualifying points for the member to 65,000 and entitled the member to remain in the silver tier for another year. The member's points, however, are still reset to 0 after the retroactive tier change.
Related Topic
Example of Setting Up Retroactive Tier Changes
Setting up a retroactive tier program requires adding additional program level attributes, defining additional tier rules, and adding an additional Admin - Retro Accrual promotion. These configurations determine whether or not retroactive changes are applied to transactions.
Creating Retroactive Tier Member Attributes
The tier class qualifying period member attributes are used to specify the current and previous qualifying period of a member for a particular tier class. These attributes determine whether or not retroactive tier logic must apply to a transaction.
Every tier class that is eligible for retroactive tier changes needs the following three member attributes defined:
TC1 Previous QP Start. For tier class 1, this attribute is the start date of the previous qualifying period.
TC1 Current QP Start. For tier class 1, this attribute is the start date of the current qualifying period.
TC1 Current QP End. For tier class 1, this attribute is the end date of the current qualifying period.
To create retroactive tier member attributes
Navigate to the Loyalty Program Administration screen.
Locate the program that the attribute applies to and click its Program Id hyperlink.
Clear the program form’s Active check box.
Click the Program Level Attributes view tab.
In the link bar of the Program Level Attributes view, click Member Attributes.
Add the first record to the Program Level Attributes list, and complete the necessary fields. Some fields are described in the following table.
Field Value Name
TC1 Previous QP Start
Data Type
Date
Display to User
No
Add the second record to the Program Level Attributes list, and complete the necessary fields. Some fields are described in the following table.
Field Value Name
TC1 Current QP Start
Data Type
Date
Display to User
No
Add the third record to the Program Level Attributes list, and complete the necessary fields. Some fields are described in the following table.
Field Value Name
TC1 Current QP End
Data Type
Date
Display to User
No
Repeat the steps in this procedure to add these attributes to each tier class and select the Active check box to activate the attributes.
When you are finished creating all attributes for the program, select the program form’s Active check box to activate the program.
Creating Retroactive Tier Member Tier Attributes
These attributes are used to distinguish a retroactive tier change from a regular tier change.
To create retroactive tier member tier attributes
Navigate to the Loyalty Program Administration screen.
Locate the program that the attribute applies to and click its Program Id hyperlink.
Clear the program form’s Active check box.
Click the Program Level Attributes view tab.
In the link bar of the Program Level Attributes view, click Member Tier Attributes.
Add a record to the Program Level Attributes list, and complete the necessary fields. Some fields are described in the following table.
Field Value Name
Tier Approval Status
Field
Tier Approval Status
Read Only
Y
Data Type
String
Pick List
LOY Member Tier Approval Status Picklist
Add another record to the Program Level Attributes list, and complete the necessary fields. Some fields are described in the following table.
Field Value Name
Transaction Sub Type LIC
Field
Transaction Sub Type LIC
Read Only
Y
Data Type
String
When you are finished creating all attributes for the program, select the Active check box to activate the attributes and then select the program form’s Active check box to activate the program.
Creating Retroactive Tier Transaction Attributes
These attributes are used to identify the date of the transaction, the current date in Siebel Loyalty, the age of the transaction and determines whether or not any retroactive tier action must be taken.
To create retroactive tier transaction attributes
Navigate to the Loyalty Program Administration screen.
Locate the program that the attribute applies to and click its Program Id hyperlink.
Clear the program form’s Active check box.
Click the Program Level Attributes view tab.
In the link bar of the Program Level Attributes view, click Transaction Attributes.
Add a record to the Program Level Attributes list, and complete the necessary fields. Some fields are described in the following table.
Field Value Name
Transaction Age
Field
Transaction Age
Read Only
Select the Read Only check box
Data Type
Number
Add another record to the Program Level Attributes list, and complete the necessary fields. Some fields are described in the following table.
Field Value Name
Is Qualifying
Field
Qualifying Flag
Read Only
Select the Read Only check box
Data Type
String
Add another record to the Program Level Attributes list, and complete the necessary fields. Some fields are described in the following table.
Field Value Name
Current Date
Field
Current Date
Read Only
Select the Read Only check box
Data Type
Date
Add another record to the Program Level Attributes list, and complete the necessary fields. Some fields are described in the following table.
Field Value Name
Transaction Date
Field
Transaction Date
Read Only
Y
Data Type
Date
When you are finished creating all attributes for the program, select the Active check box to activate the attributes and then select the program form’s Active check box to activate the program.
Setting Up Retroactive Tier Rules
The retroactive tier logic requires additional rules to evaluate member records and determine if a tier change is necessary.
For the given example for the Base Tier, the following would be the new sequence of rules (assuming only points as the criterion for Tier qualification):
Manual Tier Approval
Retro Tier Automatic Activation
250,000 Points, Upgrade Platinum Retro
250,000 Points & Not Expired - Upgrade to Platinum
120,000 Points, Upgrade Gold Retro
120,000 Points & Not Expired - Upgrade to Gold
60,000 Points, Upgrade Silver Retro
60,000 Points & Not Expired - Upgrade to Silver
Expired Cancellation Retro
Base Expired, Qualify Base
Manual Upgrade to Silver
Manual Upgrade to Gold
Manual Upgrade to Platinum
Manual Qualify Base
The additional rules having sequence numbers 1, 2, 3, 9 and the modified rule with sequence number 10 are explained in the following procedure.
To set up retroactive tier rules
Navigate to the Loyalty Program Administration screen.
In the Loyalty Programs list, select the program that the tiers are used by and click its Program Id hyperlink.
Click the Tier Classes view tab.
Select the tier class to be modified.
In the Tiers view, click the Tier Id hyperlink.
Click Modify.
Create a new rule for this Tier:
In the Rules list, add a new record and enter the values in the following table.
Field Value Sequence
1
Name
Manual Tier Approval
Apply To
Tiers
-
Click the Rule Name.
-
To create the first criterion, add a new record in the Criteria list, and complete the necessary fields in the Criteria list and the Compare to Values Details, and Values forms, as shown in the following table.
Field Value Sequence
1
Name
Check Tier Approval
Type of Comparison
Compare to Values
Object
Member Tier
Attribute
Tier Approval Status
Condition
Equals
Value
Pending
Value
Pending RT Decision
-
Click the Actions view tab and add a new record in the Actions list, and complete the necessary fields in the Actions list and form, as shown in the following table.
Field Value Sequence
1
Name
Qualify Tier
Type
Qualify Tier
-
Add a new record in the Actions list, and complete the necessary fields in the Actions list and form, as shown in the following table.
Field Value Sequence
2
Name
CreateQualPeriodAttributes
Type
Invoke Custom Action
Method
CreateQualPeriodAttrib
Create the second rule for this Tier.
-
In the Rules list, add a new record and enter the values in the following table.
Field Value Sequence
2
Name
Retro Tier Automatic Activation
Apply to
Tiers
-
Click the Rule Name.
-
To create the first criterion, add a new record in the Criteria list, and complete the necessary fields in the Criteria list and the Compare to Values Details, and Values forms, as shown in the following table.
Field Value Sequence
1
Name
Check Tier Approval
Type of Comparison
Compare to Value
Object
Member Tier
Attribute
Tier Approval Status
Condition
Equals
Value
RTCINT - To Be Activated
-
Click the Actions view tab and add a new record in the Actions list, and complete the necessary fields in the Actions list and form, as shown in the following table.
Field Value Sequence
1
Name
Qualify Tier
Type
Qualify Tier
-
Create the third rule for this Tier.
-
In the Rules list, add a new record and enter the values in the following table.
Note: The values used in this procedure are for illustration purposes only. Your values might vary depending on your configuration.Field Value Sequence
3
Name
250,000 points - Upgrade Platinum Retro
Apply to
Tiers
-
Click the Rule Name.
-
To create the first criterion, add a new record in the Criteria list, and complete the necessary fields in the Criteria list and the Compare to Values Details, and Values forms, as shown in the following table.
Field Value Sequence
1
Name
Greater Than or Equal To 250,000 Regular Points
Type of Comparison
Compare to Values
Object
Member Tier
Attribute
Regular Points
Condition
Is Greater Than or Equal To
Value
250000
-
To create the second criterion, add a new record in the Criteria list, and complete the necessary fields in the Criteria list and the Compare to Values Details, and Values forms, as shown in the following table.
Field Value Sequence
2
Name
Check Tier Approval Status
Type of Comparison
Compare to Values
Object
Member Tier
Attribute
Tier Approval Status
Condition
Equals
Value
Pending - RTC
Value
RTCINT - Automatic
-
Click the Actions view tab and add a new record in the Actions list, and complete the necessary fields in the Actions list and form, as shown in the following table.
Field Value Sequence
1
Name
Upgrade to Platinum
Type
Upgrade Tier
New Tier
Platinum
-
Create the fourth rule for this tier.
-
In the Rules list, add a new record and enter the values in the following table.
Field Value Sequence
9
Name
Expired - Cancellation Retro
Apply to
Tiers
-
Click the Rule Name.
-
To create the first criterion, add a new record in the Criteria list, and complete the necessary fields in the Criteria list and the Compare to Values Details, and Values forms, as shown in the following table.
Field Value Sequence
1
Name
Is Expired
Type of Comparison
Compare to Values
Object
Member Tier
Attribute
Is Expired
Condition
Equals
Value
Y
-
To create the second criterion, add a new record in the Criteria list, and complete the necessary fields in the Criteria list and the Compare to Values Details, and Values forms, as shown in the following table.
Field Value Sequence
2
Name
Check Transaction Sub Type LIC
Type of Comparison
Compare to Values
Object
Member Tier
Attribute
Transaction Sub Type LIC
Condition
Equals
Value
Cancellation
-
To create the third criterion, add a new record in the Criteria list, and complete the necessary fields in the Criteria list and the Compare to Values Details, and Values forms, as shown in the following table.
Field Value Sequence
3
Name
Check Tier Approval
Type of Comparison
Compare to Values
Object
Member Tier
Attribute
Tier Approval Status
Condition
Equals
Value
Pending - RTC
Value
RTCINT - Automatic
-
Click the Actions view tab and add a new record in the Actions list, and complete the necessary fields in the Actions list and form, as shown in the following table.
Field Value Sequence
1
Name
Qualify (Tier Name)
Type
Qualify Tier
-
Create the fifth rule for this tier.
-
In the Rules list, add a new record and enter the values in the following table.
Field Value Sequence
10
Name
Tier Expired, Qualify (Tier Name)
Apply to
Tiers
-
Click the Rule Name.
-
To create the first criterion, add a new record in the Criteria list, and complete the necessary fields in the Criteria list and the Compare to Values Details, and Values forms, as shown in the following table.
Field Value Sequence
1
Name
Is Expired
Type of Comparison
Compare to Values
Object
Member Tier
Attribute
Is Expired
Condition
Equals
Value
Y
-
To create the second criterion, add a new record in the Criteria list, and complete the necessary fields in the Criteria list and the Compare to Values Details, and Values forms, as shown in the following table.
Field Value Sequence
2
Name
Check Tier Approval Status
Type of Comparison
Compare to Values
Object
Member Tier
Attribute
Tier Approval Status
Condition
Equals
Value
Automatic
Value
Manual - Approved
Value
RTC - Manual - Approved
-
Click the Actions view tab and add a new record in the Actions list, and complete the necessary fields in the Actions list and form, as shown in the following table.
Field Value Sequence
1
Name
Qualify (Tier Name)
Type
Qualify Tier
-
If your loyalty program has different sets of tiers for different customers, then repeat the steps in this procedure until you have modified all of the sets of tiers in the program.
Creating the Admin - Retro Accruals Base Promotion
When you define a Retroactive Tier program, you must create the Admin - Retro Accruals base promotion to determine the type of retroactive tier logic that is used.
To create the Admin - Retro Accruals base promotion
Navigate to the Loyalty Promotions Administration screen.
Add a new record to the Promotions list, and enter the values that are provided in the following table.
Field Value Name
Admin - Retro Accruals
Always Apply
Y
Apply To
Accrual-Product
Program
Enter the name of the program.
Partner
Enter the partners for the program.
Product Inclusion
All Products
Promotion Start
Enter one day before today’s date.
Promotion End
Leave this field blank, because you do not want the base promotion to expire.
Click the Promotion Number (#) field’s hyperlink.
Click the Rules view tab.
Create the first rule for this promotion:
-
Add a new record to the Rules list, and enter the values in the following table.
Field Value Sequence
1
Name
Retro Txns 1 month ago A
Apply To
Transactions
-
Click the Name field’s hyperlink.
-
Add a new record to the Criteria list, and enter the values in the following table.
Field Value Sequence
1
Name
Check Txn Points
Type of Comparison
Compare to Values
-
In the Compare to Values Detail form, enter the values in the following table.
Field Value Object
Transaction
Attribute
Transaction Points
Condition
Is Greater Than
-
Add a new record to the Values list and enter 0 in the Value field.
-
Add another new record to the Criteria list, and enter the values in the following table.
Field Value Sequence
2
Name
Is Qualifying?
Type of Comparison
Compare to Values
-
In the Compare to Values Detail form, enter the values in the following table.
Field Value Object
Transaction
Attribute
Is Qualifying
Condition
Equals
-
Add a new record to the Values list and enter Y in the Value field.
-
Add another new record to the Criteria list, and enter the values in the following table.
Field Value Sequence
3
Name
Transaction Age < 1 Month
Type of Comparison
Compare to Values
-
In the Compare to Values Detail form, enter the values in the following table.
Field Value Object
Transaction
Attribute
Transaction Age
Condition
Is Less Than
-
Add a new record to the Values list and enter 30 in the Value field.
-
Add another new record to the Criteria list, and enter the values in the following table.
Field Value Sequence
4
Name
TC1 Previous QP Start < Txn Date
Type of Comparison
Compare to Object
-
In the Compare to Object Detail form, enter the values in the following table.
Section Field Value Compare this Object
Compare this object
Object
Member
Compare this object
Attribute
TC1 Previous QP Start
Compare this object
Condition
Is Less Than
To this object
Object
Transaction
To this object
Attribute
Transaction Date
-
Add another new record to the Criteria list, and enter the values in the following table.
Field Value Sequence
5
Name
TC2 Previous QP Start < Txn Date
Type of Comparison
Compare to Object
-
In the Compare to Object Detail form, enter the values in the following table.
Section Field Value Compare this object
Object
Member
Compare this object
Attribute
TC2 Previous QP Start
Compare this object
Condition
Is Less Than
To this object
Object
Transaction
To this object
Attribute
Transaction Date
-
Add another new record to the Criteria list, and enter the values in the following table.
Field Value Sequence
6
Name
TC1 Current QP End, Txn Date
Type of Comparison
Compare to Object
-
In the Compare to Object Detail form, enter the values in the following table.
Section Field Value Compare this object
Object
Member
Compare this object
Attribute
TC1 Current QP End
Compare this object
Condition
Is Greater Than
To this object
Object
Transaction
To this object
Attribute
Transaction Date
-
Add another new record to the Criteria list, and enter the values in the following table.
Field Value Sequence
7
Name
TC1 Current QP End < Today
Type of Comparison
Compare to Object
-
In the Compare to Object Detail form, enter the values in the following table.
Section Field Value Compare this object
Object
Member
Compare this object
Attribute
TC1 Current QP End
Compare this object
Condition
Is Less Than
To this object
Object
Transaction
To this object
Attribute
Current Date
-
Click the Actions view tab.
-
Add a new record to the Actions list, and enter the values in the following table.
Field Value Sequence
1
Name
RTC Automatic
Type
RTC Automatic
-
Create the second rule for this promotion:
-
Add a new record to the Rules list, and enter the values in the following table.
Field Value Sequence
2
Name
Retro Txns 1 Month Ago B
Apply To
Transactions
-
Click the Name field’s hyperlink.
-
Add a new record to the Criteria list, and enter the values in the following table.
Field Value Sequence
1
Name
Check Txn Points
Type of Comparison
Compare to Values
-
In the Compare to Values Detail form, enter the values in the following table.
Field Value Object
Transaction
Attribute
Transaction Points
Condition
Is Greater Than
-
Add a new record to the Values list and enter 0 in the Value field.
-
Add another new record to the Criteria list, and enter the values in the following table.
Field Value Sequence
2
Name
Is Qualifying?
Type of Comparison
Compare to Values
-
In the Compare to Values Detail form, enter the values in the following table.
Field Value Object
Transaction
Attribute
Is Qualifying
Condition
Equals
-
Add a new record to the Values list and enter Y in the Value field.
-
Add another new record to the Criteria list, and enter the values in the following table.
Field Value Sequence
3
Name
Transaction Age < 1 Month
Type of Comparison
Compare to Values
-
In the Compare to Values Detail form, enter the values in the following table.
Field Value Object
Transaction
Attribute
Transaction Age
Condition
Is Less Than
-
Add a new record to the Values list and enter 30 in the Value field.
-
Add another new record to the Criteria list, and enter the values in the following table.
Field Value Sequence
4
Name
TC1 Previous QP Start < Txn Date
Type of Comparison
Compare to Object
-
In the Compare to Object Detail form, enter the values in the following table.
Section Field Value Compare this object
Object
Member
Compare this object
Attribute
TC1 Previous QP Start
Compare this object
Condition
Is Less Than
To this object
Object
Transaction
To this object
Attribute
Transaction Date
-
Add another new record to the Criteria list, and enter the values in the following table.
Field Value Sequence
5
Name
TC2 Previous QP Start < Txn Date
Type of Comparison
Compare to Object
-
In the Compare to Object Detail form, enter the values in the following table.
Section Field Value Compare this object
Object
Member
Compare this object
Attribute
TC2 Previous QP Start
Compare this object
Condition
Is Less Than
To this object
Object
Transaction
To this object
Attribute
Transaction Date
-
Add another new record to the Criteria list, and enter the values in the following table.
Field Value Sequence
6
Name
TC2 Current QP End, Txn Date
Type of Comparison
Compare to Object
-
In the Compare to Object Detail form, enter the values in the following table.
Section Field Value Compare this object
Object
Member
Compare this object
Attribute
TC2 Current QP End
Compare this object
Condition
Is Greater Than
To this object
Object
Transaction
To this object
Attribute
Transaction Date
-
Add another new record to the Criteria list, and enter the values in the following table.
Field Value Sequence
7
Name
TC2 Current QP End < Today
Type of Comparison
Compare to Object
-
In the Compare to Object Detail form, enter the values in the following table.
Section Field Value Compare this object
Object
Member
Compare this object
Attribute
TC2 Current QP End
Compare this object
Condition
Is Less Than
To this object
Object
Transaction
To this object
Attribute
Current Date
-
Click the Actions view tab.
-
Add a new record to the Actions list, and enter the values in the following table.
Field Value Sequence
1
Name
RTC Automatic
Type
RTC Automatic
-
Create the third rule for this promotion:
-
Add a new record to the Rules list, and enter the values in the following table.
Field Value Sequence
3
Name
Retro Txns 1 month ago C
Apply To
Transactions
-
Click the Name field’s hyperlink.
-
Add a new record to the Criteria list, and enter the values in the following table.
Field Value Sequence
1
Name
Check Txn Points
Type of Comparison
Compare to Values
-
In the Compare to Values Detail form, enter the values in the following table.
Field Value Object
Transaction
Attribute
Transaction Points
Condition
Is Greater Than
-
Add a new record to the Values list and enter 0 in the Value field.
-
Add another new record to the Criteria list, and enter the values in the following table.
Field Value Sequence
2
Name
Is Qualifying?
Type of Comparison
Compare to Values
-
In the Compare to Values Detail form, enter the values in the following table.
Field Value Object
Transaction
Attribute
Is Qualifying
Condition
Equals
-
Add a new record to the Values list and enter Y in the Value field.
-
Add another new record to the Criteria list, and enter the values in the following table.
Field Value Sequence
3
Name
Transaction Age < 1 Month
Type of Comparison
Compare to Values
-
In the Compare to Values Detail form, enter the values in the following table.
Field Value Object
Transaction
Attribute
Transaction Age
Condition
Is Less Than
-
Add a new record to the Values list and enter 30 in the Value field.
-
Add another new record to the Criteria list, and enter the values in the following table.
Field Value Sequence
4
Name
TC1 Previous QP Start < Txn Date
Type of Comparison
Compare to Object
-
In the Compare to Object Detail form, enter the values in the following table.
Section Field Value Compare this object
Object
Member
Compare this object
Attribute
TC1 Previous QP Start
Compare this object
Condition
Is Less Than
To this object
Object
Transaction
To this object
Attribute
Transaction Date
-
Add another new record to the Criteria list, and enter the values in the following table.
Field Value Sequence
5
Name
TC2 Previous QP Start < Txn Date
Type of Comparison
Compare to Object
-
In the Compare to Object Detail form, enter the values in the following table.
Section Field Value Compare this object
Object
Member
Compare this object
Attribute
TC2 Previous QP Start
Compare this object
Condition
Is Less Than
To this object
Object
Transaction
To this object
Attribute
Transaction Date
-
Add another new record to the Criteria list, and enter the values in the following table.
Field Value Sequence
6
Name
TC1 Current QP Start, Txn Date
Type of Comparison
Compare to Object
-
In the Compare to Object Detail form, enter the values in the following table.
Section Field Value Compare this object
Object
Member
Compare this object
Attribute
TC1 Current QP Start
Compare this object
Condition
Is Greater Than
To this object
Object
Transaction
To this object
Attribute
Transaction Date
-
Click the Actions view tab.
-
Add a new record to the Actions list, and enter the values in the following table.
Field Value Sequence
1
Name
RTC Automatic
Type
RTC Automatic
-
Create the fourth rule for this promotion:
-
Add a new record to the Rules list, and enter the values in the following table.
Field Value Sequence
4
Name
Retro Txns 1 month ago D
Apply To
Transactions
-
Click the Name field’s hyperlink.
-
Add a new record to the Criteria list, and enter the values in the following table.
Field Value Sequence
1
Name
Check Txn Points
Type of Comparison
Compare to Values
-
In the Compare to Values Detail form, enter the values in the following table.
Field Value Object
Transaction
Attribute
Transaction Points
Condition
Is Greater Than
-
Add a new record to the Values list and enter 0 in the Value field.
-
Add another new record to the Criteria list, and enter the values in the following table.
Field Value Sequence
2
Name
Is Qualifying?
Type of Comparison
Compare to Values
-
In the Compare to Values Detail form, enter the values in the following table.
Field Value Object
Transaction
Attribute
Is Qualifying
Condition
Equals
-
Add a new record to the Values list and enter Y in the Value field.
-
Add another new record to the Criteria list, and enter the values in the following table.
Field Value Sequence
3
Name
Transaction Age < 1 Month
Type of Comparison
Compare to Values
-
In the Compare to Values Detail form, enter the values in the following table.
Field Value Object
Transaction
Attribute
Transaction Age
Condition
Is Less Than
-
Add a new record to the Values list and enter 30 in the Value field.
-
Add another new record to the Criteria list, and enter the values in the following table.
Field Value Sequence
4
Name
TC1 Previous QP Start < Txn Date
Type of Comparison
Compare to Object
-
In the Compare to Object Detail form, enter the values in the following table.
Section Field Value Compare this object
Object
Member
Compare this object
Attribute
TC1 Previous QP Start
Compare this object
Condition
Is Less Than
To this object
Object
Transaction
To this object
Attribute
Transaction Date
-
Add another new record to the Criteria list, and enter the values in the following table.
Field Value Sequence
5
Name
TC2 Previous QP Start < Txn Date
Type of Comparison
Compare to Object
-
In the Compare to Object Detail form, enter the values in the following table.
Section Field Value Compare this object
Object
Member
Compare this object
Attribute
TC2 Previous QP Start
Compare this object
Condition
Is Less Than
To this object
Object
Transaction
To this object
Attribute
Transaction Date
-
Add another new record to the Criteria list, and enter the values in the following table.
Field Value Sequence
6
Name
TC2 Current QP Start, Txn Date
Type of Comparison
Compare to Object
-
In the Compare to Object Detail form, enter the values in the following table.
Section Field Value Compare this object
Object
Member
Compare this object
Attribute
TC2 Current QP Start
Compare this object
Condition
Is Greater Than
To this object
Object
Transaction
To this object
Attribute
Transaction Date
-
Click the Actions view tab.
-
Add a new record to the Actions list, and enter the values in the following table.
Field Value Sequence
1
Name
RTC Automatic
Type
RTC Automatic
-
Create the fifth rule for this promotion:
-
Add a new record to the Rules list, and enter the values in the following table.
Field Value Sequence
5
Name
Retro Txns 1 -3 months ago
Apply To
Transactions
-
Click the Name field’s hyperlink.
-
Add a new record to the Criteria list, and enter the values in the following table.
Field Value Sequence
1
Name
Check Txn Points
Type of Comparison
Compare to Values
-
In the Compare to Values Detail form, enter the values in the following table.
Field Value Object
Transaction
Attribute
Transaction Points
Condition
Is Greater Than
-
Add a new record to the Values list and enter 0 in the Value field.
-
Add another new record to the Criteria list, and enter the values in the following table.
Field Value Sequence
2
Name
Is Qualifying?
Type of Comparison
Compare to Values
-
In the Compare to Values Detail form, enter the values in the following table.
Field Value Object
Transaction
Attribute
Is Qualifying
Condition
Equals
-
Add a new record to the Values list and enter Y in the Value field.
-
Add another new record to the Criteria list, and enter the values in the following table.
Field Value Sequence
3
Name
Transaction Age, 1 Month
Type of Comparison
Compare to Values
-
In the Compare to Values Detail form, enter the values in the following table.
Field Value Object
Transaction
Attribute
Transaction Age
Condition
Is Greater Than
-
Add a new record to the Values list and enter 29 in the Value field.
-
Add another new record to the Criteria list, and enter the values in the following table.
Field Value Sequence
4
Name
Transaction Age < 3 Months
Type of Comparison
Compare to Values
-
In the Compare to Values Detail form, enter the values in the following table.
Field Value Object
Transaction
Attribute
Transaction Age
Condition
Is Less Than
-
Add a new record to the Values list and enter 90 in the Value field.
-
Add another new record to the Criteria list, and enter the values in the following table.
Field Value Sequence
5
Name
TC1 Previous QP Start < Txn Date
Type of Comparison
Compare to Object
-
In the Compare to Object Detail form, enter the values in the following table.
Section Field Value Compare this object
Object
Member
Compare this object
Attribute
TC1 Previous QP Start
Compare this object
Condition
Is Less Than
To this object
Object
Transaction
To this object
Attribute
Transaction Date
-
Add another new record to the Criteria list, and enter the values in the following table.
Field Value Sequence
6
Name
TC2 Previous QP Start < Txn Date
Type of Comparison
Compare to Object
-
In the Compare to Object Detail form, enter the values in the following table.
Section Field Value Compare this object
Object
Member
Compare this object
Attribute
TC2 Previous QP Start
Compare this object
Condition
Is Less Than
To this object
Object
Transaction
To this object
Attribute
Transaction Date
-
Click the Actions view tab.
-
Add a new record to the Actions list, and enter the values in the following table.
Field Value Sequence
1
Name
RTC Automatic
Type
RTC Automatic
-
Create the sixth rule for this promotion:
-
Add a new record to the Rules list, and enter the values in the following table.
Field Value Sequence
6
Name
Retro Txns 3 - 8 months ago
Apply To
Transactions
-
Click the Name field’s hyperlink.
-
Add a new record to the Criteria list, and enter the values in the following table.
Field Value Sequence
1
Name
Check Txn Points
Type of Comparison
Compare to Values
-
In the Compare to Values Detail form, enter the values in the following table.
Field Value Object
Transaction
Attribute
Transaction Points
Condition
Is Greater Than
-
Add a new record to the Values list and enter 0 in the Value field.
-
Add another new record to the Criteria list, and enter the values in the following table.
Field Value Sequence
2
Name
Is Qualifying?
Type of Comparison
Compare to Values
-
In the Compare to Values Detail form, enter the values in the following table.
Field Value Object
Transaction
Attribute
Is Qualifying
Condition
Equals
-
Add a new record to the Values list and enter Y in the Value field.
-
Add another new record to the Criteria list, and enter the values in the following table.
Field Value Sequence
3
Name
Transaction Age, 3 Months
Type of Comparison
Compare to Values
-
In the Compare to Values Detail form, enter the values in the following table.
Field Value Object
Transaction
Attribute
Transaction Age
Condition
Is Greater Than
-
Add a new record to the Values list and enter 89 in the Value field.
-
Add another new record to the Criteria list, and enter the values in the following table.
Field Value Sequence
4
Name
Transaction Age < 8 Months
Type of Comparison
Compare to Values
-
In the Compare to Values Detail form, enter the values in the following table.
Field Value Object
Transaction
Attribute
Transaction Age
Condition
Is Less Than
-
Add a new record to the Values list and enter 240 in the Value field.
-
Add another new record to the Criteria list, and enter the values in the following table.
Field Value Sequence
5
Name
TC1 Previous QP Start < Txn Date
Type of Comparison
Compare to Object
-
In the Compare to Object Detail form, enter the values in the following table.
Section Field Value Compare this object
Object
Member
Compare this object
Attribute
TC1 Previous QP Start
Compare this object
Condition
Is Less Than
To this object
Object
Transaction
To this object
Attribute
Transaction Date
-
Add another new record to the Criteria list, and enter the values in the following table.
Field Value Sequence
6
Name
TC2 Previous QP Start < Txn Date
Type of Comparison
Compare to Object
-
In the Compare to Object Detail form, enter the values in the following table.
Section Field Value Compare this object
Object
Member
Compare this object
Attribute
TC2 Previous QP Start
Compare this object
Condition
Is Less Than
To this object
Object
Transaction
To this object
Attribute
Transaction Date
-
Click the Actions view tab.
-
Add a new record to the Actions list, and enter the values in the following table.
Field Value Sequence
1
Name
RTC Manual
Type
RTC Manual
-
Create the seventh rule for this promotion:
-
Add a new record to the Rules list, and enter the values in the following table.
Field Value Sequence
7
Name
Retro Txns, 8 months
Apply To
Transactions
-
Click the Name field’s hyperlink.
-
Add a new record to the Criteria list, and enter the values in the following table.
Field Value Sequence
1
Name
Check Txn Points
Type of Comparison
Compare to Values
-
In the Compare to Values Detail form, enter the values in the following table.
Field Value Object
Transaction
Attribute
Transaction Points
Condition
Is Greater Than
-
Add a new record to the Values list and enter 0 in the Value field.
-
Add another new record to the Criteria list, and enter the values in the following table.
Field Value Sequence
2
Name
Is Qualifying?
Type of Comparison
Compare to Values
-
In the Compare to Values Detail form, enter the values in the following table.
Field Value Object
Transaction
Attribute
Is Qualifying
Condition
Equals
-
Add a new record to the Values list and enter Y in the Value field.
-
Add another new record to the Criteria list, and enter the values in the following table.
Field Value Sequence
3
Name
Transaction Age, 8 months
Type of Comparison
Compare to Values
-
In the Compare to Values Detail form, enter the values in the following table.
Field Value Object
Transaction
Attribute
Transaction Age
Condition
Is Greater Than
-
Add a new record to the Values list and enter 239 in the Value field.
-
Click the Actions view tab.
-
Add a new record to the Actions list, and enter the values in the following table.
Field Value Sequence
1
Name
RTC Adjust Qualifying Points
Type
RTC Adjust Qualifying Points
-
Create the eighth rule for this promotion:
-
Add a new record to the Rules list, and enter the values in the following table.
Field Value Sequence
8
Name
Retro Txns Prior to Previous QP TC2
Apply To
Transactions
-
Click the Name field’s hyperlink.
-
Add a new record to the Criteria list, and enter the values in the following table.
Field Value Sequence
1
Name
Check Txn Points
Type of Comparison
Compare to Values
-
In the Compare to Values Detail form, enter the values in the following table.
Field Value Object
Transaction
Attribute
Transaction Points
Condition
Is Greater Than
-
Add a new record to the Values list and enter 0 in the Value field.
-
Add another new record to the Criteria list, and enter the values in the following table.
Field Value Sequence
2
Name
Is Qualifying?
Type of Comparison
Compare to Values
-
In the Compare to Values Detail form, enter the values in the following table.
Field Value Object
Transaction
Attribute
Is Qualifying
Condition
Equals
-
Add a new record to the Values list and enter Y in the Value field.
-
Add another new record to the Criteria list, and enter the values in the following table.
Field Value Sequence
3
Name
TC2 Previous QP Start, Txn Date
Type of Comparison
Compare to Object
-
In the Compare to Object Detail form, enter the values in the following table.
Section Field Value Compare this object
Object
Member
Compare this object
Attribute
TC2 Previous QP Start
Compare this object
Condition
Is Greater Than
To this object
Object
Transaction
To this object
Attribute
Transaction Date
-
Click the Actions view tab.
-
Add a new record to the Actions list, and enter the values in the following table.
Field Value Sequence
1
Name
RTC Adjust Qualifying Points
Type
RTC Adjust Qualifying Points
-
Create the ninth rule for this promotion:
-
Add a new record to the Rules list, and enter the values in the following table.
Field Value Sequence
9
Name
Retro Txns Prior to Previous QP TC1
Apply To
Transactions
-
Click the Name field’s hyperlink.
-
Add a new record to the Criteria list, and enter the values in the following table.
Field Value Sequence
1
Name
Check Txn Points
Type of Comparison
Compare to Values
-
In the Compare to Values Detail form, enter the values in the following table.
Field Value Object
Transaction
Attribute
Transaction Points
Condition
Is Greater Than
-
Add a new record to the Values list and enter 0 in the Value field.
-
Add another new record to the Criteria list, and enter the values in the following table.
Field Value Sequence
2
Name
Is Qualifying?
Type of Comparison
Compare to Values
-
In the Compare to Values Detail form, enter the values in the following table.
Field Value Object
Transaction
Attribute
Is Qualifying
Condition
Equals
-
Add a new record to the Values list and enter Y in the Value field.
-
Add another new record to the Criteria list, and enter the values in the following table.
Field Value Sequence
3
Name
TC1 Previous QP Start, Txn Date
Type of Comparison
Compare to Object
-
In the Compare to Object Detail form, enter the values in the following table.
Section Field Value Compare this object
Object
Member
Compare this object
Attribute
TC1 Previous QP Start
Compare this object
Condition
Is Greater Than
To this object
Object
Transaction
To this object
Attribute
Transaction Date
-
Click the Actions view tab.
-
Add a new record to the Actions list, and enter the values in the following table.
Field Value Sequence
1
Name
RTC Adjust Qualifying Points
Type
RTC Adjust Qualifying Points
-
Click Activate to activate the Admin - Retro Accrual promotion.
Siebel Loyalty Batch Engine Parameters
The batch engine processes the following objects:
Transactions, such as accruals and enrollments.
Buckets, used in bucket promotions
Tiers
Statements
For each of these objects, you can set batch engine parameters to control which subset of records the batch engine processes. Parameters are conditional statements, and only records that match the condition are processed. Parameters apply to all programs.
Batch engine parameters are useful to:
Do load balancing so the engine is not overloaded with too many records to process at one time.
Process subsets of records. You might want to do this because:
Some records have higher priority and must be processed first.
Some records were processed and others were not during a failure, and you only want to process the records that were not processed previously.
A change in your program only affects some records.
Batch engine parameters are discussed in the following topics:
Configuring Batch Engine Parameters for Statements for Use with LDAP Authentication
You can use batch engine parameters with the object type of Statement to control the processing of Loyalty statements.
However, if you use LDAP for authentication, then you must configure the application by updating the following user properties in the LOY Statement business service:
LDAPUserId. Update with the username.
LDAPPassword. Update with the password.
If you have not enabled LDAP, then this configuration is not necessary. You can use batch engine parameters with the object type of Statement without this configuration. For more information about LDAP authentication, see Siebel Security Guide.
Setting Batch Engine Parameters
Use this procedure to set batch engine parameters.
If you add more than one record, then data is processed only if it matches the conditions in all the records you added. In other words, the conditions are treated as a logical AND.
After the engine has processed transactions, tiers, buckets, or statements using the parameters, you must either delete the parameters to process all transactions in later runs, or create new parameters to process some new subset of parameters in the next run. For more information, see Deleting Batch Engine Parameters.
To set a batch engine parameter
Navigate to the Administration - Loyalty Programs screen, Engine Parameters view.
Click the Transaction Parameters, Tier Parameters, Bucket Parameters, or Statement Parameters view tab.
These views have the same fields, but they have different options available in the lists of values for the fields, depending on what values are needed for that type of parameter.
Add one or more new records and complete the necessary fields, described in the following table.
Field Description Object
Displays the object that the parameter applies to. The object depends on the type of parameter you are setting:
Transaction Parameters. The object is transaction.
Tier Parameters. The object is tier.
Bucket Parameters. The object is Member.
Statement Parameters. The object is Member.
You can parameterize transaction, tier, bucket and statement processing based on transaction, bucket, and statement attribute and on member dominant tier.
To setup member dominant tier as a parameter, you must select the transaction, tier, bucket or statement (in the appropriate views) as the object, select Member Tier as the attribute, and select the required tier as the value.
For transaction processing, set up and activate the Member Tier attribute in the transaction attributes for the program (in the Program screen, Program Attributes, Transaction Parameters view).
Attribute
Select the object attribute that is used in the conditional statement.
Condition
Select the conditional operator that is used in the conditional statement.
Value
Enter the value that is used in the conditional statement.
Deleting Batch Engine Parameters
After you have used batch engine parameters in a run and you do not want them to apply to following runs, delete them using the following procedure.
To delete batch engine parameters
Navigate to the Administration - Loyalty Programs screen, Engine Parameters view.
Click the Transaction Parameters, Tier Parameters, Bucket Parameters, or Statement Parameters view tab.
Delete Parameter records.
Shut down and restart the server component.
Example of Setting a Batch Engine Parameter
The Loyalty administrator of an airline Loyalty program has created a set of new rules that apply only to transactions that occurred after November 30, 2009, that have Indigo Airlines as the partner. She sets a batch engine parameter so the engine processes only records of transactions that meet all three of these conditions.
To process transactions that meet several conditions
Navigate to the Administration - Loyalty Programs screen, Engine Parameters view.
Click the Transaction Parameters view tab.
Add a new record and enter the values described in the following table.
Field Value Object
Transaction
Attribute
Current Date
Condition
Is Greater Than
Value
11-30-2009
Add a new record and enter the values described in the following table.
Field Value Object
Transaction
Attribute
Partner
Condition
Equals
Value
Indigo Airlines
Add a new record and enter the values described in the following table.
Field Value Object
Transaction
Attribute
Amount
Condition
Is Less Than
Value
2000
Records are processed only if they meet both of the conditions that were entered.
Troubleshooting Disappearing Loyalty Members
If you have set up a new program and you find that newly created members are disappearing after you create them or you get an error message when you try to save the new member saying that it is a null query, then you need to make the following changes to the program:
Make sure that at least one tier class is active.
Make sure that the primary tier of the active tier class has the Show flag selected.
Importing and Exporting Loyalty Programs and Promotions
You can export Siebel Loyalty programs and promotions to an .xml file, then import the program or promotion data either into the same Siebel Loyalty instance, or into a different Siebel Loyalty instance. The ability to import and export loyalty programs and promotions is useful if, for example, you want to move program or promotion data from the development to the production environment.
The procedures in this topic describe how to export and import loyalty programs and promotions.
Exporting Loyalty Programs and Promotions
Perform the steps in the following procedure to export loyalty programs and promotions.
To export loyalty programs or promotions
To export a loyalty promotion:
- Navigate to the Loyalty Promotions Administration screen.
Select the promotion you want to export from the Promotions list.
You can select more than one promotion for export.
Click the Export Promotions button.
The promotion is exported to an .xml file. The value of the File Name process property of the LOY EAI Export Promotions workflow determines the name and location of the exported .xml file. The default directory and file name is
D:\eaipromotions.xml.- Move the eaipromotions.xml file to a directory in the Siebel File System to which the Siebel Service owner has read and write permission.
To export a loyalty program:
- Navigate to the Loyalty Program Administration screen.
Select the program you want to export from the Programs list.
Click the Export Program button.
The program is exported to an .xml file.The value of the File Name process property of the LOY EAI Export Program workflow determines the name and location of the exported file. The default directory and file name is
D:\eaiprogram.xml.Move the eaiprogram.xml file to a directory in the Siebel File System to which the Siebel Service owner has read and write permission.
The exported program or promotion can now be imported from the relevant .xml file into Siebel Loyalty.
Importing Loyalty Programs
You can import loyalty programs that were previously exported from a Siebel Loyalty instance into your Siebel Loyalty implementation. The following program data is imported during the import process:
Tiers
Partners
Program-level attributes
Promotion data
The following procedure describes how to import a loyalty program.
To import loyalty programs
Navigate to the eaiprogram.xml file that contains the program data you want to import.
Edit the file if any changes to the data are required.
Caution: Do not change the value of the Program Id. If you do, then the program import process fails.Navigate to the Loyalty Program Administration screen.
Click the Import Program button.
The program data in the eaiprogram.xml file is imported into Siebel Loyalty. During the program import process, Siebel Loyalty validates the values specified for the program. If invalid values are identified, then the import stops, and an error message is displayed.
Entity row IDs automatically assigned in the original program, for example, tier IDs, product IDs and partner IDs, are retained when a program is imported. Replace these row IDs with equivalent row IDs for the Siebel Loyalty instance into which you imported the program.
Importing Loyalty Promotions
You can import one or more loyalty promotions that were previously exported from Siebel Loyalty into your Siebel Loyalty implementation. You can associate the imported promotion with a new program or with an existing program. During the import process, the following data associated with the promotion is imported:
Rules
Products
Promotion-specific attributes
Displayed attributes
Tiers
Incentive choices
Hierarchical rules data defined for the promotion is not imported.
The following procedure describes how to import a loyalty promotion.
<PromotionNumber> value </PromotionNumber> in the exported eaipromotions.xml file before importing the promotion. Each promotion must have a unique promotion number value.
To import loyalty promotions
Navigate to the eaipromotions.xml file that contains the promotion data you want to import, and make any changes to the data that are required, for example, you might want to change the product associated with the promotion, or amend the criteria for one of the rules.
Caution: Do not change the value of the Promotion Id. If you do, then the promotion import process fails.Navigate to the Loyalty Promotions Administration screen.
Click the Import Promotions button.
Data for all promotions included in the eaipromotions.xml file is imported into Siebel Loyalty.
During the promotion import process, Siebel Loyalty validates the values specified for the promotion. If invalid values are identified, for example, if the promotion uses attribute names that are not defined within the promotion, then the import stops, and an error message is displayed.
Note: Define any program level attributes used by a promotion before importing the promotion.If multiple promotions are imported in a single eaipromotions.xml file, then each promotion is validated individually. If an error occurs during the import process for any one promotion, then import processing for all promotions stops.
After a promotion is imported, it is in an inactive state and must be activated as follows:
- Navigate to the Loyalty Promotions Administration screen.
Select the promotion you previously imported, then click the Activate button.
Update the following values for the imported promotion:
Entity row IDs automatically assigned in the original promotion, for example, tier IDs, product IDs, and partner IDs, are retained when a promotion is imported. These row IDs must be replaced with equivalent row IDs for the Siebel Loyalty instance into which you imported the promotion.
To update the row IDs, re-select any program level attributes that are associated with a selection dialog box (pick applet), and that are used in the criteria or actions defined for the promotion. Reselecting these attributes updates the appropriate row IDs in the Expression field.
The start date and end date defined for a promotion are retained when a promotion is imported. Change these fields if required.
Related Topics
LOY EAI Export Program Workflow
LOY EAI Import Program Workflow