5Working with New Partners
Working with New Partners
This chapter covers how to add new partners to Siebel PRM. It includes the following topics:
About Partner Registration and Enrollment
Siebel PRM enables new partner recruitment by allowing public users to view the Siebel PRM Portal Web site and to register as either individuals or companies. If a prospective partner registers as a company, the brand owner can decide whether to form a partnership with that company.
There are three levels of access to the Siebel PRM Portal:
Public Users (also called Anonymous Users). Any user can view the Siebel PRM Portal home page without registering or providing any information. Public users can read company news and find out about the partner programs that are available. They can also view product offers that are available to the general public (not just to partners), and view literature in the Info Center. The public user home page also includes a login area for registered partners and a link to the registration page for visitors who want to register as partners.
Individual Partners (also called Self-Registered Users). Users who register as individual partners might be consultants who want to get detailed information about your products to recommend them to clients. After providing information about themselves, users are automatically enrolled as individual partners. They can then use the Siebel PRM Portal to purchase products for themselves, participate in auctions, browse and sign up for training courses, view literature, and view special offers. They cannot share opportunities, service requests, activities, or any other transactional or service data through the Siebel PRM Portal.
Company Partners (also called Registered Users). Companies that want to work in an active partnership with your company register in your company's partner program. They use the Siebel PRM Portal to provide detailed information about their companies. Your partner manager evaluates this information, decides how your company can work with their company, and decides whether to approve them as partners. Before they are approved as partners, they can view the same information as individual partners. After they are approved as partners, they can view and share opportunities, service requests, and other transactional data with your company.
You can also add companies as partners that you have recruited in other ways, in addition to those that have applied through the Web site.
The Siebel PRM Portal Home Page
Siebel PRM uses one home page for public, individual and registered users. Views on the home page are hidden or displayed based on the user’s login to personalize the home page for each different type of user.
When you create your home page, you must control which views and content are displayed to different types of users.
Personalization rules control whether views are hidden or displayed. Personalization is based either on global variables or on profile attributes, depending on whether the user is anonymous, self-registered or registered. For example, personalization uses a global variable to determine whether the user is anonymous.
Other personalization rules use profile attributes to determine whether the user has a position or not. For example, the Program Information view appears if the user is anonymous.
Other personalization rules used in the salutation can be based on many other profile attributes, such as the user’s organization or geography. For more information about personalization, see Siebel Personalization Administration Guide.
Providing Information for Public Users of Siebel PRM
When public users come to the Siebel PRM Web site, they see the home page as personalized for public users. In addition to letting registered users log in, this page includes links to information about your partner programs that prospective partners can read without logging in.
You can customize and personalize this home page and the linked pages.
You can give public users visibility to master data, such as literature, FAQs, and product offers. You cannot give them visibility to transactional data, such as opportunities, service requests, or activities.
In the seed data distributed with Siebel PRM, public users have the Unregistered Partner Agent responsibility, and you can control what views they can see by adding or subtracting views to this responsibility.
You can set up catalogs for public users in the same way you would for partners. Catalogs that are visible to public users are also visible to self-registered users. Only Partner Catalogs appear on the Siebel PRM Portal; these are catalogs with the value Partner in the Type field. For more information about responsibilities, see Siebel Security Guide. For more information about setting up catalogs, see the topic Assigning Master Data to the Partner Company. For more information about customizing Siebel PRM, see Using Siebel Tools and Siebel Personalization Administration Guide.
Navigate to the Administration - Application screen and the then Navigation Links view to create records to display banners and icons on the home page of the Partner Portal.
Setting Up a Partner Company Identifier
The final step in enrolling a new partner company is to set up a partner company identifier. A company identifier must be a unique, alphanumeric code such as the Row #of the partner record.
When a user navigates to the Register for a User Id (for employees of existing partner companies only) link on the Siebel PRM Portal, the user is immediately prompted for the company identifier. The user cannot proceed without entering the company identifier.
The user’s application appears in the Partner User Applications screen in Siebel PRM Manager. On that screen, the brand owner can view that application and click the Qualify button, which adds the partner to the User Assignments list view on the Administration - Partner screen, Registered Partners view.
To set up a company identifier (brand owner)
Use the following procedure to set up a company identifier.
Navigate to the Administration - Partner screen, then the Registered Partners view.
Drill down on the company record and then navigate to the More Info view.
In the Company Identifier field, enter a unique alphanumeric code, such as Row #, if necessary.
To get the Row #, on the menu bar, click Help, then About Record.
Note: When a new partner record is created, the company identifier defaults to the number converted from the row id, which you can overwrite. This unique identifier is validated across all partners. You can turn off this check by changing the user property Check Company Identifier Duplicates on BC Channel Partner to N.
To find the company identifier (partner)
On the PRM Portal, a registered user for that partner can find the company identifier and share it with other users who want to apply from that company.
Use the following procedure to find a company identifier.
Navigate to the User Profile screen, then the Company Profile view.
View the alphanumeric code in the Company Identifier field.
After the Siebel Business Application has been submitted, the brand owner can qualify it in the Partner User Application view.
To qualify a user’s application (brand owner)
Use the following procedure to qualify a user.
Navigate to the Administration - Partner screen, then the Partner User Application view and select a partner user application record.
New records have Pending Qualification in the Status field.
Click Qualify.
The user record appears in the Registered Partner screen, User Assignments view.
You now add responsibilities and a position to the user as described in Adding User Assignments at the Partner Company.
About Applying for User IDs
Any user who wants to register for a user ID must be a company or an employee of a partner company only; individual users cannot apply for a user ID.
Eligible users can apply in the following ways:
Registering for a User ID (Partner Employee)
To register as an employee of an existing partner company (partner)
Use the following procedure to register for a user ID as an employee of an existing partner company.
On the Siebel PRM Portal home page, click the New User of an Existing Partner link.
Type in your company identifier code in the Company Identifier field.
If you do not know the company identifier, you can look it up. For more information, see Setting Up a Partner Company Identifier.
Type in your personal information in the fields in the Personal Information form, and type in your contact information in the fields in the Contact Information form.
Read the Terms and Conditions page and click I Agree.
A Thank You message appears and you are registered.
Applying for Partnership (Partner Company)
A company that wants to be a partner must register online on the Siebel PRM Portal.
To apply for partnership for your company (partner)
Use the following procedure to apply for a partnership for your company.
On the Siebel PRM Portal home page, click the New Partner link.
Complete the Partnership Application form.
Click Next at the end of each page to continue.
Read the Terms and Conditions page and click I Agree, and then click Finish to complete the registration process.
A Thank You message appears and you are registered.
Configuring the Individual Partner Homepage
When people who are registered as individual partners log in to Siebel PRM, they view the individual partner home page.
This page uses Siebel Personalization to greet individual partners by name, and it includes links to information such as products available to individual partners. You can customize this home page.
Controlling Individual Partners’ Access to Data
Three factors determine what individual partners see when they use Siebel PRM:
Access Group. You give your partners visibility to master data by associating this data with access groups.
Responsibility. In Siebel Business Applications, the screens and views that users can see are determined by their responsibility. Siebel PRM has one responsibility for individual partners, which is called Self-Registered Partner Agent. Individual partners can see screens and views assigned to this responsibility.
Personalization. In Siebel Business Applications, the views that users see and the data they see can be controlled using personalization, which determines what is visible to users based on global variables (such as the global variable that determines whether the user is anonymous) and based on many profile attributes, such as the user’s organization, age, or geography.
To control individual partners’ access to data, go through the following process:
Assign other master data to individual partners.
Optionally, control the screens and views individual partners can see.
Organization is not used to limit data that individual partners can see, because organizations are used primarily for transactional data, and individual partners do not have access to transactional data. Individual partners are entered as contacts in the brand owner company’s default organization.
Assigning Master Data to Individual Partners
Siebel business Applications work with two types of data:
Master (or Referential) Data. This is data that users can only read, such as sales literature and service solutions. It is usually assigned to groups of users through access groups.
Transactional Data. This is data that users can create, read, edit, and delete, such as opportunities, accounts, contacts, and service requests. It can be assigned to individuals, to groups of individuals (such as a sales team), or to organizations. You cannot share transactional data with individual partners, only with partner companies.
Individual partners cannot view transactional data, but you can allow them to view master data. It might be useful for individual partners to view master data such as price lists and literature they use when working with your products, data sheets and information on recommended practices for system integrators, product offers that you sell to partners and to the general public, and other types of master data, such as FAQs and solutions.
Public catalogs are visible to self-registered partners out of the box, if the catalog’s Type field has the value Partner.
To use access control to make other master data visible to individual partners, add the individual partners to user lists, add these user lists to access groups, and associate the access groups with the appropriate categories. These can be categories that are also associated with partner companies, or they can be categories you create specifically for individual partners. For more information about assigning data to organizations and categories, see Siebel Security Guide. For more information on creating and assigning product offers, see Siebel Marketing User Guide. For more information on creating and assigning literature and other master data, see Siebel Applications Administration Guide.
To associate literature with a category (brand owner)
The following procedure shows how to assign literature to individual partners. Assign other types of master data in the same way, but use the other views under the category, instead of the literature view.
Navigate to the Administration - Catalog screen and click the appropriate catalog.
A Categories list appears that shows the categories in that catalog.
Select the appropriate Category.
Navigate to the Literature view for this category, and add a new record.
The Add Literature dialog box appears.
If necessary, use a query to find the literature you are looking for.
Select literature that you want to associate with the category, and click OK.
The literature is associated with the category and is visible to individual partners.
Controlling the Screens Visible to Individual Partners
By default, individual partners can see selected views in these screens:
Home
User Profile
Infocenter
Offers
Partner Locator
Search
Self-Service
Auctions Lister Area
Sales Catalog, Shopping Cart, Orders, and Saved Quotes
Training
In the seed data, the responsibility for individual partners is Self-Registered Partner Agent. You can see the views available to individual partners by showing the views that are associated with this responsibility. You can also make views in other screens visible to individual partners by associating them with this responsibility.
If you want to add a new responsibility or add new views to an existing responsibility, talk to your system administrator. For more information about responsibilities, see Siebel Security Guide.
Thanking Individual Partners for Registering
The sample data distributed with Siebel PRM uses workflows to automatically send email when new individual partners register to thank them for registering. This email works like a mail-merge letter; it is based on a form-letter template, and it is personalized using information that the partners filled out when they registered.
You must modify the form letter template included in the sample data to use your own company name. You might also want to modify it in other ways.
To modify the email template you must modify the workflow process. Ask your system administrator for details.
The name of the workflow is Prospect Registration eChannel.
About Enrolling New Partner Companies
Siebel PRM lets you share more sensitive information with partners with whom you have a formal business relationship. For example, if you have entered into a partnership with a company that resells your product, it is important to share information about accounts, opportunities, and activities with that partner. Siebel PRM lets you share this information with the partner’s employees in the same way that you would your own employees. To provide access to this data, you give the partner employees login access to the Siebel PRM Portal.
To share information in this way, you must follow a series of steps that set up this partner company in your system. Typically, this process begins when the partner uses the Siebel PRM online registration to apply to be a part of your partner program. There are other ways that a partnership can be initiated, which are discussed in the topic Other Ways of Adding Partner Records.
The process of adding partners depends on the following data and structures that are put in place by your system administrator or channel operations manager when Siebel PRM is initially set up:
The organization structure must be established so that you can place this new partner organization into the existing organization hierarchy.
Partner responsibilities must exist in order to assign these responsibilities to the partner organization.
Access groups must also have been created so that the new partner can be placed in the appropriate access groups and be given access to master data.
These steps are described in Setting Up Siebel PRM.
Process of Enrolling a New Partner Company
In some situations, you can add a partner company and skip the registration and the following steps. Skip the registration and the following steps only if the partner company is not using the Siebel PRM Portal. You can still work with the partner company record using the Siebel PRM Manager: the channel manager can view the company’s records in the Partner screen and can also use the Siebel PRM Manager to request market development funds (MDFs) for the company. You display partners who are approved but not registered by navigating to the Administration - Partner screen and choosing the Approved Partners link. You display registered partners by navigating to the Administration - Partner screen and choosing the Registered Partners link.
To enroll a new partner company, you typically perform the following tasks:
Add the partner company by:
Displaying and Assessing Prospective Partner Companies. View the Siebel Business Applications submitted on the Siebel PRM Portal by prospective partners. If a company applies to be a partner through your Siebel PRM Web site, it has entered the information you need for the partner record. After this application is submitted, it is visible in Prospective Partners List view. To view the Siebel Business Applications of prospective partners, Navigate to the Administration - Partner screen, then the Prospective Partners view.
Adding a Partner Record by Qualifying a Partner Company. To qualify the partner, click Qualify. This moves the Siebel Business Application from the Prospective Partners list to the Qualified Partners List. The prospective partner is now a qualified partner.
Registering the Partner Company. After qualifying a prospective partner, add it to the Registered Partner list by clicking Register. The partner is now a registered Partner. To view the registered partners, Navigate to the Administration - Partner screen, then the Registered Partners view.
Note: In some situations, you might add partner companies in other ways, described in Other Ways of Adding Partner Records.Assigning Responsibilities to the Partner Company. Responsibilities control the views partners can see.
Assigning Positions to the Partner Company. You can define the positions for the partner company, or you can let a delegated administrator at the partner company define these positions.
Assigning Master Data to the Partner Company. You assign most master data by adding the partner company to one or more access groups. You also assign a price list to the partner company.
Adding User Assignments at the Partner Company. You can enter the users at the partner company yourself, or you can enter one user at the partner company as a delegated administrator, who can add other users and delegated administrators at the partner company. As part of adding user assignments, you can also create a User ID and password for each employee and associate the user with a position and responsibilities.
Contacting the New Delegated Administrator. You can set up a workflow to send email to the new delegated administrator after the partner company has been added.
Adding Locations for the Partner Locator. If you want the partner company to be visible in the Partner Locator, you must add locations or have the partner add its own locations, and you must publish locations.
Completing the Partner Profile. Optionally, you can complete the partner profile to make sure that it has the information you need and that it is accessible to the correct people in your company.
Displaying and Assessing Prospective Partner Companies
This task is a step in Process of Enrolling a New Partner Company.
When a company applies to be a partner, you need to assess how well it can work with your company before deciding whether to enroll it as a partner.
There are many things you can do when you assess a potential partner company. You begin by assessing the profile data entered when the company applied to be a part of the partner program. You might also want to do a credit check, talk to key people in the company, and do many other offline activities.
When a company applies at your Siebel PRM Portal to be a partner, the company fills out a partner profile, including detailed information about the potential partner company’s business. You begin the enrollment process by examining this information to understand this company’s business model and seeing how it might fit in with your business goals.
To view prospective partners and their profiles (brand owner)
You use the Prospective Partners list to view the companies that have applied to become your partners, along with their profiles. This list includes companies and individuals that have registered as partners online.
Navigate to the Administration - Partner screen, then the Prospective Partner view.
The Prospective Partners list appears with a list of companies that have applied to be partners.
Select a partner company in the Prospective Partners list.
The profile information about that company appears.
Adding a Partner Record by Qualifying a Partner Company
This task is a step in Process of Enrolling a New Partner Company.
To qualify a partner company
If a partner company registered at your Web site wants to apply to be a partner, the first step is to qualify the partner company. Qualifying a partner company moves it from the Prospective Partners list to the Qualified Partners list.
Navigate to the Administration - Partner screen, then the Prospective Partners view.
Select the prospective partner record that you want to qualify and click Qualify.
The Prospective Partner record is converted to a Qualified Partner record, and appears in the Qualified Partners list.
In some situations, you can just qualify a partner company and skip the registration tasks. Skip the registration tasks only if the partner company is not using the Siebel PRM Portal, and you are using Siebel PRM only to keep track of the partner company, not to share information with it. You can still work with the partner company record using the Siebel PRM Manager; the channel manager can view the company’s records in the Partner screen and can also use the Siebel PRM Manager to request market development funds (MDFs) for the company.
Registering the Partner Company
This task is a step in Process of Enrolling a New Partner Company.
For any method you choose to use to add a partner company record, you must register the partner company.
About Placing the Partner Company in the Organization Hierarchy
Siebel business Applications let you divide your business into organizations, which control visibility to data. For example, when users choose All Contacts, they display the contacts in their own organization.
While setting up Siebel PRM, your company’s partner operations manager might have created a hierarchical organizational structure to organize your partner companies. For example, there might be a hierarchy that organizes partner companies based on the product they specialize in or the industry in which they work.
When you register a new company, you must place it in the organization hierarchy by choosing its parent organization. For example, if your hierarchy is based on industry, you must place the new partner organization under the organization for the appropriate industry.
You can also create a hierarchical structure with multiple organizations for the partner company itself. For example, if you assign opportunities to different regional divisions of a partner company, you can create an organization that represents the entire partner company and organizations under it in the hierarchy that represent its regional divisions. Then, you can assign opportunities to organizations representing the regional divisions, and only the division you assigned the opportunity to is able to see it. For more information about setting up the organization hierarchy in Siebel PRM, see Setting Up Siebel PRM. For more information about using organizations to control visibility to data, see Siebel Security Guide.
About Specifying the Partner Manager for a Partner Company
If you are using market development funds (MDFs), you need to specify an employee in the partner manager field, so that fund requests are routed properly for approval. The employee selected in the partner manager field is the first to approve an MDF request.
If you are not using MDFs, you do not need to use the Partner Manager field. You can enter a sales team instead. You might want to use the Partner Manager field as well as the Sales Team field to indicate that one person has primary responsibility for the partner.
In any event, the employee selected in the Partner Manager field must also be on the sales team to have visibility to the record in My Partners view. The partner’s record is displayed in My Partners view for members of the account team.
Registering the Partner Company
Select the Partner record and click Register to place the partner in the organization hierarchy and specify the Partner Manager field.
Add a Partner record for the new partner company, using the method described in the topic Adding a Partner Record by Qualifying a Partner Companyor one of the methods described in the topic Other Ways of Adding Partner Records.
In the Approved Partners view, with the new Partner record selected, click Register at the start of the Partners list.
The Register Partner form appears.
Check the Organization box.
Registering this partner company makes it an organization, so you can put it in your organization hierarchy.
Click the Single Select button for the Parent Division field.
The Organization dialog box appears.
Choose the division that comes before this partner organization in the organization hierarchy, and click OK. If you leave the field blank, the current user’s organization is the parent organization by default.
To specify the Partner Manager field:
Click the Single Select button for the Partner Manager field.
The Pick Position dialog box appears, listing the positions and names of your employees.
In the Pick Position dialog box, choose the position and person who is the partner manager for this partner organization, and click OK.
The login name of the person you selected is entered as the Partner Manager in the Register Partner form.
If you do not select an employee for this field, the current user is entered by default.
Click the Save button at the start of the Register Partner form.
The partner company has been registered.
After enrolling and registering the new partner, add the company identifier to start processing user applications from the Administration - Partner screen, then the Partner User Applications view.
Assigning Responsibilities to the Partner Company
This task is a step in Process of Enrolling a New Partner Company.
Responsibilities specify which views users of Siebel Business Applications can access.
For example, you can create the responsibility Salesperson, which includes the My Opportunities view, the responsibility Sales Manager, which includes both My Opportunities and My Team’s Opportunities views, and the responsibility Sales Director, which includes the My Opportunities, My Team’s Opportunities views, and All Opportunities views.
If you are using delegated administration, assign one partner employee the Partner Operations Manager responsibility, which includes the views for delegated administration in the Siebel PRM Portal. The partner operations manager uses the delegated administration views to add other employees and assigns them responsibilities.
Partners cannot create their own responsibilities. They can choose only from the set of responsibilities that you give them access to. You must associate at least one responsibility with the partner organization, so the partner users have access to some views when they log in to the PRM Portal. Typically, you assign multiple responsibilities to the partner organization so that the delegated administrator can give different types of users different responsibilities, just as you would with your own employees. For more information about positions and responsibilities, see the topics on defining positions and on defining responsibilities in Siebel Applications Administration Guide.
To assign responsibilities to a partner company
Navigate to the Administration - Partner screen, then the Registered Partners view.
In the Partners list, drill down on the name for the partner company to which you are assigning the responsibilities.
If necessary, navigate to the Responsibilities view.
In the Responsibilities list, add a new record.
The Add Responsibilities dialog box appears.
Select the Responsibility record that you want to add, and click OK.
The responsibility is added to the Responsibilities list.
Assigning Positions to the Partner Company
This task is a step in Process of Enrolling a New Partner Company.
Positions specify which data Siebel Business Applications users can see when they display one of the "My" views. For example, if a user displays the My Opportunities view, the user sees the opportunities that have that user’s position on the sales team.
For this reason, most Siebel implementations give a different position to each employee. For example, Siebel implementations would generally use positions such as Salesperson-042233 and Salesperson-042234 to give each of their salespeople a unique position. Then, when salespeople display My Opportunities view, for example, they see only their opportunities, not the opportunities of other salespeople.
Because positions are used this way, you can assign data to new employees who replace other employees simply by giving them the positions of the employees they are replacing (such as Salesperson-042233) to give them visibility to the data they need.
If you are using delegated administration, which lets administrators at partner companies add employees at their company, you must create at least one position for the delegated administrator. You generally want the delegated administrators to create positions in addition to adding employees, because they generally must create a new position whenever they add a new employee.
If you are not using delegated administration, you must add positions for all partner employees. For more information about positions and responsibilities, see Siebel Security Guide.
To assign positions to a partner company
Navigate to the Administration - Partner screen, then the Registered Partners view.
In the Partners list, drill down on the name for the partner company to which you are assigning the positions.
Navigate to the Positions view.
In the Positions list, add a new record.
Enter information in the Position form to create a new position.
Assigning Master Data to the Partner Company
This task is a step in Process of Enrolling a New Partner Company.
Siebel Business Applications include two different types of data, which you work with in different ways:
Transactional Data. This is data that users can create, read, edit, and delete, such as opportunities, accounts, contacts, and service requests. It can be assigned to individuals, to groups of individuals (such as a sales team), or to organizations.
Master (or Referential) Data. This is data that users can only read, such as sales literature and service solutions. It is usually assigned to groups of users through access groups.
The next step in adding a new partner company is to assign it the appropriate master data.
To assign most master data to partners, you use access groups. Before you can assign master data in this way, your channel operations manager must set up the appropriate access groups and categories of master data, as described in Setting Up Siebel PRM Then, any partner company that you add to the access group has access to the master data visible to that access group.
Price lists are the only type of master data that is not assigned using access groups, because price lists are usually assigned to smaller groups of partner companies than other forms of master data. For example, you might assign master data to an access group called resellers, but you might have a different price list for each reseller, or you might have a standard price list for most resellers but special price lists for five of your resellers. Assigning price lists to access groups would limit the utility of the access groups, because price lists often do not follow the same rules as other master data.
You might also want to assign some types of transactional data, such as customer accounts and contacts, to the new partner company. You assign other types of transactional data, such as opportunities and service requests, to the partner company after you start working with it.
Most often, the type of access groups that partners are assigned to Partner Communities, but they can be assigned to access groups of any type.
For information about assigning transactional data to partner companies, see Sharing Data with Partners.
To add a partner company to an access group
Navigate to the Administration - Partner screen, then the Registered Partners view.
In the Partners list, drill down on the name for the partner company which you are adding to the access group.
Navigate to the Access Groups view.
In the Access Groups list, add a new record.
The Add Access Groups dialog box appears.
Select the Access Groups to which you want to add the partner, and add a record.
Use the following procedure to assign a price list to a partner company.
Navigate to the Administration - Partner screen, then the Registered Partners view.
In the Partners list, drill down on the name for the partner company to which you are assigning the price list.
Navigate to the Price Lists view.
The Price Lists view appears.
In the Price Lists list, add a new record.
The Add Price List dialog box appears.
Select the Price List record that you want to add and click OK.
The price list is added to the Price Lists list.
Adding User Assignments at the Partner Company
This task is a step in Process of Enrolling a New Partner Company.
As the next step in adding a new partner company, use the User Assignments view to add partner employees as Siebel PRM users. You can also use this screen to update positions, responsibilities, and logins for existing users.
Partner users must be added as employees to be able to log in to the Siebel PRM Portal. The Employee check box must be selected in the User Assignments view. This check box is selected by default when a new user is added.
Siebel PRM lets you add two types of partner employees:
End Users. You can add the employees in your partner company as end users.
Delegated Administrators. You can designate one or more employees at the partner company as delegated administrators, who can then add new users at the partner company and assign them responsibilities you have created for this partner company. The delegated administrator can also perform routine maintenance tasks, such as modifying user records. A delegated administrator must have a responsibility that includes the views used for delegated administration. In the seed data, this responsibility is Partner Operations Manager.
Delegated administrators can also give employees at their company the responsibility of delegated administrators. Therefore, you can add the person who submitted the application for a partner company as a delegated administrator, and then that delegated administrator can add other employees at the partner company as delegated administrators, who actually enter the users.
After the delegated administrator has added partner employees, you can see them using the Siebel PRM Manager. For more information on adding users and delegated administrators, see Setting Up Siebel PRM.
To display partner employees who are Siebel PRM users
Navigate to the Administration - Partner screen, then the Registered Partners view.
Drill down on the name for the partner company whose employees you want to see.
Navigate to the User Assignments view.
The User Assignments view appears. The information in the following table is entered for the person who applied to be a partner and for any other partner employees who have been added.
Field
Description
Name fields
The first and last name and title (such as Mr. or Ms.).
Job Title
The user’s job title.
Position
The user’s position or positions.
Responsibility
The user’s responsibility.
User ID and Password
The login name and password with which the user logs into the Siebel PRM Portal. Password is only accessible if LDAP has been set up. You might have to use the Column Displayed menu item to display these fields.
Time Zone
The user’s time zone. You might have to use the Column Displayed menu item to display this fields.
Contacting the New Delegated Administrator
This task is a step in Process of Enrolling a New Partner Company.
Contact the delegated administrator at the new partner company to provide more details about next steps.
Tell the delegated administrator to use the Siebel PRM Portal to add new users, including new delegated administrators, and to add user assignments for the employees at the company who use the Siebel PRM Portal.
You can contact the new delegated administrator personally, or you can set up Siebel Business Process Designer to send the administrator email automatically when the company is added as a partner.
The sample data included with Siebel PRM includes a sample of this email and a sample of a workflow that sends it automatically after the new partner company is added. You can use these samples as the basis of your email and workflow.
The name of the workflow is Send Prospect Partner Application Status eMail (Siebel PRM). For more information about Siebel Business Process Designer, see Siebel Business Process Framework: Workflow Guide.
Adding Locations for the Partner Locator
This task is a step in Process of Enrolling a New Partner Company.
If you want partners to be visible to other partners in the Partner Locator, add their locations and publish them to the Partner Locator. Alternatively, partners can add their own locations through the Siebel PRM Portal, and you can publish them.
The Partner Locator allows customers, partners, and brand owner employees to find partners who are near to their location and who have special expertise. For example, if customers want a specific service, they can go to your Web site and use the Partner Locator to find a list of partners near them who have expertise in that service. If one partner company wants to find other partners to work with it on an opportunity, it can find other partners with the expertise it needs.
The Partner Locator allows users to search for partner name, partner type, partner expertise, and satisfaction index. It also allows users to enter their own location and choose the distance from their location that they want to search. For example, they can search for partners within 50 miles of their location.
Because one partner company can have many locations, you or the partner company must enter all the locations that appear in the Partner Locator.
Partners can add locations under their Company Profile, available through the Profile link on the PRM Portal.
You must also select the Publish check box for a partner to publish all of that partner’s locations to the Partner Locator. You can deselect this check box to remove all the partner’s locations from the Partner Locator. For example, you might want to remove a partner if you charge partners a fee to be listed in the Partner Locator and one partner company does not pay.
If this check box is not selected, the partner company is still visible to the brand owner in the Partner Locator of the Siebel PRM Manager, but it is not visible to other partner companies in the Partner Locator of the Siebel PRM Portal.
To publish a partner to the Partner Locator and add locations
Navigate to the Partners screen, then the Partner List view.
In the Partners list, drill down on the name of the partner that you want to publish to the Partner Locator.
Navigate to the More Info view.
In the More Info form, select the Publish check box.
Navigate to the Locations view.
If the address of this location has not been entered, click the Multiple Select button of the address field in the Partners form (which appears before the Locations list), and use the dialog box to add the address.
In the Locations list, add a record for each of the partner’s locations and enter the information in the following table.
Field
Description
Location Name
Enter a business name for this location.
Address
click the Multiple Select button and select the address of this location.
City
Entered when you select the address.
Zip Code
Entered when you select the address.
State
Entered when you select the address.
Country
Entered when you select the address.
Longitude
Calculated and entered by the Siebel CRM system when the record is saved.
Latitude
Calculated and entered by the Siebel CRM system when the record is saved.
Business Hours
Enter the business hours for this location.
Completing the Partner Profile
This task is a step in Process of Enrolling a New Partner Company.
Optionally, after completing the administrative tasks of adding a partner company, you can make additional entries in the partner profile to make sure that it has the information your company needs and that it is accessible to the correct people in your company.
You can:
Enter the partner’s competitors and existing partnerships.
Enter the partnership profile.
Give your employees access to the partner in the My Partners view.
Entering the Partner's Competitors and Existing Partnerships
Because it could be a security breach to expose the lists of a partner’s competitors and existing partnerships during registration, these fields remain as text fields during the registration process, so they are not automatically entered in the Siebel database. To update these fields, you can select companies that match what your partner entered in the Partner Profile view during registration.
To enter the partner’s competitors and existing partnerships
Navigate to the Partners screen, then the Partner List view, drill down on the name of the new partner company, and then navigate to the Profile view.
Navigate to the Partnership Application link.
The information that the partner filled out in the profile appears.
Note the existing partners and competitors entered by your partner.
Navigate to the Partner Profile view.
On the Profile form, in the field Other Program Memberships, enter the companies that the partner specified as its existing partners. If the specified company does not exist on the account list, you might want to add an account to your account list for this company.
In the Partner's Competitors field, enter the companies the partner specified as its competitors. If the specified company does not exist on the account list, you might want to add an account to your account list for this company.
Entering the Partnership Profile
Siebel PRM includes two types of profiles:
Partner profile. This profile describes the partner company.
Partnership profile. This profile describes how your company works with the partner company.
The partner profile was entered when a company applied to be a partner or when you were evaluating the potential partner.
After you register a partner, you can enter the partnership profile. For more information about the partnership profile, see Managing Your Partners.
Giving Your Employees Access to the Partner in My Partners View
You can give access to this partner record to specific employees in your company, so this partner is included in the Partners list when they display My Partners view.
You make the partner company visible in an employee’s My Partners view by adding that employee to the sales team for the partner company.
To add an employee to the partner’s sales team
Navigate to the Partners screen, then the Partner List view.
In the Partners list, select the record for the partner company.
In the Partner form, click the Multiple Select button of the Sales Team field.
The Sales Team Members dialog box appears.
Note: The Sales Team field links to a sales team multi-value group applet (not to an account team multi-value group applet).Select an employee you want to add to the Sales Team and click OK. If necessary, click the New button to add employees to the Sales Team Members dialog box.
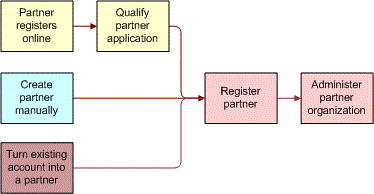
Other Ways of Adding Partner Records
Because it is most common for partners to apply through your Web site, only this method of adding partners was described as the initial tasks of Process of Enrolling a New Partner Company.
However, you can add a partner record in three ways:
Qualify and register a partner company. If a company applied to be a partner through your Siebel PRM Web site, it has entered the information you need for the partner record. To add a partner record, click Qualify and then in the Partner List, click Register. This was described earlier.
Enter a partner company manually. If a company became a partner without applying through your Siebel PRM Web site, you can enter it in the Partners list manually. When you first set up Siebel PRM, you enter records for your existing partners manually.
Convert a customer account to a partner. If one of your customers also becomes a partner, you can add it to the Partners list by converting its Account record to a Partner record.
The following topic describes the other two other methods of adding a partner record, which are less common but also are useful.
After adding a new partner in either of these two ways, you must go through the rest of the process of enrolling a new partner, as described previously. The process using the three methods of adding a new partner is shown below.
Adding a New Partner Record Manually
If a company did not apply to be a partner at your Web site, add the new partner record manually. You can enter a partner manually in two ways:
Add a qualified partner manually. If you have already qualified the partner company, you can enter it manually as a Qualified partner.
Add a prospective partner manually and promote it. If you have not already qualified the partner company, you can enter it manually as a prospective partner. After it is qualified, you can promote it.
Adding a Qualified Partner Manually
If the partner has been qualified, enter the qualified partner record manually. Then, register the partner and enter the partner profile.
To add a qualified partner manually
Navigate to the Administration - Partner screen, then the Qualified Partners view.
In the Partners list, add a new record.
Fill in the blank record and the More Info view about the new partner with the information in the following table.
Field
Description
Name
Enter the name of the partner company.
Site
Enter a description of the physical location of the partner, such as "Headquarters" or "San Francisco."
Address, and so on
Enter the partner company’s street address, city, state, ZIP code, and country.
Main Phone #
Enter the partner company’s main phone number.
Main Fax #
Enter the partner company’s main fax number.
Email
Enter the partner company’s main email address.
URL
Enter the address of the partner’s Web site.
Currency
Enter the currency the partner uses.
Partner Type
Optionally, click the Single Select button and use the dialog box to choose the type of partner you are adding. For example, aggregator, reseller, or service provider.
Partner Tier
Enter the partner tier. Companies might use tiers such as gold, silver, and bronze, or strategic, premier, and alliance.
Industries
Optionally, click the Multiple Select button, and in the dialog box, choose the industries to which this partner sells.
Territories
Optionally, click the Single Select button, and in the dialog box, choose the territories to which this partner sells.
Ranking
Optionally, enter information about how this partner is ranked against other partners in your partner program, which can help you keep track of your highest performing partners.
Stage
Use the picklist to choose the stage of the partner’s application. Options are Active, Application Pending, Candidate, and Contract Pending.
Publish
Determines whether this partner is published in the Partner Locator module. If this flag is checked, then when users search for partners in Partner Locator, this partner is included in the possible result set.
Organization
Use this field to enter the partner’s organization.
Sales Team
Select the sales team for the partner company. These are your employees who see this partner company’s record in the My Partners view.
The Sales Team field links to a sales team multi-value group applet (not to an account team multi-value group applet).
Price List
Select one or more price lists that this partner company uses.
Alias
Optionally, enter aliases for this partner company, names that the partner company might use in addition to its company name.
Currency
Select one or more currencies that this partner company uses.
Account Type
Select Partner as the account type.
Status
Select the account status: Active, Contract Pending, Marked for Deletion, or Inactive. You must select Active when adding a new record to be able to work with the partner.
Parent Account
Optionally, enter the parent company of the partner company.
Parent Account Site
Optionally, enter the site of parent company.
Click Register, and complete the process of adding the partner company, as described earlier in this chapter in About Enrolling New Partner Companies.
Adding a Prospective Partner Manually
If the partner has not yet been qualified, manually enter both the Prospective Partner record and partner profile. At some later time after the partner has been approved, click Qualify to move it to the Approved Partner list, and then complete the registration.
Before you add Prospective Partner records manually, you must make sure that the partner managers at your company who add Prospective Partner records have the value Self-Registered Partner Agent in their New Responsibility field. When these managers create new users, the new users inherit the responsibility in their New Responsibility field. When the prospective partners inherit the responsibility Self-Registered Partner Agent, the partners are able to log in to the Siebel PRM Portal as self-registered users in the interim, until they are qualified.
To enter the partner manager’s new responsibility
Navigate to the Administration - User screen.
Use a query to find the employee whose new responsibility you want to enter.
In the form for this employee, in the New Responsibility field, choose Self-Registered Partner Agent.
Navigate to the Administration - Partner screen, then the Prospective Partners view.
In the Prospective Partners list, add a new record.
Fill in the blank record and the form with the information about the new partner.
Navigate to the More Info view and enter the partner company profile and other information.
At some later time after the partner has been qualified, click Qualified to move it to the Qualified list and complete the registration process as described earlier in this chapter in About Enrolling New Partner Companies.
Converting a Customer Account to a Partner
You might find that one of your customers wants to become a partner. You can convert the customer’s Account record to a Partner record.
To convert a customer account to a partner
Navigate to the Accounts screen, then the Accounts List view.
In the Accounts list, drill down on the customer account that you want to convert to a partner.
In the More Info view, select Partner from the Account Type list.
Click the Partner check box to select it.
The account is converted to a partner and appears in the Partners screen, Approved Partners view, as well as in the Accounts screen.
Navigate to the Administration - Partner screen, then the Approved Partners view.
Click the Register button to complete the process of adding the partner company, as described in About Enrolling New Partner Companies.
Delegated Administration for Partners
Delegated administration allows partners to enter and maintain information about users and about their organizations, positions, responsibilities, and communication profiles, to reduce the administrative work that the brand owner must do.
Delegated administration also gives partners more flexibility to associate users with the appropriate organization, responsibility, and position, and to create or modify product catalogs and literature catalogs.
Partners have the ability to do the following:
Delegated User Administration for Partners
When you register a new partner company, you create an organization for that partner company. You can also use the Administration - Group screen to create suborganizations under that partner organization. For more information, see Setting Up the Organization Structure for Siebel PRM.
When you create a partner company, you add at least one user and you add positions and responsibilities used by that company. For more information, see About Enrolling New Partner Companies.
Delegated administrators can reduce your administrative burden by adding and maintaining users at the partner company. To add a user, they must associate the user with one or more positions and one or more responsibilities.
Because responsibilities control which views a user can view, delegated administrators are not allowed to create new responsibilities. The delegated administrator can associate users with responsibilities that you created.
Delegated administrators can create new positions. In most implementations of Siebel Business Applications, each employee has a different position, so it is also necessary to create new positions when you add new employees. For more information about adding users, see Adding User Assignments at the Partner Company. For more information about responsibilities, see Assigning Responsibilities to the Partner Company. For more information about positions, see Assigning Positions to the Partner Company.
A delegated administrator at a partner company can:
Add and maintain users
Add and maintain positions
Associate users with organizations or suborganizations
For the partner to use suborganizations, the brand owner must create the suborganizations under that partner organization.
Adding Positions
Positions control which data users see in the My and My Teams views:
In My views, users see the data for their own position. For example, in the My Opportunities view, users see all the opportunities where their position is on the sales team.
In My Team views, managers see the data for their own position and for all of their reports. For example, in the My Team’s Opportunities view, managers see all the opportunities where their position or their reports’ positions are on the sales team.
When delegated administrators create new positions, they specify a name and a parent position for each position. The parent position is the position of the manager whose team this employee is on.
In most implementations of Siebel Business Applications, each employee has a different position. For example, rather than one position named Sales Representatives, there would be positions named Sales Representative 100, Sales Representative 101, and so on. Then in the My Opportunities view, sales representatives would only see opportunities where they are on the sales team; they would not see all opportunities where any sales representative is on the sales team.
Therefore, delegated administrators generally must add new positions for new users. The position must be added before the user is added.
To add a new position at the partner company (partner)
The partner delegated administrator navigates to the Administration screen, then the Organization Explorer view.
In the Organization Explorer, the partner clicks the arrow next to the organization to which the position is being added.
Hyperlinks for Organizations, Positions, and Users appear under this organization.
The partner clicks the Positions link under the organization.
In the Positions list, the partner adds a new record and enters information about the new position.
Adding Users
In most implementations of Siebel Business Applications, each employee has a different position, as described in the previous topic. After you have added the position for the new user, you can add the record for the new user.
To add a new user at the partner company (partner)
The partner delegated administrator navigates to the Administration screen, then the Organization Explorer view.
In the Organization Explorer, the partner clicks the arrow next to the organization to which the user is being added.
Hyperlinks for Organizations, Positions, and Users appear under this organization.
The partner navigates to the Users link under the organization.
The Users list appears.
In the Users list, the partner adds a new record and enters information about the new user (including position).
Giving Users Visibility to Different Organizations
When new users are added, the delegated administrator adds them to an organization, as described in the previous topic. The delegated administrator can also associate existing users with different organizations and suborganizations than the ones which with they were initially associated, thus changing the data that is visible to them.
Suborganizations can be used to control data visibility within the partner company. They are also important to partner collaboration. Partner collaboration allows partners to share information with organizations and suborganizations in other partner companies, and partners can associate employees with the appropriate suborganization so they can view the data they need.
The brand owner must set up this structure of suborganizations under the partner organization. For more information about organizations, see Setting Up the Organization Structure for Siebel PRM.
A user can be associated with more than one organization. If a user is already associated with an organization and the partner wants the user to be associated with a different organization, the partner must delete the user’s existing position as well as add the position in the new organization. If the existing position is not deleted, the partner is still associated with the first organization as well as with the second.
The delegated administrator associates the user with the organization by giving the user a position in that organization. If the position does not already exist, then before performing the following procedure, the delegated administrator must create it as described.
Though the user has visibility to the data in the organization with which the position is associated, the delegated administrator still sees this user’s name listed under the user’s original organization.
To associate a user’s position with an organization or suborganization (partner)
The partner delegated administrator navigates to the Administration screen, then the Organization Explorer view.
The partner clicks the arrow next to the organization or suborganization that the user is currently in.
The partner clicks the Users link under that organization.
In the Users list, the partner clicks the name of the user to be associated with an organization.
The Users form appears, with information about that user.
The partner clicks the Multiple Select button for the Position field.
The Positions Occupied dialog box appears.
The partner uses the arrows to move positions between the Available list and the Selected list, until only the desired positions are in the Selected list, and then clicks OK.
The user can see the data visible to the organization with which this position is associated.
Delegated Catalog Administration for Partners
The partner-delegated administrator can add products or literature to catalogs.
Partners might do this for a number of reasons. For example, if a partner sells products that are complementary to the brand owner’s products, the partner can add these to the product catalog and add literature about them to the literature catalog. Then, their product and literature catalog support the complete solution that they provide to customers.
Partners might also want to create their own catalogs and use them for selling products and managing literature.
The brand owner must create the catalog, even if it has no items in it. The partner can then add items to it.
The partner can see all the master data that the brand owner has associated with the catalog, but the partner can only add products and literature. For more information about creating catalogs, see Assigning Master Data to the Partner Company. For more information about pricing, see Siebel Pricing Administration Guide.
Adding Items to Catalogs
Delegated administrators can use the following procedure to add items to catalogs.
To add items to catalogs (partner)
The partner-delegated administrator navigates to the Administration - Catalog screen.
In the Catalogs list, the partner drills down on the name of the catalog to which items are being added.
In the Categories list, the partner does either of these actions:
Selects an existing category to which the item is being added
Adds a record and enters information about a new category to which the item is being added
The partner navigates to either the Products or the Literature view.
To add an existing product:
The partner navigates to the Products view.
In the Products list, the partner adds a new record.
In the Add Internal Products dialog box, the partner queries to find an existing product, and navigates to Go.
The partner selects the existing product to be added and clicks OK.
The partner associates the product with a price list, as described in step 7.
To add a new product:
The partner navigates to the Products view.
In the Products list, the partner adds a new record.
In the Add Internal Products dialog box, the partner clicks Go to run an empty query.
In the Add Internal Products dialog box, the partner adds a new record and enters information about the product. navigates to New.
The partner associates the product with a price list, as described in step 7.
To associate a product with a price list:
After adding the product, the Partner clicks its name in the Product list.
The Product form appears, with the Price Lists list.
In the Price Lists list, the partner adds a new record.
In the Add Price Lists dialog box, the partner selects a price list.
In the Price Lists list, the partner enters a price for the product in the List Price field.
To add a new literature item:
The partner navigates to the Literature view.
In the Literature list, the partner adds a new record.
In the name field of the new record, the partner selects the file that contains the literature.
Delegated Communication Administration for Partners
Delegated communication administration uses two screens, the Communication Administration screen and the Communication Profile view of the User Profile screen.
The Siebel PRM Portal’s Communication Administration screen allows the delegated administrator to view communications drivers, such as the drivers used for email. Each driver has parameters that specify how it behaves. For example, the parameters for an email driver might allow the administrator to choose whether the message is in plain text, whether the From address is required, whether messages are deleted after being processed, and other parameters.
The drivers and parameters in Siebel PRM Portal.
After these drivers have been set up, the Siebel PRM Portal’s User Profile screen allows the delegated administrator to associate drivers with partner employees, to specify which drivers each employee uses.
In the User Profile screen, the delegated administrator can also override the default parameters for individual users. For example, for an email driver, the parameter set in the Communication Administration screen might specify that all messages are plain text. In the User Profile screen, the administrator might override this for specific users to allow them to view HTML messages. For more information about communication administration, see Siebel CTI Administration Guide.
Setting Up Drivers and Parameters
Delegated administrators can use the following procedure to add or set up drivers and parameters.
To set up drivers and parameters (partner)
The partner-delegated administrator navigates to the Administration - Communication screen.
In the Driver list, the partner selects a driver.
In the Driver Parameters list, the partner modifies the parameters for that driver by specifying whether parameters are required and specifying the default value of parameters.
Associating a Driver with Partner Employees
Delegated administrators can use the following procedure to associate a driver with a partner employee.
To associate a driver with partner employees (partner)
The partner delegated administrator navigates to the User Profile screen, then the Communication Profile view.
In the Profiles list, the partner adds a new record.
In the Name field of the new record, the partner enters a user’s name.
In the Driver field of the new record, the partner selects a driver.
Optionally, to override default parameters for that driver, in the Profile Parameter Overrides list, the partner selects names of parameters and enters new values for the parameters.