6Using Siebel REST Outbound Services
Using Siebel REST Outbound Services
This chapter provides an overview of how Siebel CRM supports outbound REST communications for on-premises or cloud applications. It includes the following topics:
About REST Outbound
Siebel CRM supports outbound REST communications for on-premises or cloud applications, allowing Siebel applications to interact with other on-premises or cloud applications that provide REST APIs.
Siebel outbound REST functionality is built alongside SOAP Outbound functionality, and allows Siebel CRM to call any external endpoint that provides a valid Open API or SWAGGER compliant schema in JSON format.
Siebel outbound REST functionality leverages Siebel Tools to import the REST contract and to create the required metadata, such as business services, integration objects, and data such as Web service definitions. For more information about Siebel Tools, seeUsing Siebel Tools.
Considerations When Using REST Outbound in Siebel
From Siebel CRM 20.8 Update release, the following limitations apply to REST outbound:
-
Siebel REST API only supports Open API 2.0 compatible JSON specifications.
-
Files must be in JSON format only.
-
You can only import JSON files using Siebel Tools. You cannot import JSON files with Web tools.
-
Because Siebel Tools uses Config Agent (CA) Tomcat for 64-bit Java to process the imported JSON file, the following limitations apply:
-
The CA Tomcat that accesses and processes the imported JSON file must be able to access the JSON file path.
-
The CA Tomcat is the Tomcat server specified in the CONTAINERURL parameter of the 64-bit Java subsystem.
-
If Siebel Tools and the CA Tomcat are running on different machines, then you must copy the JSON file to CA Tomcat, and provide the path of the JSON file when you import it into Siebel Tools.
-
-
You must download the JSON specification files to your local machine, and save them in the Temp directory of your Tools folder. You can also save these files to any directory to which Siebel Tools has access.
-
When using Siebel REST API, a single JSON file must contain a complete definition. You cannot use JSON files that refer to other JSON files for the definition.
-
Siebel REST outbound only supports security of type basic authentication.
Roadmap for Creating REST Outbound Services in Siebel CRM
This roadmap covers the essential tasks that you must perform to import a JSON into Siebel Tools, and to create an outbound REST service and repository artefacts.
When these steps are completed, the newly created business service can be used like any other Siebel business service to call external endpoints.
-
Create a 64-bit Java subsystem if it doesn’t exist already.
For more information, see Transports and Interfaces: Siebel Enterprise Application Integration.
-
Before you import an Open API JSON file in Siebel Tools, you must configure Siebel Tools so that it can invoke Java business services to process the Open API JSON file.
For more information, see Configuring Siebel Tools to Call a Java Business Service.
-
Create a new outbound REST Service based on an OpenAPI compliant JSON file.
For more information, see Creating an Outbound REST Service Based on an Open API Compliant JSON File.
-
In a Siebel Application, open the new REST outbound service in the Outbound REST Services view and verify that you have correctly imported artefacts such as service methods to the Outbound REST Services. You must also verify the endpoint URL in the Address column of the Service Params Applet.
For more information, see Creating an Outbound REST Service Based on an Open API Compliant JSON File.
-
If necessary, set up the proxy for external endpoint access.
For more information, see Integration Platform Technologies: Siebel Enterprise Application Integration.
When these steps are completed, the newly created business service can be used like any other Siebel business service to call external endpoints.
Configuring Siebel Tools to Call a Java Business Service
Before you begin: Ensure you have created a 64-bit Java subsystem. For more information about Java subsystems, see Requirements for Implementing a Java Business Service in Transports and Interfaces: Siebel Enterprise Application Integration.
In order to process the imported Open API JSON file in Siebel Tools, you must configure the 64-bit Java subsystem to invoke certain Java business services.
To configure Java subsystem in Siebel Tools
-
Open the tools.cfg file.
-
Add the following section:
[JAVA64]
FullName                 = RESTOutboundJvmSubsys
Description              = RESTOutbound Java Business Service subsystem Parameters
SubsysType               = JVMSubSys
CONTAINERURL             = http://localhost:<Config Agent Port>/siebel/jbs
Note: The value of the CONTAINERURL parameter is the same URL provided in the server’s 64-bit Java subsystem. If you have the CA Tomcat and Siebel Tools installed on different machines, then instead of the localhost name, you must enter the CA Tomcat machine name You only name the localhost if CA Tomcat and Siebel Tools are installed on the same machine or virtual machine. -
Add the following section to enable write access to the Siebel Tools Temp folder:
[EAIFileTransportConfigSubsys]
EAIFileTransportFolders = D:\<Siebel Tools>\temp
Creating an Outbound REST Service Based on an Open API Compliant JSON File
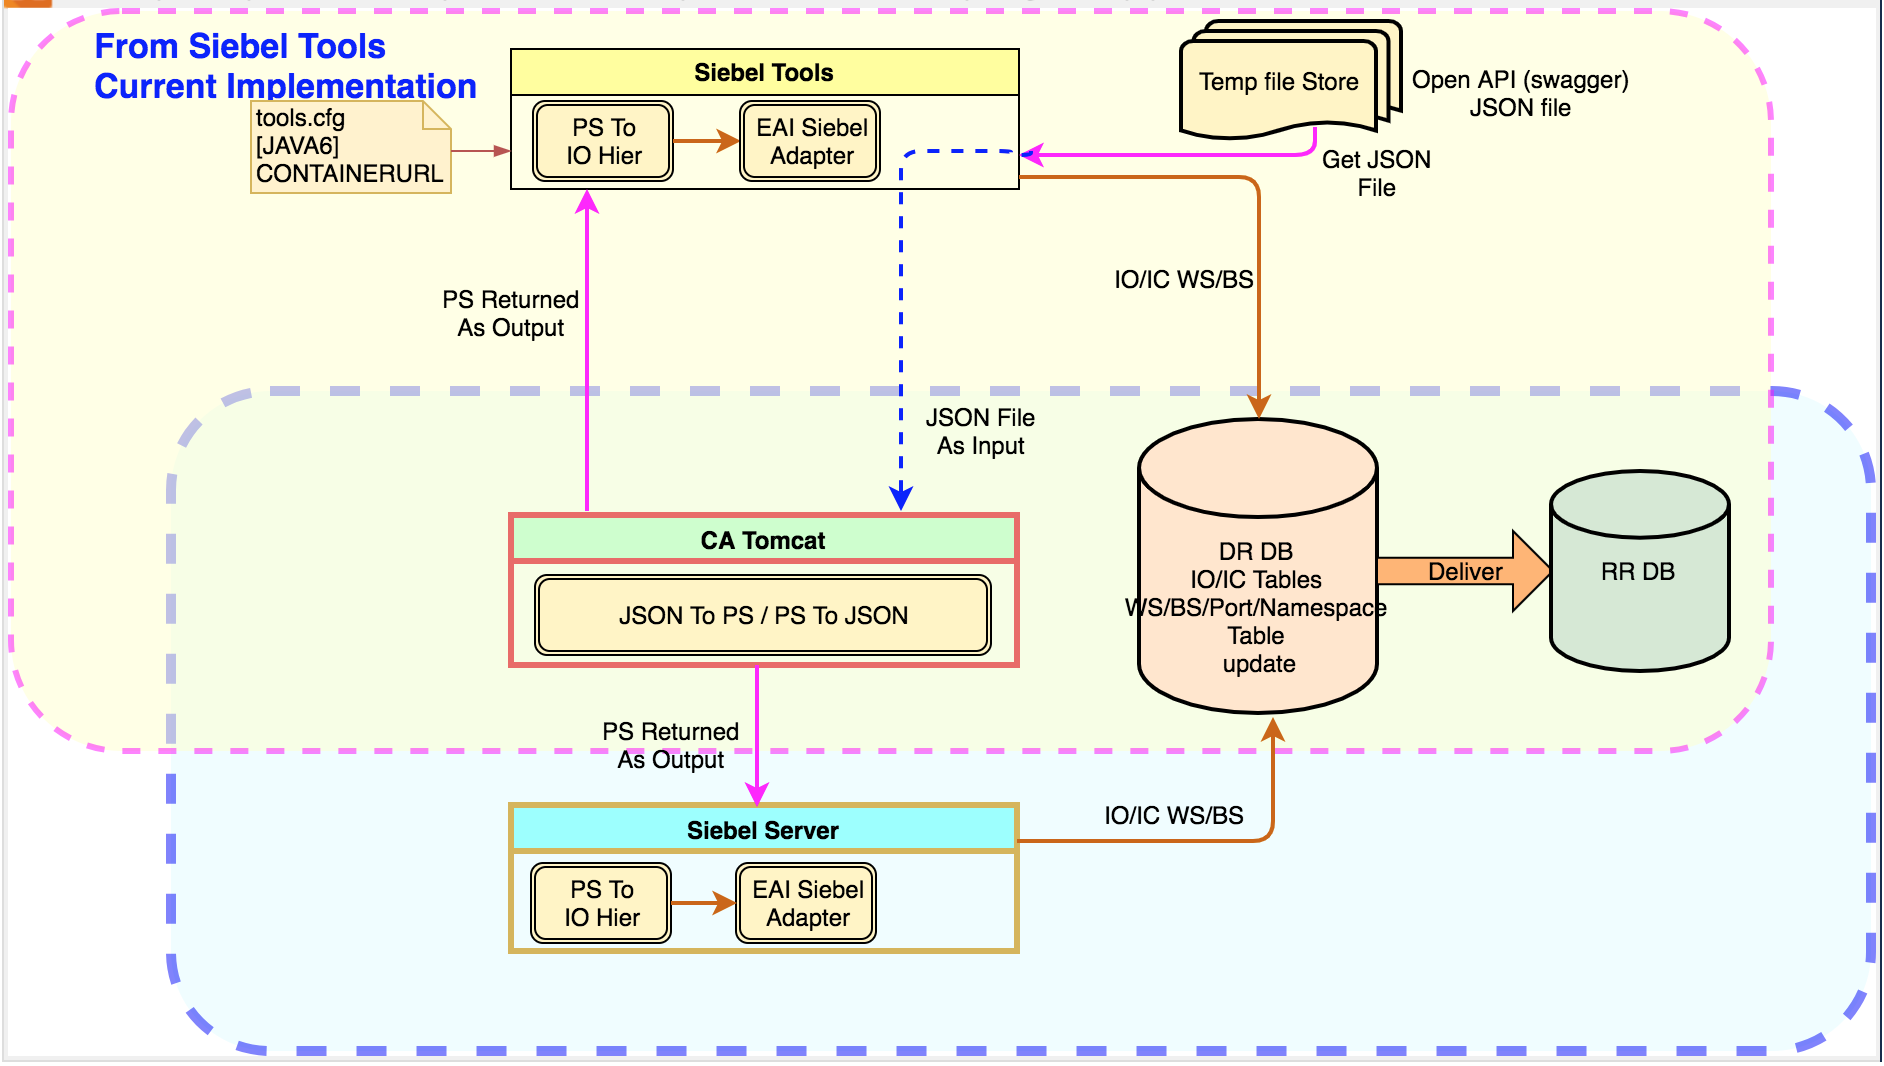
This topic describes how to create an outbound REST service. You do this by importing an OpenAPI compliant JSON file, which describes an external REST API endpoint. The following figure shows how the JSON file import creates an outbound proxy business service, a Web Service, and other artefacts.
To create an outbound REST service
-
In Siebel Tools, create and open a new workspace.
-
From the File menu, choose New Object.
The New Object Wizards dialog box appears.
-
Click the EAI tab, select Web Service, and click OK.
The WSDL/JSON Import Wizard appears.
-
Select the project that will hold the objects created from the JSON document.
-
Select the JSON file you want to import.
If CA Tomcat and Siebel Tools are on different machines, then the JSON file path provided here must be the absolute path of the JSON file saved in the CA Tomcat machine. If this is the case, copy the location of your JSON file from CA Tomcat, and paste here.
For more information on import requirements, see Considerations When Using REST Outbound in Siebel .
-
Select the XML file where you want to record the Web service definition imported in the REST Outbound Services Screen.
Siebel Tools must have write access to this location.
-
Select the log file to record errors, warnings, and other information related to the import process, or accept the default.
Siebel Tools must have write access to this location.
-
Click Next.
A summary of your import information, including errors or warnings, appears.
-
Click Finish to complete the process of importing the external object definitions into the Siebel repository.
For more information on the repository artefacts created by the wizard, see About the Repository Objects Generated by the JSON Import.
-
Deliver the workspace to use the newly created artefacts at runtime.
Note: If you decide not to deliver the workspace with the newly created repository objects, you must manually delete the new outbound REST service in the Outbound REST Services screen in Siebel. This prevents stale service records remaining in the database and it avoids naming conflicts during future imports. -
To view the new outbound REST service, do the following:
-
Open an application such as Callcenter.
-
Navigate to Administration - Web Services.
-
Navigate to Outbound REST Services.
This screen displays values for Service, Endpoint URL, and operations.
-
About the Repository Objects Generated by the JSON Import
The import wizard also generates two objects in the Siebel repository: a proxy outbound REST business service with methods and arguments, and if necessary, a set of integration objects.
Use the following JSON file extract as an example in the following topics:
{
"swagger": "2.0",
..
..
"title": "Swagger Petstore",
...
....
  "paths": {
    "/pet": {
      "post": {
        "tags": [
          "pet"
        ],
        "summary": "Add a new pet to the store",
        "description": "",
        "operationId": "addPet",
        "consumes": [
          "application/json",
          "application/xml"
        ],
        "produces": [
          "application/json",
          "application/xml"
        ],
        "parameters": [
          {
            "in": "body",
            "name": "body",
            "description": "Pet object that needs to be added to the store",
            "required": true,
            "schema": {
              "$ref": "#/definitions/Pet"
            }
          }
        ],
        "responses": {
          "405": {
            "description": "Invalid input"
          }
        },

        "security": [
          {
            "petstore_auth": [
              "write:pets",
              "read:pets"
            ]
          }
        ]
      },

  "/store/order/{orderId}":{
     "get":{
        "tags":[
           "store"
        ],
        "summary":"Find purchase order by ID",
        "description":"For valid response try integer IDs with value >= 1 and <= 10. Other values will generated exceptions",
        "operationId":"getOrderById",
        "produces":[
           "application/xml",
           "application/json"
        ],
        "parameters":[
           {
              "name":"orderId",
              "in":"path",
              "description":"ID of pet that needs to be fetched",
              "required":true,
              "type":"integer",
              "maximum":10.0,
              "minimum":1.0,
              "format":"int64"
           }
        ],
        "responses":{
           "200":{
              "description":"successful operation",
              "schema":{
                 "$ref":"#/definitions/Order"
              }
           },
           "400":{
              "description":"Invalid ID supplied"
           },
           "404":{
              "description":"Order not found"
           }
        }
     },
....
....

  "definitions": {
    "Pet": {
      "type": "object",
      "required": [
        "name",
        "photoUrls"
      ],
      "properties": {
        "id": {
          "type": "integer",
          "format": "int64"
        },
        "category": {
          "$ref": "#/definitions/Category"
        },
        "name": {
          "type": "string",
          "example": "doggie"
        },
        "photoUrls": {
          "type": "array",
          "xml": {
            "wrapped": true
          },
          "items": {
            "type": "string",
            "xml": {
              "name": "photoUrl"
            }
          }
        },
        "tags": {
          "type": "array",
          "xml": {
            "wrapped": true
          },
          "items": {
            "xml": {
              "name": "tag"
            },
            "$ref": "#/definitions/Tag"
          }
        },
        "status": {
          "type": "string",
          "description": "pet status in the store",
          "enum": [
            "available",
            "pending",
            "sold"
          ]
        }
      },
      "xml": {
        "name": "Pet"
      }
    },

    "Order":{
       "type":"object",
       "properties":{
          "id":{
             "type":"integer",
             "format":"int64"
          },
          "petId":{
             "type":"integer",
             "format":"int64"
          },
          "quantity":{
             "type":"integer",
             "format":"int32"
          },
          "shipDate":{
             "type":"string",
             "format":"date-time"
          },
          "status":{
             "type":"string",
             "description":"Order Status",
             "enum":[
                "placed",
                "approved",
                "delivered"
             ]
          },
          "complete":{
             "type":"boolean",
             "default":false
          }
       },
       "xml":{
          "name":"Order"
       }
    },
....
....
}
About the REST Outbound Service Created by the JSON Import
When the WSDL/JSON wizard finishes, it creates the new outbound REST service, as shown in the following figure. The new outbound REST service has service methods with URLs which you must invoke for this service. You can update the endpoint URL in the Outbound REST Services screen if needed.
For more information on the business service and the repository artefacts in this REST outbound service, see About the Repository Objects Generated by the JSON Import.

Overview of the REST Outbound Proxy Business Service
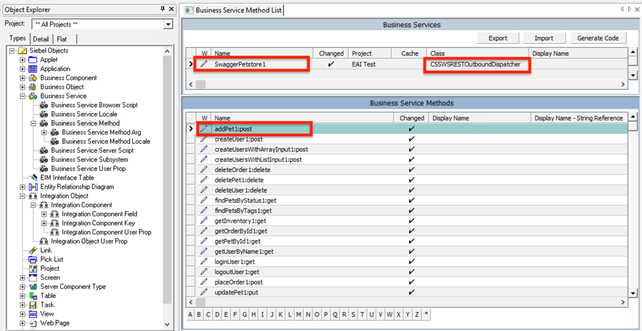
The following figure shows the Business Services pane with the business service: SwaggerPetstore1.It also shows the Business Service Methods pane, and the method name: addPet1:post.
Business Services
The first object generated by the WSDL/JSON Import Wizard is a REST outbound proxy business service belonging to the CSSWSRESTOutboundDispatcher class. This service acts as a client-side implementation of the REST API endpoint, and it includes the business methods and arguments that correspond to the operations, or OperationId fields, defined in the imported JSON document.
The business service name is derived from the title value in the JSON document. In this example, the business service is called: SwaggerPetstore1. The names of the generated repository artefacts derive from the Swagger description. A number is appended to each business service, business service method, business method arguments, integration objects and integration components depending on how often you have imported a specific JSON file into Siebel Tools.
If you can't format the names into a standard Siebel naming standard, for example, if the name is too long or if it contains special characters, then the WSDL/JSON Import Wizard automatically generates these names. The original names are available in the Comments field, under the Business Service.
Business Methods
OperationId value listed in the JSON file becomes a business service method under the generated REST outbound proxy business service. Business methods are named as follows:
-
The verb under the path is appended to the
OperationIdvalue. In our sample JSON file, the OperationId isAddPetandpostis the verb of the path. The business service method is called:addPet1:post -
If the JSON file has no
OperationIdvalues, then the JSON file import removes all special characters from the path name and combines it with the required verb to create the business method name. -
If the path name is longer than the Siebel standard length, then the business method is named as follows:
Mth<serial number><business service>:<verb>For example:Mth10SwaggerPetstore:getNote: The serial number is between 1 and 999. It starts at 1, and is incremented by 1 for every method created.
Business Arguments
The WSDL/JSON Import Wizard generates method arguments in addition to the proxy business service in the repository. The path parameters listed in the JSON file become method arguments. The method argument name derives from the name property of the parameter. Parameters listed in JSON files can be any of the following:
- Simple parameters. Integers or strings become simple method arguments with corresponding Siebel types.
- Complex parameters. These parameters can have $ref references to definitions in the JSON file, and can become integration objects. They are named by appending the new business service to the automatically generated integration object name. In the previous example, the new business service is
SwaggerPetstore1, so the new integration object name is:IO6SwaggerPetstore1. If there are simple or complex parameters as arrays, or complex parameters without a $ref reference, then these parameters also become integration objects. They are named as follows:Arg<serial number><business service>:<in>For example:
Arg4SwaggerPetstore8:queryIn this example, the <in> value specifies where this parameter is defined in the outbound call, such as
query, header, path, formData,orbody. - Security parameters. These parameters are appended with the suffix
security, and are derived from thesecurityDefinitionssection of the JSON file. Security definitions extend to all the business service methods as arguments.Note: From Siebel CRM 20.8 Update release, only basic authentication is supported, so you can only pass the username:security and password:security arguments at runtime.
The following figure shows the Business Service Method Arguments pane. This pane lists the method argument generated from a complex parameter: IO6SwaggerPetstore1.It also lists the method arguments generated from the security parameters username:security and password:security. 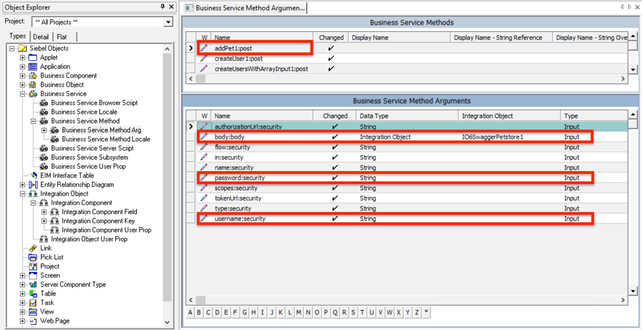
Overview of Generated Repository Integration Objects
If necessary, the WSDL/JSON Import Wizard can also generate integration objects. Each complex object defined in the JSON file converts into a Siebel integration object, composed of a parent or root integration component, and child integration components.
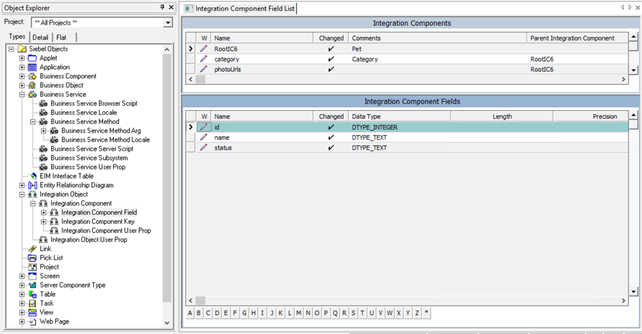
About Integration Components
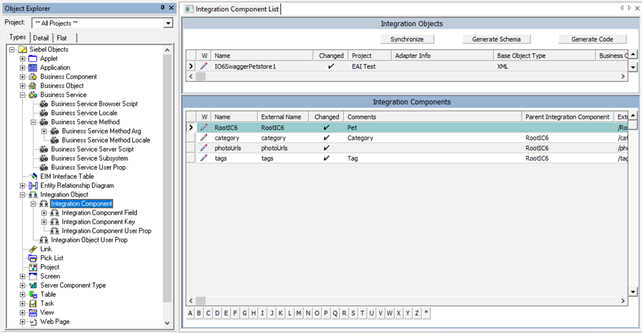
The following figure shows the Integration Objects pane. This lists the new integration object IO6SwaggerPetstore1. The Integration Components pane shows the root integration component called RootIC6 and its associated integration components:
- Child objects called
category - An array called
photoUrls - An array called
tags
After performing the import, the complex object RootIC6/Pet, has the following properties:
- id
- name
- status.
In addition, the integration object IO6SwaggerPetstore1 has the root integration component RootIC6 with the integration component fields:
- Id
- Name
- Status
The following figure shows the newly created integration component fields for the integration object IO6SwaggerPetstore1.
About Integration Component Response Arguments
Response arguments are prepared according to the specification of the response for each path and corresponding verb combination in the Swagger file, and the response structure is defined for each response with a valid schema.
Swagger Petstore example, the business service method
getOrderById:get has a defined response schema for responses when the return code is 200. For the
Swagger Petstore example, the import creates the following items:
An output argument called:
Res200:resThe following figure indicates an output argument called:
Res8SwaggerPetstore:res, and its data type is Integration Object.
-
A response integration object.
This has a root integration component for the response code, in this example,
Res200. -
A child integration component defining the response body.
This is located under the root integration component.
-
A child integration component indicating the response header.
The following figure shows the response integration object called Res8SwaggerPetstore:res and its child integration components Resp200, RespBody, and RespHeader. The response in this example is user, it is the actual response received from the outbound call.
-
If
useris a non-array type, then its content is placed under RespBody. If
useris an array of users, then each user is wrapped underRespBody. AllRespBodyintegraton components are then placed underListOfRespBody, andListOfRespBodyis placed underResp200.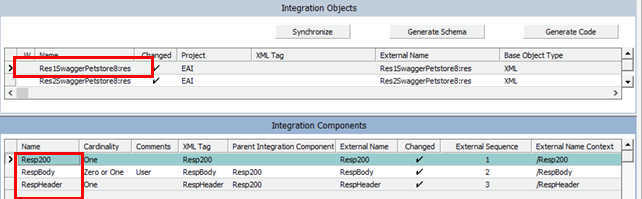
The response body integration component contains fields as specified in the Swagger definition. The following figure shows these integration component fields:
- firstName
- id
- lastName
- password
- phone

Invoking the External REST Service Endpoint Using Proxy Business Service at Runtime
This topic describes the steps involved when invoking an external REST service endpoint as a business service from a Siebel application or workflow.

-
Obtain the Open API compliant JSON file. This step requires that you obtain the external JSON file, and import it into Siebel Tools using the WSDL/JSON wizard. This creates the proxy business service, integration objects and Web service.
For more information, see Creating an Outbound REST Service Based on an Open API Compliant JSON File.
-
Prepare the input property set. This step requires that you prepare your input property set for input to the proxy business service. This depends on the definition of the proxy business service in Siebel Tools. Inputs can be simple, such as strings, or integers, or they can be complex types such as integration objects.
- Application or script or workflow invokes the proxy business service. In this step, the proxy business service is invoked just like any other business service and does the following:
-
It uses the Business Service definition to validate the inputs.
-
It uses the Web Service definition to obtain the endpoint URL and other details.
-
-
Proxy business service calls the Config Agent (CA) Tomcat. In this step, the proxy business service makes a Java Business Service call to the Config Agent (CA) Tomcat attached to the Siebel server. This executes the Java Business Service. The address of the CA Tomcat is obtained from the 64-bit Java subsystem attached to the Object Manager, passing the property set input obtained from the user.
The Java Business Service does the following:
- It converts the property set to JSON payload.
- It makes an HTTP call to external end point URL, obtaining the response, and then converting the JSON response back to a property set, and finally returning to the Proxy Business Service
-
Proxy business service converts the property set to output. In this step, on receiving the property set response from Java Business Service, the proxy business service converts it back to the output arguments according to its method’s out parameters.