Understanding Page Design and Development
Pages are the graphical interface between your users and your application database. As a system designer, you configure or build pages that meet the data requirements of the application and that are easy to use and understand. Using PeopleSoft Application Designer, you can create, modify, and delete page definitions in your PeopleSoft system.
This section discusses:
Level-based controls.
Keys for accessing pages.
Multiple occurrences of data.
Prompt fields.
Derived and work fields.
Sensitive data.
Hidden pages.
Upgrade considerations.
End-user page personalization.
You determine your page design based on the type of data that you plan to access and maintain. In some cases, a page references a single record definition; in others, you may want to reference multiple records. To accommodate a variety of page designs, PeopleSoft Application Designer uses level-based controls. The three level-based controls are:
Grids
Scroll areas
Scroll bars
You specify the level of these controls by setting the occurs levels on the Record tab of the page field properties dialog box for the level-based control that you are configuring. Level-based controls have four levels:
Level 0
This level directly corresponds to the high-level key information of the underlying record. Level 0 fields are usually physically located at the top of the page, set to be display-only, and display the data that the user entered on the initial search page.
Levels 1−3
These levels correspond to lower level key information that is subordinate to the Level 0 key values. Level 1 is subordinate to Level 0; Level 2 is subordinate to and nested within Level 1; and Level 3 is subordinate to and nested within Level 2.
Note: You can nest level-based controls up to three levels.
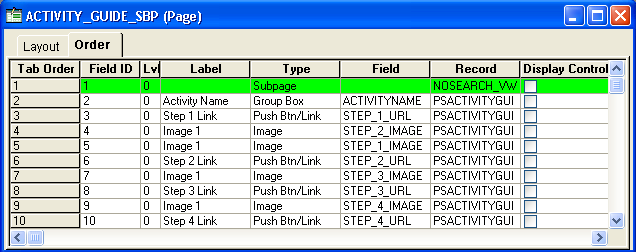
The first occurs level on a page is Level 0. In general, this level is reserved for the primary key fields that are used to search for data. A page might not contain any level-based controls; in such a case, all fields are set to Level 0. This case is particularly true for secondary pages or subpages that contain few data entry fields, as shown in the following example. The third column, Lvl (Level), that appears in the grid on the Order tab indicates that all fields on the page are at Level 0:
Image: Example of page definition Order tab
This example illustrates the fields and controls on the Example of page definition Order tab. You can find definitions for the fields and controls later on this page.
When you add a level-based control, a scroll area or a grid, to your page, the default occurs level for that control is set to 1 in the properties dialog box. If you place a field in or below that scroll area, it is also set to Level 1 on the Order tab, even if it is another level-based control. If necessary, you can use the Set to Level 0 feature of the horizontal rule control to restart the occurs level on a page.
Note: You can have any number of level-based controls at the same level.
Nested Level-Based Controls
Nesting controls involve two or more level-based controls on a page, such as two scroll areas, when the second scroll area has an occurs level of 2. You nest controls when the new data that you want to add is a repeating set of data for each entry in your first level-based control. In doing so, you create a hierarchical, or parent and child, relationship between the controls and the processing of the record definitions. The Level 2 control is the child of and is subordinate to the Level 1 control.
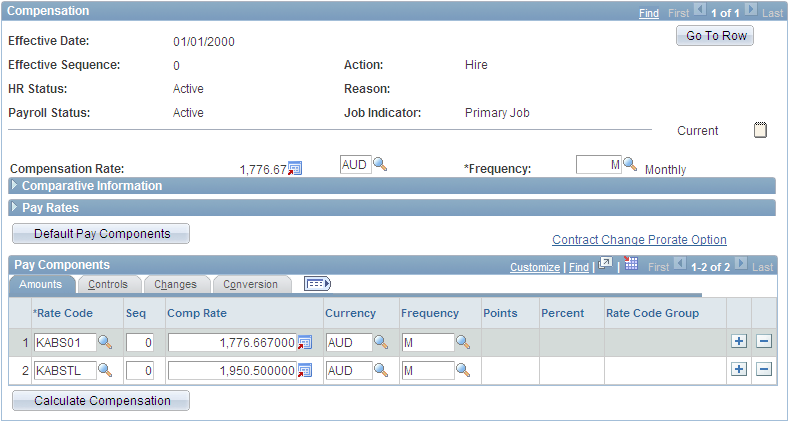
For example, on the Compensation page, the Level 2 grid is nested in the Level 1 scroll area. On the Amounts tab of the grid, each compensation action in the Level 1 scroll area has two rate codes:
Image: Example of Compensation page with nested grid in scroll area
This example illustrates the fields and controls on the Example of Compensation page with nested grid in scroll area. You can find definitions for the fields and controls later on this page.
This example of the Additional Pay 1 page shows three levels of data, two of which are nesting scroll areas in the Earnings scroll area:
Image: Example of Additional Pay 1 page with nested scroll areas
This example illustrates the fields and controls on the Example of Additional Pay 1 page with nested scroll areas. You can find definitions for the fields and controls later on this page.
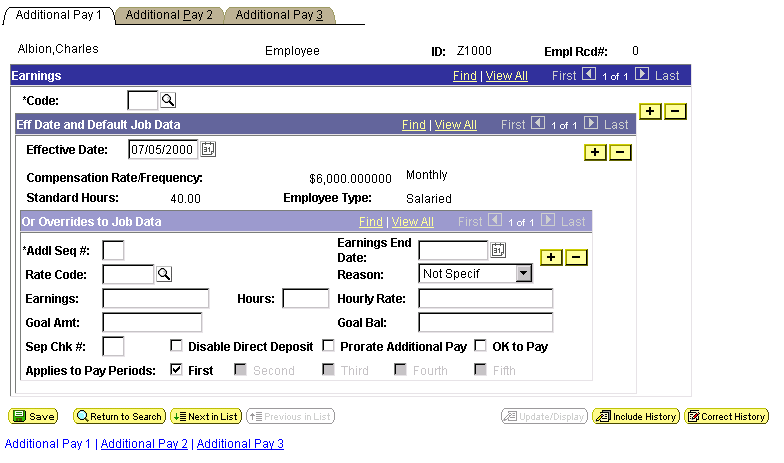
In this case, we want to maintain information about the compensation history for a single employee and, for each change or override in compensation status, enter details about that change. The first scroll area, Earnings, associates the earning code with the second, subordinate scroll area, Eff Date (effective date) and Default Job Data, which enables the user to enter the effective date for the status change. The third scroll area, Or Overrides to Job Data, which is subordinate to the second, enables the user to enter the overrides to the default job data that appears in the second scroll area.
For each of the three scroll areas, you can have several rows of data. While you do not see actual scroll bars on your page, the navigation buttons and links in the navigation bars for each scroll area enable you to navigate or scroll through the rows.
Nested Grids in Scrolls
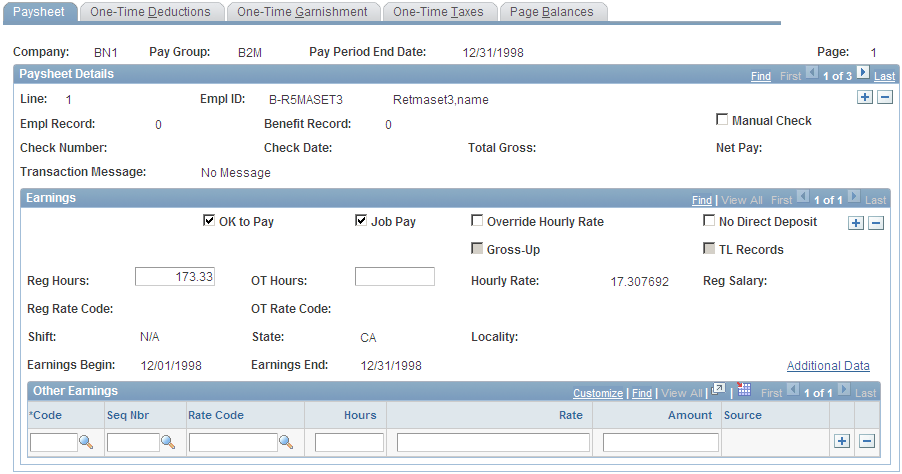
As shown previously, you can nest a grid in a scroll or scroll area. The following example shows the Other Earnings grid at Level 3, which is nested in the Earnings scroll area at Level 2, which is nested in the Paysheet Details scroll area at Level 1. A nested grid serves the same function as a nested scroll area. It can offer a more compact way of viewing many fields of data, particularly if you use a tabbed grid.
Note: You can nest a grid in a scroll area, but you cannot nest a scroll area in a grid or a grid in another grid.
Image: Example of Paysheet page with three levels of nesting
This example illustrates the fields and controls on the Example of Paysheet page with three levels of nesting. You can find definitions for the fields and controls later on this page.
Levels and Runtime Processing
Levels play an important role in runtime processing. The component processor relies on the level at which you place a field on a page to determine how to process any PeopleCode attached to the field in the record definition.
Effective Dates and Level-Based Controls
The EFFDT (effective date) field must be the only key field that is controlled by level-based controls that you create to help users maintain multiple occurrences of data that is keyed by effective date. Otherwise, the effective date processing for update actions does not function correctly.
No matter how much time you spend defining and refining your page, your work is useless unless the user can access it. You must add it to a component, and then you must add that component to a menu. When you add a page to a component, you determine what actions the user must perform to access the page and the keys that are required to retrieve rows of information.
The search record that you define for a component determines the key list; that is, search keys for which users are prompted when they select a page and an action. A search record can be either a view that concatenates information stored in several tables or the underlying table itself. Select the search record that contains all of the key items for the primary record underlying the page.
The keys for which the search dialog box prompts should populate the high-level (Level 0 in the page definition) key controls on a page. These key controls always appear before any level-based control on the page and are typically display-only. A search record might differ from a primary record definition, but it must contain all of the Level 0 keys that you placed on the page.
Using Keys for Views
When you create a view that should use key values from a page, each key must be:
Listed as an output column from the view (not just referenced in the WHERE clause of the view).
Marked as a key field of the view.
For example, suppose that a page has PERSON.PERSONID as a Level 0 field. PERSONID is the key of the PERSON record. A grid on the page uses the PERSON_ADDRESS_VW view to display addresses for the current person. The SQL statement for the view cannot only mention PERSON.PERSONID in the WHERE clause; PERSONID must be both an output column of the view and a key field of the view.
On some pages, you may want a few of the field controls to display multiple rows or occurrences of data. To do this, you can add a level-based control: a scroll area, a grid, or a scroll bar. Users can then add, edit, delete, find, and scroll through multiple occurrences of data in a page control or group of controls using action buttons, links, or the browser scroll bar, depending on how you set the occurs count. Using a scroll area or a grid, rather than a scroll bar, is the preferred page design to show multiple occurrences of data.
For example, this Checklist Table page contains the Assignment Checklist Item grid with an occurs count of 5. The Checklist Item scroll area in which it is nested must have an occurs count of 1 since we can see only one row of data in the scroll area:
Image: Example of Person Checklist page with a grid of occurs count 5 nested in a scroll area of occurs count 1
This example illustrates the fields and controls on the Example of Person Checklist page with a grid of occurs count 5 nested in a scroll area of occurs count 1. You can find definitions for the fields and controls later on this page.
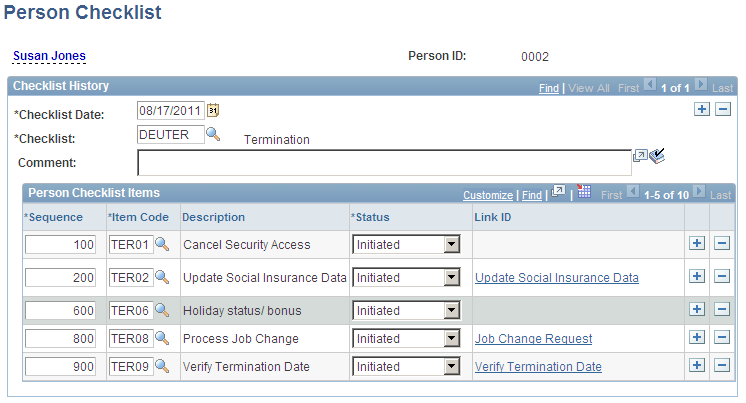
To see the next set of five rows in the Assignment Checklist Item grid, a user can click the right arrow button. To see all rows of data at once, in either the grid or scroll area, the user can select the View All link in the navigation bar.
In PeopleSoft Application Designer, you set the occurs count for a level-based control on the General tab in the properties dialog box. You can set the occurs count to any number. You also have the option of selecting Unlimited Occurs Count so that the user sees all rows of data. If the page has more options than can be viewed in the window at runtime, the browser displays a scroll bar enabling the user to scroll to the bottom of the page.
Note: When an occurs count is set to a number other than 1, the grid displays the specified number of rows. However, when it is set to 1, the grid displays as many rows as possible within the given space allocated for the grid control at design time.
You can enable your users to look up the valid values that they can enter in a field. For this, PeopleSoft Application Designer provides prompts, or lookup buttons. Your PeopleSoft applications use the following three types of prompts:
Drop-down list box
This type of prompt generates a list of values, which appears directly below the prompt field when the user clicks the down arrow that appears beside the field.
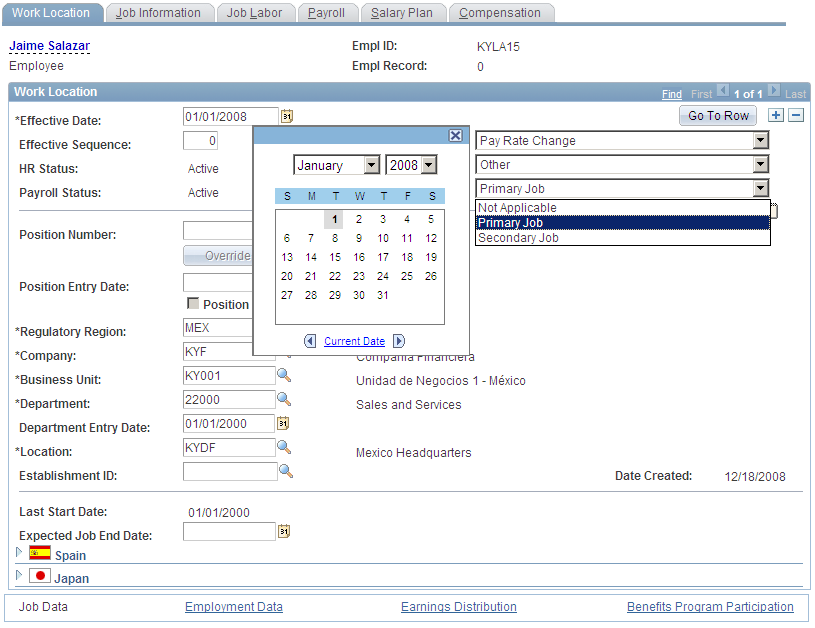
The drop-down list box is a predefined control that you place on your page. The Job Indicator field on the Work Location page is an example of drop-down list box.
Calendar prompt
This type of prompt generates a small calendar, which appears next to the date field, when the user clicks the calendar button. Users can navigate the calendar to find and select a date. The Effective Date, Position Entry Date, and Department Entry Date fields on the Work Location page are examples of calendar prompts. The calendar prompt appears automatically as part of any edit box control that you associate with a date field as long as the Show Prompt Buttoncheck box display option on the Record tab is selected.
Lookup button
A prompt or lookup button opens a lookup page in the user's browser populated with up to 300 available values for that field. The user can then either select the desired value or refine their search further. For extremely large tables, the system administrator has the option of excluding that table from auto prompting on the Lookup Exclusion Table via PeopleTools, Utilities, Administration.
In PeopleSoft Application Designer, you can only associate a lookup button with an edit box control. The look up button appears automatically as part of any edit box control as long as the Show Prompt Buttoncheck box display option on the Record tab is selected and the record field with which you associate the edit box lists values in either the Translate table or a prompt table.
Image: Work Location page showing sample prompt fields
This example illustrates the fields and controls on the Work Location page showing sample prompt fields. You can find definitions for the fields and controls later on this page.
You can use a field definition from a derived or work record to store a temporary value that PeopleCode uses to determine the values of other field controls on the page.
For example, for a budgeting transaction in PeopleSoft General Ledger, assume that you have an annual amount that you must spread to multiple accounting periods. You can create a page that includes both a field control from a derived record for the annual amount and an amount control for each accounting period. You then write PeopleCode to derive the amount per accounting period from the annual amount. When a user enters the annual amount in the derived field control, PeopleCode calculates the amount per accounting period and inserts it into each accounting period field control. The annual amount is not stored in the database, but the period amounts are.
You can allocate sensitive data to a single page and limit access to that page to the users who need to update it. Alternatively, you can enter PeopleCode to hide certain fields on pages based on appropriate criteria. The page approach is simpler, however, and can be used in most situations. For secondary pages, this sort of security is more complex to manage.
Hidden pages are work pages that are associated with derived or work records; they are often used in work groups. You can store all of your work field controls on hidden pages. Create these pages when you want PeopleCode calculations to be performed in the background so that the user does not see them. As a convention, the names of work pages that are delivered with your application names end with the suffix _WRK; you should follow the same naming convention. An example name is: MC_TYPE_WRK.
Hide a page by selecting the Hidden check box in the component grid as you set up the component definition.
If you adapt a PeopleSoft application, you might affect your use of future PeopleSoft releases. The closer your PeopleSoft system is to the standard product, the easier your upgrades will be. Avoid superfluous or cosmetic changes to data structures in the standard product. Document all of your changes in the comment area on the General tab in the Page Properties dialog box.
End users of PeopleSoft applications can personalize various settings on a page, including tab order, the display state of scroll areas and grids, and the state of collapsible sections. Users can also choose that the default page display for a component each time they open that component. In addition, users can choose to share their personalization settings with or copy settings from another user.
The page personalization option is set in the Component Properties dialog box, Internet tab. The Personalize Page Link check box is selected by default to enable the Personalize Page link in the pagebar at runtime for all pages.