Adding New Language Codes to the System
This section discusses adding new language codes to the system.
See the product documentation for PeopleSoft 9.2 Application Installation for your database platform.
The PeopleSoft system does not currently use the ISO standard language and locale identifiers in PeopleTools. Instead, PeopleTools uses a proprietary three-letter language code that is determined and maintained by PeopleSoft developers. When adding a new language, you must choose a three-letter language code to represent the name of your language.
Because this code is used to key several PeopleTools database objects and the PeopleTools cache file, ensure that the language code contains only three uppercase US-ASCII letters—no numbers, spaces, or accented characters.
This table lists the PeopleSoft language codes that are allocated:
|
Code |
Language |
|---|---|
|
ARA |
Arabic |
|
BUL |
Bulgarian |
|
CFR |
Canadian French |
|
CRO |
Croatian |
|
CZE |
Czech |
|
DAN |
Danish |
|
DUT |
Dutch |
|
ENG |
English |
|
ESP |
Spanish |
|
FIN |
Finnish |
|
FRA |
French |
|
GER |
German |
|
GRK |
Greek |
|
HEB |
Hebrew |
|
HUN |
Hungarian |
|
JPN |
Japanese |
|
KOR |
Korean |
|
MAY |
Malay |
|
NOR |
Norwegian (Bokmål) |
|
POL |
Polish |
|
POR |
Portuguese |
|
ROM |
Romanian |
|
RUS |
Russian |
|
SER |
Serbian |
|
SLK |
Slovak |
|
SLV |
Slovenian |
|
SVE |
Swedish |
|
THA |
Thai |
|
TUR |
Turkish |
|
UKE |
UK English |
|
ZHT |
Traditional Chinese |
|
ZHS |
Simplified Chinese |
As an example, we will chose QUE for Quechua (the QUE code is derived from the language) as our additional language.
Once you have chosen a three-letter code for your new language, you must determine which ISO locale corresponds to that language. ISO locales are comprised of two components, a language identifier and a territory identifier, separated by an underscore or a hyphen. Typically, the language component is in lowercase letters, and the territory identifier is in uppercase letters. For example, en_US is the ISO locale for U.S. English, and de_CH is the ISO locale for Swiss German.
The language component of the locale is the two-letter language code defined by the ISO 639 standard. The territory component of the locale is the two-letter country code defined by the ISO 3166 standard.
The territory portion of the ISO locale can be omitted if you want to indicate only a language and not a country-specific derivation of that language. In our example, we plan to add the Quechua language, so the appropriate ISO locale is qu. If we were adding a specific dialect of Quechua, we would use a specific ISO locale, such as qu_QU. But as long as we're adding the generic Quechua language, we can use qu as the complete ISO locale code.
In most situations, you can use only the language portion of the ISO locale. However, the two-component locale is important if you are planning to add derivations of existing languages, such as Mexican Spanish (es_MX) or Australian English (en_AU). You can easily create those language derivations from a related language using the PeopleTools Terminology Management tool.
Although the majority of the PeopleSoft system runs in Unicode, some operations, such as file system operations on Unix/Linux platforms and integration to some third-party products, cannot use Unicode characters. For each language in your database, you must determine which non-Unicode character set should be used when Unicode operations cannot be performed. The following table lists some of the non-Unicode character sets that are supported by PeopleTools. The complete list is in the PSCHARSETS table in the PeopleTools database. For each new language you add, select the appropriate non-Unicode character set from this table.
If you are not using a Unicode PeopleSoft database, the character set you select must be the character set you used to create the PeopleSoft database. For example, if you are using a DB2 UDB for OS/390 and z/OS database, you must specify the EBCDIC CCSID specified in your system's DSNZPARM configuration parameters.
This table shows some of the character sets that are supported by PeopleTools. Remember that this table is an excerpt from the complete list.
|
Character Set |
Description |
|---|---|
|
ISO-2022-KR |
ISO-2022-KR (Korean) |
|
ISO_8859-1 |
ISO 8859-1 (Latin1) |
|
ISO_8859-10 |
ISO 8859-10 (Latin6) |
|
ISO_8859-11 |
ISO 8859-11 (Thai) |
|
ISO_8859-14 |
ISO 8859-14 (Latin8) |
|
ISO_8859-15 |
ISO 8859-15 (Latin9 / Latin0) |
|
ISO_8859-2 |
ISO 8859-2 (Latin2) |
|
ISO_8859-3 |
ISO 8859-3 (Latin3) |
|
ISO_8859-4 |
ISO 8859-4 (Latin4) |
|
ISO_8859-5 |
ISO 8859-5 (Cyrillic) |
|
ISO_8859-6 |
ISO 8859-6 (Arabic) |
|
ISO_8859-7 |
ISO 8859-7 (Greek) |
|
ISO_8859-8 |
ISO 8859-8 (Hebrew) |
|
ISO_8859-9 |
ISO 8859-9 (Latin5) |
|
Shift_JIS |
Shift-JIS (Japanese) |
For the complete list, query the PSCHARSETS table in your SQL tool or in PeopleSoft Query. The complete list of character sets from PSCHARSETS is also provided in this PeopleBook.
See Character Sets Across the Tiers of the PeopleSoft Architecture.
Once you have determined the three-letter PeopleSoft language code for your new language, you must add it to the Translate table so that other PeopleTools utilities and PeopleSoft applications can recognize it.
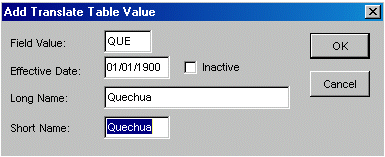
Image: Add Translate Table Value dialog box
This example illustrates the fields and controls on the Add Translate Table Value dialog box.
To add the language code to the Translate table:
In Application Designer, open the field named LANGUAGE_CD.
Select .
Move to the Translate Values tab and click the Add button.
The Add Translate Table Value dialog box appears.
Add the new three-letter language code and a description of your new language.
Use an effective date of 01/01/1900 to ensure that the language is always accessible to your applications. When adding the long and short names for your new language code, enter the name of the language as it is referred to in the base language of your database. Once you have defined the translate value for your language code, you can translate it into each language.
Save the changes.
In this example, the database base language is English, so Quechua is used as both the long and short name of the new language. Once the new language is defined, Quechua translators might want to translate this new value qheshwa.
Access the Manage Installed Languages page ().
Image: Manage Installed Languages Page
This example illustrates the fields and controls on the Manage Installed Languages page.
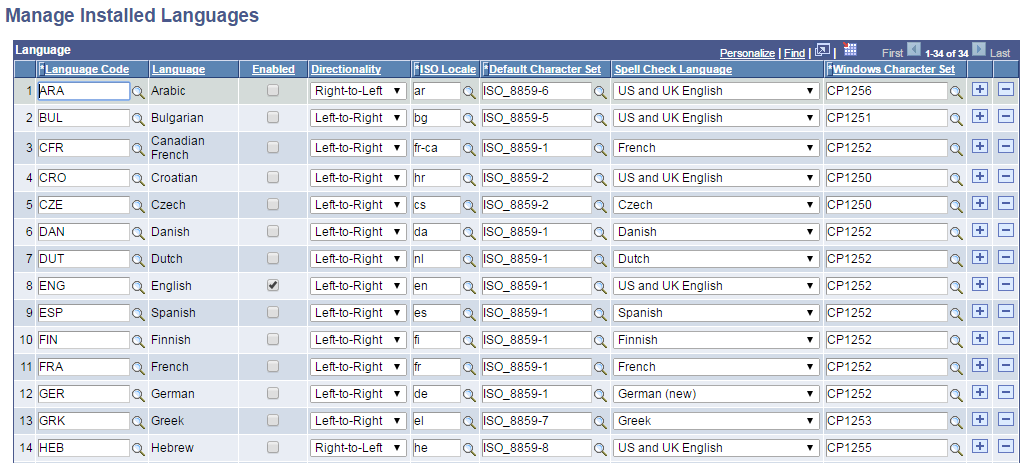
You can update and add the languages used by your PeopleSoft system to the PSLANGUAGES table using the Manage Installed Languages page.
Note: Whenever modifications to the PSLANGUAGES table are made, such as on the Manage Installed Languages page, the application server’s in-memory cache must be refreshed by restarting the application server in order to cache the new values.
Use the Manage Installed Languages page to:
Enable or disable a language.
The PSLANGUAGES table is used by many PeopleTools utilities to determine which languages defined in the database are actually in use, rather than merely being defined but unused.
Note: English is always delivered as an enabled language. If you do not want to allow your users to sign into the PeopleSoft Pure Internet Architecture using English, you can disable English on this page. However, you must ensure that the language selected in psprcs.cfg is set to one of the languages that remains enabled for your system to operate properly. In addition, for the PeopleTools development environment, Configuration Manager must be set to use one of the languages that remains enabled.
Specify a default, non-Unicode character set.
The PSLANGUAGES table also provides a mapping to a default non-Unicode character set that is used to represent that language when a Unicode representation is not possible, for example, during some file system operations.
Identify the spell check language.
You also use the PSLANGUAGES table to select the language of the spell check dictionary that is associated with a given language code. The spell check language that you select for a language code is the default spell check dictionary that is associated with that language when the user signs on to the system in that language. The user can override the default spell check dictionary through the My Personalizations option on the homepage.
Specify the character set for encoding query results to be downloaded in comma-separated values (CSV) format.
The PeopleSoft system downloads query results to a file in CSV format. You can use the PSLANGUAGES table to select a character set value for a given language code to encode the results.
|
Field or Control |
Definition |
|---|---|
| Language Code |
Enter the three-letter language code from the PSXLATITEM table. |
| Enabled |
Select this option to indicate that the language is in use. When this option is selected, login or multi-language entry with this language is allowed. This option is selected automatically during the process of loading translations into the database. However, this option allows you to manually enable a language without loading the translations. |
| ISO Locale |
Use the lookup to select the ISO locale code from the PSLOCALEDEFN table. The code consists of an ISO 639 language code, optionally followed by an ISO 3166 country code. |
| Default Character Set |
Use the lookup to select the character set from the PSCHARSETS table. The default character set determines the default encoding for input and output files. |
| Spell Check Language |
Use the drop-down list box to select the spell check language from the PSXLATITEM table. This enables you to select the language of the spell check dictionary that is associated with a given language code. |
| Windows Character Set |
Use the Lookup option to select a Microsoft code page to use to encode CSV formatted query results for the corresponding language code. The character set must be valid for Java encoding and mime-type, or downloads will fail with an error. The default value for all language codes is CP1252. |
Note: You can override the information specified on the Manage Installed Languages page using the Look and Feel tab on the Web Configuration page.
PeopleSoft Configuration Manager provides a list of languages that are available to users for their PeopleTools development environment sessions. This list is embedded in the Windows Resource File for PeopleSoft Configuration Manager itself.
To add your new language to the list of languages in PeopleSoft Configuration Manager:
In \SRC\RES\ENG\PSCFG, edit the file pscfg.rc using a text editor.
This file stores the list of languages used in the Display tab of the PeopleSoft Configuration Manager. These languages are stored as strings with the name IDS_LANGx, where x is a sequential number. To add your new language, find the next available IDS_LANG entry and change the text to match your new language using the format LanguageCode – Description. Then, update the entry IDS_NUMLANGUAGES to specify the new highest IDS_LANG entry that you used.
Copy \src\res\eng\inc\version.rcx to \src\res\eng\PSCFG.
Set up your environment by running a batch files, as follows:
    set respath= C:\temp\RES
    set incdir=c:\temp\SRC\INC
    set vcinstall=c:\apps\dvlp\visualstudio\vc98
    set include=%include%;%incdir%
    call %vcinstall%\bin\vcvars32 x86
Use the MAKEALTL.BAT batch file to compile PSCFGENG.DLL.
For example:
makealtl ENG PSCFGThen copy the DLL file to the PS_HOME\bin\client\winx86 directory.
Use MAKEALTL.BAT to compile the new language version you added.
In this case you will compile PSCFGxxx.dll, where xxx is the new language.
If you plan to translate Windows resources into the new language, create another directory structure under \SRC\RES\ to include the new translations. To do so, copy the existing \SRC\RES\ENG tree (or use another language if you prefer not to use English as the source for your translations) to a new directory under the existing \SRC\RES\ directory, matching the three-letter PeopleSoft code for the new language.
Then, translate the strings in the RC files in your new directories, and use the MAKEALTL.BAT batch file to compile the alternate language DLLs. For example:
makealtl QUE PSCFGThen copy the DLL file to the PS_HOME\bin\client\winx86 directory.
Use MAKEARTL.BAT to compile the language(s) that will use the new language.
For example, if users using the French language were going to use the Quechua language you would compile PSCFGFRA.DLL as follows:
makealtl FRA PSCFGThen copy the DLL file to the PS_HOME\bin\client\winx86 directory.
The PeopleSoft Pure Internet Architecture enables users to select their sign-in language by selecting the language from the sign-in page. This page is maintained on the web server as a static HTML file and is not generated from a PeopleTools page definition. You must edit this HTML file to add the new language code.
Work with your web server administrator to edit the signin.html file on your PeopleTools web server. The signin.html file contains an HTML table that lists each PeopleTools language. Add a new entry to this table to reference the name of your new language in the new language. If the language does not use Latin characters, you might want to reference an image that contains the name of the language to ensure that all users can correctly see the language name, even if their web browser settings are not configured appropriately for that language.
In the following example, we added the lines shown in boldface to the signin.html file.
<tr>
<td width="50%" class="pslogintext"><a href="?cmd=login&languageCd=POL"
title="<%=psPOL%>">Polski</a></td>
<td width="50%" class="pslogintext"><a href="?cmd=login&languageCd=POR"
title="<%=psPOR%>">Português</a></td>
</tr>
<tr>
<td width="50%" class="pslogintext"><a href="?cmd=login&languageCd=QUE"
title="<%=psQUE%>">Quechua</a></td>
<td width="50%" class="pslogintext"><a href="?cmd=login&languageCd=FIN"
title="<%=psFIN%>">Suomi</a></td>
</tr>
The text.properties and errors.properties files are located in PS_HOME\webserv\web_server\applications\peoplesoft\PORTAL.war\WEB-INF\psftdocs\DBdomain.
To modify text.properties and errors.properties files for new languages:
Edit the base text.properties file to add a language title for the new language title in the correct alphabetical position in the file.
For example, for Quechua, its language title is entered in the following position:
#language titles
...
psNOR=Norwegian
psPOL=Polish
psPOR=Portuguese
psQUE=Quechua
psROM=Romanian
psRUS=Russian
...
Copy the modified base text.properties and errors.properties to two files named after your three-letter language code in this format: filename_XXX.properties in which XXX is the three-letter language code.
For example, for Quechua, the file names would be text_QUE.properties and errors_QUE.properties.
Set language-specific properties in the text_XXX.properties file.
Translate the non-setting specific information in the text_XXX.properties and errors_XXX.properties files as needed for your new language.
Run the native2ascii utility to convert your translated properties files if needed.
Add the new language to each of the language-specific versions of text.properties files that are relevant to your system.
Note: Translate the new language title to each relevant language, run native2ascii on a temporary file that includes the translated language title, and copy and paste each encoded translated language title into the appropriate text_XXX.properties file.
After you have modified the text and error properties files, you must restart the web server.
Text Property File Variables
You must set the following properties in the text_XXX.properties file:
Note: Do not translate any of the values you enter for these properties.
|
Variable |
Description |
|---|---|
|
active |
Set the ISO language code. Preface the active variable with the two character ISO code for the language and set the variable equal to -s. For example: qu_active=-s |
|
direction |
Set the direction that text is read. The valid options are:
|
|
alignstart |
Set the starting point. The valid options are:
The value you select must be consistent with the directionality that you specify. For example, if you set the direction variable to ltr, then you must set the alignstart variable left. If you set the direction variable to rtl, then you must set the alignstart variable to right. |
|
alignend |
Set the ending point. The valid options are:
The value you select must be consistent with the directionality that you specify. For example, if you set the direction variable to ltr, then you must set the alignend variable right. If you set the direction variable to rtl, then you must set the alignend variable to left. |
The following example shows a text.properties file entry for French:
fr_active=-s
direction=ltr
alignstart=left
alignend=right
File Format
Properties files are saved in a special format. US-ASCII Unicode characters must be represented by a Java-style Unicode escape sequence in the format \udddd, where dddd represents the hexadecimal value of the Unicode character.
native2ascii
The native2ascii utility, a part of the JDK (Java Development Kit), can be used to transform your properties files into the correct format after it has been translated.
For example, to convert a non-European text.properties file, you will need to run the following:
native2ascii −encoding encoding sourcefile destinationfileNote: Use the destination properties files that have the Java-style encoding.
Note: For more information about the native2ascii utility, refer to the oracle's online documentation.
After you add a new language you may find that images appear truncated on PeopleSoft toolbar buttons. To remedy truncated toolbar buttons, adjust the width of the styleclass.
Image: Margins tab for the PSPUSHBUTTONTBSAVE styleclass
This example illustrates the fields and controls on the Margins tab for the PSPUSHBUTTONTBSAVE styleclass.
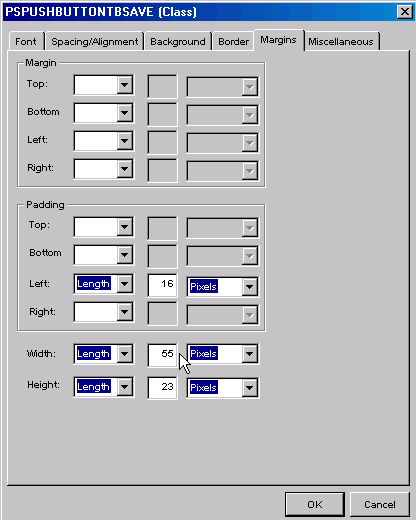
Note: All styleclasses that relate to toolbar buttons start with PSPUSHBUTTONTB*.
To adjust truncated toolbar buttons:
Open the stylesheet that contains the truncated styleclass.
Open the styleclass.
Click the Margin tab.
In the Width field, adjust the values.