Copying Projects
This section provides an overview of project copy options.
Note: When upgrading from one database to another some migrated images may not display in a browser. To remedy this situation manually clear the cache files in your browser after the project is copied. For more information about clearing the browser cache, refer to the documentation for your internet browser version.
The Copy Project from File and Copy to Project to File menu items are available only to users who have upgrade security or read-only access to the database. If these menu items are not available to you, contact your system administrator to update your security profile.
There are two ways to copy projects to another database:
Copying a source project directly to a target database to which you are connected.
Copying a source project to a file and then copying the file to a target database.
This feature provides more flexibility in moving PeopleTools definitions and projects across databases. To move definitions to another database, you copy definitions to a target directory and files instead of another database. The directory and files can be local or reside on a file server. These files then become the source when copying a project from a file. Note, however, that not all definition types that are supported by the Copy to Database process are supported by the Copy to/from File processes. Those that are not supported must be migrated using Copy to Database.
Follow this procedure to copy a project to a target database.
To copy a project:
(Optional) Lock target database definitions.
Before PeopleSoft Application Designer replaces or deletes a definition in the target database, it checks to determine whether the definition has a change control lock applied. If so, PeopleSoft Application Designer takes action on that definition if it has been locked by the same user ID that is performing the copy. Consequently, the speed of a copy might be slow because every definition to be deleted or replaced in the target must be checked.
You can avoid the performance degradation by locking all of the database definitions in the target database by using the Change Control Administrator dialog box. This sets a flag telling PeopleSoft Application Designer not to check the lock status of every definition. When all target definitions are locked, the copy is faster.
Deactivate all system tracing.
Select from the PeopleSoft Application Designer toolbar.
The Target Signon dialog box appears, prompting you to sign in to a target database.
Sign in to the target database as you do with any PeopleSoft database.
The Copy dialog box appears.
In the Copy dialog box, specify the types of definitions to copy and start the Copy process.
(Optional) Select the Reset Done Flags check box.
Any definition with a selected Done check box is not copied. The first time that you copy a project, all Done check boxes are cleared. When you're repeating a copy due to problems found the first time, however, you might want to clear the Done check boxes of definitions that were copied incorrectly. Clear all project Done check boxes from the Copy dialog box by selecting Reset Done Flags. This option is selected by default.
(Optional) Select the Copy Project Definition check box.
If you select this check box, the project definition is copied to the target database.
Select the definition types to copy.
Only the definition types that exist in the project are displayed in the Object Type(s) list. To select all types, click Select All. You can also copy one definition type at a time (repeat this procedure each time).
Note: If you copy definition types individually, copy them in the order in which they’re presented in the dialog box. For instance, start with records, then indexes, and so on.
Click Copy.
As the Copy process runs, a progress indicator appears on the status bar of the dialog box, displaying the definition type, the total number of definitions to copy, and the number copied so far.
After the copy completes, check for messages.
If you find any problems, correct them and repeat the copy.
Stamp the database.
To track the history of the configuration upgrades, PeopleSoft recommends that you stamp the target database after each copy.
When copying a project to multiple databases, or multiple PeopleSoft systems, use one of the techniques described in this section to ensure that version numbers remain in the correct sequence.
Sign off and re-sign onto Application Designer between each project copy to a new environment. This ensures the target environment version is being incremented for each copy. If you do not sign off and re-sign onto the system, the version from the previous target environment will be incremented in the next target environment, which may result in a version discrepancy.
Use Change Assistant. You can do this in either Update mode or Upgrade Mode. In Update mode, create multiple Change Packages and apply them individually, selecting the target environment each time in the Apply Wizard. Your target environments must be registered on an EMF hub. In Upgrade mode, create multiple jobs and run them individually by opening and running each job. When creating the job, the target environment is specified.
Create a batch file with multiple PSIDE command lines: one for each system.
To copy a project to a file:
Open the project that you want to copy.
Select
The Copy File dialog box appears.
Select the objects that you want to copy, and enter the output directory.
Click Copy.
If the file already exists, a confirmation dialog box appears asking if you want to overwrite the existing project. Select Yes to continue and overwrite project or No to cancel the Copy process.
The Progress dialog box shows the progress of the Copy process as it copies each definition in the project to the specified directory. If you click the Cancel button, the system cancels the Copy process. Any files that were created by the Copy process are removed from the specified directory. To continue copying a project, restart the Copy process if it was canceled.
When the Copy process completes successfully, a directory with the same name as the current project is created under the specified export directory. This directory contains the PeopleTools definitions and project definition in XML file format.
Note: Index key fields are not copied to the project file in certain cases when the session language set in Configuration Manager does not match the base language for your installation. For best results, set your session language to match the base language before performing a project copy to file.
The Copy Project From File command in the Tools menu imports PeopleTools definitions and the project definition from a file that was previously copied by using the Copy To File feature.
This section discusses how to:
Track fixed incidents.
Copy a project that does not exist in the database from a file.
Copy a project that does exist in the database from a file.
Tracking Fixed Incidents
When PeopleSoft delivers a software update, it is in the form of a change project file. This project file usually includes enhancements or updates that fix incidents. You can view incident IDs and their dependencies before you copy the file to the target database.
To view incident IDs that were included in the project file:
Open the maintenance project that you are planning to copy to the database.
Click the Project Properties button.
Select the Update IDs tab.
This tab contains a list of update IDs that were fixed and applied to the software.
Select the Pre-Requisites tab.
This tab contains a list of update IDs that are dependent on other fixes that are being applied. These are validated against the target database when you copy the project. If a fix in the Pre-Requisites list has not been applied, a message appears, indicating that the target database is missing a dependency. The only way to have the system allow you to copy projects that have dependencies that are not applied is to select the Override Pre-Requisites check box.
Note: We can track applied update ID fixes only through the Copy Project From File command in the Tools menu. Therefore, every update ID fix that PeopleSoft delivers is in a change project that must be copied to your database.
Copying From a File a Project That Does Not Exist in the Database
To copy a project from a file:
Select
The Copy From File: Select Project dialog box appears.
Browse to locate the project file or select the file from the Projects list.
Note: You can use the Open button to open folders while browsing. It does not open the project file and begin the copy process.
You can copy only one project from a file at a time.
Select the project from the projects list by clicking Select or double clicking the project name.
The Copy From File dialog box appears.
Select whether to use the project definition from the file or the database, and click OK.
Select the definition types to copy.
The Definition Type(s) list shows the definition types that have been exported and are available to be copied into the database.
Select the Override Pre-Requisites check box if required.
You can select the Override Pre-Requisites check box if you want the system not to check for project prerequisites and apply the project regardless of prerequisites that have not been applied.
Select the Compile PeopleCode after Import check box..
You can select the Compile PeopleCode after Import check box to compile all the PeopleCode programs in the Project.
Click Copy.
There are two phases to the Import process: content on the XML file is written to the system cache directory (as specified in the PeopleSoft Configuration Manager) under a stage directory for the current database. Then the cache is copied to the database. When the import is complete, the cache files are deleted.
The Progress dialog box shows the progress of the Copy process as it copies each definition from the export directory into the attached database. When the Copy from File process successfully completes, the system creates a new project definition from the PeopleTools definitions in the current database.
If you click the Cancel button before copying the project, the project becomes invalid and the system deletes the project reference from the database.
Note: When copying application packages and Portal Registry Structures, the Progress dialog box may display unexpected counting behavior, making it appear that definitions are being processed more than once. This behavior is expected.
Copying From a File a Project That Does Exist in the Database
Image: Copy From File: prompting for project definition location
The following is a screenshot of Copying From File a project that does not exist in the database. You can find definitions for the fields and controls later on this page.
The process for copying a project from a file when a project of the same name exists in the database is slightly different. After selecting Tools, Copy Project, From File and a project of the same name already exists in the database to which you are currently signed on, the following dialog box appears.
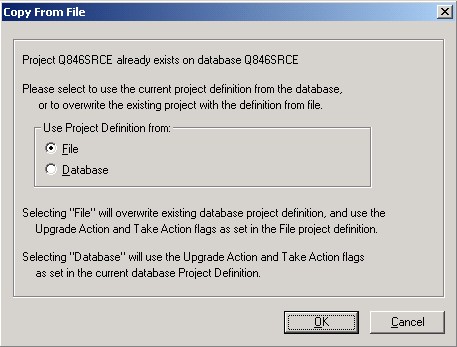
This prompt enables you to specify which project definition to use, the one stored in the database to which you are signed on or the one stored in the file from which you intend to copy. Keep in mind that the project definition is the metadata of the project and determines which definitions (pages, fields, records, and so on) are members of the project.
|
Field or Control |
Definition |
|---|---|
| File |
Select this option if you intend to copy the project stored in the file regardless of any Upgrade Action or Take Action settings in the database. Note: By selecting this option, you overwrite the project definition of the same name that previously existed in the database. Important! After selecting File and clicking OK, the second Copy From File dialog box appears where you can view source and target information, select Definition Types, select copy options, and so on. If you select Cancel from this dialog box, the project file does not get copied into the database, however, the existing project definition will be deleted from the database. |
| Database |
Select this option if you intend to maintain control of the upgrade project definition stored in the database and manually override any Upgrade Action or Take Action settings. |