Creating a Change Project
In addition to identifying the project as a change project, if necessary, you will need to add a file reference definition to the project, which requires a file type code definition. A file reference is only necessary if there is a physical file that you want to execute or deploy or both when the change package is applied by Change Assistant.
This section discusses how to:
Set project properties for a change package.
Define the file type code.
Create a file reference definition.
Modify the upgrade definition type.
Before beginning to work with the Change Packager, you must identify the project you want to use as a change project. You do this in the Project Properties dialog box.
To create a change project and set project properties:
Create a new project.
Open the Project Properties dialog box.
Enter a Project Description and any pertinent comments for your internal tracking system on the General tab.
The system populates the information you enter here into the change log and the manifest.
Select Change Project on the General tab.
This enables the Update IDs and the Pre-Requisites tabs. Here you identify the lead incidents from your incident tracking system, if applicable, that identify the updates to the database.
Select the Update IDs tab.
Enter the primary incident tracking ID associated with the update you want to implement in the Update ID field.
This field is numeric. The system considers the first value in the list to be the primary ID for the project. When entering your own incidents:
Enter the names of the fixes or the update IDs fixed in this project. The system logs them to the manifest and includes them when Change Packager copies the project.
Click Add to add it to the list.
Note: In order for Change Packager to create the change package successfully, you must enter a value in the Update ID field.
Select the Pre-Requisites tab.
List any prerequisites that this project might have. Change Assistant checks those incidents that you enter here against those listed in the target environment's change log to verify whether the fix has been applied.
Each file reference definition that you create for the project must be associated with a file type code. The file type code stores generic information that is applicable to a group of files within the same target directory.
Access the file type code definition from
To define the file type code for the file reference definition:
Click New to access the New File Type Code dialog box.
Enter a file type code and click OK.
The file type code can be up to 30 characters in length. This action opens the File Type Code dialog box.
Enter the Path.
This notifies Change Assistant where the file belonging to this type code should be deployed. The only supported environment variable for use is %ps_home%.
Enter a description for the file type code.
This field is required in order to save the definition.
If you have individual files that need to be packaged with the project, you can create file reference definitions to identify them. Create one file reference definition for each file. You create a file reference definition in the same manner as all other PeopleTools definitions in Application Designer, by selecting from the menu.
|
Field or Control |
Definition |
|---|---|
| File Name and Path |
Enter the path and file name for the file you want to reference. Use the browse button to search the proper path. This is the source location and file from which Change Packager selects the definition for packaging. This field supports the use of environment variables. If you want to create a file reference with a variable path, prepend %FILEREFPATH% to the filename. |
| Change Assistant Template Text |
Enter the text you want to display in the Change Assistant template for this change package. This field has a 20 character limit. |
| Binary |
Check if the file is a binary file. This information is necessary to properly transfer the file to the target platform. |
| Database Platform |
Select the database platform for the target database. |
| Operating System |
Select the operating system for the target database. |
| PeopleSoft Server |
Select the applicable server for your system. |
| Unix Target Directory Security |
Specify the file permissions the file should have once it is copied if operating on a UNIX system. |
For each of the drop-down list boxes in this dialog box, you may select multiple entries by using the Shift/Ctrl keystroke combinations.
The file reference properties contain only the General tab where you can enter any comments about the file reference as well as select the Owner ID. This tab also tells you when the definition was last updated and by whom.
When you save the file reference definition, the definition name defaults to the file name you entered in the File Name and Path field. The Save As dialog box prompts you for the File Type Code, which is a requirement for every file reference definition.
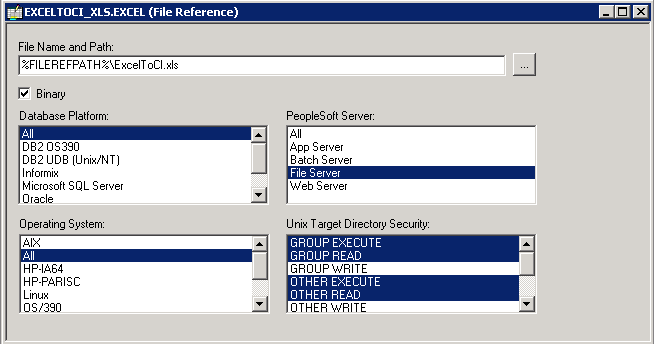
Variable File Reference Path
You can use a variable path as a file reference. To do this, in addition to the steps for creating an absolute path:
In the File Name and Path edit box, enter the name of the file and prepend the filename with %FILEREFPATH%.
For example: %FILEREFPATH%\ExcelToCI.xls
Add this file reference to a change project.
Image: Example of Variable Path File Reference
This example illustrates the fields and controls on the Example of Variable Path File Reference. You can find definitions for the fields and controls later on this page.
Using variables in the file reference definition eases the repackaging of a change package. When you create a change package with a variable file reference, the File Reference Path edit box in Create Change Package dialog expands the %FILEREFPATH% variable in the file reference definition. However, the file reference definition itself is not updated in the process.
This enables you to repackage change packages without having to modify the file reference definitions. The value in the File Reference Path field is stored in the registry and displays the last value.
When the change package is recreated, the update ID automatically expands the file reference paths according to the following construct:
file reference path + upd + update ID + \ +upd + update ID +_batch\filereferences\ + file type code + filename
For example:
c:\temp\upd999999\ upd999999_batch\filereferences\XLS\ExcelToCI.xls
c:\temp\upd999999\ upd999999_batch\filereferences\SQR\xrfwin.sqr
If the file does not exist in the directory, the system searches for the file reference path. If the file isn’t found in this directory, then an error will be displayed and the Change Packager fails to create a change package.
After creating the file reference definitions and inserting them into the change project, the next step is to modify the upgrade definition type to instruct whether Change Assistant should deploy or execute the file reference. Deploying the file copies it to the location specified in the File Type Code defined in the target environment. Executing the referenced file means it will be run on the Change Assistant machine.
Note: File references and application engine programs are the only definition types that can be executed.
To modify the upgrade definition type:
Open the change project.
Select the Upgrade tab in the project workspace.
Double-click the File References folder.
This action opens the upgrade definition type listing all file reference definitions for that project.
Choose the appropriate upgrade attributes for each of the file references listed.
Refer to this table to ensure the desired results:
Desired Result
Execute Check Box
Upgrade Check Box
Action Option
Deploy and Execute
Selected
Selected
Copy
Deploy only
Cleared
Selected
Copy
Execute only
Selected
Cleared
Copy
No Step*
Cleared
Cleared
Copy
No Action**
Either
Either
Delete
* No step indicates that the generated Change Assistant template will not have a step corresponding to that file reference definition.
** No action means that the file is neither deployed or executed in the target machine.
The default settings for the upgrade definition type are set for deploy only.
Save the project.