Creating Change Packages
This section discusses how to:
Create a change package.
Modify the Change Assistant template.
Finalize the change package.
Once you have created your change project you can build the change package using the Change Packager feature in Application Designer.
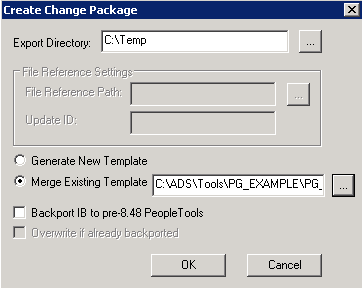
To create a change package, select Tools, Create Change Package, which invokes the Create Change Package dialog box.
Image: Create Change Package dialog box
This example illustrates the fields and controls on the Create Change Package dialog box. You can find definitions for the fields and controls later on this page.
|
Field or Control |
Definition |
|---|---|
| Export Directory |
The Change Packager feature copies the project into the directory you identify. Use the browse button to search for the desired directory. If you already created a change package for this project in the same directory, the system prompts you to delete the existing file. |
| File Reference Settings |
These settings apply only if your change package contains file references, otherwise these settings are disabled.
|
| Generate New Template |
Select this option if you intend to generate a new Change Assistant template with your change package that does not incorporate any manual changes made to an existing template. |
| Merge Existing Template |
Select this option if you intend to incorporate any manual changes you have made to an existing Change Assistant template. Enter the file path or navigate to the location of the existing Change Assistant template you want to merge with the updated template. |
| Backport IB to pre-8.48 PeopleTools |
Select if your changes affect Integration Broker (IB) definitions and need to be applied to versions of PeopleTools before PeopleTools 8.48. In PeopleTools 8.48, the metadata surrounding Integration Broker changed significantly. |
| Overwrite if already backported |
Only appears if Backport IB to pre-8.48 PeopleTools is selected. Select this option to overwrite any Integration Broker changes that have already been backported. |
The progress dialog boxes indicate the definitions that the system is copying into the change package. The system then confirms that the change package was created successfully. The Results tab of the output window displays a list of the definitions in the project by definition type, as well as any errors encountered.
Open the staging directory to confirm the change package was created successfully. The destination directory now includes a new folder named after the project and appended with the word Package.
Change Packager Output
The Change Packager feature generates several folders and a manifest, placing them in the output directory you specified previously. The manifest from the change package is an XML document containing data that may need to be accessed quickly by Change Assistant. This manifest information includes:
Update ID(s) from the project properties.
Prerequisite ID(s) from the project properties.
Update summary text from the project properties.
The user who created the update.
This is the user ID for the individual that last updated the project based on the By User field in the Project Properties dialog box.
Post date.
This date is generated from last updated Date/Time field from the Project Properties dialog box. Change Assistant uses this date to determine the order in which to apply a selection of change packages.
The number of manual steps included in the Change Assistant template.
A count of the definition types included in the project.
In addition to the manifest are six folders that include:
The Change Assistant template
The template contents for the update are tailored to the specific contents of the change project, including all relevant file deployment steps for each file reference definition given the file type code and the file reference attributes.
Documentation
The change package documentation is an HTML file. This document contains general information on the installation as well as instructions that are customized to your specific customizations. When you open the change package in Change Assistant, it displays the proper documentation for the current step in which you are currently working.
File references
The File References folder contains folders for each file type code associated with each file reference definition in the project. Each file type code folder contains a copy of the actual file referenced by the project's file reference definitions associated with this file type code.
Project folder
This folder contains an XML file of all project information.
Pre 8.44 project folder
This folder is applicable only to customers operating on a pre-8.44 PeopleTools release and are therefore not using Change Assistant to deploy change packages.
In most cases, the Change Assistant template generated by the Change Packager is exactly what you need to begin working with Change Assistant. However, in rare instances it may be necessary to manually add or update the steps in the Change Assistant template. The template is located in the Change Assistant package directory as an XML file.
Once you create the change package and are satisfied with the Change Assistant template, finalize the change package. The finalization process validates the files to confirm that all of the necessary pieces to produce the change package are present and generates a zip file for the entire change package. The zip file enables you to easily migrate your change sets to multiple environments.
To finalize a change project:
Open the change project to finalize.
Select from the menu.
Enter the location of the staging directory that you would like zipped up for the change package and click OK.
Use the browse button to search for the proper directory.
Change Packager places the zip file in the "<project name>Package" file, using the project name for the file name.