Creating Report Requests
This section describes how to:
Create requests.
Open existing report requests.
Delete report requests.
Note: Most end users create report requests, run and distribute reports, and view reports using Report Manager on the Web in the PeopleSoft Pure Internet Architecture. Topics in this section are used by developers who use the Windows environment to perform the same tasks.
Before you can run a PS/nVision report, you must create a corresponding report request. Each report request is a collection of report-specific information such as request name, report title, associated layout, scope, and so on. In a report request, you can use the Scope feature to create multiple instances of a report from a single request.
Use the PeopleSoft nVision Report Request dialog box to enter information about the report that you’re running, such as what layout to use, what time period to report on, and where to store the reports. This information makes up a report request, which you can save and reuse.
To access the PeopleSoft nVision Report Request dialog box:
Open nVision client by selecting
Select from the nVision menu.
The PeopleSoft nVision Report Request dialog box appears.
Note: You can specify effective date for trees either when you run the report request or when you define criteria.
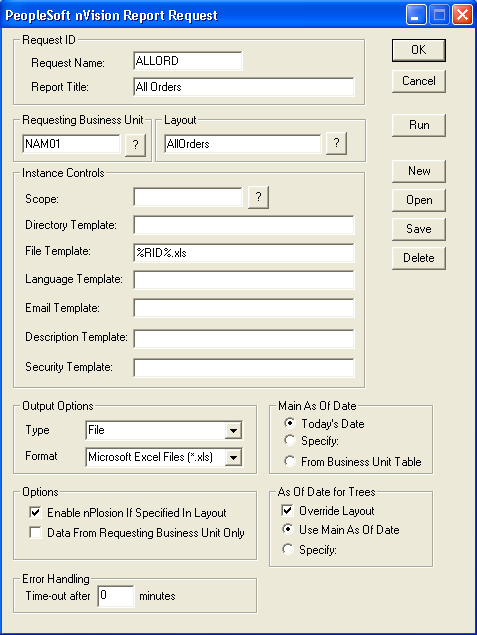
Image: PeopleSoft nVision Report Request dialog box in Windows
This example illustrates the fields and controls on the PeopleSoft nVision Report Request dialog box in Windows.
While you run the report, its layout file is opened in read-only mode to protect the layout from accidental changes while the report runs. To modify the layout file, open the layout from the nVision menu or from the Open Layout button on the NVSUSER home page.
Note: Microsoft Excel does not support the following characters in its file names: < > ? [ ] : | or *. PS/nVision has an additional restriction of not allowing the characters of / \ “ or ‘ in report names and not allowing % or a space at the beginning of report names.
Report requests that are created in PS/nVision for Windows are public. If you want to create secured report requests, you must use PS/nVision on the web, where requests are secured by default.
Request ID
|
Field or Control |
Definition |
|---|---|
| Request Name |
Enter a name to identify your report request. By naming and saving report requests, you can retrieve all the information of a report request the next time you run the report. You can use the %RID% variable within a layout to display name of a report instance. |
| Report Title |
Enter a description to describe your report request. Use the %RTT% variable within a layout to display this title on a report instance. |
| Requesting Business Unit |
Enter the business unit that the report belongs to. You can retrieve data for this business unit alone or for several business units. Use the %RBN% variable on your layout to show the description of the requesting business unit on a report instance. To show the value of the requesting business unit, use the %RBU% variable. |
| Layout |
Select the report layout (the XNV file) to use for this report. The directory for saving layouts is found in Configuration Manager on Windows and in Process Scheduler Configuration file on Web. Use the %LYN% variable on your layout to show the layout name on a report instance. |
Note: The table that stores nVision report definitions (PS_NVS_REPORT) now has a related language table, so the description of the reports are translatable.
Instance Controls
Most report layouts enable you to create multiple instances of a report using a single report request. For example, you might run three instances of an expense report that differ only in the division they report on.
Note: If you enter a list of values in any template field, make sure to use a semicolon to separate each item.
|
Field or Control |
Definition |
|---|---|
| Scope |
Select a scope definition to specify the data each report instance includes and how many instances PS/nVision creates. For example, you can select a scope to create multiple instances of a report based on specific values for a field, such as instances for business unit, department, or product. Use the %SCN% variable on your layout to show the scope name on the report instance. If you create multiple report instances, you must ensure that each instance has a unique directory or file name, or each new instance will overwrite the previous one. Use variables in the Directory Template and File Template fields to have PS/nVision generate directories or names on each instance it creates. For example, if you are running a report for multiple business units, you can have the business unit appear as part of the file name, or you can opt to save each instance into a different directory. |
| Directory Template |
Enter a directory name from the nVision report server for your instances. Use variables to create unique directory names. If a directory does not exist, PS/nVision creates one. If this field is blank, PS/nVision on Windows uses the directory specified in the Report Instance path setting in Configuration Manager. PS/nVision on the Web uses the path specified in Process Scheduler Configuration file. For example, you can use \\<servername>\Directory 1\Directory 2, but you have to make sure all the subdirectories under the servername (which comes from the combination of directory template and file template) are accessible from your client machine. Examples are:
Include the %BUV% and %APA% variables to yield directories that indicate the business unit and as of accounting period for which the report was produced. Example: C:\User\nVision\%BUV% and %APA%. A directory for each business unit and as-of date combination is created. |
| File Template |
Enter the file name to give report instances. You can include PS/nVision to dynamically create file names at runtime. The %RID% variable instructs PS/nVision to use the Request Name value as the file name, with the appropriate extension according to your output format. Use the %IFN% variable to use the file name in the layout. If this field is blank, PS/nVision uses the layout name as the default file name. For example:
The instance counter variable %ICT% causes each instance to be consecutively numbered. For example, for a report named OPSUM, the file template %RID%%ICT% creates files named OPSUM1.XLS, OPSUM2.XLS, and so on for each instance generated by this report request. |
| Language Template |
Enter an alternate language code for automatic translation on the report instances. This option is available only if alternate language design features are included in the layout design. If you are applying a scope to the report request, you can enter a string containing one or more PS/nVision variables (like the File Template and Directory Template fields). For example: |
| Email Template |
Enter a list of email addresses or use variables to specify who receives report instances. This template has no default. You must have values in this field if your output type is EMAIL, or the instances will not be sent. If you use role or users in your email templates, the email addresses associated with these users are entered into their user profiles in Security. You can enter up to 254 characters in this field. If you have a long list of email addresses, use the role or user variables. To enter a list of email addresses, separate each address with a semicolon. For example:
Note: If you want to email a multi-tab spreadsheet or a spreadsheet with an image (a graph, pivot table, or an embedded image), you must run the report with an output type of .XLS or distribute it through the Web using Report Manager. |
| Description Template |
Enter a description of the report instances for identification in Report Manager, or use variables to create the descriptions dynamically. For example: |
| Security Template |
Enter user IDs, role IDs, or variables to give specific users access to report instances in Report Manager. To authorize a user ID, enter a U followed by a colon before the user ID. To authorize a role, enter an R followed by a colon before the role ID. If this field is blank, the report is automatically distributed to the user running the report. For example: |
Output Options
|
Field or Control |
Definition |
|---|---|
| Type |
Select between sending output to a file or sending it to a local printer. Email, window, and web output types are not valid selections unless you are running a report from your browser. |
| Format |
Select an appropriate file format. |
Main As Of Date
Set the reporting period for this report. Many report layouts associated with PeopleSoft Financials applications report on data over a given accounting period, such as the current quarter or year-to-date. PS/nVision uses the main as of date to determine the meaning of any TimeSpans used in the layout. The date you select is compared to the calendar to determine the current period, and TimeSpans are then evaluated relative to that period. Available options are:
|
Field or Control |
Definition |
|---|---|
| Today’s Date |
Select this option to use date of today. |
| From Business Unit Table |
Select this option to use the date as specified on the business unit table. |
| Specify |
Select this option to specify another date for the report. |
Options
|
Field or Control |
Definition |
|---|---|
| Enable nPlosion If Specified In Layout |
Select this option to enable nPlosion. This specification overrides the specification in layout. If you do not select this option, nPlosion is disabled—even if the layout definition uses it. |
| Data From Requesting Business Unit Only |
Select this option to make the report reflect data from the requesting business unit only. nVision will add the WHERE criteria for requesting business, either from layout or scope definition, if there is no any explicit BUSINESS_UNIT criteria. This option is selected by default. Clear this option for PS/nVision to extract data for all business units with the criteria specified within the layout unless the business unit is specified in report scope. |
| Translate Summary Ledgers to Detail |
Select this option to retrieve data from the underlying detail ledger whenever you specify a summary ledger in a layout. This option is not available if the Selected Summary ChartField Nodes method was used in the layout to retrieve summary ledger balances. |
As Of Date for Trees
Use these options to specify trees that are in effect as of the reporting date by selecting the Use Main As Of Date option. Or, you can specify a different date and use a set of trees in effect on that date. For example, you may have a reporting structure set to go into effect in three months (remember that trees are effective-dated). You can select to run the report using the new tree structure by specifying the future effective date of the new tree.
The Override Layout option enables you to define layout-specified As of Date criteria, if any. This Override Layout option is selected by default, and:
If this Override Layout option is selected, the As of Date for trees specified in layout definition is overridden when you run report request.
If this Override Layout option is cleared, the As of Date for trees specified in layout definition is used.
If this Override Layout option is cleared and the As of Date for a tree is not specified during the time of layout definition, the As of Date for the tree from Report Request is used.
Error Handling (Time-out)
Use this option to specify the maximum processing time for this process and enable the system to kill the process if processing exceeds this time. The default value is specified in the Process Definition. If a nonzero value is specified in the report request, that value is used—if the report request's value is zero, the value from the Process Definition is used. If no value is specified in the Process Definition, a default value of 15 minutes is used.
A report scope enables you to create multiple instances of a report using a single report layout and report request. Using a scope, each report instance is generated with data specific to an individual field value (such as a business unit or department) or to a group of values (such as a tree node summarizing all sales departments). In this way, each report instance can share the same layout, while containing data unique to these field values.
For example, if you have a report request with a scope that produces one income statement for each division in the company, you could use a scope variable in the Email template to have each divisional report emailed to VP of that division. Alternatively, you could make each VP's report available in Report Manager by using a scope variable in the Security template.
Scope variables are used in the Email and Security templates the same way that you use them to create unique file names with the File template or directory names with the Directory template in your report request. The Scope Descriptive Variable (%DES%) is used to select a related field value from the Scope Value table or the Tree Node table. You can use values for email addresses, user Ids, or role Ids. The general syntax of the %DES% variable is:
%DES.[scope field].[detail field].[node field]%Note: The %DES% variable requires the associated field value be in the same table that the scope is based on.
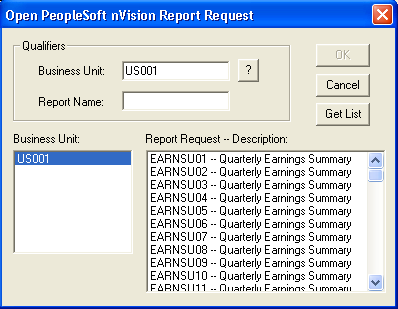
Use the Open PeopleSoft nVision Report Request dialog box to enter the Business Unit and the Report Name.
Image: Open PeopleSoft nVision Report Request dialog box
This example illustrates the fields and controls on the Open PeopleSoft nVision Report Request dialog box.
To open an existing report request in PS/nVision:
With a layout opens, selecting nVision, Report Request from the nVision menu.
Click the Open button on the PeopleSoft nVision Report Request dialog box.
Enter a business unit.
Click the Get List button to display a list of report requests in the Report Request list box.
After you click the Get List button, if the Report Request list box is too long to scroll through, enter a partial report name and click the Get List button again.
Click a report request and click the OK button, or double-click a request name in the Report Request list box.
The Open PeopleSoft nVision Report Request dialog box closes and the report request information appears in the PeopleSoft nVision Report Request dialog box.
To delete a report request in PS/nVision:
With a layout opens, selecting nVision, Report Request from the nVision menu.
Select from the nVision menu.
Open the report request that you want to delete.
Click the Delete button.