Administering Self-Service Schedules
PeopleSoft Applications administrator must create and setup the self-service schedules. This section discusses how to create and set-up self service schedule.
To create a self-service schedule, the administrator must define the schedule parameters and the modifiable parameters. Use the Self-Service Schedule page (Search) to add a new self-service schedule.
Note: The Customer Setup section is defined only at deployment on the customer’s environment and should not be filled in this phase.
To add a new self-service schedule:
Select .
Click the Add a New Value tab.
Enter a self-service schedule ID and click Add.
On the Self-Service Schedule page, define the schedule parameters and the modifiable parameters.
Note: The Customer Setup section is updated on the end user’s environment only.
Image: Self-Service Schedule page
This example illustrates the fields and controls on the Self-Service Schedule page. You can find definitions for the fields and controls later on this page.
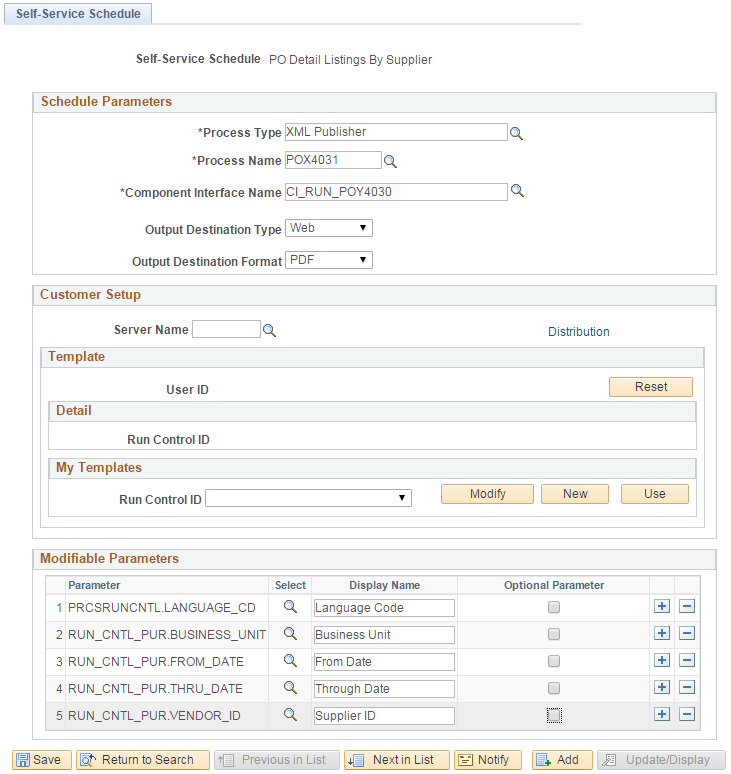
Schedule Parameters
|
Field or Control |
Definition |
|---|---|
| Process Type |
Enter the process type for each database and operating system platform on which you want the processes to run. |
| Process Names |
Enter a process name to display. The process names available are based on the type selected. Leave blank to display all names. |
| Component Interface Name |
Enter the component interface on the run control for the process schedule. You must create a component interface in the Application Designer if it does not exist. |
| Output Destination Type |
Select the output destination for this schedule that is applicable for this process type. The process uses the values in the process type definition to determine where to send the output. |
| Output Destination Format |
Select the format of the output destination type. |
Modifiable Parameters
For every self-service schedule, a set of parameters can be defined whose values can be over-ridden at run-time. You can select the values for the modifiable parameters at run-time either from the transaction pages, API, or run-time prompt.
|
Field or Control |
Definition |
|---|---|
| Parameter |
Enter the field name of the component. |
| Display Name |
Enter the label that is displayed when the run-time prompt is displayed. |
| Optional Parameter |
Select this option to indicate that there will be no run-time prompt if the parameter is not mapped to a transaction page. |
You can setup a self-service schedule by:
Mapping the related content to transaction pages.
Using API
Mapping to Transaction Page
The administrator must configure the related information for the application users to run processes to generate reports.
To map the related content to a transaction page, you must first identify the page from where the schedule would be executed. The end users execute the schedule from the transaction page. You can configure the data in the transaction page to the modifiable parameters.
To configure the related information :
Select .
On the Manage Related Content for Content References page, select a content reference.
Image: Manage Related Content for Content Reference page
This example illustrates the fields and controls on the Manage Related Content for Content Reference page.
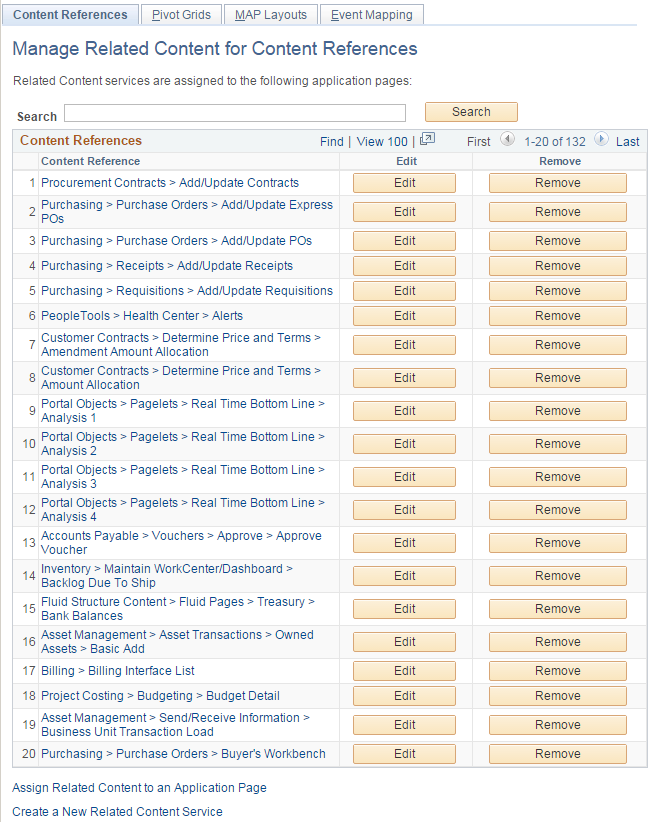
Click the Edit button.
Click the Configure Related Actions tab.
From the Page Level Related Actions section, select the transaction page on which you want the related action.
In the Service Type field, select Service.
Select the Service ID as SCHEDULESERVICE.
Note: Starting PeopleTools 8.54, SCHEDULESERVICE application class provides a new Related Content Framework service.
On the Look up Schedule Name page, select the node. You can select either the local or the remote node.
The self-service schedules available in that node are displayed.
Note: To access and run schedules on remote node, you must configure the remote nodes. For configuring remote nodes, see “Configuring Remote Nodes”.
Image: Look up Schedule Name page
This example illustrates the fields and controls on the Look up Schedule Name page.
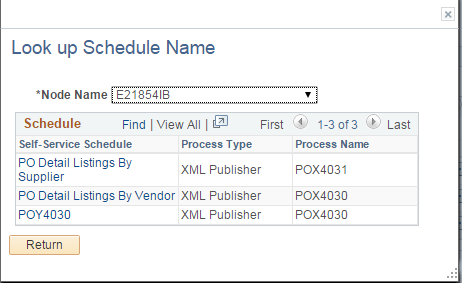
Choose the self-service schedule that you have created.
Click the Configure button.
Image: Assign Related Actions page
This example illustrates the fields and controls on the Assign Related Actions page.

The Configure Service page displays the modifiable parameters specified in the self-service schedule.
On the Configure Service page, you can set the mapping type from the Mapping Type list.
Image: Configure Service page
This example illustrates the fields and controls on the Configure Service page.
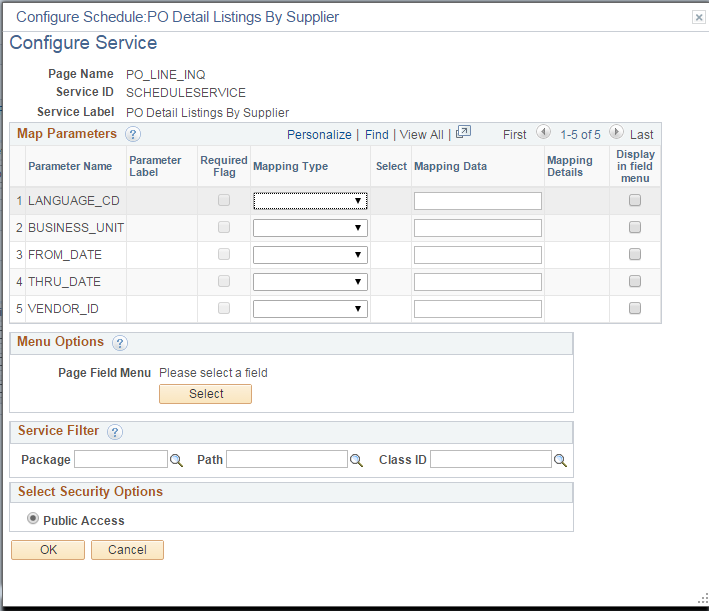
Click OK to save the configuration.
For more information about managing related content, see Configuring Related Content, Related Actions, and Menu and Frame Layouts.
Configuring Remote Nodes
Set the routings for the following Service operations:
|
Field or Control |
Definition |
|---|---|
| PTS_GETSCHEDULES |
Obtains all schedules from remote node. |
| PTS_GETSCHEDULE_INFO |
Obtains specific schedule information. |
| PTS_RUNSCHEDULE |
Executes a schedule on remote node synchronously. |
| PTS_RUNSCHEDULE_ASYNC |
Executes a schedule on remote node asynchronously. |
Note: Enable the first routing for service operation PTS_STATUS_NOTIFY to receive and handle notifications for the scheduled processes.
Using API
You can also setup a self-service schedule by using the API. Use SchedulerEditor class to update the modifiable parameters.
Pass an empty string as parameter value to create SchedulerEditor class object.
&editor = create PTSCHEDULESERVICE:SchedulerEditor("");Pass the schedule name and the node name to Invoke the SetSchedule() method.
&editor.SetSchedule(<Schedule_Name>, <Node_Name>);Pass the CI parameter name and value to invoke the &editor.SetCIParamValue() method.
&editor.SetCIParamValue(<Param_Name>, <Param_Value>);Invoke SetNotifyAppMethod and AddNotifyInfo to get the notifications.
Invoke Run() to execute the process.
This is a code example of setting up self-service schedule using the SchedulerEditor class.
&itemProcRequest = create PTSCHEDULESERVICE:SchedulerEditor("");
&strErrorMessage = &itemProcRequest.SetSchedule
  (&ItemToBeScheduled.ProcessScheduleName,
     &ItemToBeScheduled.ProcessTargetNode);

Evaluate &strErrorMessage

/* Invalid schedule or schedule not available */
When = "PTS_SCHEDULE_NOT_FOUND"

/* Handle error */
Break;

When = "PTS_IB_ERROR" /* Any IB errors */
/* Handle error */
Break;

When = "PTS_SUCCESS"
&itemProcRequest.SetCIParamValue(&prcsCtxData.CIParamName,
  &prcsCtxData.paramValue);

&itemProcRequest.SetNotifyAppMethod("PTAI_ACTION_ITEMS:
  ProcessAutomation:ProcessNotification", "updateProcessStatus");
&itemProcRequest.AddNotifyInfo("PTAI_LIST_ID", &ItemToBeScheduled.ListId);
&itemProcRequest.RunCntlID = &ItemToBeScheduled.ProcessRunControlID;
&strErrorMessage = &itemProcRequest.Run();
break;
End-Evaluate;