Implementing PeopleSoft-Only Single Signon
This section provides an overview of PeopleSoft-only single signon and discusses:
Defining nodes for single signon.
Working with the Single Signon page.
Defining authorized sites for single signon.
Setting up certificate authorization.
Single signon transaction example.
PeopleSoft-only single signon configuration considerations.
PeopleSoft-only single signon configuration examples.
Securing the PeopleSoft single signon token.
Using the single signon API.
Configuring single signoff.
Note: In this configuration, you must create PeopleSoft node definitions for each of the participating applications. You can run any of the participating applications on Oracle WebLogic. You can use passwords or digital certificates for single signon authentication.
PeopleSoft applications supports single signon among other PeopleSoft applications. Within the context of your PeopleSoft system, single signon means that after a user has been authenticated by one PeopleSoft application server, then that user can access other PeopleSoft application servers without entering an ID or a password. Although the user is actually accessing different applications and databases—recall that each suite of PeopleSoft applications, such as HCM or CRM, resides in its own database—the user navigates seamlessly through the system.
Note: The PeopleSoft-only single signon solution applies only to PeopleSoft applications. Single signon requires that user profiles exist in all databases involved in single signon.
The user profiles to utilize single signon must be defined on all participating databases. For example, for user Marcia Brady to be able to use single signon to access Database A, Database B, and Database C, her user profile must be defined in each of the three databases.
Single signon is critical for PeopleSoft portal implementations because the portal integrates content from various data sources and application servers and presents them in a unified interface. When the users sign in through the portal, they always take advantage of single signon. Users need to signon once and be able to navigate freely without encountering numerous signon screens. Because single signon is so integral to the portal, you always need to configure it before deploying a live portal solution.
Authentication Token (PS_TOKEN)
After the first application server/node authenticates a user, the system delivers a web browser cookie containing an authentication token (PS_TOKEN). PeopleSoft uses web browser cookies to store a unique access token for each user after they are authenticated initially. When the user connects to another PeopleSoft application server/node, the second application server uses the token in the browser cookie (as long as the token is valid) to re-authenticate users automatically so they don’t have to sign in repeatedly.
Note: The browser cookie is an in-memory cookie and is never written to disk. The cookie is also encrypted to prevent snooping and digitally signed to prevent tampering.
Check Token IDs
A check token ID verifies that the PS Token is still valid at the originator site or at the last site visited.
Each PeopleSoft database participating in single signon must define a check token ID on the default local node definition on the local database, as well as define the check token ID of their single signon participants on the remote node definitions of each.
You can create a system-generated check token ID by using the Create CheckTokenID button on the Nodes - Node Definitions page. When you click the button, the system generates a random 184 byte/248 character value and populates the value in the Check TokenID field. Note that the Create CheckTokenID button appears only on the Nodes - Node Definitions page for the local default node. As an alternative you can create your own custom check token ID. Custom check token IDs have a 254-character limit. Be sure to copy the ID before saving the component. You must provide this value to your single-signon participants, as they must define this value on their local database on the remote node definition that represents your database. Once you save the component, a mask appears in the field.
See the section “Defining Nodes for Single Signon” later in this section for more information.
The following table list steps for setting up single signon among PeopleSoft systems. Note that additional configuration may be required based on your business and security requirements.
|
Step |
Page/Navigation |
Description |
|---|---|---|
|
1. Configure the default local node definition. |
Nodes - Node Definitions page. Select the default local node and click the Nodes Definition tab. |
|
|
Nodes - Portal page. Select the default local node and click the Portal tab. |
|
|
|
2. Configure remote PeopleSoft node for each node participating in single signon. |
Nodes - Node Definitions page. Select the remote PeopleSoft node and click the Nodes Definition tab. |
|
|
Nodes – Portal page. Select the remote PeopleSoft node and click the Portal tab. |
|
|
|
3. Add nodes/databases participating in single signon to the Single Signon page. |
Single Signon page.
|
Add nodes participating in single signon to the Trust Authentication Tokens Issued by These Nodes grid. Click the Lookup button to search for and select nodes to participate in single signon. The default local node appears in the grid by default. |
|
4. Add sites participating in single signon to the Authorized Sites page. |
Authorized Sites page.
|
You can add sites two ways:
|
Defining General Node Properties for PeopleSoft-Only Single Signon
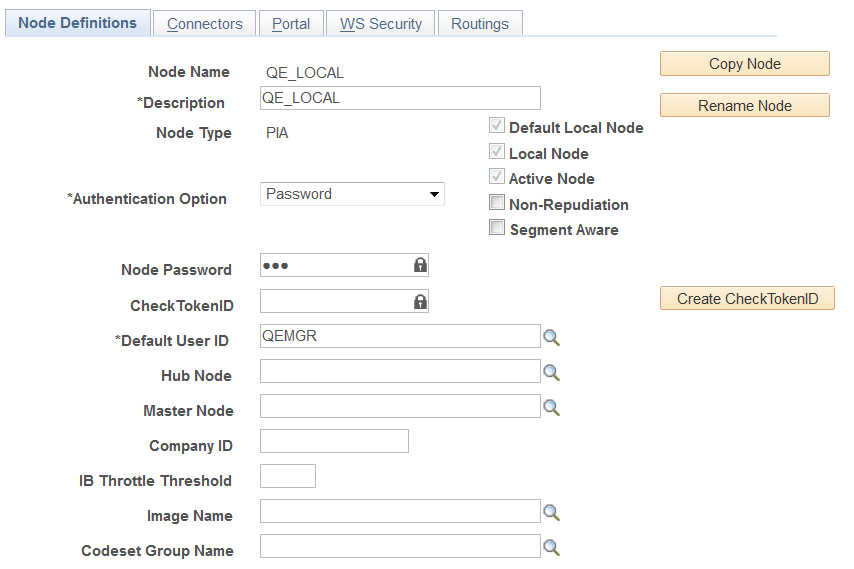
Access the Node Definitions page ().
Image: Nodes - Node Definition page for a default local node.
This example illustrates the fields and controls on the Nodes - Node Definitions page for the default local node.
The following example shows the Nodes - Node Definitions page for a remote PeopleSoft node participating in single signon as defined on the local database:
Important! The node name that you define for a remote PeopleSoft node to participate in single signon must be the same name as the default local node name on the participant’s local database.
Image: Nodes - Node Definition page for a remote PeopleSoft node.
This example illustrates the fields and controls on the Nodes - Node Definitions page a remote PeopleSoft node.

The fields and controls required for single signon are described in the following table. Note that your business and system requirements may warrant additional configuration of this page.
|
Field or Control |
Definition |
|---|---|
| Description |
Enter a description for the node. |
| Node Type |
Select PIA from the drop-down list. The Node Type for local and remote PeopleSoft nodes participating in single signon must be PIA. |
| Authentication Option |
Determines how nodes in a single signon configuration authenticate other nodes in the same configuration. The valid options for single signon are:
While the option None, which signifies no authentication between nodes, is included in the drop-down list, it is not a valid option for single signon nodes. . |
| Default Local Node |
When defining the default local node on the local database, select the Default Local Node option. Indicates that the current node represents the database you’re signed in to. The default local node is used specifically for setting up single signon. The options you set for single signon should be made on the default local node. |
| Node Password |
Note: You must reboot the application server and the web server after you define or change this value. |
| Default User ID |
|
| Create CheckTokenID |
The Create CheckTokenID button appears only:
Click the button to create a system-generated check tokenID for use in conjunction with single signon among PeopleSoft systems. When you click the button, the system populates the Check TokenID field with the generated value. |
| Check TokenID |
After you save the page the field becomes masked, regardless of whether a value is defined in the field or not. Note: You must reboot the application server and the web server after you define or change this value. |
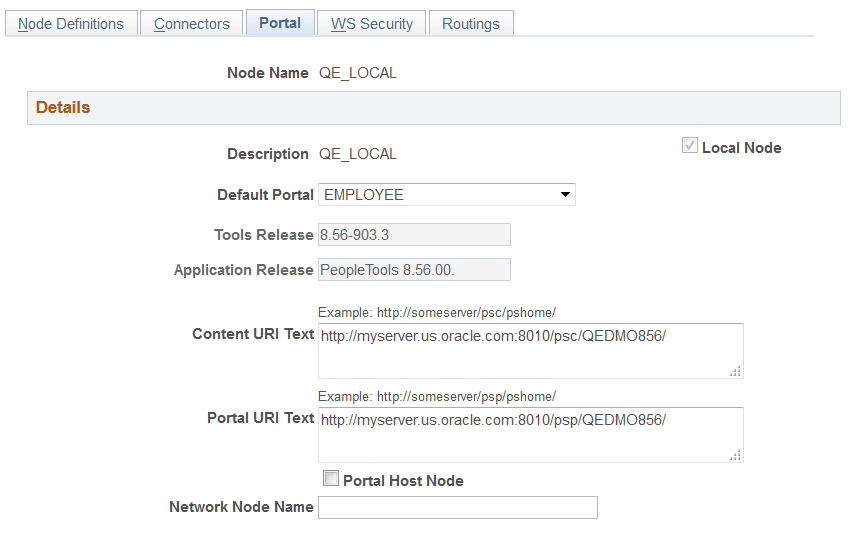
Defining Portal Node Properties for PeopleSoft-Only Single Signon
Access the Nodes - Portal page ( and click the Portal tab).
The following example shows the Nodes - Portal page for the local default node.
Image: Nodes – Portal page (Default local node)
This example illustrates the fields and controls on the Nodes - Portal page for a default local node.
The fields and controls required for single signon are described in the following table. Note that your business and system requirements may warrant additional configuration of this page.
Note: References to “remote PeopleSoft nodes” in the descriptions refer to remote node definitions that you must define for each PeopleSoft system participating in single signon.
|
Field or Control |
Definition |
|---|---|
| Tools Release |
|
| Content URI Text |
|
| Portal URI Text |
|
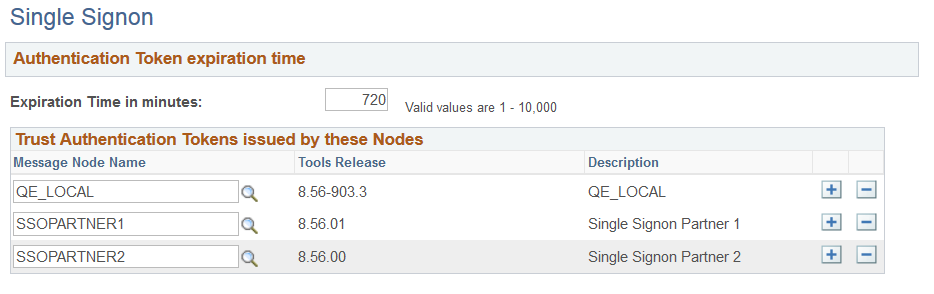
Access the Single Signon page (select ).
Image: Single Signon page
This example illustrates the fields and controls on the Single Signon page. You can find definitions for the fields and controls later on this page.
|
Field or Control |
Definition |
|---|---|
| Expiration time in minutes |
You need to set an expiration time for tokens this system accepts for authentication. Otherwise, once the user is authenticated, the user could be authenticated and signed on to the system with the token for as long as it stays up and running. You can set the authentication interval to be minutes, hours, or days depending on your signon strategy. The value is in minutes. For example, 480 minutes is 8 hours. This is global setting for all users of your PeopleSoft system that get issued the cookie. A short expiration period is more secure, but less convenient because users need to enter their passwords more frequently. The system accepting the token controls the expiration time, not the issuing system. For example, Node HCM_WEST, which has an expiration time of 100 minutes, issues a token to a user. The user attempts to use that token to sign in to Node FIN_EAST, which has an expiration time set to 60 minutes. If a period greater than 60 minutes has transpired, Node FIN_EAST rejects the token. When a node rejects a single signon token, the system prompts the user to enter a user ID and password on the standard signon screen. Note: This expiration time is separate from the timeouts you specify in the Permission Lists and the web server configuration files. |
| Message Node name |
Shows the name of the Message Node. In order to share authentication tokens between nodes, the nodes need to trust each other. By adding a node to this grid, you indicate that a particular node is known to the system and trusted. When a node is trusted, the local node accepts tokens issued by it. By default, no nodes appear in the trusted nodes list. If you want to implement single signon, you need to explicitly configure your system to support it by adding trusted nodes. First, you need to add the local node to the grid as a node must be able to trust its own tokens. When you sign in to the portal, the system authenticates users with a single signon token issued by the local system. The portal won't be able to sign in unless the local node is trusted. Then you add the names of other nodes in the system that should be trusted. Note: You define nodes in Portal, Node Definitions. |
| Tools Release |
Displays the PeopleTools release of the node, as defined on the Nodes - Portal page. |
| Description |
Displays the node name description, as defined on the Nodes - Node Definitions page. |
Note: After you update the list of trusted nodes, the system automatically recognizes the new list. Rebooting the application server is not required.
You can authorize the sites that users can access using single signon. The sites must be located on nodes/databases defined on the Single Signon page (PeopleTools, Security, Security Objects, Single Signon).
There are two ways to authorize sites for single signon:
Allow access to all sites configured on the domains of nodes defined on the Single Signon page.
Create a white list of sites of the domains defined on the Single Signon page..
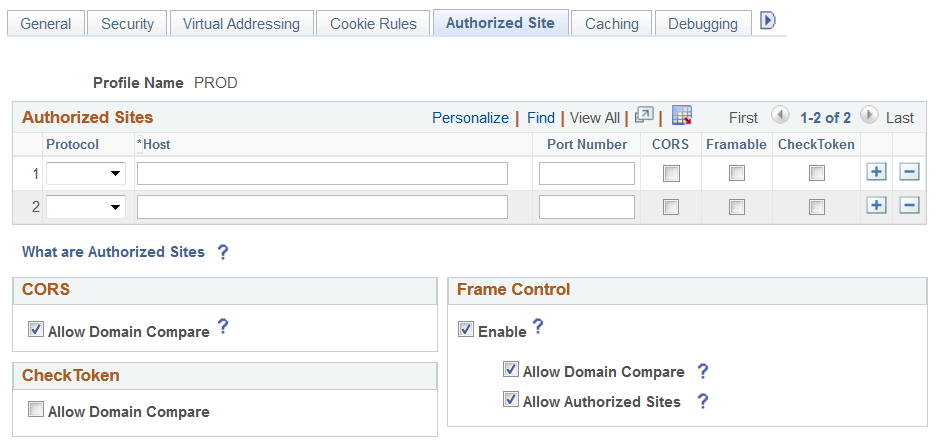
Use the Authorized Sites page to define sites authorized for single signon. To access the page select
Image: Authorized Sites page
This example illustrates the fields and controls on the Authorized Sites page. The fields and controls related to defining authorized sites for single signon are described later in this section.
Authorizing Single Signon Sites Across All Defined Single Signon Domains
To authorize sites to use single signon across all of the domains listed on the Single Sigon page, in the CheckToken section of the Authorized Sites page, select Allow Domain Compare, as shown in the following example:
Image: Authorized Sites page (Allow Domain Compare option)
This example illustrates the Authorized Sites page with the Allow Domain Compare option highlighted.
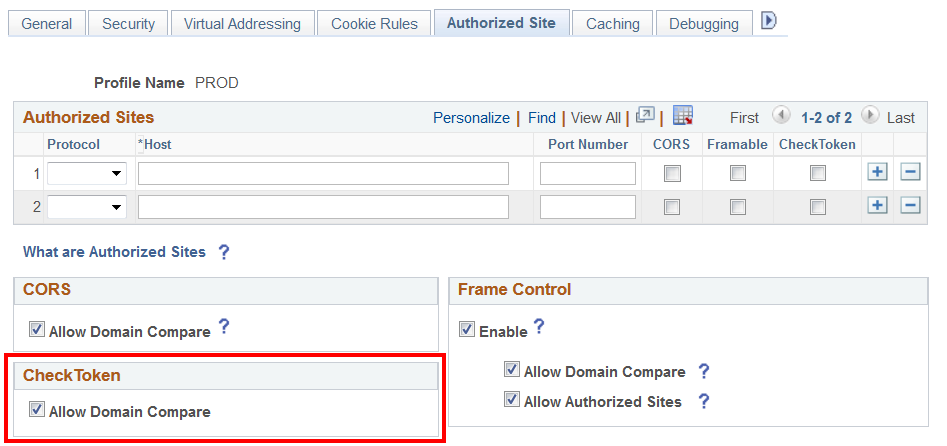
When you select the Allow Domain Compare option, the system allows single signon across all authentication domains and sub-domains of the nodes that you have listed on the Single Signon page.
Note: You must reboot the application server and the web server after you enable or disable this option.
Creating a White List of Sites Authorized for Single Signon
To create a white list of sites authorized for single signon, define the sites in the Authorized Sites grid on the Authorized Sites page. The Authorized Sites grid is shown in the following example:
Image: Authorized Sites page (Authorized Sites grid)
This example illustrates the Authorized Sites page with the Authorized Sites grid highlighted.
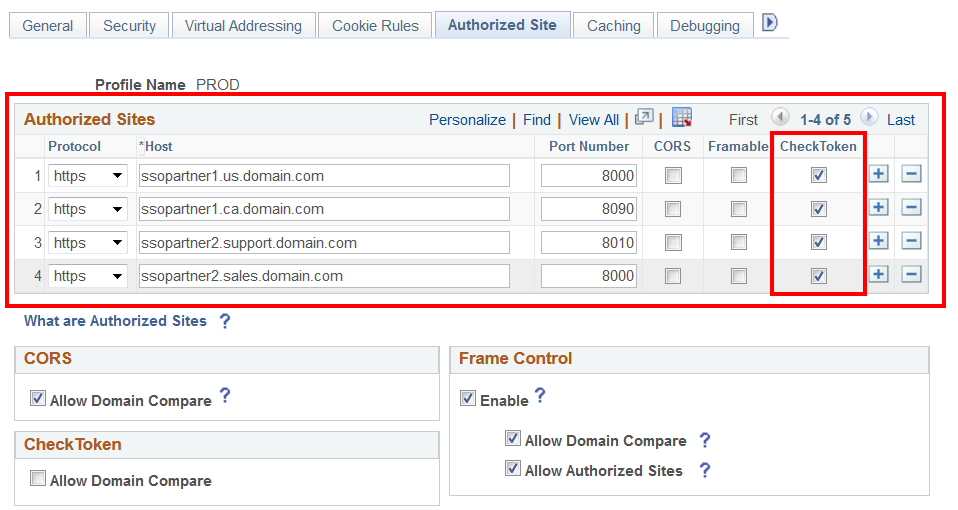
To define a white list of sites authorized for single signon, in the Authorized Sites grid at the top of the page:
From the Protocol drop-down list, select the protocol used on the site. The options are:
http.
https.
In the Host field, enter the domain of the site.
In the Port Number field, enter the port number of the domain.
Select the Check Token box.
Repeat steps 1 to 5 to define additional sites.
Click the Save button.
Reboot the application server and the web server.
Note: It’s important that you remember to select the Check Token option in the Authorized Sites grid for each site you want to white list for single signon. The Authorized Sites grid can contain site information for other PeopleTools functionality. Selecting the Check Token option enables the white list functionality for the site to be used during token validation.
Note: You must reboot the application server and the web server after you add or remove a site from the list.
This section provides additional details and steps to assist the configuration of certificate authentication used in a single signon implementation.
In the following scenario, you are configuring single signon between these two PeopleSoft systems.
|
Database |
Node Name |
Local Node |
Remote Node |
|---|---|---|---|
|
PeopleSoft Portal (master) |
PSPORTAL |
PSPORTAL |
PSHCM |
|
PeopleSoft HCM (content) |
PSHCM |
PSHCM |
PSPORTAL |
Perform these steps:
Set certificate authentication option in master database.
Define the portal node and establish trust in content database.
Create the private key and install the digital certificate for the local node in master database.
Install the digital certificate for the remote node in the content-side database.
Setting Certificate Authentication Option in Master Database
To set certificate authentication option in master database:
Sign in to the Portal database.
Select .
Select PSPORTAL from the list of nodes.
Verify that it is the local node.
Select Certificate from the Authentication Option drop-down list box.
Save the page.
Click the Return to Search button.
Verify that PSHCM exists as a remote node.
Defining Portal Node and Establishing Trust in Content Database
To define the portal node and establish trust in content database:
Sign in to the HCM database.
Select
Click the Add a New Value link.
Enter PSPORTAL and click the Add button.
Select Certificate from the Authentication Option drop-down list box.
Save the page.
Select and add the PSPORTAL message node to the list of trusted nodes in the Trust Authentication Tokens issued by these Nodes group box.
Save the page.
Creating the Private Key and Installing the Digital Certificate for Local Node
To create the private key and install the digital certificate for the local node:
Sign in to the Portal database.
Select
Note: Make sure that Root CA with Issuer Alias of PeopleTools is available.
Click the Add a new row button (+).
Select Local Node as the Type.
Enter PSPORTAL in the Alias field.
Select PeopleTools as the Issuer Alias.
Click the Request link.
Fill in the form
Note: For UNIX application servers, use 512 as the Key Size and PSPORTAL as the common name.
Click the OK button.
Select all of the text, copy the request, and click the OK button.
Request a certificate from your certificate provider.
Request the certificate using a base-64-encoded CMC or PKCS #10 file, or submit a renewal request by using a base-64-encoded PKCS #7 file.”
When you receive the certificate, download and save it to C:\temp as newcert.cer.
Open the certificate with a text editor.
Select all of the text and copy the certificate.
Sign in to the Portal database.
Select
Click the Import link for the PSPORTAL alias.
Paste the certificate into the text box.
Note: Make sure that there is no space after END CERTIFICATE, otherwise, you are not allowed to save.
Click the OK button.
Installing Digital Certificate for the Remote Node in the Content-Side Database.
To install the digital certificate for the remote node in the content-side database:
Sign in to the HCM database.
Navigate to
Click the Add a new row button (+).
Select Remote Node as the Type.
Enter PSPORTAL in the Alias field.
Select PeopleTools as the Issuer Alias.
Click the Import link.
Open the certificate that you downloaded to C:\temp\newcert.cer with a text editor.
Copy the text and paste the digital certificate into the empty edit box.
Click the OK button.
Now that you have a general understanding of why a single signon implementation is useful, and some of the details involved with PeopleSoft-only single signon, this section presents an example of how the PeopleSoft-only single signon scheme works.
In this scenario there are two databases, or nodes: an HCM database and Financials database. Recall that the terms database and node are synonymous. Each database has one application server and one web server. The following steps describe the “back-end” events that occur when a user signs in to the HCM database, completes a transaction, and then clicks a link that targets a page in the Financials database.
Step 1: User Signs In to an HCM Application
The following occurs:
The user PTDMO clicks this link: http://hcm.myserver.com/psp/hcmprod/?cmd=login&languageCd=ENG
The user enters ID and Password at the sign in page and clicks the Sign In button.
Step 2: Application Server Authenticates User
The following occurs:
The web server relays sign in request to the HCM application server.
The HCM application server authenticates the user.
Step 3: Application Server Generates Single Signon Token
The following occurs:
If the user is authenticated by the application server, then it generates a single signon token.
The application server encrypts and encodes the token (base 64).
The application server sends the token to the web server, along with a return code indicating that the system authenticated the user.
Step 4: Web Server Creates Cookie in User's Browser
When the web server receives the single signon token from the application server, it creates a cookie and inserts the cookie in the user's browser.
If the browser is configured to show the Security Alert dialog, then the user sees a message similar to the following example. In most cases, you don't configure browsers to show this dialog; this dialog box is just an example of the data that the browser receives.
Image: Message alerting user about the cookie
This example illustrates the Security Alert dialog box.
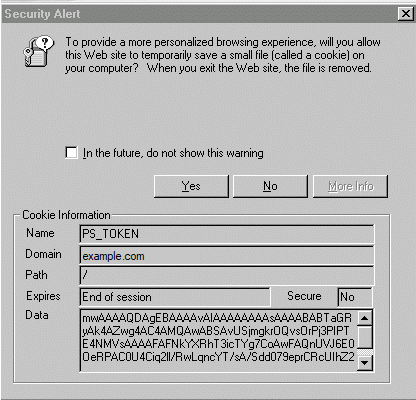
The cookie that the web server distributes for PeopleSoft single signon is named PS_TOKEN. In this case the domain mydomain.example.com set the cookie.
Notice that the cookie expires at the end of session. This indicates that the system never writes the cookie to disk, the cookie exists in browser memory for the duration of the session only.
The web server inserts the single signon token within the Data field of the cookie. So that the system can send the binary data across the HTTP protocol, the token data is encrypted and base 64 encoded.
Step 5: User Needs to Access Financial Application
After the user completes a few transactions in the HCM system, suppose they arrive at a page containing a link to the Financial system. The user clicks the link, and because they've already entered their credentials for the HCM system they don't need to sign in again.
The browser sends the PS_TOKEN cookie to the Financials web server.
Step 6: Financials Web Server Receives PS_TOKEN Cookie
The Financials web server does detect that the user hasn't been authenticated by the Financials system yet. However, because the web server received the signon cookie it does not display the sign in page.
To retrieve the page the user requested (by way of the link in the HCM application), the Financials web server attempts to connect to the Financials application server. It passes only the Data field from the PS_TOKEN cookie because the application server needs only the information in the Data portion.
Step 7: Financials Application Server Authenticates PS_TOKEN
Before allowing the user to connect, the Financials application server evaluates the PS_TOKEN Data field in the following flow:
Is the forwarding node trusted?
The application server checks to see that the message node name listed as the Issuing System is a trusted node. The list of trusted nodes for the Financials system resides in the PSTRUSTNODES table. You configure the list using PeopleTools, Security Objects, Single Signon. The Single Signon page enables the administrator of the Financials system to "trust" authentication tokens generated from HCM as well as any other nodes deemed trusted.
Has the token expired?
The application server checks that the authentication token hasn't expired. Using the Issued Date and Time field within the token, the Financials application server makes sure that the token was issued within the interval between the timeout minutes value and the current time. You configure a token's expiration time on the Single Signon page.
Note: It is important to note that the expiration parameter specified in the Financials system is the relevant value, not the expiration value specified in HCM. This enables the Financials administrator to control the maximum age of an acceptable token. It's also important to consider that all times are in Greenwich Mean Time (GMT), so it doesn't matter what time zones the systems are in.
Has the signature been tampered with?
The application server checks that the signature is valid. The Financials application server takes all the fields in the token and the Node password for the issuing node and generates a hash. The token is valid only if the signature within the token exactly matches the one generated by the Financials application server. Because an exact match is the only acceptable situation, Financials can be sure that HCM generated the token, and that it hasn't been tampered with since it was generated. If a hacker intercepted the token in transit and changed the User ID, Language, and so on, the signatures wouldn't match and as a result the Financials application server would reject the token.
Note: You should use digital certificate authentication when implementing single signon.
The following topics describe some items you might want to consider as you implement your single signon configuration.
Single Authentication Domain Limitation
Web servers must be assigned to the same authentication domain—the server name in the URLs used to access them must contain the same domain name. A browser sends a cookie back only to the same domain from which it received the cookie.
In PeopleSoft applications, an authentication domain is not the same thing as an internet protocol (IP) address. An authentication domain is a logical URL address that you specify during Pure Internet Architecture setup, and its purpose is to associate different web servers (even at different physical locations) so that they appear to be at the same location to the PeopleSoft applications that use those web servers.
Important! Specifying authentication domains incorrectly for multiple Pure Internet Architecture installations can produce single signon errors.
If you want to keep two PeopleSoft applications from erroneously attempting to employ single signon, make sure that the authentication domain you specify for one application's web server is not a subset of the authentication domain you specify for the other. For example, if your CRM web server has an authentication domain of .crm.mycompany.com, your Financials web server authentication domain must not be .mycompany.com (the parent of the CRM server domain) or .fin.crm.mycompany.com (a child of the CRM server domain). It can, however, be .fin.mycompany.com (or any child of the mycompany.com domain).
If you do want two PeopleSoft applications to employ single signon, you must ensure that each application contains a definition of the other as a trusted node, and you must specify the same authentication domain for both applications' web servers during Pure Internet Architecture setup.
Furthermore, the web server that generates the cookie must have the domain that shares the PS_TOKEN cookie specified in the web profile of the local Pure Internet Architecture web site. For example, in the context of our HCM to Financials example, the web profile for the HCM web server must contain the value of .example.com in the Authentication Domain property.
Note: You must specify the leading dot (.).
The single domain issues occur in the following situations:
You're using straight Pure Internet Architecture, as in you are deploying applications but not by way of the portal.
You're using the portal with frame-based templates. All PeopleSoft portal solutions products (Enterprise, Employee, Customer, Supplier portals) are built using frame-based templates.
Frame-based templates aren't proxied automatically. Proxying refers to when the system rewrites the URL to point to a location on the portal servlet, rather than the original location of the URL.
Single Signon Between Machines without DNS Entries
If you're setting up single signon between machines that don't have DNS entries, you need to modify the hosts file on the machine that's running the web browser. For example, let’s say that you are using machine a.example.com to signon to the web server a.example.com, and then access b.example.com using single signon. In this situation, you would need to update the hosts file on a.example.com as follows.
# Copyright (c) 1993-1999 Microsoft Corp.
#
# This is a sample HOSTS file used by Microsoft TCP/IP for Windows.
#
# This file contains the mappings of IP addresses to host names. Each
# entry should be kept on an individual line. The IP address should
# be placed in the first column followed by the corresponding host name.
# The IP address and the host name should be separated by at least one
# space.
#
# Additionally, comments (such as these) may be inserted on individual
# lines or following the machine name denoted by a '#' symbol.
#
# For example:
#
#      192.0.2.1     myserver.example.com          # source server
#       203.0.113.1     myclient.example.com              # x client host

192.0.2.8       localhost
203.0.113.4  a.example.com
198.51.100.5  b.example.com
Domain Names
You need to use a fully qualified domain name when addressing the web server in your browser.
This is an example of a correctly formatted URL: http://hcm.example.com/myapplication/signon.html
This is an example of a incorrectly formatted URL: http://hcm/myapplication/signon.html
When using the portal, the domain name that you specify in the Portal URI Text edit box on the Content Provider administration pages must match the fully qualified domain name you enter as the authentication domain. For example, you must specify myserver.example.com/servlets, not myserver/servlets.
Cross Domain Single Signon
The current PeopleSoft single signon solution deals mainly with systems where there is only one DNS domain. Many sites need to deploy the PeopleSoft Portal in multi-domain environments. For example, you might want to have the portal in one domain such as, www.myserver.com, and the HCM database in another domain, such as www.yourcompany.com.
You can configure your environment to support cross-domain single signon by completing the following configuration tasks.
Setup a third-party web security product that supports multi-domain single signon and supports LDAP user profiles.
There are several industry-standard products on the market.
Configure the portal and content provider web servers to trust the web server for authentication.
For PeopleSoft applications , this involves creating and enabling the public access user.
Set up the PeopleSoft applications to download the user profiles from the same LDAP server that the web security product uses.
This means that the DN that comes from the subject field of the certificate has to be a valid DN for the directory that the LDAP_profilesynch function references. Because of this you need to build a user profile cache map that points to the same directory that generated the subject's DN.
Note: This cross-domain limitation does not apply to the portal if the content from the provider in a different domain is wrapped in an HTML template. However, this limitation does apply for any content in the portal that is wrapped in a frame template. Because the Enterprise, Customer, Supplier, and Employee portals that ship with PeopleTools all include frame templates as defaults, you'll need to perform the extra configuration steps to support cross-domain single signon in multi-domain environments. This limitation also applies to Pure Internet Architecture-to-Pure Internet Architecture (iClient-to-iClient) single signon.
The following topics describe examples of single signon configurations and the steps required to implement them.
One Database and Two Web Servers
In this scenario there is one database and two or more web servers. While single signon is configured at the database level (that is, you specify timeout minutes and trusted nodes for the entire database), it’s actually used any time two different PeopleSoft servlets connect to the same database.
To set up single signon with one database and multiple web servers:
Select and make sure that at least one node is defined as the Default Local Node.
In the results on the search page, you can determine this by looking for a Y in the Default Local Node column.
Select and set the following:
Make sure the Default Local Node appears in the list under Trust Authentication Tokens issued by these Nodes.
Set the timeout minutes to an appropriate value (the default is 720).
Access the web profile for each web server and modify the Authentication Domain property.
Because single signon is implemented using browser cookies, it must be configured so that the user's browser sends the single signon cookie to each web server machine involved. By default, the browser only sends cookies back to the machine that set the cookie. So if web server a.example.com sets a cookie after the user is authenticated, the browser (by default) only sends the cookie to a.example.com. By default, the browser would not send the cookie to b.example.com. To make the browser send the single signon cookie to all servers at in a domain (example.com), access the Web Profile Configuration - General page and set a value of .example.com for the Authentication Domain property.
Note: You need the leading period (.) before the domain. It should appear as “.example.com,” not “example.com.”
If you use only one web server, you don’t need to modify the Authentication Domain property. A web server is designed to accept the cookies it distributes.
Two Databases and Two Web Servers
To set up single signon with multiple databases and multiple web servers:
Select .
For each node that you want to involve in the single signon configuration and check the following:
Make sure that at least one node definition is defined as the Default Local Node for each database.
In the results on the search page, you can determine this by looking for a Y in the Default Local Node column.
Make sure that each database contains a node definition for the other nodes in the single signon configuration.
Make sure that the Authentication Option is set correctly.
For example, if you are using password authentication make sure that the node password for node ‘X’ is the same in each node definition for node ‘X’ in each database.
If you use digital certificate authentication, make sure the certificates are properly installed in the PeopleSoft Keystore before setting the node’s Authentication Option to Certificate.
Select and set the following:
Make sure the Default Local Node appears in the list under Trust Authentication Tokens issued by these Nodes.
Set the timeout minutes to an appropriate value (the default is 720).
Access the web profile on your web server and modify the Authentication Domain property.
Because single signon is implemented using browser cookies, it must be configured so that the user's browser sends the single signon cookie to each web server machine involved. By default, the browser only sends cookies back to the machine that set the cookie. So if web server a.example.com sets a cookie after the user is authenticated, the browser (by default) only sends the cookie to a.example.com. By default, the browser would not send the cookie to b.example.com. To make the browser send the single signon cookie to all servers at in a domain (example.com), modify the authentication domain as follows.
See Understanding SSL/TLS and Digital Certificates, Understanding the PeopleSoft LDAP Solution.
Single Signon with Third Party Authentication
This section presents a simple example of how to implement single signon when you have implemented a third-party authentication system at the web server level. This applies to both portal and intranet web servers.
This discussion assumes that you have enabled public user access in the web profile for the appropriate site.
See Creating a Public Access User.
Note: While this example does not cover authentication, it assumes that you have set up your third-party authentication correctly. Third-party authentication is out of the scope for PeopleSoft support and documentation.
For PeopleSoft application single signon, the PeopleSoft system needs to know the user ID to be used for the web session. If implementing this configuration, you are required to address the following steps:
Authenticate the web user.
Determine which PeopleSoft user ID to use for this web user.
Send the user ID to the PeopleSoft application server.
Write Signon PeopleCode to retrieve the user ID from the location, as indicated in step 3.
Reauthenticate the user ID during Signon PeopleCode.
Indicate to the PeopleSoft application server to use the user ID for all subsequent service requests.
The following examples address steps 3, 4, and 6.
The following HTML applies to step 3 above. You can change the JavaScript function to set the cookie name and value that you want. Also, change the location to point to the PeopleSoft page to which you want to redirect users, for example:
<html>
<head>
<title>PeopleSoft 8 Single Signon Example</title>
</head>

<!--
PeopleSoft 8 Single Signon Example

In this example, security is non-existent.  In a production
system, the UserId could come from your site's single signon
tool.  Other information could also be included.  For this
example, only the UserId is saved into cookie.  This cookie then
gets sent to the PIA Web Servlet which passes it on to the
PeopleSoft Application Server.  A piece of Signon PeopleCode is
needed to extract the UserId from the cookie and call
SetAuthorizationResult to "sign on" the user.

- Change the domain value of the cookie to your domain.
- Change the location ref to the target URL within your PeopleSoft site.
//-->

<body>
<script language=JavaScript>
var cookie = "ThirdPartyUserId=PS; Domain=.example.com; path=/; MaxAge=1";
document.cookie = cookie;
location="https://hcm.mycompany.com/psp/hcmprod/EMPLOYEE/HCM/c/ROLE_EMPLOYEE.TIME_OFF.GBL?FolderPath=PORTAL_ROOT_OBJECT.EE_SELF_SERVE.EE_TIMEOFF_GBL&IsFolder=false&IgnoreParamTempl=FolderPath%2cIsFolder"</script>
</body>

</html>
The following Signon PeopleCode example applies to steps 4 and 6 above. The Signon PeopleCode needs to retrieve &UserID from where the third-party portal put it in the HTTP Request. For example,
Function SSO_EXAMPLE()

/*This is step 4*/
   &TPUserId = %Request.GetCookieValue("ThirdPartyUserId");
   /*This is step 6*/
   If &TPUserId <> "" Then
      SetAuthenticationResult( True, &TPUserId, "", False);
   End-If
End-Function;
After you write the program, you need to enable the program using the Signon PeopleCode page ().
PeopleSoft single signon functionality also applies at the web server level. For example, let's say that you have two web servers: server X and server Y. Assume that web server X is an SSL/TLS site, and assume that web server Y is not. In these situations, many organizations want server Y to trust the authentication token, PS_TOKEN, issued by server X. This requires that the PS_TOKEN be set to be secure.
If the PS_TOKEN is not marked as secure, then when a user signs in through server Y, the browser sends PS_TOKEN to server Y over the unencrypted, non-SSL/TLS link. This is typical behavior for browsers when dealing with non-secure cookies. Potentially, in this situation a hacker could identify this token from the clear network and use it to signon to the SSL/TLS-secure server X.
Another important use of this feature relates specifically to the PeopleSoft Interaction Hub. When the portal proxies content with an HTML template, it should forward PS_TOKEN cookies that are marked secure only over SSL/TLS connections.
To resolve this potential security issue, select the Secure Cookie with SSL check box on the Web Profile Configuration - Security page. You use this property to control the secure attribute of the single signon cookie. If you enable the property, and the scheme of the current request is HTTPS (an SSL/TLS server), the system sets the secure attribute of the single signon cookie (PS_TOKEN) to true. This prevents the single signon token from travelling over an insecure network.
Note: If you enable this property, you are effectively disabling single signon to any non-SSL/TLS servers.
If, at your site, you want users to sign in to an HTTPS server, and then want to do single signon with HTTP servers, set this property to false, which allows single signon between HTTPS and HTTP servers.
Note: If you can tolerate the security risk, and want single signon between secure and non-secure links, you can set this flag to false. However, before doing this make sure you are aware of all the security implications, such as the security of the HTTPS server may be compromised.
PeopleSoft provides a component interface named PRTL_SS_CI that enables external applications to seamlessly integrate a single signon solution with the PeopleSoft portal applications. This ensures that users who have already signed in to the portal don't have to sign in again for every system you reference in your portal.
To take advantage of the Single Signon API, you need to create a custom API, which includes building the dynamic link libraries, classes, and registry settings necessary to enable an external application to communicate with PeopleSoft software.
Note: Due to constraints imposed by the PeopleCode SwitchUser built-in function, PRTL_SS_CI does not work properly when called from PeopleCode. Only external applications, such as Java, Visual Basic, and C/C++ programs, can access PRTL_SS_CI.
The files of your custom API need to reside on the client machine; that is, the web server for ASP, and the machine running the Java program for Java. The registry file may also need to be executed to update the registry with the new libraries.
Understanding the Signon Process with the API
The PRTL_SS_CI Component Interface contains two user-defined methods:
Authenticate
Your external authentication program distributes an authentication token that can be retrieved from a cookie in the browser. The Authenticate function determines if an authentication token is valid.
GetUserID
If the token is valid, you use the GetUserID function to retrieve the User ID associated with the authentication token.
Before we describe the development requirements of your API, PeopleSoft recommends that you take a moment to examine the steps that occur internally when you use the API in conjunction with the delivered PRTL_SS_CI.
|
Step |
Description |
|---|---|
|
1 |
The user enters the User ID and password into the PeopleSoft portal sign in page. |
|
2 |
If the login on portal application server is successful, the server generates a single signon token. The web server receives the single signon token from the application server, and issues a cookie to the browser. |
|
3 |
The user navigates in the portal and encounters a link to the external system. The user clicks the link. |
|
4 |
The browser passes the PS_TOKEN cookie to your external web server. |
|
5 |
The external web server checks for the PS_TOKEN cookie before displaying a sign in page. |
|
6 |
Once it is determined that the user is accessing your application through the PeopleSoft portal, you retrieve the authentication token and send it to the PRTL_SS_CI component interface to verify authentication. |
|
7 |
After the system authenticates the token, the system can then make calls to the PRTL_SS_CI.Get_UserID function to return the appropriate User ID. |
Developing your External Application to Support Single Signon
Developers of the external applications need to alter the signon process to conform to the following requirements.
Check for the PS_TOKEN cookie.
If the cookie doesn’t exist, continue with your normal signon process. Otherwise, bypass the sign in page.
Retrieve the authentication token from the PS_TOKEN cookie.
Make a connection to the PeopleSoft system through the PRTL_SS_CI API.
Pass the authentication token to the
Authenticate()function of the API.If the function returns True, you then the
Get_UserID()function retrieves the user ID associated with the authentication token.
Note: The component interface is not mapped to data because the key field for the data would be the authentication token. This token is dynamically assigned when the user signs in to the portal, and it is not stored anywhere in the system as data. Therefore, there are no key fields and the token is passed directly to the user defined functions.
In addition to single signon, the PeopleSoft system also signs the user off of content providers when the user signs off. However, there are some exceptions to the sign-off functionality.
The portal only signs out content providers that meet the following criteria:
Content providers are accessed only through HTML templates.
Content providers are all PeopleSoft 8.x or higher applications.
This means that for content providers accessed through frame templates, single sign off is not automatically enabled when you configure single signon. This section describes the steps you need to complete to configure single sign-off for content providers being accessed through frame templates, which includes all of the PeopleSoft Portal solutions (Employee, Customer, and so on).
The following procedure covers inserting an HTML image tag <img> containing a logout command into a set of files on the web server. When the user signs off, the browser attempts to download the images using an "HTTP get," which causes the system to send the logout command to each specified content provider.
This procedure is not appropriate for content that is never accessed using a frame, as in it is accessed from the content source using an iScript and a business interlink, such as Lotus Notes integration.
To configure single sign-off for frame content:
On your web server, locate and open signin.html.
Open signon.html, select Save As, and enter the name signout.html.
Open signout.html, expire.html, and exception.html.
Add the following image tags to these files.
You need to add one image tag to each of these files for each content provider that requires single signoff.
Add the tags just before the closing body tag, as shown:
<! add tags here>
</body>
If you have three content providers that require single signoff, such as HCM, FIN, and HTML Access, you need to add three image tags to each file.
For example:
<IMG src="http://hcm.myserver.com/servlets/psp/ps/hrdb/?cmd=logout"
height=0 width=0 border=0>
<IMG src="http://fin.myserver.com/servlets/psp/ps/hrdb/?cmd=logout"
height=0 width=0 border=0>
<IMG src="http://htmlaccess.example.com/html_access/system/init_asp/
logout.asp?cmd=dummy"
height=0 width=0 border=0>
The previous code is an example. To determine the exact URL you need to add for your implementation, right-click the logout link of each content provider. You can usually view the logout link when accessing the application outside of the portal. Examine the properties of this link, and add the specified URL to the image tag.
Note: The string "cmd=dummy" is required in the image tag for HTML Access to make sure that the browser doesn't attempt to cache the image, which would prevent it from issuing the logout command.
Select on your web server.
In the Signon/Logout Pages group box, change the value of the Logout Page field to signout.html.