Scheduling Outbound EDI Agents
Select to access the Outbound EC Agent - Run Parameters page.
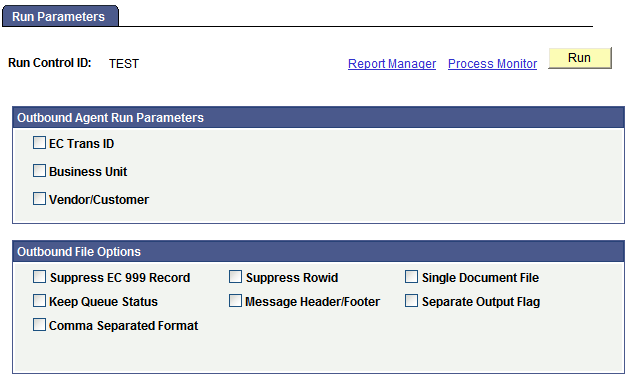
Image: Outbound EC Agent - Run Parameters page
This example illustrates the fields and controls on the Outbound EC Agent - Run Parameters page.
To schedule the outbound EDI agent to run:
Specify the transactions that you want the EDI agent to process.
To have the EDI agent process all pending transactions, clear all three check boxes. A pending transaction is one that an application extract process has added to the staging tables, and it has a status of L (Loaded).
To process all transactions of a particular type, select the EC Trans ID check box, and then select the transaction ID from the drop-down list that appears.
To process all transactions from a particular business unit, select the Business Unit check box and enter the business unit ID in the drop-down list that appears.
To process all transactions for a particular trading partner, select the Vendor/Customer check box, and then enter the vendor ID, customer ID, or other internal ID for the desired partner.
You can select multiple check boxes. For example, you could process all outgoing invoices for a particular vendor by selecting both the EC Trans ID andVendor/Customer check boxes.
Specify how you want to format the outgoing transaction file.
By default, the outbound EDI agent adds a record with the row ID 999 at the beginning of each transaction. This record identifies the transaction type in a way that is recognized by the PeopleSoft inbound EDI agent. If you select theSuppress EC 999 Record check box, the outbound EDI agent does not include this record in the outgoing file.
If you do not want to include the row ID for each record in the outgoing file, select the Suppress Rowid check box.
By default, the outbound EDI agent creates outbound transaction files in which the data for each field appears in the fixed column position specified in the outbound map definition. If you select the Comma Separated Format check box, the outbound EDI agent instead creates transaction files in which the fields are separated by a comma or other character rather than always appearing in a specified column position. The comma-separated option enables you to select the file options to read in flat file data that is comma-delimited.
Note: The Comma Separated Format option is only available if you used forced agent mapping. Selecting theSuppress Rowid option enables you to load data without requiring a row ID. However, your map definition must contain a row ID even if you are suppressing it in the run control setup. The row ID must be 000.
The CSV separator is the character that the EDI agent uses to separate the fields in a record. The CSV delimiter is the character that the EDI agent uses to mark the beginning and end of a data value. In the following example, the separator is a comma, and the delimiter is a single quotation mark:
'WOW','23.23','Big Deal'
Note: When you use comma-separated format, the outbound EDI agent ignores the column positions specified in the outbound map definition. It adds data to the outbound file in the exact order in which the fields appear in the map definition. You must make sure that the order of rows map definition specifies the fields in the order that you want them to appear in the file.
Select Single Document File to allow the results of the EDI to be written to a single output file. The business document ID is increased incrementally as though multiple documents were created. The file may contain multiple 999 records.
Select Keep Queue Status to not update the ECQUEUE.ECQUEUSTATUS field at the completion of processing. This action allows the record in ECQUEUE to be processed multiple times.
Select Message Header/Footer to process header and footer information before and following each business document. Header and footer information is stored with the trading partner definition.
Click the Run button.
Specify on which server you want the agent to run.
Specify when and how often you want the agent to run.
If you are running the EDI agent once, enter the date and time when you want to run it.
If you are running the agents on a server, Process Scheduler can run them once or periodically on a specified schedule.
Click the OK button to run, or schedule to run, the EDI agent.