Creating Customization Repository
The customization repository resides on the PUM Source. In order to create the repository, you must first identify all of the customizations that you want to track in the target databases and then upload the customization projects to the PUM Source. The customization projects apply across all your target databases. There are 2 types of customization projects, Managed Objects projects and ADS Managed Objects Projects.
Managed Object Customization Project
To create a managed object project:
Create a project on the customer database that includes your customizations.
Note: You can create as many customization projects as required.
The following methods are available to create the customization projects:
In Application Designer create a project by manually adding the managed objects you have identified as customizations.
You can use the UPGCUST project from your last upgrade.
Note: This method can be used for target databases on PeopleTools release 8.53, 8.54 and 8.55.
Create the project using PJRCUST, using one of theses options:
In Change Assistant use the step Create Customization Project to create the project.
See Step Types
Create the project using the command line PJRCUST.
Important! Your target database must be on PeopleTools 8.55 to use PJRCUST.
Create the customization project in Change Assistant using the Create New Database Project option in Upload Customer Data to Image.
(Optional) Copy the customization project to file.
Use Change Assistant to upload the customer data to PUM Source.
Review the upload on the PUM Source.
Run the Customization Calculation on the PUM Source.
ADS Managed Objects Project
To create an ADS project:
Sign on to the browser for the database where your ADS managed objects reside.
Select .
Create the ADS project and save it.
Optionally copy the project to file.
Note: If the data set is encrypted, you will not be able to upload the file in Change Assistant.
Use Change Assistant to upload the customer data to PUM Source.
Review the upload on the PUM Source.
Run the Customization Calculation on the PUM Source.
Navigation
In Change Assistant, select Tools, Upload Customer Data to Image.
Image: Upload Customer Data to Image page
This example illustrates the fields and controls on the Upload Customer Data to Image page. You can find definitions for the fields and controls later on this page.
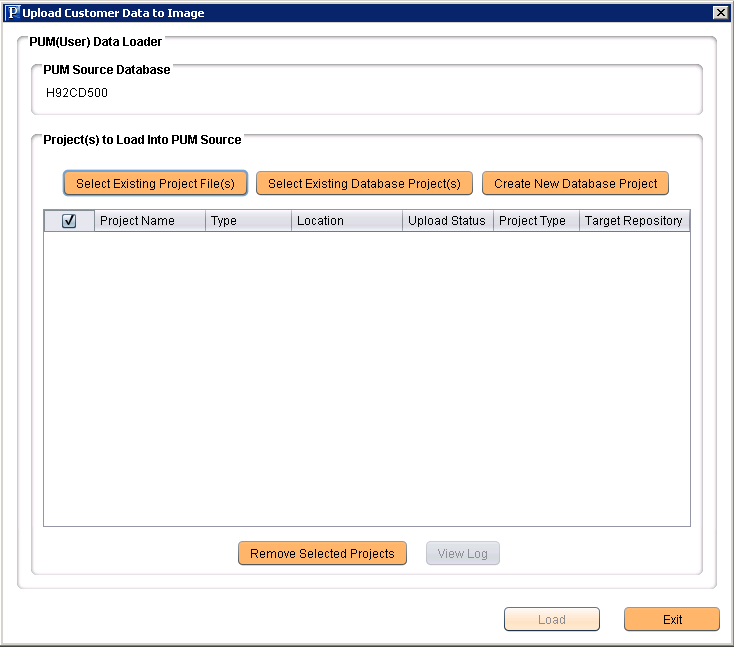
There are 3 options for uploading customization data:
Select Existing Project File(s)
Select Existing Database Project(s)
Create New Database Project
After selecting the projects, click the Load button to upload the customizations to the PUM source Customization Repository.
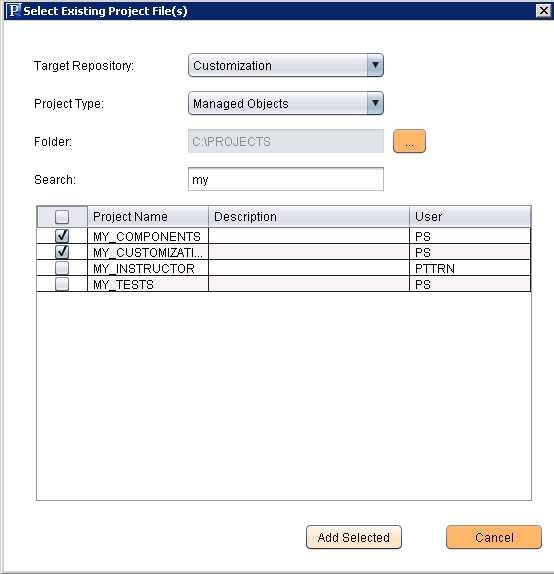
Select Existing Project File(s)
Image: Select Existing Project File(s) page
This example illustrates the fields and controls on the Select Existing Project File(s) page. You can find definitions for the fields and controls later on this page.
|
Field or Control |
Definition |
|---|---|
| Target Repository |
By default the Customization repository is selected. |
| Project Type |
For Customizations, the project types are:
Note: If the ADS Managed Object project is encrypted, it will not be available to upload from project file. |
| Folder |
Select the folder where the project file is stored. |
| Search |
Enter value to search for and press the Enter key. All projects matching the entered value will be returned. |
| Project Grid |
Select the projects that you want to upload from the project grid. |
| Add Selected |
Click the Add Select to return to the Upload Customer Data to Image page. |
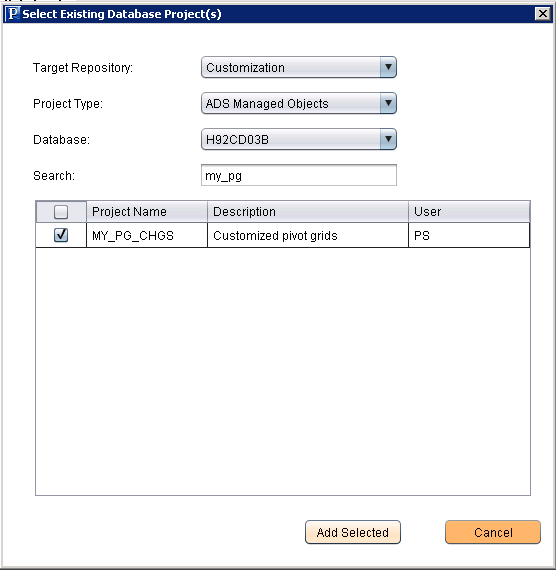
Select Existing Database Project(s)
Image: Select Existing Database Project(s) page
This example illustrates the fields and controls on the Select Existing Database Project(s) page. You can find definitions for the fields and controls later on this page.
|
Field or Control |
Definition |
|---|---|
| Target Repository |
By default the Customization repository is selected. |
| Project Type |
For Customizations, the project types are:
|
| Folder |
Select the folder where the project file is stored. |
| Search |
Enter value to search for and press the Enter key. All projects matching the entered value will be returned. |
| Project Grid |
Select the projects that you want to upload from the project grid. |
| Add Selected |
Click the Add Select to return to the Upload Customer Data to Image page. |
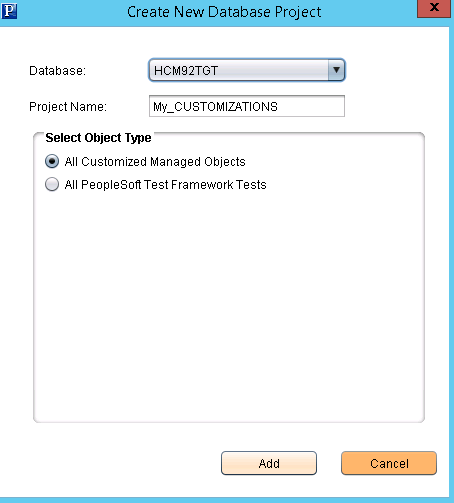
Create New Database Project
Image: Create New Database Project
This example illustrates the fields and controls on the Create New Database Project. You can find definitions for the fields and controls later on this page.
|
Field or Control |
Definition |
|---|---|
| Database |
Select the database that contains the customizations. |
| Project Name |
Enter the Project Name. |
| All Customized Managed Objects |
This feature will go through the specified objects in a database and compare the object user id with ‘PPLSOFT’ and insert the object into the customization project if the user ID is not ‘PPLSOFT’. |
| All PeopleSoft Test Framework Tests |
This feature will insert all PTF tests in the database. |