Defining New Trees
This topic discusses how to define new trees.
Use the Tree Definition and Properties page (PSTREEDEFN) to specify general attributes for a tree.
Navigation
Select
Search for an existing tree or create a new one.
Click the link on the Tree Manager page.
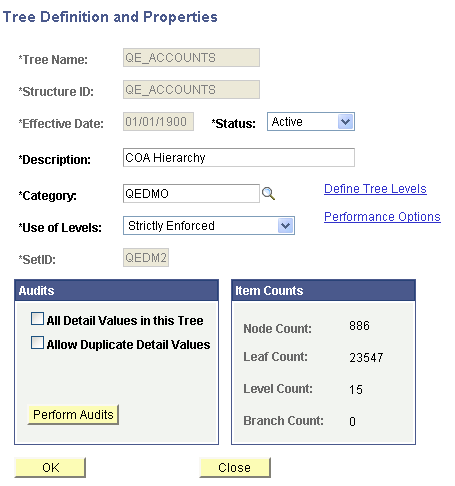
Image: Tree Definition and Properties page
This example illustrates the fields and controls on the Tree Definition and Properties page. Definitions for the fields and controls appear following the example.
|
Field or Control |
Definition |
|---|---|
| Tree Name |
If you create a new tree, enter a tree name. Note: SmartNavigation passes the values of several tree-specific fields to the application via URL. Certain characters are inappropriate for use in an URL and should be avoided. When you set up trees, some characters in the tree name, setID, set control value, and tree branch fields should not be used. |
| Structure ID |
Select a tree structure ID. Define structures using the Tree Structure Properties page. |
| Status |
Select a status of Active or Inactive. If you mark a tree as inactive, no other users have access to your tree from other PeopleSoft applications or tools. |
| Category |
Select or add a category. Categorizing is a user-defined way of organizing trees so that they are easier to find when using the tree search pages. Note: Previously, the category determined how trees were arranged at the highest level and was an important visual clue in organizing trees. Category is now used only as a search value. |
| Use of Levels |
Select a method for enforcing levels. Use Strictly Enforced or Loosely Enforced levels unless you have a compelling reason not to. Some features, such as creating summary trees, require levels. Note: For an existing tree, you can change the Use of Levels field. For example, you can change Strictly Enforced levels to Loosely Enforced levels, but you cannot change from not using levels to using them.
|
| All Detail Values in this Tree |
Select to check if all values in the detail value table should be included in the tree. For example, if you want to verify that all of the department IDs in the DEPT_TBL for a given setID are contained in the DEPT_SECURITY tree for that setID, select this box, and PeopleSoft Tree Manager will check for any department IDs that are not found in the tree. If you select this option and click the Performance Methods link, you can select an option in the Auditing All Detail Values group box on the Performance Options page. Note: This option is not available for use with winter trees. |
| Allow Duplicate Detail Values |
Select to skip the audit that checks for duplicate detail values in the tree. When selected, you can have the same detail value appear under different parent nodes. Note: This option is not available for use with winter trees. |
| Perform Audits |
Click to run the selected audit option from this page. PeopleSoft Tree Manager also performs audits whenever you save a tree. However, no audits are performed if you save the tree using the Save Draft option. |
| Item Counts |
Displays the number of nodes, leaves, levels, and branches in the currently opened tree or branch. It does not count nested branches (branches with a parent branch that is different than a currently opened branch). |
| Define Tree Levels |
Click to access the Tree Levels page and add, update, or delete tree levels. See Defining Tree Levels. |
| Performance Options |
Click to access the Performance Options page and set access method, tree selector, or selector options. You can also set the Auditing All Detail Values option as well as Tree Change Service Operation options. Note: The Access Method, Tree Selectors, and Selector options are used mainly for optimizing tree usage with PeopleSoft nVision and Query when using the In Tree criteria option. |
Use the Enter Root Node for Tree page (PSTREEROOTLEVELS) to define tree levels and the root node.
Navigation
Select
Create a new one.
Click the link.
On the Tree Definition and Properties page, enter the appropriate values and click the OK button.
Image: Enter Root Node for Tree page
This example illustrates the fields and controls on the Enter Root Node for Tree page.
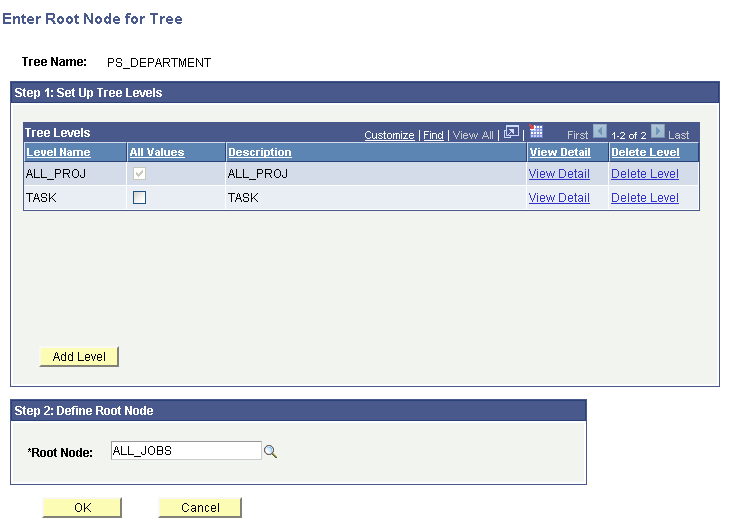
You create a tree from the top down. You start by creating the root node, then add the children of the root node, and continue down to the detail values (if the tree has them). If the tree uses levels, then you must first define the level for the root node. You may want to set up additional levels at this time.
To add a root node for tree:
Note: If your tree does not use levels and the Add Root Node page does not include level configuration, skip to step 5.
In the Enter Root Node for Tree page, add tree levels by clicking the Add Level button.
The Tree Levels page appears.
Enter a name for the level.
Use a name that reflects what the nodes at this level represent. For example, the first level in the Department Security tree is CORPORATE, indicating that the root node is Corporate Headquarters. You can also enter the name of a level from another tree.
Note: You can also use the search box to search for names of existing levels.
Specify whether nodes can skip over the level.
The All Values option specifies whether PeopleSoft Tree Manager permits nodes to skip over the level you’re defining to report to a higher level. Select this option to make sure that all values from lower levels report to a node at this level. Clear this option to allow nodes to skip a level. For example, you might want to do this if you have one or more departments that are not part of any division but report directly to the COMPANY level.
Note: When you are adding a top level (the root node), the All Values option is selected but unavailable. You cannot skip over the top level.
Click the OK button.
The Tree Levels page closes. If you entered the name of an existing level from another tree, the level name is added. If you entered a new name, PeopleSoft Tree Manager displays the page for entering tree level information. The displayed page is the page specified for levels in the tree structure. For most trees, it is the Tree Levels page.
Enter a new root node name or select an existing root node.
If you are entering new node information, you must enter the information in the Tree Nodes page.
Click the OK button.
The tree appears with the root node on the page.
Note: When the multiuser environment is enabled, a newly created tree appears by default in edit mode.
For more information on inserting nodes into trees, see Inserting Nodes, Working with Tree Nodes.
For more information on adding detail values, see Adding Detail Values, Working with Detail Values.