Working with Tree Nodes
This topic discusses how to work with tree nodes.
A node in PeopleSoft Tree Manager has three parts: the node image, the node name, and a node description.
Image: Node with a description
In this example, the node is collapsed, so the folder image is closed. The node name is 10600, and the node description is Branch Office Administration.

Image: Node that skips a level with level displayed
In this example, the node skips a level.

To display images for working with nodes, click the description or node name.
Image: Node with editing images
This example illustrates Node with editing images. Definitions for the images appear following the example.

This is a complete list of node editing images. When you highlight a node, only the images representing the available actions appear:
|
Field or Control |
Definition |
|---|---|
 |
Click the Expand Node Hierarchy icon to expand all child objects for the selected node. |
 |
Click the Insert Child Node icon to insert a new node that will be a child of the currently selected node. |
 |
Click the Insert Sibling Node icon to insert a new node that will share the same parent as the currently highlighted node. |
 |
Click the Insert Detail icon to insert a new detail value. This icon is available only if the detail value information has been entered on the Tree Structure Detail page. |
 |
Click the Update Node Properties icon to display the Node Properties page, which enables you to change the level of a node or rename a node. |
 |
Click the Edit Data to display a page for maintaining or editing the application data for the node. The table that stores the data is defined on the Tree Structure Maintenance page. |
 |
Click the Delete Node icon to delete the selected node. Note: If you delete an object that has child nodes, all of its child nodes will also be deleted. |
 |
Click the Cut icon to cut one or multiple tree nodes or tree leaves, and then use the Paste as Sibling or Paste as Child icons to paste all cut tree nodes or tree leaves at once as children or siblings. When you perform cut and paste in Tree Manager, note that:
Note: This icon is not available for dynamic detail leaves. |
 |
Click the Paste as Sibling icon to paste a cut node into the tree as a sibling. |
 |
Click the Paste as Child icon to paste a cut node into the tree as a child. |
 |
Click the Branch icon to subdivide that part of the tree into a separate component that can be maintained and viewed separately from the main tree. |
 |
Click the Open Branch icon to open the selected branch in PeopleSoft Tree Manager. |
 |
Click the UnBranch icon to remove the selected branch and PeopleSoft Tree Manager replaces the branch image with the node image. Any nodes that report to the selected node are now available in the tree. |
Note: You cannot define a sibling or child node with an effective date greater than the effective date of the tree.
To insert a node:
Select
Search for an existing tree or create a new one.
On the Tree Manager page, highlight a node.
Click either the Insert Child Node or Insert Sibling Node icon.
In the Tree Node field, click the prompt button to find the node name to insert.
Enter the node name or select the node from the list.
The Insert Child Node or Insert Sibling Note page appears with the selected value.
Click the Add button.
If you entered values that have already been defined in the User Node data record (table) but was not a part of the tree, PeopleSoft Tree Manager adds the values to the tree when you click the Add button.
If you enter new values, PeopleSoft Tree Manager opens a User Node data page, where you can add a new value. If a new value is successfully added to the database, Tree Manager adds that value to the tree.
If the node you specified already exists in the tree, the system displays an error pointing to the duplicate node.
To move a node using cut and paste:
Select
Search for an existing tree or create a new one.
In the Tree Manager page, highlight the node and click the Cut icon.
Select the destination node and click the Paste as Sibling or Paste as Child icon.
The node is pasted into the position that you specified. Remember that you cannot insert a child node into a branch node, insert a sibling node into a root node, or insert a parent node into its child.
PeopleSoft Tree Manager moves the entire part of the tree starting at the selected node. If the moved node has nodes or detail values reporting to it, they also move to the new position.
Note: You cannot move branched nodes.
Levels Behavior When Nodes are Moved
The following are general rules used for levels when nodes are moved:
Tree with strictly enforced levels: The parent node must always be at a higher level than its children.
Tree with loosely enforced levels: No rules are enforced; therefore, levels of the descendant nodes should be manually adjusted by using the switch level function on the pasted node.
The following table shows the basic behavior of levels when cutting and pasting nodes.
|
Action |
Strictly Enforced Levels |
Loosely Enforced Levels |
|---|---|---|
|
Moving node to a higher level. |
Levels of the pasted node and its children are not automatically adjusted. The pasted node appears as a skipped node. (Node image changes to a skipped node image). |
Levels of the pasted node and its children are not automatically adjusted. The pasted node appears as a regular node. |
|
Moving node to a lower level. |
To ensure that the parent node is always at a higher level than its children, PeopleSoft Tree Manager automatically adjusts the level of the node and its children. |
The levels of the pasted node and its children are not adjusted. |
Note: New tree levels are not automatically created in non-root branches when a tree node is moved or a new tree node is added.
Use the Node Properties page (PSTREENODELEVELS) to change node levels, change node properties, and rename nodes.
Navigation
Select
Search for an existing tree or create a new one.
Select a node on the Tree Manager page and click the Update Node Properties icon.
Image: Node Properties page
This example illustrates the fields and controls on the Node Properties page.
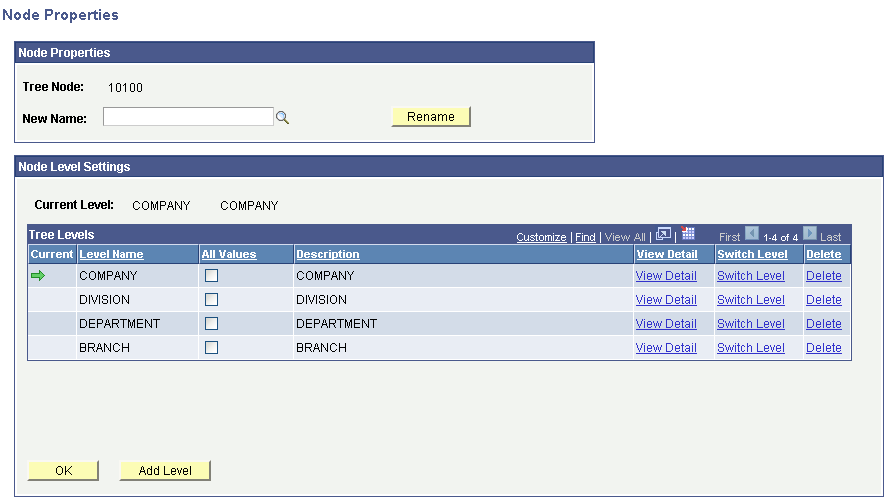
In the Node Properties page, click the Switch Level link associated with the level to which you want to change the node. Then the node level information is updated and changed. The node level is indicated by the green arrow.
Levels Behavior When Switching Node Levels
The following are general rules used when switching node levels:
Tree with strictly enforced levels: The parent node must always be at a higher level than its children.
Tree with loosely enforced levels: The parent node must be at the same or higher level than its children.
The following table shows the basic behavior of levels when the switch node level function is used.
|
Action |
Tree with Strictly Enforced Levels |
Tree with Loosely Enforced Levels |
|---|---|---|
|
Switching node to a higher level. |
Only available for skipped nodes. Can only ascend the number of levels that have been skipped. PeopleSoft Tree Manager automatically adjusts the levels of the child nodes. For example, if the parent node is switched two levels, the children are automatically adjusted two levels. |
Only available for skipped nodes. Can only ascend the number of levels that have been skipped. Levels of the child nodes are not automatically adjusted. |
|
Switching node to a lower level. |
To ensure that the parent node is always at a higher level than its children, PeopleSoft Tree Manager automatically adjusts the level of the node and its children. PeopleSoft Tree Manager will automatically create additional levels, if necessary. |
The levels of the pasted node and its children are not adjusted. Note: If the switch results in a child node level becoming higher than its parent, PeopleSoft Tree Manager automatically adjust the level to be equal to the level of parent. PeopleSoft recommends that when switching levels, you should switch to just one level at a time. |
Use the Tree Node Maintenance page (PSTREENODEUPDATE) to edit node descriptions and other data.
To change the description of a node:
Select
Search for an existing tree or create a new one.
Access the Tree Node Maintenance page by selecting a node in the Tree Manager page, and clicking the Edit Data icon.
The page that appears here is defined by application.
Update the value in the Description field.
Enter the new date as well as a new description.
Click the OK button to accept changes and return to the Tree Manager page.
Note: Tree node descriptions will not be visible if the effective date of the tree is earlier than the effective date of the node.
To delete a node:
Select
Search for an existing tree or create a new one.
Highlight the node in the Tree Manager page, and click the Delete icon.
Note: If you delete an object that has child nodes, all of its child nodes will also be deleted.
In the message that appears, click the Yes button to delete or the No button to return to the tree without deleting.
To rename a node:
Select
Search for an existing tree or create a new one.
Access the Node Properties page by selecting a node in the Tree Manager page, and clicking the Update Node Properties icon.
Enter new name for the node in the New Name text box and click the Rename button.
Note: The edit data image is not available for the root node.
You cannot rename the root node or branched nodes.