Navigating PeopleSoft Tree Manager
This topic gives an overview of navigating PeopleSoft tree manager.
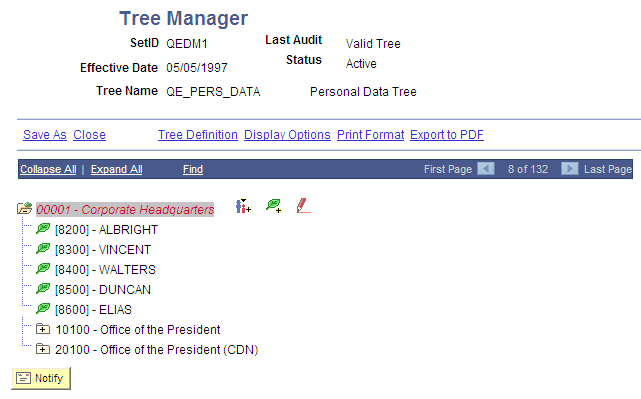
Use the Tree Manager page (PSTREEMGR) to view or modify trees. This page displays the tree with the root node expanded one level.
Navigation
Image: Tree Manager page
This example illustrates the fields and controls on the Tree Manager page. Definitions for the fields and controls appear following the example.

Note: PeopleSoft Tree Manager displays one page of the tree at a time. You can navigate through large trees using First Page, Next Page, Last Page, and so on.
You can perform the following actions on the selected tree by using the links and images on the navigation bar – the horizontal blue bar at the top of the tree.
|
Field or Control |
Definition |
|---|---|
| Collapse All |
Click to close all of the visible nodes except for the root node. The root node is always expanded. |
| Expand All |
Click to expand all of the nodes on the tree, so that the entire tree or branch hierarchy is visible. Expands all parent/child relationships, but the tree hierarchy is still presented one page at a time. Use the Next Page and Previous Page arrows to move forward and backward through the tree. |
| Find |
Click to access the Find Value page and search for nodes and detail values. |
| Notify |
Click to send an email containing a link to the tree to an individual or group with whom you are currently working. You can attach a message to this email to describe a specific transaction. Note: PeopleSoft Tree Manager is delivered with the Notify button enabled. You can disable this button in PeopleSoft Application Designer. |
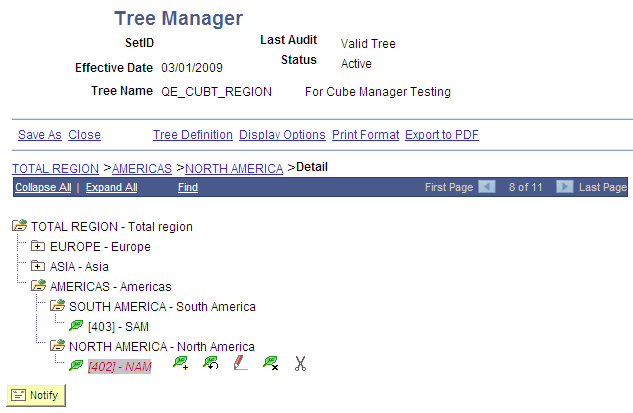
As you navigate through your tree, navigation paths appear above the navigation bar. They show you the parent/child relationships between the currently-selected object and its parents. Navigation paths can provide you with a basic map of your route through the tree.
When you hover your cursor over a navigation path, a tooltip appears that identifies whether the navigation path is a link to a branch or a node.
Navigation path represent nodes in the current branch (A type nodes) and the parent branch of the opened branch (B type nodes).
Image: Tree Manager navigation bar and navigation path
In this illustration, node TOTAL REGION is the parent branch of AMERICAS; AMERICAS is the parent node of NORTH AMERICA and SOUTH AMERICA; and NORTH AMERICA is the parent node of 402-NAM.

The maximum number of entries in a navigation path displayed is seven. When you start exceeding that number, the system automatically removes the earlier ancestor nodes. This ensures that navigation paths always begin with the parent node of the currently selected node.
You can collapse any node at any level to give you a better overview of the entire tree. Closed yellow folders indicate that you can expand the node to show additional nodes and detail values. Closed gray folders indicate a node that has no children – either child nodes or detail values. Open yellow folders indicate a node that has been expanded and is showing child nodes or detail values.
To expand a node one level, click its folder image. Click the folder image again to collapse the node.
To expand all child objects for a node, first select the node, and then click the image with two folders, located to the right of the node description.
Note: Expanding all child objects (node hierarchy) can be a time-consuming process. The more levels in the node hierarchy, the longer the process will run. A warning message appears if your process might take a long period of time to run.
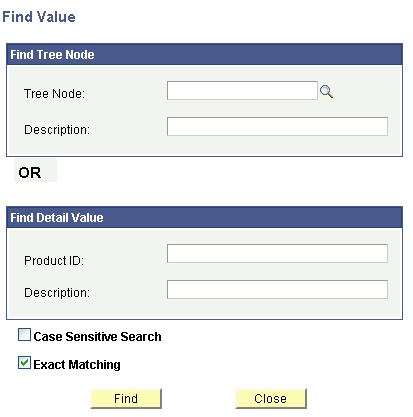
Use the Find Value page (PSTREEMGRFIND) to find a specific node or value.
Navigation
Select .
Search for an existing tree or create a new one.
Select a tree on the Tree Manager page and click the Find link.
Image: Find Value page
This example illustrates the fields and controls on the Find Value page. Definitions for the fields and controls appear following the example.

Note: The actual labels on these fields change depending on the default labels defined for the column used for the node or detail values. For example, in the Department Security tree, the label for the node values reads Department ID.
|
Field or Control |
Definition |
|---|---|
| Tree Node |
Enter the tree node name and click the Find button. A newly created node will not be listed in the Node List until a Save is performed. However, if you enter the exact name of the newly created node and click the Find button, the node will be found. Search results of the newly created nodes do not depend on selecting or clearing the Exact Matching option. |
| Description |
Enter the tree node description and click the Find button. When searching by description, the system does not locate newly created nodes until a Save is performed. |
| Detail Value (EmplID) and Description (Last Name) |
Note: In this example, the Detail Value field appears as EmplID and the Description field appears as Last Name. Enter a detail value or description and click the Find button. When searching by value, if a detail value is defined as a range of values, then the system looks for the detail values that the entered value falls under. If the detail value is defined as a specific value, then the system looks for detail values that begin with or match the value entered. If a user types in the exact name of the newly created detail value and clicks the Find button, the detail value is found. Search results of the newly added details do not depend on selecting or clearing the Exact Matching option. If the tree features the Duplicate Leaves option, only the first occurrence of the newly added detail value will be found. Note: When searching for detail values that involve a range of values or duplicate values, the system may not find a detail value that has been recently added or changed until a Save has been performed. The results of this operation depends on database sorting options and database type. |
| Case Sensitive Search |
Select to use the case-sensitive search option for descriptions. This option is not used for node or detail names, because they are key fields, which PeopleSoft Tree Manager automatically changes to upper case. |
| Exact Matching |
Select to search for an exact match. Clear this option to perform partial searches. If you clear this option, the system automatically adds a wildcard character at the end of the user defined search condition. If you want to use a wildcard search by applying a wildcard character at the beginning of the word, you need to use the database-specific wildcard character. You receive a warning message if you cleared this option and your search criteria was too broad – more than 200 rows returned. |
If PeopleSoft Tree Manager finds a node or detail value that matches your search string, it displays the node or detail value and builds navigation paths to show the navigation path to the entry found.
Note: If the value for which you are searching is contained inside a detail range, PeopleSoft Tree Manager displays the appropriate range. Click the Edit Data image to display the list of values contained in that range. Keep in mind that detail values are stored as strings, so if your values are identified by numbers, the range may include more values than expected.
PeopleSoft Tree Manager finds the first occurrence of the node or detail value that matches your search string and highlights it. If duplicate values exist, click Next to search for the next occurrence of the value.
When the next occurrence has been found, the Previous link become available.
If you enter values or descriptions in more than one field on the Find Value page, the system uses the higher located field as a search condition and ignores the lower fields.
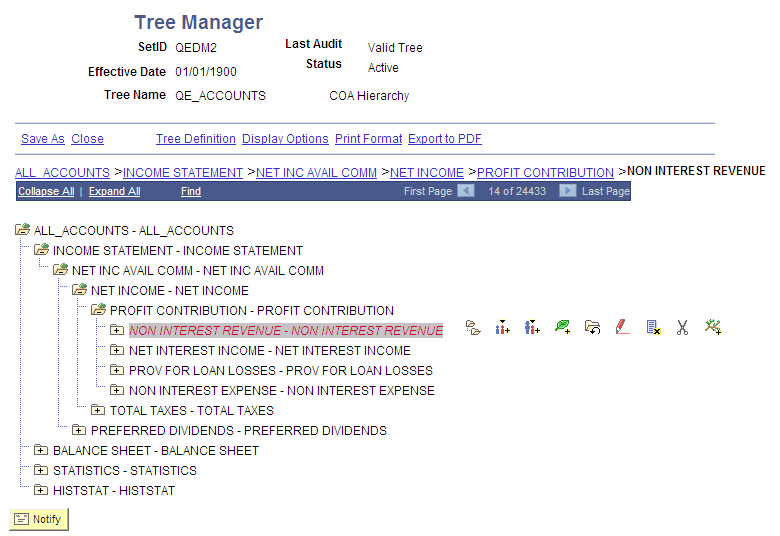
PeopleSoft Tree Manager's line counter provides an automatic count of the numbers of lines of a tree that are currently displayed. In this example, the line counter displays 14 of 24433, telling us that 14 rows are currently displayed out of a possible 24433 rows available in the tree. The line counter does not provide information on the position in the tree of the displayed lines.
Image: Example of line counter that provides number of rows currently displayed
Example of line counter that provides number of rows currently displayed.
