Simplified Batches provide a streamlined version of the functionality available in the broader standard Oracle Financial Services Analytical Applications (OFSAA) batch module. The Simplified Batch feature is designed to facilitate the creation, maintenance, and execution of batches for the EPM application engines and various other OFSAA components. You can use its drag-and-drop approach to task selection especially helpful in the management of large batches.
You can view, execute, schedule, and monitor Simplified Batches within the OFSAA Operations batch framework. To view Simplified Batch summary page, navigate to Common Object Maintenance, select Operations, and then select Simplified Batch.
Figure 1: Accessing the Simplified Batch Window
The Batch Maintenance window is used to view the Simplified Batches, but you cannot edit them. Create and modify them within the Simplified Batch window.
You can execute the Simplified Batches from the Simplified Batch summary page or from the OFSAA Infrastructure UI be selecting Operations, and then Batch Execution.
Other Operations batch functionality including Batch Scheduler, Batch Monitor, Batch Processing Report, Batch Cancellation, and View Log apply equally to Simplified Batches and to batches that have been built in the Batch Maintenance window.
For more information, see the Oracle Financial Services Analytical Applications (OFSAA) Infrastructure User Guide.
This chapter describes the creation, maintenance, and execution of Simplified Batches.
Topics:
· Simplified Batches
· Simplified Batch details
· Creating a Simplified Batch
· Running a Simplified Batch
· Viewing the Task Logs
· Additional Batch Options
To view the Simplified Batch summary page, navigate to Common Object Maintenance, select Operations, and then select Simplified Batch. The Simplified Batch summary page displays a list of existing Simplified Batch rules. Using search criteria, you can control the set of batches that are displayed.
When you Add, Edit, or View a rule, a Simplified Batch details window is displayed.
The Simplified Batch summary page has a Search pane and the summary table. When you first navigate to the Simplified Batch summary page, the batches stored within your preferred folder are presented in the summary page. This preferred folder is determined by the set of Application Preferences that were last saved in which you selected the Active for Master Maintenance check box. For more information, see the Application Preferences section.
The summary table presents all the batches that meet the search criteria. The Simplified Batch summary page offers several icons that allow you to create a new batch or perform different functions when a batch is selected.
Click the column header (the column name) to sort on a column in the Simplified Batch summary page.
Figure 2: Simplified Batch summary Page
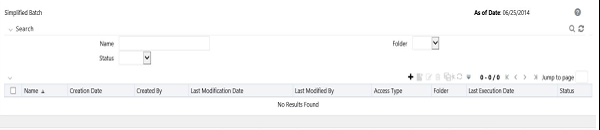
The Search page allows you to restrict the batches visible within the summary table by any combination of Name, Folder, or Status. Search by Name is wild card character search, that is, searching for Name like pricing will find all batches that include pricing within their names.
To search a Simplified Batch Rule, follow these steps:
1. Enter the desired search criteria and click Search.
Click Reset to clear any search criteria and refresh the Simplified Batch summary page.
2. The search results are displayed in a tabular format containing all of the Simplified Batch Rule curves that meet the search criteria. The Simplified Batch Rules summary page offers several icons to perform the different functions when a Simplified Batch Rule is selected.
|
Icons |
Description |
|---|---|
|
Add |
Click the Add to begin the process of building a new Simplified Batch. The Add icon is disabled if any rows in the summary table are selected. |
|
View |
Select a single row in the summary table to enable the View icon. Click View to view the detailed definition of a Simplified Batch on a read-only basis. The View icon is only enabled when a single batch is selected. |
|
Edit |
Select a single row in the summary table enables the Edit icon. Click Edit to modify an existing Simplified Batch. The Edit icon is only enabled when a single batch is selected. |
|
Copy |
Select a single row in the summary table to enable the Copy icon. Click Copy to create a copy of an existing Simplified Batch. The Copy icon is only enabled when a single Simplified Batch is selected. You can also duplicate a batch using the Save As from the Simplified Batch Detail page. |
|
Delete |
Select one or more rows in the summary table to enable the Delete icon. Click Delete to deletes the batch or batches are selected. |
|
Run |
Select a single row in the summary table to enable the Run icon. Click Run to execute the selected Simplified Batch rule. The Run icon is only enabled when a single Simplified Batch rule is selected. The As-of-Date and other parameters applicable to each task within a Simplified Batch will vary by task type. For more information, see the Specifying Task Parameters section in Oracle Financial Services Analytical Applications Infrastructure User Guide. |
|
Refresh |
Click Refresh to refresh the Simplified Batch summary page, including updates to the Last Execution Date and Status. |
3. To select a Simplified Batch Rule, select a check box in the first column of the table. More than one Simplified Batch Rules can be selected at a time, but this disable some of the action icons.
You can select or deselect all the Simplified Batch Rules in the summary table by selecting the check box in the upper left-hand corner of the summary table directly to the left of the Name column header.
The following table provides the Simplified Batch Rule details based on the search criteria.
|
Fields |
Description |
|---|---|
|
Name |
Displays the Simplified Batch rule's short name. Hover on a batch name displays the rule's system identifier, long name, and description. NOTE:The rule's long name consists of a concatenation of the Information Domain (Infodom) and the rule's short name. This long name is the name under which the batch is submitted internally through the Oracle Financial Services Analytical Applications (OFSAA) Infrastructure. |
|
Creation Date |
Displays the Date and Time at which a Simplified Batch rule was created. |
|
Created By |
Displays the name of the user who created a Simplified Batch rule. |
|
Last Modification Date |
Displays the Date and Time at which a Simplified Batch rule was last modified. |
|
Last Modified By |
Displays the name of the user who last modified a Simplified Batch rule. |
|
Folder |
Displays the name of the Folder in which a Simplified Batch rule is stored. |
|
Last Execution Date |
Displays the Date and Time at which a Simplified Batch was last executed. |
|
Status |
Displays the latest status for a batch rule and includes the following possible values: · Complete · Failed · New · Ongoing · Cancelled |
When you Add, Edit, or View a batch, the Simplified Batch details window is displayed. The Simplified Batch details window presents the following panes for defining and maintaining your batch:
· Simplified Batch - header level information, such as Rule Name, and so on
· Batch Execution Type
· Search Task Details
· Task Details
· Audit Trail
When you Add, Edit, or View a Simplified Batch Rule, the Simplified Batch Rule details window is displayed. The Simplified Batch Rule details window includes a Simplified Batch Rule details pane, three Simplified Batch Rule panes, and an Audit Trail pane.
The Audit Trail pane is a standard footer pane for every OFSAA rule type. It displays Created By, Creation Date, Last Modified By, and Modification Date. The User Comments tab can be used to add comments to any rule, subject to a maximum of 4000 characters.
To create a Simplified Batch Rule, follow these steps:
1. Click Add ( ) from the Simplified Batch Rule summary page.
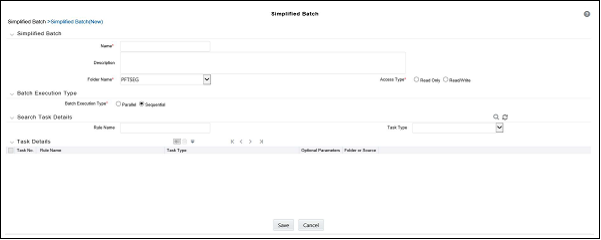
2. Enter the following information in the Simplified Batch Rule details window as tabulated:
Figure 3: Simplified Batch details window to create a new Simplified Batch Rule
|
Fields |
Description |
|---|---|
|
Name * Description |
Simplified Batch Name and Description. You cannot edit the Name after you have created the rule. The maximum length for the Name is based on (name and infodom), subject to the total length not exceeding 42 characters. Underscore (_) is the only special character allowed for a Simplified Batch name. The maximum length for the Description is 300 characters. Allowed special characters for a Simplified Batch description are underscore (-), hyphen (-), Colon (:), Dot (.), and Space. |
|
Folder Name* |
Select a folder in which the batch is to be stored. |
|
Access Type* |
Specify whether you want the batch rule to be Read, Write or Read-Only. |
* Mandatory UI element.
3. Click Save. To build out your Simplified Batch Rule, enter the data within the Simplified Batch Rule details page. For more information, see the following sections:
§ Batch Execution Type
§ Searching Task Name
§ Task Details
§ Task Selection
Select the tasks in the batch to run in Parallel or Sequentially. To run some tasks sequentially and some in parallel, utilize the OFSAA Infrastructure Operations batching framework to construct the batch. The Simplified Batching Framework provides a simpler and faster pathway to specify many of the batches that requires, but the OFSAA Infrastructure Operations framework offers more flexibility.
Figure 4: Batch Execution Type on Simplified Batch details Window

You can construct batches containing dozens or even hundreds of tasks. In such cases, it can become difficult to isolate a specific task. The Search Task details pane allows you to focus on the Task Details and display a specific task name or task type. The Rule Name search is a wild card character search. Enter Task Type, Folder, or Task Name, and then click Search ( ). Click Refresh (
 ) to remove the search criteria and refresh the Task Details pane to display all tasks within the batch.
Figure 5: Searching for a Task Details

For a new batch rule, the Task Details pane will initially be empty. Use the Task Selector to populate the Task Details pane with the processes to run in the batch. For a Sequential batch, the Task Details pane presents the tasks in the order in which they will be run. For a Parallel batch, all tasks are initiated in parallel.
The Task Details pane also provides a Delete icon for removing tasks from the batch.
|
Fields |
Description |
|---|---|
|
Delete |
Selecting one or more rows in the Task Details page enables the Delete icon. Click Delete to remove the task or tasks that you have selected. You can also remove tasks through the Task Selection window. |
|
Task Selector |
The Task Selector icon is always enabled. Click the Task Selector to open the Task Selection window. |
Figure 6: Task Details pane of Simplified Batch details Window

|
Fields |
Description |
|---|---|
|
Task Number |
Each task is arranged sequentially by the task number. |
|
Rule Name |
Displays the task's short name, such as an Allocation rule name. The complete or long name under which the task is submitted for execution (becoming the task's Batch Run ID) is a concatenation of several identifiers, as noted the View Log. For more information, see the Viewing the Task Logs section. |
|
Task Type |
Use Simplified Batches to submit the different tasks for each of the application engines and various other components. For ALM, the following task types can be submitted within a Simplified Batch: · ALM Dynamic Deterministic · ALM Dynamic Stochastic/Historical Simulation · ALM Static Deterministic · ALM Static Stochastic/Historical Simulation · Cash Flow Edits · Extract Data · RUN DQ RULE · SQL Rule · Transform Data This list will vary based on the installed Application pack (or packs). |
|
As of Dates and Additional Parameters |
The As of Date applicable to each task within a Simplified Batch will vary by task type. Some task types also accept runtime parameters. For more information about the task parameters, see the Specifying Task Parameters section in the Oracle Financial Services Analytical Applications Infrastructure User Guide. |
|
Folder or Source |
For Extract Data tasks, values in this column represent Sources. For Transform Data tasks, this column is not applicable and is left blank. For all other task types, values in this column represent the Folder in which a rule is stored. |
Click Task Selector from the Task Details pane to open the Task Selector window to support the maintenance of tasks in a batch.
Figure 7: Task Selection window
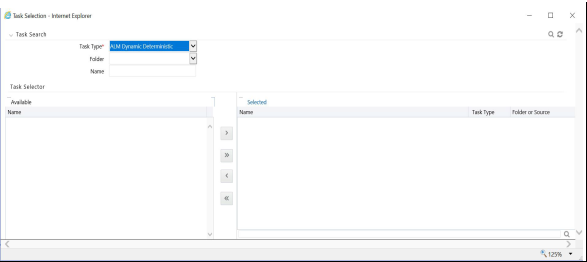
Use the Task Selection window to perform the following:
· Choose tasks to include in your batch
· Remove tasks from your batch
· Reorder tasks within your batch
To select the task from the Task Selector window, follow these steps:
1. After opening the Task Selection window, the list of Available Tasks on the left-hand side of the Task Selector window is blank.
2. To populate the list of available tasks, search the task in the Task Search pane. You must select a specific type of task from the Task Type drop-down list, and optionally specify search criteria for Folder (or Source) and Name, where applicable to the task type and click Search ( ).
).
3. Select the Task Type.
For ALM, following are the available task types:
§ ALM Dynamic Deterministic
§ ALM Dynamic Stochastic/Historical Simulation
§ ALM Static Deterministic
§ ALM Static Stochastic/Historical Simulation
§ Cash Flow Edits
§ Extract Data
§ RUN DQ RULE
§ SQL Rule
§ Transform Data
This list will vary based on the installed Application pack (or packs).
4. Select the Source or Folder.
§ Extract Data Task
Select Extract Data task to select a data source prior to executing your search.
§ Transform Data Task
After selecting Transform Data task, do not select a Folder prior to executing the search.
§ All Other Task Types
Select any other Task Type to constrain the search to a particular folder. Alternatively, search for the tasks in all Folders by selecting blank (all folders).
Executing a search for tasks always refreshes the Available list of tasks, but never has any impact on tasks that you have already Selected (tasks on the right-hand side of the window).
You can further refine the search by entering a Task Name. Search using Name are wild card character searches, that is, searching for Name like rate will find all tasks that include rate within their Name.
5. For Task Types with potentially large volumes of tasks, the Available list is divided into pages. Use the vertical scrollbar to navigate to the bottom of each page and click more to display the names on the next page. You can control the number of tasks listed per page by changing the setting in the SIMPLE_BATCH_PAGE_SIZE parameter in the FusionApps.properties file in the WEB-INF/props directory under context root. The recommended default value is 50 records per page. As you increase the value over a certain amount, you will start to see a slower response in the moving tasks between the Available and Selected lists.
6. Move the tasks between the Available and Selected lists.
Use the Select ( ) or Select All (
 ) to move rules from the displayed page of the Available list to the Selected list or vice versa. The Select (
 ) moves rules from the left to the right, adding rules from the Available list to the bottom of the Selected list. Moving rules from the right to the left remove rules from the Selected list. You can also use the drag-and-drop feature to place the rules in a specific position in the Selected list to specify the execution order for a Sequential Type batch.
Tasks within the Available list of tasks are disabled (greyed-out) after they are selected (that is, included in the Selected list of tasks).
The Task Selector also supports drag-and-drop operations for choosing Available tasks, removing Selected tasks, or rearranging the sequence of the Selected tasks.
§ Select an Available task and then drag-and-drop it anywhere within the Selected list, where the targeted placement is displayed in the red line.
§ Dragging a task from the Selected list and dropping it into the Available list removes that task from the Selected list.
§ To select or deselect a range of tasks, click the first task in the range to be selected, press the Shift key, click the last task in the range to be selected, and then drag-and-drop the set of tasks.
§ To select or deselect a set of tasks that are not in sequence, click each task individually while pressing the Control key, after clicking on the last task to drag-and-drop the set of tasks.
7. Find a Selected task.
To search for any of the selected tasks, enter the Task Name or partial name in the field under the Selected list, and then click Search ( ).
).
To run a Simplified Batch from the Simplified Batch summary page, follow these steps:
1. Select a Simplified Batch from the Simplified Batch summary page.
2. Click Run ( ) to execute the batch.
3. A confirmation message is displayed. Click Yes to proceed, or No to return to the Simplified Batch summary page.
4. After clicking Yes, a Date Selection window is displayed. If any Extract Data or Transformation Data tasks are included in the batch, select the appropriate date for use in processing (it will ignore this date for all other task types). The Date defaults to the System Date. To change the Date, either directly enter a date in the format dis-played, or use the Calendar tool.
5. Click OK.
6. A confirmation message is displayed. Click OK.
7. You can monitor the status from the Simplified Batch summary page or the Simplified Batch details page.
a. To monitor the status from the Simplified Batch summary page, click Refresh ( ). The summary page will update the Last Execution Date with the current date and the Status at completion (for example, Complete, or Failed if there was a critical problem).
b. To monitor the status from the Simplified Batch details page, see the Viewing the Task Logs section.
|
NOTE |
This currently applies to all task types except Extract Data and Transform Data. |
To view the processing log for each task in the batch, navigate to the log details from the Simplified Batch details page:
1. Select the batch from the Simplified Batch summary page.
2. Click View ( ) to navigate to the Simplified Batch details page.
3. For a specific task in the Task Details pane, navigate to the processing log through View Log.
4. In the View Log window, view the log details through the Task ID link.
The Task ID represents the System ID of the task (for example, in Profitability Man-agement, an Allocation Rule's System ID).
The task's Batch Run ID is a concatenation of several identifiers. For example, Batch Run ID OELPMINFO_Task1_smb alloc2_20110805_2 represents the following:
§ Information Domain name (for example, OELPMINFO)
§ Task sequence within the Simplified Batch (for example, Task1)
§ Simplified Batch rule name (for example, smb alloc2)
§ The run date in YYYYMMDD format and the sequential run number for that date (for example, 20110805_2, for the second execution on August 5, 2011).
You can also view, execute, schedule, monitor, cancel, and view task logs for Simplified Batches within the OFSAA Infrastructure Operations batching framework.


