
Members refers to the individual items that constitutes a dimension when data is categorized into a single object.
For example, Product, Organization, Time, and so on. Members is available within Dimension Management section of the Infrastructure system.
You (Business Analysts) need to have ETL Analyst function role mapped to access Members.
This chapter describes the creation and maintenance of OFSAA Hierarchies. Specifically, this chapter will cover:
· Member Summary and Detail Screens
· Navigation within the Member Summary Screen
· Navigation within the Member Detail Screen
See Overview of OFSAA Infrastructure for details on how Members are used in OFS Analytical Applications. For information on bulk loading members, see the Oracle Financial Services Analytical Applications Infrastructure Installation and Configuration Guide.
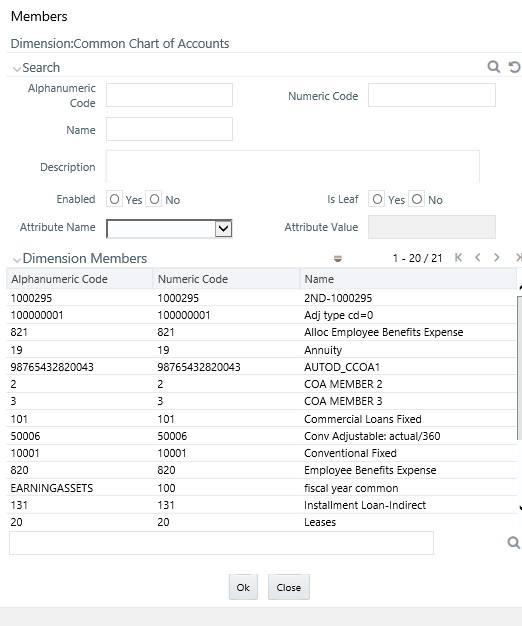
Navigating to Common Object Maintenance, select Dimension Management, and then Members, a summary window is displayed showing all of the defined Dimension Members for one dimension (your first dimension alphabetically). By selecting a dimension and by using search criteria, you can control the set of Dimension Members that are displayed. When you Add, Edit, Copy, or View a Dimension Member, a detail window is displayed.
Figure 1: Members Summary Window
When you first navigate to the Dimension Members summary screen, the Dimension Members associated with your first dimension are presented in a summary grid. The Dimension Members summary screen has three panes:
To add or maintain a Dimension Member, you must first select the dimension to which a Dimension Member belongs. The Dimension drop-down list box in the Dimension container displays all of your dimensions that are configured to be viewable (not every dimension is viewable through the application user interface; for details on which dimensions are viewable, see the Oracle Financial Services Analytical Applications Infrastructure (OFSAAI) Installation and Configuration Guide.
Figure 2: Dimension Pane

Each Dimension Member possesses a Code value, a Name, and a Description. Dimension Members also have the properties of being enabled or disabled and of being a leaf member (last-descendent-child value) or a rollup member (representing a rollup point in a hierarchy). Finally, each Dimension Member value is assigned an attribute value for each its attributes. You may search on any of these properties in the Search pane.
Figure 3: Search Pane

· Search Control: Enter your desired search criteria and click the Search control.
· Reset Control: Clicking the Reset control clears any search criteria you may be using and refreshes the screen.
Dimensions are comprised of finite lists of Dimension Members. The Dimension Members container presents a grid containing all of the Dimension Members that meet your search criteria. The Dimension Members summary grid offers several controls that allow you to perform different functions when a Dimension Member is selected.
To select a Dimension Member, click a check box in the first column of the grid. More than one Dimension Member can be selected at a time but this will cause some of the controls to become disabled. Clicking a check box a second time deselects a Dimension Member.
Figure 4: Members Control Pane

You may select or deselect all of the Dimension Members in the summary grid by clicking on the check box in the upper left hand corner of the summary grid directly to the left of the Code column header.
|
Icon |
Description |
|---|---|
|
Add |
Click Add to build a new a Dimension Member. The Add icon is disabled if any rows in the table are selected. |
|
View |
Select a single row from the table to enable the View icon. Click the View icon to view the detailed definition of a Dimension Member on a read-only basis. The View icon is only enabled when a single Dimension Member is selected. |
|
Edit |
Select a single row from the table to enable the Edit icon. Click the Edit icon to modify a previously saved Dimension Member. The Edit icon is only enabled when a single Dimension Member is selected. |
|
Delete |
Select one or more rows from the table enables the Delete icon. Click Delete to delete the Dimension Member(s) you have selected. OFSAA Infrastructure will not allow you to delete any Dimension Member that is utilized within a hierarchy (see Check Dependencies in the following row). |
|
Check Dependency |
Click View Dependencies to generate a report on hierarchies that utilize a selected Dimension Member. The View Dependencies icon is only enabled when a single Dimension Member is selected. |
|
Copy |
Select a single row from the table to enable the Copy icon. Click Copy to create a copy of an existing Dimension Member. The Copy icon is only enabled when a single Allocation rule is selected. When you click Copy, a Save As pop-up window appears. Click Save after entering the Name, Description, Folder, and Access Type Details. |
The following columns categorize each Dimension Member in the summary pane:
· Alphanumeric Code: Displays the Dimension Member's code value.
· Numeric Code: Displays the Dimension Member's numeric code value.
· Name: Displays the Dimension Member's short name. Performing a “mouse-over” on a Dimension Member Name displays the Dimension Member's description.
· Is Leaf: Displays the Dimension Member's “Is Leaf?” property. Members may be declared to be either “leaf members” or “rollup members”. When building a hierarchy in OFSAAI, “leaf members” are those dimension members that have no descendent dimension members. In building a dimension member set, you must have at least some rollup members (Is Leaf = No) before you can construct a multilevel hierarchy.
Figure 5: Dimension Members Summary Pane

Your business data is normally expressed at the leaf level. An individual mortgage instrument record, for example, would belong to a (leaf level) cost center for a (leaf level) principal balance General Ledger Account and would carry a (leaf level) designation of Product.
At least one leaf level dimension member is required for hierarchies used in allocations.
When you Add, Edit, Copy, or View a Dimension Member, the Dimension Members Detail screen is displayed.
Figure 6: Member Definition (New Mode)

Displays the name of the dimension to which a Dimension Member belongs. When Editing or Copying an existing Dimension Member, this is a read-only value. When Adding a new Dimension Member, you must select the dimension to which you want your new Dimension Member to be assigned.
Figure 7: Dimension Pane

The Dimension Member Details pane contains the following:
Figure 8: Dimension Member Details Pane
The fields and descriptions are as follows:
· Alphanumeric Code: The Alphanumeric Code field is editable only if the selected Dimension accepts Alphanumeric Code. For example, Billing Method Dimension. Else, the field is Read Only and the value is fetched from the Numeric Code field entered. Enter the required Alphanumeric Code. Ensure that the code has a maximum of 14 characters and there are no special characters like & ' ~ " @ + included.
· Numeric Code: Enter the Numeric Code by doing any of the following:
To auto-generate a Numeric Code, click the ( ) icon. A system generated code is displayed.
Manually enter the required code which is auto validated for uniqueness. A maximum of 14 numeric characters can be specified.
|
NOTE |
If the selected Dimension accepts only Numeric Code, then the specified Numeric Code is auto populated to the Alphanumeric Code field also. |
· Name: Enter the Name of the Member. The characters &' ” are restricted.
· Description: Enter the required Description for the Member. The characters ~&+' "@ are restricted.
· Enabled: This field is set to Yes by default and is editable only in Edit screen.
You can change the option to No only when the particular member is not used in any hierarchy. The disabled members will not be displayed in Hierarchy rules, or UIs which are based on Hierarchies, such as Hierarchy Filters and hierarchical assumption browsers used in applications.
· Is Leaf: This field is set to Yes by default. If Yes, the particular member can be used as a leaf node in any hierarchy and child cannot be added to this node. If No, the node becomes a non leaf and can have child nodes.
A member created as Non Leaf having child nodes to it in any hierarchy cannot be made Leaf.
· Copy Attribute Assignment From: If the Dimension is selected as Common Chart of Accounts, then the Copy Attribute Assignment From option is enabled.
Instead of manually completing all the attribute value assignments for a new Dimension Member, you may copy attribute assignments from a pre-existing Dimension Member. To do so, click the ellipses adjacent to Copy Attribute Assignment From field to open the Member Browser window. You may select a member directly or you may search for the member whose attributes you wish to copy. Once you have selected a member and clicked OK, the attribute values of the member you selected are copied into the definition of your new Dimension Member.
If you have not copied attribute values from an existing dimension member using the Copy Attribute Assignment From feature described above, assign them in the Member Attributes Pane.
· Dimension Member Attributes have defined data types including String, Number, Date, and Dimension. If an attribute is a Date data type, use the calendar control to select a date. If an attribute is a Number or String data type, enter your free-form value directly. If an attribute is a Dimension data type, select your value from the drop-down list.
· Attributes marked with an asterisk indicate required attributes.
Figure 9: Member Attributes

Default Values: If a Member Attribute is defined as having a default value, the default value will be displayed when you create a new Dimension Member.


