Hierarchies refers to dimension members that are arranged in levels, with each level representing the aggregated total of the data from the level below. One dimension type can have multiple hierarchies associated with it. Hierarchies is available within the Dimension Management section of Infrastructure system. You (Business Analysts) need to have ETL Analyst function role mapped to access Hierarchies.
This chapter describes the creation and maintenance of OFSAA Hierarchies. Specifically, this chapter will cover:
· Hierarchy Summary & Detail Screens
· Navigation within the Hierarchy Summary Screen
· Navigation within the Hierarchy Detail Screen
For information on bulk loading the hierarchies, see the Oracle Financial Services Analytical Applications Infrastructure Installation and Configuration Guide.
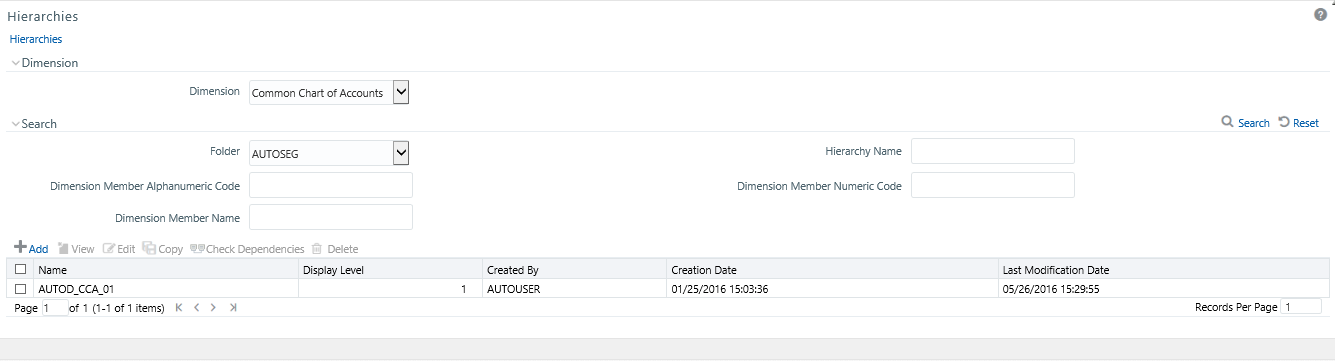
Navigate to Common Object Maintenance, select Dimension Management, and then select Hierarchies to display the Summary window. This screen shows all the defined Hierarchies for one dimension (your first dimension alphabetically that supports hierarchies). By selecting a dimension and by using search criteria, you can control the set of Hierarchies that are displayed. When you Add, Edit, Copy, or View a Hierarchy, a detail window is displayed.
Figure 1: Hierarchies Summary Window
When you first navigate to the Hierarchies summary screen, the Hierarchies that are stored within your current default folder and that are associated with your first dimension are presented in a summary grid. The Hierarchies Summary screen has the following three panes:
· Dimension Pane: Select the Dimension of the hierarchies you wish to View. When you change your dimension selection in the summary screen, the screen refreshes and displays the Hierarchies that are stored within your current default folder.
Figure 2: Dimension Pane

|
NOTE |
The dimensions drop-down list will only display dimensions that are configured to support hierarchies. |
· Search Pane: Your default Folder functions as a search constraint. The value of your default Folder is set in Application Preferences. You may select a different Folder or you may remove the Folder constraint entirely by selecting the “blank” Folder, that is no Folder. You may also search by Hierarchy Name, Dimension Member Code, and/or Dimension Member Name.
Figure 3: Search Pane

§ Search Control: Searches for Hierarchy Name, Dimension Member Code, and Dimension Member Name are wild card searches, i.e., searching for Hierarchy Names like “standard” will find any hierarchies that include “standard” within their names. When searching by Dimension Member Code or by Dimension Member Name, the application will find any or all hierarchies that utilize that dimension member but only if the member is not found in the hierarchy's “orphan” branch (see discussion of Orphan branches below). Enter your desired search criteria and click on the Search control.
§ Reset Control: Clicking on the Reset control clears any search criteria you may be using, resets Folder to your default Folder, and refreshes the screen.
· Hierarchies Pane: The Hierarchies container presents a grid containing all of the Hierarchies that meet your search criteria. The Hierarchies summary grid offers several controls that allow you to perform different functions when a Hierarchy is selected.
Figure 4: Hierarchies Pane

To select a Hierarchy, click on a check box in the first column of the grid. More than one Hierarchy can be selected at a time but this will cause some of the controls to become disabled. Clicking on a check box a second time deselects a Hierarchy.
You may select or deselect all of the Hierarchies in the summary grid by clicking on the check box in the upper left hand corner of the summary grid directly to the left of the Name column header.
1.
|
Icons |
Description |
|---|---|
|
Add |
Click the Add to begin the process of building a new Hierarchy. The Add icon is disabled if any rows in the summary table are selected. |
|
View |
Select a single row in the summary table to enable the View icon. Click View to view the detailed definition of a Hierarchy on a read-only basis. The View icon is only enabled when a single Hierarchy is selected. |
|
Edit |
Select a single row in the summary table enables the Edit icon. Click Edit to modify an existing Hierarchy. The Edit icon is only enabled when a single Hierarchy is selected. |
|
Delete |
Select one or more rows in the summary table to enable the Delete icon. Click Delete to deletes the Hierarchy or Hierarchies that are selected. FSAA Infrastructure will not allow you to delete any Hierarchy that is utilized by another OFSAA rule (that is, a Transfer Pricing Processing rule, an Allocation rule, and son on). See Check Dependencies in the following row. |
|
Check Dependency ( |
Select a Hierarchy and then click the Check Dependencies to generate a report on all rules that utilize your selected interest rate curve. The Check Dependencies icon is only enabled when a single Hierarchy is selected. |
|
Copy |
Select a single row in the summary table to enable the Copy icon. Click Copy to create a copy of an existing Hierarchy. The Copy icon is only enabled when a single Hierarchy is selected. |
Figure 5: Hierarchies Summary pane

The following columns categorize each Dimension Member in the summary pane:
· Name: Displays the Hierarchy's Name. Performing a “mouse-over” on a Hierarchy's Name displays the Hierarchy's Description.
· Display Level: Display Level is the default level at which a hierarchy is displayed by the application when you open it.
· Created By: Created By displays the name of the user who created a Hierarchy. If a Hierarchy is saved as Read Only, only the user who created the rule, i.e., the owner, may modify the rule.
· Creation Date: Displays the date and time at which a Hierarchy was created.
· Last Modification Date: Displays the date and time at which a Hierarchy was last modified.
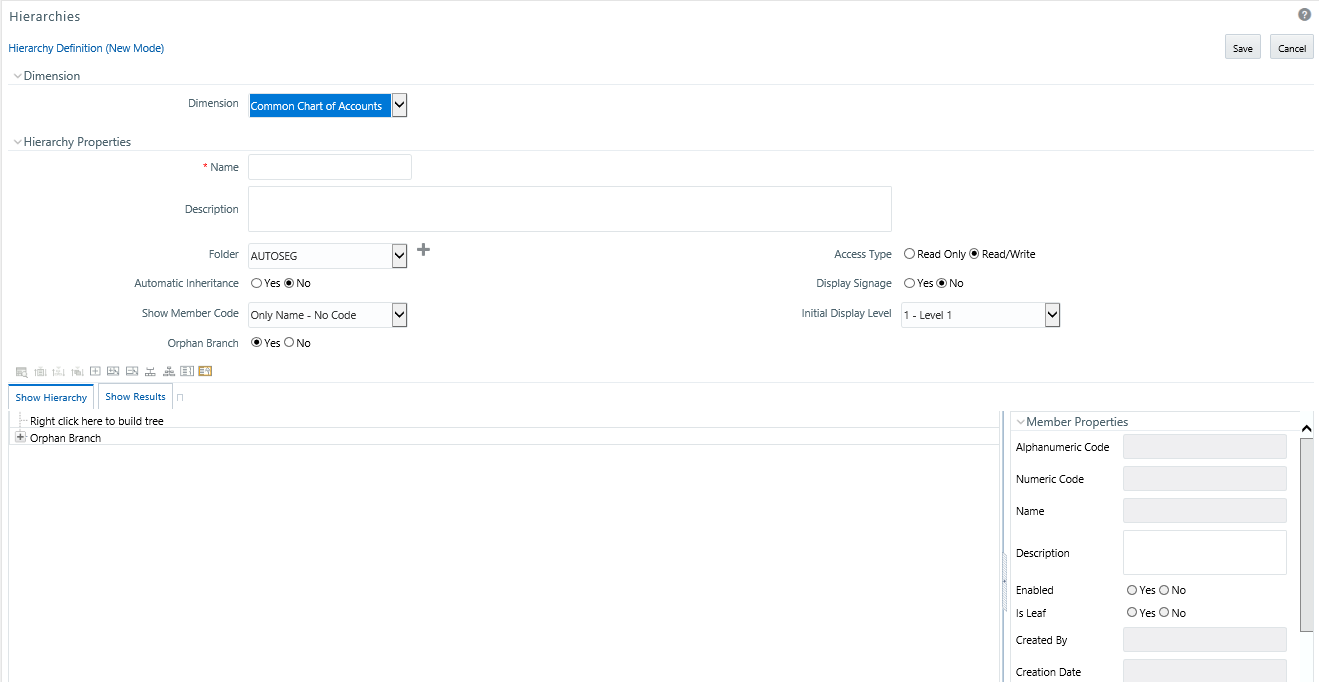
When you Add, Edit, Copy, or View a Hierarchy, the Hierarchies Detail screen is displayed.
Figure 6: Hierarchy Definition (New Mode)
The Audit Trail container is a standard footer container for every OFSAA rule type. It displays Created By, Creation Date, Last Modified By, and Modification Date on the Audit Trail tab. The User Comments tab may be used to add comments to any rule, subject to a maximum of 4000 characters.
Figure 7: User Comments pane

For a new Hierarchy, select the dimension upon which you want to build a hierarchy. For an existing Hierarchy, you may not change the dimension.
Figure 8: Dimension Pane

Specify a Hierarchy Name and Description, select a Folder in which the Hierarchy is to be stored, and specify whether you want the Hierarchy to be “Read/Write” or “Read Only” (Access Type). Naming your Hierarchy is required before it can be saved. Default values for Folder and Access Type are stored in Application Preferences. The Hierarchy Properties container also stores values for Automatic Inheritance, Display Signage, Show Member Code, Initial Display Level, and Orphan Branch.
Figure 9: Hierarchy Properties Pane
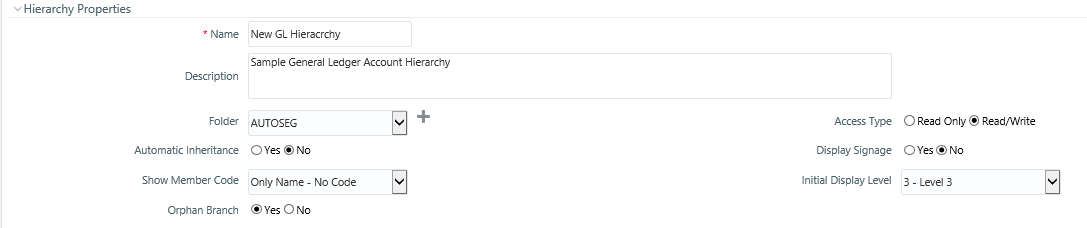
The following are the fields and their descriptions in the Hierarchy Properties pane:
· Name and Description: Displays the hierarchy's name and description. Name is a required property; you cannot save a hierarchy until you supply a name.
· Folder: Select the folder in which you want the hierarchy to be stored.
· Automatic Inheritance: Click Yes to inherit the hierarchy properties of the parent to the child. Click No to define a new hierarchy.
· Show Member Code: Show Member Code governs the default display behavior of a hierarchy. This code may be set to one of three different values:
§ Alphanumeric Code to Left of Name: Displays Alphanumeric Code on the Left side of Member name.
§ Alphanumeric Code to Right of Name: Displays Alphanumeric Code on the Right side of Member name.
§ Only Name: No Code: Displays only the Member Name.
§ Numeric Code to Left of Name: Displays the Numeric Code on the Left side of Member name.
§ Numeric Code to Right of Name: Displays the Numeric Code on the Right side of Member name.
While viewing or editing a hierarchy, you may override whatever default behavior has been set by clicking on the Show Code Values (Right) ( ) or on the Show Code Values (Left) (
 ) controls that are located on the title bar of the hierarchy display grid.
Figure 10: Show Code Value Controls

Orphan Branch: When you initially enter the Hierarchies Detail screen in Add mode (i.e., for a brand new hierarchy), Orphan Branch is set to Yes. When set to Yes, unassigned leaf members and node members are displayed within a special “Orphan” branch. This can be convenient because the user interface includes functionality that allows you to “cut and paste” members of the orphan branch into desired locations within your hierarchy. The Orphan Branch can also be convenient when you are maintaining an existing hierarchy because when it contains members, it provides a visual cue that dimension members have been defined that have yet to be assigned locations within a hierarchy. You may suppress the display of the Orphan Branch by setting Orphan Branch to No.
Access Type: You may set Access Type to Read-Only or Read/Write. When set to Read-Only, only the owner – the creator of a rule is its owner – may modify or delete the hierarchy.
Display Signage: Display signage is not used within any of the OFSAA engines, but is used within the Oracle Financial Services Profitability Analytics OBI application. Its purpose is to inform reporting applications on how to subtotal information on financial reports, most typically for income statement reporting. The default value for all new dimension members is “+”.
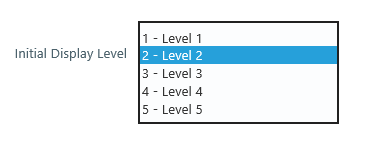
Initial Display Level: This setting controls the level at which a hierarchy is displayed when you initially enter the Hierarchies Detail screen. This setting is particularly useful when you are working with a hierarchy that has many levels. In a deep, many-leveled hierarchy, only one or two high level rollup points would be displayed if the hierarchy were displayed in its entirety.
The main body of the Hierarchies Detail screen displays a visual representation of your hierarchy. When building a hierarchy within a given dimension, you have access to every dimension member defined for that dimension. For dimensions that support hierarchies, every dimension member has the property of either being a “leaf” member or a “rollup node” member. You construct your hierarchy by attaching leaf members to roll up node members and by attaching rollup node members to other rollup node members depending on how “deep” or multi-leveled you want your hierarchy to be.
At least one leaf level dimension member is required to be assigned under a rollup node member as a non orphan leaf in order for the hierarchy to be used in PFT.
Hierarchies may be either “balanced” or “unbalanced”. In a balanced hierarchy, all leaf members reside at the same “level” or depth. The following example shows an unbalanced hierarchy in which you see leaf members (shown in blue) three levels beneath to “root” or top of the hierarchy within the Bank 1 branch, but in which you also see leaf members two levels beneath the root level in the Company C, Mortgage Origination, and Statement Processing branches.
Figure 11: Hierarchy Display Pane
Generally, there is no limit to the number of levels of depth you may build into a hierarchy for Standard Dimensions that support hierarchies. For Key Processing Dimensions, which always support hierarchies, you may construct hierarchies with up to 14 levels of depth. For details on depth limitations and configuring maximum depth levels for hierarchies, see Oracle Financial Services Analytical Applications Infrastructure Installation and Configuration Guide.
There are a number of controls on the title bar of the hierarchy that allow you to modify how the hierarchy is displayed.
Click the Search () icon to display a dialog box in which you can perform wild card searches for dimension members by Member Code or by Member Name.
Figure 12: Search Dialog box
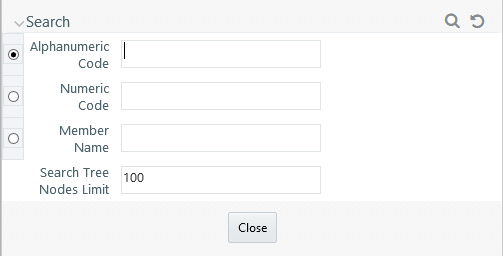
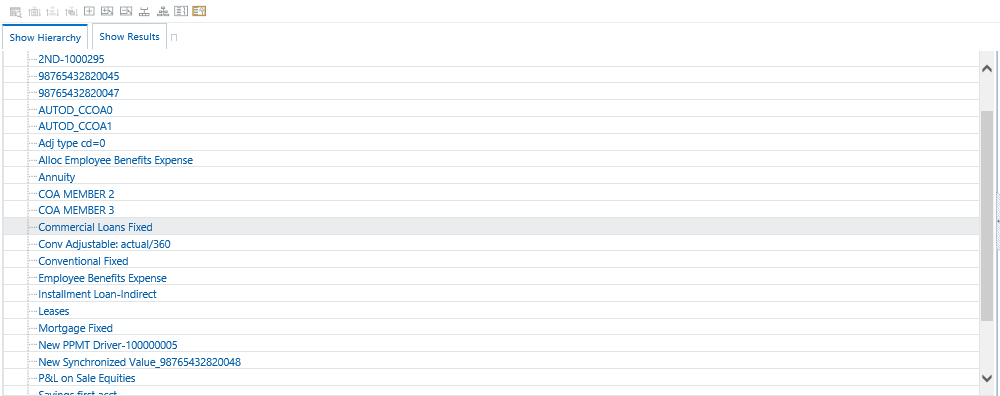
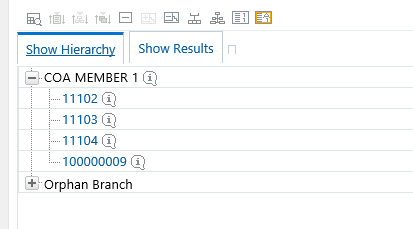
When you click the Search button within the pop-up dialog, the dialog closes, your search is executed, and results are returned within the Hierarchy Display pane under the heading of Show Results.
Figure 13: Hierarchy Window
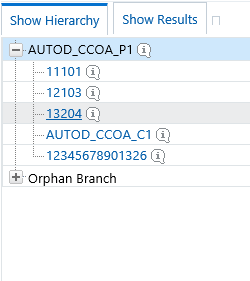
When viewing search results under the Show Results heading, you may locate a dimension member within the hierarchy by selecting it and clicking on the Focus control. After selecting a dimension member and clicking on Focus, the application responds by focusing on your selected member under the Show Hierarchy heading (that is, under the normal hierarchy display).
This method of searching for dimension members will only find assigned members, that is, members that are not found in the Orphans Branch.
Expand All and Collapse All: When you initially enter the Hierarchies Detail screen, click the Expand All or Collapse All icons to expand every branch of your hierarchy to display its entire depth. Click on this control a second time to shrink the hierarchy display down to (1) the root node of the hierarchy plus (2) the “Orphans” branch.
· The Orphan branch is only displayed when a hierarchy's Orphan Branch property is set to Yes.
· For very large hierarchies, the Expand All / Collapse All control is disabled. You may define what constitutes a very large hierarchy. For more information, see Oracle Financial Services Analytical Applications Infrastructure (OFSAAI) Installation and Configuration Guide.
Expand Branch: When you click on a node member and then click Expand Branch, your selected rollup node is expanded to its maximum depth.
Collapse Branch: Select a dimension member and then click Collapse Branch to shrink the display of any members beneath the dimension member you have chosen.
Focus and Unfocus: When you click on a node member and then click Focus icon, only the selected node and its descendants are displayed. Click Unfocus to remove the focus that you established using the Focus control.
Show Code Values (Left) and (Right): Click on Show Code Values (Left) to show code values to the left of each dimension member name. Click on Show Code Values (Right) to show code values to the right of each dimension member name. The default behavior for your hierarchy is controlled by the “Show Member Code” property discussed above.
When creating a new hierarchy, you must initially provide a name and, optionally, a description. You must also select the Folder in which you want the hierarchy to be stored, the hierarchy's Read Only vs. Read and Write (Access Type) property and the other Hierarchy Properties described above. Select Read-Only option to give other users access to only view the hierarchy definition. Select Read and Write option to give all users the access to view, modify (including Access Type) and delete the hierarchy definition. Default values for Folder and Access Type are stored in Application Preferences.
Figure 14: Add Hierarchy
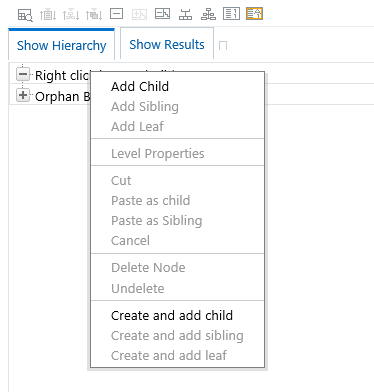
To begin the process of building a new hierarchy, right mouse click at the top of the hierarchy (see example above) to invoke a pop-up dialog in which you may select dimension members. Every hierarchy must begin with a top level rollup node. Since you cannot have a leaf member as a top level rollup node, your only choice at this point is Add Child. Click Add Child to invoke a pop-up dialog in which you can select a rollup node.
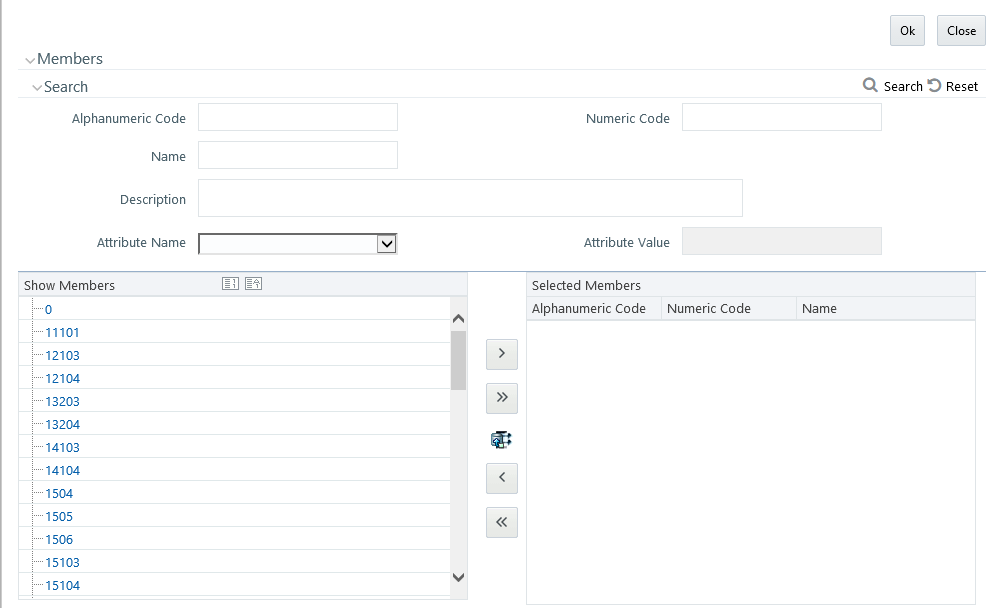
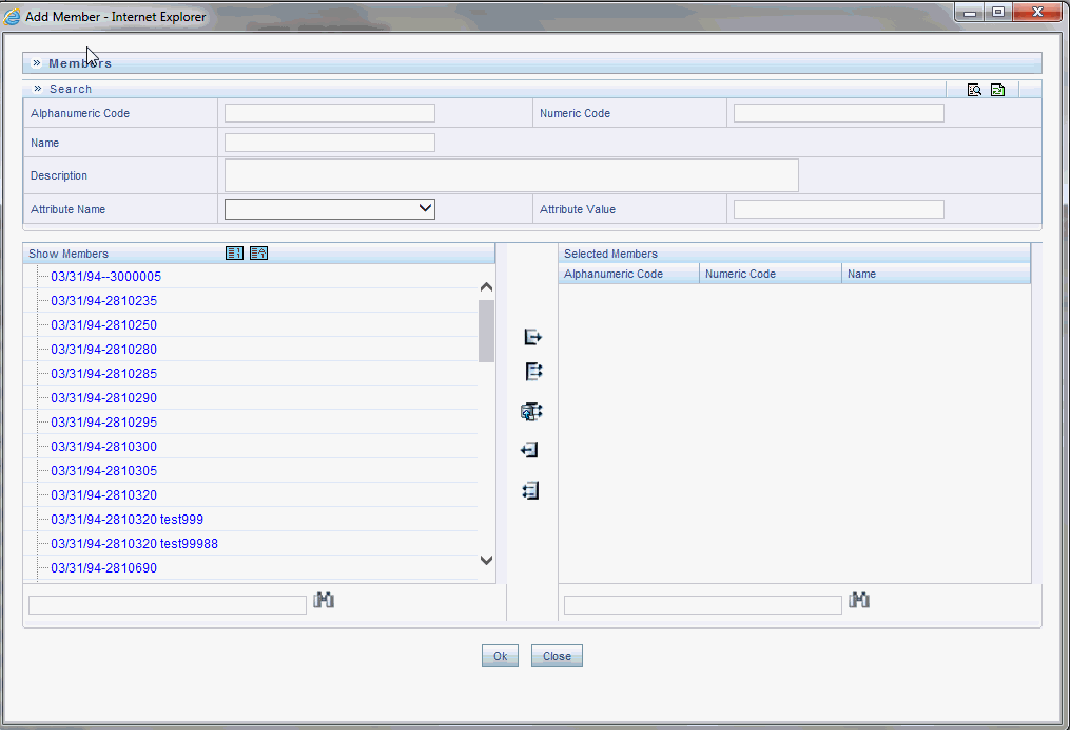
Figure 15: Hierarchy Member Selection
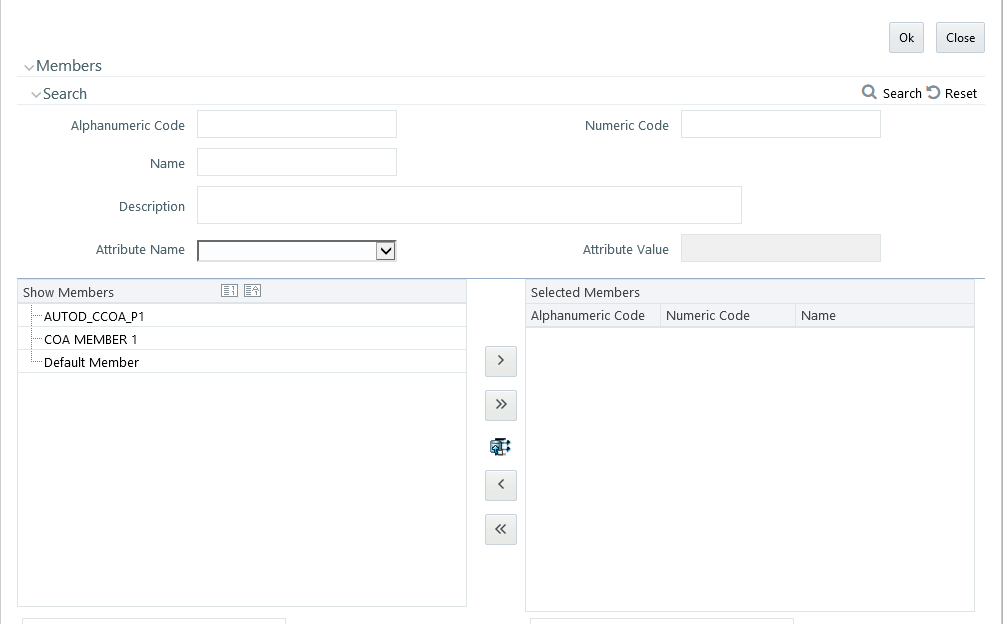
Within the Add Member pop-up dialog, use the shuttle box controls to select the member from the left hand side that you want to serve as the root member for your hierarchy. Note that in this context, the Show Members column only lists rollup members (i.e., a leaf member may not serve as the root of a hierarchy). When you click OK, the Add Member dialog closes and the original hierarchy display is modified to show your selected root member.
At this point, the process of adding additional dimension members (leaves and rollup nodes) is the same for existing hierarchies as it is for new hierarchies.
Inserting New Members into a Rollup Node
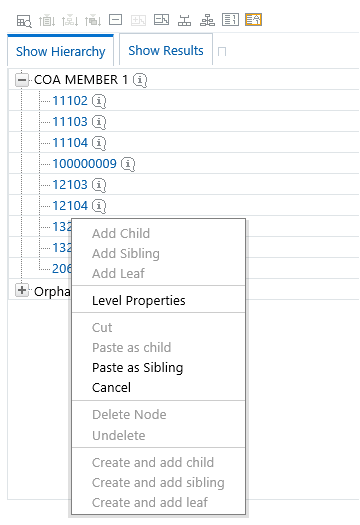
Select a rollup node member and then right click the mouse to display a number of choices including Add Child, Add Sibling, and Add leaf. The following example continues from the above description of creating a new organizational unit hierarchy.
Figure 16:
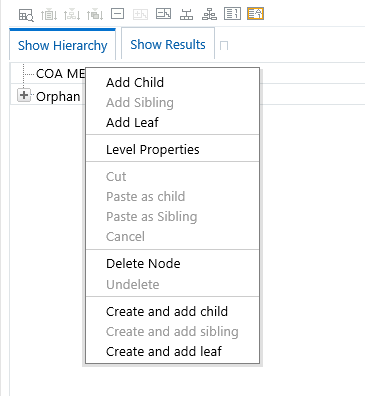
In this current example, we have selected a rollup node member which serves as the root member of the hierarchy. Because OFSAA Infrastructure does not support hierarchies with multiple “tops”, you may not add a sibling member (i.e., a member to be stored at the root level of the hierarchy) so the Add Sibling option is disabled.
Whenever you select the “Add Child” or “Add Sibling” or “Add Leaf” option, the Add Member dialog is displayed.
For the “Add Child” option, the Add Member dialog presents all dimension members that have not already been assigned elsewhere (i.e., all members that are not found in the orphan branch). The value or values you select will be placed in the hierarchy one level beneath the node you originally selected.
In the following example, Company A, Company B, and Company C have been selected to act as the children of the All Orgs root node.
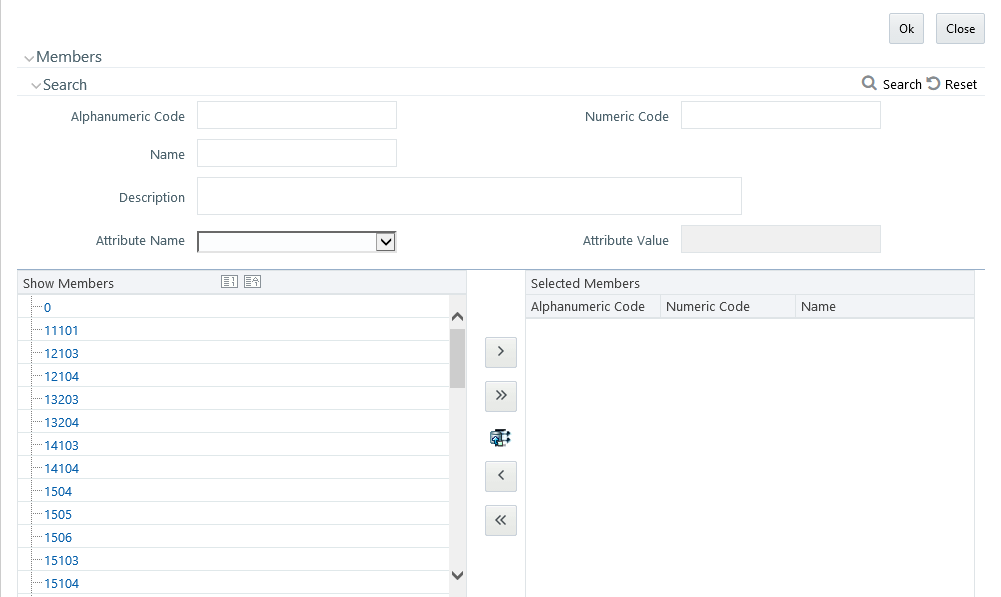
Figure 17: Hierarchy Members
Select the required Member and click Select ( ). The Member is displayed in the Selected Members panel. Click Select All (
 ) to select all Members which are shown in the Show Members pane. Click Select All From Server (
 ) to select all nodes/ members in the server. You can click Deselect (
 ) to deselect a Member or click Deselect All (
 ) to deselect all the Members. You can click Search to search for the required member using Alphanumeric code, Numeric Code, Name, Description, Attribute Name, or Attribute Value.
When you click OK on the Add Member dialog, the dialog box closes and the underlying the Hierarchy Display is updated to reflect your choices.
For the “Add Sibling” option, the Add Member dialog presents all dimension members that have not already been assigned elsewhere (i.e., all members that are not found in the orphan branch). The value or values you select will be placed in the hierarchy at the same level as the node you originally selected. In the following example, “Corporate – Parent” has been selected to be a sibling to Company C, i.e., to be inserted at the same level within the hierarchy as Company C.
Figure 18: Add Sibling
Select the required Member and click Select ( ). The Member is displayed in the Selected Members pane. You can click Select All (
 )to select all Members which are shown in the Show Members pane. Select All From Server (
 ) to select all nodes/ members in the server. You can click Deselect (
 ) to deselect a Member or click Deselect All (
 ) to deselect all the Members. You can also Click Search button to search for the required member.
Figure 19: Show Hierarchy
For the Add Leaf option, the Add Member dialog presents all leaf members that have not already been assigned elsewhere. The leaf value or values you select will be placed in the hierarchy one level beneath the node you originally selected.
Figure 20: Adding a Leaf
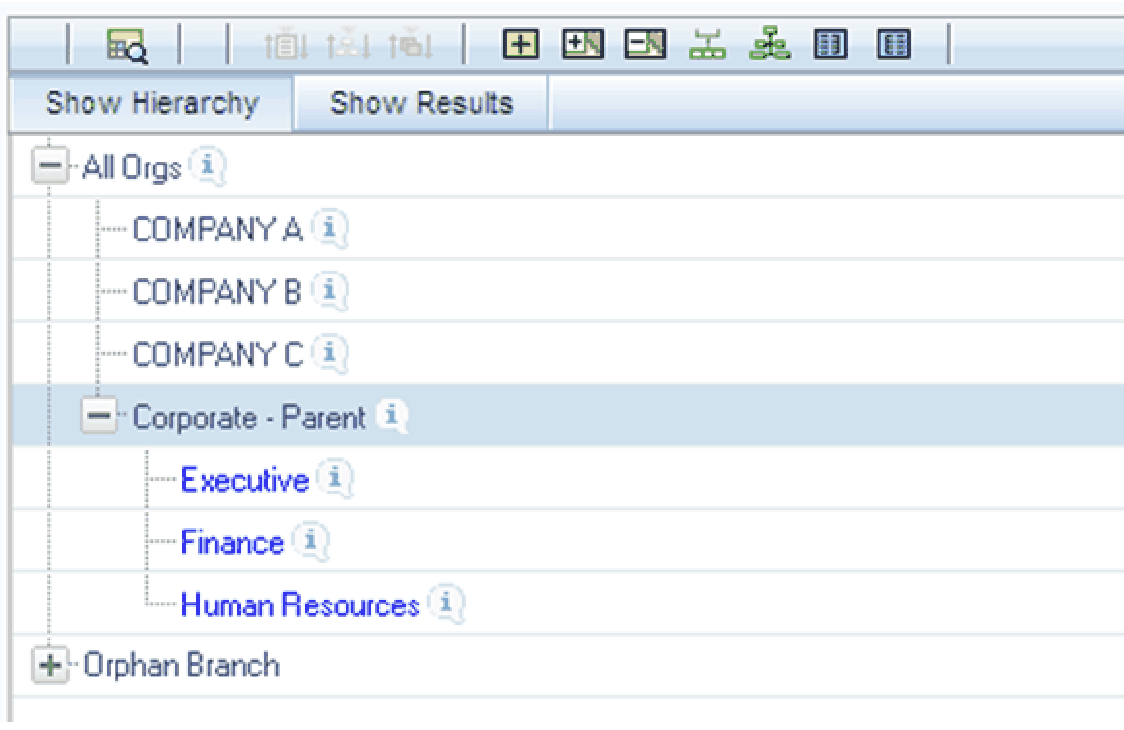
In the example above, Executive, Finance, and Human Resources have been selected to be children of the Corporate – Parent rollup node.
Figure 21: Members
Select the required Member and click Select ( ). The Member is displayed in the Selected Members panel. You can click Select All (
 ) to select all Members which are shown in the Show Members pane. Click Select All From Server (
 ) to select all nodes/ members in the server. You can click Deselect (
 ) to deselect a Member or click Deselect All (
 ) to deselect all the Members. You can also Click Search button to search for the required member.
Selecting the Level Properties option invokes the Level Properties dialog. Within this dialog, you may provide names and descriptions for each of the levels within your hierarchy.
Figure 22: Level Properties
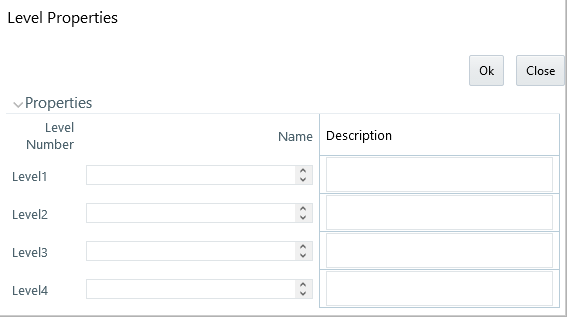
The Level Properties dialog will display as many levels as you have currently built out. In the above example, names and descriptions are being added at a time when only 3 levels have been built within the underlying hierarchy. If a fourth level is built into the hierarchy, you could return to Level Properties to add a name and description to level 4.
Assigning names or descriptions to levels is completely optional. Within the Hierarchy Properties Container, the drop-down list for “Initial Display Level” will reflect your level name choices. Your choices may also be utilized within downstream reporting applications, but level names and descriptions are otherwise not utilized within OFSAA.
Figure 23: Levels
If you wish to move a dimension member, click on a leaf member or a rollup member and select Cut. You may wish to move a dimension member because it is in the wrong location within the hierarchy. You may also wish to Cut a dimension member from the Orphan Branch in order to subsequently paste it within the body of your hierarchy. Any Cut operation must be followed by a Paste as Child, Paste as Sibling, or Cancel operation. Until you have executed a Cut operation, Paste as Child, Paste as Sibling, and Cancel are disabled; conversely, once you have executed a Cut operation, Paste as Child, Paste as Sibling, and Cancel are enabled.
After performing a Cut operation, you may perform a Paste as Child or Paste as Sibling operation. If you have Cut a dimension member and then subsequently selected leaf member, the Paste as Child option is disabled, i.e., no dimension member may be a child of a leaf member. Leaf members, by definition, can have no children. Since OFSAA supports unbalanced hierarchies, any dimension member, regardless of whether it is a leaf member or a rollup member, may be pasted as a sibling to any other dimension member.
In the following example, Human Resources has been Cut from the “Corporate – Parent” rollup node so that it may be pasted as a child into Company C.
Figure 24: Paste as Child or Paste as Sibling
The Cancel option is only enabled after you have executed a Cut operation. Once you have Cut a dimension member, you may not perform any other operation except for Paste as Child, Paste as Sibling, or Cancel (you may, however, still invoke Level Properties; see discussion above on Level Properties). Utilizing the Cancel option allows you to select and subsequently Cut another dimension member (i.e., after you have performed a Cancel operation, Paste as Child, Paste as Sibling, and Cancel are disabled).
To move a dimension member back into the Orphans Branch, click on a member and then select the Delete option. Once you have performed a Delete operation, the member selected for deletion appears with a strike-through font. The following example shows the deletion of the Human Resources dimension member.
Figure 25: Delete Node or Undelete
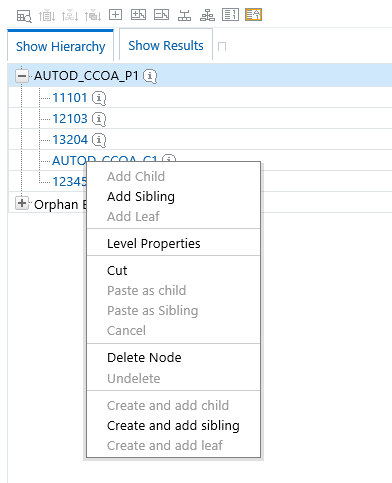
Figure 26: Deleted Node in Strike-through
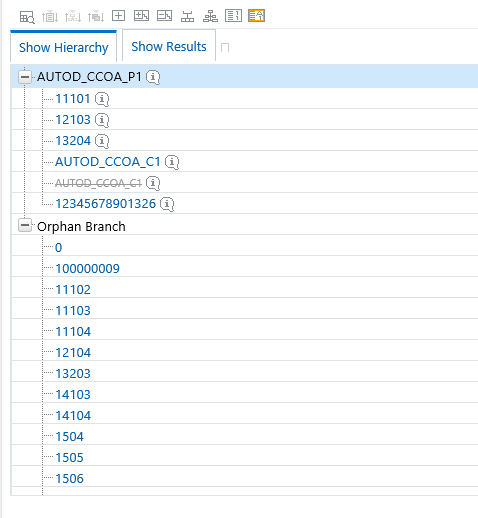
Note that after having deleted the Human Resources member, it may be “restored” to its original condition by executing an Undelete operation.
Figure 27: Undelete

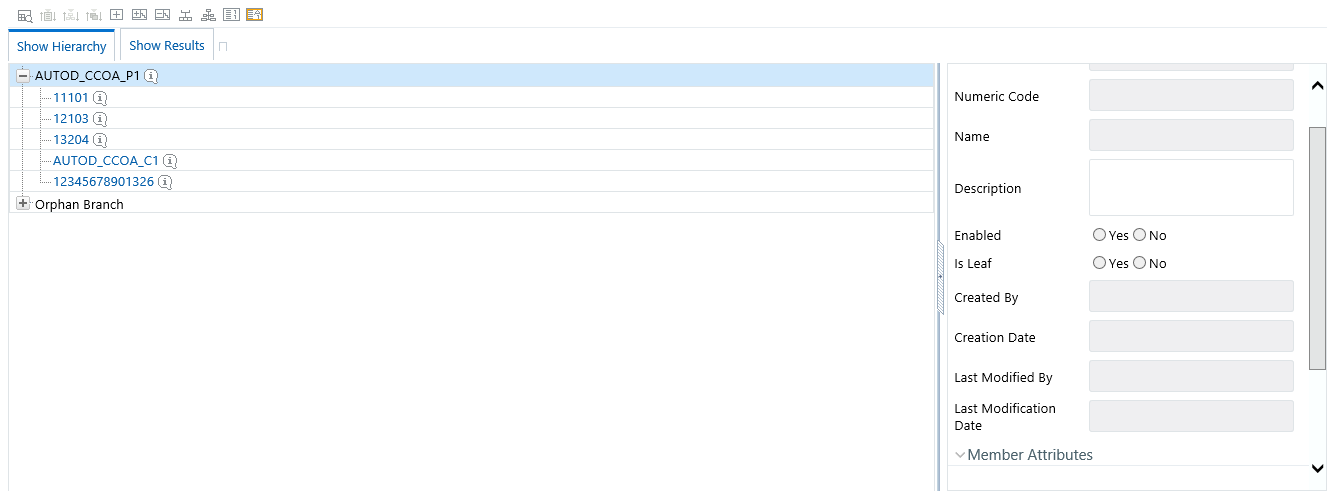
Click on the separator bar at the extreme right hand side of the Hierarchy Display Grid to invoke the Member Property display.
Figure 28: Member Properties
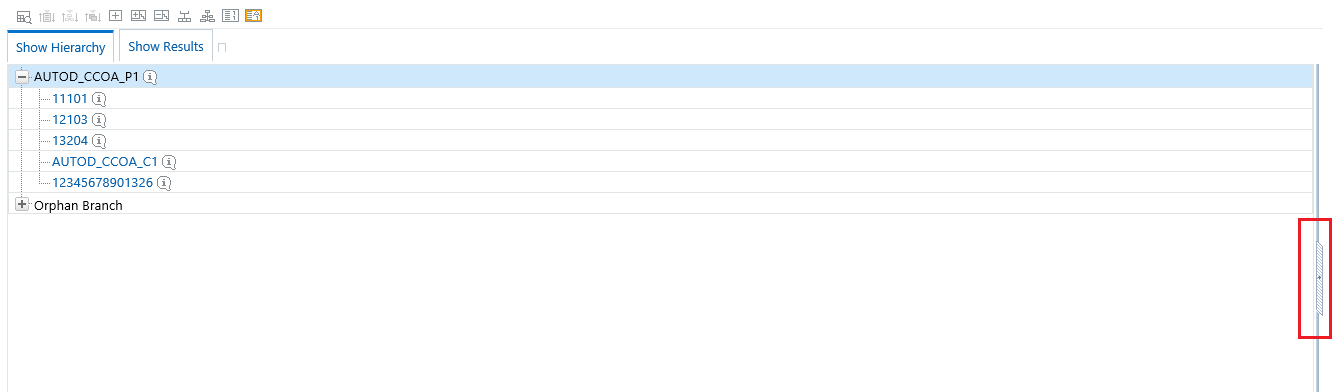
The Member Property display shows all of the properties of the currently selected dimension member (the member selected within the hierarchy). While the Member Property display is open, you may use your Up arrow, Down arrow, Left arrow, or Right arrow keys to move from dimension member to dimension member.
Figure 29: Member Properties Expanded


 )
)