5 Franchise Return
Franchise Returns are defined as any return of stock from a franchise store to a company warehouse or store. The return can contain items from multiple orders, but must be from a single franchise store.
Two different types of returns can be created: either a return that brings inventory back to a company store or warehouse, or a return for which the returning store will destroy the goods on site. The latter may be used in the case where the goods are damaged beyond repair or perishable, such that the retailer does not want to take them back into inventory, but has agreed to refund the franchise customer.

Return Merchandise Authorization (RMA)
The RMA (Return Merchandise Authorization) section includes the RMA number in the title. The return type and status is displayed in the right hand corner of the section.
The RMA section contains the following fields.
Table 5-1 RMA - Fields and Description
| Fields | Description |
|---|---|
|
Customer |
Displays the customer. |
|
Customer Location |
Displays the customer location. |
|
Return Location |
Displays the return location. |
|
Return Method |
Displays the return method. |
|
Currency |
Displays the currency of the franchise return. |
|
Customer Reference |
Displays the customer reference, if available. This field remains enabled until the franchise return is approved. |
|
Create Date |
Displays the date the franchise return has been created. |
|
Cancel Reason |
Displays the cancel reason. This field is only displayed when the franchise return has been cancelled at the header level. Only 40 characters of the cancel reason are displayed. |
|
Transfer |
Displays the transfer number linked to the return. The transfer number link takes you to the Transfer page in view mode. This field is only available when the franchise return has been approved. |
|
Comments |
Displays comments for the franchise return. |
Items
In the Items section you can add or maintain the items for the franchise return.
Items - Actions Menu and Icons
Use the Actions Menu and icons to apply actions to the table. You can perform the actions listed below, as well as actions described in ”Action Menu and Icons” in the Oracle Retail Merchandising Do the Basics User Guide.
Table 5-2 Items - Actions Menu/Icons and Description
| Actions Menu/Icons | Description |
|---|---|
|
Mass Update and Mass Update button |
Opens the Mass Update pop-up. This option is only available for franchise returns in Input status. For more information about the mass update option, see the Apply a Mass Update for Items on a Franchise Return section. |
|
Stock on Hand |
Opens the Inventory by Location page. For more information about this page, see View Inventory by Location in the Oracle® Retail Merchandising Inventory User Guide. |
Franchise Return Toolbar
The toolbar contains the following icons and buttons, as well as icons and buttons described in ”Screen Level Action - Icons and Buttons” in the Oracle Retail Merchandising Do the Basics User Guide.
Table 5-3 Franchise Return Toolbar - Icons/Buttons and Description
| Icons/Buttons | Description |
|---|---|
|
Status |
If you click the Status button, the status of the franchise return changes to the status specified on the button. Possible franchise return statuses are:
|
|
More Actions |
Click More Actions to see a list of additional actions that can be performed in the Franchise Return page.
|
|
Done |
If you open the page in view mode, the Done button is displayed. Click Done to close the page. |
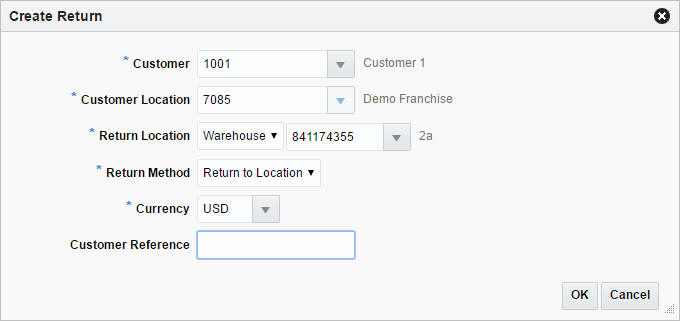
Create a Franchise Return
To create a franchise return, follow the steps below.
-
From the Tasks menu, select Inventory > Franchise Orders > Create Return. The Create Return pop-up appears.
-
In the Customer field, enter, select or search for the customer. This field is a required field.
-
In the Customer Location field, enter select or search for the customer location. This field is a required field.
-
In the Return Location field, select a return location type from the list. Then enter, select or search for the return location. This field is a required field.
-
In the Return Method field, select if you want to return the item to the location or destroy the item on site. This field is a required field.
-
In the Currency field, enter, select or search for the currency of the franchise return. This field is a required field.
-
In the Customer Reference field, enter a customer reference, if available.
-
Then choose one of the following options.
-
Select OK to create the franchise return and close the pop-up. The Franchise Return pop-up appears in a new tab. The RMA section of the pop-up contains the information you have entered.
For more information about the Franchise Return pop-up, see the Franchise Return section.
-
Then add items to the franchise return. For more information about how to add items to the franchise return, see the Add Items to a Franchise Return section.
Note:
Select Cancel to reject all entries and close the pop-up.
-
-
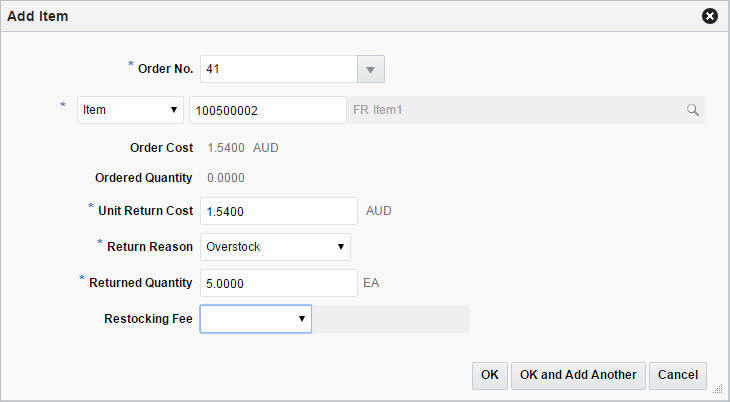
Add Items to a Franchise Return
To add an item to a franchise return, follow the steps below.
-
In the Items section, select Actions > Add, or use the Add icon
 . The Add Item pop-up appears.
-
In the Order No. field, enter, select or search for the franchise order number. This field is a required field.
-
In the Item field, select if you want to return an item or reference item. Then enter, select or search for the item. This field is a required field.
-
The following fields are populated, depending on the selected item.
-
Order Cost
If the selected item is a component of a pack item on the order, the cost is calculated based on its percentage of the pack item.
If the selected item is both a component of a pack item on the order and a regular item on the order, the regular item's cost is the cost displayed as the order cost.
-
Ordered Quantity
If the selected item is a component of a pack item on the order, the ordered quantity is calculated based on the pack item.
If the selected item is both a component of a pack item on the order and a regular item on the order, the ordered quantity displays the sum of the component pack item and the regular item on the order.
-
-
In the Unit Return Cost field, enter the unit return cost. This field is a required field.
-
In the Return Reason field, select a return reason from the list.
-
In the Returned Quantity field, enter the return quantity.
-
In the Restocking Fee field, select either the restocking type percent or specific amount from the list. Then enter the desired value.
-
Then choose one of the following options.
-
Click OK to add the item and close the pop-up.
-
Click OK and Add Another to add additional items to the franchise return.
-
Click Cancel to reject all entries and close the pop-up.
-
-
-
In the Franchise Order Return pop-up, choose a saving option to save your franchise return.
Manage a Franchise Return
The Manage Franchise Returns option opens the Franchise Return Search page. In this page you can perform the following actions.
-
Search for franchise returns by various search criteria
-
View the search results
-
View franchise return information
-
Create a franchise return
-
Edit franchise return information
You can access the Franchise Return Search page form the Task menu, select Inventory > Franchise Orders > Manage Franchise Returns. The Franchise Return Search page appears.
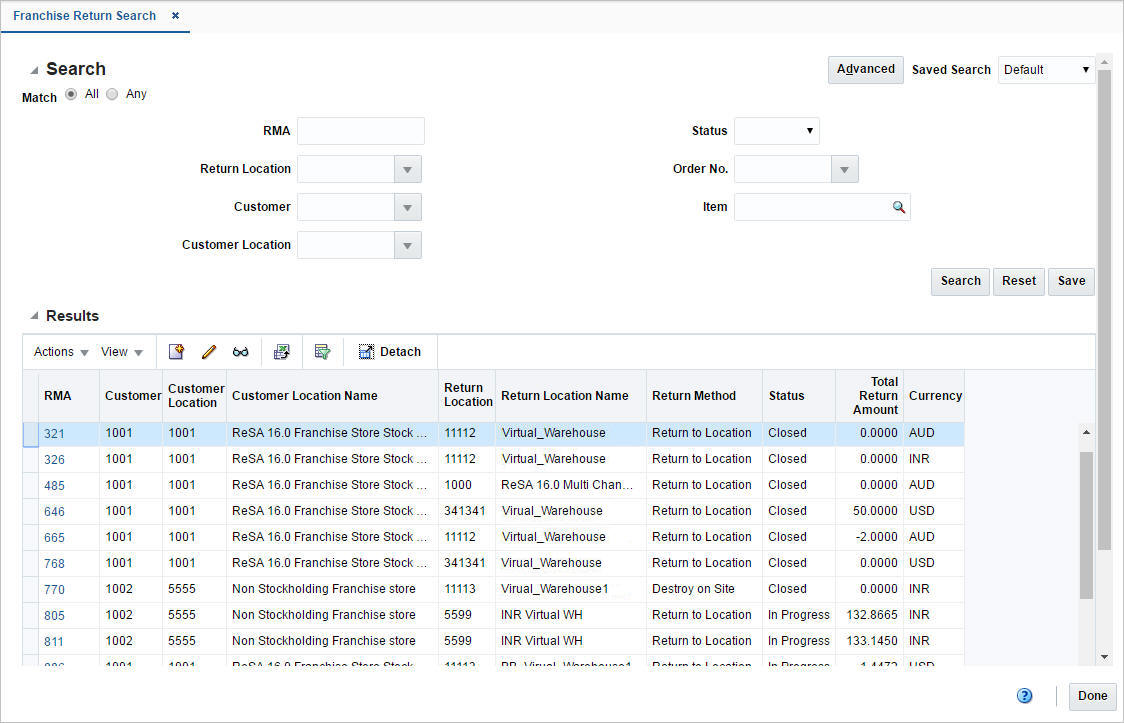
Search for a Franchise Return
To search for a franchise return:
-
From the Task menu, select Inventory > Franchise Orders > Manage Returns. The Franchise Return Search page appears.
-
You can search for a franchise return using basic or advanced search criteria, depending on the requirement. The basic mode is the default search mode.
-
Click Advanced to access the search section in advanced mode.
-
Click Basic to return to basic mode.
-
Search for a Franchise Return Through the Basic Search Criteria
To search for a franchise return using basic search criteria:
-
Enter, select or search for one or all of the following basic search criteria.
Table 5-4 Franchise Return Search - Basic Search Criteria and Description
Fields Description Match option
Check radio button All or Any.
All - only franchise returns matching all entered search criteria are shown.
Any - franchise returns matching any of the entered search criteria are shown.
RMA
Enter the RMA.
Return Location
Enter, select or search for the return location.
Customer
Enter, select or search for the customer.
Customer Location
Enter, select or search for the customer location.
Supplier Site
Enter, select or search for the supplier site.
Supplier Site Name
Enter the supplier site name.
Status
Select the status of the franchise return from the list.
Order No.
Enter, select or search for the order number.
Item
Enter, select or search for the return item.
-
Click Search. The franchise returns that match the search criteria are displayed in the Results section.
-
Click Reset to clear the search section and results.
-
Click Done to close the page.
Search for a Franchise Return Through Advanced Search Criteria
To search for a franchise return using advanced search criteria:
-
To search using advanced search criteria, enter or select one or all of the advanced search criteria.
-
To narrow down the search, use the list next to the search fields. For example, determine if the entered value should equal or not equal the search result.
-
Click Search. The franchise returns that match the search criteria are displayed in the Results section.
-
Click Reset to clear the search section and results.
-
Click Add Fields to add more fields for the advanced search. To remove the field from the search, click the x right next to the field.
-
Click Done to close the page.
Edit a Franchise Return
To edit a franchise return, follow the steps below.
-
From the Tasks menu, select Inventory > Franchise Orders > Manage Returns. The Franchise Return Search page appears.
-
Enter or select search criteria as desired to make the search more restrictive.
-
Click Search. The franchise returns that match the search criteria are displayed in the Results section.
-
In the RMA column, click the RMA link, or mark a record and select Actions > Edit, or use the Edit icon
 . The Franchise Return pop-up appears.
 -
In the RMA section:
Edit the Customer Reference field, or a comment to the franchise return.
Note:
You can only edit these fields when the franchise return is still in Input status. -
In the Items section:
-
Add an Item
For more information about how to add an item to a franchise return, see the Add Items to a Franchise Return section
-
Edit an Item
For more information about how to edit an item on a franchise return, see the Edit Items on a Franchise Return section.
-
Delete an Item
-
Apply a Mass Update for all items on the franchise return
For more information about how to apply a mass update for items on a franchise order, see the Apply a Mass Update for Items on a Franchise Return section.
Note:
You can only add, delete or apply mass updates for items on a franchise return when the return is still in Input status. -
-
Then choose one of the following options.
-
Click Save to save your changes.
-
Click Save and Close to save your changes and close the pop-up.
-
Click Cancel to reject all entries and close the pop-up.
-
Edit Items on a Franchise Return
To edit an item on a franchise return, follow the steps below.
-
In the Items section, select Actions > Edit, or use the Edit icon
. The Edit Item pop-up appears.-
Edit the following fields, as necessary.
-
Unit Return Cost
-
Return Reason
-
Returned Quantity
-
Restocking Fee
-
Cancel Reason
This field is only available, if the franchise return is in Approved status and the returned quantity is less than the original quantity.
-
-
Then choose one of the following options.
-
Click OK to add your changes to the table.
-
Click Cancel to reject all entries and close the pop-up.
-
-

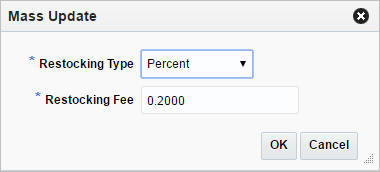
Apply a Mass Update for Items on a Franchise Return
To apply a mass update for all items on the franchise return, follow the steps below.
Note:
This option is only available for franchise returns in Input status.-
In the Items section, select Actions > Mass Update, or use the Mass Update button. The Mass Update pop-up appears.
-
In the Restocking Type field, select either the restocking type percent or specific amount from the list. This field is a required field.
-
In the Restocking Fee field, enter the desired value.
-
Then choose one of the following options.
-
Click OK to update the restocking type and fee for all items on the franchise return.
-
Click Cancel to reject all entries and close the pop-up.
-
-
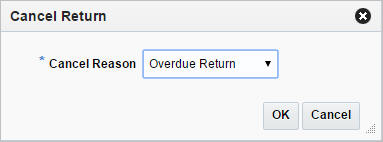
Cancel a Franchise Return
To cancel a franchise order, follow the steps below.
-
From the Tasks menu, select Inventory > Franchise Orders > Manage Returns. The Franchise Return Search pop-up appears.
-
Restrict your search to franchise returns with the status Approved and In Progress.
-
Click Search. The franchise returns that match the search criteria are displayed in the Results section.
-
In the RMA column, click the RMA number link, or mark a record and select Actions > Edit, or use the Edit icon
. The Franchise Return pop-up appears. -
Select Cancel Return. The Cancel Return pop-up appears.
-
In the Cancel Reason field, select the reason for cancelling the franchise return.
-
Then choose one of the following options.
-
Click OK to cancel the franchise return.
-
Click Cancel to reject your entry and close the pop-up.
-
-