3 Application Security
For information on the administrative tasks, see the following sections:
EICS Application Security
Users are required to have store access and permissions in order to use the EICS client applications.
For access to special areas, group assignment in IDCS is also required as mentioned in previous sections.
Users that are assigned the global store users group (sim_global_store_users) automatically have access to all store locations in EICS. Users that do not have global store access require store assignments, which are setup through the EICS security admin UI.
EICS implements fine grained permissions for controlling access to functionality and data. All users accessing the EICS client application must have valid role assignments in order to be granted access to permissions. Users are assigned roles through the EICS security admin UI.
Application roles are created and managed through the EICS security admin UI by assigning permissions to the role.
For detailed information regarding user and role management with the EICS security admin UI, please see the Oracle Retail Enterprise Inventory Cloud Services User Guide.
Role Management
-
Log into the EICS admin UI.
-
Navigate to Security\ Role Maintenance.
-
Click Create New or the name of an existing role.
-
For new roles, enter the name, description, type.
-
Assign permissions to the role using the table.
-
Click Save when changes are complete.
Assigning Stores to a User
-
Log into the EICS admin UI.
-
Navigate to Security\ User Assignment.
-
Locate the user in the table, using filters as needed.
-
Click on the username.
-
Click on the Stores tab.
-
Assign stores to the user using the table.
-
Click Save when changes are complete.
Assigning Roles to a User
-
Log into the EICS admin UI.
-
Navigate to Security\ User Assignment.
-
Locate the user in the table, using filters as needed.
-
Click on the username.
-
Click on the Roles tab.
-
Click Create New to assign roles to the user.
-
Select the store scope and store(s) for the role assignment(s).
-
Select the role(s) to assign.
-
Enter start and end dates if needed.
-
Click Apply to create the selected assignments.
-
Click Save when changes are complete.
Mass Assigning Roles and Stores
-
Log into the EICS admin UI.
-
Navigate to Security\ User Assignment.
-
Click Import.
-
Click Download Template on the Import Data File dialog.
-
Fill data in the downloaded template.
-
Drag and drop the filled template file or click to select the file.
-
Click Import.
Deleting an EICS User Profile
The EICS user profile will be automatically deleted through a scheduled batch job if the user is deleted in IDCS.
However, an EICS user profile can be manually deleted without deleting the user in IDCS. This should be done if the user no longer requires access to EICS, or if the same username is used for a new user before the batch job has executed.
The EICS User Assignment table displays users stored in IDCS as well as EICS user profile information, such as the create date and login date. These refer to the EICS user profile creation and client login, not IDCS user information.
Users with a create date have an existing EICS user profile, which can be deleted with the following steps.
-
Log into the EICS admin UI.
-
Navigate to Security\ User Assignment.
-
Locate the user in the table, using filters as needed.
-
Select the row(s) in the table.
-
Click Delete Profile.
Deleting an EICS user profile includes all store and role assignments for that user. It does not affect group assignments or other user information managed through IDCS.
If a user account needs to be deleted or all access disabled it is recommended to use IDCS to perform the user management.
If a user only needs access to certain stores or permissions within EICS removed then the EICS security admin UI should be used.
Importing a Batch of User Accounts
If you have batch of users that have to be created, the Oracle team can bulk load the users into the IDCS application. When users are bulk loaded, each initial password is set to the current password of a template user. The new users are required to change the password on their first login.
To request the creation of accounts by bulk loading:
-
Create a CSV file listing all users to create. Following is an example of this file.
##################
filename.csv
###################
##########################################
USR_LOGIN,USR_FIRST_NAME,USR_LAST_NAME,USR_EMAIL,ORG_NAME
CE.ADMIN1,ce,admin1,CE.ADMIN1@oracle.com,Retail
CE.ADMIN2,ce,admin2,CE.ADMIN2@oracle.com,Retail
CE.ADMIN3,ce,admin3,CE.ADMIN3@oracle.com,Retail
CE.ADMIN4,ce,admin4,CE.ADMIN4@oracle.com,Retail
CE.ADMIN5,ce,admin5,CE.ADMIN5@oracle.com,Retail
CE.ADMIN6,ce,admin6,CE.ADMIN6@oracle.com,Retail
CE.ADMIN7,ce,admin7,CE.ADMIN7@oracle.com,Retail
CE.ADMIN8,ce,admin8,CE.ADMIN8@oracle.com,Retail
CE.ADMIN9,ce,admin9,CE.ADMIN9@oracle.com,Retail
CE.ADMIN10,ce,admin10,CE.ADMIN10@oracle.com,Retail
##########################################
-
Create or identify a user whose password will be used as the initial password for all created users.
-
Open an SR with Oracle Support and provide the CSV file and user from Steps 1 and 2.
Bulk Group Membership Update (Optional)
If a considerable number of users need to have roles to be assigned, the Oracle team can bulk update the role membership into the IDCS application.
To update the membership by bulk update:
-
Create a CSV file with the user role mapping. Note that the user name must be in upper case format. See the example below.
-
Open an SR with Oracle Support and provide the CSV file and user name from Step 1.
##################
role.csv
###################
##########################################
UGP_NAME,USR_LOGIN
Role1,CE.ADMIN1
Role2,CE.ADMIN1
Role1,CE.ADMIN2
Role3,CE.ADMIN3
Role4,CE.ADMIN4
Role5,CE.ADMIN5
Role6,CE.ADMIN6
Role7,CE.ADMIN7
Role8,CE.ADMIN8
Role2,CE.ADMIN8
Role2,CE.ADMIN9
##########################################
Note:
If more than one role is to be attached to a particular user, add one more row with the role that the user is to have and the user name. Refer to the CE.ADMIN1 in the above example.Nightly Batch File Uploads
The following steps describe the file upload process.
The Private/Public keys must be generated and the Public key must be associated with your SFTP Account for the file uploads. The Adding Authorized Keys section describes the step-by-step method to generate the keys (2048 bit RSA Keys).
Adding Authorized Keys
The following process is used to generate a 2048 bit RSA key and to add the same to the SFTP server. This is done with the help of the WinSCP tool on Windows. However, the same can be done using ssh-keygen on Linux as well.
-
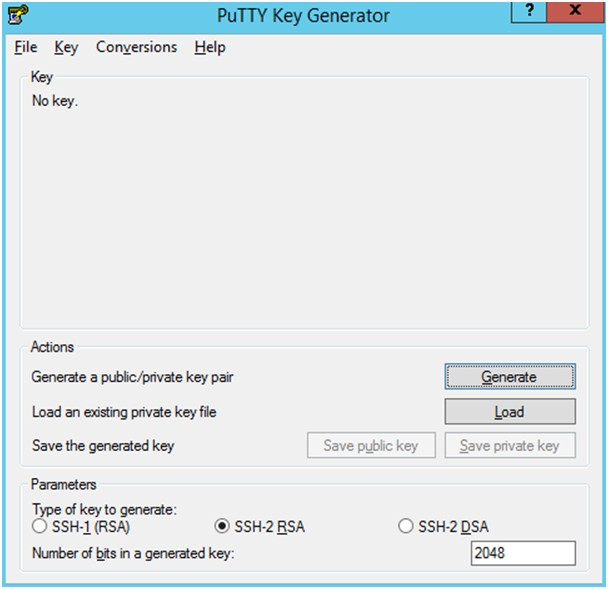
Launch WinSCP and select Tools\ Run PuttyGen.
-
Select SSH-2 RSA for the type of key to generate and enter 2048 for the number of bits in a generated key field. Click Generate.
-
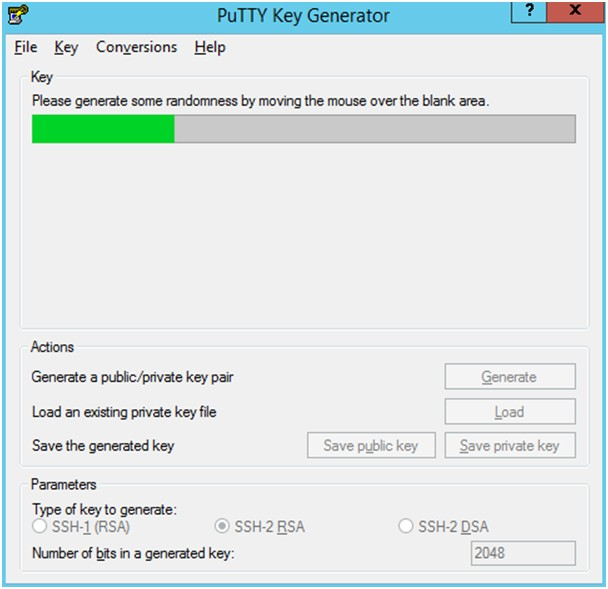
Move the mouse over the blank space in the window until the key is generated. Moving the mouse over the blank space creates a random pattern which is used for key generation.
-
Once the key is generated, click Save public key to save the public key to a file.
-
Click Save private key to save the private key to a file. Confirm to save it with or without a passphrase.
-
Open an SR with Oracle Support, to associate the public key with your SFTP account (attach the key with the SR).
Logging In to WinSCP
The upload steps use the private key generated in the Adding Authorized Keys section.
-
Launch WinSCP and connect to <SFTP Server> using port 22.
-
Enter the user name and click Advanced.
-
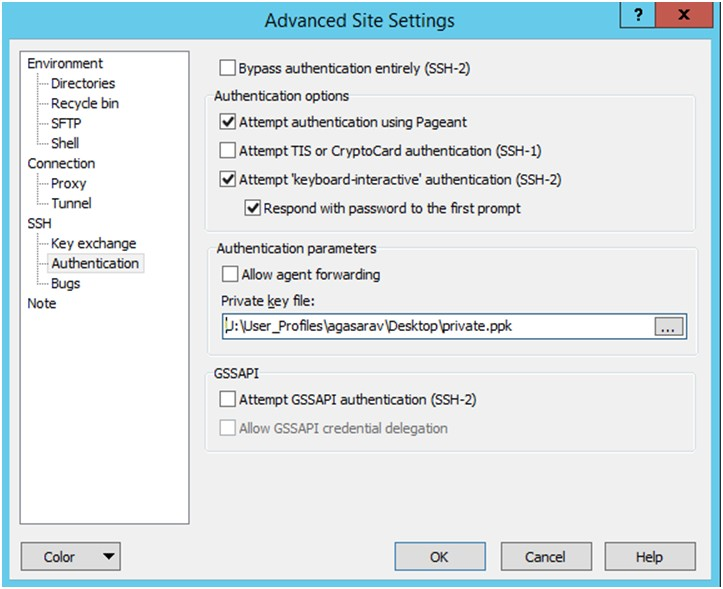
Click Authentication.
-
In the Private Key File field, click Browse and select the private key created in the Adding Authorized Keys section.
-
After loading the private key file, click OK.
-
Click Login. The window does not prompt for a password and logs in to the SFTP server. Provide a passphrase if one has been set up.
Note:
Login can only be performed using the authorized keys. Login with username / password is not supported.

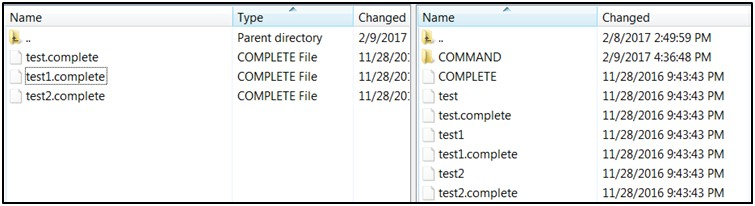
Uploading the Batch File
To upload the batch file:
-
Log in to WinSCP. Follow the steps in Logging In to WinSCP.
-
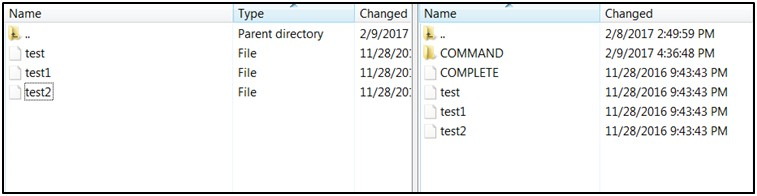
Transfer the file to be copied (for example, test) to /<SFTP User>.
-
Transfer an empty file <filename>.complete (for example, test.complete) to the directory /<SFTP User>.
-
If multiple files have to be transferred, copy all the files to /<SFTP_user>.
-
Transfer all the corresponding <filename>.complete files to the /<SFTP_user> directory for the transfer to complete.


Export File Downloads
To export file downloads:
-
Log in to WinSCP. Follow the steps in Logging In to WinSCP.
-
Change the directory to /<SFTP User>/EXPORT.
-
Download all data files.
Web Services Security
The SOAP web services provided and consumed by EICS can be configured with security policies by the installer. These web services are designed to participate in Retail Service Backbone (RSB) flows which support two distinct Oracle WebLogic WS-Policy configurations. These are referred to as Policy A and Policy B.
Note:
Cloud deployment supports only Policy A for SOAP web services.On the provider side of the communication, Policy A and Policy B are configured using one or more Oracle WebLogic WS-Policy configurations defined in the xml files included in Oracle WebLogic:
-
Policy A
-
Description: Message must be sent over SSL and requires authentication of a plain text UsernameToken.
-
Configuration: Wssp1.2-2007-Https-UsernameToken-Plain.xml
-
-
Policy B
-
Description: Message body must be encrypted and signed, and requires authentication of an encrypted UsernameToken.
-
Configuration:
-
Wssp1.2-2007-Wss1.1-UsernameTokenPlain-EncryptedKey-Basic128.xml
-
Wssp1.2-2007-EncryptBody.xml
-
Non-RSB Web ServicesWssp1.2-2007-SignBody.xml
-
-
Personal Data
Personal data is not stored within EICS.
Regulatory Compliance
EICS does not store any credit card data.
EICS does not store any HIPPA/health related data.
EICS does use Oracle TDE (Transparent Data Encryption) for portion of schema that stores users' passwords.