Using PeopleSoft Fluid User Interface for Time Reporting as an Employee
Employees can perform time reporting and related operations using applications which are developed with the help of PeopleSoft Fluid User Interface tools. These applications are scalable across smart phones, tablet and personal computers. Employee can report and review time by the day and week, report leave and compensatory time, view reported time by the day and week, view payable time, view base benefits leave and compensatory time balances and enter user preferences for defaulting and viewing time data.
When the user taps the Time tile on the Employee Self Service Homepage, the application start screen for Time and Labor appears. The application start page contains a list of tasks the user can select to perform. The tasks listed are based on the applications that are installed and are on the security access of the logged in user.
The following video provides a demonstration new fluid timesheet with new rapid time entry pages.
Image Highlights, PeopleSoft Update Image 27: Time and Labor Fluid Time Entry for Mobile Phone
The following video provides an overview of Fluid Time Entry pages.
For general information about fluid pages in PeopleSoft, see Understanding PeopleSoft Fluid User Interface Home Pages
|
Page Name |
Definition Name |
Usage |
|---|---|---|
|
HC_TL_START_NAV_FLU_ESS2_GBL(this is the cref for the tile) |
Add the Time tile to the home screen to access the actionable tiles for Time. |
|
|
HC_TL_EMP_DSHBD_FL_LINK |
Collection of actionable tiles for Time. |
|
|
HC_TL_ENTER_TIME_FLU_GBL |
Select to access Enter time page. |
|
|
TL_ELP_TIME_FLU |
Enter time and view the default time period for the workgroup or the default time period based on the user preferences. Here you will be logged in as Elapsed Time Reporter. |
|
|
TL_PCH_TIME_FLU |
Enter time and view the default time period for the workgroup or the default time period based on the user preferences. Here you will be logged in as Punch Time Reporter. |
|
|
TL_ICON_LEGEND_SCF |
Open to view the legends with description. |
|
|
HGA_SS_REQ_FLU |
Request absence request from the Enter Time page. |
|
|
TL_TR_COMMENT_FLU |
Modal where the employee can enter time reporting comments. |
|
|
TL_DEL_CONFIRM_FLU |
Confirm deletion before the final delete or go back to the previous page. |
|
|
HC_TL_TIME_SUM_FLU_GBL |
Select to access the Time Summary page. |
|
|
TL_TIME_SUM_FLU |
View time summary for weekly, monthly and bi-weekly The Time Summary displays the default time period for the workgroup or the default time period from the user’s preferences. This view can be changed by the time reporter. Note: For Mobile device, the Time Summary page will re-direct you to Weekly Time page automatically. |
|
|
HC_TL_EMPL_EXCEP_FL_GBL |
Select to access View Exception page. |
|
|
TL_EMPL_EXCEP_FL |
Displays all exceptions for your team in one place. |
|
|
HC_TL_QUICK_FILL_FLU_GBL |
Select to access Setup Quick-Fill page. |
|
|
TL_QUICK_FILL_FLU |
Create a new Quick-Fill and view the existing saved quick fills. You can update, active and de-activate the existing Quick-Fills |
|
|
HC_TL_RPT_TIME_FLU_GBL |
Select to open Report Time page. |
|
|
TL_RPTD_ELP_FLU |
Report Time Page takes the users to the new Fluid Time Sheet. Users can report the time for their configured time period using this page. |
|
|
TL_WEB_CLOCK_FLU |
Report Time Page takes the users to the new Fluid Time Sheet. |
|
|
TL_RPTD_ELP_FLU |
Open to view and update the time reporting details. The page also lets the punch time reporters to record time for a day at a particular time. |
|
|
HC_TL_PRE_POP_ELP_FL_GBL |
Select to access Weekly Time Entry page. |
|
|
TL_PRE_POP_ELP_FLU |
View the weekly time reported by a punch time reporter or an elapsed time reporter and submit time for a day. The elapsed time reporter can choose between pre-populate options Apply Schedule, Copy from Previous or Manual Entry based on their allowed configuration. |
|
|
TL_WEEKLY_COPY_FL |
Review the weekly time before submitting the time for a time reporter. This page lets you to add or edit time for any specific day before submitting their weekly time. This is an intermediate page after Weekly Time page and allows you to review and update the reported time before submitting it. |
|
|
HC_TL_WEEKLY_TIME_FLU_GBL |
Select to open |
|
|
TL_WEEK_TIME_FLU |
View the reported time for a week for an employee and then navigate to report time page for a day. |
|
|
HC_TL_RPT_TIME_FLU_GBL_2 |
As a punch reporter, report vacation, sick and other leave types as well as the compensatory time as a value in units of hours. |
|
|
HC_TL_PAYBTIME_FLU_GBL |
Select to open Payable Time page. |
|
|
TL_PAYBTIME_FLU |
View the payable time reported in the payable time page. |
|
|
HC_TL_COMPLEAVBAL_FLU_GBL |
Select to open Leave Balances page. |
|
|
TL_COMPLEAVBAL_FLU |
View the details about the Leave Type or Compensatory Plan. |
Use the Time tile (HC_TL_EMP_DSHBD_FL_LINK) to navigate to the time collection.
Navigation
The Time tile is delivered as part of the Employee Self Service home page, but the location can change if you change the delivered home pages or if administrators personalize their home pages.
As an employee, you can add the tile, through personalization, to a system-delivered home page or a home page that you create.
Image: Time tile
This example illustrates the Time tile.

Select the Time tile to access these employee self-service actionable tiles without using traditional menu navigations:
Enter Time
Time Summary
View Exceptions
Setup Quick-Fill
Report Time
Weekly Time
Weekly Time Summary
Payable Time
Request Absence
Cancel Absences
View Requests
Absence Balances
The following video provides an overview of Actionable Tiles for Time and Labor and Absence transactions.
Use the Time Collection — Actionable Tiles (HC_TL_EMP_DSHBD_FL_LINK) to navigate to the corresponding pages.
Navigation
Select Time tile available on the Employee Self Service Home page to access the actionable tiles.
As an employee, you can add the tile, through personalization, to a system-delivered homepage or a homepage that you create.
The following video provides an overview of Time and Labor Actionable Tiles.
Redefine Employee Navigation for Time and Labor and Absence Transactions
Image: Time Collection — Actionable tiles for Elapsed Time reporter
This example illustrates the Time Collection — Actionable tiles when logged in as an elapsed time reporter.

Image: (Smartphone) Time Collection - Actionable Tiles
This example illustrates the (Smartphone) Time Collection - Actionable Tiles while using a mobile.

The difference of Actionable tiles collection page for Punch time reporter is that, this type of time reporter can report time using Report Time Page without going to the respective page.
Image: Time Collection Actionable — Tiles for Punch Time Reporter
This example illustrates the fields and controls of Time Collection — Actionable Tiles for Punch Time Reporter

See Report Time Tile for more details.
The Job Selector banner at the top of the Actionable Time Tile page is used to select the job, in case of an employee who has more than one job to select.
The employee can select the job from Select a job drop down and view the corresponding details on the dashboard tiles.
Image: Job Selector banner in Actionable Tiles page
This example illustrates the fields and controls of Job selector banner.

A user with multiple job profile can select a job using job-selector drop-down and Apply to view the details of that job profile.
The Enter Time Tile (HC_TL_ENTER_TIME_FLU_GBL) is one of the tile in the Time Tile collection page. The tile displays up-front information such as time period which contains begin date and end date. According to configuration, the status bar on the next line displays reported and scheduled time in the Selected color configuration for the specified time period.
The next two lines display the color codes and respective representation of the status bar.
Select Enter Time tile to navigate to Enter Time page.
Navigation
Select Time Tile available on the Employee Self Service Home Page to access the Enter Time tile.
Image: Enter Time tile
This example illustrates the Enter Time tile.

For Mobile Phone, the Enter Time Page is not available. You can use Report Time tile and Report Time Page for reporting time.
The Enter Time tile displays the time period and Reported and Scheduled time at one place for a quick review.
Use Enter Time (TL_ELP_TIME_FLU) page to enter time and view the default time period for the workgroup or the default time period based on the user preferences.
Navigation
Select Time tile available under the Employee Self Service Home Page Tile Collections page. You can select Enter Time tile to open Enter Time page.
You need to login as an elapsed time reporter.
Image: (Desktop) Enter Time page for Elapsed Time Reporter
This example illustrates the fields and controls of Enter Time page for elapsed time reporter.

Image: Enter Time Page with Time Units
This example illustrates the fields and controls on the Enter Time Page with Time Units. You can find definitions for the fields and controls later on this page.
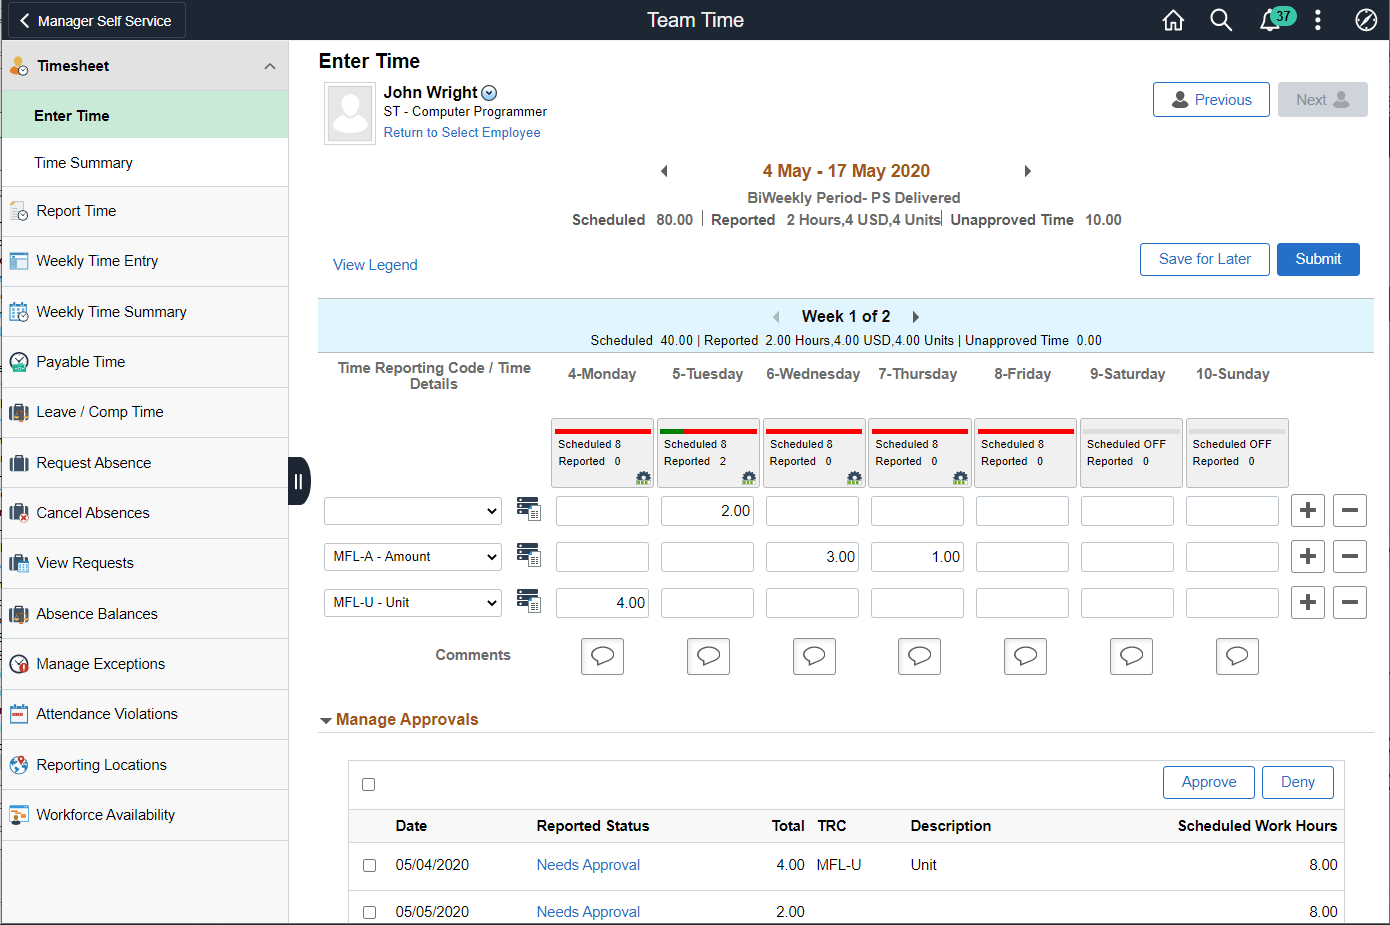
The period slider and Week time on the header indicates the time updates in units for an elapsed time reporter.
Note: The reported time hours are updated on entry in both Employee and Manager Self Service. If Refresh Reported Time Totals on Time Entry is not selected, the reported hours and status bar will not be updated until the time is either saved or submitted.
The following video provides an overview of Update of Reported Totals on Fluid Time Page after Save or Submit.
Update of Reported Totals on Fluid Time Page after Save or Submit
Image: Time Detail values inline for Elapsed Time reporter
This example illustrates the Time Detail values inline in the Timesheet of an Elapsed time reporter.

Administrators can configure for employees to view the time detail values inline in the timesheet by selecting the option of Expand Time Details on Timesheet under Time and Labor Installation Page.
The Enter Time pages for elapsed time reporters show Time Details icon when Expand Time Details on Timesheet option is not selected under Fluid Timesheet section in the Time and Labor Installation page.
For more details, see Setting Up System Defaults and Loading Dates.
A ChartField is a data field that stores accounting information that affects budget and this field is used for internal and external reporting.
The ChartField is associated to search for valid Combination Code or Speed type using table lookups.
The ChartField integration using Fluid is now available in Time and Labor for Managers and Employees. The user with the user role TL Employee Time Fluid and Permission List ChartField Fluid (HCCPCF1000) can use this facility.
Image: Enter Time Page with ChartFields link
This example illustrates the fields and controls on the Enter Time Page with ChartFields link. You can find definitions for the fields and controls later on this page.

Note: When time details are expanded in timesheet, the Enter Time page displays the combination code prompt and chart fields link for an elapsed time reporter.
For more information on common ChartField Pages, refer Understanding ChartField Validation.
|
Field or Control |
Definition |
|---|---|
| Job Title |
Job title of the user is displayed. |
| Period Selector |
The period selector lets user selects the time period for which they will be reporting or viewing time. Clicking on the date will bring up a calender to choose a different date. The default period for the user will be available for selection and is displayed below the dates. Users can control the time period defaults for time entry using the configuration under user preferences. Period Summary totals are displayed under the dates. If there is no schedule configured then the scheduled total will not display. All action buttons below the date selector will perform the action for the period selected. If the user is viewing time for time period greater than a weeks time, then the time will be submitted for the entire period including the weeks that are not available in the current view for the users. Users can access this data using the previous and next buttons on the weekly pagination. This is applicable for the elapsed desktop users. |
 |
Navigate to previous time period. |
 |
Navigate to future time period. |
| Weekly Banner , Scheduled and Reported |
These are applicable only for elapsed reporters using desktop. Weekly summary will be displayed in the weekly banner. The summary will show the scheduled total and reported total for the week in view. If the selected time period for the user is greater than weekly, the weekly pagination (green banner) will be displayed. Users can enter time for one week at a time and navigate between weeks using the previous and next button on the weekly banner. Alternatively, users can click on the Week label to select a drop down with a list of weeks and choose the intended week from the drop down. Note: If there is no schedule configured then the scheduled total will not be displayed. |
 |
Select to open Request Absence Modal(HGA_SS_REQ_FLU) Modal. |
 |
Select to keep the entry as draft. Note: The time details that can be entered will depend on the configuration of the time reporting template used by the time reporter. |
 |
Submit the timehseet entries. |
| Time Reporting Code/ Time Details |
Select the Time Reporting Code (TRC). Note: Once the user selects the TRC and performs another action like navigating to the next or previous weeks or selecting apply rules, save for later button, then the row is locked for the TRC selected. The TRC selector will be grayed out and the time details will change to read-only. This is done to preserve data integrity when the user leaves the page. The selected TRC will be available for the entire period spanning weeks in-case of bi-weekly or other periods and users can report the quantity against the same TRC and time details. |
 |
The Time details for different entries. See Time Details page for more details. This icon will be hidden and the time detail values are expanded in the timesheet pages if the option of Expand Time Details on Timesheet is selected in Time and Installation page. For more details, see Time and Labor Installation Page. |
| Days |
Days of the week with scheduled and reported time is displayed. You can click on the Status bar and navigate to the requested page, while preserving the context of the date from which the action was performed. Note: Icons will appear in the boxes if the user has an exception or saved time. When approvals are configured the approval status for the time reported can be viewed here. The visibility of the status bar can be controlled on the Time and Labor Installation. Administrators can set the options like hide/show and the default colors and patters that will be available for their user population. Individual users can override the color preferences using the user fluid preferences. This status bar will not be automatically displayed if there is no schedule configured for the user. Note: Current date is highlighted in blue. |
 |
Add a new row. |
 |
Delete the entry which is not required. See theDelete Confirmation Page for more details. |
 |
Enter comments for the entries. See the Time Reporting Comments Pagefor more details. |
 |
Comments have been already entered for the time entry. |
| View Legend |
Select this link to view theLegend Page and review the patterns. Note: Any message or warning for the time reporter will appear in the screen below the View Legend link. On a Mobile device, the View Legend link re-directs you to the Weekly Time page. |
The following video provides an overview of Attestation feature:
Image: Elapsed Time Reporting enabled with Attestation
This example illustrates the fields and controls of Elapsed Time Reporting enabled with Attestation.

Image: (Smartphone) Elapsed Time Reporting enabled with Attestation
This example illustrates the fields and controls of Elapsed Time Reporting enabled with Attestation.

Image: Enter Time Page with Fluid Reported Time Total by Units
This example illustrates the fields and controls on the Enter Time Page with Fluid Reported Time Total by Units.

The header displays reported time in different units other than hours for an elapsed time reporter. The weekly header box also shows the reported time in units other than hours.
Note: The header box and the weekly header hides the TRC types Units and Dollars for a day when the particular TRC types are not present for the day .
Use Enter Time Details page to view and select ChartField links to for selecting advanced search of Combination Code.
Select the Time Details icon for viewing Time Details Page.
Image: Enter Time Details page
This example illustrates the fields and controls on the Enter Time Details page. You can find definitions for the fields and controls later on this page.

Select ChartFields hyperlink to open ChartField Details Pagepage.
Note: When Time Details icon is enabled, the Time Details Page display the combination code prompt and ChartFields link.
Use Enter Time (TL_PCH_TIME_FLU) page to enter time and view the default time period for the workgroup or the default time period based on the user preferences for a punch time reporter.
Navigation
Select Time Tile available under Employee Self Service Home page to access the Tile Collections. You can select Enter Time tile to open Enter Time page.
You need to login as a punch time reporter.
Image: (Desktop) Enter Time Page for Punch Time Reporters
This example illustrates the fields and controls on the Employee Self Service - Enter Time (TL_PCH_TIME_FLU) page for punch time reporters.
For overview of PeopleSoft HCM Update Image 27: Time and labor Fluid Time Entry for Tablet and Desktop

Select Show All Punch Columns to view all the punch breaks.
Image: Enter Time Page for Punch Time Reporter with all punch breaks
This example illustrates the fields and controls for Enter Time page for a Punch Time Reporters with all the possible punch break times.

Image: Enter Time page for Punch Time reporter with Show all Punch Columns
This example illustrates the fields and controls for Enter Time Page for Punch Time reporter with Show all Punch Columns enabled.

Image: Time detail values for Punch Time Reporter
This example illustrates the time detail values inline in the Timesheet for Punch Time Reporter.

Administrators can configure for employees to view the time detail values inline in the timesheet by selecting the option of Expand Time Details on Timesheet under Time and Labor Installation Page page.
The Enter Time pages for Punch time reporters show Time Details icon when Expand Time Details on Timesheet option is not selected under Fluid Timesheet section in Time and Labor Installation page.
Image: Enter Time Page with ChartFields link for Punch Time Reporter
This example illustrates the fields and controls on the Enter Time Page with ChartFields link for Punch Time Reporter. You can find definitions for the fields and controls later on this page.

Note: When the expand time details is enabled, the Enter Time page display the ChartFields link and combination code prompt.
|
Field or Control |
Definition |
|---|---|
| Job Title |
Job title of the user is displayed. If a user has multiple jobs that allow time reporting, then a drop down will appear for user to switch between jobs and report time for the selected job. |
| Period Selector |
The period selector lets user select the time period for which they will be reporting or viewing time. Click on the date to bring up a calender to choose a different date. The default period for the user will be available for selection and is displayed below the dates. Users can control the time period defaults for time entry using the configuration under user preferences. Period Summary totals are displayed under the dates. If there is no schedule configured then the scheduled total will not display. All action buttons below the date selector will perform the action for the period selected. If the user is viewing time for time period greater than a week’s time, then the time will be submitted for the entire period including the weeks that are not available in the current view for the users. Users can access this data using the previous and next buttons on the weekly pagination. This is applicable for the elapsed desktop users. |
|
Navigate to previous time period. |
|
Navigate to future time period. |
|
Select to open Request Absence Modal (HGA_SS_REQ_FLU) Modal. |
| Weekly Banner , Scheduled and Reported |
These are applicable only for elapsed reporters using desktop. Weekly summary will be displayed in the weekly banner. The summary will show the scheduled total and reported total for the week in view. If the selected time period for the user is greater than weekly, the weekly pagination (green banner) will be displayed. Users can enter time for one week at a time and navigate between weeks using the previous and next button on the weekly banner. Alternatively, users can click on the Week label to select a drop down with a list of weeks and choose the intended week from the drop down. Note: If there is no schedule configured then the scheduled total will not be displayed. |
 |
Select to display all punch patterns and breaks used in the punch reporting. For more information, refer Punch Pattern Page in Creating Time Reporting Templates. |
 |
Select to apply Rules which has already been defined. |
|
Select to keep the entry as draft. Note: The time details that can be entered will depend on the configuration of the time reporting template used by the time reporter. |
|
Submit the timehseet entries. |
| Time Reporting Code/ Time Details |
Select the Time Reporting Code (TRC). Note: Once the user selects the TRC and performs another action like navigating to the next or previous weeks or selecting apply rules, save for later button, then the row is locked for the TRC selected. The TRC selector will be grayed out and the time details will change to read-only. This is done to preserve data integrity when the user leaves the page. The selected TRC will be available for the entire period spanning weeks in-case of bi-weekly or other periods and users can report the quantity against the same TRC and time details. |
| Quick Fill/ Time Details |
Select saved Quick-Fill/ Time Details. |
|
Time details for different entries. This icon will be hidden and the time detail values are expanded in the timesheet pages if the option of Expand Time Details on Timesheet is selected in Time and Labor Installation Page. |
| Days |
Days of the week with scheduled and reported time is displayed. You can click on the Status bar and navigate to the requested page, while preserving the context of the date from which the action was performed. Note: Icons will appear in the boxes if the user has an exception or saved time. When approvals are configured the approval status for the time reported can be viewed here. The visibility of the status bar can be controlled on the TL Installation. Administrators can set the options like hide/show and the default colors and patters that will be available for their user population. Individual users can override the color preferences using the user fluid preferences. This status bar will not be automatically displayed if there is no schedule configured for the user. Note: Current date is highlighted in blue. |
|
Add a new row. |
|
Delete the entry which is not required. See the Delete Confirmation Pagefor more details. |
|
Enter comments for the entries. See the Time Reporting Comments Pagefor more details. |
|
Comments have been already entered for the time entry. |
| View Legend |
Select this link to view theLegend Page and review the patterns. Note: Any message or warning for the time reporter will appear in the screen below the View Legend link. On a Mobile device, the View Legend link re-directs you to the Weekly Time page. |
Employee can use Legends (TL_ICON_LEGEND_SCF) window to view the legends used and a short description of legends.
Navigation
Select the View Legend hyperlink to open Legends window.
Image: Legend Window
This example illustrates the legend patterns.

Image: Legend Window
This example illustrates the legend patterns (2_2) window

Note: The Reported, Reported Under Schedule, and Reported Over Schedule legend colors are dynamic. Your Organization configures the color combination as per the need in User Preferences.
Employee can use Request Absence (TL_TR_COMMENT_FLU) modal to report the absence from enter time page.
Navigation
Select the Request Absence button from Enter Time page to open Request Absence modal.
Image: Time Reporting Modal
This example illustrates the fields and controls of Time Reporting modal.

Employee can use Time Reporting Comments (TL_TR_COMMENT_FLU) page to enter comments for the time reported.
Navigation
Select the comments icon to open Time Reporting comments page.
Image: Time Reporting Comments Page
This example illustrates the fields and controls of Time Reporting Comments page for employees.

Employee can use Delete Confirmation (TL_DEL_CONFIRM_FLU) window to confirm deletion before the final delete.
Navigation
Select the negative icon to get the Delete Confirmation window.
Image: Delete Confirmation Modal
This example illustrates the fields and controls of delete confirmation modal.

Select Report (Time Tile (HC_TL_ENTER_TIME_FLU_GBL) to navigate toReport Timepage.
Navigation
Select Time Tile available under Employee Self Service Home page to access the Tile Collections. You can select Report Time tile to open Report Time page.
Image: Report Time tile for elapsed time reporters
This example illustrates the Report Time tile.

For Mobile Phone, the Enter Time Page is not available. You can use Report Time tile and Report Time Page for reporting time.
Image: (Smartphone) Report Time tile
This example illustrates the Report Time tile.

Image: Report Time tile for punch time reporters
This example illustrates the Report Time tile for punch time reporters.

The Report Time tile is not available while using a mobile phone for punch time reporters.
The tile displays the current date based on users time zone irrespective of any crossover punches pending action. The second line displays the live time with a dynamic refresh in HH:MM AM/PM format for user preferences of 12 hour time display and in HH:MM for user preferences of 24 hour time display. The next line shows last action as shown on the Daily Time page. A button on next logical punch and actions button are available on the tile.
Image: Report Time Actions for Punch Time Reporters
This example illustrates the actions options available for a punch time reporter while using Report Time tile.

The tile will display the next logical button according to the last action performed. Select actions icon to select any other options than logical punch. The Actions button is enabled with View Full Site. Employee can navigate to Report Time page for daily time reporting.
Use the Report Time page (TL_RPTD_ELP_FLU) to navigate to the different reporting time options when logged in as an elapsed time reporter.
Navigation
Select the Time tile on the Employee Self Service page or a homepage where the tile is added.
Select Report Time tile from the Tile Collections .
Image: (Desktop) Report Time Page for Elapsed time reporters
This example illustrates the fields and controls on the Employee Self Service - Report Time page for Elapsed time reporter.

Image: Report Time Page with ChartFields
This example illustrates the fields and controls on the Report Time Page with ChartFields.

Select ChartFields hyperlink to navigate to ChartField Details Page for selecting the required combination code.
Image: (Smartphone) Report Time Page for Elapsed time reporters
This example illustrates the fields and controls on the Employee Self Service - Report Time page for elapsed time reporter using a smartphone.

Image: (Mobile) Report Time Page with ChartFields
This example illustrates the fields and controls on the (Mobile) Report Time Page with ChartFields. You can find definitions for the fields and controls later on this page.

Note: Quick fill and the status bar display on the basis of the user configurations.
|
Field or Control |
Definition |
|---|---|
| Punch Type |
Enter the Punch type as In, Out, Meal, Break, or Transfer. as per the requirement. |
| Time Reporting Code |
Element of compensation or a bucket of several elements in which the system collects labor data, hours, amounts, or units worked. Select Regular or Holiday. |
| Time Details |
Collapsible group box that contains any fields configured to be shown on the phone other than Punch Type, or TRC. |
| Comments |
Select the chevron to open the Time Reporting Comments Page to enter the comments. Once saved, you can view the comments entered for a time on a mobile. |
| Submit |
Select to submit the reported time. |
Use the Report Time page (TL_WEB_CLOCK_FLU) to navigate to the different reporting time options for Punch time reporter.
Navigation
Select the Time tile on the Employee Self Service page or a homepage where the tile is added.
Select Report Time tile from Time Tile collections.
Image: Report Time Page for Punch Time Reporter
This example illustrates the fields and controls Report Time Page when the employee is logged in as a Punch Time reporter.

Image: Report Time Page for Punch Time Reporter with ChartField
This example illustrates the fields and controls on the Report Time Page for Punch Time Reporter with ChartField. You can find definitions for the fields and controls later on this page.

Select the ChartFields link to open the ChartField Detail page. You can select the ChartField Details or do an advanced search of Combination code and Speed Types in ChartField Detail modal.
Image: Report Time_ChartField Detail for Punch Time
This example illustrates the fields and controls on the Report Time_ChartField Detail for Punch Time.

|
Field or Control |
Definition |
|---|---|
| Punch Type |
Enter the Punch type as In, Out, Meal, Break, or Transfer. as per the requirement. |
| Time Reporting Code |
Element of compensation or a bucket of several elements in which the system collects labor data, hours, amounts, or units worked. Select Regular or Holiday. |
| Time Details |
Collapsible group box that contains any fields configured to be shown on the phone other than Punch Type, or TRC. |
| Submit |
Select to submit the reported time. |
Image: (Smartphone) Report Time page for Punch Time Reporter
This example illustrates the fields and controls of Report Time Page when the employee is logged in as a Punch Time reporter using smartphone.

The Time page displays options according to the employees permissions.
You can use the employee punch template to identify the punch pattern and insert the punch patterns as next items. The button bar displays two up-front actions listed and the others under Actions overflow.
When an employee is enrolled as a punch time reporter, the reported time is captured as a point in time rather than duration. In and out pairs are used to calculate the duration of time worked.
If the Time options are disabled on the Punch template, a read-only running digital clock with seconds tracked displays at the top of the page. It uses the format HH:MM:SS. suffix the clock with AM or PM. accordingly. Below the clock displays the last action taken by you.
When Time option is enabled, the time clock displays the days details.
|
Field or Control |
Definition |
|---|---|
 |
Select to display the next logical punch for the time reporter. |
 |
Select to enter the break details. for example, once Meal is selected, the next punch in the list In comes in the place of Meal. The logical punch Meal will not be displayed unless it re-occurs in the punch pattern later. |
 |
Display the overflow actions like regular related action. Select the vertical dots see the action overflow. On selectingActions, you can select any other action like In, Meal or Out. |
Note: Primary action or the first action in the list is highlighted in green. Other actions depicts in the grey background. Once the action is recorded, the next logical punch from the sequence replaces the action taken. The reporting page display is determined by the employees time reporter type of Punch or Elapsed Timesheet. When the employee taps to expand the group boxes in punch type, the fields that display are determined by the settings in the Time Reporting template and the Task Template.
These options are valid only for an employee who has been logged in as an Elapsed Time reporter.
When an employee is enrolled as an elapsed time reporter, the reported time is captured as a duration when the TRC Type is in Hours. The employee will enter a value in the Quantity field and the value entered will represent the number of hours worked.
To display the next logical punch shift, the system checks the employee's punch pattern. System would check if shift exists for the employee then the Punch Schedule is used. If the schedule is unavailable, the system uses the following sequence to derive the next logical punch.
Time reporting template from time reporter data.
Time reporting template from Taskgroup.
Punch pattern from Time and Labor Installation.
|
Field or Control |
Definition |
|---|---|
| Time Reporting Code |
The reported time is captured as a duration when the time reporting code type is in hours. |
| Quick Fill |
Select the pre-entered or saved time schedule |
| Quantity |
Enter a value which represents the number of hours worked. |
| Time Details |
Collapsible group box that contains any fields configured to show fields based on time reporting template and taskgroup. |
| Summary and Detail tabs |
For the submitted hours grid, the summary view shows TRC with Quantity, where as the details view shows all available fields. |
Note: The employee can select the TRC which represents the unit of measure other than hours.
Image: Report Time Page for Punch Time Reporter with comments
This example illustrates the fields and controls on the Report Time Page for Punch Time Reporter with comments. You can find definitions for the fields and controls later on this page.

|
Field or Control |
Definition |
|---|---|
| Comments |
Select the chevron to open Time Reporting Comments Page to enter and save the comments for future reference. |
Copying Time
For employees whose time reporting is not varying from week to week, the administrator can set up the My Preferences to copy time which is previously reported, schedules of the employee or predefined Task Values.
There are three options in user preferences for copying time, they are Prior Period, Schedule, and Task Values.
|
Field or Control |
Definition |
|---|---|
| Prior Period |
Employee can copy the time reported seven days prior to the current day and this time is added to the current day. |
| Schedule |
Employee can copy the time schedule for a particular day from the employee schedule and is added to the current time. |
| Task Values |
Employee can copy the task value set up in PIA User preferences at the user level and is added to the current time. |
Note: The Copy button appears on the Report Time page, when the options of Prior Period, Schedule, or Task Values are enabled in user preferences. Copy Time is available only in case of time reporting for today's date.
If the administrator allows user override, the user can specify their own preference on their user preference.
Reporting Time Page for Multiple Jobs
An employee can have more than one active job at a time. This is represented in the Job component as multiple employee record numbers. Each job in the job record for a single employee should be designed so that the Job Title for each employee record number is unique. Company Directory, Absence Management and Time and Labor components use the Job Title on the Job record to select each job when an employee has multiple jobs.
The multiple job drop-down list box is visible only when an employee has more than one active job. All active jobs will be displayed in the drop-down list box.
To avoid inadvertent time reporting against an incorrect job, the employee need to select a job before submitting the time.
Image: Report Time page for Multiple Jobs
This example illustrates the fields and controls on the Time reporting for an employee having multiple jobs.

The employee can select a different job by tapping on the Job drop-down list box again and selecting another job. After selecting a different job from the drop-down list box, the screen is updated with inform the newly selected job. As the employee navigates between jobs and dates, the Report Time screen may display elapsed time fields or punch time fields depending upon the configuration of the job.
Multiple jobs applies for the following transactions:
Report Time
Report Leave
Timesheet
Weekly Time Summary
Payable Time
Leave and Comp Balances
Select Time Summary Tile (HC_TL_TIME_SUM_FLU_GBL) to navigate toTime Summarypage.
Navigation
Select Time tile available under Employee Self Service Home page to access the Tile Collections. You can select Time Summary tile to open Time Summary page.
Image: Time Summary tile
This example illustrates the Time Summary tile.

The time entry for more than one entries display as link at the bottom of the tile as an extended link.
For Mobile Phone, the Enter Time Page is not available. You can use Report Time tile and Report Time Page for reporting time.
This Time Summary (TL_TIME_SUM_FLU) page is used to view the time summary for a particular period, weekly, bi-weekly and monthly time entries by an employee.
Image: Time Summary: Weekly Page for Elapsed Time Reporter
This example illustrates the fields and controls of Time Summary: Weekly page for an Elapsed Time Reporter.

|
Field or Control |
Definition |
|---|---|
| View By |
Select from the options Biweekly, Monthly, Weekly or for a particular Period. |
| Days |
Each box will display up-to 3 TRC's with accumulated time. Icons will appear for the day to display exception, saved time and approval statuses. Each box will also display the status bar if a schedule is configured and will display the schedule and reported total for that day. Note: Current date is highlighted in blue. |
 |
Select to go to more actions, you can edit time using this option. |
Image: Time Summary Reported Time Tab
This example illustrates the fields and controls on the Time Summary Reported Time Tab. You can find definitions for the fields and controls later on this page.

The Time Summary page reported time tab displays the reported time in different units other than hours for an employee in header, day box and footer.
Note: The Reported Time tab hides the TRC types Units and Dollars for a day when the particular TRC types are not present for the day .
The page header hides the Units and Dollars if all the time reported for the chosen period is only of Hours.
Image: Time Summary Payable Time Tab
This example illustrates the Time Summary Payable Time Tab

Image: Time Summary: Bi-Weekly Page for Elapsed Time Reporter
This example illustrates the fields and controls of the Time Summary: Bi-Weekly page for an Elapsed Time Reporter.

Image: Time Summary: Monthly Page for Elapsed Time Reporter
This example illustrates the fields and controls of Time Summary: Monthly page for an Elapsed Time Reporter.

User can also use the Filters option to narrow down the results.
Image: Time Summary Page with Filter
This example illustrates the Time Summary page with filter applied.

When filters are applied, the icon turns green and filter results are highlighted as blue boxes in the Footer area. Clicking on any day will automatically clear the filters. AClear filters link display at the top of the screen to clear the filter. The time details for the selected day when individual day is selected is also displayed in the Footer area.
|
Field or Control |
Definition |
|---|---|
| Edit Time |
Users can use the Edit Time button for the selected date to view or edit time for that day. Note: Edit Time button is not displayed, when the filter is applied. |
Note: The default View By is decided by the user preferences in time reporting.
Image: Time Summary: Weekly Page for Punch Time Reporter
This example illustrates the fields and controls of Time Summary: Weekly Page for Elapsed Time Reporter.

Image: (Smartphone) Time Summary Tile Navigation to Weekly Time page
This following example illustrates the Time Summary Navigation to Weekly Time page for a mobile device.

Select View Exceptions Tile (HC_TL_EMPL_EXCEP_FL_GBL) to navigate toView Exception page.
Navigation
Select Time Tile to access the View Exceptions tile.
Image: View Exceptions tile
This example illustrates the View Exceptions tile.

The Exceptions tile display the exception count as a number.
For Mobile Phone, the Enter Time Page is not available. You can use Report Time tile and Report Time Page for reporting time.
The View Exceptions (TL_EMPL_EXCEP_FL) page is used to view the exceptions of time entries for an employee.
Image: View Exceptions page
This example illustrates the fields and controls of View Exceptions page.

|
Field or Control |
Definition |
|---|---|
 |
Sort the entries. |
 |
Select to view the Enter Time page and highlight the day in context. |
Image: (Desktop) View Exceptions - Enter Time Page
Select the Exception icon to view the options: Time Summary, View Exceptions and Payable Time Summary. This facility is available only for desktop users.

Navigation
The related action will only be available for a reported exception.
Image: View Exceptions Page
This example illustrates the View Exceptions details for time reported for the day.

Select Setup Quick-Fill Tile (HC_TL_QUICK_FILL_FLU_GBL) to navigate toSetup Quick-Fillpage.
Navigation
Select Time tile available under Employee Self Service Home page to access the Tile Collections. You can select Setup Quick-Fill tile to open Setup Quick-Fill page.
Image: Setup Quick-Fill tile
This example illustrates the Setup Quick-Fill tile.

For Mobile Phone, the Enter Time Page is not available. You can use Report Time tile and Report Time Page for reporting time.
Use Setup Quick-Fill (TL_QUICK_FILL_FLU) page to create a quick fill and view the existing saved quick fills. Using this page, you can select and update the quick fill and change the status to active or inactive as required.
Using Quick-Fill, you can populate the Time Details fields that are configured on a timesheet. This allows users to save combinations of values in the Time Details.
Image: (Desktop) Setup Quick-Fill Page
This example illustrates the files and controls for Setup Quick-Fill page.

|
Field or Control |
Definition |
|---|---|
 |
Select to add a new Quick-Fill. In the modal which opens, you can enter the time detail components that are part of that quick fill. |
| Name |
Select quick fill name to view the quick fill parameters. |
| Details |
View the time details encapsulated in the quick fill. Note: You cannot edit the name of the Quick-Fill. |
| Status |
Select to make the quick fill active or inactive. |
Note: Quick-Fills are ordered by creation date descending by default. However the user can use the sort option to choose the columns to sort. You cannot delete the Quick-Fill once added.
Image: Setup Quick-Fill page with ChartFields Selected
This example illustrates the fields and controls on the Setup Quick-Fill page with ChartFields Selected.

Image: (Smartphone) Setup Quick-Fill page _Summary Tab
This example illustrates the files and controls for Setup Quick-Fill page using a mobile device.

Note: Inactive Quick-Fill cannot be seen in the Enter Time page unless some time is reported for the particular Quick-Fill.
|
Field or Control |
Definition |
|---|---|
 |
View the summary of saved quick-fills which contains Name and status. |
 |
Displays the Quick-Fill name and details. |
 |
Select to add a new quick-fill. |
Image: (Desktop) Create Quick-Fill modal window
This example illustrates the files and controls for Quick-Fill modal window.

Use Template Type, Taskgroup, Project ID, Activity ID, Location, Business Unit, Customer, Product, Locality, Currency Code, Combo Codes, Comp Rate Code, User Fields, Rule Element, Time zone, Country, State, Locality, Billable Indicator, Task Template for filling the quick fill details.
Use Save to save the quick fill and Cancel to go back to the Setup Quick-Fill page.
Image: Setup Quick-Fill Details page
This example illustrates the fields and controls on the Setup Quick-Fill Details page.

Select already reported time to view and update the time details of the time reported.
Image: Report Time Details page
This example illustrates the fields and controls of Report Time Details page.

Image: Report Time Details with ChartFields
This example illustrates the fields and controls on the Report Time Details with ChartFields.
|
Field or Control |
Definition |
|---|---|
 |
Cancel to go back to Report Time Page. |
 |
Select to submit the updates for Reported Time details. |
Select Weekly Time (HC_TL_PRE_POP_ELP_FL_GBL) tile to navigate toWeekly Time Entrypage.
Navigation
Select Time tile available under Employee Self Service Home page to access the Tile Collections. You can select Weekly Time tile to open Weekly Time page.
Image: Weekly Time tile
This example illustrates the Weekly Time tile.

For Mobile Phone, the Enter Time Page is not available. You can use Report Time tile and Report Time Page for reporting time.
The Weekly Time tile displays the begin date and end date considering the user preferences. The status bar in the next line based on the users color preference configuration. The status bar displays the schedule to the reported ratio for the period displayed.
Select the Weekly Time tile on Actionable tile collections page.
Image: Weekly Time Entry page
This example illustrates the fields and controls of Weekly Time page for Employee Self Service.

Image: Weekly Time Entry Page with ChartFields
This example illustrates the fields and controls on the Weekly Time Entry Page with ChartFields. You can find definitions for the fields and controls later on this page.

Image: (Smartphone) Weekly Time Page
This example illustrates the fields and controls of Weekly Time page for Employee Self Service using a smartphone.

The user can do three types of time entries using the options:
Apply Schedule
Copy From Previous Week
Manual Entry
|
Field or Control |
Definition |
|---|---|
 and and  |
Icons that control the date ranges. Use the icons to navigate to a different week. |
 |
Go to the reported time for a day by tapping the icon corresponding to that day. |
| Select Days |
Select more than one day icons to report time for more than one days. |
Note: Whenever there is time reported already for the given week, the page shows only manual entry.
Employee can use Weekly Time Review Page (TL_WEEKLY_COPY_FL) to review and submit the reported weekly time.
An employer can review the weekly time reported for a week for a job by navigating to weekly time Review page. The employee can also tap on the reported time row to navigate to the Report Time page and update existing time for that day.
Image: (Smartphone) Review Weekly Time Page
This example illustrates the fields and controls of the Review Weekly Time Page using smartphone.

|
Field or Control |
Definition |
|---|---|
|
Enter to submit time after reviewing the time entries for a week. |
Select Weekly Time Summary Tile (HC_TL_WEEKLY_TIME_FLU_GBL) to navigate toWeekly Time Summarypage.
Navigation
Select Weekly Time Summary Tile to access the Weekly Time Summary page.
Image: Weekly Time Summary tile
This example illustrates the Weekly Time Summary tile.

For Mobile Phone, the Enter Time Page is not available. You can use Report Time tile and Report Time Page for reporting time.
Employee can use Weekly Time (TL_WEEK_TIME_FLU) page to view the time reported for the entire week, and then navigate to the report time page for a particular day by selecting that days time.
Image: Weekly Time Summary Page
This example illustrates the fields and controls of Weekly Time Summary page for employees.

Select Report Leave (HC_TL_RPT_TIME_FLU_GBL_2) tile to navigate toReport Leavepage.
Navigation
Select Report Leave Tile to access the Report Leave page.
Image: Report Leave tile
This example illustrates the Report Leave tile.

On selecting the Report Leave tile, opens the Report Time Page for Elapsed Time Reporter, using which you can request a leave.
Select Payable Time (HC_TL_TIME_SUM_FLU_GBL) tile to navigate toPayable Timepage.
Navigation
Select Payable Time Tile to access the Payable Time page.
Image: Payable Time tile
This example illustrates the Payable Time tile.

The Payable Time tile details Include Pay Period, Total Hours and Estimated Gross. The Pay Period refers to the last pay period that was paid for the employee. The Estimated Gross is controlled on the basis of configuration.
For Mobile Phone, the Enter Time Page is not available. You can use Report Time tile and Report Time Page for reporting time.
Employee can use Payable Time page (TL_PAYBTIME_FLU) to report his vacation, sick and other leave types as well as compensatory time as punch reporter.
Image: Payable Time Page
This example illustrates the fields and controls of Payable Time page for employees.

|
Field or Control |
Definition |
|---|---|
| Payable Time Summary |
Summarizes the payable time with TRC Types of Units, Hours and Amount. |
Note: The Payable Time Page is for the case when the relevant Workgroup setting for Payable Time Range field is set to Date Range. The page layout will change according to Pay Period or Time Period settings.
Select Leave / Comp Time Tile (HC_TL_TIME_SUM_FLU_GBL) to navigate to Leave Balancespage.
Navigation
Select Leave Balances Tile to access the Leave Balances page.
The following provides an overview of the Leave / Comp Time Tile:
Image: Leave / Comp Time Tile
This example illustrates the Leave / Comp Time tile.

Select the Leave / Comp Time tile to view the Leave / Comp Time details page.
Image: Leave / Comp Time details page
This example illustrates the fields and controls on the Leave / Comp Time details page.

Leave and Comp Time balances are arranged in the card format with details upfront.
Image: Leave Balances History page
This example illustrates the fields and controls on the Leave Balances History page.

|
Field or Control |
Definition |
|---|---|
| Return to Leave Balances |
Select to return back to Leave Balances page. |