Business pipelines are defined in OFS Cloud services to design and execute the sequence of tasks which are either OFS Cloud services tasks or external tasks, to derive a well-defined outcome. This flow is defined by using various OFS Cloud services artifacts from the component toolbar and the execution can be defined to be in serial or parallel. Using the Process Modeller, we can Orchestrate a Business pipeline.
Business Pipeline is used to design a Business Process that consists of a sequence of tasks either internal or external tasks through well-defined interfaces. Using the designer, you can design the entire business flows consisting of various types of tasks or another business pipeline.
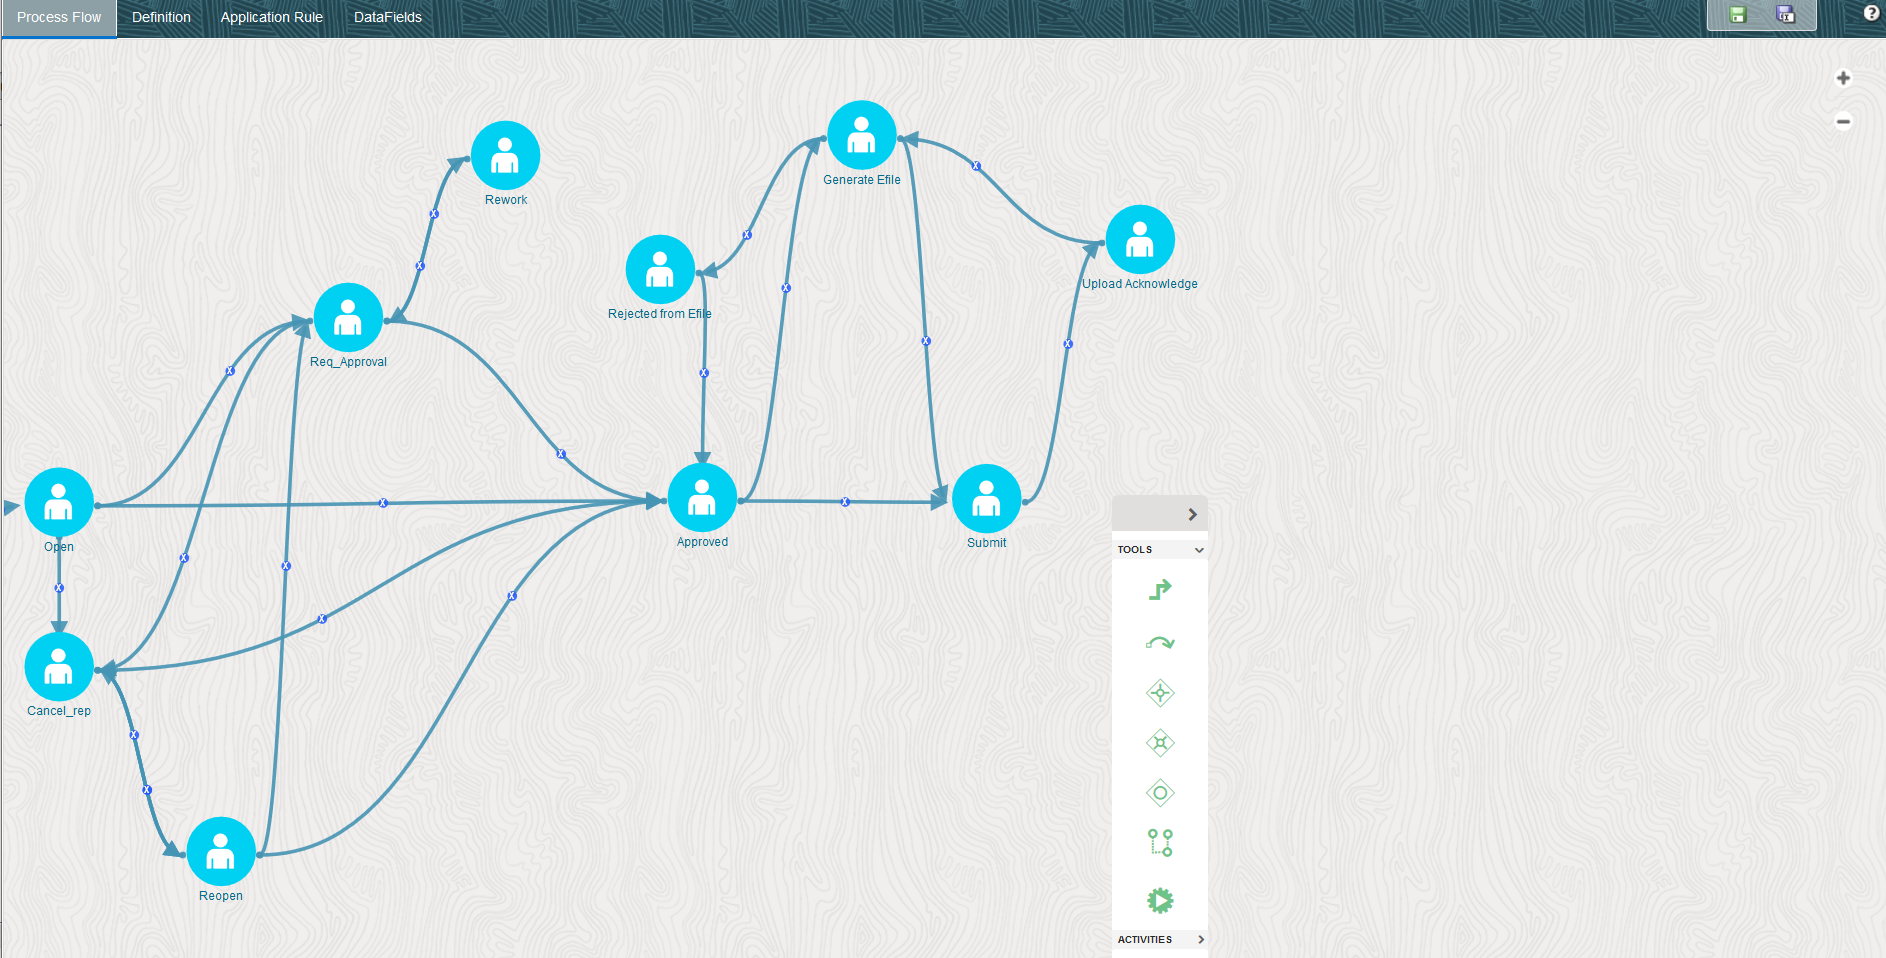
Description for example of a business pipeline follows
In the example shown, we use various activities such as Human Tasks and Service tasks, which are related to each other through transitions. For executing tasks in parallel, we used Parallel Gateways.
To create a Business Pipeline:
1. Click  in
the Process Modeller window.
in
the Process Modeller window.
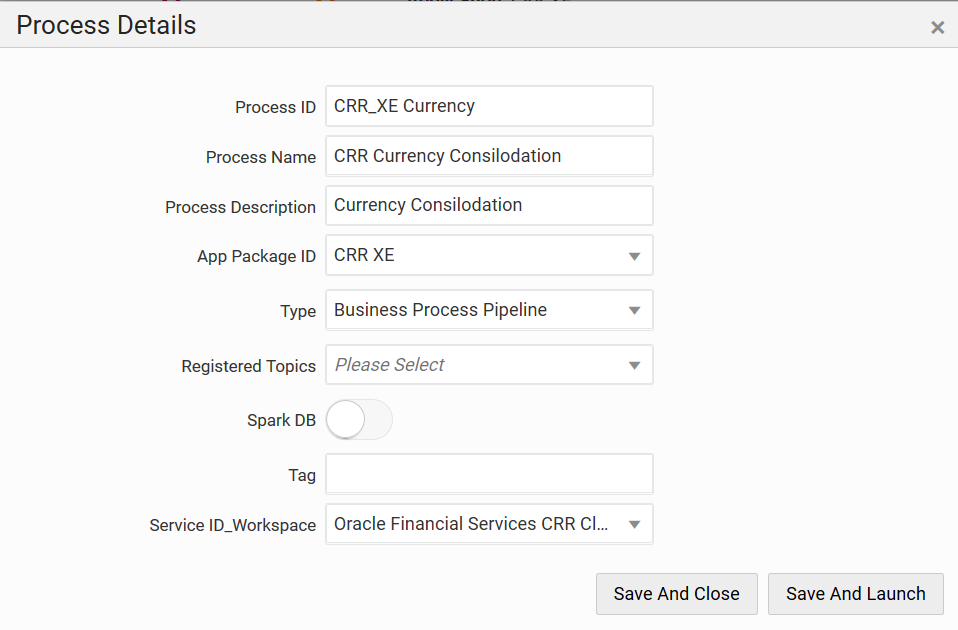
Description of the Process Details context window follows
2. Enter a unique Process ID, Process Name, and a description.
3. Select the appropriate App package in which you want to create the process. For more information, see the Application Package section.
4. Select Business Process Pipeline from the Type drop-down list.
5. Select the information domain in which you want to create the Business Pipeline, from the Service ID_Workspace drop-down list. The list displays all the workspaces mapped to the services configured in your OFS Cloud services instance.
6. Click Save & Launch. The Process Flow canvas is displayed.
7. Click  Start
from the Tools pane in the floating toolbar
and click on the drawing canvas where you want to place it. This Start
activity indicates the beginning of the Process.
Start
from the Tools pane in the floating toolbar
and click on the drawing canvas where you want to place it. This Start
activity indicates the beginning of the Process.
8. Design your Process with various components available in the Process Flow tab. For more information on each component, see the Process Modeller topic.
This section describes the additional functionalities that can be performed in the Process Modeller window.
Topics:
This option allows you to modify a Pipeline.
1. From the Process Modeller window, search for the Pipeline (Business) and click the Pipeline name. The Process Flow tab is displayed.
2. Modify the Process Flow, Definition, Application Rules, and Data Fields, as required.
This option allows you to check whether the Process flow you designed works as expected.
To test a Process flow:
1. From the Process Modeller window, click  to view the sub-menu
and select Test Process Flow. The Execute Workflow
window is displayed.
to view the sub-menu
and select Test Process Flow. The Execute Workflow
window is displayed.
2. Enter an Object ID to identify the Process flow. This will be displayed as Entity ID in the Process Monitor window.
3. Enter the Application Parameters that are required in the Process flow you are testing. Specify parameters in JSON format. This is an optional field.
For example, {"WF_RUNSK":"15","WF_MISDATE":"12/31/1999"}
4. Click OK.
This option allows you to view the workflow of an already existing Business Process.
From the Process Modeller
window, click to
view the sub-menu and select View. You can view
the Process Flow of the Pipeline.
This option facilitates you to quickly create a new Business Process based on an existing Process by updating the Process flow or other required details.
To copy a Business Process:
1. From the Process Modeller window, click to
view the sub-menu and select Copy. The Process Details window is displayed.
2. Enter a unique Process ID, Process Name, and Process Description. If you select the same App Package ID, then Data Fields and Application Rules also will be copied.
3. Select the newly created Process and click the Process Name. Modify the Process flow and other details if required.
This option allows you to delete a Business Pipeline.
To delete a Pipeline:
1. From the Process Modeller window, click  corresponding to
the Pipeline you want to delete.
corresponding to
the Pipeline you want to delete.
2. A confirmation message is displayed.
3. Click OK to confirm the deletion.
4. Click Delete Anyway to delete the Pipeline or click Cancel to cancel the delete operation.
NOTE |
Processes cannot be deleted for the records that are preconfigured in the service. Similarly, processes which have instances under them cannot be deleted. |