A Task can be either a Human Task or a Service Task.
A Human Task is used if an activity requires a human intervention to go to the next activity.
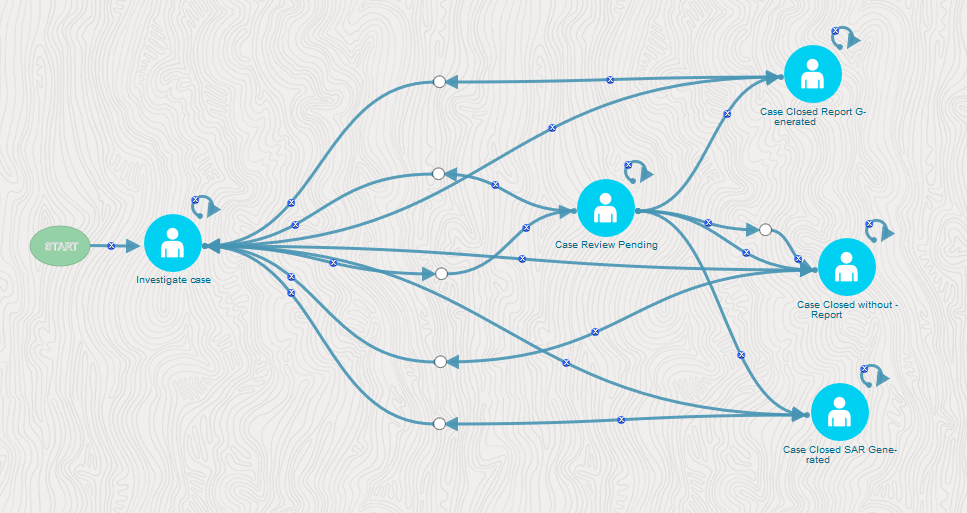
Description of Human Tasks follows
1. From the Process Flow tab, click Human
Task  from the Activities pane in the floating
toolbar and click on the drawing canvas where you want to place it.
from the Activities pane in the floating
toolbar and click on the drawing canvas where you want to place it.
2. Double-click
 icon.
The Activity drawer window is displayed.
icon.
The Activity drawer window is displayed.
Activity Tab
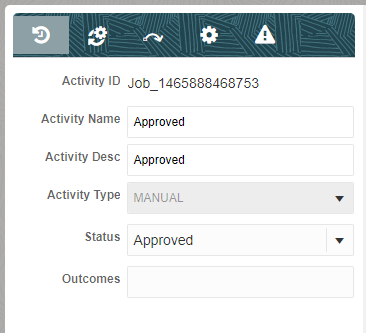
Description of the Activity tab follows
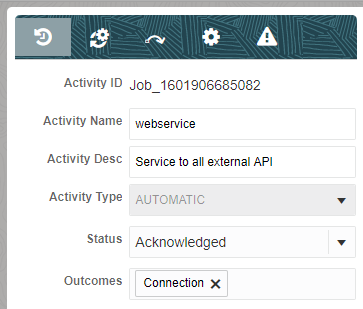
3. Activity ID is auto-populated.
4. Enter the Activity Name and Description.
5. Select the Status of the activity from the drop-down list.
An Action or Task is used to inform the assigned user about an action to be completed in the current stage of the Workflow. You can add multiple tasks for an activity. A task can be assigned to a user, user group, users with a particular role, or users selected by an application rule. The task is sent to the Application Inbox of the assigned users.
1. Click  to define Actions.
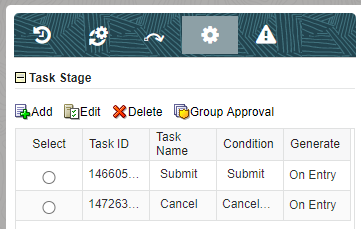
Description of the Action tab follows
2. Click Add  from the Action tab to add a new Task.
Setting Email Notification
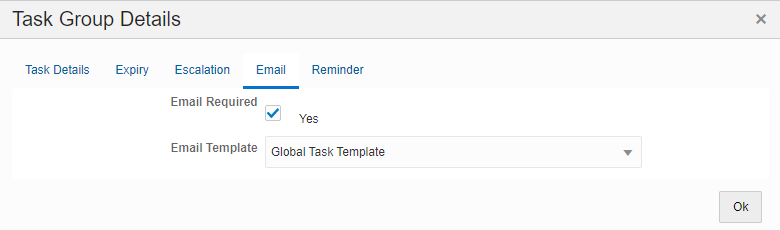
Description of Email Notifications follows
You should have configured Email settings before setting email notification for your tasks.
1. Select the Yes checkbox if an email needs to be sent for the task.
2. Select the email template to be used from the drop-down list.
Setting Task Expiry
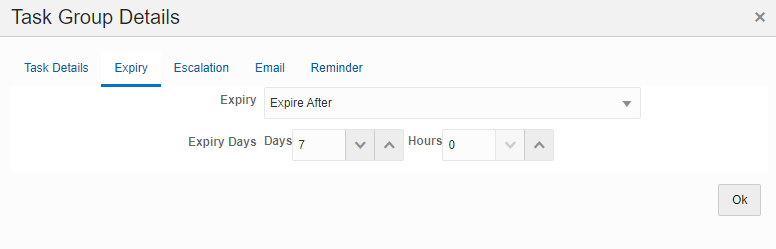
Description of Task Expiry follows
1. Select the required option from the Expiry drop-down list:
§ Global Expiry Setting- To set the task expiry based on a global setting. The global setting can be set from the backend.
§ Never Expire- If the task should not expire.
§ Expire After- If you want to set the task expiry after some days and (or) hours.
§ Dynamic Value – If you want the user assigned to this task to set the task expiry date and time dynamically. This value needs to be entered in the code.
2. If Expiry is selected as Expire After, enter the number of days and (or) hours after which the task should expire.
Setting Task Escalation
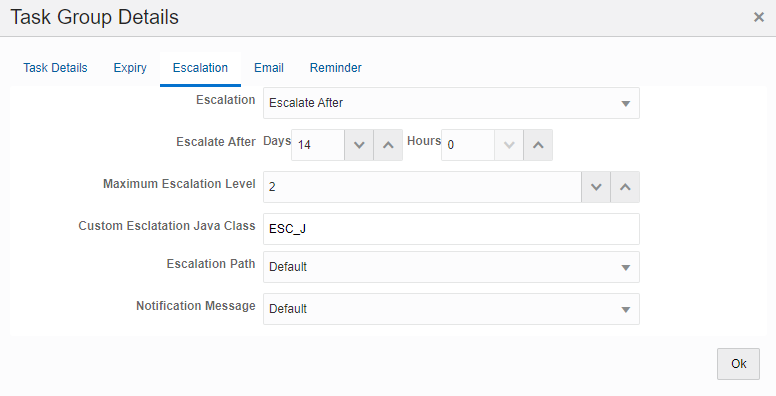
Description of Task Escalations follows
3. Select the Escalation criteria:
§ Global Escalation Setting- To set the task escalation based on a global setting. The global setting can be set from the backend.
§ Never Escalate - If an escalation is not required for the task.
§ Escalate After- If you want to escalate when the task is not addressed after pre-configured days and (or) hours.
NOTE |
Escalation should be set after the expiry of the task. If you have selected the Never Expire option for Expiry, you cannot set escalation. |
4. If Escalate After is selected for Escalation, enter the number of days and (or) hours after which the escalation should be triggered.
5. Enter the maximum number of escalation levels.
a. 1 indicates escalation to the immediate manager.
b. 2 indicates escalation to the manager’s manager and so on.
6. Enter the Custom Escalation Java Class which you want to call.
7. Select the Escalation Path from the drop-down list. The options are Default, People Hierarchy, and Custom Rule.
8. Select the type of notification message from the drop-down list.
Setting Reminder for Your Task
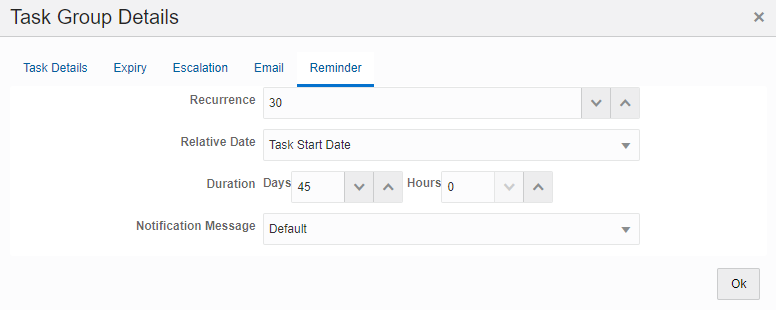
Description of Task Reminders follows
Reminders will be sent to the assigned user as an open task to their Inbox.
9. Enter the number of times you want to set the reminder from the Recurrence field.
10. Select Task Start Date if you want to send a reminder after a defined number of days and (or) hours, from the start date of the task. Select Task Expiration Date if you want to send a reminder before a defined number of days and (or) hours from the end date or expiry date of the task.
11. Select the number of days and (or) hours from the Relative Date after or before which you want to set the reminder.
12. Select the Notification Message you want to send, from the drop-down list.
13. Click OK.
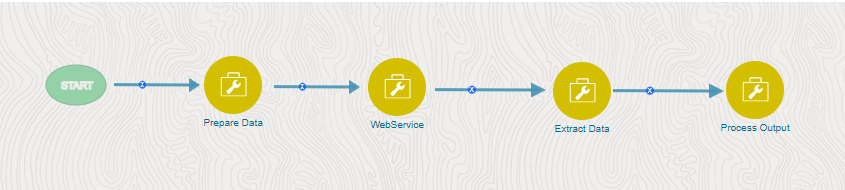
A Service Task is an automatic task that gets triggered in the Process flow. It is used to execute the Business Logic which is defined through an Application Rule of Execution Rule type. For more information on configuring the Application Rules, see the Application Rule section.
Service Tasks are typically used to call External Model Service through REST APIs, External Java APIs, Stored Procedures, and Functions.
Description of Service Tasks follows
1. From the Process Flow tab, click Service
Task  from
the Activities pane in the floating toolbar
and click on the drawing canvas where you want to place it.
from
the Activities pane in the floating toolbar
and click on the drawing canvas where you want to place it.
2. Double-click
the  icon.
The Activity drawer window is displayed.
icon.
The Activity drawer window is displayed.
Description of Activity tab follows
3. Activity ID is auto-populated.
4. Enter the Activity Name and Activity Description.
5. Click  . The Implementation
tab is displayed.
. The Implementation
tab is displayed.
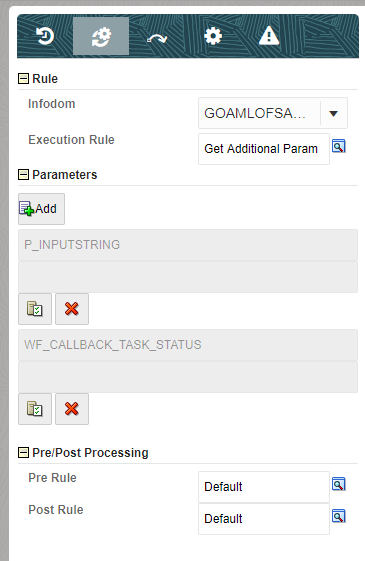
Description of the Implementation tab follows
6. Select the information domain where the Execution Rule you want to execute is available, from the Infodom drop-down list. The list displays all the Infodoms mapped to the services configured in your OFS Cloud services instance.
7. Select the Execution Rule which needs to be executed for this activity. For more information on how to define an Application Rule, see the Application Rules section.
§ Click  .
The Participant Details window is displayed
with all Application Rules of Execution Rule types available in your Process.
.
The Participant Details window is displayed
with all Application Rules of Execution Rule types available in your Process.
§ Click the Name link of the Application Rule to view the details.
§ Select the required Rule and click Ok.
8. Add the Parameters you want to pass to the Execution Rule using Data Fields. You can pass Static values or Dynamic Values. In the case of Dynamic, the value needs to be entered during the execution of the workflow.
§ Click Add  under Parameters.
The Binding Details window is displayed.
under Parameters.
The Binding Details window is displayed.
§ Select the Data Field to which you want to pass the value. The list displays all Data Fields for the current Process or Package.
§ Select Static from the Parameter Type list to pass a static value to the selected Data Field in the Value field or Dynamic to pass the value during execution of the workflow.
NOTE |
The added parameters are displayed under the
Parameters pane. You can click |
9. Select an application rule which you want to execute before executing the Execution Rule.
§ Click corresponding
to Pre Rule and select the required application
rule.
10. Select an application rule which you want to execute after executing the Execution Rule.
§ Click corresponding
to Post Rule and select the required application
rule.
 corresponding
to a parameter to edit it or click
corresponding
to a parameter to edit it or click  to
delete it.
to
delete it.