10Customizing Oracle CRM On Demand Desktop
Customizing Oracle CRM On Demand Desktop
This chapter describes how to customize an implementation of Oracle CRM On Demand Desktop. It includes the following topics:
Process of Customizing Objects in Oracle CRM On Demand Desktop
Process of Enabling Custom Object Synchronization in Oracle CRM On Demand Desktop
Process of Adding a Predefined Oracle CRM On Demand Picklist to Oracle CRM On Demand Desktop
Customizing Oracle CRM On Demand Desktop
This topic describes the options for modifying the customization package. It includes the following information:
For more information, see Metadata That Describes the Oracle CRM On Demand Desktop Application.
Overview of Customizing Oracle CRM On Demand Desktop
You can customize Oracle CRM On Demand Desktop to achieve the following:
Extend the set of data that is available to the user.
Add custom business logic to support the work that the user performs.
Oracle CRM On Demand Desktop can synchronize this information with Oracle CRM On Demand data in Microsoft Outlook. You can also make the data available to support offline usage when the user possesses limited or no connection to the Internet. You can create an interface where Oracle CRM On Demand Desktop stores the information the user requires to complete a business process. This technique allows the user to work in a single application rather than having to navigate between multiple applications, which simplifies the work process.
You Can Customize How Oracle CRM On Demand Desktop Processes Objects
To add custom logic for object processing in Microsoft Outlook, you can use Oracle CRM On Demand Desktop functionality, such as deduplication or data validation. You can also use JavaScript to create your own custom logic. Because you can use JavaScript to create, delete, modify, and convert objects, you can migrate your Oracle CRM On Demand Desktop data to Microsoft Outlook, including logic that supports a business process.
You can use a standard Oracle CRM On Demand Desktop form to display Oracle CRM On Demand objects, or you can create a completely new and custom form. A custom form can contain a native Microsoft Outlook control, such as a text box, or new controls that you develop for Oracle CRM On Demand Desktop, such as a lookup or a multiselect list. You can implement these forms through a custom toolbar, which can contain custom actions that you use JavaScript to implement. Some of the basic functionality that allows the user to use Oracle CRM On Demand Desktop functionality is predefined. The user can use Microsoft Outlook view controls on custom forms to display relationships between Oracle CRM On Demand objects. These views are configurable and support the functionality of native Microsoft Outlook views. You can also set the default views that Oracle CRM On Demand Desktop uses to display Microsoft Outlook objects.
Files in the Customization Package
To customize certain Oracle CRM On Demand Desktop features, you can modify XML files and JavaScript files in the customization package. Oracle CRM On Demand Desktop includes the following basic customization capabilities:
Adjusting the business logic to suit the business environment
Customizing the user interface
Specifying security and data validation rules
For more information, see Changes That Oracle CRM On Demand Desktop Makes During an Installation.
About the Customization Package
The customization package consists of two types of files:
Common platform JavaScript files that should not be changed during customization
Product-specific files that include Javascript files and XML files.
You must tune product-specific files during customization to change the Oracle CRM On Demand Desktop behavior according to desired business logic in Oracle CRM On Demand.
Common platform files are added or replaced as required during an upgrade to the current version of Oracle CRM On Demand Desktop. For more details, see the table in the following topic and the table in the topic XML Files in the Customization Package.
JavaScript Files in the Customization Package
The following table describes the JavaScript files that Oracle CRM On Demand Desktop includes in the customization package.
Table JavaScript Files in the Customization Package
| JavaScript File Name | Description |
|---|---|
Common Platform Files
Note: Do not change common platform files during customization.
|
|
actions_support.js |
Defines the common toolbar action support functions that are called from the actions.js file. |
activity_processor.js |
New for Version 2.0. Defines the common business logic for all the complex activity-related processing for calendar events, tasks, and email. |
autoresolve_helpers.js |
New for Version 2.0. Defines common helpers that are called from the autoresolver.js file. |
data_model.js |
Defines the common logic that handles the complex relations between objects and joined fields. This data model is initialized in the business_logic.js file. |
form_helpers.js |
Defines common JavaScript helpers for handling user interface events. |
helpers.js |
Defines the common utility functions to reuse in different files. |
idle.js |
Defines the Idle Processing Manager and common idle handlers. |
md5.js |
Defines how to implement message digest algorithm (MDA).
Note: The md5.js file pertains to one of the many message digest algorithms available.
|
mvg_dialogs.js |
Defines controls for multi-value groups (MVG). |
raw_item_functions.js |
Defines general functions that access Microsoft Outlook items. |
od_helpers |
Defines common utility functions to reuse in different files that are specific to Oracle CRM On Demand. |
security_manager.js |
Defines the common security model and manager used in the security_utils.js file. |
Product-Specific Files |
|
actions.js |
Defines the handlers for toolbar actions. This file includes functions for sharing email replies or forwards, and the Save Correspondence manager handler. |
application_script.js |
Defines the main entry point script file for the product and initializes the basic script context. This file includes the Scriptable First Run Assistant and supports extended activity processing (partially extracted to the activity_processor.js common file). It also includes two additional handlers for always sharing email replies or forwards and the Save Correspondence manager handler. Scriptable objects open from the Microsoft Windows Control Panel on the Sync Issues and Collision pages. |
autoresolver.js |
Defines functions with predefined rules to resolve conflicts when possible, based on business requirements. The major common code duplications reused in the file have been extracted to the new autoresolve_helpers.js common file to minimize and clarify the coding. This file implements a scriptable associations auto-resolver. |
business_logic.js |
Defines the business logic for product behavior and defines the basic data model for object relations. This file includes a flexible activity processing model with field length restrictions support. Options for email attachments processing have moved to the Options page. Search criteria have been updated for like type searches. This file supports opening association objects from the Microsoft Windows Control Panel. The file contains settings for the custom scripted SalesBook form. |
forms.js |
Defines the user interface actions for all the custom forms and dialogs. This file includes online lookups for SalesBook forms and supports record pin mode on the form. In addition, it supports custom view controls for external data storage and supports default visibility for subforms. This file validates addresses migrated from Microsoft Outlook contacts to Oracle CRM On Demand after installation. |
security_utils.js |
Defines the security definitions for types of objects and their relations. This file supports record pin mode. It restricts the deletion of contacts from Oracle CRM On Demand (either by adding the record to an exclusion list so that it is not included on the client even though it is present on the server, or by cancelling the deletion). This file contains additional restrictions for Opportunity.Product (where Product is a child record of the Opportunity record). |
XML Files in the Customization Package
The following table describes the XML files that Oracle CRM On Demand Desktop includes in the customization package. For more information, see Creating and Publishing the Customization Package.
Customizing How Oracle CRM On Demand Desktop Maps Fields
The od_basic_mapping.xml file describes objects you can add to Microsoft Outlook. These objects can be stored in either Microsoft Outlook storage (in .PST or .OST files) or in Oracle CRM On Demand Desktop’s DB FACADE storage. It is a common practice to add objects displayed on the left side list of Outlook Explorer to Outlook storage, and to add other objects including associations and picklists to DB FACADE storage. Objects placed in Outlook storage are typically required to be displayed using Microsoft Outlook forms. Objects in DB FACADE storage are usually represented using dialogs.
The od_basic_mapping.xml file also defines the mapping between an Oracle CRM On Demand field and a Microsoft Outlook field. Using this file, you can extend the set of fields that Microsoft Outlook objects reference. Each description for an object defined in Microsoft Outlook storage includes the following information:
The form that Oracle CRM On Demand Desktop uses to display the object. The form must be described in the forms_xx.xml file. The forms_xx file is dependent on the od_basic_mapping file. However, the form ID for each object is defined in od_basic_mapping.xml.
The icons that Oracle CRM On Demand Desktop uses to display the object. Oracle CRM On Demand Desktop uses these icons in Microsoft Outlook views.
The folder name for the object in the Microsoft Outlook navigation pane.
A set of custom Microsoft Outlook views that Oracle CRM On Demand Desktop applies to the Microsoft Outlook view.
Each description for an object defined in DB FACADE storage includes the object name and the icons that Oracle CRM On Demand Desktop uses to display the object. For more information, see XML Code to Customize the Data That Oracle CRM On Demand Desktop Deletes If You Remove Oracle CRM On Demand Desktop.
Specifying Which Data Oracle CRM On Demand Desktop Removes from Microsoft Outlook
The platform_configuration.xml file allows you to specify which custom data Oracle CRM On Demand Desktop removes from Microsoft Outlook. If the user uninstalls Oracle CRM On Demand Desktop or changes credentials, then Oracle CRM On Demand Desktop removes all the custom data from Microsoft Outlook that the od_basic_mapping.xml file describes. You can configure Oracle CRM On Demand Desktop to not delete data for a certain object type. Note that Oracle CRM On Demand Desktop does not remove Microsoft Outlook data, which is data that the user creates in the native Microsoft Outlook application. For more information, see XML Code to Customize the Data That Oracle CRM On Demand Desktop Deletes If You Remove Oracle CRM On Demand Desktop.
To specify which data Oracle CRM On Demand Desktop removes
To configure Oracle CRM On Demand Desktop not to delete data for a specific object type, define a rule named script for the appropriate type element in the platform_configuration.xml file.
For example:
type id="Action" rule="skip"/>
In this example, Oracle CRM On Demand Desktop does not delete any data that is associated with the Action object type.
To configure Oracle CRM On Demand Desktop to conditionally not delete data for a specific object type, define an attribute named language for the rule you defined in Step 1.
The language attribute defines the script language in the CDATA section. Oracle CRM On Demand Desktop supports only JScript, for example:
<type id="Action" rule="script" language="JScript">
    <![CDATA[ … JavaScript code … ]]>
</type>
To configure Oracle CRM On Demand Desktop not to delete data for multiple object types, add a separate rule for each object type, for example:
<type id="Action" rule="skip"/>
<type id="Opportunity" rule="skip"/>
Customizing Synchronization
The connector_configuration.xml file defines the objects that Oracle CRM On Demand Desktop synchronizes. It includes the synchronization settings that affect deduplication and preset filters. The connector_configuration.xml file provides the following capabilities:
Deduplication. To determine whether an item already exists in the Oracle CRM On Demand database when Oracle CRM On Demand Desktop uploads the item from Microsoft Outlook to the Oracle CRM On Demand database, Oracle CRM On Demand Desktop uses special criteria that the connector_configuration.xml file describes. For more information, see How Oracle CRM On Demand Desktop Avoids Duplicate Data.
Preset filters. Defines the preset filters for a custom synchronization. These preset filters help the user to synchronize only the data that the user requires, avoiding downloading data that the user does not require. You can configure any filter preset as the default. For more information on preset filters, see Factors That Determine What Data an Oracle CRM On Demand Desktop User Can Access.
For more information, see XML Code to Customize Synchronization.
Customizing a Form
The forms_12.xml file contains a definition for customized forms in Oracle CRM On Demand Desktop. These files allow you to customize forms, remove fields, change field names, and set custom list views.
The Microsoft Outlook version on which Oracle CRM On Demand Desktop runs determines which form Oracle CRM On Demand Desktop uses:
Forms for Microsoft Outlook 2007 and above are described in forms_12.xml.
Each form is described in a form element. Oracle CRM On Demand Desktop includes the following basic customization capabilities for these files:
Changing field labels.
Removing fields from the form that are not applicable to the work environment.
Identifying fields on forms.
Designating field type. Oracle CRM On Demand Desktop supports the following:
Native Microsoft Outlook field types, such as text box or check box
Custom Oracle CRM On Demand Desktop controls, such as currency control, lookup, and multiselect list
Positioning a field on the form.
Modifying custom Oracle CRM On Demand Desktop controls.
Creating entirely new forms that use the look-and-feel of Microsoft Outlook. To enter data in these forms, Oracle CRM On Demand Desktop uses fields that the user defines.
Programmatically applying custom behavior and logic to a form or field.
Setting Microsoft Outlook view controls on a custom form to display relationships between Oracle CRM On Demand objects.
Modifying interface elements, such as text in a system message, a dialog box, a label, or a caption.
For more information, see XML Code to Customize Forms, and Correct Usage of the Forms_xx.XML File and Object ID.
Validation Rules That Oracle CRM On Demand Desktop Uses When Customizing a Form
The forms.js file contains a description of the validation rules that Oracle CRM On Demand Desktop uses for the object that it displays on any form. You can configure Oracle CRM On Demand Desktop to do the following:
Determine whether it enters information in the required fields
Examine the format of any other field values, and so on
Inform the user if a field validation failure occurs
Because validation uses JavaScript functions, you can combine these functions with JavaScript RegEx (JavaScript Regular Expressions) to configure a wide variety of format examination. For more information on defining validation rules, see Defining the Validation Rules.
Business Logic That Oracle CRM On Demand Desktop Uses with Customizing a Form
The forms.js files contain some of the business logic. You must implement them in JavaScript. JavaScript capabilities in Oracle CRM On Demand Desktop allow you to access any field of an object or any property of a Microsoft Outlook form. You can use this access to execute code on a specific event, such as opening a form, saving a form, and so on. You can configure Oracle CRM On Demand Desktop to fill fields automatically, format field values automatically, and disable or enable a control, depending on certain criteria.
Customizing a Toolbar
The toolbars12.xml and toolbars14.xml files describe the custom toolbars that Oracle CRM On Demand Desktop displays on a native Microsoft Outlook or custom form, or in a Microsoft Outlook window with programmable actions on the toolbar. Because some of the basic functionality is predefined, it is possible to use Oracle CRM On Demand Desktop without modification to meet your basic requirements. For more information, see XML Code to Customize Toolbars.
Customizing a Dialog Box
The dialogs.xml file defines the layout for a custom dialog box that Oracle CRM On Demand Desktop uses, such as the dialog box that it uses with an MVG, an address, or for email processing. Because the dialogs.xml file is an extension of the forms_12.xml file, it contains the same structure as the dialogs root element instead of the forms element in the forms_12.xml file. For more information, see XML Code to Customize Toolbars.
To customize the behavior of the MVG dialog box, you can modify the XML file that Oracle CRM On Demand Desktop includes in the customization package. You can customize the following MVG behaviors:
Objects that Oracle CRM On Demand Desktop uses to create an association in the MVG dialog box.
Fields that Oracle CRM On Demand Desktop specifies for the association.
Format of the fields that Oracle CRM On Demand Desktop specifies for the association.
Format in which Oracle CRM On Demand Desktop displays the Primary record. The default format is position (name), for example, District Manager 1 (Wasaka Takuda). You can specify the fields to display and the order in which Oracle CRM On Demand Desktop displays them.
Fields that represent the associations you create. Oracle CRM On Demand Desktop displays these fields in the Microsoft Outlook view. Oracle CRM On Demand Desktop can display only the attributes of the record. If Oracle CRM On Demand Desktop stores the User name in the position record, then it can display only the user name for the position.
The user permissions. The customization package uses security validation rules to describe the user permissions that function in the MVG. For example, if the user is not the primary user, then the user cannot delete users from the collection because Oracle CRM On Demand Desktop turns off the delete button for any user who is not a primary user.
How a lookup control behaves. When you search for a record, a lookup control searches through the File As field for all associated objects.
Hide the details of the parent record, such as the Opportunity Name.
Add or remove association attributes for the associated record.
Use an OK button instead of the Save and Close icon.
Customizing a View
The views.xml file describes the view configurations that Oracle CRM On Demand Desktop uses on Oracle CRM On Demand Desktop forms and in Microsoft Outlook views. Each Microsoft Outlook view uses an xml file that is native to Microsoft Outlook. Oracle CRM On Demand Desktop reuses this XML description for custom views. For more information on customizing a view in Oracle CRM On Demand Desktop, see XML Code to Customize Views Used for Microsoft Outlook Explorer List.
Customizing the SalesBook Control
The lookup_view_defs.xml file sets configuration options for the SalesBook control in Microsoft Outlook. This control defines references between objects. Oracle CRM On Demand Desktop uses it primarily in lookup controls. You can use the lookup_view_defs.xml file to specify which objects Oracle CRM On Demand Desktop makes available through each SalesBook control. You can also set filters for the objects you must display in the SalesBook control. For more information, see XML Code to Customize the Sales Book Control.
Customizing Meta Information
The od_meta_info.xml file contains the following meta information:
A description of the object types that Oracle CRM On Demand Desktop supports.
Fields that are defined and the type for each field.
XML element names that Oracle CRM On Demand Desktop uses to build or parse an Oracle CRM On Demand message. Oracle CRM On Demand Desktop uses information about the relations between objects from the file for the Oracle CRM On Demand message.
The definition of each object that Oracle CRM On Demand Desktop supports contains a unique name, an XML element, and an XML collection element that Oracle CRM On Demand Desktop uses in an Oracle CRM On Demand message.
Every object field includes a name, an Oracle CRM On Demand data type, and an XML element. Oracle CRM On Demand Desktop uses this information in an Oracle CRM On Demand message to display values and filters for that field. For more information, see XML Code for Meta Information.
Customizing Localization
To customize localization, you can customize the resource files.
To customize localization
Add a new resource for the custom label and attribute name or warning message in the following files:
Use the package_res.xml file for the default resources.
Use the package_res.xx_YY.xml file for the specific locale.
where:
xx_YY is the language you use in your implementation.
For example, use package_res.pt_BR.xml for Portuguese Brazilian.
The following standards determine the locale naming convention:
xx is the ISO 639-1 standard for the language.
YY is the ISO 3166-1 standard for the country. This standard supports dialects and language adoptions for specific countries.
Add the XML files to the customization package.
Republish the customization package.
For more information, see Publishing or Unpublishing Customization Packages.
Customizing a Language for the Forms Files
To customize the behavior of the forms_xx.xml file that is predefined with Oracle CRM On Demand Desktop, you can use a forms file that is specific to a language. For example, forms_12.ja_JP.xml for JPN (Japanese).
To customize a language for the forms files
In Windows Explorer, navigate to the directory that contains the forms_xx.xml file.
For more information, see Files in the Customization Package.
Right-click the forms_xx.xml file, and then choose the Copy menu item.
Rename this copy to indicate that it is a specific to a language, for example:
forms_12.ja_JP.xml
Use an XML editor to open the file you renamed in Step 3, and then make any changes that are required to support the language.
You can use this file to change the layout of the form, such as adding new fields. For example, in Japanese, you might define three different fields for the Account Name:
One field represents the native name of the company for the account.
One field represents the Kanji symbol for the company.
One field represents the phonetic name of the company.
If you make these changes, then make sure you also perform the other configuration tasks that the changes require, such as defining field mappings and changing the form layout.
(Optional) To change text strings, repeat Step 2 and Step 3 but create a copy of the package_res.xml file, rename it, and then edit the text strings, for example:
package_res.ja_JP.xml
Customizing the URL Protocol to Use HTTPS
You can customize the URL protocol to use HTTPS (Hypertext Transfer Protocol Secure).
To customize the URL protocol to use HTTPS
Open a DOS command line interface, and then type
regedit.exe.Set the Connector:Protocol registry parameter to https.
For more information, see Modifying the Windows Registry to Change Oracle CRM On Demand Desktop Behavior.
Customizing the Email Address of the Support Team
The package_res.xml file defines various resources for the customization package. In this file, you can specify the email address of the support team to which the user sends feedback.
To customize the email address of the support team
Modify the following code of the package_res.xml file:
<!-- Feedback page -->
  <str key="support_email">email_address</str>
where:
email_address is the email address to which Oracle CRM On Demand Desktop sends requests for support
For example:
<str key="support_email">support@your_company.com</str>
If you specify the email address in the support_email variable, and if the user clicks Send Feedback on the Feedback tab in the Options dialog box, then Oracle CRM On Demand Desktop opens a new email message. Oracle CRM On Demand Desktop automatically enters the value that you specify in the support_email variable. It enters this information in the address To line of this email message.
If the user clicks the Send Feedback button on the Feedback tab in the Options dialog box, and if the email address is not specified, then Oracle CRM On Demand Desktop opens the email without an email address in the To line. A support email address is not specified in the predefined Oracle CRM On Demand Desktop product.
Performing Typical Customization Work
This topic describes other customization work that you might find useful. It includes the following information:
Customizing the Product Name
The Oracle CRM On Demand Desktop clients display the following text in several locations:
Oracle CRM On Demand
Oracle CRM On Demand Desktop
Microsoft Outlook
You can change this text to a custom value.
To customize the product name
Use an XML editor to open the package_res.xml file.
For more information, see Files in the Customization Package.
Create or modify any of the following attributes, as required:
<str key="app_name">Oracle CRM On Demand Desktop</str><str key="pim_name">Microsoft Outlook</str><str key="remote_app_name">Oracle CRM On Demand</str>
For example, in the remote_app_name attribute, change Oracle CRM On Demand to the name of your company.
Save your changes, republish, and then test your changes.
For more information, see Publishing or Unpublishing Customization Packages.
Localizing Values
You can modify a single file to do the following work:
Support different languages.
Change a label value that is included in multiple locations in the user interface.
To localize values
Use an XML editor to open the package_res.xml file.
For more information, see Files in the Customization Package.
To define a localizable string, add the following code to the package_res.xml file:
<str key="string_id">localizable_string</str>
where:
string_id is the Id of the localizable string
localizable_string is the localizable string
Use the localizable string Id in every location where Oracle CRM On Demand Desktop must display the string.
You must use different formats to define the string in different types of files. Use values from the following table.
File Type Description Any XML file except for the views.xml file.
Use the following format:
#string_id
For example:
<cell size="22">
  <static id="account_label" tab_order="6">
    <text>#lbl_account</text>
  </static>
</cell>
The views.xml file.
Use the following format:
$string_id$
For example:
<str key="all_accounts">
<![CDATA[
<?xml version="1.0"?> <view
   type="table"> <viewname>$view_siebel_accounts$</viewname>
   ................................. </view>
]]>
</str
Any JavaScript file.
Use the following format:
session.res_string("string_id")
For example:
ui.message_box(0, session.res_string("msg_general_error"),
session.res_string("msg_general_error_caption"), 0x40);
Example of Displaying a Custom Oracle CRM On Demand Field in an Oracle CRM On Demand Desktop Form
This topic gives one example of how to display a custom Oracle CRM On Demand field in an Oracle CRM On Demand Desktop form. You might use this feature differently, depending on your business model. In this example, you display the Mail Stop field on the Contact form in Oracle CRM On Demand Desktop. You make this field available through Oracle CRM On Demand and then customize Oracle CRM On Demand Desktop to synchronize and display the field. You modify the following files:
od_meta_info.xml
od_basic_mapping.xml
forms_12.xml
package_res.xml
For more information, see Files in the Customization Package.
To display a custom Oracle CRM On Demand field in an Oracle CRM On Demand Desktop form
Define the objects and fields to synchronize:
Use an XML editor to open the od_meta_info.xml file.
For more information, see Files in the Customization Package.
In the od_meta_info.xml file, locate the following element:
object TypeId='Contact'
Several child field tags reside in the object TypeId='Contact' element. These children define the fields for the Contact object.
Add the following field element as a child to the object TypeId='Contact' element:
<field Name='Mail Stop' Label='Mail Stop' DataType='DTYPE_TEXT'
IOElemName='MailStop' />
Repeat Step b and Step c for the following element:
object TypeId='Account.Contact'
Repeat Step b and Step c for the following element:
object TypeId='Opportunity.Contact'
Save and close the od_meta_info.xml file.
Map the Mail Stop field from the Contact object in the Oracle CRM On Demand database to a field in Oracle CRM On Demand Desktop:
Use an XML editor to open the od_basic_mapping.xml file.
For more information, see Files in the Customization Package.
In the od_basic_mapping.xml file, add a new field element to the type element, using values from the following table.
Element Value type id
Contact
Add the following code to the element you created in Step b.
<field id="Mail Stop">
   <reader class="mapi_user">
      <user_field id="od Mail Stop" ol_field_type="1"></user_field>
      <convertor class="string"></convertor>
   </reader>
   <writer class="Microsoft Outlook_user">
      <user_field id="od Mail Stop" ol_field_type="1"></user_field>
      <convertor class="string"></convertor>
   </writer>
</field>
Save and close the od_basic_mapping.xml file.
Insert a label and the Mail Stop field just below the Job Title field on the Contact form:
Open the forms_12.xml file, and then locate the cell that contains the #lbl_job_title label control.
Insert the following XML code immediately after the cell that contains the #lbl_job_title label control:
<cell size="22">
   <static id="lbl_MailStop" tab_order="6">
      <text>#lbl_mail_stop</text>
   </static>
</cell>
The text #lbl_mail_stop specifies a key that the package_res.xml file uses to determine the localized value for the label.
Locate the section that is labeled with the left side fields comment.
This section resides in the element that resides in the form that contains the OD Contact ID.
To add the text field control, insert the following XML code immediately above the cell that contains the ContactToAccount MVG control, and just below the cell that contains the status_image control:
<cell size="22">
   <edit id="MailStop" tab_order="7">
      <field value="string">Mail Stop</field>
   </edit>
</cell>
Locate the cell size element, and then change its value to the following:
<cell size="185">
To make room for the new field, you must increase the size of the cell that houses all of the child objects. In this example, you change the cell size from 155 to 185.
Add the following code to the package_res.xml file:
<str key="lbl_mail_stop">Mail stop:</str>
Add this code as a child of the res_root element under the
<!-Contact Formcomment.This code provides localized values and images to the Oracle CRM On Demand Desktop client. This code allows the Contact form to render the Mail Stop label through a key value. The package_res.xml file provides localized values and images to Oracle CRM On Demand Desktop. Because you added the new Mail Stop field to the Contact form, you must provide the text for the label. When you modified the forms_12.xml file, you created a label control that contains #lbl_mail_stop for the text value. This control identifies the key to use in the package_res.xml file.
Republish the updated package files.
During the next synchronization, Oracle CRM On Demand Desktop uses the updated files to apply the modifications to the Contact form. The Mail Stop field is available on the Contact form and Oracle CRM On Demand Desktop synchronizes the values in this field with the Oracle CRM On Demand Desktop server. For more information, see Publishing or Unpublishing Customization Packages.
Making a Field in Oracle CRM On Demand Desktop Read-Only
This topic describes how to add a field in Oracle CRM On Demand Desktop and how to make the field read-only so it cannot be modified by users.
To make a field in Oracle CRM On Demand Desktop read-only
Use a JavaScript editor to open the forms.js file.
Locate the field that you want to make read-only.
Append the control.enabled attribute to the field, and set it to False, for example:
ctx.form.control_id.enabled = false;
Save and close the forms.js file.
Adding a Default Value to a Field in Oracle CRM On Demand Desktop
This topic describes how to configure Oracle CRM On Demand Desktop to add a default value to a field when the user creates a new record.
To add a default value to a field in Oracle CRM On Demand Desktop
Use a JavaScript editor to open the business_logic.js file.
Locate the following function:
create_ondemand_meta_scheme2
Add the following string to the create_siebel_meta_scheme2 function:
scheme.objects.get_object("Service_Request").get_field("Status")["initial_value
"] = "Open"
where:
Service_Request is the TypeId of the object. If you want to identify the TypeId, then you can locate the corresponding type description in the od_basic_mapping.xml file. The id attribute of the type element is the TypeID.
Status is the name of the field in which Oracle CRM On Demand Desktop adds a default value. If you want to identify the name of the field, then you can locate the corresponding type description and field element inside the type element in the od_basic_mapping.xml file. The id attribute of the corresponding field element is the name of the field.
Save the business_logic.js file, and then test your work.
Process of Customizing Objects in Oracle CRM On Demand Desktop
This topic gives one example of customizing objects in Oracle CRM On Demand Desktop. You might use this feature differently, depending on your business model.
This topic is a step in Roadmap for Installing Oracle CRM On Demand Desktop.
To customize objects in Oracle CRM On Demand Desktop, do the following:
For more information on:
Overview of XML files that you modify in this example, see Customizing Oracle CRM On Demand Desktop.
Details about tags in XML files that you modify in this example, see XML Files Reference.
Lengthy XML code that you use in this example, see Additional Code in the Customization Example.
Defining the Custom Object
When you add a new object to Microsoft Outlook, you describe the structure of the object, create mapping between fields, lists, and so on. You make these customizations in the od_basic_mapping.xml file.
When adding a custom object from Oracle CRM On Demand Desktop, enter the custom object names in the XML file using the following structure:
For Custom Objects 1 -3, enter
Custom ObjectXfor the custom object name.Spaces are allowed for Custom Objects 1 -3 names.
For Custom Objects 4-x, enter
CustomObjectXfor the custom object name.Spaces are allowed for Custom Objects 4-x (picklist object) names in some instances. For more information, see Guidelines for Defining a List Object.
This task is a step in Process of Customizing Objects in Oracle CRM On Demand Desktop.
To define the custom object
Use an XML editor to open the od_basic_mapping.xml file.
For more information, see Files in the Customization Package.
To define the name of the custom object, add the following sample code to the od_basic_mapping.xml file and modify the values as required:
<type id="Activity" display_name="#obj_activity_plural" folder_type="10">
    <form message_class="IPM.Contact.OnDemand.Activity"
icon="type_image:Event:16" large_icon="type_image:Event:32"
display_name="Activity">OnDemand Activity</form>
</type>
If the object is stored in DB FACADE storage, then add the following XML code:
<type id="Currency" icon="type_image:Currency:16"></type>
For more information, see Example Code for the Activity Form.
Define a set of fields for the custom object. The fields that you define for this example are described in the following table.
Field Label Field Name Field Type Description
Description
Text
Type
Type
Picklist
Priority
Priority
Picklist
Owner
Primary Owner Id
Lookup
Account
Account Id
Lookup
Opportunity
Opportunity Id
Lookup
Contacts
No field on this object
MVG
Employee
No field on this object
MVG
Planned Start
Planned
datetime
Planned Completion
Planned Completion
datetime
Due
Due
datetime
Status
Status
Picklist
Comments
Comment
Textarea
For more information, see Fields That Oracle CRM On Demand Desktop Uses for the Custom Object. To examine the code you must add for this step, see XML Code That Defines a Set of Custom Fields.
Define intersection objects for many-to-many relationships.
You do not define many-to-many relationships in Step 3. Because there is a many-to-many relationship between contacts and activities and between users and activities, you must define more objects that contain links to activity and contact, or activity and user. The remaining description for a many-to-many relationship is the same as for other objects where you specify the object name and object fields. This object can also contain a field that indicates if this intersection record is a primary or not a primary.
To examine the code you must add for this step, see XML Code That Defines a Set of Custom Fields.
Define the lists.
For more information, see Guidelines for Defining a List Object. To examine the code that you must add for this step, see XML Code That Defines a List.
Example Code for the Activity Form
The example code defines Activity as the form to display for this object. The form layout is defined later when you define the user interface. In this example, you add an Activity object to Microsoft Outlook. In Oracle CRM On Demand, this object is named Action. To add this object to Microsoft Outlook, you modify the od_basic_mapping.xml file. You add the type element to describe the new object. You can also use the display_name attribute of the type element to define the folder name for the object in Microsoft Outlook. You can use the folder_type attribute to define the native Microsoft Outlook object that is the base for the custom object folder type.
Fields That Oracle CRM On Demand Desktop Uses for the Custom Object
The od_basic_mapping.xml file describes each of the fields for the custom object. Oracle CRM On Demand Desktop maps each field to a custom field, except for the Description and Comments fields:
Oracle CRM On Demand Desktop maps the Description field to the Last Name field, which is a native field in Microsoft Outlook.
Oracle CRM On Demand Desktop maps the Comment field to the Body field because Oracle CRM On Demand Desktop does not support the textarea field. Therefore, Oracle CRM On Demand Desktop uses the native Microsoft Outlook control that displays the Body field value.
Guidelines for Defining a List Object
Because the custom object stores items that the user chooses in a list, you describe the list field in the same way as a string field. Therefore, you must describe the object that stores all list values. Each list uses a separate object to store the values of the list. You must build the IDs for these objects in the following order:
Object name, where the list is used, for example, Activity.
Name of the field containing the list name, for example, Type field on Activity object.
Name of the list, for example, Picklist.
Ensure the Type list on the Activity object includes the ID of the ActivityTypePicklist object.
Defining a List Object
Complete the following procedure to define a list object.
To define a list object
You must define the following set of standard fields:
Label
Value (string)
SortOrder (integer)
IsDefault (bool)
Defining Synchronization for a Custom Object
This task is a step in Process of Customizing Objects in Oracle CRM On Demand Desktop.
This topic describes how you can define a custom object so that Oracle CRM On Demand Desktop can synchronize it with an Oracle CRM On Demand object.
To define synchronization for a custom object
Use an XML editor to open the connector_configuration.xml file.
For more information, see Files in the Customization Package.
Define the Links section.
The Links section contains a set of fields that reference other objects. You must define these references to allow the synchronization engine to synchronize objects in the correct order and to download the related items. Add the following XML code to define the links:
  <type id="Action">
    <view label="Activity" label_plural="Activities"
small_icon="type_image:Event:16" normal_icon="type_image:Event:24"
large_icon="type_image:Event:48"></view>
    <synchronizer name_format=":[:(Description):]">
       <links>
         <link>Account Id</link>
         <link>Opportunity Id</link>
         <link>Primary Owner Id</link>
       </links>
    </synchronizer>
  </type>
Define the deduplication keys.
Because the business environment for this example requires that activities are the same if their descriptions are the same, one natural key is defined. That key is Description. Add the following XML code to the synchronizer element:
  <natural_keys>
    <natural_key>
      <field>Description</field>
    </natural_key>
</natural_keys>
Add the following descriptions to the connector_configuration.xml file for the intersection records that you defined for contacts and user in Step 4 in the topic Defining the Custom Object:
  <type id="Action.Employee.Association">
    <view label="Activity Employee" label_plural="Activity Employees"
small_icon="type_image:Generic:16" normal_icon="type_image:Generic:24"
large_icon="type_image:Generic:48" suppress_sync_ui="true"></view>
    <synchronizer name_format=":[:(UserName) :]">
       <links>
         <link>EmployeeId</link>
         <link>ActionId</link>
         </links>
    </synchronizer>
  </type>
  <type id="Action.Contact.Association">
    <view label="Activity Contact" label_plural="Activity Contacts "
small_icon="type_image:Generic:16" normal_icon="type_image:Generic:24"
large_icon="type_image:Generic:48" suppress_sync_ui="true"></view>
    <synchronizer name_format=":[:(ContactName) :]">
       <links>
         <link>ActionId</link>
         <link>ContactId</link>
       </links>
    </synchronizer>
  </type>
Adding Custom Views in Microsoft Outlook
This task is a step in Process of Customizing Objects in Oracle CRM On Demand Desktop.
After you define a folder in Microsoft Outlook that displays the custom object, you define the Microsoft Outlook views that apply to this folder.
To add custom views in Microsoft Outlook
Use an XML editor to open the od_basic_mapping.xml file.
For more information, see Files in the Customization Package.
Add the following custom_views section to the Activity type element in the od_basic_mapping.xml file:
  <type id="Activity" display_name="#obj_activity_plural" folder_type="10">
    <form (…) >OnDemand Activity</form>
       <custom_views default_name="#view_od_activities">
         <view id="all_activities" name="#view_od_activities"></view>
         <view id="all_activities_by_owner"
name="#view_od_activities_by_primary_owner"></view>
         <view id="all_activities_by_priority"
name="#view_od_activities_by_priority"></view>
       </custom_views>
...
Make sure the views.xml file describes the views that you define in Step 2.
For more information on views, see Customizing a View.
Defining the User Interface
This task is a step in Process of Customizing Objects in Oracle CRM On Demand Desktop.
In this topic, you define the user interface for the custom object. To provide the user with a way to work with the custom object, you must define the form that Oracle CRM On Demand Desktop uses to display the custom object. The custom object is configured to use the custom OnDemand Activity form in the od_basic_mapping.xml file that you modified in Defining the Custom Object. Therefore, you must create the OnDemand Activity form.
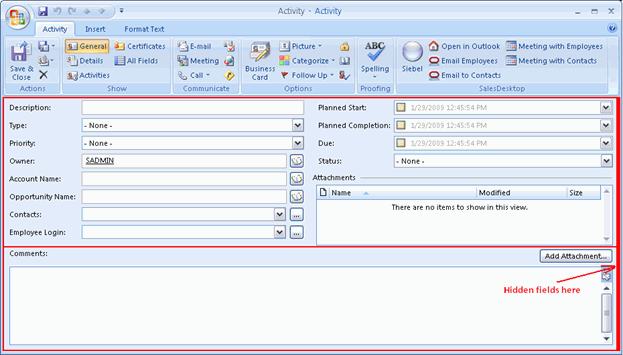
The following figure illustrates the layout of the Activity Form.
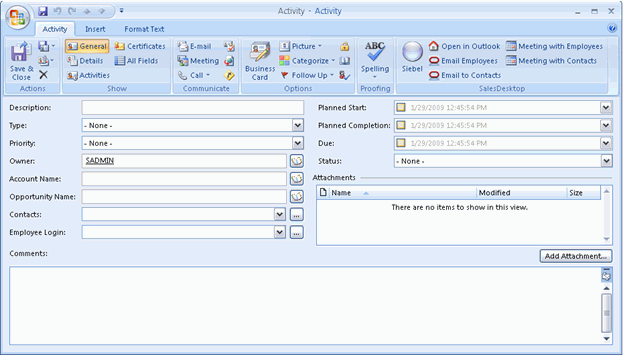
A set of cells describes the form layout. A cell can be empty, or it can contain a control or a stack. A single stack can contain numerous cells. Therefore, the form is divided into the following two parts:
One part includes visible controls.
One part includes hidden controls.
This example uses this technique because the example uses native Microsoft Outlook forms as a base for custom forms. Although you can modify the position of a native Microsoft Outlook control, you cannot remove it entirely from the form. Therefore, you move the unused controls that are native to Microsoft Outlook to a location where the user cannot view them, which is typically a small cell.
This form is a prototype that helps to visualize the cells, stacks of cells, and the order in which you use the cells and stacks. This visualization helps to reduce the wide range of combinations of cells and stacks that you can describe. The visualization is restricted to only those cells and stacks that you can support effectively. You can add new fields, remove fields, reorder fields, and apply any other changes during development and testing.
To define the user interface
Use an XML editor to open the forms_12.xml file.
For more information, see Files in the Customization Package.
To divide the form into a visible section and a hidden section, add the following XML code to the forms_12.xml file:
  <form id="OnDemand Activity">
    <page id="General" tag="0x10A6" min_height="335" min_width="520">
       <cell>
         <stack layout="horz" padding="10">
         <!-- visible section -->
            <cell>
            <!-visible fields here -->
            </cell>
         <!-- hidden section -->
            <cell size="1">
            <!-hidden fields here -->
            </cell>
         </stack>
       </cell>
    </page>
  </form>
Divide the visible section into two vertical sections that include a top section and a bottom section, as illustrated in the following figure:
Although not required, this step helps to support the current layout of the form. Add the following code:
  <form id="OnDemand Activity">
  (……………)
    <!-- visible section -->
       <cell>
         <stack layout="vert" padding="5" spacing="5">
            <!-top section-->
            <cell size="220">
              <!-top section fields here-->
            </cell>
            <!-bottom section-->
            <cell>
              <!-bottom section fields here-->
            </cell>
         </stack>
       </cell>
  (……………)
  </form>
Divide the top section into two parts: one that displays a left column of fields and the other a right column of fields, see the following figure:
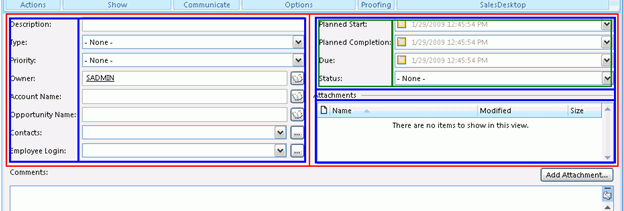
Add the following code:
<-- top section -->
<cell size=220>
  <stack layout="horz" spacing="5">
    <cell>
      <stack layout="horz" spacing="3">
      <!-- left side captions -->
         <cell size="105">
         </cell>
      <!-- left side fields -->
         <cell>               </cell>
      </stack>
    </cell>
    <cell>
      <stack layout="vert" spacing="5">
         <cell size="105">
            <stack layout="horz" spacing="3">
            <!-- left side captions -->
              <cell size="110">
              </cell>
            <!-- left side fields -->
              <cell>
              </cell>
            </stack>
         </cell>
         <cell size="13">
            <!-attachments caption and separator here -->
         </cell>
         <cell>
            <!-attachments view here -->
         </cell>
      </stack>
    </cell>
  </stack>
</cell>
Divide the left column into cells where you can place captions for fields, see the following figure:

For more information, see XML Code That Creates Cells.
Divide the right column into cells where you can place fields.
Because the code that you use to complete this step is similar to the code you use in Step 5, you can copy and modify the code that is described in XML Code That Creates Cells.
Define the Comments section of the Activity form, as illustrated in the following figure:

The Comments section is divided into the following parts:
Comments caption and the Add Attachment button
Comments field
The Add attachment button is described separately. For more information on buttons, see Adding a Label, Button, and Selector Control.
Add the following code:
  <!-- visible section -->
    <cell>
      <stack layout="vert" padding="5" spacing="5">
      <!-top section-->
        <cell size="220">
        <!-top section fields here-->
        </cell>
        <!-bottom section-->
        <cell size="22">
          <stack layout="horz">
            <cell>
              <control id="0x20022" class="static" tab_order="30">
                <text>Comments:</text>
              </control>
            </cell>
            <cell size="110" attraction="far">
            <control class="button" id="0x20059" tab_order="29"
             on_click="LinkAttachment()">
            <text>Add attachment…t</text>
              </control>
            </cell>
            <cell size="5" attraction="far"></cell>
            </stack>
          </cell>
          <cell>
            <control id="0x103f" tab_order="31"></control>
          </cell>
        </stack>
      </cell>
Make sure the description you create supports the version of Microsoft Outlook that your users currently use.
For more information, see Correct Usage of the Forms_xx.XML File and Object ID.
Correct Usage of the Forms_xx.XML File and Object ID
Outlook 2007 and above use different IDs for native Microsoft Outlook controls. Because Oracle CRM On Demand Desktop supports these versions of Microsoft Outlook, you must create a different description of the form for each version that your implementation uses, where each form uses the same description of the layout, but the native Microsoft Outlook control IDs are different.
Because the code in this topic supports Microsoft Outlook 2007 and above, you must add it to forms_12.xml.
Defining the Validation Rules
This task is a step in Process of Customizing Objects in Oracle CRM On Demand Desktop.
Oracle CRM On Demand Desktop allows you to define which Oracle CRM On Demand fields are required to make sure the user completes the form correctly. When you define a field or set of fields as required, they are automatically highlighted in red.
For more information, see Correct Usage of the Forms_xx.XML File and Object ID.
The following procedure describes how to define a validation rule so that both the Full Name and Account fields are required to save a Contact Record. If the user attempts to save a record without first entering or selecting values for these fields, then an error message is displayed.
In this procedure, you use the following files:
forms.js. This file requires JavaScript.
package_res.xml. This file requires an XML addition to specify the localized message that is displayed when a validation rule is violated.
To define validation rules
Open the forms.js file.
Locate the XML code that defines the fields and scripts used for the Contact form, for example, locate:
‘id="On Demand Contact"’
Define a validation object by adding the following code to the form script:
var validation = ctx.validator;
This object is used to define all the validation rules on a form.
Add the rule to this validation object by calling the validate_empty_field function on your validation object. This function accepts five arguments:
validation.validate_empty_field(field, control, message_id, highlight_control,
group);
where:
field. This is the Oracle CRM On Demand field name you are going to specify as Required.
control. This is the ID of the control on a form that represents this field.
message_id. This is the ID of a string resource in package_res.xml. The string with the specified ID is shown as an error message when the validation fails.
highlight_control. If this is set to True, then the control will be highlighted if validation fails. The default value of this is True.
group. The name of the validation group. It is not required.
Repeat Step 4 for each required field.
Open the package_res.xml file.
Identify where you want to add the new XML.
Tip: Messages and labels are grouped together by comments. Validation rule messages are grouped under the<!-- Script and validation Messages -->comment.Add a new <str> element to the XML code, for example:
<str key="msg_first_name_validation">First Name is required.</str>
The key value must match the message_id argument passed to the validate_unique_fields function.
Oracle CRM On Demand Desktop allows you to validate the format of Oracle CRM On Demand fields, for example, email address, and phone number, and so on. This feature prevents users from entering incorrect data into Oracle CRM On Demand records. If a user enters data in an incorrect format, then Oracle CRM On Demand Desktop displays an error message, and Oracle CRM On Demand Desktop does not save the data.
In this example, the Business Phone field is required to save a Contact record. If the user attempts to save a record with a value that is not in the correct format, then Oracle CRM On Demand Desktop displays an error message.
In this procedure, you use the following files:
forms.js. This file requires JavaScript.
package_res.xml. This file requires an XML addition to specify the localized message that is displayed when a validation rule is violated.
To define a validation rule for value formats
Open the forms.js file.
Locate the XML code that defines the fields and scripts used for the Contact form, for example:
‘id="On Demand Contact"’
Define a validation object by adding the following code to the form script:
var validation = ctx.validator;
This object is used to define all the validation rules on a form.
Write a function that validates the phone number format.
This function must return True if the value in a field matches a specific pattern. Otherwise, it must return False. For example, this function uses regular expression to validate the Work Phone number (#) field format:
function validate_phone_number() {
    var phonetest = new RegExp(/^[+]?[0-9]{0,3}[\s]?[\(-. ]?[0-9]{2,3}[\)-.
]?[\s]?[0-9]{3}[-. ]?[0-9]{2}[-.]?[0-9]{2}$/);
    var snapshot = ctx.form.item.snapshot;
    return snapshot["Work Phone #"] != '' ? ( snapshot["Work Phone
#"].match(phonetest) != null ? true : false) : true
}
You can also use any other methods to validate the field format.
Add the rule to this validation object by calling the add_custom function on your validation object. This function accepts four arguments:
validation.add_custom(custom_function, array_of_controls, message_id , group);
where:
custom_function. This is the function you wrote in Step 4.
array_of_controls. This is the array of IDs of the control on a form that represents fields that must be highlighted if the custom rule is not followed.
message_id. This is the ID of a string resource in package_res.xml. The string with the specified ID is shown as an error message when a validation fails.
group. This is the name of the validation group. It is not required.
Open the package_res.xml file, and define the required messages.
Identify where you want to add the new XML.
Tip: Messages and labels are grouped together by comments. Validation rule messages are grouped under the<!-- Script and validation Messages -->comment.Add a new <str> element to the XML code, for example:
<str key="msg_business_phone_validation">Business Phone format is not correct.</
str>
The key value must match the message_id argument passed into your custom function that you wrote in Step 4.
Adding Custom Logic
This task is a step in Process of Customizing Objects in Oracle CRM On Demand Desktop.
To improve usability, sometimes you must add custom logic to Oracle CRM On Demand Desktop. Oracle CRM On Demand Desktop allows you to manipulate Microsoft Outlook data, for example, you can do the following:
Automatically include the ID of the current user in the Owner field.
Cause the first letter of each word in the description of an activity to automatically capitalize.
Change the state of some controls, for example, to inform the user that the control is required.
To add custom logic
Use an XML editor to open the forms_12.xml file.
For more information, see Files in the Customization Package.
To add the custom logic for this example, add the following code:
<form id="On Demand Activity"
    <script>
      <![CDATA[
        include("forms.js", "forms");
          var ctx = {
          "application": application,
          "ui": ui,
          "application_script": application_script,
          "form": form
          };
          var current_form = new
          forms.activity_form(forms.create_form_ctx(ctx));
      ]]>
    </script>
...
</form>
In forms.js, create the activity_form(ctx){} function.
This function contains the custom logic.
Defining the Toolbar
This task is a step in Process of Customizing Objects in Oracle CRM On Demand Desktop.
For this example, it is recommended that you implement some actions for the custom object on a toolbar. An action can be simple, such as attaching a note to the custom object. An action can be more complex, such as sending an email to all contacts who are related to the custom object. In this example, you add the following buttons to the toolbar:
Add Open in Oracle CRM On Demand
Add attachment to the toolbar of the form
Add New Activity to the Oracle CRM On Demand Desktop toolbar
To implement these changes, you modify the toolbars.xml file. Because this file typically already contains definitions for the Oracle CRM On Demand Desktop and form toolbars, you define only the custom buttons.
To define the toolbar
Encode the icon that represents the new button:
Create a PNG file that includes the icon that will represent the button in the Oracle CRM On Demand Desktop client.
Encode the PNG file for Base64.
Because Oracle CRM On Demand Desktop stores the icon in the resource file in a Base64 encoded string, you must encode the PNG file. You can use any standard Base64 encoder, such as base64.exe.
Remove the line breaks from the contents of the output file you created in Step b.
Add the contents of the output file you created in Step b to the package_res.xml file.
To define a new button for the Oracle CRM On Demand Desktop toolbar, add the following code to the toolbars.xml file:
<toolbar caption="Oracle CRM On Demand Desktop" for="explorer">
  (…………….)
  <button name="New Activity" small_image="type_image:Activity:16">
    <action class="create_item" item_type="Action"/>
  </button>
  (…………….)
</toolbar>
To define a new button for the form toolbar, add the following code to the toolbars.xml file. Note that the code uses the term inspector to reference the form:
<toolbar caption="Oracle CRM On Demand Desktop" for="inspector">
  (…………….)
  <button name="Attach File" small_image="attach_btn_img">
    <action class="create_attachment" accept_type="Action">
      <attachment type="Attachment" name_field="Name" body_field="Body"
       linking_field="ParentId"/>
    </action>
  </button>
  (…………….)
</toolbar>
Defining Other Options
This task is a step in Process of Customizing Objects in Oracle CRM On Demand Desktop.
You can define other options.
To define other options
Define a support email address.
For more information, see Customizing the Email Address of the Support Team.
Define the setup options.
For more information, see Third Party Options for Installing and Configuring Oracle CRM On Demand Desktop.
Process of Enabling Custom Object Synchronization in Oracle CRM On Demand Desktop
This topic describes how to enable a custom object in Oracle CRM On Demand Desktop by modifying the metadata files in the customization package.
To enable custom object synchronization in Oracle CRM On Demand Desktop perform the following tasks:
Defining the Custom Object
This topic describes how to define the object name and field names for the object called Custom Object 1. The object name and field names are the same as those saved in the WDSL file for Custom Object 1.
This task is a step in Process of Enabling Custom Object Synchronization in Oracle CRM On Demand Desktop.
To define the custom object
Using an XML editor, open the od_meta_info.xml file.
Locate the following <SiebelMetaInfo> XML element.:
<SiebelMetaInfo>

...

...

<object TypeId='Custom Object 1' Label='CustomObject1' LabelPlural='CustomObject1'
ViewMode='Sales Rep' IntObjName='Custom Object 1'
SiebMsgXmlElemName='CustomObject1'
SiebMsgXmlCollectionElemName='ListOfCustomObject1'>

</object>

</SiebelMetaInfo>
Update the following attributes in the <object> XML element with your custom object values:
TypeId='Custom Object 1'. The unique identifier of the object defined in the od_meta_info.xml file. The TypeId='Custom Object 1' attribute must have the same value as the IntObjName='Custom Object 1' attribute in the od_meta_info.xml file.
IntObjName='Custom Object 1'. The name of the integration object that Oracle CRM On Demand Desktop uses for requests. The IntObjName='Custom Object 1' attribute must have the same value as the TypeId='Custom Object 1' attribute.
Note: For Custom Objects 1, 2, and 3, there is a space between the words in the IntObjName value, for example, Custom Object 1 or Custom Object 2, but for Custom Object 4 and custom objects with higher numbers, they are declared as one word, CustomObject4.SiebMsgXmlElemName='CustomObject1'. The XML element of the object, which is declared in the "Custom Object 1" WSDL for Oracle CRM On Demand Web Services v2.0.
SiebMsgXmlCollectionElemName='ListOfCustomObject1'. The name of the collection XML element as declared in the "Custom Object WSDL for CRM OD Web Services v2.0.
Locate the following <object> element:
<object TypeId='Custom Object 1' Label='CustomObject1'
LabelPlural='CustomObject1' ViewMode='Sales Rep' IntObjName='Custom Object 1'
SiebMsgXmlElemName='CustomObject1'
SiebMsgXmlCollectionElemName='ListOfCustomObject1'>
  <field Name='CreatedBy' Label='CreatedBy' DataType='DTYPE_TEXT'
IsHidden="yes"/>
  <field Name='CreatedById' Label='CreatedById' DataType='DTYPE_ID'
IsRefObjId="yes" RefObjTypeId="User" IsHidden="yes"/>
<field Name='CreatedDate' Label='CreatedDate' DataType='DTYPE_UTCDATETIME'
IsHidden="yes"/>
</object>
Update the following Oracle CRM On Demand Desktop system fields as hidden fields for Microsoft Outlook:
Name='CreatedById'. The name of a field as declared in the "Custom Object 1" WSDL for CRM OD Web Services v2.0.
IsHidden="yes". This attribute indicates that the Oracle CRM On Demand Desktop system fields are hidden fields for Microsoft Outlook.
'CreatedById' field. The foreign key field that points to the User object in Oracle CRM On Demand Desktop.
IsRefObjId="yes". This <field> element attribute indicates that the CreatedById field is a foreign key field in Oracle CRM On Demand Desktop.
RefObjTypeId="User". This <field> element attribute indicates the name of the object type to which the CreatedById field points.
Locate the <object> element that you want to synchronize between Oracle CRM On Demand Desktop and Microsoft Outlook.
Update the following Custom Object 1 fields:
<field Name='Id' Label='Id' DataType='DTYPE_ID' IsPrimaryKey='yes' />
<field Name='Name' Label='Name' DataType='DTYPE_TEXT' />
<field Name='Description' Label='Description' DataType='DTYPE_TEXT' />
When the value for the IsPrimaryKey attribute is Yes, it indicates that this field is the primary key field for the object. For more information on the attributes defined in the <field> XML element, see Field Element of the od_meta_info.xml File.
Save and close the od_meta_info.xml file.
The following code is an example of a complete object definition for Custom Object 1 in the od_meta_info.xml file:
<SiebelMetaInfo>
...
...
    <object TypeId='Custom Object 1' Label='CustomObject1'
LabelPlural='CustomObject1' ViewMode='Sales Rep' IntObjName='Custom Object 1'
SiebMsgXmlElemName='CustomObject1'
SiebMsgXmlCollectionElemName='ListOfCustomObject1'>
      <field Name='CreatedBy' Label='CreatedBy' DataType='DTYPE_TEXT'
       IsHidden="yes"/>
      <field Name='CreatedById' Label='CreatedById' DataType='DTYPE_ID'
       IsRefObjId="yes" RefObjTypeId="User" IsHidden="yes"/>
      <field Name='CreatedDate' Label='CreatedDate' DataType='DTYPE_UTCDATETIME'
       IsHidden="yes"/>
       <field Name='Id' Label='Id' DataType='DTYPE_ID' IsPrimaryKey='yes' />
       <field Name='Name' Label='Name' DataType='DTYPE_TEXT' />
       <field Name='Description' Label='Description' DataType='DTYPE_TEXT' />
    </object>
</SiebelMetaInfo>
Related Topics
Specifying the Type of Object the User Can Confirm for Deletion
Defining Synchronization for the Custom Object
This topic describes how to define the synchronization of Custom Object 1 by editing the connector_configuration.xml file.
This task is a step in Process of Enabling Custom Object Synchronization in Oracle CRM On Demand Desktop.
To define synchronization for the custom object
Using an XML editor, open the connector_configuration.xml file.
Locate the following <types> element:
<types>
...
...
  <type id="Custom Object 1">
    ...
  </type>
</types>
Define a new synchronization type in the <type> element.
For more information on defining the synchronization type, see Types Element of the connector_configuration.xml File.
Define a <view> element inside the <type> element, for example:
<type id="Custom Object 1">
  <view label="CustomObject1" label_plural="CustomObject1"
   small_icon="type_image:Generic:16"normal_icon="type_image:Generic:24"
   large_icon="type_image:Generic:48"></view>
</type>
For more information on defining a <view> element inside the <type> element, see View Element of the connector_configuration.xml File.
In the same code, define a <synchronizer> element with <link> tags, for example:
<type id="Custom Object 1">
  <view label="CustomObject1" label_plural="CustomObject1"
   small_icon="type_image:Generic:16"normal_icon="type_image:Generic:24"
   large_icon="type_image:Generic:48"></view>
  <synchronizer name_format=":[:(Name) :]" threshold="10">
    <links></links>
  </synchronizer>
</type>
A <synchronizer> element is an element that describes additional, synchronization settings. It includes the <link> element, which describes references between types. In the previous example, you synchronize Custom Object 1 only as an independent parent object so that the values inside the <links> tags are blank. For more information on the <synchronizer> element, see Synchronizer Element of the connector_configuration.xml File.
For more information on the <links> element, see Links Element of the connector_configuration.xml File.
The following code is an example of a complete synchronization definition for Custom Object 1 in the connector_configuration.xml file:
<type id="Custom Object 1">
  <view label="CustomObject1" label_plural="CustomObject1"
   small_icon="type_image:Generic:16"normal_icon="type_image:Generic:24"
   large_icon="type_image:Generic:48"></view>
  <synchronizer name_format=":[:(Name) :]" threshold="10">
    <links></links>
  </synchronizer>
</type>
Save and close the connector_configuration.xml file.
Related Topics
Specifying the Type of Object the User Can Confirm for Deletion
Defining a Mapping of the Custom Object
This topic describes how to define the mapping of Custom Object 1 in the od_basic_mapping.xml file.
This task is a step in Process of Enabling Custom Object Synchronization in Oracle CRM On Demand Desktop.
To define a mapping of Custom Object 1
Using an XML editor, open the od_basic_mapping.xml file.
Locate the <types> element:
<types>
...
...
  <type id="Custom Object 1" folder_type="10" display_name="CustomObject1"
   ver="2">
  </type>
</types>
In this example, id="Custom Object 1" is the unique identifier of the mapping definition for Custom Object 1 defined in the od_basic_mapping.xml file.
Define the new mapping type for Custom Object 1.
For more information on the attributes used with the <type> element, see Type Element of the od_basic_mapping.xml File.
Define the <form> element inside the <type> element:
<type id="Custom Object 1" folder_type="10" display_name="CustomObject1" ver="2">
  <form message_class="IPM.Contact.OnDemand.CustomObject1"
   display_name="CustomObject1" icon="type_image:Generic:16">OnDemand
   CustomObject1</form>
</type>
The values for this example are as follows:
<form> element. This value corresponds to the custom form ID value of the object's custom form, which is defined in the forms_xx.xml file.
"Custom Object 1". This value has a custom form definition with the value OnDemand CustomObject1. It is declared in the <form> element in od_basic_mapping.xml.
For information on the attributes for the form element, see Form Element of the od_basic_mapping.xml File.
In the following code, define the <custom_views> element:
<type id="Custom Object 1" folder_type="10" display_name="CustomObject1" ver="2">
  <form message_class="IPM.Contact.OnDemand.CustomObject1"
   display_name="CustomObject1" icon="type_image:Generic:16">OnDemand
   CustomObject1</form>
  <custom_views  default_name = "#view_od_co1">
    <view id="all_customobject1" name ="#view_od_co1"> </view>
  </custom_views>
</type>
The <custom_view> element can contain many <view> elements. Similar to the value inside the <form> element in Step 4, the view id attribute value corresponds to the custom view value that is defined in the views.xml file. This example includes a view with the ID value of all_customobject1 which maps to a custom view.
Note: The default_name attribute in the <custom_views> element and the name attribute in the <view> element has the following value: #view_od_co1. This label will be defined as a resource in the package_res.xml file.For information on the attributes in the <custom_view> and <view> tags, see Custom Views Element of the od_basic_mapping.xml File. For information on declaring the custom view in the od_basic_mapping.xml file, see Adding Custom Views in Microsoft Outlook.
In the following code, map the Name field to a custom Microsoft Outlook field:
<type id="Custom Object 1" folder_type="10" display_name="CustomObject1" ver="2">
  ...
  ...
     <field id="Name">
       <reader>
          <mapi_user>
            <user_field id="od Name" ol_field_type="1"></user_field>
               <convertor>
                 <string/>
               </convertor>
          </mapi_user>
       </reader>
       <writer>
          <outlook_user>
            <user_field id="od Name" ol_field_type="1"></user_field>
               <convertor>
                  <string/>
               </convertor>
          </outlook_user>
       </writer>
     </field>
</type>
This code maps the Name field you already defined in the od_meta_info.xml file to a custom Microsoft Outlook field. For information on the attributes in the <field> tags, see Field Element of the od_basic_mapping.xml File.
Each <field> element describes only one field. In the <field> element, there is a <reader> element and a <writer> element. For information on the <writer> element, see Writer Element of the od_basic_mapping.xml File.
In the following code, map the Description field to a native Microsoft Outlook field:
<type id="Custom Object 1" folder_type="10" display_name="CustomObject1" ver="2">
  ...
  ...
     <field id="Description">
       <reader>
          <mapi_std>
            <mapi_tag id="0x3A110000"></mapi_tag>
               <convertor>
                  <string/>
               </convertor>
          </mapi_std>
       </reader>
       <writer>
          <outlook_std>
             <outlook_field id="LastName"></outlook_field>
                <convertor>
                  <string/>
                </convertor>
          </outlook_std>
       </writer>
     </field>
</type>
This code maps the Description field you already defined in the od_meta_info.xml file to the Microsoft Outlook field Last Name.
There are differences between this Description field mapping and the Name field mapping described in Step 6. The Name field is mapped to a custom Microsoft Outlook field, and it uses the <user_field> element in the <reader> and <writer> elements. However, because the Description field is mapped to a native Microsoft Outlook field, it uses the <outlook_field> element inside the <writer> element. For more information on Microsoft Outlook fields, see Fields That Oracle CRM On Demand Desktop Uses for the Custom Object. For sample code of a complete mapping definition for Custom Object 1 in the od_basic_mapping.xml file, see XML Code That Maps a Definition for a Custom Object.
Save and close the od_basic_mapping.xml file.
Related Topics
Specifying the Type of Object the User Can Confirm for Deletion
Defining a Mapping of the Custom Object if You Are Using DB FACADE Storage
If you are using DB FACADE storage to store the object, then you complete a simpler procedure instead of Defining a Mapping of the Custom Object.
This task is a step in Process of Enabling Custom Object Synchronization in Oracle CRM On Demand Desktop.
To define a mapping of the custom object if you are using DB FACADE storage
Using an XML editor, open the od_basic_mapping.xml file.
Locate the <types> element:
<sd2_meta>
    <database>
      <types>
      ....
        <type id="Currency" icon="type_image:Currency:16">
        ...
        </type>
      </types>
    </database>
</sd2_meta>
Define the new mapping type for Custom Object 1.
<type id="Custom Object 1" icon="type_image:Custom Object 1:16"/>
Define the new field for the type. No mapping to a Microsoft Outlook field is required if an object is stored in DB FACADE.
<type id="Custom Object 1" icon="type_image:Custom Object 1:16"/>
  ...
  ...
    <field id ="Description">
      <type>
        <simple type="string"/>
      </type>
    </field>
  ...
</type>
Save and close the od_basic_mapping.xml file.
Related Topics
Specifying the Type of Object the User Can Confirm for Deletion
Defining a Customized Microsoft Outlook User Interface for the Custom Object
This topic describes how to define a customized Microsoft Outlook user interface for Custom Object 1 by editing the forms_12.xml file. The example in this topic is a basic customized form with two fields on the Microsoft Outlook user interface.
This task is a step in Process of Enabling Custom Object Synchronization in Oracle CRM On Demand Desktop.
To define the form for Custom Object 1
Using an XML editor, open the forms_12.xml file.
Locate the following code:
<forms>
...
...
    <form id="OnDemand CustomObject1" >
    </form>
...
</forms>
In the <forms> tags, define the form.
In the following code, define the visible controls for the form:
<form id="OnDemand CustomObject1" >
  <page id="General" tag="0x10A6" min_height="155" min_width="520">
    <cell>
      <stack layout="vert" padding="5">
        <cell>
          <stack layout="horz" spacing="3">
            <!-- captions -->
            <cell size="65">
              <stack layout="vert" spacing="5">
                <cell size="21">
                  <static id="lbl_co1_name" tab_order="2">
                    <text>#lbl_co1_name</text>
                  </static>
                </cell>
                <cell size="21">
                  <static id="lbl_co1_description" tab_order="4">
                    <text>#lbl_co1_description</text>
                  </static>
                </cell>
              </stack>
            </cell>
            <!-- fields -->
            <cell>
              <stack layout="vert" spacing="5">
                <cell size="21">
                  <edit id="Name" max_chars="100" tab_order="3">
                    <field value="string">Name</field>
                  </edit>
                </cell>
                <cell size="21">
                  <edit id="Description" max_chars="100" tab_order="5">
                    <field value="string">Description</field>
                  </edit>
                </cell>
              </stack>
            </cell>
          </stack>
        </cell>
      </stack>
    </cell>
  </page>
</form>
For more information on customizing the forms_12.xml file, see Defining the User Interface.
Note: There is a section of cells for the captions, and a section of cells for the fields. You must structure the cells so that the captions align with the corresponding fields. In the captions section, there is reference to the lbl_co1_name and lbl_co1_description labels.Edit the forms_12.xml file to hide the unused Microsoft Outlook controls.
This customization already contains new fields in the form, for example, the Name field. It also has repositioned Microsoft Outlook fields, for example, the LastName field is now repositioned to Description. The remaining Microsoft Outlook fields are not used in this example. However, they cannot be removed from the form definition. You can hide all the unused Microsoft Outlook controls by moving them to a location where the cell size value is zero. For more information on the Microsoft Outlook user interface, see Defining the User Interface. For an example of how the unused native Microsoft Outlook controls are removed in to a small cell, see XML Code That Hides Unused Microsoft Outlook Controls. For an example of a complete custom form for Custom Object 1 in the forms_12.xml file, see XML Code of a Complete Form for Custom Object1.
Save and close the forms_12.xml file.
Related Topics
Specifying the Type of Object the User Can Confirm for Deletion
Defining a Custom View for the Custom Object
This topic describes how to define a custom view for Custom Object 1 by editing the views.xml file.
This task is a step in Process of Enabling Custom Object Synchronization in Oracle CRM On Demand Desktop.
To define a custom view for the custom object
Using an XML editor, open the views.xml file.
Define a custom view for Custom Object 1.
This custom view was already declared in the od_basic_mapping.xml file.
Create an <str> element in the views.xml file with the corresponding all_customobject1 key attribute.
A custom view with the id="all_customobject1" attribute in the <view> element is declared in the first line of the following code:
<str key="all_customobject1">
<![CDATA[<?xml version="1.0"?>
  <view>
    <viewname>$view_od_co1$</viewname>
    <viewstyle>table-layout:fixed;width:100%;font-family:Segoe UI;fontstyle:
       normal;font-weight:normal;font-size:8pt;color:Black;font-charset:0</
     viewstyle>
    <viewtime>0</viewtime>
    <linecolor>8421504</linecolor>
    <linestyle>3</linestyle>
    <gridlines>1</gridlines>
    <collapsestate/>
    <rowstyle>background-color:window;color:windowtext</rowstyle>
    <headerstyle>background-color:#D3D3D3</headerstyle>
    <previewstyle/>
      <arrangement>
        <autogroup>0</autogroup>
        <collapseclient/>
      </arrangement>
      <multiline>
        <width>0</width>
      </multiline>
      <column>
        <type>string</type>
        <heading>Name</heading>
        <prop>http://schemas.microsoft.com/mapi/string/{00020329-0000-0000-C000-
         000000000046}/od%20Name</prop>
        <width>50</width>
        <style>padding-left:3px;;text-align:left</style>
        <editable>1</editable>
        <userheading>Name</userheading>
      </column>
      <column>
        <type>string</type>
        <heading>Description</heading>
        <prop>urn:schemas:contacts:sn</prop>
        <width>426</width>
        <style>padding-left:3px;;text-align:left</style>
        <editable>1</editable>
        <userheading>Description</userheading>
      </column>
      <orderby>
        <order>
          <heading>Name</heading>
          <prop>http://schemas.microsoft.com/mapi/string/{00020329-0000-0000-C000-
           000000000046}/od%20Name</prop>
          <type>string</type>
          <sort>asc</sort>
        </order>
      </orderby>
      <groupbydefault>0</groupbydefault>
      <previewpane>
        <markasread>0</markasread>
      </previewpane>
  </view>]]>
</str>
The views.xml file defines columns for displaying objects in grids. In this example, the all_customobject1 view displays all custom objects in the top-level folder in Microsoft Outlook.
In the previous example code, you see a column element in the custom view for the Name field and another column element for the Description field. Within the column element, there is a prop element. The prop element provides the object property name, and is written in a special format. All Microsoft Outlook custom fields, like the Name field, are in the following format:
http://schemas.microsoft.com/mapi/string/{00020329-0000-0000-C000-000000000046}/"
The Name field is then appended to the Microsoft Outlook custom field the with the user_field id from the od_basic_mapping.xml.
Note: Any spaces in the text string must be replaced with %20.All Microsoft Outlook native fields take the following format:
urn:schemas:contacts:sn" (LastName), "urn:schemas:contacts:givenName" (FirstName)
For more information on native Microsoft Outlook properties, see your Microsoft documentation.
Save and close the views.xml file.
Related Topics
Specifying the Type of Object the User Can Confirm for Deletion
Adding Custom Views in Microsoft Outlook
XML Code to Customize Views Used for Microsoft Outlook Explorer List
Defining Labels Used as Resources for the Custom Object
This topic describes how to define labels used as resources for the custom object called Custom Object 1 in the package_res.xml file.
This task is a step in Process of Enabling Custom Object Synchronization in Oracle CRM On Demand Desktop.
To define the labels used as resources for Custom Object 1
Using an XML editor, open the package_res.xml file.
Define a custom view for Custom Object 1.
Define the labels used as resources for Custom Object 1 in the package_res.xml file.
These labels are used in the od_basic_mapping.xml file and in the forms_12.xml file.
Include the following labels in the package_res.xml file:
<res_root>
...
...
  <!-- C01 form -->
    <str key="lbl_co1_name">Name</str>
    <str key="lbl_co1_description">Description</str>
    <str key="view_od_co1">CustomObject1</str>
...
...
</res_root>
Save and close the package_res.xml file.
Related Topics
Specifying the Type of Object the User Can Confirm for Deletion
Adding Custom Logic and Validation Rules in the Customized Microsoft Outlook Form
This topic describes how to add custom logic and validation rules for certain fields in the customized Microsoft Outlook form for Custom Object 1.
This task is a step in Process of Enabling Custom Object Synchronization in Oracle CRM On Demand Desktop.
To add custom logic and validation rules
Using an XML editor, open the forms_12.xml file.
Edit the <script> element as follows:
<form id="OnDemand CustomObject1" >
  <script>
    <![CDATA[
     include("forms.js", "forms");
    var ctx = {
      "application": application,
      "ui": ui,
      "application_script": application_script,
      "form": form
    };

    var current_form = new forms.od_co1_form(forms.create_form_ctx(ctx));

    ]]>
  </script>
  <page id="General" tag="0x10A6" min_height="155" min_width="520">
    ..
    ..
  </page>
</form>
Note: A JavaScript function called od_co1_form() is in the <script> element.Save and close the forms_12.xml file.
Using a JavaScript editor, open the forms. js file.
Create the od_co1_form() function, using the following example:
function od_co1_form(ctx)
{
  //FORM VALIDATION
  var validator = ctx.validator;
  validator.validate_empty_field("Name", "Name", "msg_co1_name_validation", false);
}
Define a new label, msg_co1_name_validation in the od_co1_form() function.
For more information, see Defining the Validation Rules.
Add the msg_co1_name_validation label to the package_res.xml file:
<res_root>
..
..
  <!-- C01 form -->
  <str key="lbl_co1_name">Name</str>
  <str key="lbl_co1_description">Description</str>
  <str key="view_od_co1">CustomObject1</str>
  <str key="msg_co1_name_validation">CO1 Name is required.</str>..
..
</res_root>
Save and close the forms.js file.
Related Topics
Process of Adding a Predefined Oracle CRM On Demand Picklist to Oracle CRM On Demand Desktop
This topic gives one example of how to add a predefined Oracle CRM On Demand picklist to Oracle CRM On Demand Desktop. You might use this feature differently, depending on your business model. In this example, you add a picklist to the Contact form, which allows the user to choose from a set of predefined contact methods. These methods indicate how the contact prefers to be contacted, such as through email, pager, or phone.
To add a predefined Oracle CRM On Demand picklist to Oracle CRM On Demand Desktop, do the following:
Adding a Field to the Customization Package
This task is a step in Process of Adding a Predefined Oracle CRM On Demand Picklist to Oracle CRM On Demand Desktop.
In this topic you add a field to the customization package.
To add a field to the customization package
Create a working set of files for the customization package:
Open a DOS command prompt, and then navigate to the directory that contains the current files of the customization package.
For more information, see Files in the Customization Package.
Create a copy of the current set of customization package files.
Move the original set of files to a backup directory.
If it is necessary to restore the configuration that existed before you started this customization effort, then you can revert to this backup set of files.
To create a working set of customization package files, rename the set of files you copied in Step b, for example, enter the following command:
rename v01* v02*
This command renames the prefix for all files in the directory that currently use v01 as the prefix. For example, it renames v01_forms_12.xml to v02_forms_12.xml. It is recommended that you use this technique to indicate that you have modified the customization package.
To define the picklist, add the following element to the od_meta_info.xml file:
<picklist TypeId='PickList_Preferred_Communications' CollectionTypeFld
Name='Type' SrcObjectTypeId='PickList_Preferred_Communications'
ValueFldName='Value' LabelFldName='Value' LangFldName='Language' >
    <master_filter_expr>
      <![CDATA[
        [Parent] = LookupValue ('OFFER_MEDIA', 'Package')
    ]]>
    </master_filter_expr>
</picklist>
For more information, see Defining Attributes of the Picklist Element.
Add the Preferred Communications field to the Contact object:
To locate the Contact object, search for the following text:
object TypeID='Contact'
Add the following element to the Contact object:
<field Name="Preferred Communications" Label="Preferred Communications"
DataType="DTYPE_TEXT" HasPicklist="yes" PicklistIsStatic="yes"
PicklistCollectionType="OFFER_MEDIA" PicklistTypeId="PickList Preferred
Communications" IOElemName="PreferredCommunications" />
Repeat Step 2 for each of the following objects:
Account.Contact
Opportunity.Contact
In this example, these objects in the od_meta_info.xml file must include the Preferred Communications field. You must add this field to each object.
Add code that creates a map for the picklist between the Oracle CRM On Demand server and Oracle CRM On Demand Desktop for the parent Contact object:
Use an XML editor to open the od_basic_mapping.xml file.
Create a new object type for the picklist.
For more information, see Code to Create a New Object Type for the Picklist.
To locate the parent object, search the od_basic_mapping.xml file for the following code:
<type id="Contact"
Add code to the Contact object that defines a map between the Oracle CRM On Demand server and Oracle CRM On Demand Desktop.
For more information, see Code to Define a Mapping Between the Oracle CRM On Demand Server and Oracle CRM On Demand Desktop.
Add code that creates a map for the picklist between the Oracle CRM On Demand server and Oracle CRM On Demand Desktop for the child Account Contacts object:
Choose the code from the contact object that you use to map the child account object.
For more information, see Mapping Child Objects for a Custom Picklist.
Copy this code to the clipboard.
To locate the Account Contacts child object, search the od_basic_mapping.xml file for the following code:
type id="Account.Contact.Association"
To locate the Contact field, search in the Account.Contact.Association object for the following text:
field id="ContactId"
To locate the matching ContactId, search the ContactId field for the following text:
user_field id="OD Contact ID"
Paste the contact fields that you copied to the clipboard in Step a into the OD Contact ID user field.
For more information, see Mapping Child Objects for a Custom Picklist.
To map the Preferred Communications field, add the following code immediately after the code you pasted in Step f:
<field from="Preferred Communications" to="ContactPreferred
Communications"></field>
Repeat Step 5 for the opportunity child object.
Defining Attributes of the Picklist Element
If you define a picklist element in the od_meta_info.xml file, then the TypeId and SrcObjectTypeId attributes of this element must match the value in the PicklistTypeId property of the object definition. For example, assume you add the following field:
<field Name='Note Type' Label='#fld_account_account_note@note_type'
DataType='DTYPE_TEXT' HasPicklist='yes' PicklistIsStatic='yes'
PicklistTypeId='AccountNoteType' IOElemName='NoteType' />
In this example, you must set the TypeId attribute in the picklist element to AccountNoteType.
The following table describes the values to use in the picklist element.
Adjust these values so they match the field names on the integration component field.
Table Values to Use in the Picklist Element
| Attribute | Value |
|---|---|
CollectionTypeFldName |
Type |
ValueFldName |
Value |
LangFldName |
Language |
To add more filters, you can use the master_filter_expr attribute. In the example on Step 2 in the previous topic, the master_filter_expr attribute constrains the values to the correct LOV Type.
Code to Create a New Object Type for the Picklist
To create a new object type for the picklist, you must use the following format for the type id attribute:
<type id="object_namefield_namePicklist" predefined_folder="1">
where:
object_name is the name of the object type in the od_meta_info.xml file.
field_name is the name of the field that resides in the object that you define in object_name.
For example:
<type id="ContactPreferred CommunicationsPicklist" predefined_folder="1">
To create a new object type for a picklist, add the following code to the od_basic_mapping.xml file:
<type id="ContactPreferred CommunicationsPicklist" predefined_folder="1">
  <form message_class="IPM.Contact.OnDemand.ContactPreferred
CommunicationsPicklist"></form>
    <field id="Label">
      <reader>
        <mapi_user>
        <user_field id="On Demand picklistLabel" ol_field_type="1"></  user_field>
          convertor><string/></convertor>
        </mapi_user>
      </reader>
      <writer>
        <outlook_user>
        <user_field id="On Demand picklistLabel" ol_field_type="1"></user_field>
          <convertor><string/></convertor>
        </outlook_user>
      </writer>
    </field>
    <field id="Value">
      <reader>
        <mapi_user>
        <user_field id="On Demand picklistValue" ol_field_type="1"></user_field>
          <convertor><string/></convertor>
        </mapi_user>
      </reader>
      <writer>
        <outlook_user>
        <user_field id="On Demand picklistValue" ol_field_type="1"></user_field>
          <convertor><string/></convertor>
        </outlook_user>
      </writer>
    </field>
    <field id="SortOrder">
      <reader>
        <mapi_user>
        <user_field id="od SortOrder" ol_field_type="3"></user_field>
          <convertor><integer/></convertor>
        </mapi_user>
      </reader>
      <writer>
        <outlook_user>
          <user_field id="od SortOrder" ol_field_type="3"></user_field>
          <convertor><integer/></convertor>
        </outlook_user>
      </writer>
    </field>
    <field id="IsDefault">
      <reader>
        <mapi_user>
          <user_field id="od IsDefault" ol_field_type="6"></user_field>
          <convertor><bool/></convertor>
        </mapi_user>
      </reader>
      <writer>
        <outlook_user>
          <user_field id="od IsDefault" ol_field_type="6"></user_field>
          <convertor><bool/></convertor>
        </outlook_user>
      </writer>
    </field>
</type>
Code to Define a Mapping Between the Oracle CRM On Demand Server and Oracle CRM On Demand Desktop
To define a map between the Oracle CRM On Demand server and Oracle CRM On Demand Desktop, add the following field element to the Contact object of the od_basic_mapping.xml file:
<field id="Preferred Communications">
  <reader>    <mapi_user>
      <user_field id="od Preferred Communications" ol_field_type="1"></user_field>
      <convertor><string/></convertor>
    </mapi_user>
  </reader>
  <writer>
    <outlook_user>
      <user_field id="od Preferred Communications" ol_field_type="1"></user_field>
      <convertor><string/></convertor>
    </outlook_user>
  </writer>
</field>
If you are adding your object to Oracle CRM On Demand Desktop's DB FACADE storage, then add this code:
<field id = "Preferred Communications">
  <type>
    <simple type="string"/>
  </type>
</field>
If you are adding a picklist object to DB FACADE storage, which is recommended for picklists, then you do not have to specify the predefined_folder attribute. Generally, the XML code to add picklists is as follows:
<type id="ContactPreferred CommunicationsPicklist"
icon="type_image:ContactPreferredCommunicationsPicklist:16">
  <field id ="Label">
    <type>
      <simple type="string"/>
    </type>
  </field>
  <field id ="Value">
    <type>
      <simple type="string"/>
    </type>
  </field>
  <field id ="SortOrder">
    <type>
      <simple type="integer"/>
    </type>
  </field>
  <field id ="IsDefault">
    <type>
      <simple type="boolean"/>
    </type>
  </field>
</type>
Mapping Child Objects for a Custom Picklist
It is recommended that you do not map a child object directly in the child object. Instead, copy values from the parent object, and then paste them into the child object. This technique provides the following advantages:
Allows Oracle CRM On Demand Desktop to copy values on the contact to the child object, such as the account or opportunity
If the user changes the value in a contact, then Oracle CRM On Demand Desktop automatically updates the child objects
Example Code to Map Child Objects for a Custom Picklist
The following figure illustrates example code to map a child object for a custom picklist.

Explanation of Callouts
The example code to map a child object for a custom picklist includes the following items:
The following attribute identifies the account child object of the parent contact:
type id="Account.Contact.Association"
The following element identifies the Contact field in the account object:
field id="ContactId"
The following attribute identifies the matching ContactId:
user_field id="od Contact ID"
You copy these fields from the parent contact object and then paste them into the account child object.
You add the Preferred Communications field to provide a way to add it to Account Contact forms. You define this field in Code to Define a Mapping Between the Oracle CRM On Demand Server and Oracle CRM On Demand Desktop.
Customizing the Physical Layout for the Picklist
This task is a step in Process of Adding a Predefined Oracle CRM On Demand Picklist to Oracle CRM On Demand Desktop.
The following figure illustrates the Contact Details section of the contact form that you customize in this example.

Explanation of Callouts
The Contact form includes the following parts:
The following object in the forms_12.xml file identifies the Contact Details section:
OnDemand Contact
Oracle CRM On Demand Desktop considers this area as a single cell. This cell includes two child regions that are placed horizontally in relationship to one another.
The left side of this cell includes six cells that are arranged vertically.
The right side of the cell includes the following items:
The Oracle oval link and the ellipsis (. . .) buttons include their own cell layers.
The top cell includes the following items:
Two horizontal subcells. These subcells accommodate the Oracle oval link.
Two vertical subcells that accommodate the fields to the left of the Oracle oval link.
The remaining cells below the top cell include subcells that accommodate their picklists and ellipsis (. . .) buttons.
To customize the physical layout for the picklist
Examine the physical location of where to place the custom field:
Open the Oracle CRM On Demand Desktop client, and then navigate to the Contact form.
For more information, see the figure in the previous topic.
In the Contact Details section, locate the Business Addresses field.
In this example, you add the custom Preferred Contact Method field under the existing Business Address field.
To provide sufficient vertical room for the custom field and label, increase the cell size:
Locate the cell size attribute for the cell that you want to increase.
You must increase the size of the cell that contains all the other cells. In this example, examine the figure in the previous topic, and then note that you must increase the height of the cells that are labeled 2 and 3. To do this, you increase the size of the cell that is labeled 1.
Increase the cell size by 30.
For example, if the current cell size is 155, then change it to 185:
<cell size="185">
Add the label for the custom field:
Use an XML editor to open the forms_12.xml file.
In this example, assume you are using Microsoft Outlook 2007 or above. For more information, see Customizing a Form.
To locate the form you must modify and locate the following code:
form id="OnDemand Contact"
Each form includes the OnDemand prefix, which is immediately followed by the object name, such as Contact.
Locate the following code, which defines the label for the existing business address:
<cell size="22">
    <control id="dd_addresses" class="dropdown"
    caption="#head_business_addresses" tab_order="12" />
</cell>
The code for the label and fields is located in the OnDemand Contact object after the validation rules.
To define the label for the new contact method, add the following code immediately below the code you located in Step c:
<cell size="22">
    <static id="ContactMethod" tab_order="9">
      <text>#lbl_ContactMethod</text>
    <static>
</cell>
For more information, see Format of the Label for a Custom Field.
Add the custom field:
Locate the following code, which defines the field for the existing business address. For brevity, ellipsis points (...) indicate code that has been omitted:
<cell size="21">
    <stack layout="horz" spacing="5">
      <cell>
        <combobox id="business_address_mvg" tab_order="13">
        <field>Primary Address Id</field>
          . . .
          </combobox>
       </cell>
    </stack>
</cell>
To simplify this step, search for unique text, such as business_address_mvg.
To define the field for the new contact method, add the following code immediately below the code you located in Step a:
<cell size="22">
    <combobox id="cbx_ContactPreferred CommunicationsPicklist">
      <field>Preferred Communications</field>
      <source type="ContactPreferred CommunicationsPicklist" field="Value"
format=":[:(Label):]">  </source>
    </combobox>
</cell>
For more information, see Format of the Custom Field.
Define the custom symbolic strings:
Use an XML editor to open the package_res.xml file.
Add the following code anywhere in the file:
<str key="lbl_ContactMethod">Contact Method:</str>
<str key="head_contact_method">Contact Method</str>
You can place these strings anywhere in the file. To assist with maintenance, it is recommended that you place them with similar strings. If it is necessary, then you can create alternate package_resource_xml files to create symbolic strings that accommodate another language. For more information, see Customizing Localization.
Format of the Label for a Custom Field
To define the label for the custom contact method field, you add the following code:
<cell size="22">
  <static id="ContactMethod" tab_order="9">
    <text>#lbl_ContactMethod</text>
  </static>
</cell>
where:
Id is an arbitrary, unique value for the form
Tab_order determines the order in which Oracle CRM On Demand Desktop places the cursor in the fields in the form when the user presses the TAB key
Text defines the text that Oracle CRM On Demand Desktop uses for the label
# indicates the symbolic string that is defined in the package_res.xml file. You can use this string for a global deployment.
Format of the Custom Field
To define the custom field for the contact method, you add the following code:
<cell size="22">
  <combobox id="cbx_ContactPreferred CommunicationsPicklist">
    <field>Preferred Communications</field>
    <source type="ContactPreferred CommunicationsPicklist" field="Value"
    format=":[:(Label):]">  </source>
  </combobox>
</cell>
where:
Id is an arbitrary, unique value in the form. A picklist must include the cbx prefix.
Tab_order determines the order in which Oracle CRM On Demand Desktop places the cursor in the fields in the form when the user presses the TAB key. The value that you enter must be greater than the value you enter in the Tab_order for the label.
Source determines where to get the data
Type identifies the object name. This name is defined in the od_basic_mapping.xml file.
Field specifies the field that provides the values that the user chooses from the picklist. In this example, the Value field provides these values.
<Field> identifies the field name from the object definition that populates the picklist.
Format specifies how to display text in the picklist.
The format element allows you to use a combination of static text and fields in the picklist. It uses the following format:
*any_static_text*:[:(field1_name):]*any_static_text*:[:(field2_name):]*any_static_
text*
You must use the brackets ([ ]), colon (:), and parentheses ( ), or example:
Contact :[:(First Name):] :[:(Last Name):] ? Contact: John Smith
Publishing and Testing a Custom Picklist
This task is a step in Process of Adding a Predefined Oracle CRM On Demand Picklist to Oracle CRM On Demand Desktop.
In this topic, you publish and test your customization.
To publish and test a custom picklist
Publish your changes.
For more information, see Publishing or Unpublishing Customization Packages.
Test your changes:
Open the Oracle CRM On Demand Desktop Client, and then navigate to the Contact form.
Verify that the form includes a label and picklist for the Contact Method field, as illustrated in the following diagram:
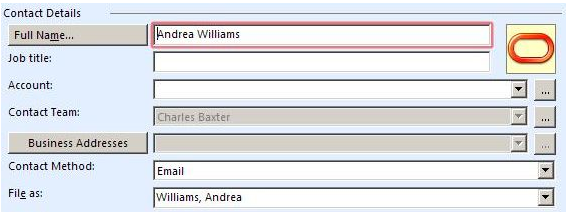
Click the down arrow next to the Contact Method field, and then verify that Oracle CRM On Demand Desktop displays a picklist that contains the following values:
None
Chat
Email
Fax
Pager
Phone
Wireless message
Choose a value in the picklist, and then verify that Oracle CRM On Demand Desktop changes the value in the Contact Method field to the value you choose.
Roadmap for Adding an MVG Field
This topic gives one example of how to add an MVG field. You might use this feature differently, depending on your business model.
To add an MVG field, do the following task and process:
An MVG field displays an association with other objects. This association can be a many-to-many association or a many-to-one association. The user can use an MVG field to do the following:
Add or remove an association
Change a primary association
Browse existing associations
You can also use an MVG to reduce the layout of a form. You can display a set of associated records in a single-line control instead of using the outlook_view control. In this example, you add an MVG control to the Opportunity form. This MVG displays an association between an opportunity and channel partners.
Process of Modifying the Customization Package to Add an MVG
This task is a step in Roadmap for Adding an MVG Field.
To modify the customization package to add an MVG, do the following:
Adding a Custom Object
This task is a step in Process of Modifying the Customization Package to Add an MVG.
To add a custom object to Oracle CRM On Demand Desktop, you display the object in Oracle CRM On Demand and then modify customization package XML files. In this example, you make available and then add the Channel Partner object.
To add a custom object
Make sure the object you must add is available.
To add a custom object type, modify the od_meta_info.xml file.
For more information, see Code to Add a Custom Object Type.
To map objects, modify the od_basic_mapping.xml file.
For more information, see Code to Map a Custom Object.
To configure synchronization for the custom object, modify the connector_configuration.xml file.
For more information, see Code to Configure the Synchronization of a Custom Object.
Adding the MVG Link
This task is a step in Process of Modifying the Customization Package to Add an MVG.
In this topic, you add the MVG link to the business logic file.
To add the MVG link
Use a JavaScript editor to open the business_logic.js file.
For more information, see Files in the Customization Package.
Locate the following function:
create_ondemand_meta_scheme2
Add the code to add a new association.
For more information, see Code to Add a New Association.
Adding the Primary Field
This task is a step in Process of Modifying the Customization Package to Add an MVG.
In this topic, you add the primary field to the customization package. This field displays in the MVG dialog box that you add for this example.
To add the primary field
To add the primary field, do the following:
Use an XML editor to open the od_meta_info.xml file.
Add the following code to the Opportunity object in the od_meta_info.xml file:
<field Name='Primary Partner Id' Label='Primary Partner Id'
DataType='DTYPE_ID' IsFilterable='no' IsRefObjId='yes'
RefObjTypeId='ChannelPartner' IOElemName='PrimaryPartnerId' />
This code adds the field, Primary Partner Id, to the Opportunity type. The field is defined as the reference for ChannelPartner type.
Save and then close the od_meta_info.xml file.
Use an XML editor to open the od_basic_mapping.xml file:
Add the following code to the Opportunity type element:
<field id="Primary Partner Id">
    <reader>
      <mapi_user>
      <user_field id="od Primary Partner Id" ol_field_type="1"></user_field>
        <convertor><binary_hexstring/></convertor>
      </mapi_user>
    </reader>
    <writer>
      <outlook_user>
      <user_field id="od Primary Partner Id" ol_field_type="1"></user_field>
        <convertor><binary_hexstring/></convertor>
      </outlook_user>
    </writer>
</field>
This code adds custom field Primary Partner Id to Opportunity type to access the field from Microsoft Outlook. The field is defined as binary_hexstring.
Add the link:
Use an XML editor to open the connector_configuration.xml file.
Add the following code to the Opportunity type element:
<link>Primary Partner Id</link>
This code is required for defining foreign key fields; that is, for defining links to other objects.
Save and then close the connector_configuration.xml file.
Adding a Field
This task is a step in Process of Modifying the Customization Package to Add an MVG.
This topic describes how to add the ChannelPartnerStatus field.
To add a field
Use an XML editor to open the od_basic_mapping.xml file.
Add the following code to the Opportunity.Channel_Partner.Association type in the od_basic_mapping.xml file.
<field id="ChannelPartnerStatus">
  <reader>
    <mapi_user>
      <user_field id="od ChannelPartnerStatus" ol_field_type="1"></user_field>
        <convertor><string/></convertor>
    </mapi_user>
  </reader>
  <writer>
    <outlook_user>
      <user_field id="od ChannelPartnerStatus" ol_field_type="1"></user_field>
        <convertor><string/></convertor>
    </outlook_user>
  </writer>
</field>
Save and then close the od_basic_mapping.xml file.
Adding a Lookup View
This task is a step in Process of Modifying the Customization Package to Add an MVG.
To customize a SalesBook control, you use the definition of a lookup view. A SalesBook control displays a list of objects and then allows the user to choose any object from this list. Oracle CRM On Demand Desktop uses this control on forms and MVG dialog boxes. In this example, you add the definition for a lookup view for Channel Partner objects.
To add a lookup view
Use an XML editor to open the lookup_view_defs.xml file.
Add the following code to the array element that contains the lookup types in the lookup_view_defs.xml file:
<item value="ChannelPartner"></item>
Add the definition for the lookup view.
For more information, see Code to Add a Lookup View.
Adding a Label, Button, and Selector Control
This task is a step in Process of Modifying the Customization Package to Add an MVG.
In this topic, you add a label, button, and selector control.
To add a label, button, and selector control
Use an XML editor to open the forms_xx.xml file.
Add a label for the MVG:
Locate the following section:
right side captions
Insert the following code immediately under the code that defines the Probability label:
<cell size="22">
    <static id="0x20014" tab_order="166">
      <text>#lbl_channel_partner</text>
    </static>
</cell>
Add the button and primary selector control:
Locate the following section:
right side fields
Add the following code immediately under the code that defines the Probability control.
<cell size="22">
    <stack layout="horz">
      <cell>
        <mvg_primary_selector id="channel_partner_mvg">
          <source type="Opportunity.Channel_Partner.Association"
          left_id="OpportunityId" item_value="ChannelPartnerId"
          display_format=":[:(PartnerName):]"></source>
          <field>Primary Partner Id</field>
        </mvg_primary_selector>
      </cell>
      <cell size="5"></cell>
      <cell size="22">
        <button id="btn_mvgChannelPartner">
          <text>...</text>
        </button>
      </cell>
    </stack>
</cell>
Make sure you specify the Id for the button and the Id for the primary selector in the same way that you specified them in the script.
Increase the size of the cell that contains the label, button, and selector control:
Locate the following section:
Category bar
Locate the fifth cell that is included in the Category bar section.
Change the code of the fifth cell to the following code:
<cell size="153">
Save and then close the forms_xx.xml file.
Customizing the Validation Message and Labels
This task is a step in Process of Modifying the Customization Package to Add an MVG.
In this topic, you customize the validation message and a label for the dialog box and forms.
To customize the validation message and labels
Use an XML editor to open the package_res.xml file.
Add the following code to the Script section:
<str key="msg_channel_partner_present">This channel partner is already present in
the list.</str> <str key="msg_channel_partner_is_primary">This channel partner is
primary. The primary record cannot be removed. To remove this record, make another
record primary first.</str> <str key="msg_channel_partner_add_caption">Add
channel partner.</str><str key="lbl_channel_partner">Lead Partner Name</str>
Add the same code that you added in Step 2 to the Messages section.
Close and then save the package_res.xml file.
The following code specifies the values for labels that you use in the dialog box and form layouts:
<str key="lbl_channel_partner">Lead Partner Name</str>
Publishing and Testing a Custom MVG Field
This task is a step in Roadmap for Adding an MVG Field.
In this topic, you publish and test your customization.
To publish and test a custom MVG field
Publish your changes.
For more information, see Publishing or Unpublishing Customization Packages.
Test your changes:
Open Oracle CRM On Demand Desktop, and then navigate to the Opportunity form.
Verify that the form includes an MVG for the Lead Partner Name field.
Click the MVG that Oracle CRM On Demand Desktop displays next to the Lead Partner Name field, and then verify that Oracle CRM On Demand Desktop does the following:
Displays the Channel Partners MVG dialog box
Displays the list of partners in the Associated Channel Partners window of the dialog box
Includes a partner record in the Primary window
Enter letters in the Enter Value to Find Record window.
Verify that Oracle CRM On Demand Desktop automatically displays records in accordance with the letters you enter.
To verify the SalesBook control, click the SalesBook icon, and verify that Oracle CRM On Demand Desktop displays the SalesBook dialog box and that this dialog box displays a list of channel partners.
Example Code You Use to Add an MVG
This topic describes some of the code you use to add an MVG in this example. It includes the following information:
Code to Add a Custom Object Type
To add a custom object type, you add the following code to the od_meta_info.xml file. To assist with debugging, it is recommended that you place this code after the last Type definition:
<object TypeId='ChannelPartner' Label='Channel Partner' LabelPlural='Channel
Partners' EnableGetIDsBatching='true' ViewMode='Sales Rep' IntObjName='Channel
Partner' SiebMsgXmlElemName='ChannelPartner'
SiebMsgXmlCollectionElemName='ListOfChannelPartner' >
    <field Name='DS Updated' Label='DS Updated' DataType='DTYPE_DATETIME'
     IsFilterable='no' IsHidden='yes' IOElemName='DSUpdated' />
    <field Name='Id' Label='Id' IsPrimaryKey='yes' DataType='DTYPE_ID'
     IsFilterable='no' IsHidden='yes' IOElemName='Id'/>
    <field Name='Name' Label='Name' DataType='DTYPE_TEXT' IsPartOfUserKey='yes'
     IOElemName='Name' />
    <field Name='Location' Label='Location' DataType='DTYPE_TEXT'
    IsPartOfUserKey='yes' IOElemName='Location'/>
</object>
This code does the following:
Uses properties of the integration object and integration component as the values for attributes.
References only a few of the many fields that exist in the Channel Partner object in Oracle CRM On Demand.
Uses the Name and Location fields as parts of the user key.
You define the natural key in the connector_configuration.xml file.
Code to Map a Custom Object
You can map a field of an Oracle CRM On Demand object to a Microsoft Outlook field or to a custom Oracle CRM On Demand Desktop field. For example, you can do the following:
Map the Name field in Oracle CRM On Demand to the LastName field in Microsoft Outlook
Map the mapLocation field in Microsoft Outlook to the Location field in Oracle CRM On Demand
To map objects, you add the following code to the od_basic_mapping.xml file:
<type id="Currency" icon="type_image:Currency:16">
  <field id ="Name">
    <type>
      <simple type="string"/>
    </type>
  </field>
  <field id ="Currency Symbol">
    <type>
      <simple type="string"/>
    </type>
  </field>
</type>
Note the following requirements:
The value for the type id element in the od_basic_mapping.xml file must equal the value in the TypeId object in the od_meta_info.xml file.
If the object you are adding is to be placed into DB FACADE storage, then the code must be as follows:
<type id="Currency" icon="type_image:Currency:16">
  <field id="Name">
    <type>
      <simple type="string" />
    </type>
  </field>
</type>
Code to Configure the Synchronization of a Custom Object
To configure synchronization for a custom object, you add the following code to the connector_configuration.xml file:
<type id="ChannelPartner">
  <view label="Channel Partner" label_plural="Channel Partners"
   small_icon="type_image:Account:16" normal_icon="type_image:Account:24"
   large_icon="type_image:Account:48"></view>
    <synchronizer name_format=":[:(Name):]">
      <links></links>
      <natural_keys>
        <natural_key>
          <field>Name</field>
          <field>Location</field>
        </natural_key>
      </natural_keys>
    </synchronizer>
</type>
Note the following:
The value in the type id element must equal the value in the TypeId object in the meta_info.xml file.
The natural_key element includes the Name and Location fields as part of the user key.
Code to Add a Lookup View
To add a lookup view, add the following code to the lookup_view_defs.xml file:
<lookup_view_def key="lookup:channel_partners">
<display name="Channel Partners"></display>
<filter dasl="[http://schemas.microsoft.com/mapi/proptag/0x001A001E] >=
'IPM.Contact.OnDemand.Channel_Partner' AND [http://schemas.microsoft.com/mapi/
proptag/0x001A001E] <= 'IPM.Contact.OnDemand.Channel_Partner'"></filter>
<view id="channel_partner:salesbook"></view>
<quick_lookup dasl_format="[http://schemas.microsoft.com/mapi/id/{00062004-0000-
0000-C000-000000000046}/8005001E] = '%s'"></quick_lookup>
<type id=""></type>
</lookup_view_def>
The following table describes important attributes you use in this code.
Table Attributes in the Code to Add a Lookup View
| Attribute | Description |
|---|---|
key |
Id of the lookup control. |
display name |
Caption of the lookup control. |
filter |
Object that Oracle CRM On Demand Desktop displays on the lookup control. To specify an object type, use the message_type attribute from the od_basic_mapping.xml file. |
view |
Id of the salesbook control that Oracle CRM On Demand Desktop uses for this lookup. |
type id |
The type of object that Oracle CRM On Demand Desktop creates if the user clicks New on the lookup control. If this attribute is empty, then Oracle CRM On Demand Desktop disables the button. |
Code to Add a View
To add the definition for a view, add the following code to the views.xml file:
<str key="channel_partner:mvg">  <![CDATA[<?xml version="1.0"?>
  <view>
    <viewname>Phone List</viewname>
  <viewstyle>table-layout:fixed;width:100%;font-family:Segoe UI;font-
   style:normal;font-weight:normal;font-size:8pt;color:Black;font-charset:0</
   viewstyle>
  <viewtime>0</viewtime>
  <linecolor>8421504</linecolor>
  <linestyle>3</linestyle>  <gridlines>1</gridlines>
  <collapsestate/>
  <rowstyle>background-color:window;color:windowtext</rowstyle>
  <headerstyle>background-color:#D3D3D3</headerstyle>
  <previewstyle/>
    <arrangement>
      <autogroup>0</autogroup>
      <collapseclient/>
    </arrangement>
    <multiline>
      <width>0</width>
    </multiline>
    <column>
      <name>HREF</name>
      <prop>DAV:href</prop>
      <checkbox>1</checkbox>
    </column>
    <column>
      <type>string</type>
      <heading>Name</heading>
      <prop>http://schemas.microsoft.com/mapi/string/{00020329-0000-0000-C000-
       000000000046}/od%20PartnerName</prop>
      <width>426</width>
      <style>padding-left:3px;;text-align:left</style>
      <editable>1</editable>
      <userheading>Name</userheading>
    </column>
    <column>
      <type>string</type>
      <heading>Location</heading>
      <prop>http://schemas.microsoft.com/mapi/string/{00020329-0000-0000-C000-
       000000000046}/od%20PartnerLocation</prop>
      <width>426</width>
      <style>padding-left:3px;;text-align:left</style>
      <editable>1</editable>
      <userheading>Location</userheading>
      </column>
      <orderby>
        <order>
          <heading>File As</heading>
          <prop>urn:schemas:contacts:fileas</prop>
          <type>string</type>
          <sort>asc</sort>
        </order>
      </orderby>
      <groupbydefault>0</groupbydefault>
      <previewpane>
        <markasread>0</markasread>
      </previewpane>
  </view>]]>
</str>
Code to Add a New Association
To add a new association, add the following code to the business_logic.js file:
{
var opportunity_channel_partner =
    add_mvg_link("Opportunity", "ChannelPartner", "Primary Partner Id", null,
    "Opportunity.Channel_Partner.Association", "OpportunityId",
    "ChannelPartnerId", null, "ChannelPartnerStatus",
    null, ["lookup:channel_partners"],
    false, false, false, true);
    deny_primary_delete(opportunity_channel_partner.mvg1);//optional
    opportunity_channel_partner.mvg1.dialog_template_params =
    "dialog_caption": "#obj_activity_employee_plural",
    "autocomplete_display_format": ":[:(Name):]",
    "associations_view_caption": "#head_associated_channel",
    "associations_view_id": "channel_partner:mvg",
    "primary_selector_display_format": ":[:(PartnerName):]"
}
The ChannelPartnerStatus field contains the status of the Channel Partner object, such as unsaved, deleted, and so on.
The following table describes the important attributes you can use with the add_mvg_link function.
Table Attributes in the Code to Add a New Association
| Attribute | Description |
|---|---|
left_type |
The type of the first linked object, for example, Opportunity. |
right_type |
The type of the second linked object, for example, Channel Partner. |
left_obj_primary |
The field of the Opportunity object. This field contains the primary Id for the Channel Partner object. |
right_obj_primary |
The field of the Channel Partner object. This field contains the primary Id for the Opportunity object. |
assoc_type |
The Id of the association type described in the od_meta_info.xml file and the od_basic_mapping.xml file. |
left_link |
The field of the association object that contains the Id of the opportunity. |
right_link |
The field of the association object that contains the Id of the channel partner. |
left_assoc_status |
The field of the association that contains the status of the opportunity. |
right_assoc_status |
The field of the association that contains the status of the channel partner. |
left_objs_view_ids |
The list of lookup view definitions you must use to display opportunity objects. |
right_objs_view_ids |
The list of lookup view definitions you must use to display channel partner objects. |
left_primary_refresh _required |
If the primary object is changed, and if the left_primary_refresh_required attribute is true, then Oracle CRM On Demand Desktop updates the object Id for the primary field of the opportunity that you specify in the left_obj_primary attribute. If you use the |
right_primary_ refresh_required |
If the primary object is changed, and if the right_primary_refresh_required attribute is true, then Oracle CRM On Demand Desktop updates the object Id for the primary field of the channel partner that you specify in the right_obj_primary attribute. If you use the |
assoc_left_link_refresh _required |
If the opportunity object is changed, then Oracle CRM On Demand Desktop updates the OpportunityId field of the association that you specify in the left_link attribute. If you use the |
assoc_right_link_ refresh_required |
If the channel partner object is changed, then Oracle CRM On Demand Desktop updates the ChannelPartnerId field of the association that you specify in the right_link attribute. If you use the |
Code to Define a Sales Book Control
To define a SalesBook control, add the following code to the views.xml file.
<str key="channel_partner:salesbook">
  <![CDATA[<?xml version="1.0"?>
    <view>
      <viewname>Phone List</viewname>
      <viewstyle>table-layout:fixed;width:100%;font-family:Segoe UI;font-
style:normal;font-weight:normal;font-size:8pt;color:Black;font-charset:0</
viewstyle>
      <viewtime>0</viewtime>
      <linecolor>8421504</linecolor>
      <linestyle>3</linestyle>
      <gridlines>1</gridlines>
      <newitemrow>1</newitemrow>
      <collapsestate/>
      <rowstyle>background-color:window;color:windowtext</rowstyle>
      <headerstyle>background-color:#D3D3D3</headerstyle>
      <previewstyle/>
      <arrangement>
        <autogroup>0</autogroup>
        <collapseclient/>
      </arrangement>
      <multiline>
        <width>0</width>
      </multiline>
      <column>
        <name>HREF</name>
        <prop>DAV:href</prop>
        <checkbox>1</checkbox>
      </column>
      <column>
        <heading>Last Name</heading>
        <prop>urn:schemas:contacts:sn</prop>
        <type>string</type>
        <width>322</width>
        <style>padding-left:3px;;text-align:left</style>
        <editable>1</editable>
      </column>
      <column>
        <type>string</type>
        <heading>Location</heading>
        <prop>http://schemas.microsoft.com/mapi/string/{00020329-0000-0000-C000-
         000000000046}/od%20Location</prop>
        <width>322</width>
        <style>padding-left:3px;;text-align:left</style>
        <editable>1</editable>
        <userheading>Location</userheading>
      </column>
      <orderby>
        <order>
          <heading>File As</heading>
          <prop>urn:schemas:contacts:fileas</prop>
          <type>string</type>
          <sort>asc</sort>
        </order>
      </orderby>
      <groupbydefault>0</groupbydefault>
        <previewpane>
          <markasread>0</markasread>
        </previewpane>
    </view>]]>
</str>
Setting Up Books for a Customized Package from Version 2.0
To set up book functionality from a customized Oracle CRM On Demand Desktop Version 2.0 package to work with the current version of Oracle CRM On Demand Desktop, complete the following procedure.
Before You Begin
Complete the steps in Updating Oracle CRM On Demand Desktop Product-Specific Files from Version 5.0 to Version 5.1.
To set up books for a customized package from Version 2.0
In the package_res.xml file, insert the following lines inside the
<res_root>element:<str key="lbl_book_of_business">Book Name:</str> <str key="btn_book_select">...</str> <str key="obj_book_plural">Books</str> <str key="lbl_record_set_caption">Record Set</str> <str key="cbx_record_set_team">All records where I am owner or on the team</str> <str key="cbx_record_set_book">All records in a book</str> <str key="cbx_record_set_default_book">All records in my default book</str> <str key="btn_book_select">...</str> <str key="head_record_type">Record Type</str> <str key="head_visibility_model">Record Set</str> <str key="head_book_name">Book Name</str> <str key="record_set_tab_description">Please specify the visibility model to be used for each record type. If using visibility based on Book of Business, you will need to pick a book using the Book Selector. If a visibility mode is not specified for a record type, then "Owner and Team" visibility will be used.</str> <str key="caption_book_dlg">Select Book</str> <str key="msg_book_is_required">Book Name is required.</str> <str key="msg_book_cannot_contain_data">This book cannot contain data. Select another one to proceed.</str> <str key="msg_book_must_be_custom">Record must be associated to a custom book.</str> <str key="msg_owner_must_be_empty">Owner must be empty.</str> <str key="inaccessible_book"><Inaccessible book></str> <str key="lbl_include_book_subitems">Include Sub-Items</str> <str key="book_selector_top_node">$obj_book_plural$</str> <str key="msg_ownership_log" skip_translation="yes">Ownership mode of {0} is {1}</ str> <str key="msg_Specifying_both_Book_and_Owner_is_prohibited">Specifying both Book and Owner is prohibited.</str> <str key="lbl_books_not_supported">There are no Books of Business defined for this user. Only records where you are owner or a team member will be synchronized.</str> <str key="books_retrieve_failed_title">Books of Business</str> <str key="btn_clear">Clear</str> <str key="filter_page-page_description">Please, specify the criteria you'd like to use for determining which $remote_app_name$ items have to be synchronized with $app_name$. The following filters are applied to selected categories and sub- categories based on the data selected in the $lbl_record_set_caption$ tab.</str> <str key="msg_subitems_required_for_book">The book you have selected is a parent book and cannot contain data. To synchronize using the related sub-books, enable "Include Sub-Books" to continue. If this parent book has no sub-books, select another book.</str> <str key="msg_cannot_select_book_subitems_disallowed">You cannot select a book that cannot contain data.</str> <str key="head_contact_book_info">Contact Book info</str> <str key="head_account_book_info">Account Book info</str> <str key="head_opportunity_book_info">Opportunity Book info</str> <str key="head_lead_book_info">Lead Book info</str> <str key="err_msg_invalid_request">Request contains invalid data</str> <str key="msg_book_access_denied">You don't have access rights to Books of Business, used for synchronization or the Books are no longer valid. Please check your Books of Business configuration settings in the Control Panel or contact technical support for assistance.</str> <str key="msg_record_access_denied">Access denied.</str> <str key="msg_record_set_query_save_record_set">Do you want to save changes to record set?</str>In the dialogs.xml file, make the following updates:
Remove the following lines from the <dialogs> element:
<dialog id="Control panel">
  <script>
  </script>
  <layout caption="#control_panel_title" sizable="true"
   small_icon="app_small_icon">
    <appearance height="480" width="744" position="desktop_center" />
    <cell>
      <stack layout="vert" rollup="true">
        <cell size="70">
          <cp_toolbar id="toolbar"/>
        </cell>
        <cell size="32" autosize="true">
          <cp_infobar id="infobar"/>
        </cell>
        <cell>
          <pages id="cp_pages" tab_order="2">
            <page id="cp_busy_page" layout="cp_busy_page"/>
            <page id="cp_filters_page" layout="cp_filters_page"/>
            <page id="cp_issues_page" layout="cp_issues_page"/>
            <page id="cp_conflicts_page" layout="cp_conflicts_page"/>
            <page id="cp_duplicates_page" layout="cp_duplicates_page"/>
            <page id="cp_confirmations_page" layout="cp_confirmations_page"/>
          </pages>
        </cell>
      </stack>
    </cell>
  </layout>
</dialog>
Insert the following lines inside the <dialogs> element:
<dialog id="select_book_dialog">
  <script><![CDATA[]]>
  </script>
  <layout sizable="true" id="General" caption="#caption_book_dlg"
   min_height="300" min_width="600" small_icon="app_small_icon">
    <appearance height="300" width="600" position="desktop_center" />
    <cell>
      <stack layout="horz" padding="10">
        <cell>
          <stack layout="vert" padding="10" spacing="5">
            <cell>
              <stack layout="horz" spacing="5" padding="5">
                <cell>
                  <treeview id="books_tree" tab_order="1" lines_at_root="true"/>
                </cell>
              </stack>
            </cell>
            <cell size="10" />
            <cell size="25">
              <stack layout="horz" spacing="5">
                <cell size="75">
                  <button tab_order="2" id="btn_clear" visible="false">
                    <text>#btn_clear</text>
                  </button>
                </cell>
                <cell>
                  <checkbox id="include_subitems" tab_order="3" visible="false">
                    <text>#lbl_include_book_subitems</text>
                  </checkbox>
                </cell>
                <cell />
                <cell size="75">
                  <button tab_order="4" id="btn_ok">
                    <text>#btn_ok</text>
                  </button>
                </cell>
                <cell size="75">
                  <button id="btn_cancel" tab_order="5">
                    <text>#btn_cancel</text>
                  </button>
                </cell>
              </stack>
            </cell>
          </stack>
        </cell>
      </stack>
    </cell>
  </layout>
</dialog>
In the connector_configuration.xml file, make the following updates:
Locate the <bindings> section and make the following updates:
Add the following code to <type name="Opportunity"> section:
<binding>
  <field name="OwnerId"/>
  <field name="BookId"/>
</binding>
Add the following code to the <type name="Activity"> section:
<binding>
  <field name="OwnerId"/>
  <field name="BookId"/>
</binding>
Add the following code to <bindings>:
<type name="Contact">
    <binding>
      <field name="OwnerId"/>
      <field name="BookId"/>
    </binding>
</type>
<type name="Account">
    <binding>
      <field name="OwnerId"/>
      <field name="BookId"/>
    </binding>
</type>
<type name="Lead">
    <binding>
      <field name="OwnerId"/>
      <field name="BookId"/>
    </binding>
</type>
Add the following code to the <types> section:
<type id="Book.Type.Association"> <!--Fake type to store user selected data-->
    <view label="Book.Type.Association" label_plural="Book.Type.Association"
     small_icon="type_image:Generic:16" normal_icon="type_image:Generic:24"
     large_icon="type_image:Generic:48" suppress_sync_ui="true"></view>
    <synchronizer sync_it="false" name_format=":[:(BookId) :]:[:(TypeName):]"
     threshold="0">
      <natural_keys>
        <natural_key>
          <field>TypeName</field>
        </natural_key>
      </natural_keys>
    </synchronizer>
</type>
<type id="Book">
    <view label="Book" label_plural="Books" small_icon="type_image:Generic:16"
     normal_icon="type_image:Generic:24" large_icon="type_image:Generic:48"
     suppress_on_top="true" suppress_sync_ui="true"></view>
    <synchronizer name_format=":[:(Label):]" threshold="0" frequency="0">
      <links></links>
    </synchronizer>
</type>
<type id="BookDefaults">
    <view label="BookDefaults" label_plural="BookDefaults"
    small_icon="type_image:Generic:16" normal_icon="type_image:Generic:24"
    large_icon="type_image:Generic:48"  suppress_sync_ui="true"></view>
    <synchronizer name_format=":[:(Value) :]:[:(BookId):]" threshold="0"
    frequency="0">
      <links></links>
    </synchronizer>
</type>
<type id="RequiredFields">
    <view label="RequiredFields" label_plural="RequiredFields"
     small_icon="type_image:Generic:16" normal_icon="type_image:Generic:24"
     large_icon="type_image:Generic:48" suppress_sync_ui="true"></view>
    <synchronizer name_format=":[:(TypeName) :]:[:(Value):]" threshold="0"
     frequency="0">
      <links></links>
    </synchronizer>
</type>
Replace the two occurrences of the
<field>OwnerId</field>element inside the <type id="Activity"> <natural_keys>section with the following line:<field allow_null="true">OwnerId</field>
Update the data_sources.xml file, as follows:
Replace all occurrences of the
scope="general"attribute with the following value:scope="6001"
Insert the following lines inside the <connector> element:
<data_source name="Book.Type.Association">
    <type>Book.Type.Association</type>
    <columns>
      <column>TypeName</column>
      <column>BookId</column>
      <column>IncludeSubBooks</column>
    </columns>
</data_source>
<data_source name="::Defaults">
    <type>::Defaults</type>
    <columns>
      <column>DefaultBookId</column>
      <column>DefaultBookName</column>
    </columns>
</data_source>
<data_source name="Book">
    <type>Book</type>
    <columns>
      <column>Label</column>
      <column>Value</column>
      <column>ParentBookName</column>
      <column>ParentBookId</column>
      <column>BookType</column>
      <column>CanContainDataFlag</column>
    </columns>
</data_source>
<data_source name="BookDefaults">
    <type>BookDefaults</type>
    <columns>
      <column>Label</column>
      <column>Value</column>
      <column>BookId</column>
      <column>IncludeSubBooks</column>
      <column>OrderNumber</column>
    </columns>
</data_source>
In the forms_12.xml files, add a book selector control and a label to each form for the book-enabled object types, and provide a tab_order attribute value for those elements:
Label:
<static id="lbl_book_of_business" tab_order="…">
  <text>#lbl_book_of_business</text>
</static>
Book selector control:
<stack layout="horz">
  <cell>
    <scriptable_edit id="book_of_business" tab_order="…">
      <field value="string"></field>
    </scriptable_edit>
  </cell>
  <cell size="5"></cell>
  <cell size="22">
    <button id="btn_book_select" tab_order="…">
      <text>#btn_book_select</text>
    </button>
  </cell>
</stack>
Update the od_basic_mapping.xml file as follows:
Insert the following lines inside the
<type id = "User">element:<field id = "PrimaryPositionId"> <!-- Custom Book id --> <type> <simple type = "string"/> </type> </field>Insert the following lines inside the
<type id = " ::Defaults">element:<field id = "DefaultBookId"> <type> <simple type = "string"/> </type> </field> <field id = "DefaultBookName"> <type> <simple type = "string"/> </type> </field> <field id = "Book"> <type> <simple type = "string"/> </type> </field> <field id = "TypeDefaultBook"> <type> <simple type = "string"/> </type> </field> <field id = "RequiredFields"> <type> <simple type = "string"/> </type> </field> <field id = "PrimaryPositionId"> <type> <simple type = "string"/> </type> </field> <field id = "FullName"> <type> <simple type = "string"/> </type> </field>Add new types by inserting XML code inside the
<database> <types>element. For a listing of the code to add, see XML Code Addition for the od_basic_mapping.xml File.Add the BookId field to each book-enabled object type as follows:
<field id="BookId">
    <reader>
      <mapi_user>
        <user_field id="od BookId" ol_field_type="1"></user_field>
        <convertor>
          <string/>
        </convertor>
      </mapi_user>
    </reader>
    <writer>
      <outlook_user>
        <user_field id="od BookId" ol_field_type="1"></user_field>
        <convertor>
          <string/>
        </convertor>
      </outlook_user>
    </writer>
</field>
Update the od_meta_info.xml file as follows:
Locate the following lines:
<product_flavor>OD</product_flavor>
<error_codes Type="RecordAlreadyExists" >SBL-EAI-04383/SBL-EAI-04383, SBL-
DAT-00381/SBL-EAI-04381, SBL-DAT-00357/SBL-EAI-04375, SBL-DAT-00381/SBL-DAT-
00381, SBL-DAT-00357/SBL-DAT-00357, SBL-DAT-00215/SBL-DAT-00215</
error_codes>
<error_codes Type="RecordAlreadyDeleted" >SBL-EAI-04378/SBL-EAI-04378</
error_codes>
<error_codes Type="AccessDenied" >*/SBL-ODS-50085</error_codes>
<error_codes Type="SessionExpired" >SBL-ODU-01006/*</error_codes>
<error_codes Type="RecordUpdatedPrematurely" >SBL-DAT-00523/SBL-EAI-04290</
error_codes>
Replace these lines with the following:
<errors>
    <codes Type="RecordAlreadyExists">SBL-EAI-04383/SBL-EAI-04383, SBL-DAT-
     00381/SBL-EAI-04381, SBL-DAT-00357/SBL-EAI-04375, SBL-DAT-00381/SBL-
     DAT-00381, SBL-DAT-00357/SBL-DAT-00357, SBL-DAT-00215/SBL-DAT-00215</
     codes>
     <codes Type="RecordAlreadyDeleted">SBL-EAI-04378/SBL-EAI-04378</codes>
     <codes Type="AccessDenied">*/SBL-ODS-50085</codes>
    <codes Type="SessionExpired">SBL-ODU-01006/*</codes>
    <codes Type="RecordUpdatedPrematurely">SBL-DAT-00523/SBL-EAI-04290</
     codes>
    <codes Type="BookAccessDenied"
     ErrMsgReplacement="#msg_book_access_denied" PassToBalloon="true">SBL-
     EAI-04471/SBL-EAI-04471</codes>
    <codes Type="RecordAccessDenied"
     ErrMsgReplacement="#msg_record_access_denied">SBL-DAT-00542/SBL-EAI-
     04376</codes>
</errors>
Locate the following line:
<object TypeId="::Defaults" Label="#obj_defaults" LabelPlural="#obj_defaults"
IsAssociation="no" IsTopLevel="yes" AllowTypedefCaching="false">
Replace this line with the following:
<object TypeId="::Defaults" Label="#obj_defaults" LabelPlural="#obj_defaults"
IsAssociation="no" IsTopLevel="yes">
Insert the following lines inside the
<common_settings>element:<access_modes_config> <books Enable="true" > <request_scopes> <scope Name="General" /> <scope Name="QBID" /> </request_scopes> <t2b_bnd_config StorageTname="Book.Type.Association" TnameFldname="TypeName" BookIdFldName="BookId" SubbooksFldname="IncludeSubBooks" /> <default_books_picklist Name="TypeDefaultBookPL" /> </books> </access_modes_config>Locate the following line:
<field Name="Id" Label="Id" IsPrimaryKey="yes" IsReadonly="yes"
IsRequired="no" DataType="DTYPE_ID" IsNullable="no" />
Replace this line with the following:
<field Name="RawId" Label="RawId" IsPrimaryKey="yes" IsReadonly="yes"
DataType="DTYPE_ID" IsNullable="no" IsHidden="true" IsFake="true" />
Add the following fields to the
<object TypeId="::Defaults">element:<field Name="FullName" Label="FullName" DataType="DTYPE_TEXT" /> <field Name="PrimaryPositionId" Label="PrimaryPositionId" DataType="DTYPE_TEXT" /> <field Name="Book" Label="Book" DataType="DTYPE_TEXT" IsHidden="true" IsFake="true" PicklistTypeId="BookPL" /> <field Name="DefaultBookId" Label="DefaultBookId" DataType="DTYPE_TEXT" /> <field Name="DefaultBookName" Label="DefaultBookName" DataType="DTYPE_TEXT" / > <field Name="TypeDefaultBook" Label="TypeDefaultBook" DataType="DTYPE_TEXT" IsHidden="true" IsFake="true" PicklistTypeId="TypeDefaultBookPL" /> <field Name="RequiredFields" Label="RequiredFields" DataType="DTYPE_TEXT" IsHidden="true" IsFake="true" PicklistTypeId="FieldsInfoPL" />
For each
<object>element which contains the<extra_command_options>element, do the following:Locate the following line:
<option Name="UseDefaultViewMode" Value="true" Scopes="Dedup" />
Replace this line with the following:
<option Name="UseDefaultViewMode" Value="true" Scopes="Dedup;ONLKP;QBID" />
Insert the following lines inside the
<object>element:<viewmodes> <viewmode Name="None" Scopes="Dedup;ONLKP;QBID" /> </viewmodes>
For each
<object>element of a book-enabled object type, do the following:Insert the following lines inside the
<object>element, whereTypeOrderNumberis the order number of the Type in the connector_configuretion.xml file:<access_mode_config BooksSupported="true" TypeOrderNumber="5" > <involved_fields> <field Name="Owner" /> <field Name="BookName" /> </involved_fields> <scopes> <scope Id="Dedup" BookId="" /> <scope Id="ONLKP" BookId="" /> <scope Id="QBID" BookId="" /> </scopes> </access_mode_config>Add the following fields to the
<object>element of the Contact, Account, Opportunity, and Lead record types:<field Name="BookId" Label="BookId" DataType="DTYPE_TEXT" CRMName="Primary Position Id" /> <field Name="BookName" Label="BookName" DataType="DTYPE_TEXT" CRMName="Primary Position Name" > <suppress_on Upstream="true" /> </field>Add the following fields to the
<object>element of the Activity record type:<field Name="BookId" Label="BookId" DataType="DTYPE_TEXT" CRMName="Position Id" /> <field Name="BookName" Label="BookName" DataType="DTYPE_TEXT" CRMName="Position Name" > <suppress_on Upstream="true" /> </field>Replace the
<field Name='Owner' … />element of the Contact, Account, Opportunity, and Lead record types with the following field element:<field Name='Owner' Label='Owner' DataType='DTYPE_TEXT' IsFilterable='no' IsHidden="yes" CRMName="Owner Alias" > <suppress_on Upstream="true" /> </field>Add the following field element to the Activity object:
<field Name="Owner" Label="Owner" DataType="DTYPE_ID" IsFake="true"
IsFilterable='no' CRMName="Assigned To" IsHidden="yes">
    <suppress_on Upstream="true" />
</field>
Inside the
<root>element, add the lines of XML code listed in XML Code Addition for the od_meta_info.xml File.
In the od_helpers.js file, after the first line of the file, insert the JavaScript code listed in JavaScript Code Addition for the od_helpers.js File.
Update the application_script.js file as follows:
Insert the following code line after the
var cp_pages = [line:{native: false, layout: "cp_record_set_page", available: true, image: "type_image:Book:32", caption: application.session.res_string("lbl_record_set_caption")},Locate the existing
fra_handler(fra)function:function fra_handler(fra) { var current_form = null; var on_closed = function() { current_form = null; fra.exit_current_step(false); } function on_fra_step(id) { if (id == "advanced") { var xml = ui.get_dialog_xml("PropSheetHost"); xml = helpers.replace_all("$prop_sheet_layout", "options_advanced_page", xml); current_form = ui.create_dialog_from_xml(0, xml); current_form.on_closed.connect(on_closed) current_form.visible = true; } } fra.on_step.connect(on_fra_step); fra.add_builtin_step("welcome"); fra.add_builtin_step("sync_filters"); fra.add_builtin_step("sync_schedule"); fra.add_step("advanced", session.res_string("sa-advanced_settings- caption"), session.res_string("sa-advanced_settings-description"), "sa- advanced_settings-picture", true); fra.add_builtin_step("convert_items"); fra.add_builtin_step("first_sync"); }Replace the existing
fra_handler()function with the following:function fra_handler(fra) { var current_form = null; var on_closed = function() { current_form = null; fra.exit_current_step(false); } function on_fra_step(id) { switch (id) { case "advanced": step_advanced(); break; case "record_set": step_record_set(); break; case "server_configuration": step_server_configuration(); break; } function step_advanced() { var xml = ui.get_dialog_xml("PropSheetHost"); xml = helpers.replace_all("$prop_sheet_layout", "options_advanced_page", xml); current_form = ui.create_dialog_from_xml(0, xml); current_form.on_closed.connect(on_closed); current_form.visible = true; } function step_record_set() { var cp_ctx = { "open_context": "cp_record_set_page", "single_page": true, "on_closed_fn": on_closed }; sync_ui_session..show_cp(cp_ctx); } function step_server_configuration() { current_form = ui.create_dialog(0, "FRA Server Configuration Dlg"); current_form.on_closed.connect(on_closed); current_form.visible = true; } } fra.on_step.connect(on_fra_step); fra.add_builtin_step("welcome"); fra.add_step("server_configuration", application.session.res_string("sa- server_configuration-caption"), application.session.res_string("sa- server_configuration-description"), "sa-server_configuration-picture", true); fra.add_step("record_set", application.session.res_string("sa-record_set- caption"), application.session.res_string("sa-record_set-description"), "sa- record_set-picture", true); fra.add_builtin_step("sync_filters"); fra.add_builtin_step("sync_schedule"); fra.add_step("advanced", application.session.res_string("sa- advanced_settings-caption"), application.session.res_string("sa- advanced_settings-description"), "sa-advanced_settings-picture", true); fra.add_builtin_step("convert_items"); fra.add_builtin_step("first_sync"); }Add the following code to the end of the file:
var ownership_logger = application.create_state_set();
var types_to_log = ["Activity", "Contact", "Opportunity", "Lead", "Account"];
ownership_logger.add("synchronizing", false);
ownership_logger.on_changed.connect(function(synchronizing_finished){
  if(synchronizing_finished)
   {
        var sync_is_finished = ownership_logger.is_actual;
        helpers.for_each2(types_to_log, function(type_id){
        application.logger.info(helpers.format(session.res_string("msg_owners
        hip_log"),[type_id, od_helpers.get_ownership_mode(g_ctx, type_id)]));
        });
        // Store Users' Custom Book Ids for autoresolver
        var book_ids = [];
        helpers.for_each(session.find_items("User", session.empty_criteria),
            function(item) { book_ids.push(item["PrimaryPositionId"]); });
        g_ctx.application.settings.set("CustomBookIds", book_ids.join(";"));
    }
});
Update the autoresolver.js file as follows:
Replace the substring
left_valueswithremote_valuesthroughout the entire file.Replace the substring
right_valueswithlocal_valuesthroughout the entire file.Add the following
resolve_custom_book()function to the end of the file:function resolve_custom_book(field_name, local_set, remote_set, resolution) { var lid = local_set.get_field(field_name); var rid = remote_set.get_field(field_name); var custom_book_ids = application.settings.get("CustomBookIds"); if (lid == "" && custom_book_ids != null && custom_book_ids.search(rid) > -1) return resolution.set_field(field_name, rid), true; return false; }Locate the following line:
resolve_to_winner("OwnerId", remote_set, local_set, resolution); //OLOD-284Add the following after the line:
resolve_custom_book("BookId", local_set, remote_set, resolution);Locate the following line:
resolve_to_local_nonempty("PrimaryShipToCounty", local_set, remote_set,
resolution);
Add the following after the line:
resolve_custom_book("BookId", local_set, remote_set, resolution);Locate the following line:
resolve_to_local_nonempty("AlternateCounty", local_set, remote_set,
resolution)
Add the following after the line:
resolve_custom_book("BookId", local_set, remote_set, resolution);Locate the following line:
resolve_zero_to_null("Revenue", local_set, remote_set, resolution)Add the following after the line:
resolve_custom_book("BookId", local_set, remote_set, resolution);Locate the following line:
resolve_to_local_nonempty("County", local_set, remote_set, resolution);Add the following after the line:
resolve_custom_book("BookId", local_set, remote_set, resolution);
Update the business_logic.js file as follows:
Locate the following line:
if(!(ctx.form.item.snapshot.AccountId != null && account_id == null))
Replace the line with the following:
if(!(action_ctx.item_ex.get_property("AccountId") != null && account_id ==
null))
Locate the following function:
function deny_primary_delete(mvg_link)
{
    scheme.triggers.add_simple_trigger(data_model.deny_primary_delete_trigger,
mvg_link.type, mvg_link.link_to, mvg_link.tag, "removing");
}
Replace the function with the following functions:
function deny_primary_delete(mvg_link)
{
    scheme.triggers.add_simple_trigger(deny_primary_delete_trigger_wrapper,
    mvg_link.type, mvg_link.link_to, mvg_link.tag, "removing");
    scheme.triggers.add_simple_trigger(deny_primary_set_non_current_user,
    mvg_link.type, mvg_link.link_to, null, "creating");
     function deny_primary_set_non_current_user(ctx, action_ctx)
    {
      var mode = od_helpers.get_ownership_mode(ctx, action_ctx.type);
      if(mode == "mixed" || mode == "owner")
      {
        var curr_user_id = helpers.get_current_user_id(ctx.session),
        with_user_id = action_ctx.with_id;
        var is_manual_operation = action_ctx.params == null ||
        action_ctx.params.is_manual_operation;
        // prevent manual set primary to non-current user
        if (is_manual_operation && with_user_id != null && action_ctx.tag ==
        "direct" && !helpers.ids_equal(ctx.session, curr_user_id,
         with_user_id )) action_ctx.notification_params.cancel = true;
          // set current user primary, allowed for manual operation only
          if (is_manual_operation && with_user_id != null && action_ctx.tag
          == "mvg" && helpers.ids_equal(ctx.session, curr_user_id,
         with_user_id ))
         {
            var linked_direct = ctx.linker.linked({ "item_ex":
            action_ctx.item_ex, "tag": "direct", "link_to":
            action_ctx.link_to });
            ctx.linker.link({ "item_ex": action_ctx.item_ex, "link_to":
            action_ctx.link_to, "tag": "direct", "with_id": with_user_id });
            var linked = ctx.linker.linked({ "item_ex": action_ctx.item_ex,
            "tag": "mvg", "link_to": action_ctx.link_to });
            if(linked_direct.value == null &&
            helpers.contains_object_id(ctx.session, linked.values,
            with_user_id)) // owner was empty but association with current user
            alrady exists
          action_ctx.notification_params.cancel = true; // prevent "already
          present" msg
        }
      }
    }
     function deny_primary_delete_trigger_wrapper(ctx, action_ctx)
    {
        var mode = od_helpers.get_ownership_mode(ctx, action_ctx.type);
        if(mode == "owner")
          data_model.deny_primary_delete_trigger(ctx, action_ctx);
    }
}
Locate the following function:
function prefill_owner(ctx)
{
    var current_user_id = helpers.get_current_user_id(ctx.session);
    if (current_user_id != null)
    {
      return ([
          { "with_id": current_user_id, "tag": "mvg" },
          { "with_id": current_user_id, "tag": "direct" }
      ]);
    }
    else return [];
}
Replace the function with the following code:
function prefill_owner(ctx, type_id)
{
    type_id = type_id || ctx.item_ex.get_type();
    var current_user_id = helpers.get_current_user_id(ctx.session);
    if (current_user_id != null)
    {
      var ownership_mode = od_helpers.get_ownership_mode(ctx, type_id);
      var fill_owner = ownership_mode != "book" && !(ownership_mode == "mixed"
      && prefill_book(ctx, type_id)); // prefill owner in mixed mode if no book
      was prefilled
      var links = [
        { "with_id": current_user_id, "tag": "mvg" }, // add to team
        { "with_id": current_user_id, "tag": "direct" } // fill owner
      ];
      if(!fill_owner)
        links = [];
      return links;
    }
    else return [];
}
function prefill_activity_owner(ctx)
{
    return prefill_owner(ctx, "Activity");
}
function prefill_book(ctx, type_id)
{
    type_id = type_id || ctx.item_ex.get_type();
    var ownership_mode = od_helpers.get_ownership_mode(ctx, type_id);
    switch (ownership_mode)
    {
      case "book":
        var user_selected_book = od_helpers.get_ol_storage_rs_book(ctx,
        type_id);
        var book_id = user_selected_book != null ? user_selected_book.BookId
        : "";
        if (!book_id) {
          var default_book = ctx.session.find_item("BookDefaults",
          ctx.session.create_expression("Value", "eq", type_id));
          book_id = default_book != null ? default_book.BookId : "";
          }
        if(!book_id)
        {
            var defaults = helpers.get_defaults(ctx.session),
              user_default_book_name = defaults != null ?
              defaults.DefaultBookName : "",
              user_default_book = ctx.session.find_item("Book",
              ctx.session.create_expression("Label", "eq",
              user_default_book_name));
              book_id = user_default_book != null ? user_default_book.Value :
              book_id;
        }
        if(od_helpers.book_can_contain_data(ctx, book_id))
          return book_id;
    break;
    case "mixed":
        var user_selected_book = od_helpers.get_ol_storage_rs_book(ctx,
        type_id);
        var book_id = user_selected_book != null ? user_selected_book.BookId
        : "";
        if (book_id && od_helpers.book_can_contain_data(ctx, book_id))
      return book_id;
    break;
    default:
      return "";
    break;
    }
}
function prefill_activity_book(ctx)

{
    return prefill_book(ctx, "Activity");
}
function prefill_lead_owner_od(ctx)
{
    var current_user_id = null;
    if(ctx.security_descriptor.ownership_mode() != "book")
    {
      current_user_id = helpers.get_current_user_id(ctx.session);
    }
    return current_user_id;}
}
Locate the following line:
scheme.objects.get_object("Activity")["initial_links_fn"] = prefill_owner;

scheme.objects.get_object("Activity").get_field("OwnerId")["initial_value_fn
"] = prefill_owner_od;
Replace the line with the following:
scheme.objects.get_object("Activity")["initial_links_fn"] =
prefill_activity_owner;

scheme.objects.get_object("Activity").get_field("BookId")["initial_value_fn"
] = prefill_activity_book;
Locate the following line:
scheme.objects.get_object("Contact").get_field("OwnerId")["initial_value_fn"
] = prefill_owner_od;
Replace the line with the following:
scheme.objects.get_object("Contact").get_field("BookId")["initial_value_fn"]
= prefill_book;
Locate the following line:
scheme.objects.get_object("Account").get_field("OwnerId")["initial_value_fn"
] = prefill_owner_od;
Reeplace the line with the following:
scheme.objects.get_object("Account").get_field("BookId")["initial_value_fn"]
= prefill_book;
Locate the following line:
scheme.objects.get_object("Lead").get_field("OwnerId")["initial_value_fn"] =
prefill_owner_od;
Replace the line with the following:
scheme.objects.get_object("Lead").get_field("OwnerId")["initial_value_fn"] =
prefill_lead_owner_od;

scheme.objects.get_object("Lead").get_field("BookId")["initial_value_fn"] =
prefill_book;
Locate the following line:
scheme.objects.get_object("Opportunity").get_field("OwnerId")["initial_value
_fn"] = prefill_owner_od;
Replace the line with the following:
scheme.objects.get_object("Opportunity").get_field("BookId")["initial_value_
fn"] = prefill_book;
Locate the following line:
add_association_description(owner_result.owner, proxy, null, "direct");
Replace the line with the following:
if(activity_ownership_mode() != "book" &&
!proxy.item_ex().get_property("BookId"))
                    add_association_description(owner_result.owner, proxy, null, "direct");
Locate the following line:
var const_ctx = { "item_ex": proxy.item_ex(), "submited": submited != false };Replace the line with the following:
var const_ctx = { "item_ex": proxy.item_ex(), "submited": submited != false,
"params": {"is_manual_operation": false} };
Locate the following line:
if(helpers.contains_object_id(ctx.session, proxy_team.values, current_user))
Replace the line with the following:
if(activity_ownership_mode() != "owner" ||
helpers.contains_object_id(ctx.session, proxy_team.values, current_user))
Locate the following lines:
//    var owner_filter = ctx.session.create_expression("Primary Owner Id", "eq",
owner);
  var owner_filter = ctx.session.create_expression("OwnerId", "eq", owner);
Replace the lines with the following:
  var owner_filter = ctx.session.create_expression("OwnerId", "eq", owner),
   ownership_mode = activity_ownership_mode();
Locate the following line:
conversation_id_filter.add(owner_filter);
Replace the line with the following:
if(ownership_mode == "owner")
  conversation_id_filter.add(owner_filter);
Locate the following line:
filter.add(owner_filter);
Replace the line with the following:
if(ownership_mode == "owner")
  filter.add(owner_filter);
Locate the following line:
if (helpers.ids_equal(ctx.session, owner.value,
get_owner_for_ol_item(ol).owner)
Replace the line with the following:
if ((activity_ownership_mode() != "owner" || helpers.ids_equal(ctx.session,
owner.value, get_owner_for_ol_item(ol).owner))
Locate the following line:
if (is_current_user(primary_employee.value) || object_is_not_sync)
Replace the line with the following:
if (activity_ownership_mode() == "owner" &&
is_current_user(primary_employee.value) || object_is_not_sync)
Insert the following function inside the activity_processor(ctx) function:
function activity_ownership_mode()
{
  return od_helpers.get_ownership_mode(ctx, "Activity")
}
Update the forms.js file as follows:
Insert the
register_book_control(ctx, owner_ctrl)function at the end of the file. For a listing of the code, see JavaScript Code Addition for the forms.js File.Locate the following line inside the
activity_subform(ctx)function:activity_form_base.apply(this, arguments);
Add the following code after the line:
register_book_control(ctx, "ActionToEmployee");
Make the following changes inside the
activity_form(ctx)function:Remove the following lines:
// enabling autoprefilling this item;

ctx.form_links_manager.init_new();
Locate the following line:
activity_form_base.apply(this, arguments);
Add the following code after the line:
// enabling autoprefilling this item;
ctx.form_links_manager.init_new();
register_book_control(ctx, "ActionToEmployee");
Remove the following line:
validator.validate_empty_field("OwnerId", "ActionToEmployee",
"msg_activity_owner_validation", false);
Locate the following line inside the
od_contact_form(ctx)function:ctx.form_links_manager.init_new();
Add the following after the line:
register_book_control(ctx, "TeamToContact");
Locate the following line inside the
od_lead_form(ctx)function:ctx.form_links_manager.init_new();
Add the following after the line:
register_book_control(ctx);
Make the following changes inside the
od_opportunity_form(ctx)function:Remove the following lines:
// enabling autoprefilling this item;
ctx.form_links_manager.init_new();
Remove the following lines:
Status_control_changed();
if (ctx.item_ex.get_id() == null) {
  Type_control_changed();
} else {
  update_picklistSalesStage_control(form.item.snapshot.SalesProcessId);
}
Locate the following line:
ctx.form.on_saved.connect(form_saved);Add the following code after the line:
// enabling autoprefilling this item;
ctx.form_links_manager.init_new();

 register_book_control(ctx, "TeamToOpportunity");

 Status_control_changed();
if (ctx.item_ex.get_id() == null) {
  Type_control_changed();
} else {
  update_picklistSalesStage_control(form.item.snapshot.SalesProcessId);
}
Make the following changes inside the
od_opportunity_form(ctx)function:Remove the following lines:
// enabling autoprefilling this item;

ctx.form_links_manager.init_new();
Locate the following line:
ctx.form.on_saved.connect(form_saved);
Add the following code after the line:
// enabling autoprefilling this item;
ctx.form_links_manager.init_new();

 register_book_control(ctx, "TeamToAccount");