6 NCL DCC
This document contains the setup and usage of Credit Card Transfer for NCL DCC Handling.
Prerequisite, Supported Systems, and Compatibility
This section describes the minimum requirements to use the NCL DCC Handling.
-
OHC Credit Card Transfer.exe
-
OHC Tools.exe
-
SPMS Parameters
Compatibility
SPMS version 20.1 or later. For customer operating on version below 20.1, database upgrade to the recommended or latest version is required.
SPMS Parameters NCL DCC
This section describes the Parameters available to Credit Card Transfer module and they are accessible in Administration module, System Setup, Parameter.
Table 6-1 PAR_GROUP General
| PAR Name | PAR Value | Description |
|---|---|---|
|
Enable Signature Capture for Credit Card |
0 or 1 |
0 - Disables Signature Capture for Credit Card 1 - Enables Signature Capture for Credit Card |
|
Credit Card DCC Confirm Message |
0 or 1 |
0 - Disables Credit Card DCC (Dynamic Currency Conversion) 1 - Enables Credit Card DCC (Dynamic Currency Conversion) |
|
Credit Card DCC Message |
&Guest Currency Choice &&Your Card Billing Currency: <xxx> &&Current Rate of Exchange: <yyy> &Rate includes 3% margin &&Select the currency your charges will be finalized in |
|
|
Credit Card DCC Route Message |
&The guest named below: &Name as it appears on the card: &<CNAME> &&Credit Card No. : & XXXX XXXX XXXX <NO> &will pay for all charges made by the & Following guest(s) during their onboard vacation: &&Cabin : Guest Name : & |
|
|
DCC Base Country |
Leaves as blank |
|
|
Enable Credit Card DCC |
0 or 1 |
0 - Enables Credit Card DCC 1 - Disables Credit Card DCC |
Table 6-2 PAR_GROUP Interfaces
| PAR Name | PAR Value | Description |
|---|---|---|
|
Enable Add-on DCC |
NOVATE |
CC Provider that supports Add-on DCC. For example: Novate |
|
Batch CCard Processing Format |
NCL |
Specifies the message format to be generated by OHC Credit Card Transfer |
|
CC Auth/Settlement Folder |
Folder path |
Repository location for authorization/settlement files generated by OHC Credit Card Interface Note: To avoid adverse impact on your system, please abstain from using the following folder path:
|
Configuring SPMS
This section describes the program setup within the Administration module and Management module.
Prerequisite for Program Setup
The Verifone card device requires the vFormAgent.dll and Interop.vFormAgent.dll. These files are downloaded automatically from XAPP into Oracle Hospitality Cruise folder after you run the OHC Launch Panel.
-
DCCLBL.frm
-
DCCCONFIRMLBL.frm
-
SIGNATURE.frm
-
925_SWIPE_CARDONLY.frm
-
WELCOME.frm
-
ROUTING.frm
Hardware Setup
-
Start the Management module and select the Options menu.
-
Navigate to the Hardware tab of the Options screen.
-
At the Card Reader/Encoder #1 section, select the Card Reader Type as Verifone MX925. The port details are shared with Signature Capture, defined in the next step.
-
The port details need to be defined as per below setting, similar to Port properties configured in My Computer, Device Manager.
-
Speed: 115200
-
Data bits: 8
-
Parity: None
-
Stop Bits: 1
-
-
Click Apply and close the Hardware Option screen. The Verifone device will download the required pre-loaded forms and prompt ‘File successfully downloaded’ upon completion.
-
Re-open the Hardware tab and verify that the port number no longer appears in the Port Number column.
-
If a Signature Capture device is used during the credit card registration, assign the device at the Hardware Option under Signature Device. Both the Verifone MX925 Card Reader Type and Signature Capture share the same Port setting.
-
Close the Hardware Optionscreen and restart OHC Management. The device will download and install the required forms upon the program startup. Below are the indicators for the process.
-
Signal is caught screen: This mean the Verifone device is detected.
-
Form Agent screen: Forms are being loaded from the device.
-
System Information screen: Displays the configuration information.
-
-
If the port number is wrongly assigned or the device is not properly connected, a message box shall prompt during program startup. Check if the device is connected and the DLL are properly registered.
vFormAgent.dll & interop.vFormAgent.dllis not updated.vFormAgent.dll & interop.vFormAgent.dllis not registered properly.
System Configuration NCL DCC
This section describes the various system codes setup within the Administration module.
Department Setup
A debit/credit department code of a credit card type is required for charge/posting and this is set up in Administration module, Financial Setup, Department setup.
-
Login to Administration module and select Financial Setup, Department setup from the drop-down list.
-
Click the New button to create a Sub-Department code.
-
At the Main Department section, enter the credit/debit card information such as Payment type, department code and description.
-
At the Payment Type details section,
-
Enter the two digits of the first set of the credit card number in Credit Card digit.
-
Enter the Credit Card ID. For example, MC - MasterCard, VI - Visa, etc.
-
Select the corresponding Credit Card Internal ID from the drop-down box.
-
Enter the Credit Card Merchant Number provided by Service Provider.
-
Select the Commission department from the drop-down list and update the commission rate in percentage.
-
Check the Debit Card No Commission charge if the commission is not applicable to debit card.
-
-
At the Department Security access, select the relevant security level from the drop-down box.
-
At the Department Security access, select the relevant security level from the drop-down box.
-
Click OK to save.
Setting up Receipt
A receipt can be generated upon payment and this requires a report template to be set up. A Standard Credit Card receipt template is available in Administration module, System Setup, Report setup, _Receipts group. Please contact Oracle Hospitality Cruise Support if you would like to configure a customized receipt format.
Importing Credit Card BIN
In order for the program to determine the correct card type (Credit/Debit) and its handling, you are required to import a Credit Card Bank Identification Numbers (BIN) in the file into SPMS. This file contains the complete set of eligible BIN range and is provided periodically by ELAVON. When the BIN file reloads, all previously loaded information will be is overwritten during the process.
Loading the BIN File
-
Login to Administration module and select Financial Setup, Import Credit Card Bin file.
-
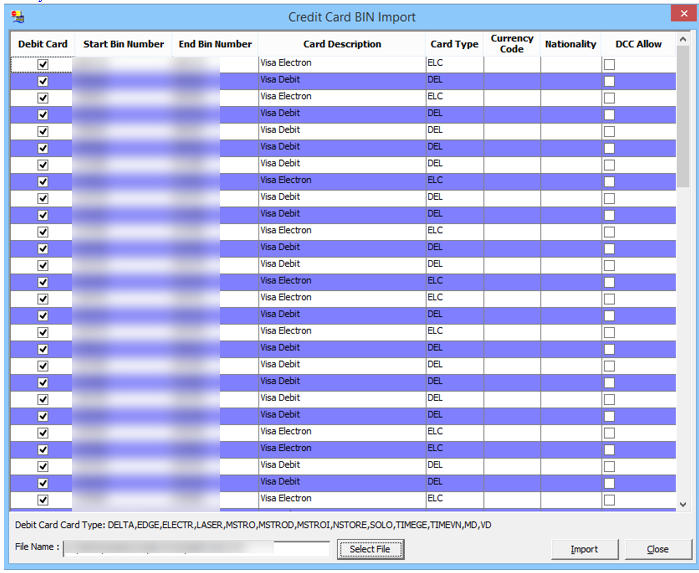
Locate and select the latest BIN file from the folder. For example, see section Sample BIN file.
Figure 6-1 Credit Card BIN Import Screen
-
The BIN file information populates in the Credit Card BIN Import screen. Click the Import to save the BIN ranges into the BIN table and Close to exit.
Setting up PGP Encryption
-
Run OHC Tools and select Upload PGP Key to upload PGP key pair for DCC handling.
Figure 6-2 OHC Tools Menu

-
At the PGP Key Uploaded screen, navigate to the DCC handling tab.
-
Browse for the bank public key (file format is .pkr) under Public Key column.
-
Browse for the secret key (file format is .skr) under Private Key column.
-
Enter a Key Passphrase if the key pair is generated with a passphrase.
-
Enter Ship’s database username and password.
Figure 6-3 PGP Key Uploader — DCC Handling Tab

-
Click the Upload button to begin the key upload for DCC Handling.
-
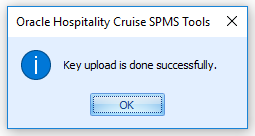
Upon successful upload, the system prompts a message box. Click OK to close and exit.
Figure 6-4 Successful PGP Key Upload Prompt
Using the Verifone Card Device
This section describes the usage of the Verifone device in AQCI, Management Module, and Credit Card Transfer Program.
OHC Management
-
Start the Management module.
-
From the main menu, select Cashier then Guests.
-
Select a checked-in guest and click Get Credit Card button in guest handling screen.
-
The system will prompt a message requesting the card to be swiped. Swipe the card through the card slot of the card device.
-
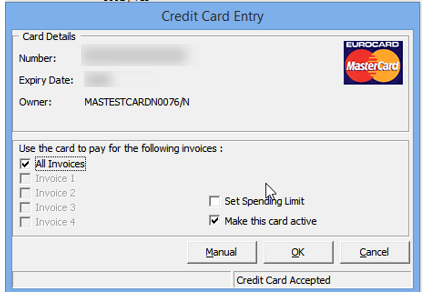
After the card is swiped, the credit card information and its status are reflected on the credit card entry. If the credit card is valid, the credit card accepted status is shown on the screen.
Figure 6-5 Credit Card Entry Details
-
The processing screen displays during the credit card registration in the Credit Card Entry screen.
Note:
The Currency Exchange rate used refers to the DCC table and exchange rate imported from the authorization response file.
If the credit card is eligible for Dynamic Currency Conversion (DCC) and is within the DCC BIN range, the program prompts the DCC handling message box, followed by the currency selection screen
. -
Select the available Card Billing Currency for the credit card to enroll into the DCC handling prompt for acknowledgement of the DCC’s Term and Conditions clause on the card device.
-
Click the Decline prompt on the device will terminate the credit card enrollment and save the credit card data into the database. Before saving the credit card data, it will prompt for signature if the parameter Enable Signature Capture for Credit Card is enabled.
-
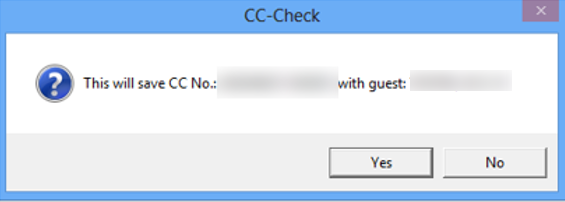
Click Acceptto enroll the credit card in DCC Handling. The system prompts a confirmation to save the credit card data. Click Yes to proceed
Figure 6-6 Message box — DCC Confirmation
-
If the parameter Credit Card DCC Route Message is enabled, a routing message will display on the device.
-
Click the Accept button to accept the routing for the other guest or Decline if there is no routing for this guest.
-
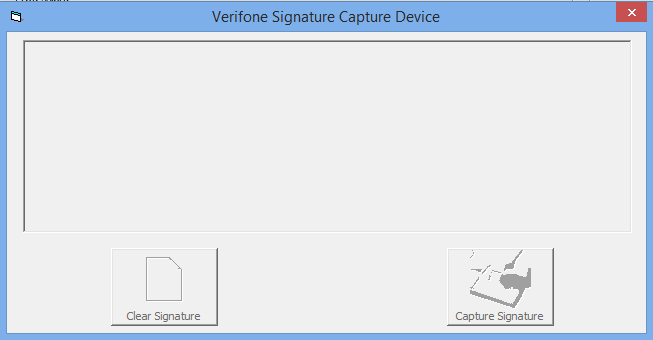
To use the Signature Capture feature, the parameter ‘Enable Signature Capture for Credit Card’ must be enabled and the Signature screen will prompt when the card is registered at both the Management module and the device.
Figure 6-7 Signature Screen at Module
-
After the guest places their signature on the device, click Enter to complete the credit card registration process. If Cancel is pressed, you will receive a No Signature Received promptly in Guest Handling screen.
-
A Transaction Completed screen will display on the device when the registration completes or Transaction Cancelled when the Cancel button is pressed.
-
The signature captured is shown on the signature screen. Clicking the Clear Signature button resets the signature and allow the guest to place a fresh signature.
-
Click the Capture Signature button to complete the credit card registration on the guest account.
-
Click OK at the registration complete prompt to return to the previous screen.
-
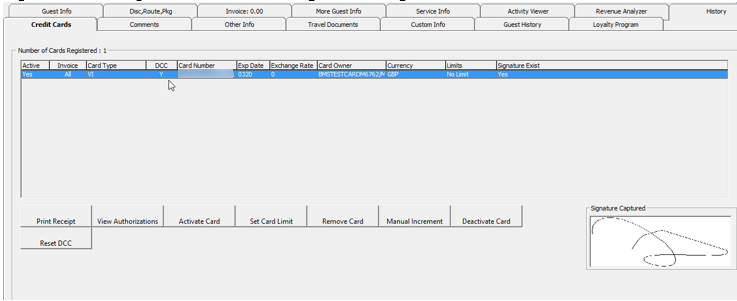
The registered credit card details are stored in the Credit Card tab of Guest handling screen, with the DCC column flagged with ‘Y’ when the card is enrolled with DCC. At the Signature Captured column, the signature captured during the credit card registration is shown. The program does not allow credit card registration without a signature when parameter Enable Signature Capture for Credit Card is enabled.
Figure 6-8 Guest Handling Credit Card Screen
-
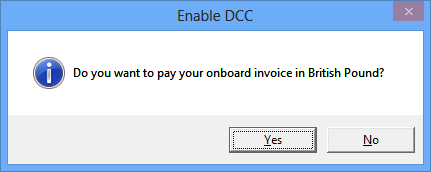
For DCC handling, below message box will prompt when the ‘Card Reader Type’ is assigned to magnetic swipe device. This shows that the credit card is eligible for DCC enrolment.
Figure 6-9 DCC Enable Screen — Manual Card Swipe
-
Click Yes to enroll the DCC handling or No to register credit card without DCC handling.
OHC Advanced Quick Check In
-
Run OHC Advanced Quick Check In (AQCI).
-
At the ribbon bar, select the Setup tab, General Setup, Hardware tab.
-
At the Hardware tab, Card Reader #1 section, a port number is assigned. The port number in AQCI always shows the assigned port number that is different from OHC Management.
-
Select the device from the drop-down list. The Get Credit Card button is enabled at the ribbon bar after you assigned the device.
-
Clicking the Get Credit Card button after selecting a checked-in passenger will prompt a Please Swipe Card notification on AQCI screen.
-
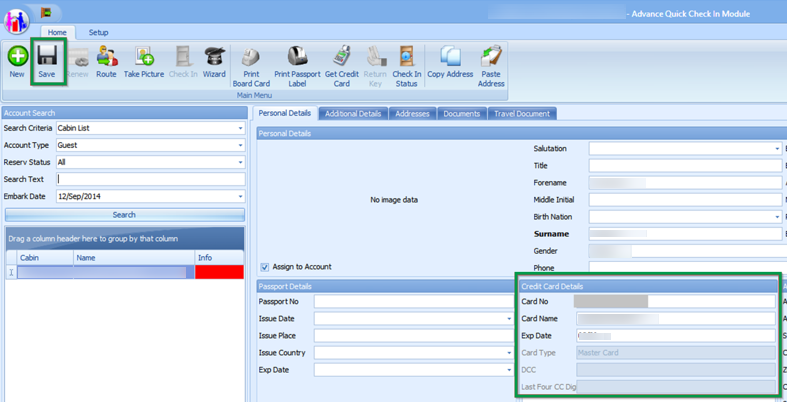
After the card is swiped, the credit card details populate in the respective field of Credit Card Details section.
Figure 6-10 AQCI Credit Card Section
-
Click Save to proceed with the registration. If the credit card is eligible for DCC enrolment, the system prompts the DCC handling message, requesting you to select the currency on the device.
Note:
The Currency exchange rate used refers to the rate in DCC table, an exchange rate imported from the authorization response file.
If the credit card is eligible for Dynamic Currency Conversion (DCC) and is within the DCC BIN range, the program prompts the DCC handling message box, followed by the currency selection screen.
-
Select the available Credit Card Billing Currency to enroll the card in DCC handling. At the DCC Term and Conditions notification prompt, have the guest read and Accept the Terms & Condition on the device. Pressing Decline will terminate the card enrollment and saves the credit details into the database. You will be prompt to place a signature on the device if parameter ‘Enable Signature Capture for Credit Card’ is enabled.
-
At the AQCI screen, select Yes at the confirmation to write the card details into the database.
-
If the parameter Credit Card DCC Route Message is enabled, a routing message will display on the device. Click Accept to route to another guest or Decline if no routing is required.
-
Have the guest place the signature on the device signature screen and press Enter to complete the card registration. The guest signature is captured and shown on AQCI screen. Click the Capture Signature to save and complete the registration.
-
Clicking the Clear Signature button erases the signature, allowing the guest to replace the signature. This prompts a No Signature Received on AQCI screen and Transaction Cancelled on the device.
-
The registered credit card details are stored in the Credit Card tab of Guest handling screen, with the DCC column flagged with ‘Y’ when the card is enrolled with DCC. At the Signature Captured column, the signature captured during the credit card registration is shown. The program does not allow credit card registration without a signature when parameter Enable Signature Capture for Credit Card is enabled and you are required to configure the device in hardware option setup.
-
For DCC handling, when the ‘Card Reader Type’ is assigned to magnetic swipe (not Verifone device), the system prompts a message if you would like to settle the invoice in xxx currency. This shows that the credit card is eligible for DCC enrolment.
-
Click Yes to enroll the DCC handling or No to register credit card without DCC handling.
OHC Credit Card Transfer
-
DCC New Incremental File: For credit card enrolled with DCC Handling.
-
New Incremental File: For normal credit card registration that is not enrolled with DCC Handling.

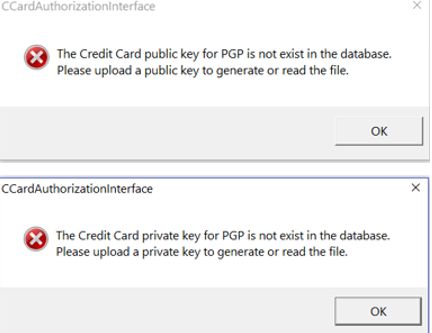
When the PGP Key Pair does not exist in the database, and the Process button is clicked, a message box per below will prompt, prohibiting you to generate an authorization file.
Figure 6-11 PGP Does Not Exist Message Prompt
Batch File Processes
-
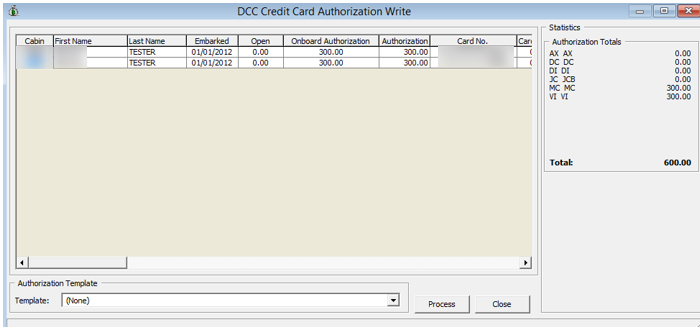
At the Authorization menu, clicking the DCC New Incremental File will list all the credit card requiring authorization that is flagged with DCC= “Y” on the DCC Credit Card Authorization Write screen.
Figure 6-12 DCC Credit Card Authorization Write Screen
Note:
The initial authorization amount refers to Minimum Authorization in Credit Card Financial Setup. -
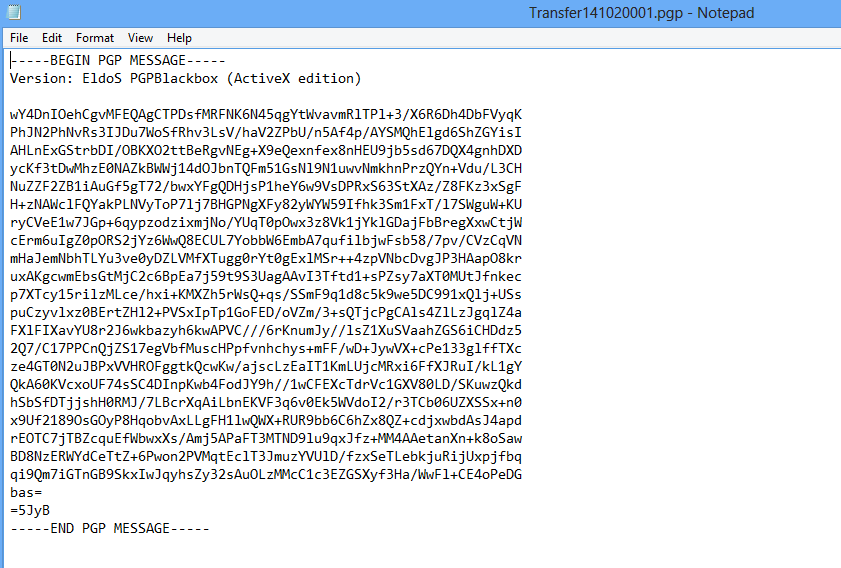
After the Process button is clicked, an Authorization file is generated and encrypted with a PGP key.
Figure 6-13 Sample PGP Encrypted Authorization File
-
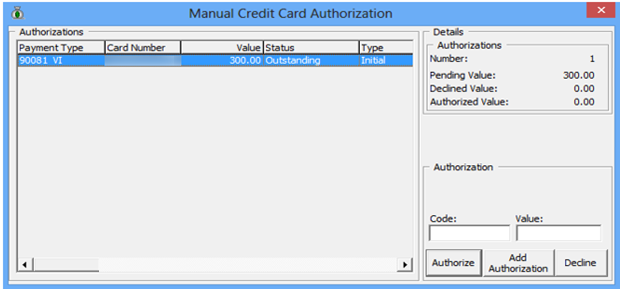
Status for the pending approval authorization transaction is Outstanding, and the transaction can be traced in Management module, Guest handling, Credit Card tab, View Authorization.
Figure 6-14 Credit Card Authorization in Management Module
Reading an Authorization
-
After you have obtained the response file from the merchant, at the Authorization menu, select DCC Read Increment File.
-
Click the Open File button and locate the response file from the merchant.
-
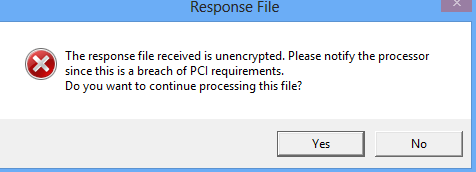
If the response file is not encrypted, an alert message box shall prompt. Select the appropriate response.
Figure 6-15 Non-encrypted Response File
-
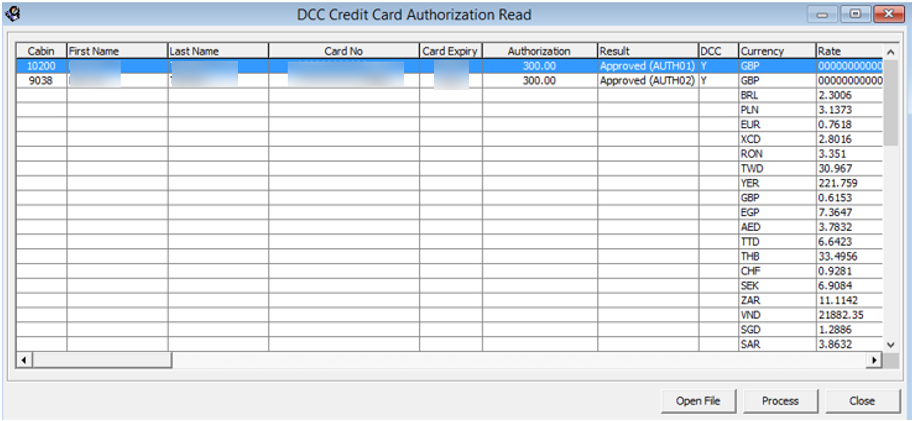
You will receive a batch with currency exchange rate provided by the merchant. See the figure below for sample.
Figure 6-16 Sample Response File with Currency Exchange Rate

-
Click the Process button to continue and this populates the authorization transactions onto the grid.
Figure 6-17 DCC CreditCard Authorization Read Screen with Data
-
Click the Process button again to begin the process. The progress status is displayed on DCC Credit Card Authorization Read screen.
-
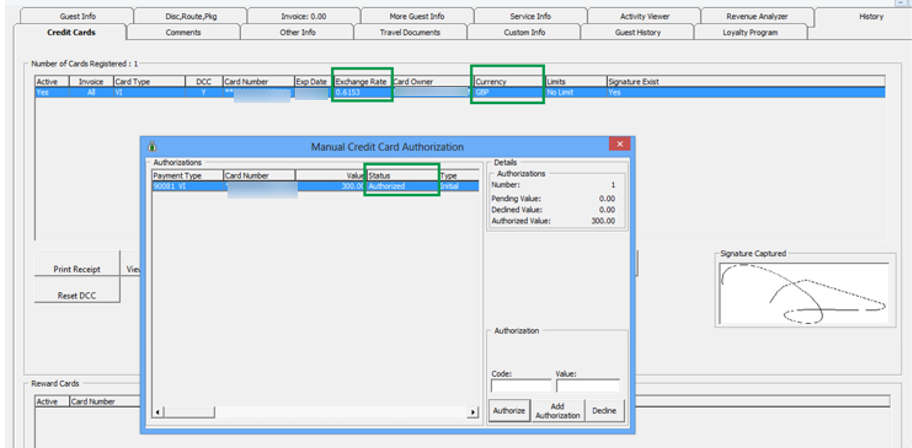
After the authorization completes, the authorization status in Guest Handling, Credit Card tab, View Authorization is updated to Authorized, with the exchange rate provided in the response file. The exchange rate is also stored in the DCC table.
Figure 6-18 OHC Management — Credit Card Tab
Generating an Incremental File
-
At the DCC Credit Card Authorization Write screen, a converted (Onboard Authorization * Currency Exchange Rate) pending authorization transaction is listed. Click the Process button to write the authorization transactions into the file.
Figure 6-19 DCC Credit Card Authorization Write

-
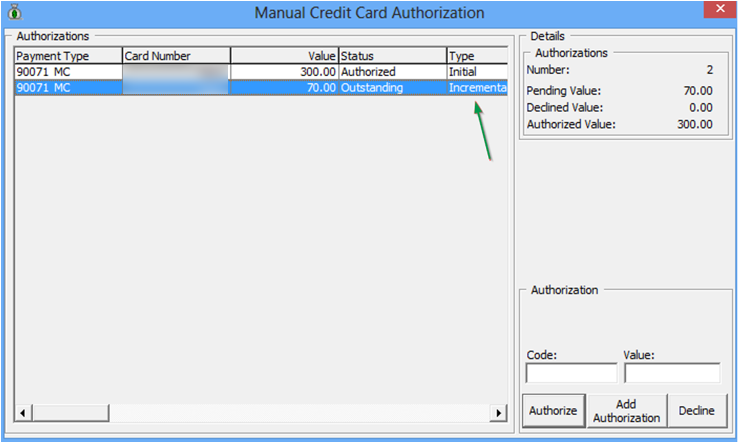
In Guest Handling, Credit Card, View Authorization screen, the status of the unconverted incremental authorization amount is listed as Outstanding status.
-
To change the status to Authorize, see Reading an Authorization.
Figure 6-20 View Authorization with Incremental Authorization — Pending Approval
Generating Incremental File with Authorization Template
An Authorization Template is used to obtain additional authorization amount. Usage of this template only applies to Incremental Authorization and does not apply to Initial Authorization. Below are the steps to setup the Authorization Template.
-
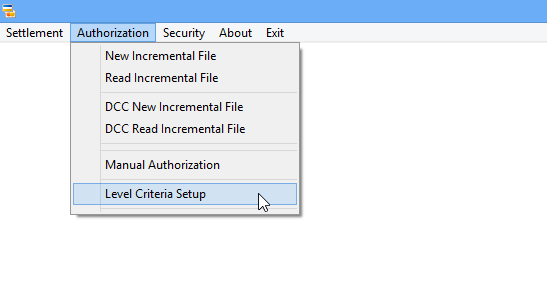
At the Authorization menu, clicked the Level Criteria Setupfrom the drop-down list.
Figure 6-21 OHC Credit Card Transfer — Authorization
-
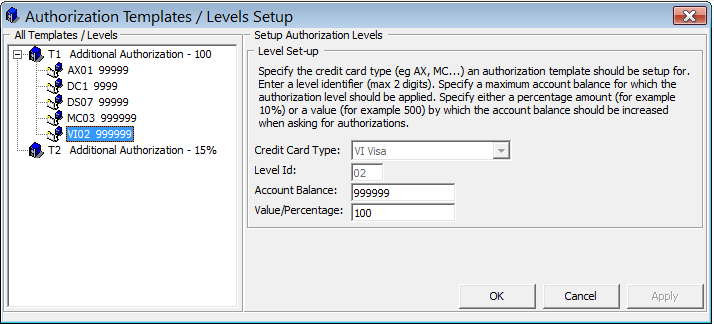
Configure the Authorization template in value amount. For example, see Figure 6–27 — Sample Level Criteria Setup in Value.
-
Define the credit card type (VI Visa).
-
Define the Level ID (02)
-
Define the Account Balance (999999)
-
Define the Value/Percentage (100)
Figure 6-22 Sample Level Criteria Setup in Value
-
-
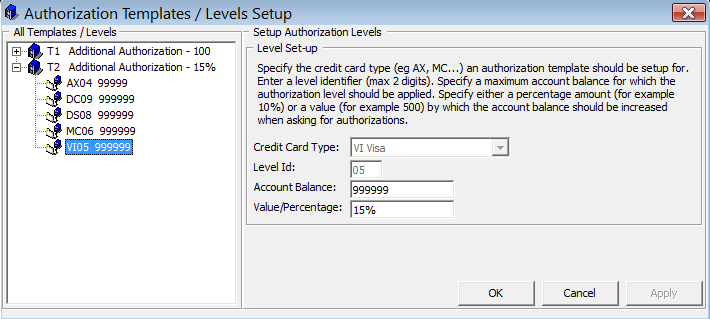
Configure the Authorization template in percentage. For example, see Figure 6–28 — Sample Level Criteria Setup in Percentage.
-
Define the credit card type (VI Visa)
-
Define the Level ID ( 05)
-
Define the Account Balance (999999)
-
Define the Value/Percentage (15%)
Figure 6-23 Sample Level Criteria Setup in Percentage
-
-
Below are the formulas use in Authorization Template calculation
-
For Value Amount
-
If current balance > 0 = (Total Posting - Total Approved Authorization Amount) + Level Amount
-
If current balance < 0 = (Level Amount - Open balance)
-
-
For Percentage
-
(Total posting - Total approved authorization) + (current balance + percentage%)
-
-
-
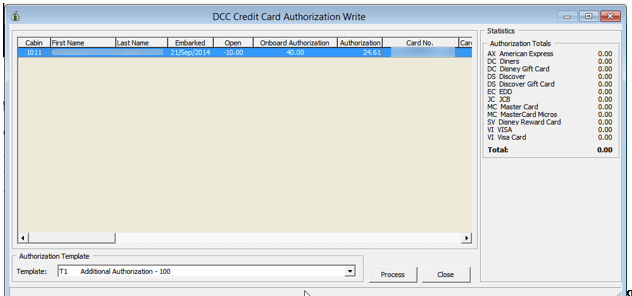
Current Balance = -10
-
Total Approved Authorization Amount = 50
-
Template: Additional Authorization $100
-
Result : (-10 + 100) - 50 = 40
-
**Authorization amount converted with exchange rate = 40 * 0.6153 = 24.61
Figure 6-24 DCC Credit Card Authorization Write with Authorization Template
-
Template : Additional Authorization 15%
-
Result : (-10 - 50) + (-10 * 15%) = -61.50
-
Negative Authorization amount/value will not be process
Generating Settlement File
-
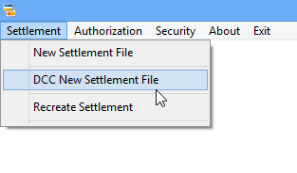
After a settlement is performed on a guest account, the settlement transaction requiring approval will be list under DCC New Settlement file.
Figure 6-25 OHC Credit Card Transfer — Settlement Menu
-
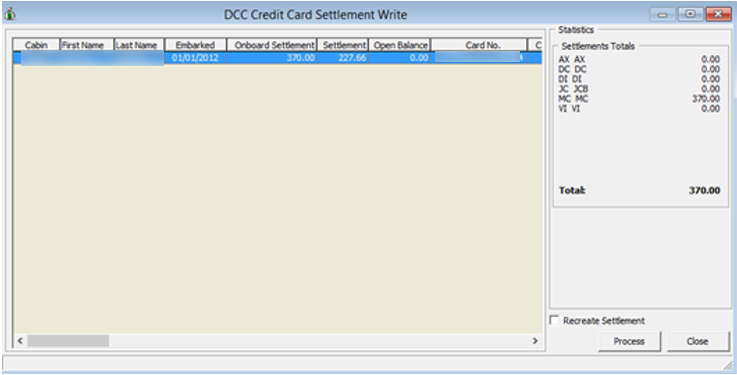
At the Settlement Menu, DCC New Settlement screen, the settlement transaction is flagged with DCC, and the amount shown is converted using the exchange rate from DCC table. (Onboard Settlement * Currency Exchange Rate).
Figure 6-26 DCC Credit Card Settlement Write Screen (With Settlement Transaction)
-
Click the Process button to write the settlement transaction into the settlement file.
Note:
The NCL Credit Card format does not read the settlement response file. Hence the CCT_STATUS is updated to ‘1’ upon generation of the settlement file.
Note:
The NCL Credit Card format does not read the settlement response file. Hence the CCT_STATUS is updated to ‘1’ upon generation of the settlement file.Recreating a Settlement File
-
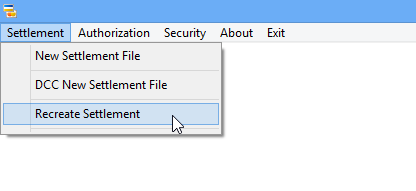
Click the Recreate Settlement from the Settlement menu.
Figure 6-27 Settlement Menu — Recreate Settlement
-
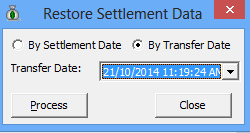
At the Restore Settlement Data screen, select a Transfer Date to regenerate and click Process.
Figure 6-28 OHC Credit Card Transfer — Recreate Settlement Screen
-
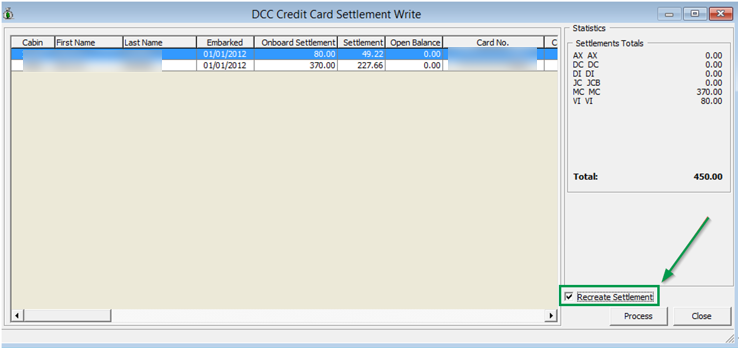
At the DCC Credit Card Settlement Write screen, select the Recreate Settlement check box to list the transaction.
Figure 6-29 DCC Credit Card Settlement Write Screen — Recreate Settlement Checkbox
Mapping Fields
Transfer161108006.pgp
Transfer<DATE><SEQ#>.pgp
Table 6-3 Request File Format Detail
| Name | Description |
|---|---|
|
Transfer |
Transfer - Authorization file Settle - Settlement file |
|
161108 |
Creation date |
|
006 |
Sequence number of authorization/settlement file |
|
.pgp |
File name extension |
Table 6-4 Transaction Record Detail
|
Field |
Start |
End |
Size |
Comment |
|
Account No |
1 |
7 |
7 |
Generated when authorization or settlement file is created by OHC Credit Card Transfer. (CCA_ID, CCT_ID) |
|
Trans. Type |
8 |
10 |
3 |
Hardcoded - OBC |
|
Method of Pmt. |
11 |
12 |
2 |
Hardcoded - AX-Amex, MV-Visa/Master, D-Discover |
|
Credit Card No. |
13 |
28 |
16 |
CRD_NO |
|
Blank |
29 |
29 |
1 |
Blank |
|
Crdt Card Seq no |
30 |
33 |
4 |
Hardcoded - 0001 |
|
Company |
34 |
35 |
2 |
Hardcoded - 01 |
|
Blank |
36 |
36 |
1 |
Blank |
|
Ship No. |
37 |
38 |
2 |
Parameter > DCC Ship ID |
|
Reply Code |
39 |
39 |
1 |
A-Approved, H-Refund, S-Settled, D-Denied, W-Wait, E-Error, C-Call back, X-Deleted, ‘ ‘-None, R-Reject (CCA_CRED_SOURCE / CCA_CRED_RESPONSE) |
|
Response Code |
40 |
45 |
6 |
Authorization number provided in authorization response file (CCA_AUTH_REFERENCE) |
|
Reservation no. |
46 |
54 |
9 |
RES_V_GUESTID |
|
Group No |
55 |
60 |
6 |
Space |
|
Cruise no |
61 |
68 |
8 |
Read ship number from parameter (DCC Ship Id) + SCR_A_DATE |
|
Cruise Segment |
69 |
70 |
2 |
Space |
|
Blank |
71 |
71 |
1 |
Blank |
|
Sailing date |
72 |
77 |
6 |
Format : YYMMDD (SCR_A_DATE) |
|
Blank |
78 |
78 |
1 |
Blank |
|
Amount |
79 |
88 |
10 |
CCA_AMOUNT - Authorization amount CCT_AMOUNT - Settlement amount CCA_CUR_AMOUNT - to track value written to authorization / settlement file |
|
Blank |
89 |
89 |
1 |
Blank |
|
Cdt Card Expiry |
90 |
93 |
4 |
Credit card expiry date (Format : MMYY) |
|
Last Name |
94 |
108 |
15 |
UXP_A_NAME |
|
First Name |
109 |
118 |
10 |
UXP_A_FSTN |
|
Authentication Code |
119 |
127 |
9 |
Blank |
|
Authentication Source |
128 |
128 |
1 |
5-Approval, D-Referral, E-Offline Approval. (CCA_CRED_RESPONSE / CCA_CRED_SOURCE) |
|
Interface Cmd |
129 |
133 |
5 |
CAUTH - Authorization CSETL - Settlement |
|
Card track 1 |
134 |
212 |
79 |
Blank |
|
Card track 2 |
213 |
252 |
40 |
Blank |
|
Message |
253 |
282 |
30 |
Use only when declined - CCA_NONAPPROVAL_TEXT |
|
Auth ACI Code |
283 |
284 |
2 |
Blank |
|
Tran ID |
285 |
299 |
15 |
CCA_REPLY017TO122 |
|
Validation Code |
300 |
303 |
4 |
CCA_REASON |
|
Transmit Status |
304 |
304 |
1 |
Blank |
|
Request Type |
305 |
305 |
1 |
A-Authorization, I-Incremental, I-Settlement |
|
Blank |
306 |
306 |
1 |
Blank |
|
CTD Auth Amount |
307 |
316 |
10 |
Hardcoded - 0 |
|
Blank |
317 |
317 |
1 |
Blank |
|
Initial Auth Amount |
318 |
326 |
10 |
CCA_AMOUNT |
|
Blank |
327 |
328 |
2 |
Blank |
|
Init Auth Date |
329 |
334 |
6 |
CCA_BDATE |
|
Blank |
335 |
335 |
1 |
Blank |
|
Init. Auth. Time |
336 |
341 |
6 |
CCA_BDATE |
|
DCC Opt In |
342 |
342 |
1 |
1 - DCC, 0 - Not DCC (CRD_DCC) |
|
DCC Currency Ind. |
343 |
345 |
3 |
CRD_CUR |
|
DCC Exchange Rate |
346 |
356 |
11 |
CCA_RATE |
|
DCC Control Number |
357 |
396 |
40 |
CCA_CTLNO |
Table 6-5 Exchange Rate Record Detail
| Field | Start | End | Size | Comment |
|---|---|---|---|---|
|
Base currency code |
1 |
3 |
3 |
Currency code is in ISO 4217 format. (DCC_BASE) |
|
Foreign currency code |
4 |
6 |
3 |
Currency code is in ISO 4217 format. (DCC_CUR) |
|
Exchange rate |
7 |
19 |
13 |
DCC_EXRATE |
|
Rate issue date |
20 |
33 |
14 |
DCC_DATE |
|
Rate expiry date |
34 |
47 |
14 |
DCC_EXP_DATE |
|
Exchange rate source name |
48 |
79 |
32 |
Specifies the source of the exchange rate |
|
Commission percentage |
80 |
86 |
7 |
Reserved for the purpose of meeting regulatory requirements where applicable. Space if not present. |
|
Exchange rate source timestamp |
87 |
100 |
14 |
Format yyyymmddhhmmss. |
Sample BIN file
Below are the BIN range samples provided periodically by the bank.
VOL120110427162858 4000790643RUB 4001020986BRL 4001030032ARS
4001040032ARS 4001150826GBP 4001210978EUR 4001310978EUR
4001360986BRL 4001450937VEF 4001540710ZAR 4001590376ILS
4001620986BRL 4001630986BRL 4001680986BRL 4001700986BRL
4001740986BRL 4001760986BRL 4001780986BRL 4001820986BRL
4001840986BRL 4001850986BRL 4001870986BRL 4001880978EUR
4001900978EUR 4001910986BRL 4001920578NOK 4001990986BRL
4002010901TWD 4002110901TWD 4002160578NOK 4002170986BRL
4002230410KRW 4002250986BRL 4002270985PLN 4002340986BRL
4002350986BRL 4002360986BRL 4002370986BRL 4002380986BRL
4002390986BRL 4002420986BRL 4002430986BRL 4002450986BRL
4002470986BRL 4002480986BRL 4002490986BRL 4002520986BRL
4002530986BRL 4002540986BRL 4002580214DOP 4002670214DOP
4002680986BRL 4002710978EUR 4002720978EUR 4002760032ARS
4002770578NOK 4002800978EUR 4002810978EUR 4002870643RUB
4002880578NOK 4002910784AED 4002930978EUR 4003020978EUR
4003080214DOP 4003090214DOP 4003110978EUR 4003120978EUR
4003140978EUR 4003150978EUR 4003160978EUR 4003170978EUR
4003320978EUR 4003330978EUR 4003340978EUR 4003350978EUR
4003400780TTD 4003530901TWD 4003550901TWD 4003560901TWD
4003570901TWD 4003580344HKD 4003590901TWD 4003610901TWD
4003890344HKD 4003990682SAR 4005240203CZK 4006010414KWD
4006050484MXN 4006080170COP 4006090036AUD 4006120344HKD
4006150032ARS 4006250986BRL 4006260826GBP 4006270643RUB
4006280643RUB 4006310780TTD 4006340986BRL 4006350986BRL
4006360986BRL 4006370986BRL 4006380986BRL 4006420986BRL
4006430986BRL 4006450986BRL 4006460986BRL 4006470986BRL
Table 6-6 OHC Tools Known Issue and Solution
| Known Issue | Solution |
|---|---|
|
Error - ‘Key unable to upload’ |
Register PGPBBox7.dll with regsvr32.exe again. |
|
Error - ‘License Key has not been set’ |
Register PGPBBox7.dll with regsvr32.exe again. |
Table 6-7 OHC Credit Card Transfer Known Issue and Solution
| Known Issue | Solution |
|---|---|
|
OHC Credit Card Transfer doesn’t reflect the correct credit card format. |
Check the credit card format in System Parameter in Administration Module under System Setup, Database Parameter, Interfaces, Batch CCard Processing Format. |
Table 6-8 OHC Management Known Issue and Solution
| Known Issue | Solution |
|---|---|
|
Error - ‘Please check if Verifone device dll is registered or device is connected’ |
Ensure the Verifone device is connected with the workstation. |