2 System Configuration
This section describes the Operational Position Setup within the Administration module.
Operational Position Setup
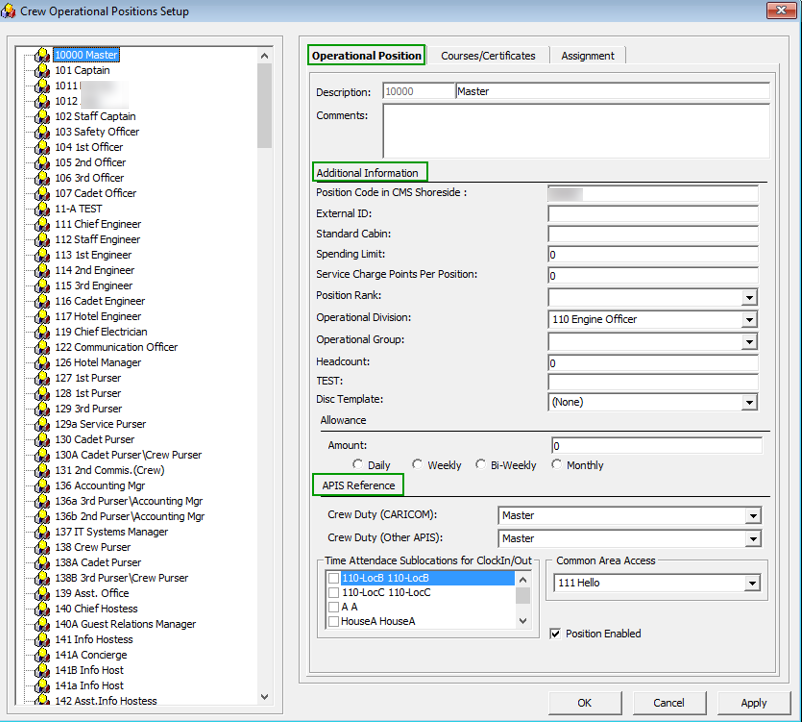
An Operational Position is required in the Advanced Passenger Information System (APIS) for references and reporting, and this is set up in Administration module.
Figure 2-1 Crew Operational Position Setup
-
Login to Administration module and select Crew Setup, Operational Position from the drop-down list.
-
Right-click and select Add to create a new Operational Position or select from the existing list.
-
Navigate to the Operational Position tab and enter the Position code, description and comment.
-
Under the Additional Information section, select the Operational Division from the drop-down list.
-
Under the APIS Reference section,
-
Define the Crew Duty (CARICOM) position
-
Define the Crew Duty (Other APIS) position
-
-
Click OK to save.
APIS XML Setup
You are required to upload the related APIS XML files into SPMS database and below are the affected tables.
Table 2-1 APIS File List
| Description | XML File | Table |
|---|---|---|
|
Agency List |
Agency_List.xml |
|
|
CARICOM Port |
CARICOMPORTS.xlsx |
|
|
Crew Type List |
Crew Type List |
|
|
Foreign Port List |
Foreign_Port_List.xml |
|
|
International Ship Security Certificate Recognized Security Organization (RSO) |
RSO.xml |
|
|
Port Code |
PortCode.csv |
|
|
UK Port List |
Port_UK_List.xml |
|
-
Place all the XML files in
\\Public Documents\Oracle Hospitality Cruisefolder for the respective data to be updated into the database. -
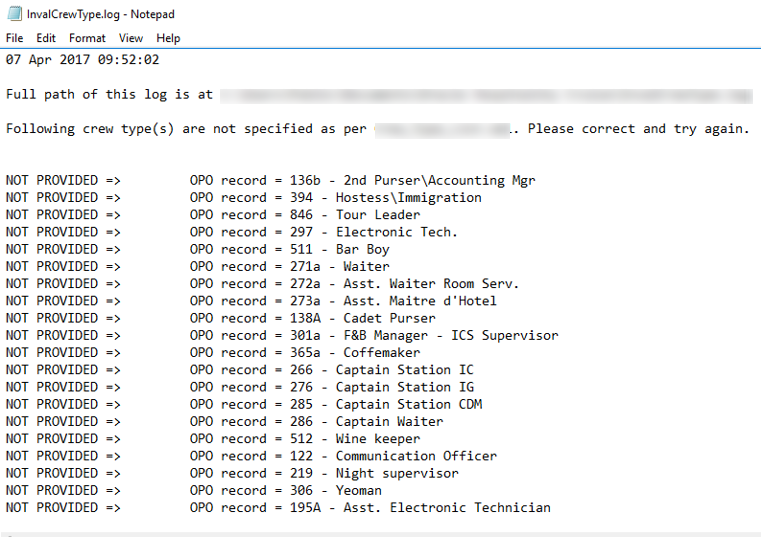
The system prompts an error message when opening the eBorderUK setup if a mismatch is found in the position or crew type maintained in Administration module and the
Crew Type.XMLfile. -
Ensure all the required Operational Position is in the XML file before generating the report. Click OK to continue.
-
Review and correct all the invalid data listed the log file.
Figure 2-2 Sample Invalid Crew Record
Ship Information Setup
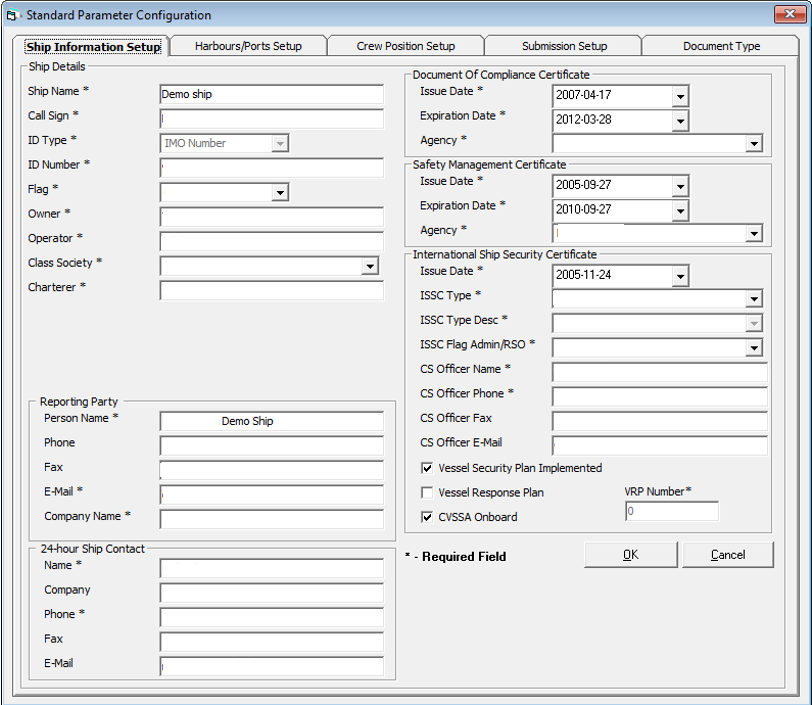
To generate a report, you must first setup the Ship information in the EBorder UK application.
Figure 2-3 Standard Parameter Configuration Window
-
Run the EBORDER UK.exe.
-
Select EBORDER UK Setup from the EBORDER UK Transfer.
-
At the Ship Information Setup tab, enter the ship’s information.
-
Click OK to save.
Port Setup
The Port Setup is differentiated by the symbols used and stored in the XML files. For example, the ISO Port Code for Dover has “#” and “<”. This means the ISO Port is shown in the Standard Parameter Configuration, Harbours/Ports Setup, ISO Port Codes and eNOAD Port. See below table and figures for symbol use in the port setup.
Figure 2-4 Harbours/Ports Setup
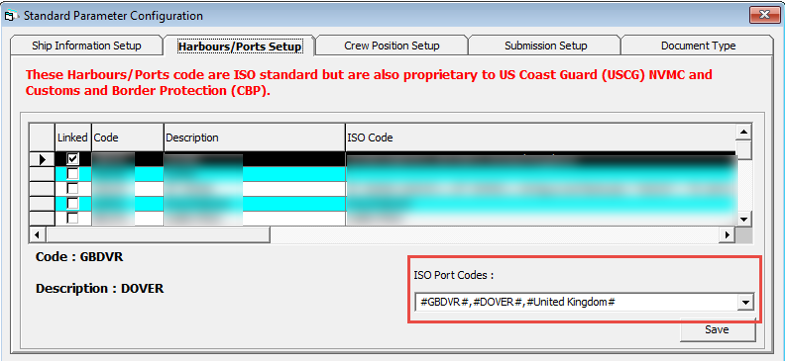
Table 2-2 APIS Port Type and Symbols
| Port Type | Symbol |
|---|---|
|
CARICOM Port |
^ |
|
eNOAD Port |
< |
|
Panama Canal ADR Port |
- |
|
eBorder UK Port |
# |
Submission Setup
The Submission Setup window where you define the WebService Submission path and it supports manual report generation and online submission. You are to obtain the URL from your agent/representative.
-
Web Services Submission Token String
-
Web Services Submission URL Address
-
Web Services Submission SOAP Header
-
Web Service Submission SOAP Action
Transfer Folder Setup
A transfer folder is required when generating the report file. Manually create the folder and then enter the path in Parameter, File Output Folder if wish to save the file to a default location. If none is defined in the Parameter, the system defaults the folder to C:\Users\Public\Documents\Oracle Hospitality Cruise\[Folder].
If the Transfer folder does not exist, the system prompts an error message ‘Invalid path [path]’.
Document Type Setup
You must map the Document Types accepted in SPMS with a correct EBORDER UK code.
-
Login to Administration module.
-
Select Administration, System Codes and the Document Types from the menu option.
-
Select the Document and in the APIS <ID_TYPE> Mapping field, enter the system coded document type. See Table A-1 for more information.
-
Click OK to save.
Document Type Layout
Figure 2-5 Document Type Layout
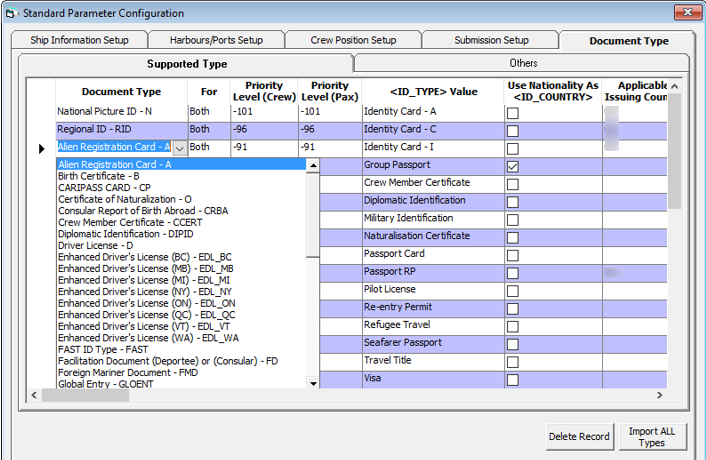
Table 2-3 Document Type Field Definition
| Field Name | Description |
|---|---|
|
Document Type |
The type of document required by e-Border. |
|
For |
Select “Both” if the document type is applicable to crew and guest, or individually if it applies to only one type of passenger. |
|
Priority Level (Crew/Pax) |
Define the Priority level of the document if there is more than one type of document. The smallest number has the highest priority. |
|
<ID TYPE> Value |
Defines the value to default in the Manifest for the selected document type. |
|
Use Nationality As <ID_COUNTRY> |
Defaults the nationality country into |
|
Applicable Issuing Country |
The system checks the document against the issuing country and defines the country code for the document type. If it matches, if will then default the document details onto the manifest. Else, it will be blank. |
-
At the Standard Parameter Configuration screen, select Document Type tab.
-
Define the type of document required by E-Border by selecting clicking the last row marked with Asterisk (*).
-
Select the Document Type from the drop-down list.
-
Click on the field to edit the row information if required. If the Nationality code is use as a Country ID, check the corresponding check box.
-
To remove a record, select the desired row and then click Delete Record.