8 Stateroom Setup
-
Cabin features codes
-
Exact location of the cabin in Safety Plan
-
Housekeeping sections
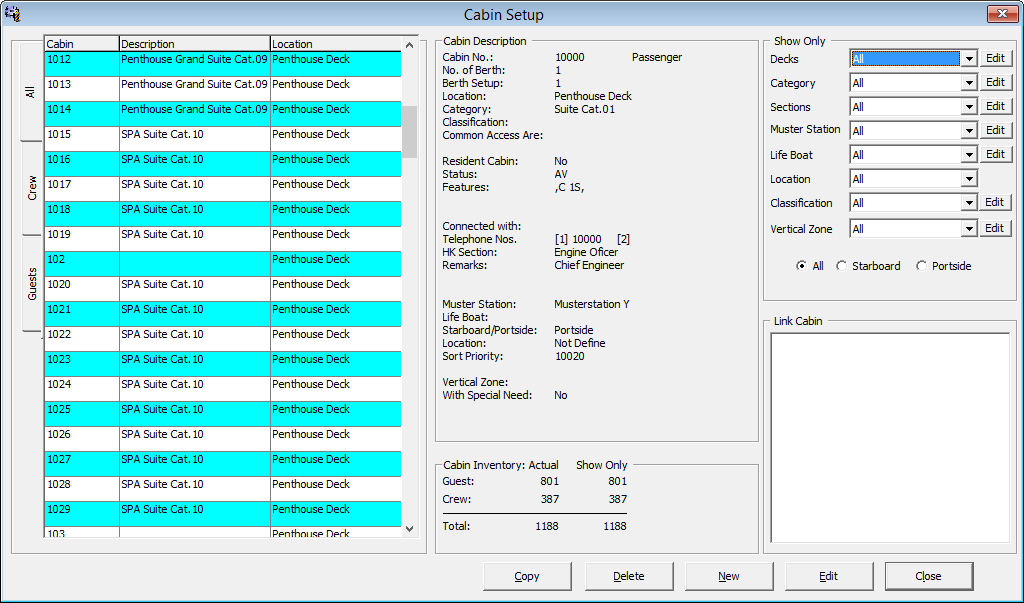
Figure 8-1 Cabin Setup Window

Adding, Editing and Copying A Stateroom
- From the Stateroom Setup menu, select Staterooms from the drop-down list.
- In the Cabin Setup window, click New.
- In the New Cabin form, enter the Cabin number, No of Berth, Berth Setup and select the Deck from the drop-down list.
- In the Feature section, select the Type, Category, Features, Classification and Common Access Area.
- Check theWith Special Need Feature if the cabin is equipped with special needs amenities.
- Select the HK Section, Life Boat, Muster Station, Location and Vertical Zone in the Assignments section.
- In the Crew Assignment section, select the Keeper, Assistant Keeper, Head Waiter, Waiter and Assistant Waiter.
- Enter the Phone extension of the cabin in the Phone Numbers section.
- If the cabin is linked to another cabin and has a common door, check the cabin number in the Link Cabin section.
- Click OK to save the cabin number.
- Repeat the same for the remaining cabin or use Copy Cabin to copy cabin of the same category and features.
Editinga a Cabin
- Select the Cabin number from the Cabin Setup window.
- Click Edit.
- Click OK to save the changes.
Copying a Cabin Code
- In the Cabin Setup window, select the cabin number to copy.
- In the Cabin Setup form, enter the new cabin number and the telephone number.
- Click Add to List.
- Continue to add the cabin number until you complete the list.
- Click OK to save.
Batch Check-In/Out
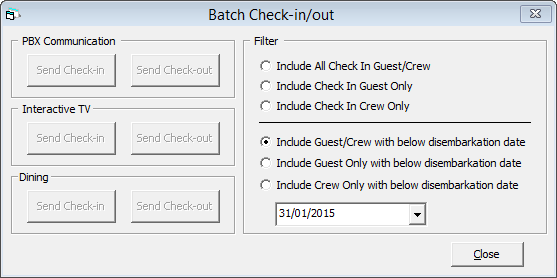
The Batch Check-In/Out function allow you to send triggers by batch to enable/disable the Telephone, ITV or Dining System.
Figure 8-2 Batch Check In/Out Window

Table 8-1 Batch Check-In/Out Filters
| Field Name | Description |
|---|---|
|
Include All Check In Guest/Crew |
Sends triggers for all check-in/out for all guest. |
|
Include Check In Guest Only |
Sends triggers for check in/out guest only. |
|
Include Check In Crew Only |
Sends triggers for check in/out crew only. |
|
Include Guest/Crew with below disembarkation date |
Sends triggers for check/out guest/crew with specified disembarkation date. |
|
Include Guest Only with below disembarkation date |
Sends triggers for check/out guest with specified disembarkation date. |
|
Include Crew Only with below disembarkation date |
Sends triggers for check/out crew with specified disembarkation date. |
-
From the Stateroom Setup menu, select Batch Check-In/Out.
-
Choose from the available filter and select a Date.
-
Select the type of batch to execute.
-
Click Close to exit.
Feature/Amenity Item
- SelectFeature or Amenity Items from the Stateroom Setup menu.
- Right-click on the blank space and select Add New.
- Enter a code and description, and a comment if any.
- Click OK to save.
Cabin Cleaning State Color
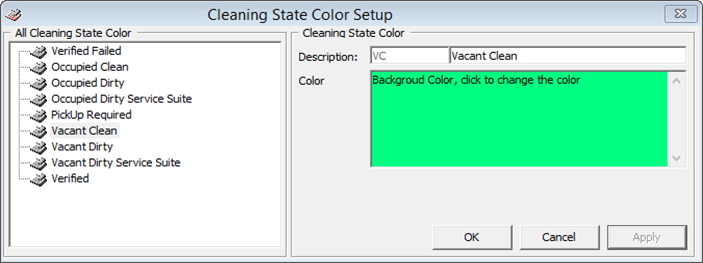
Figure 8-3 Cleaning State Color Setup

- Select the Cleaning State Color from the Stateroom Setup menu.
- Select the Cleaning Status
- In the Color field, click to change the background color.
- Click OK to save.
Deck Plan Designer
Figure 8-4 Deck Plan Setup

- Select the Deck Plan Designer from the Stateroom Setup menu.
- Click New Plan and insert the Plan name.
- Click Load Picture to load the base plan from file.
- Click New Element and then drag the element box to the desired location.
- Select the Cabin Number from drop-down list, then click the element box to assign the cabin.
- Repeat steps 4 and 5 until all cabin number for the deck is assigned.
- Click Save Plan to save the changes.
Editing a Deck Plan
- From the Deck Plan Designer window, right-click the element you wish to edit.
- Select the option from the menu.
- Click Save Plan to save the changes.
Linking a Plan
- Select a Plan Name to edit.
- Select the Next Plan from the drop-down list.
- Click New Element and place the element near a staircase of the diagram.
- Click Save Plan.
Deck Plan Setup
Ving Card Crew Key Type
- In the Stateroom Setup, select Ving Card Crew Key Type.
- Right-click on the left panel and select Add New.
- Enter the Code, Description and Comment
- Click OK to save.
Common Access Area
Common Access Area Name
- Select Common Access Area Name from the drop-down list.
- Right-click on the left panel and select Add New.
- Enter a Code, Description and Comment.
- Click OK to save.
Common Access Area Definition
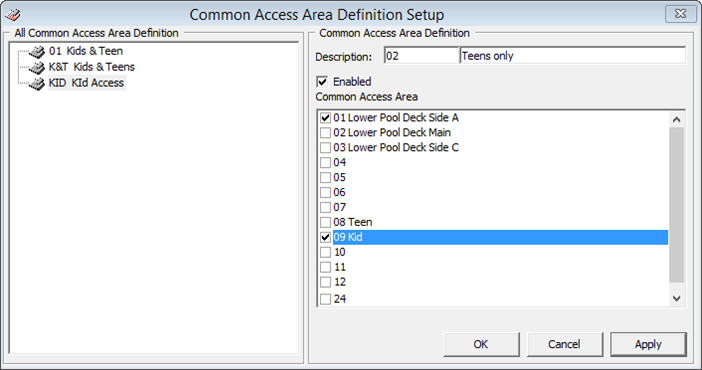
Figure 8-5 Common Access Area Definition

- Select Common Access Area Name Definition from the drop-down list.
- Right-click on the left panel and select Add New.
- Enter a Code, Description and Comment.
- Check the respective common area for this code and click Apply.
- Repeat above until you have created all the area.
- Click OK to save.