1 Setting Up AQCI
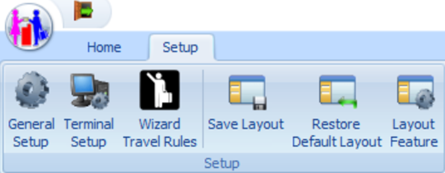
In the Setup tab, you can configure the related parameter and hardware used by the ship. It features General Setup, Terminal Setup, Wizard Travel Rules, Save Layout, Restore Default Layout, and Layout Feature.
Figure 1-1 AQCI Setup Tab
General Setup
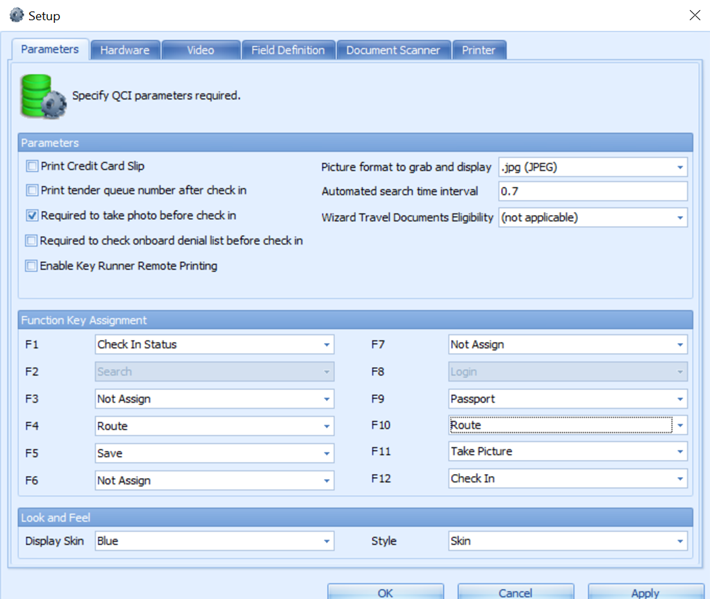
The General Setup section contains all the general settings for use in AQCI. The general setting tabs are described as below:
Figure 1-2 AQCI General Setup
Parameters
To enable the parameters, at the Function Key Assignment section, assign the function keys according to the ship operator requirements
Hardware
You can specify the required devices such as Card Reader, Barcode Reader, Signature Devices, Passport Reader and Special Settings in this tab.
Video
The system is preconfigured with a video format and this can be adjusted settings according to the device used in this function.
-
Click Video Format tab, adjust the necessary fields and click Apply.
-
Click Capture to preview the video display.
Field Definition
To define the required entry fields in the reservation screen, you can select the available check boxes.
-
Required Field: This sets the field as mandatory and you must enter a value into this field.
-
Editable Field: This field is shown on the reservation screen and is editable but not a mandatory field.
-
Required Per Cabin: If this field is checked, then it becomes required for that particular cabin and use per below scenario:
-
Either one of the checked-in guest in the same cabin have entered the required field.
-
Either one of the checked-in guest or expected guest in the same cabin have entered the required field.
-
Both expected check-in guest and expected debarking guest in the same cabin have entered the required field Message will not prompt for expected debarking guest if expected check-in guest have the required field entered. The program checks the required field for expected check-in guest even though the expected debark guest has the required field entered.
- Program will take Required Field as priority if both Required Field and Required per Cabin option is checked for the field.
-
Document Scanner
You can assign a document scanner to each document type use in AQCI.
-
In Predefined Document Type, choose from the drop-down list the specific document type and in Scanner, and choose the preferred scanner.
-
Click Apply and continue to define the next document type.
-
To remove the scanner assignment from Predefined Document Type, select the document type from the drop-down list and click Reset.
Printer
In this section, printers such as Board Card Printer, Credit card slip printer or encoder are configured for use in AQCI. To configure, choose the specific printer from the drop-down list and click Apply.
Setting Up a Terminal
- Click Add to add a new terminal workstation.
- Enter a mandatory Code field and Name, followed by the Terminal Name.
- Insert the comment in the Comments field, if any.
- Click Save to save the information.
- Click Delete to delete the terminal workstation that you no longer require.
- Click Close to exit the setup window.
Saving a Layout
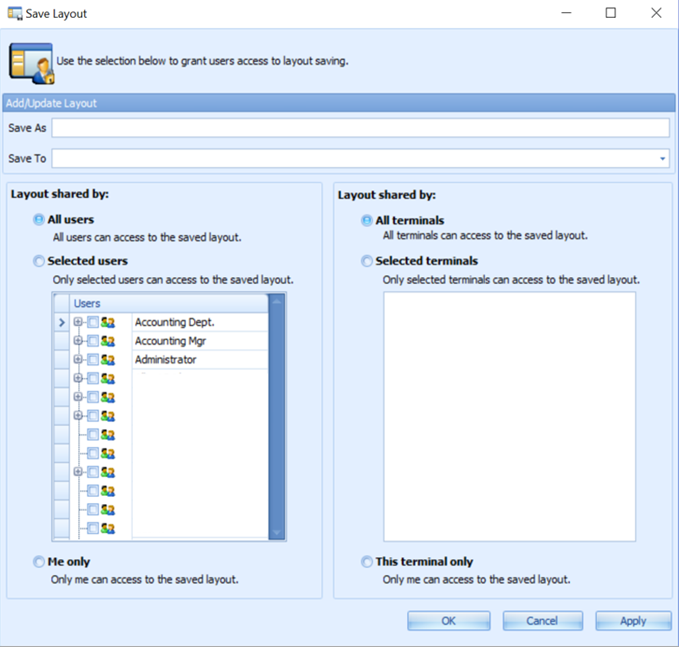
The layout selection allow you to save and grant a specific user or terminal to a use layout designed to accommodate the check in process at each location
Figure 1-3 Save Layout
-
For new layout, you can choose Save As to define the layout name, and click OK to save.
-
For existing layout, you can choose Save To, to update the existing layout from the drop-down list.
You can share the layout using below options:
-
All Users: All users can access to the saved layout.
-
Selected Users: Only selected users can access to the saved layout.
-
Me Only: Only I can access to the saved layout.
-
All Terminals: All terminals can access to the saved layout.
-
Selected Terminals: Only selected terminal can access to the saved layout.
-
This Terminal Only: Only for this particular terminal can access to the saved layout.
Restoring Default Layout
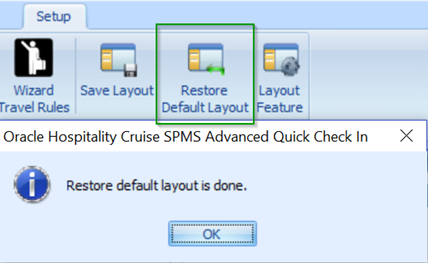
The Restore Default Layout restores the entire check-in screen back to the system default layout.
To reset the layout, click the Restore Default Layout button at ribbon bar and then click OK once the restore completes.
Figure 1-4 Restore Default Layout
Customizing a Layout
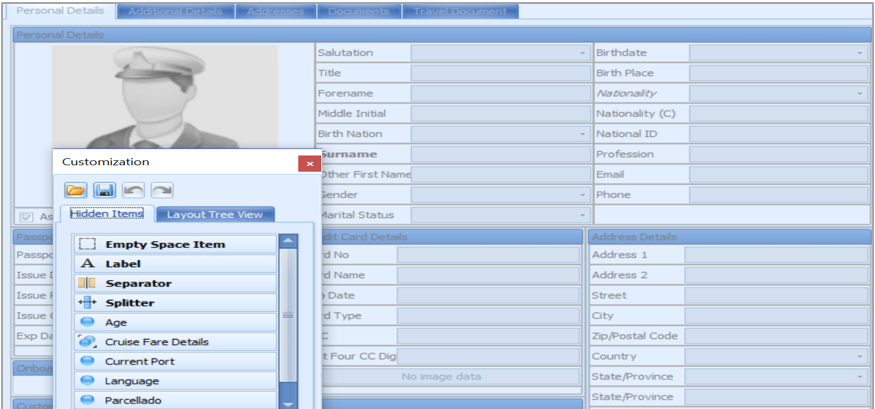
Every ship operator have the option to design their Check-In screen layout according to their user, user group or workstation. In this Customize Layout option, you can drag and drag the objects to customize the layout.
Figure 1-5 Layout Labels
-
At the AQCI main screen, right-click at any blank space in the All Details Tab.
-
Select the Customize Layout to open the Customization window and switches the AQCI form to a Disable mode.
-
To remove a field from the All Details form, highlight a field until a dotted outline appears around the element.
Figure 1-6 Selected Label

-
Drag and drop the selected field into the Customization, Hidden Items tab to remove the field from the AQCI Check In form.
-
Once the layout is finalized, click the X to close and return to AQCI Enable mode.
Restoring Field/Group
In order to restore a field or group back to the detail screen, you are required to switch the layout mode to Disable.
-
At the Customization window, Hidden Items tab, highlight a field or a group from the Hidden Items list.
-
Drag the field/group to the AQCI form and drop the item(s) at the desire location. The new location of the field/group depends on where the splitter line is.
Figure 1-7 Layout Field Splitter

Renaming a Field Name
-
Highlight a field and then right-click to select the Rename option. The field label is now enabled for editing.
-
Rename the label with a new name and click Enter to save.
Layout Features
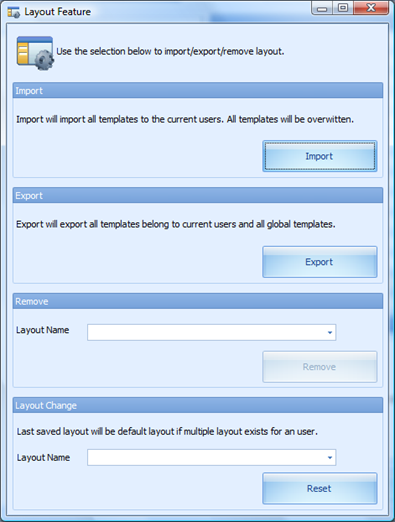
The Layout Feature allows you to Import, Export and Remove of the specific layout required by the users. In Layout Change, the default layout is the last saved layout, if multiple layout exists for a user.
Figure 1-8 Layout Feature
Importing a Layout
-
At theImport screen, browse the XML file you want to import into the database
-
By default, the Export template with XML file default users and terminals is checked. Uncheck the check mark to select whether shared the template to Selected Users, an individual, Selected Terminals or This Terminal only.
-
Click Import.
-
At the notification prompt, read and understand the message, then select Yes to complete the process.
Exporting a Layout
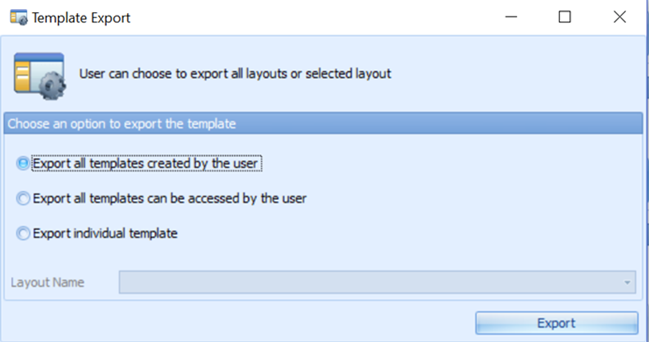
The Export feature allows you to export the saved template and layout to an XML file format, for use in the same or different database. In Template Export screen, you can export layout based on below options:
-
Export all templates created by the user.
-
This exports the template created by current login user. For example, Template A is created by user A. Template B is created by user B. When User A login to the system, only Template A is being exported.
-
-
Export all templates can be accessed by the user.
-
This exports the template that are shared by the current login user. For example, Template A and Template B is shared by user A. Template C is shared by user B only. When User A login to the system. Only Template A and Template B is being exported.
-
Exporting a Template
-
From the Layout Feature window, click Export. This opens the Template Export window.
-
Choose the export option by selecting the radio button. If Export individual template is chosen, select the template from the drop-down list. For example, the template created by current login user is shown.
Figure 1-9 Template Export
-
Click Export to proceed and select a location to save the file when prompt.
-
Click Save to complete the process.
Removing a Layout
The Remove Layout option only permits the creator of the layout to remove the layout from the view. If the layout has been deleted, only the user who is linked to that particular layout is able to login to the module and load the original layout.
To remove a layout, select the Layout Name from the drop-down list and click Remove.
Changing a Layout
The system permits a you to share multiple layout and specify which layout is the default for other users. Note the last saved layout is the default if multiple layout exists for the user.
To change a layout, select the layout name from the Layout Name drop-down list and click Reset.
Resetting Layout to System Default
A layout can be restored to the system default layout with one simple step that is, by right-clicking on the Reservation screen and select Reset Layout.