2 AQCI Functions
The AQCI module is designed to ease the check-in process using a quick passenger registration and collection of passport details, and printing of board card at the end of the process. All these processes are performed from the Home Tab.
Figure 2-1 AQCI Functions

New
A vast majority of guests arriving are with confirmed reservations. However, there are instances where new reservations are added on the spot.
-
Click New at the ribbon bar.
-
At the Reservation Form, enter all the relevant details manually or scan the passport through the passport scanner.
-
Check the Notice and Consent check-box. If this is left uncheck, the system prompts a warning message and prevent you to proceed.
-
Click Save at the ribbon bar to save the reservation. The newly created reservation is group under the Expected reservation category.
Renew
-
Search for the passenger account in Account Search section and choose Reserv Status as History and select the past Embark Date using the date editor.
-
In the result grid, select the passenger name, update the passenger detail and select a cabin from the available cabin list, and click Renew at the ribbon bar.
-
At the Information has been changed. Do you want to save? prompt, select Yes to complete the process.
Route
-
At Account Search section, search for the guest account and select the desire account by holding the CTRL+ key or SHIFT+ key.
-
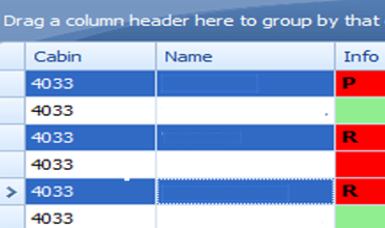
At the ribbon bar, click Route and select the account to route. The first account you select is the Payer and Payer account is tagged with “P”, whereas the Routed account is tagged with “R”.
-
To cancel the routing, select the account and click Cancel Route at the ribbon bar.
Figure 2-2 Route Function

Take Picture
The Take Picture function allows you to recapture the picture of the pre-embark guest or for a new reservation. To take a picture, select the account and click Take Picture at the ribbon bar
Check In
The Check In function checks in the select account(s) and changes the booking status from Reservation to Embark when all passenger’s information have been corrected and updated accordingly.
The system validates the guest mandatory fields based on defined coast guard agency requirements in Administration, System Setup, Database Parameter Setup, General, APIS Border Custom Handling. For example, if Parameter value is ‘CARICOM’, the system validates guest mandatory fields based on Parameter, ‘CARICOM’,’ Mandatory Fields For <NONCREW>’.
-
Search the account using the selection filters in Account Search section.
-
Select the account and click Check In at the ribbon bar. The system does not permit a check in into a dirty cabin.
Print Board Card
-
At the selected account, click Print Board Card at the ribbon bar.
-
Select the Print Board Card reason when prompt and click OK. This encodes a card that includes the door lock combination, depending on the type of door lock interface and the guest details such as cabin number, embark/disembark date
Print Passport Label
The Print Passport Label prints an identification label to be tagged to passenger’s passport. You are require to configure the supported hardware in Setup, General Setup, Printer, Passport Label Printer. You can also configure the same in Management module, Options, Hardware, Printer. Please consult Oracle Customer Support for supported hardware or assistance.
Return Key
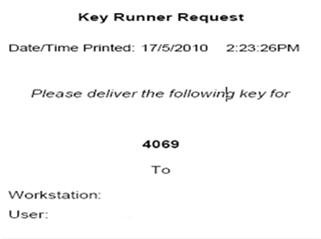
The Return Key function allows the Check In agent to request a key (board card) for a passenger during embarkation from a central location where the keys are stored. This additional printing process handling speeds up the check in process by allowing the Key Runner to pull out the key for those passengers, based on the requests stated on the printed receipt.
These keys physically handed to the respective Check In agent. To use this function, you must turn on parameters in Administration module, System Setup, Database Parameter Setup, Enable Key Runner Remote Printing and Auto Print Key Runner Receipt.
-
Edit the passenger’s passport number
-
Edit the passenger’s credit card information
-
Scan the Booking Number barcode
-
Auto Print Key Runner Receipt = 1
-
Extend Search Criteria = RES_BOOKNR
-
When searching for a guest, change the search criteria to Same Booking No. If three (3) guests with same booking number and same cabin were found, a single Key Runner Receipt will be printed. Whereas, for three guests with different cabins, three different Key Runner receipts will be printed.
-
Guest with the same embarkation date and cabin will be printed in a single Key Runner receipt.
-
The Key Runner printer must be configured in General Setup, Printer, Key Runner Printer and choose the required printer from the drop-down list.
-
The Return Key is re-enabled at the ribbon bar of the Check In screen once the receipt has been printed for the passenger. The receipt is only print once for the same cabin, unless the Return Key is clicked to reset the key status. This would then allow the user to send the key request again to the Key Runner.
Figure 2-3 Key Runner Request

Check In Status
You can view the total number of Reservations, Checked-In, and the Remaining status of the guests that has not checked-in based on the current date and time
Copy/Paste Address
The Copy Address function allows you to copy the address from one reservation to another reservations and saving data entry time when both reservation shares the same address.
-
At the Passenger Details screen of the selected account, click Copy Address at the ribbon bar.
-
Select the account to copy to and click Paste Address.
Swipe Passport
The Swipe Passport function allows you to capture the passenger’s passport details by swiping the passport through a passport scanner instead of manually entering the details. This requires a passport reader to be configured in General Setup, Hardware, Card Reader section.