5 Safety
Every crew on board are assigned with specific Emergency roles and you can define them in the Safety management function within the Safety tab. The defined emergency roles can be a standard when assigning emergency functions across the fleet, based on the crew accreditation.
Muster List Setup
The Muster List setup is a representation of the Ship’s emergency stations. The information entered here requires a crew entry and will become the foundation for future safety reporting purpose. The Safety Manager or Safety Coordinator is responsible in setting up and updating this information.
This function is controlled by Parameter ‘Safety’, ‘Advance Safety Drill’ (0= Standard / 1= Advance Safety Drill) and the setup of the Muster List Setup for Standard Safety Drill Mode is described below.
Configuring Standard Muster List Setup
Figure 5-1 Standard Muster List Setup
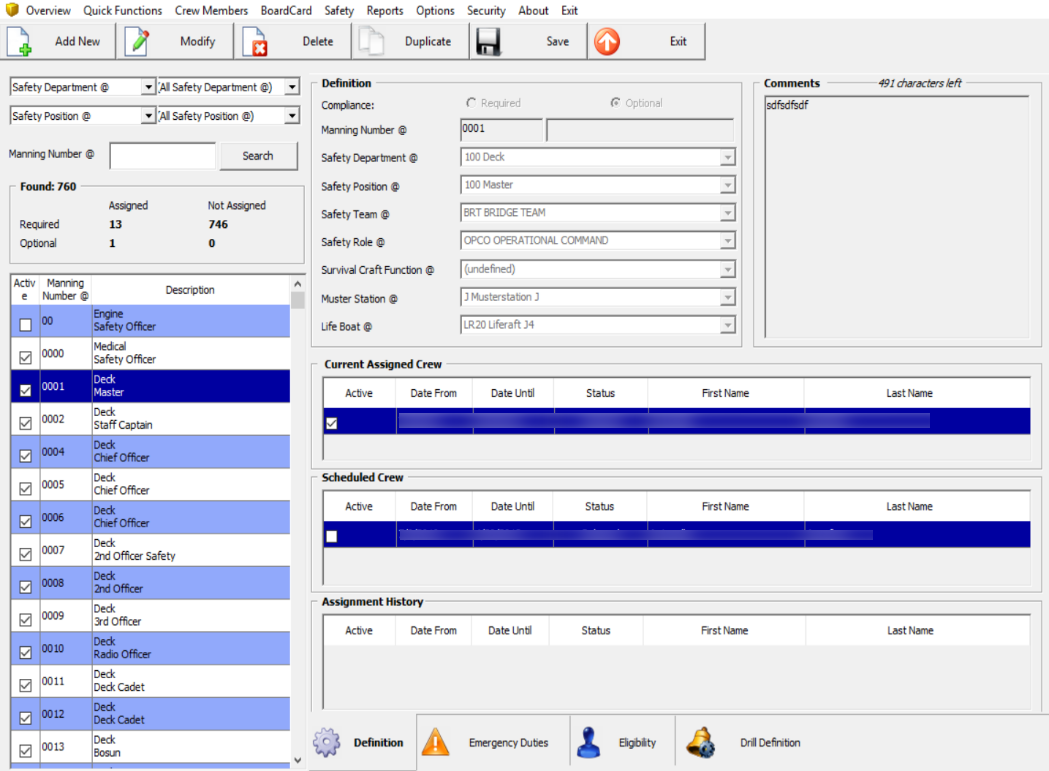
The Standard Muster List Setup mode comprises four main tabs – Definition, Emergency Duties, Eligibility and Drill Definition. Each of these tab defines the Safety task to be carried out during emergency, required accreditation and the drill courses.
Search Panel
Figure 5-2 Muster List Setup Search Panel
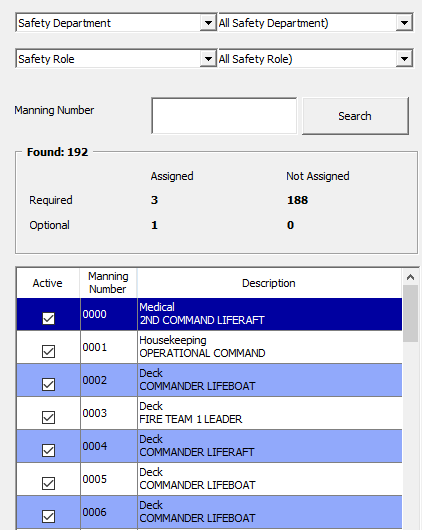
In the Summary Section,
-
You can see the total number of Required/Optional Safety Numbers Assigned/Unassgined
-
Active Safety Numbers has a check mark in the Active column.
Definition Tab
The Definition section defines the safety number associates to the safety information.
Figure 5-3 Definition Tab
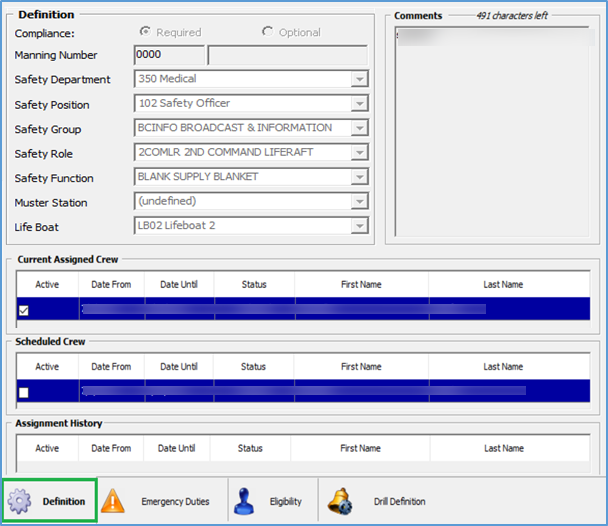
Table 5-1 Drill Definition Tab
| Field | Description |
|---|---|
|
Compliance |
Safety Number flag – Required or Optional. |
|
Manning Number |
A unique Safety Number that identifies the Emergency Function. Field is compulsory and alphanumeric. |
|
Safety Department |
Crew Safety Department related to Emergency Function. Field is compulsory and reference to setup in Administration, Safety Setup, and Safety Department. |
|
Safety Position |
Defines the Safety Position in emergency, and is a compulsory field. |
|
Safety Group |
Grouping of related safety functions. Reference to Administration, Safety Setup, Safety Group |
|
Safety Role |
Crew Safety Role. Reference to Administration, Safety Setup, Safety Role. |
|
Safety Function |
Function define in Survival Craft. Reference to Administration, Safety Setup, Survival Craft Function. |
|
Muster Station |
Muster Station assigned to the Safety Number. Reference to Administration, Safety Setup, Muster Station. |
|
Life Boat |
Life Board assigned to a specific emergency function. Reference to Administration, Safety Setup, Life Boat. |
|
Current Assigned Crew |
Crew currently assigned to the Safety Number. |
|
Scheduled Crew |
Crew scheduled to the Safety Number. |
|
Assignment History |
Past records of crew assigned to the Safety Number. |
|
Comments |
Additional comments pertaining to the Safety Number. |
Emergency Duties Tab
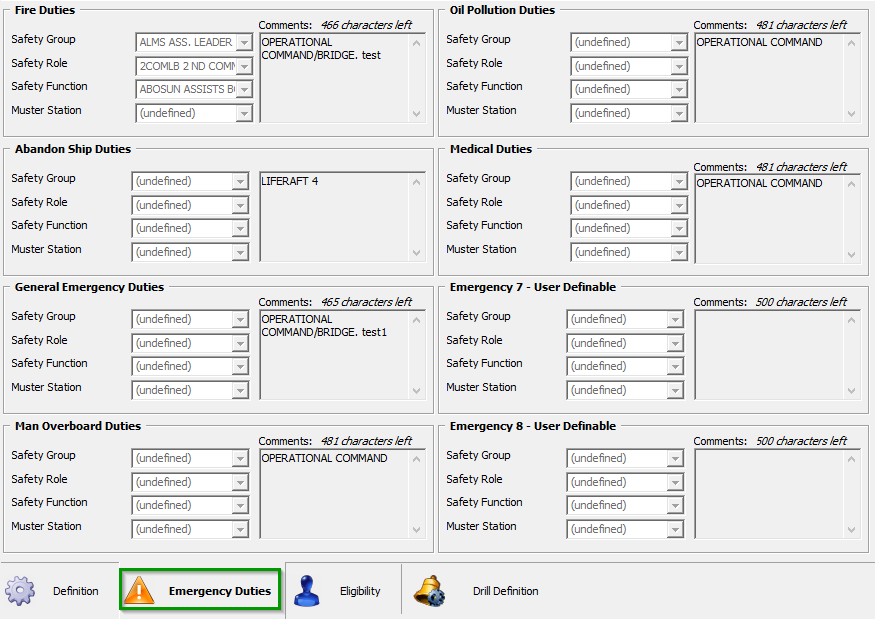
The Emergency Duties to be carried out by crew that are assigned to the Safety Number are defined in this tab. The headings of the Emergency Type is set up in Administration, System Setup, Label Setup under SFTEM group.
Figure 5-4 Emergency Duties Tab
Eligibility Tab
In the Eligibility tab, the required Operational Position courses and certifications are defined in accordance to SOLAS regulation and the Ship’s safety rules.
Figure 5-5 Eligibility tab
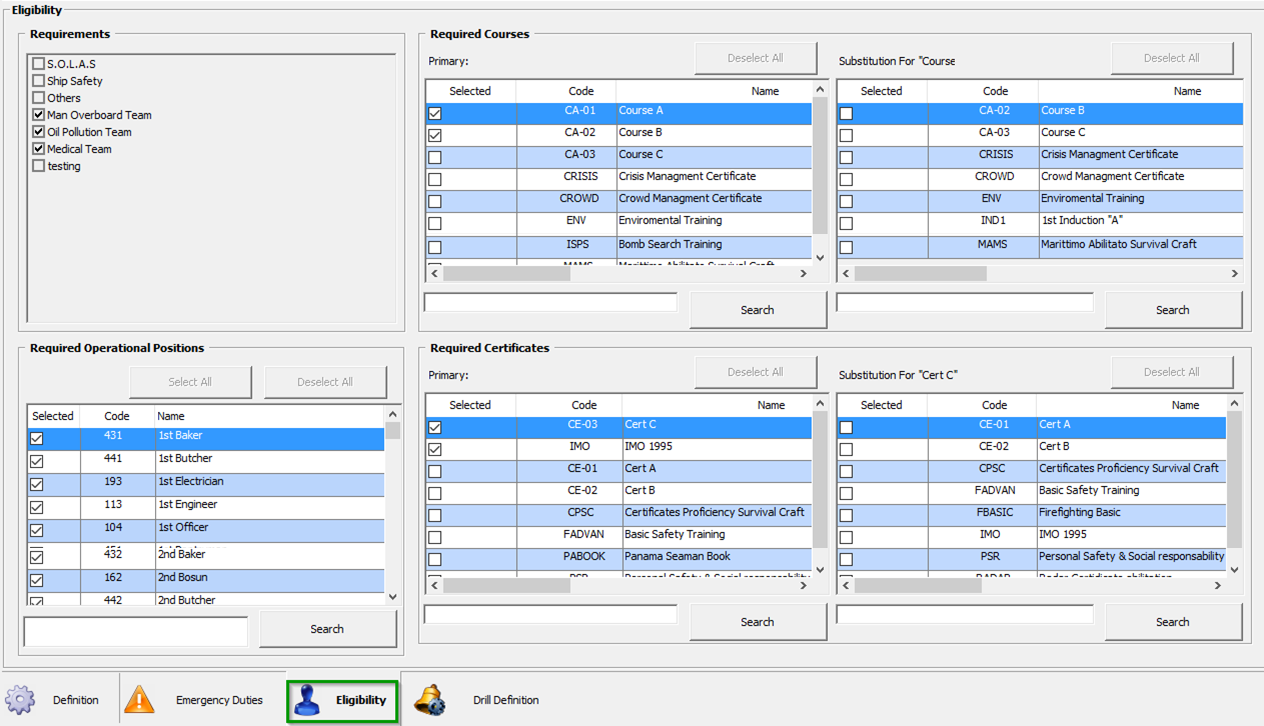
Table 5-2 Eligibility tab Field Definition
| Field | Description |
|---|---|
|
Requirements |
Reference to governing authorities’s requirements for selected position to be onboard at all times. |
|
Required Courses |
Courses required to be completed by Crew that either are attached to this Safety number, the selected primary course or substitute course. |
|
Required Operational Positions |
Operational Positions requires in the Safety Number. |
|
Required Certificates |
Mandatory Certification held by crew who are assigned to the Safety Number |
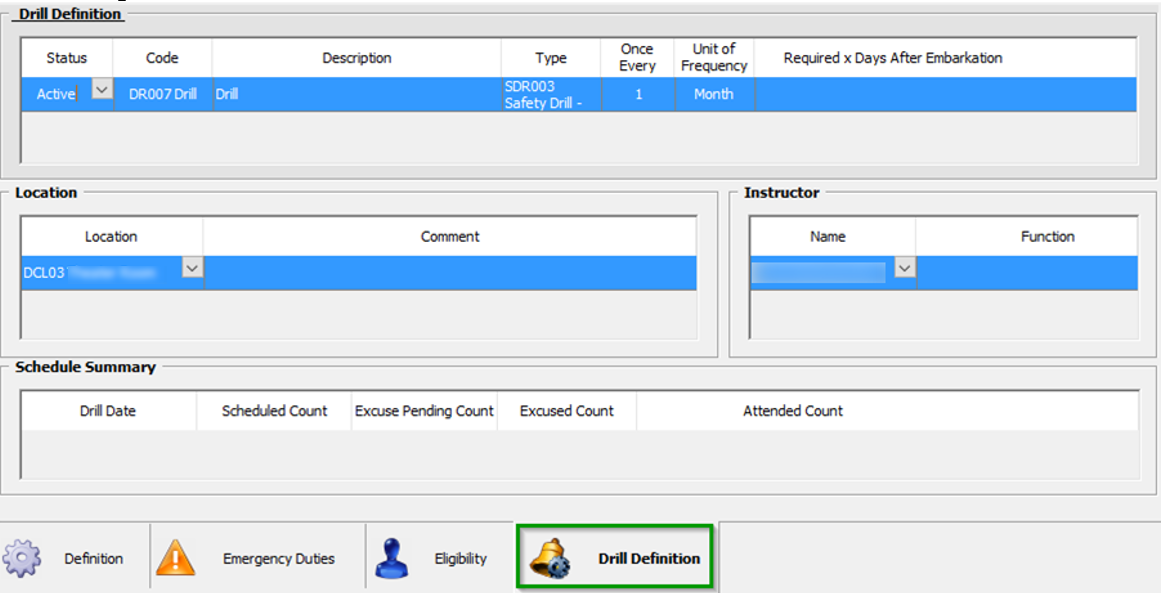
Drill Definition Tab
The Drill Definition tab is a view only window and it displays information of drills assigned in Safety Drill module. See Safety Drill User Guide for more information on drill setup.
Figure 5-6 Drill Definition Tab
Adding Manning Number
-
At the Muster List Setup window, click Add New.
-
Enter all the required fields in the Definition tab using the drop-down list.
-
Navigate to Emergency Duties tab and define the type of duties for the Safety Number by selecting the Safety Group, Safety Role, Safety Role, Safety Function and Muster Station from the drop-down list.
-
Navigate to Eligibility tab and choose the mandatory requirements, courses/certification and Operational Position by checking the respective check boxes.
-
Click Save to save the Safety Number.
Duplicating Manning Number
You can duplicate a Safety Number when majority of the information are the same.
-
Select the Safety Number from the Search Panel and then click Duplicate.
-
Update the necessary information and then click Save to save the record.
Deleting Manning Number
You can delete a Safety Number that are not in use, simply by selecting the Safety Number and then click Delete.
Configuring Advance Muster List Setup
The Advance Muster List Setup has less tab than the Standard Muster List Setup. It comprises two main tabs, which are Definition and Eligibility.
Definition Tab
In the Definition section, you can define the safety number associated to the safety information and it has additional fields compared to the Standard Muster List setup.
Figure 5-7 Muster List Setup Definition Tab
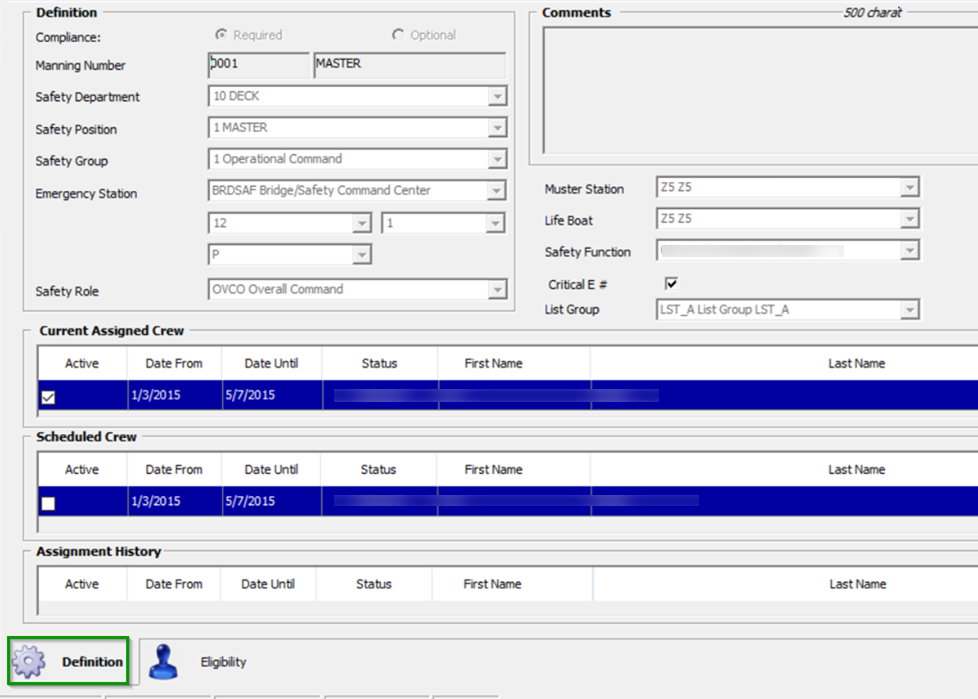
Table 5-3 Muster List Setup Field Definition
| Field | Description |
|---|---|
|
Compliance |
Safety Number flag – Required or Optional. |
|
Manning Number |
A unique Safety Number that identifies the Emergency Function. Field is compulsory and alphanumeric. |
|
Safety Department |
Crew Safety Department related to Emergency Function. Field is compulsory and reference to setup in Administration, Safety Setup, Safety Department. |
|
Safety Position |
Define the Safety Position in emergency, and is a compulsory field. |
|
Safety Group |
Grouping of related Emergency function, and is a compulsory field. |
|
Emergency Station |
A station assigned to the Safety Number. Reference to setup in Administration, Safety Setup, Muster Station. |
|
Safety Role |
Crew Safety Role. Reference to Administration, Safety Setup, Safety Role. |
|
Muster Station |
Muster Station assigned to the Safety Number. Reference to Administration, Safety Setup, Muster Station. |
|
Life Boat |
Life Board assigned to a specific emergency function. Reference to Administration, Safety Setup, Life Boat. |
|
Safety Function |
Function define in Survival Craft. Reference to Administration, Safety Setup, Survival Craft Function. |
|
Critical E# |
An indicator flag if the Safety Number is a critical Emergency Number. |
Eligibility Tab
The information contained in this tab is similar to the Eligibility tab in Standard Muster List Setup.
To set up the Advance Muster List Setup, see steps in section, Adding Manning Number.
Muster List Assignment
The Muster List Assignment function is where you assign a specific Safety Number to crew members onboard or expected to arrive.
This function is the second option from the Safety menu, and the assignment is done by either Function or Person. The behavior of the Muster List Assignment is dependent on Parameter defined in ‘Safety’, ‘Allow Multiple Safety Number Assignment’.
All records in the Muster List are active assignments that you committed after changes has been made. The system checks and ensure only qualified onboard crew members are assigned to the specific Safety Number /Function, based on crew’s qualification and Muster List Setup.
Standard Muster List Assignment
Active Muster List Assignment — Standard
The Muster List Assignment has two functions which are an assignment by function or person. Although the information on these tab is different, they yield the same results.
The Assign by Function tab has two sections:
-
Muster List and Eligible Crew, and the
-
Assign by Person consist the Crew List and Eligible Function.
Figure 5-8 Standard Muster List Assignment
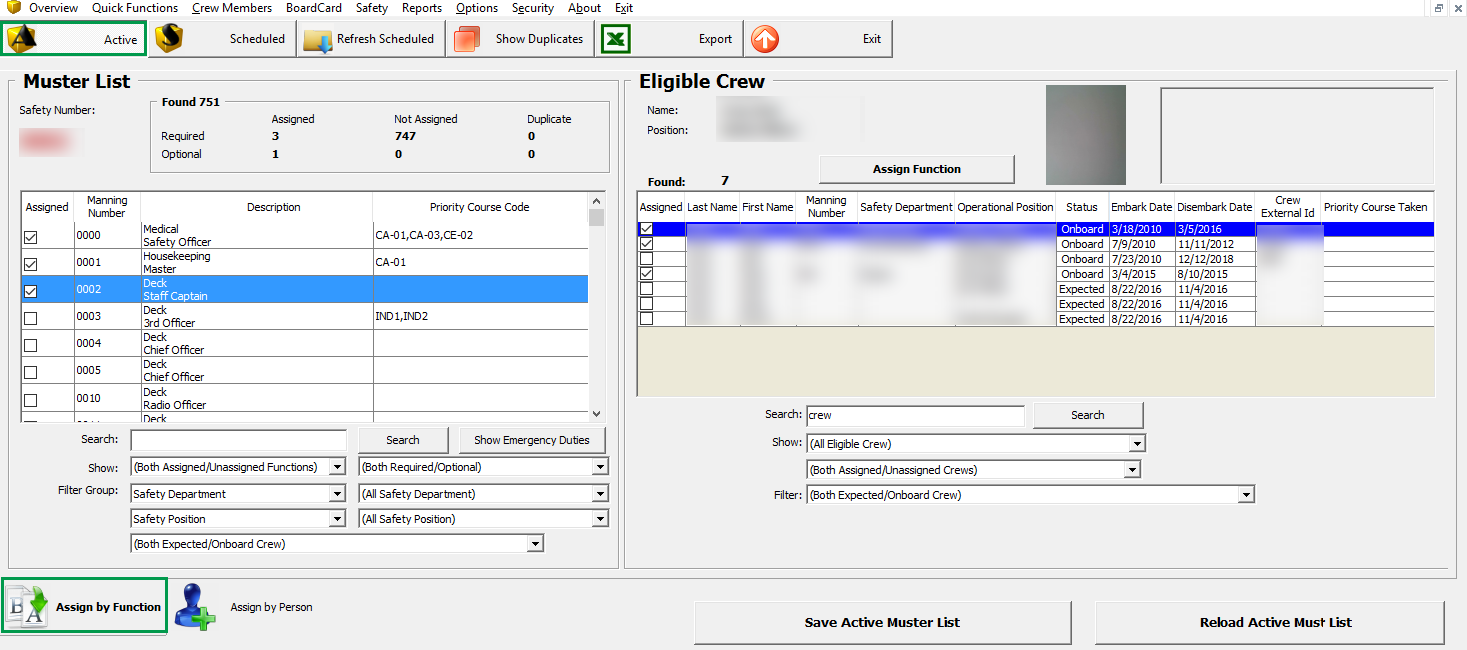
Figure 5-9 Advance Muster list Assignment by Function
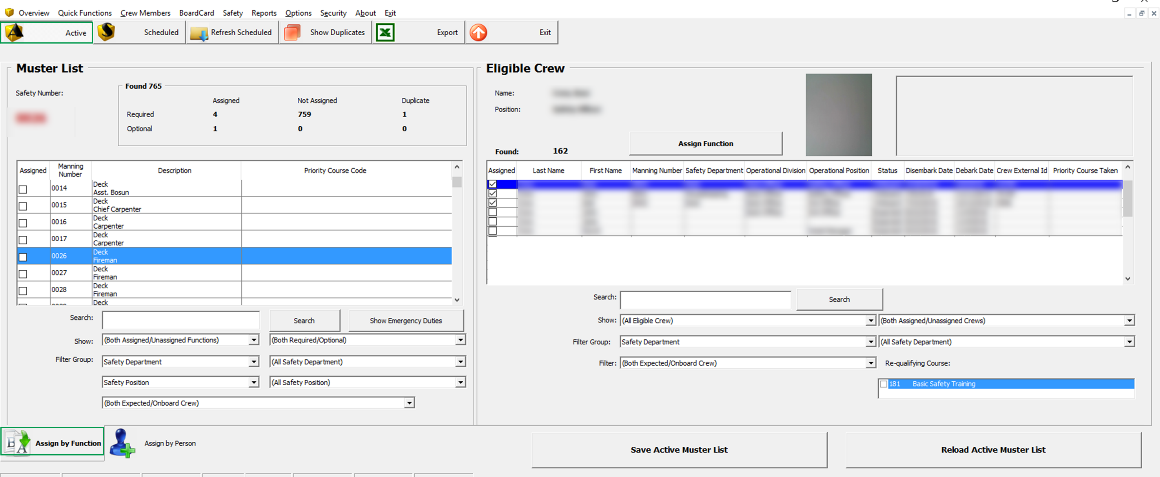
In Assign by Function tab, you will see a summary of assigned/not-assigned count, with a list of all Safety Numbers associated to a position of the Muster Station underneath it.
In Eligible Crew section, lists of crew matching the eligibility criteria and to be assign to the Safety Number is shown. List of courses taken are shown in the grid if this is defined in Parameter ‘Safety’, ‘Display Valid Courses on Muster List Assignment’.
-
Save Active Muster List: Saves all current safety number assignment as backup in a text file format.
-
Reload Active Muster List: Allow restoration of backed up safety number assignment based on the saved muster list file. You can use this function to undo all the changes after activating the Schedule Muster List.
Assigning Safety Number by Function
-
In the Muster List Assignment window, click Active and Assign by Function.
-
Select the criteria from the drop-down list.
-
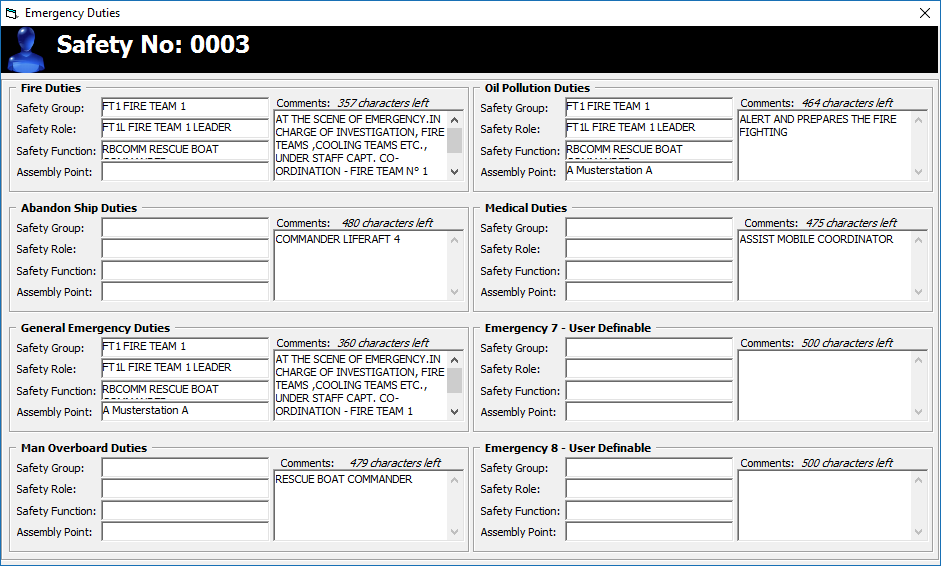
To view more information about the selected Safety Number, click the Show Emergency Duties.
Figure 5-10 Emergency Duties Information
- Navigate to the Eligible Crew section and further filter the information to display.
- Double-click the Crew name to view the Crew Eligibility Status and course history.
- Select the desire Crew name and then click Assign Function. Only crew with on-board status can be assign.
- At the confirmation prompt, click Yes to proceed and this places a check mark on the Assigned column or No to return to previous window.
Assigning Safety Number by Person
In Assign by Person tab, crew on-board/expected is listed.
In Eligible Function section, crew that matches the eligibility function to the Safety Number is shown, including the courses taken if they are defined in Parameter ‘Safety’, ‘Display Valid Courses on Muster list Assignment’.
Function that are assigned has a check mark besides them and information on the grid may vary depending black filter selection.
Assigning Safety Number
-
In the Muster List Assignment window, click Active and Assign by Person.
-
Select the criteria from the drop-down list.
-
To view more information about the selected Safety Number, click the Show Emergency Duties.
-
Select the desire Crew name and then click Assign Function in Eligible Function section.
-
If the Safety Number is assigned, the system prompts and overriding confirmation. Selecting Yes reassigns the Safety Number to the selected crew.
-
Select the Crew you wish you un-assign and then click the Unassign Funtion.
-
At the confirmation prompt, click Yes to proceed.
Scheduled Muster List Assignment - Standard
This function allow Safety Officers to plan ahead and assign a safety number in advance, allowing the arriving crew to replace those due to disembark.
In the Scheduled tab, the system checks and ensure only qualified Onboard and Expected crew members are assigned to the specific emergency functions.
The assignment of Safety number per crew or by onboard/expected is manage by Parameter ‘safety’, ‘Allow SafetyNo Assignment to Onboard or Expected’. See Appendix — Parameter for further details.
Figure 5-11 Standard Schedule Muster List — Assign by Funtcion
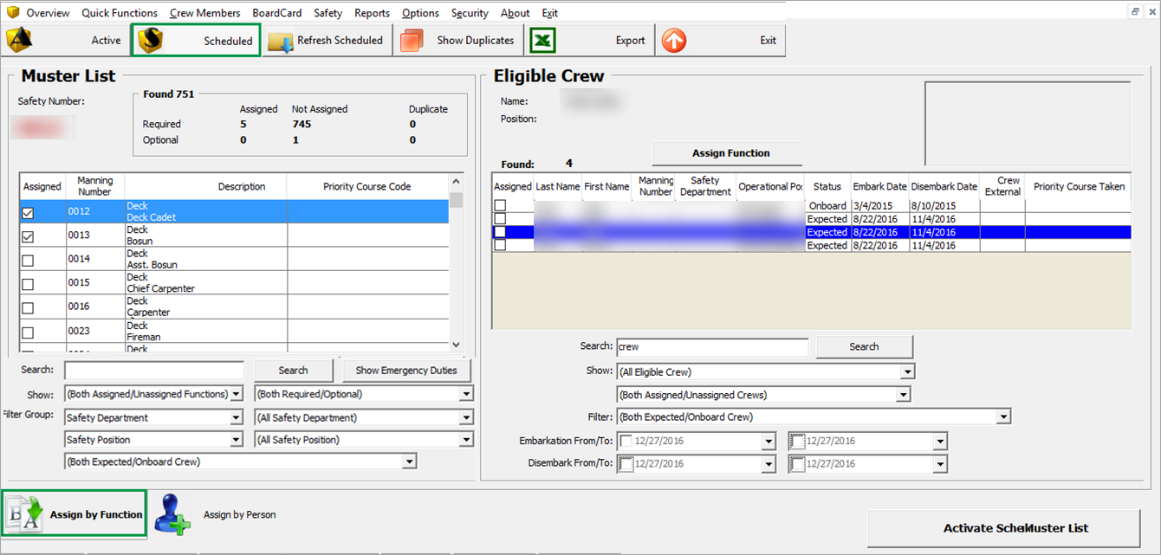
Figure 5-12 Advance Schedule Muster List — Assign by Function
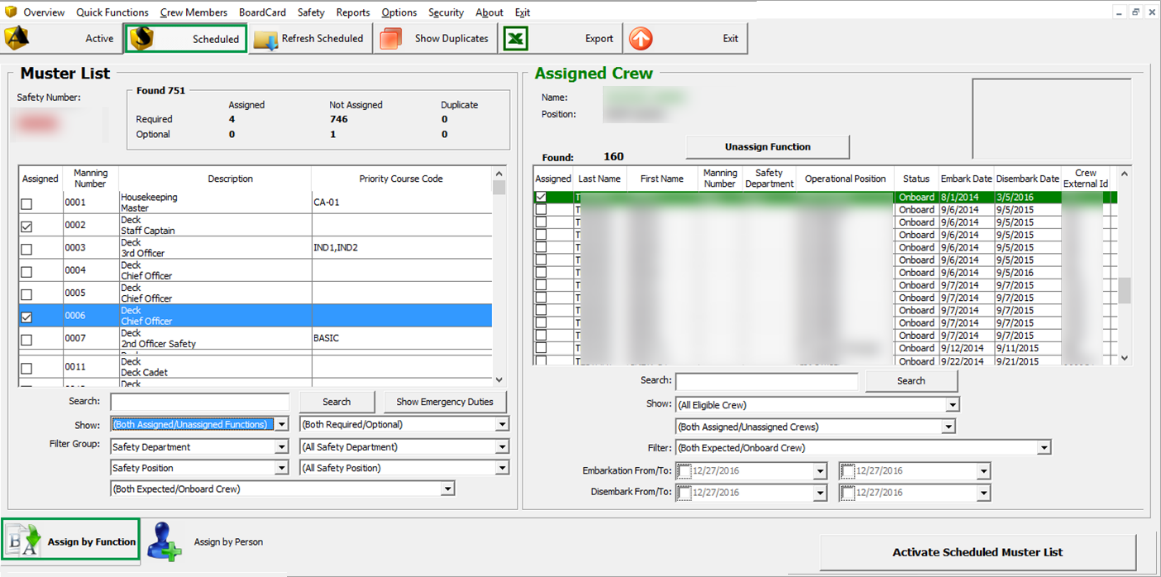
That Information displayed in Assign by Function tab is similar to Active Muster List and it has additional filter by Embarkation From/To and Disembark From/To in Eligibility section.
Scheduling Safety Number by Function
-
In the Muster List Assignment window, click Schedule.
-
Select the criteria from the drop-down list.
-
To view more information about the selected Safety Number, clikc the Show Emergency Duties.
-
Navigate to the Eligible Crew section and further filter the information to display.
-
Double-click the Crew name to view the Crew Eligibility Status and course history.
-
Select the desire Crew name and then click Assign Function.
-
At the confirmation prompt, click Yes to proceed and this places a check mark on the Assigned column or No to return to previous window.
-
Select the Crew you want to un-assign and then click Unassign Function.
-
At the confirmation prompt, click Yes to proceed.
Figure 5-13 Schedule Muster List Assignment by Person
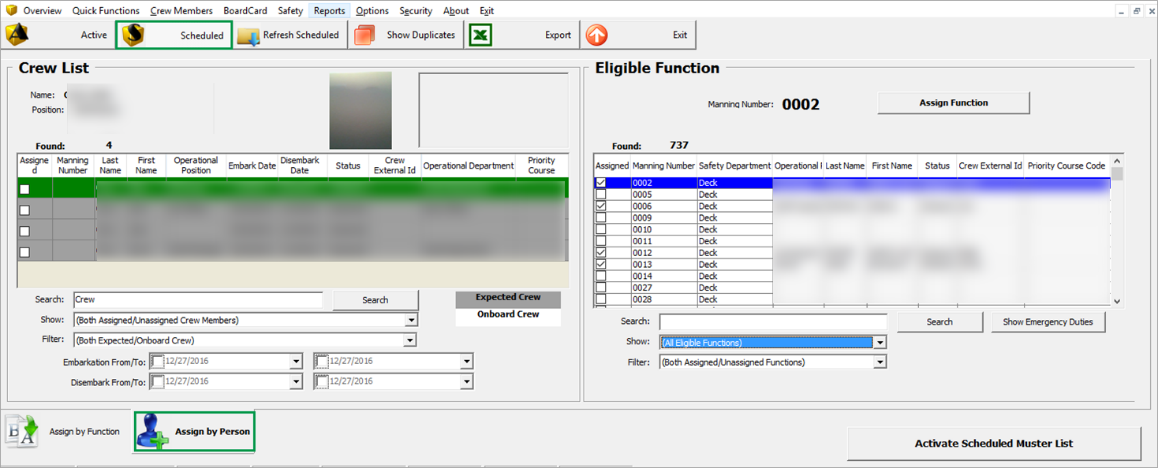
The function in Assign by Person is the same as Assign by Function, with an added functionality to customize the grid display color scheme for crew onboard or expected.
Scheduling Safety Number
- In the Muster List Assignment window, click Schedule.
- Select the criteria from the drop-down list.
- To view more information about the selected Safety Number, click the Show Emergency Duties at the Eligible Function section.
- Select the Crew name and then click Assign Function in Eligible Function section.
- If the Safety Number is assigned, the system prompts an overriding confirmation. Selecting Yes reassigns the Safety Number to the selected crew.
Activating Muster List
In the scheduling mode, the Activate Scheduled Muster List activates all the changes made to Safety Number/Functions assignment. Once this is activated and committed, you will see the changes in the Active Muster List.
-
Under the Eligible Crew section in Schedule Muster List, click Activate Scheduled Muster List.
Figure 5-14 Activate Schedule Muster List
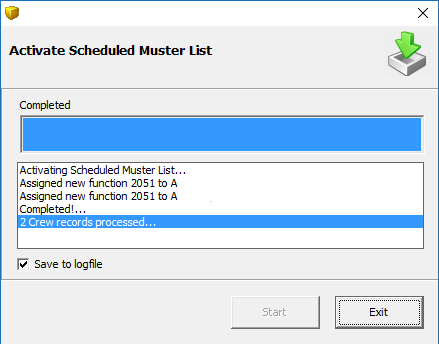
-
In the Activate Scheduled Muster List dialog window, check the Save to logfile if you wish to save the process into a log.
-
Click Start in the dialog window and select Yes at the confirmation prompt.
-
The number of records processed are shown at the status bar.
-
During this process, the system checks and prompt a warning if discrepancies are found; for example, the status of the assigned crew is still in Expected status or new crew has the same safety number as existing crew onboard.
Figure 5-15 Crew Safety Number
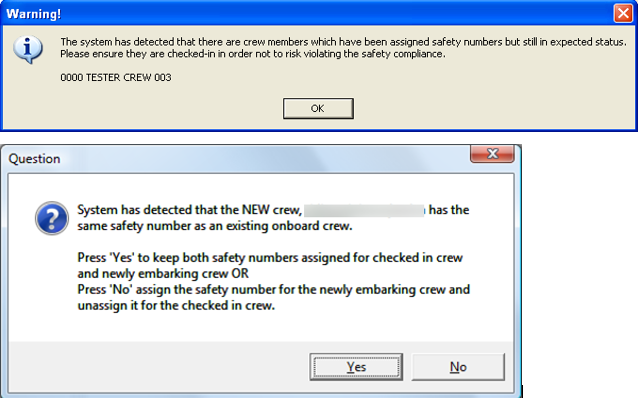
-
Click Exit once the process status shows Completed. The log file is saved in Oracle Hospitality Cruise program folder.
Note:
The system is able to automate the Safety Number assignment without prompting a dialog box based on value define in Parameter, ‘General’, ‘Duplicate Safety Number Action’. See Appendix — Parameter for more information.
Refresh Scheduled
The Refresh Schedule functionality imports previously saved Activate Schedule Muster List into current Schedule muster list. For emergency assignment prior to embarkation date, the Safety Officers is required to compile the current crew manifest and import into the Scheduled.
Re-importing of the current crew manifest allow the Safety Officer to determine the status of newly embarked crew and those scheduled to disembark, and ensures the Muster List has the current data and assignments.
Refreshing a Schedule
Figure 5-16 Confirmation of Re-Import
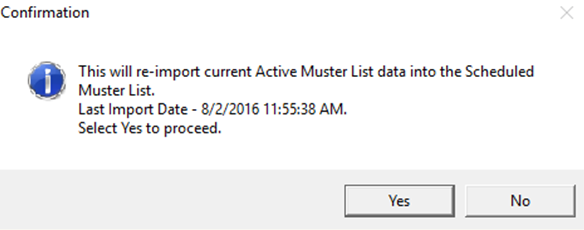
-
Click Refresh Schedule at the ribbon bar.
-
Take note of the last import date at the confirmation prompt before proceeding. Once proceed, the system refreshes and overrides any unsaved Scheduled Muster List with the Active Muster List.
Show Duplicate
The system only permit one (1) Emergency Function per crew member, with the exception in Scheduled Muster List where same function assignment to an Expected Crew Member and Onboard Crew member is allowed. You can use this function to show all duplicate assignment and correct where necessary.
Depending on the selected tabs – Active or Scheduled and when you click the Show Duplicate, the system prompts a list of duplicate Emergency Function assignment. Safety Officer is required to re-assigned the Emergency Function to a unique crew member, if any.
Export
-
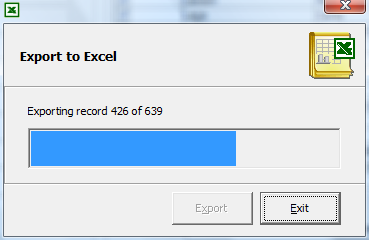
In the Muster List Assignment window, click Export to export all the data.
Figure 5-17 Export to Excel
-
System launches the Microsoft Excel application and transpose the information on a spreadsheet when the export completes.
-
Save the file to your chosen location.
-
Click Exit to return to Muster list Assignment window.
Violation Overview
Figure 5-18 Safety Violation Overview

You can only choose one of these violation from the drop-down list:
-
Operational Requirement Violation: Crew with Safety number assigned but Operational Position not linked to assigned Safety Number.
-
Qualification Requirement Violation: Crew with Safety number assigned but does not fulfil the primary/substitution course and certificate required for that safety number.
-
Both: Crew that violates both the above requirements.
To view the violation, select the Violation Typefrom the drop-downlist.
In Port Manning
-
IPM Group or otherwise known as Safety Group
-
Safety Roles
-
Safety Department
-
In Port Occurrence
-
IPM Parameter
IPM Port Occurrence
-
At Port: Ship is docked alongside the port
-
Tender: Ship is docked at Tender Port
-
Undefined: Ship is at Sea Day
The occurrence is link to System Cruise in Administration, System Cruise Setup. IPM Port Type.
In Port Manning Setup
The IPM Setup consists of two tabs; an Overview and IPM Setup. Multiple IPM Group can be set up with safety functions defined on each one. In each of the IPM, only one Safety Department is allowed to be assign and is based on the IPM Port Occurrence.
Assigning IPM Group
Figure 5-19 IPM Setup
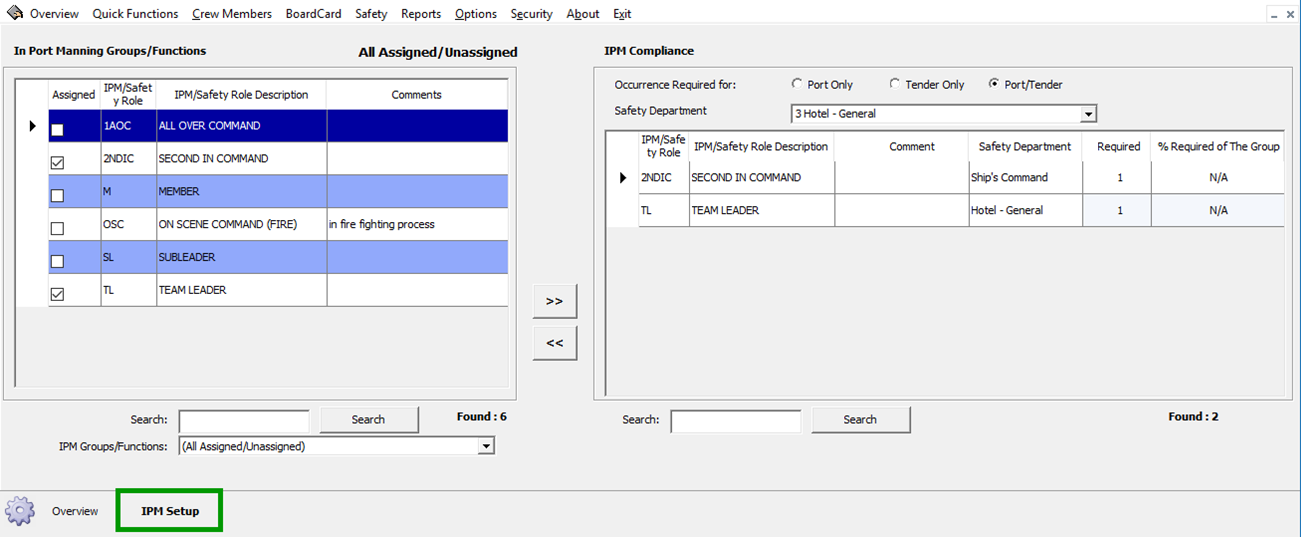
Table 5-4 Field Description of IPM Setup Window
| Field | Description |
|---|---|
|
IPM Groups/Functions |
List of available IPM Groups |
|
Assigned |
Indication of IPM Group currently assigned if check box is ticked. |
|
IPM/Safety Role |
Defines the Safety Department the IPM Group belongs to. |
|
Occurrence Required |
Occurrence based on selected port and IPM Group. Port Only: Belong to specific Safety Department Occurrence at Port. Tender Only: Belong to specific Safety Department Occurrence at Tender Port. Port/Tender: IPM Group applicable to both type of port. |
|
Required |
Define the number of required crew member(s) to remain onboard to perform the safety function and this may be overwritten. This value take precedence if no value is define in % Required of The Group. |
|
% Required of The Group |
Define the minimum number of crew onboard by percentage. If the number of crew in the group changes, the required crew onboard changes automatically based on the percentage specified. For example, a safety group with 20 crew members and % is set to 50%, the required crew is 10. |
-
From the Safety Menu, select In Port Manning Setup from the drop-down list.
-
Navigate to IPM Setup tab and select the Occurrence Required and Safety Department.
-
Select the In Port Manning Groups/Functions then click the right arrow.
-
In the Required or % Required of The Group field, enter the desire value.
-
Use the Search function to search for the IPM Group. The search field is case sensitive.
Defining IPM Eligibility
-
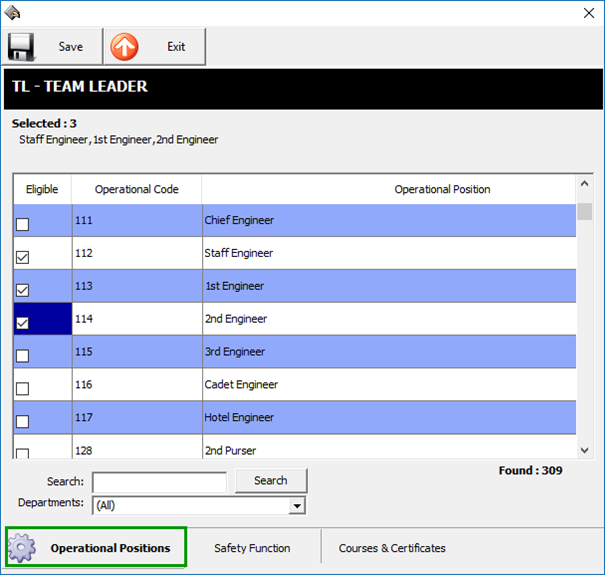
At the IPM Setup window, IPM Compliance section, double-click the IPM/Safety Role Description field.
-
Select the eligibility by Operational Positions, Emergency Functionsor Course and Ceritficates per each IPM Group.
Figure 5-20 IPM Setup Eligibility
-
Operational Positions- Crew members whose position matches the selected operation position.
-
Safety Funtion- Crew members whose safety Number assigned is the same as the selected safety function.
-
Course & Certificates- Crew members have either completed the selected primary course or selected substitution course AND primary certificate OR selected substitution course.
-
-
When you un-assign the IPM Group from the Safety Department, the system checks if the IPM Group has crew member assigned in the IPM Assignment.
-
If the answer is yes, you will receive a warning message before you are allowed to proceed.
-
When the IPM Group has crew member scheduled, un-assignment of IPM Group from the Safety Department is not allowed.
-
Click Save to save the selection, and then click Exit to close the window.
Overview of IPM Setup
he eligibility of IPM is based on crewmembers Operational Position, Emergency Functions (Muster List) or Course and Certificates. The selection can either be one or both of these criteria.
This function shows all the required Head Count, Eligible Operational Positions, Emergency Functions, Required Course and Certificate per each Safety Department, IPM Group/Function.
Figure 5-21 IPM Overview Window

On this window, the assignment of eligible Operational Positions or Emergency Functions is performed by double-clicking the field name.
IPM Assignment
Assigning Crew to IPM Group
-
From the Safety menu, select IPM Assignment.
-
In the IPM Assignment window, choose the Occurrence Required to display, and then select the Safety Department from the drop-down list.
-
The Operational Department to display is default to All. Choose the department, if required.
-
Select the Type of Eligibility to display and/or type of crew to filter from the drop-down list.
-
Check the Assigned check-box to assign the selected crew from the grid individually or use the Select All to assign all crew shown in the grid.
-
Crew with multiple assignments has additional IPM Code in Belongs to IPM column. To view crew with multiple assignment, select Crew with Multiple Assignment from the Filter option.
-
Once a crew is assigned to the IPM Group, the number of crew assigned to the IPM Group then populates into the Compliance Requirements.
-
Some of the IPM Groups could have the same eligible Operational Positions or Emergency Functions and some crewmembers may appear or assign to more than one IPM Group, depending on the Ship’s operation.
-
Assignment of a crew to multiple IPM Group is controlled by setting the Parameter, ‘Safety’, ‘InPortManning Enable One Crew Assignment per Group’ to 0. If the Parameter is set to 1, the system prompts a dialog before removing the Crew from previously assign IPM Group.
-
To un-assign the crew from the IPM Group, un-check the Assigned check-box and at the message prompt, select Yes to confirm.
IPM Scheduling
IPM Scheduling Tool allow the Department Head to schedule daily task for crewmembers on duty when at port, based on the set up in IPM Group and IPM Assignment.
In the IPM Scheduling window, the system displays IPM Groups per department based on IPM Port Occurrence setup for that day. See IPM Port Occurrence for more information.
In the Scheduled Crew Members section, the system display the list of crew members according to the respective IPM Assignment and crew embarkation/disembarkation within the system cruise date.
Crew that has IPM duties are not allowed to go ashore. The Gangway Security staffs receives an alert when crew swipes their card at the gangway. This setting is configured in Administration, Security Alert Setup using a script. Please consult Oracle Support for more information.
Figure 5-22 IPM Scheduling Window
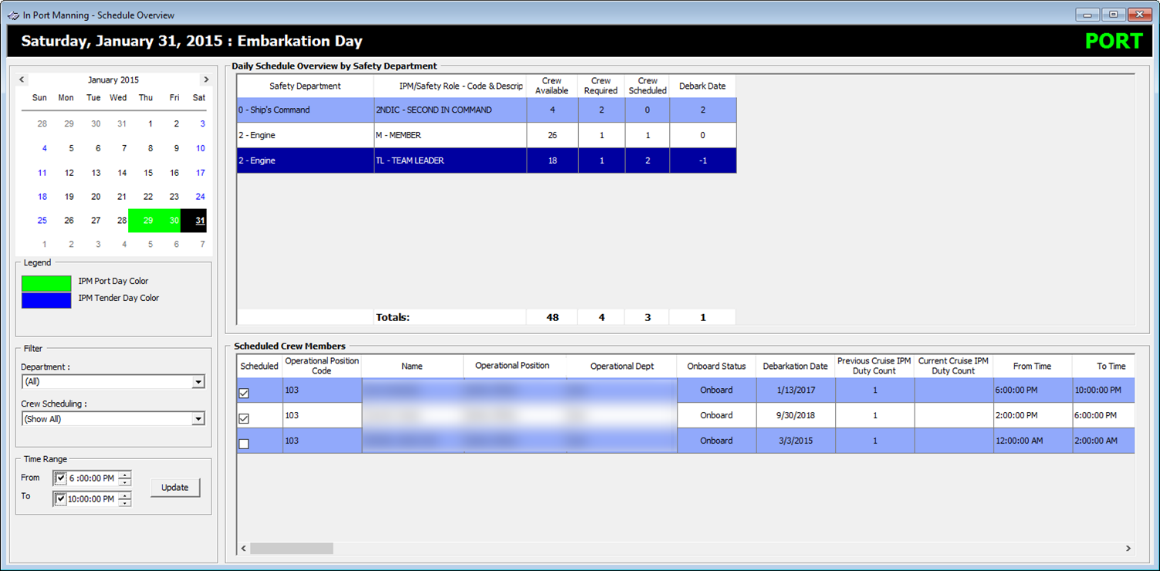
In the window, only the crew with IPM Assignment is able to view other crew within the same IPM group.
For example:
Crew A, B, C is eligible to IPM Group – Commander Lifeboat. Assign crew A, B to same IPM Group, where crew C is not belong any IPM group. If crew C login, IPM scheduling will not show any available crew for scheduling. If crew C is assigned to IPM group and login, IPM scheduling then shows all available crew that belong to same group of logged in crew.
Scheduling a Crew
- In the IPM Scheduling window, select the date and the Safety Role from the Daily Schedule Overview by Safety Department.
- In the Scheduled Crew Members section, check the Scheduled check box of the crew.
- In the Time Range editor, check the check box and adjust the time accordingly, and then click Update to populate the new time.
If scheduling is performed on the same day as the System Date, the system only allow you to schedule crew members whose status is onboard. This is to prevent accidental assignment to crew members who are already ashore and not able to perform the duty.
All scheduled performed on past cruises is not modifiable.
Ashore Deny List
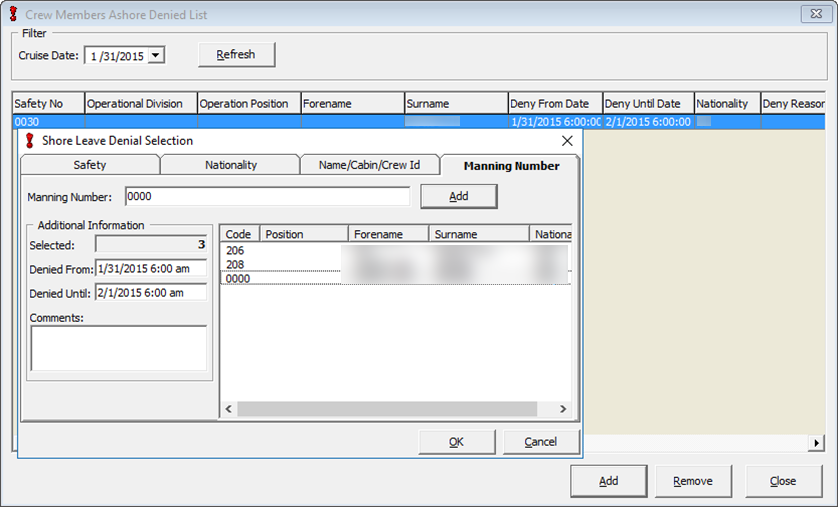
Figure 5-23 Crew Ashore Denied List
-
From the Safety Menu, select Ashore Deny List option.
-
Select the Cruise Date from the drop-down list and click Refresh.
-
Select the tab to add the deny list then enter the search identifier.
-
In the Additional Information section, enter the date to deny from/until and reason in the comments field
-
Click Add to add the crew name to the selection grid and then click OK to confirm.
-
Denied crew name(s) with its Operational Position, denied From/Until date and Nationality are shown in the grid.
-
To remote the name from the Denied List grid, select the name and then click Remove. Use CTRL +- or SHIFT + to remove crew name by batch.
-
At the confirmation prompt, select Yes to proceed.
-
Click Close to return to the main window.