1 System Configuration
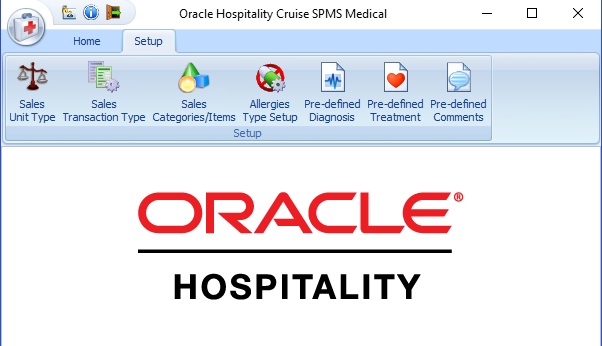
In the Medical module, codes such as Sales Unit Type, Sales Transaction Type, Sales Categories/Items, and Allergies Type Setup are added to table Medical Team onboard to record the diagnosis and medicines dispensed to guest or crew. The steps to create the code is the same throughout the module, except for Sales Items, which have more details. The table below explains the type of codes to configure.
Table 1-1 Type of Medical Codes
| Code | Description |
|---|---|
|
Sales Unit Type |
Defines the measurement unit used in sales items or transactions. |
|
Sales Transaction Type |
Defines the type of medical services offered to the passenger/crew onboard; For example, Doctor or nurse consultation, medicines, treatment, and others. |
|
Sales Categories/Items |
Defines the group for a sale item; For example, medicines, treatment, laboratory test, and much more. A category is required before an item can be created or added to a category. |
|
Allergies Type Setup |
Defines the type of allergies that the passenger/crew may have. |
|
Pre-defined Diagnosis |
Defines the common diagnostic offered to passenger/crew. |
|
Pre-defined Treatment |
Defines the treatment offered to the passenger/crew |
|
Pre-defined Comments |
Defines the commonly use comments during treatment/consultation. |
Accessing the Setup Page
To access the Setup page, launch the Medical module and navigate to the Setup tab on the main page.
Figure 1-1 Medical Setup Main Page

Adding New Codes
Figure 1-2 Setup Form and Icons
-
On the Setup tab ribbon bar, select the code type to configure.
-
Click Add New at the ribbon bar.
-
Enter the Code, Name, and Comment if any. The added code is enabled by default. Deselect or sliding the Enable check box to No disables the code.
-
To save the record, click Save.
-
Repeat steps 2 to 4 to add more codes.
Deleting a Code
The Delete button is disabled when the code is assigned to a transaction. To delete, select a code and click Delete at the ribbon bar.
Setting Up Sales Categories/Items
The Sales Categories/Items is a category that groups the sale items according to the diagnostic, treatment or supplies. For example, medicines, treatment, and laboratory test. You must create a category before you can create an item or add the item into a category
Setting Up Sales Items
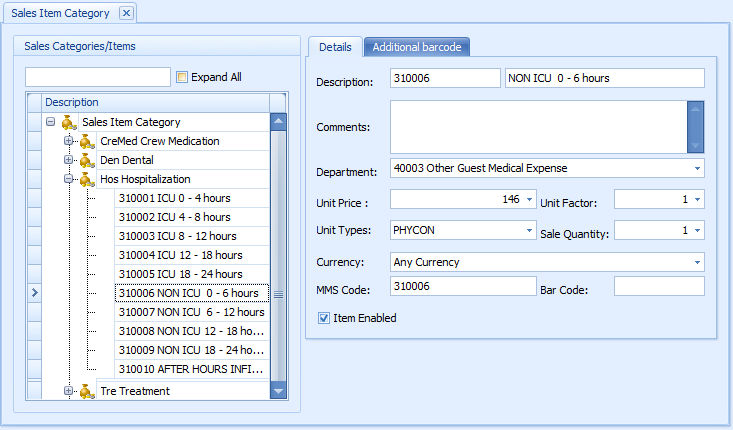
Once the Sales Categories is available, you can then create the sales items with pricing and the sale quantity for the respective category.
Figure 1-3 Sales Categories/Items Configuration Form

Table 1-2 Field Definition of Sales Items Window
| Field Name | Description |
|---|---|
|
Description |
Item shortcode and name |
|
Comments |
Item description |
|
Department |
Item Posting Department |
|
Unit Price |
Price chargeable per unit |
|
Unit Factor |
Quantity per box |
|
Unit Type |
Item unit measurement for example, bottle, ounce, milliliter, tablet, and others. |
|
Sales Quantity |
Item minimum quantity of the item |
|
Currency |
Charge currency of the item |
|
MMS Code |
Stock reference code in Material Management System (MMS) |
|
Barcode |
Item barcode |
-
On the Sales Category page, expand the tree view and select a category.
-
To create a new item, click Add New at the ribbon bar.
-
Enter the Description code and name in the description field.
-
Enter the item description in the comments field.
-
Select the Posting Code from the Department drop-down list.
-
Enter the Unit Price, Unit Factor, and theSale Quantity.
-
Select the Unit Types from the drop-down list.
-
Select the Currency from the drop-down list. The system populates the item code and posts the value with current onboard currency during posting for an item that is tagged to “Any Currency”.
Note:
If a currency is defined in the setup and the current onboard currency defer from the setup, then the item code is not available for posting. For example, item currency is Euro and onboard currency is USD.. -
Enter the MMS Code, if any.
-
Enter the Barcode in the Barcode field or scan the code using a barcode scanner. The scanned barcode of the item is shown in Additional barcode tab.
-
To save the record, click Save.
-
Repeat the steps above to add more Sales Items.