4 Daily Setup
Daily Setup Overview
-
Location Schedule information.
-
Therapists Schedule information.
-
Discount Period setup and maintenance.
Before you can create a setup for a specific Location and Date, the system must have been the information about the Location – see Location Maintenance – as well as the Therapists assigned to each Location – see Therapists Setup
Location Schedule Information
-
Opening & Closing Times
-
Schedules number
-
Schedules captions
These default values can be altered to the values appropriate for each Daily Setup.
-
Port Info
-
Therapist Info
Therapists Schedule Information
In the same way as for Location Schedule, the appropriate Therapists are loaded from the Therapists Setup into the Therapists drop-down list boxes, allowing you to assign the appropriate Therapist to each schedule later.
-
Red: for Expected Therapists (and for schedules that are not link to any Therapists).
-
Green: for Checked-In Therapists.
Each displayed Therapist's tool tip text is showing the word Expected or Checked-In next to the existing Expected Disembarkation Date
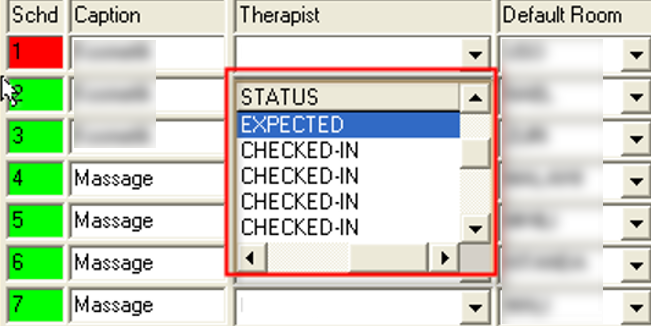
Inside the Therapists drop-down selection box, you will find an additional column Status next to each Therapist’s name (Expected or Checked-In).
Figure 4-1 Expected Status

-
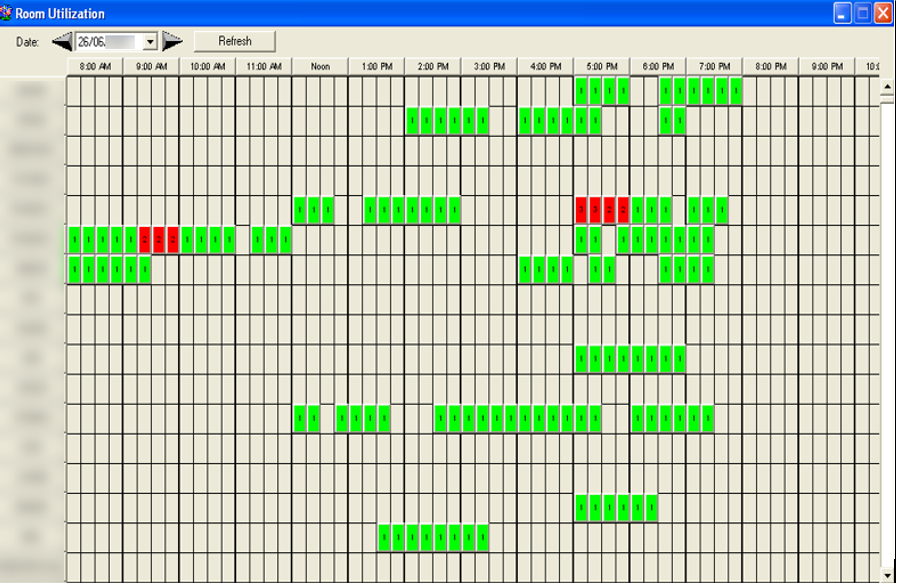
The Blocked Times are displayed with the default gray / dark gray / dark green & black colors.
-
All other Treatment (Expected & In House) Reservations are displayed in yellow.
Note:
Only Expected & In House Treatment Reservations are display here since this is a pure availability overview.Multiple Discount Periods
This functionality extends the existing single Discount Period per Day into Multiple Discount Periods for each Day in Daily Setup screen.
Additionally, you can now define the selected or all Item Groups and/or selected or all specific Items (Retail & Therapies) that will be assign to the specific Daily Discount period.
The default Discount percentage definition includes option to define Discount value or Discount percentage.
Setting up a Day
To set up a Day, choose the Location and Date from the calendar.
As soon as you click on the Calendar into a Date that does not exist as a Spa Location Daily Schedule, the system will load the default values for this Location as found in the Location Maintenance as well as in the Therapists Setup.
-
Number of Schedules
-
Opening and Closing times
The system will create the Therapists Schedules with their default captions, will load all appropriate Therapists into each Schedule’s Therapist drop-down list box and prepare them for further editing.
The system will also load all available Rooms into each Schedule’s Default Room drop-down list box.
-
Accepting the default Schedule caption or edit it.
-
Select the correct Therapist for each Schedule from the Therapist drop-down list box.
-
Select the default Room for each Schedule from the Default Room drop-down list box.
-
When done creating the schedule, click Insert to save it.
Copying a Previous Day
To avoid setting up each single working day, the system provides the functionality to setup a Day by copying the setup of an existing working Day.
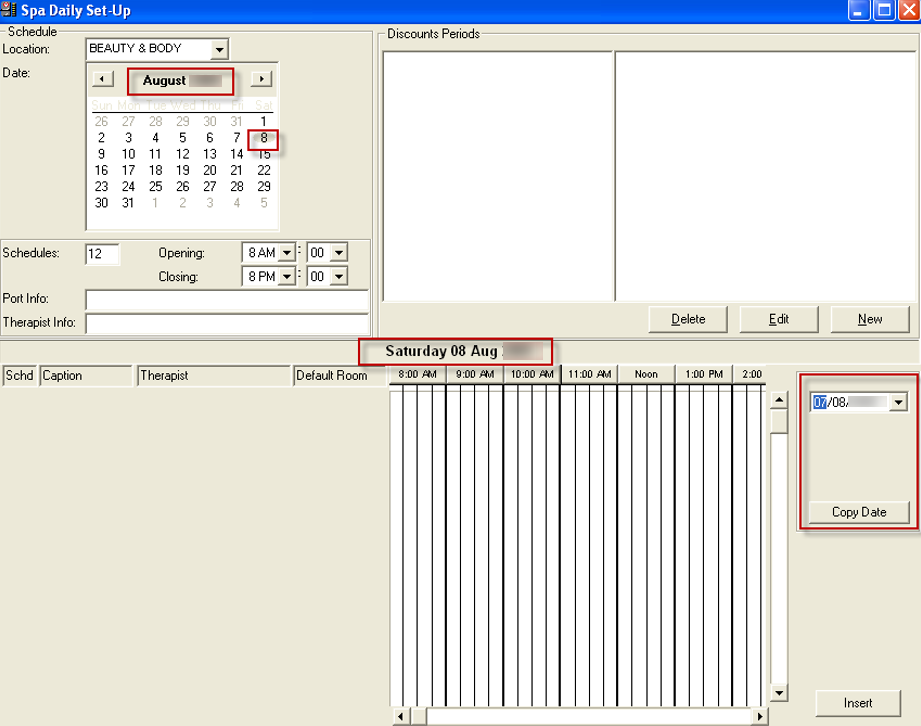
Choose the Date you want to setup by selecting it from the calendar. The system will display an empty working Day as well as the option to select an existing Working Day and copy this Day’s Setup into the selected empty Setup.
Figure 4-2 Spa Daily Setup

Select the working Date you want to copy the setup from and then click Copy Date.
The copy process commence immediately and the date will have the same setup as the one yo copied from.
Additionally, the system will display two more buttons to either Update the proposed/copied setup or Remove Date to remove the proposed setup.
Clicking on Remove Date will result in removing the Daily Setup for selected Day “Are you sure you want to remove the Daily Setup for selected Date: 08/08/2019”
Adding & Removing Schedules
The function allow you to add additional schedules and therapist to the selected date.
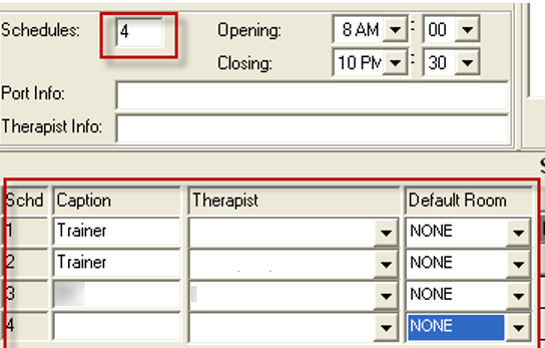
Figure 4-3 Schedules

To do that, place the cursor to the Schedules text box and replace the number as shown in above figure from four (4) with six (6) and click Tab. The system will create to additional schedules where you can now enter their captions as well as select Therapists and default Rooms
After finishing all necessary changes, click Update to save. You can remove existing Schedules from a Daily Setup the same way, by reducing the Schedules number and clicking the Tab key. Clicking on Yes, will result in removing the last two (2) schedules and bring the total Schedules for this working Date to four (4) Schedules.
Note:
When you try to remove a Schedule that already has Appointments or Blocked Times assigned, the system will not allow it and will display the following warning message “There are already appointments for one of the schedules you are trying to delete. Cannot continue.”Assigning Crew Member to Schedules
When adding Schedules into the Daily Setup, the system by default leaves the Captions, Therapists and Default Rooms empty.
You can assign Therapists to those Schedules, by selecting the Therapist from the Therapist drop-down combo box and then click Update.
Multiple Discount Periods
The Daily Setup screen displays all Multiple Discount Periods assigned to each day on the upper right. The Discounts Periods displays the list of assigned Discount Periods and the Retail, or Therapy Groups and Items assigned to each Discount Period.
-
A tree view listing of all Discount Periods grouped by retail and Therapies types.
-
A tree view listing of all Groups and items assigned to each Discount Period.
-
Short Code description.
-
Discount value as amount of percentage (%)
-
Starting & Ending time of Discount Period
While the listing on the right displays all Retail or Therapies Groups and items that are currently assigned to the selected Discount Period of the left side.
Creating & Editing Multiple Discount Periods
The assignment of Groups and Items works in the same way as the assignment of Trained Therapies in the Therapists Setup screen. You are able to assign to each Discount Period an entire Group of Items or selected Items.
This can be done during the creation of a Discount Period (New) or when editing an existing Discount Period (Edit).
-
Code: Enter a short description for the new Discount Period. This will be used later to describe this Discount Period in the Reservations and Posting screen.
-
Discount: Enter the amount of the Discount and its type: Value
-
Percentage (%): 2.50 or 10%
-
Type: Select whether this Discount Period will include Retail
-
Therapies Items: Clicking on each type will result in automatic loading of Retail or Therapies Groups and Items on the right side tree view listing.
-
From Time: Enter the starting time of the Discount Period.
-
To Time: Enter the ending time of the Discount Period.
-
Click on the check box of a Group to select the entire Group and all items belonging to the Group.
-
Double-click on the Group to expand the listing to display the individual items that each Group contains to select specific items to include into the Discount Period.
-
Click OK create this Discount Period and save it into the current displayed Date. The Daily Setup screen will be automatically updated to display the addition of the new Discount Period.
-
To edit some or all of the information of a Discount Period, simply click on Edit.
-
The same window as before will open to edit the information you wish the change. Clicking on OK will save the changes and will update the Daily Setup screen automatically.
Discount Periods Overlaps
The Discount Periods functionality has a limitation in multiple Discounts Periods overlapping. Discount periods of the same type (Retail or Therapies) cannot be overlapped or the system will not accept multiple periods existing for the same type in the same or overlapping period with another Discount Period of the same type.
In other words, looking at the screen above, we are having 2 Discount Periods for Therapies.
The first is CLASSIC from 10:00 – 12:00 for 5% for the 2 SPORT MASSAGE Therapies.
The second is HARMONY from 12:00 – 17:00 for 20% for all Therapies.
If we try to extend the ending time for the first period – CLASSIC – from 12:00 to 13:00, we will get the following message.
In other words, looking at the screen above, we are having 2 Discount Periods for Therapies.
The first is CLASSIC from 10:00 – 12:00 for 5% for the 2 SPORT MASSAGE Therapies.
The second is HARMONY from 12:00 – 17:00 for 20% for all Therapies.
If we try to extend the ending time for the first period – CLASSIC – from 12:00 to 13:00, we will get the following message “Discount Period overlaps with an existing Discount Period.
But, the system will allow you to new Discounts Periods for Retail Items as you wish, as long as they do not overlap with the existing one from 10:00 – 14:00.
Discount Periods and Reservations
When Discount Periods exists for the selected-displayed Date & Location, the system displays the Multiple Discount Periods in the lower left corner of the main Reservations screen, using the same tree view listing as in the Daily Setup screen.
The Multiple Discount Periods handling during reservations is implement as follows. The first time the system checks for Reservations that include Therapies that might be assign into Discount Periods is during Checking-In of appointments. At this time, the system checks and looks for all Therapies Discount Periods that might contain the currently checked-in Therapy that falls inside the specified Starting and Ending Time.
If the system finds that the current Reservation includes a Therapy that applies for a Discount, it automatically updates the Reservation record internally with the Discount amount and type (value or %). Now, after the Reservation record has been updated with all necessary Discounting information, you see the Original Treatment price and the discounted price in the Reservation Info layout.. At a later point, during the Finish & Post process, the Discount will be automatically calculated and displayed in the Posting screen. Additionally, the posting screen will list on the right side all available Discount Periods of current selected Date, sorted by Type (Retail or Therapies) and then by Starting Time.
Discount Periods and Retail Items
When posting Retail Items, the Posting screen will not only show the Multiple Discount Periods, but also will check if a selected Retail Item falls into an existing Discount Period.
-
Calculate the Discount and display the new Extended Price (after discount). Display the Discount value and type (underneath the Extended Price).
-
When you finally click on Add To Receipt, the calculated Discount amount will be displayed together with the Retail Item on the Invoice list (left side). The Total Amount will automatically reflect the final price. The same way, the system will calculate Discounts that are assign as Discount values (instead of %).
Daily Export
This is the option where the Manager would generate the Daily Sales Export file at the end of the day and it can be used to import the Daily Items consumption into various Inventory systems like Materials Management System, Crunch Time etc.
The system will display the default preset File Location where the Daily Export Sales file will be place upon completion of the export process. You need to select the Sales Date and click on Export.
Note:
Once the Sales Data have been exported for a specific date, the Sales Data resets and system will not be able to reproduce Sales Data Export for the same Date again.