1 System Configuration
This section describes the required configuration prior to using the Track It module.
Accessing the Setup Window
To access the Setup window, start the Track It module, and select the Setup tab.
Confiscate Item Location and Item Discard Method
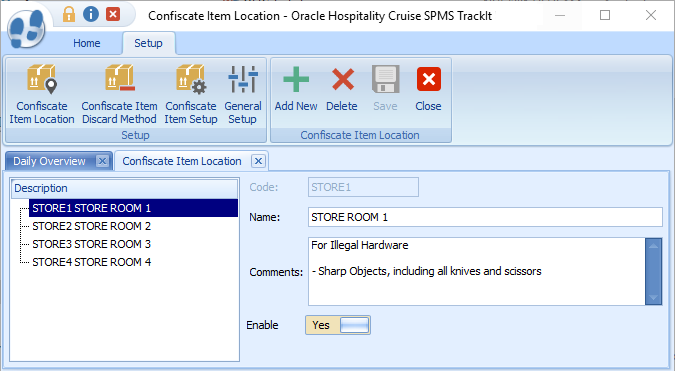
Figure 1-1 Confiscate Item Location
-
From the Setup tab, click Confiscate Item Location or Confiscate Discard Method Item.
-
To create a new record, click Add New.
-
Enter the short code, description and additional comments. For example, Stores Sharp Objects or Items Hand over to Customs.
-
The newly added code is “Enabled” by default. To disable the record, slide the menu to the left to switch the display to No.
-
To save the code, click Save.
-
To enter an additional item, repeat from Step 1.
Setting Up the Confiscate Item
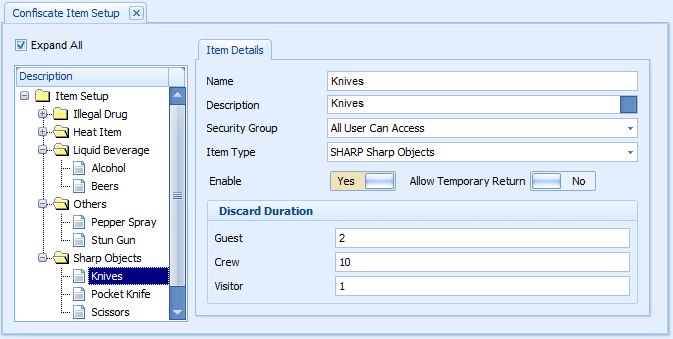
A Confiscate Item is a list of items prohibited or restricted on-board of the ship. these items are categorized into categories, depending on the nature of the items.
Figure 1-2 Confiscate Item Setup
Creating a Confiscate Item Category
-
From the Setup tab, click the Confiscate Item Setup.
-
To create a new category, select Item Setup and click Add New.
-
Enter the Item Code, Name, and Description
. -
To save the new category, click Save.
-
Select an Item Category from the tree view and click Add.
-
Enter the Item Name, Description.
-
Select the Security Group from the drop-down list. The Security Group is defaulted to “All User Can Access” and this is set up for the User Security module. Refer Appendix A. User Security Group for more information.
-
The Item Type is default to the selection from the tree view and is enabled by default.
-
By default, the Allow Temporarily Return is set to No. If the item allows for temporarily return, slide the button to the right to set it to Yes.
-
At Discard Duration section, define the maximum number of days to keep the item in the store. The default value is 0 = never discard.
-
To save the record, click Save.
-
To enter additional Confiscate Item, repeat steps 2 to 7.
Setting Up a Signature Capture Device
-
From the Setup tab, click the General Setup button.
-
In the General Setup window, check the Prompt signature when confiscate item click the Setup tab.
-
Choose the Signature Device from the drop-down list.
-
To save the setting, click Save.
Setting Up a Barcode Scanning Device
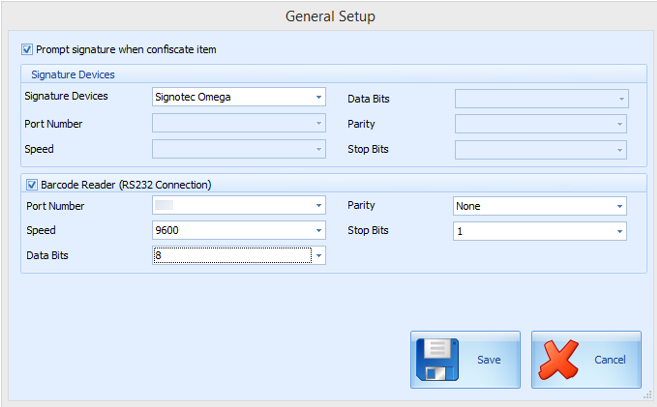
You can use a Barcode scanning device to scan the barcode on the items tagged and below are the set up steps.
Figure 1-3 Track It General Setup
-
From the Setup tab, click the General Setup button.
-
In the General Setup window, Barcode Reader (RS-232 connection) check box.
-
Select the device Port Number, Speed, Data Bits, Parity, and Stop Bits.
-
To save the settings, click Save.
Setting Up the Report Printer
-
Track It Return Receipt
-
Track It Label
-
Track It Receipt
-
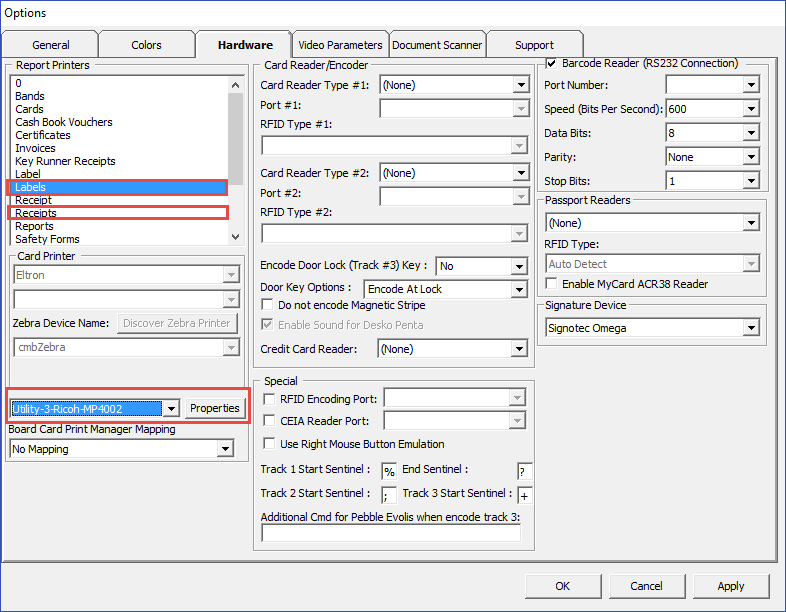
Login to Management module and select Options from the menu.
-
Navigate to Hardware tab, Report Printers section.
-
Ensure Labels and Receipts type is assigned to a printer.
Figure 1-4 Management Module Printer Configuration
Configuring the Database Sequence for Barcode Printing
For barcode label printing, the item ID must be minimum 6 digits long. An adjustment to the start sequence from 100000 is imperative and running below script will recreate the Confiscated Item sequence
DROP SEQUENCE [dbschema].CNT_CIL;
CREATE SEQUENCE [dbschema].CNT_CIL
START WITH 100000
MAXVALUE 1000000000000000000000000000
MINVALUE 1
NOCYCLE
CACHE 20
NOORDER;
Commit;
Barcode Printing
For barcode printing, below are the prerequisites DLL’s and fonts.
Copy the DLL and font files to folders C:\Windows\system32 and C:\Windows\SysWOW64.
-
Barcode.dll
-
u2lbcode.dll
-
Interleaved2of5.ttf
-
Interleaved2of5Thin.ttf
Setting up System Labels
-
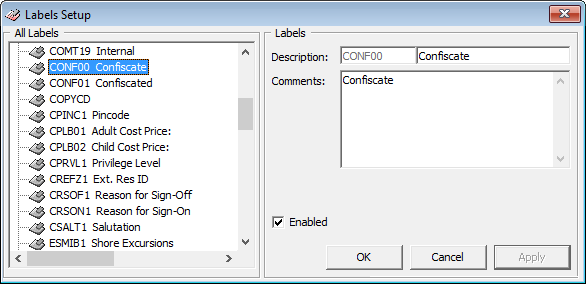
Login to Administration module, select Administration, System Setup, Labels Setup.
-
Locate the label codes CONF00 and CONF01.
Figure 1-5 Label Setup
-
Select the code and enter a new label description, and click OK to saveThe label code “CONF00” refers to the word “Confiscate” and is displayed on the following windows:
-
Setup menu ribbon bar
-
General Setup: ‘Prompt Signature Capture when...’
-
Confiscate Item Setup
-
Confiscate Item Discard Method
-
Confiscate Item Location
-
Ability to show for ‘Button ‘Confiscate Item’ in menu Confiscate Item
-
-
Overview window: Total Item Confiscated Today
-
Overview window: Top 10 most confiscated item
-
Confiscate Item: Confiscated Item
-
Management module: Loyalty/Track It tab, Confiscated Item section
The TrackIt program enable you to record items confiscated, its storage location and when it is return to the guest or crew.