2 Track It
The TrackIt program enable you to record items confiscated, its storage location and when it is return to the guest or crew.
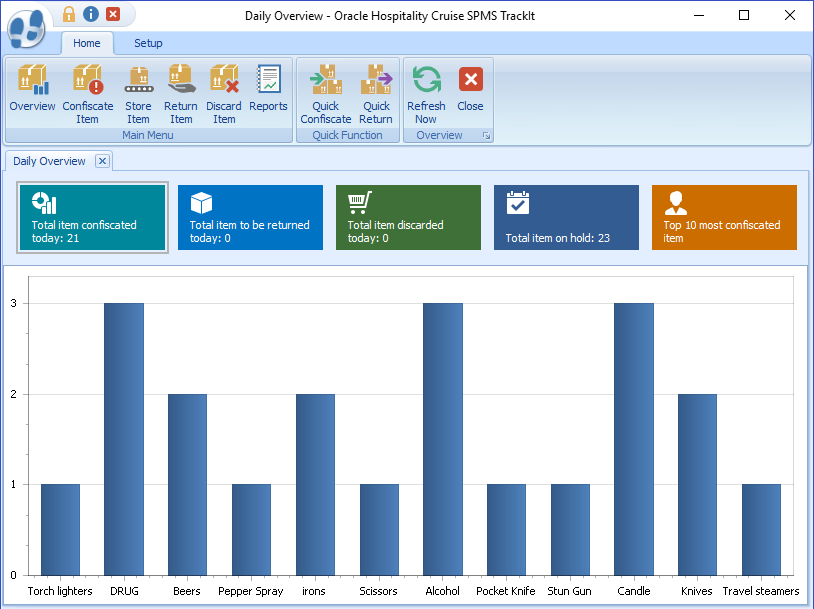
Overview Window
-
Item confiscated today
-
Item to be returned today
-
Item discarded today
-
Item on hold, yet to return to passenger
-
Top 10 most confiscated item
Figure 2-1 Track It Overview Window
Recording Confiscated Item
-
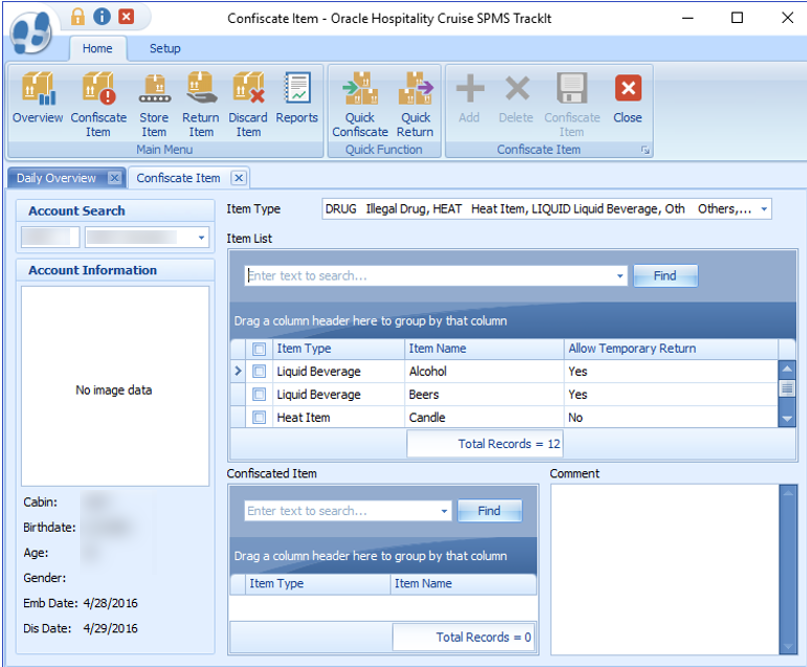
Click the Confiscate Item button on the ribbon bar.
-
In the Account Search section, swipe the board card though the card reader to search for the account, or manually enter the cabin number/name in the Account Search field. Press F2 to reset the search information.
Figure 2-2 Confiscate Item Account Search
-
In the Item Type field, choose the item category from the drop-down list, and click OK. Alternatively, you may search using the keyword search function by entering the work in the Item List text box, and click Find.
-
Check the Item check boxes and click Add to add the item to the Confiscated Item list.
-
If the same item is added to the list, the system prompts a warning message.
-
Click Yes to add the same item to the list or click No to cancel.
-
Insert a comment/description for the item, and click Confiscate Item
. -
If a signature device is connected, the system starts the Signature Capture dialog box.
-
Allow the passenger to sign on the signature pad, and press the Green Check icon on the signature pad.
-
If the signature device is not connected, a warning message will pop up, disallowing you to enter the item.
-
Once the item is added successfully, a bar code label item receipt will be printed.
-
To remove the item from the list, select the item, and click Delete.
Managing Confiscated Items in Guest Handling Tab
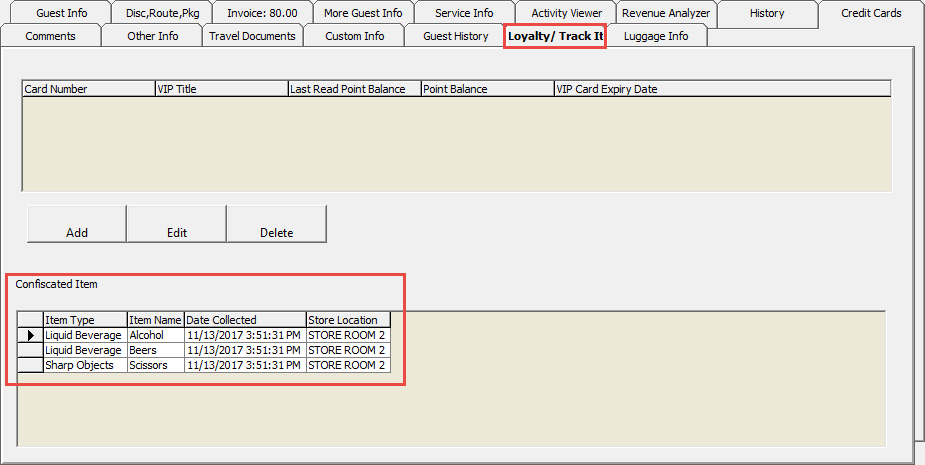
When a passenger has a confiscated item, details of the items and storage location is displayed in the Loyalty/Track It tab on the Guest Handling tab.
Figure 2-3 Confiscated Item in Guest handling
-
Item is checked-in at the security check point the system inserts a record in the Confiscated Item section.
-
Item is returned or checked-out temporarily to the guest/crew; the system removes a record from the Confiscated Item section.
Confiscated Items in Security Gangway
A confiscated item can also be managed and tracked through the WPF Security module. Guest/Crew leaving the ship are prompt to collect their items when the board card is swiped or vice versa.
On the list of items to return page, select the item and click Return. Items will not be check out if you click Close.
Figure 2-4 Check-out Handling at Security Gangway

If there are items to be collected upon returning to the ship, the system prompt you to re-check in this item. . Click Collect to check-in the item.
- For passenger going ashore: The system changes the on-board status to shore-side without prompting the confiscated item list if a passenger checks out the item from the store location.
-
For passenger returning on-board: The system changes the status from shore-side to on-board without prompting the confiscated item list when confiscated items are checked in upon returning from shore-side.
-
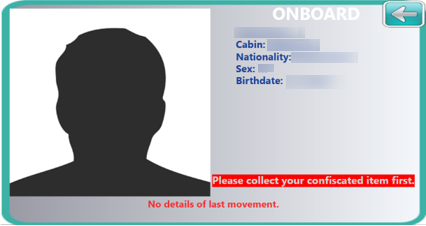
For expected check out passenger leaving for shore-side that did not collect their confiscated item: The system prompts a reminder at the gangway for items to be collected before the stats can be change.
The reminder prompt is configurable in Administration, Security Alert Setup.
Figure 2-5 Reminder for Collection of Confiscated Item for Departing Passenger
Storing Items in Designated Store
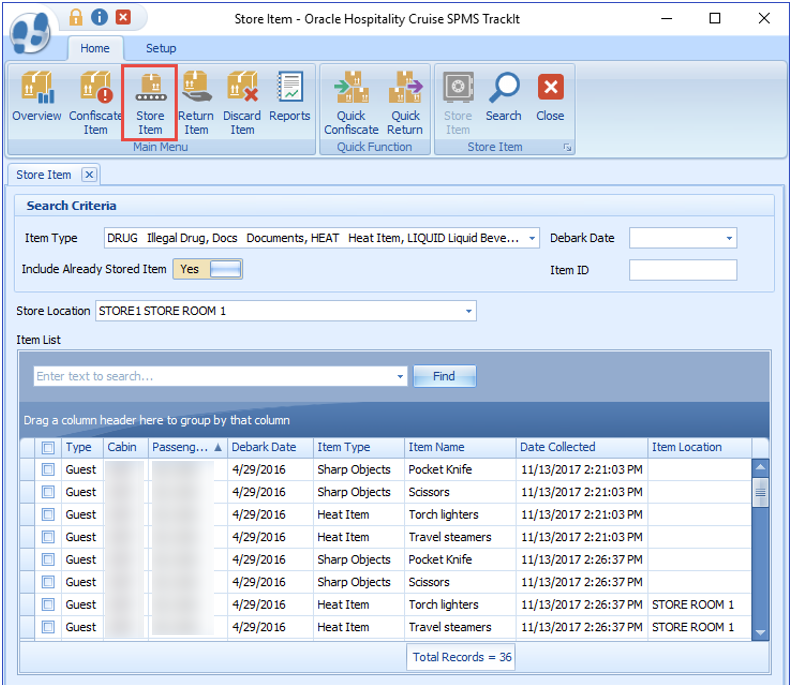
The Stored Item allows you to identify the location of where the items to be stored. Items that do not have a designated store assigned are listed in the Item List grid, which then enables you to assign a storage location.
Figure 2-6 Store Item Window
-
Click Store Item on the ribbon bar.
-
In the Search Criteria section, choose the following filter option and click Search.
-
Item Type: Select the items to display from the drop-down list.
-
Debark date: Select an item stored date from the calendar editor.
-
Item ID: Use the barcode scanner or manually enter the Item ID in the text box. When entering a barcode manually, the Type and Debark Date option is disabled.
-
Include Already Stored Item: If the option is set to Yes, items stored will be listed in the grid including the store location.
-
-
Select the item(s) to store and choose a store location from the drop-down list.
-
Click Store Item.
-
A confirmation prompt, click OK to close. The Store location is added to the Item Location field.
Returning Confiscated Items
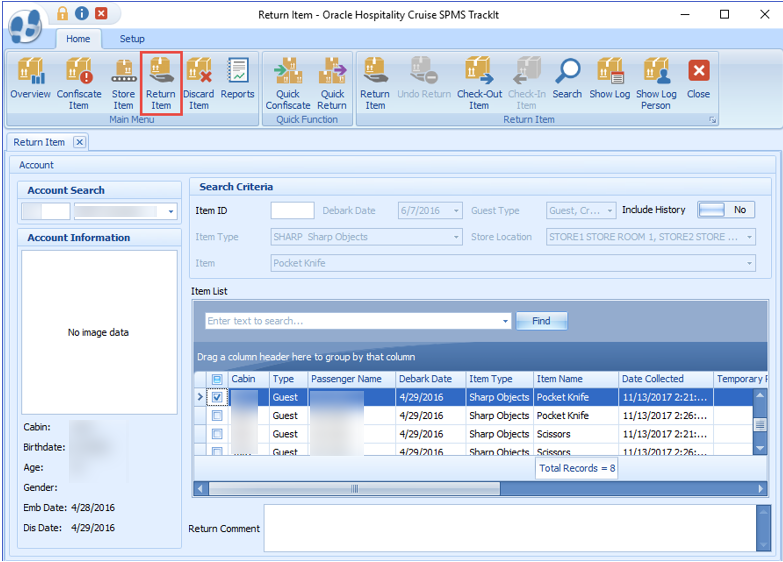
Figure 2-7 Return Item Main Window
-
Click Return Item on the ribbon bar.
-
In the Account Search section, search for the passenger account and choose the item to return. Items that are allowed a temporary return is marked with “YES” in Allow Temporary Return column.
-
Click Check-Out to check out the item. The system prompts a confirmation indicating the number of items being check-out.
-
Click OK to close the prompt. The date/time the item checked out is recorded in the Temporary Returned Date column.
Undoing Returned Items
An item returned accidentally to a guest can be undone by the Return Item function.
- In the Return Item window, search for the passenger account.
- Switch the Include History to “Yes” to display items returned to guests are displayed in the Item List grid with the date and time shown in the Date Returned/Discard column.
- Select the item and click theUndo Return button.
- Click OK to confirm the number of returned items to undo and this resets the Date Returned/Discarded column to null.
Checking in Confiscated Items
-
From the Return Item window, search for the passenger’s account.
-
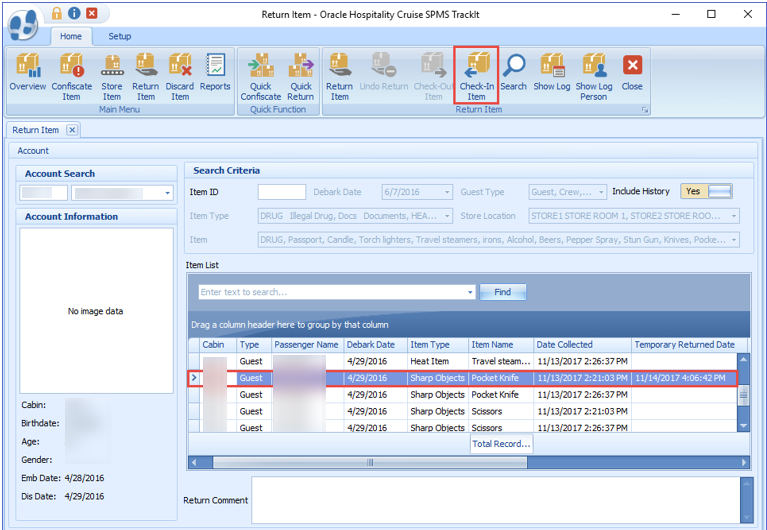
Slide the Include History to “Yes” to display items previously checked-out.
Figure 2-8 Checked In Item Window
-
Select the item and click Check-In.
-
The number of item(s) checked-in is shown in the confirmation prompt. Click OK to confirm and this resets the Temporary Returned Date to null.
Viewing the Activity Log
-
From the Return Item window, search for the passenger account.
-
Select the item from the Item List grid and click Show Log or Show Log Person.
-
A Track It Item Log window opens, displaying the logged activities of the selected item. Click Close to exit.
Adding Confiscated Items by Batch
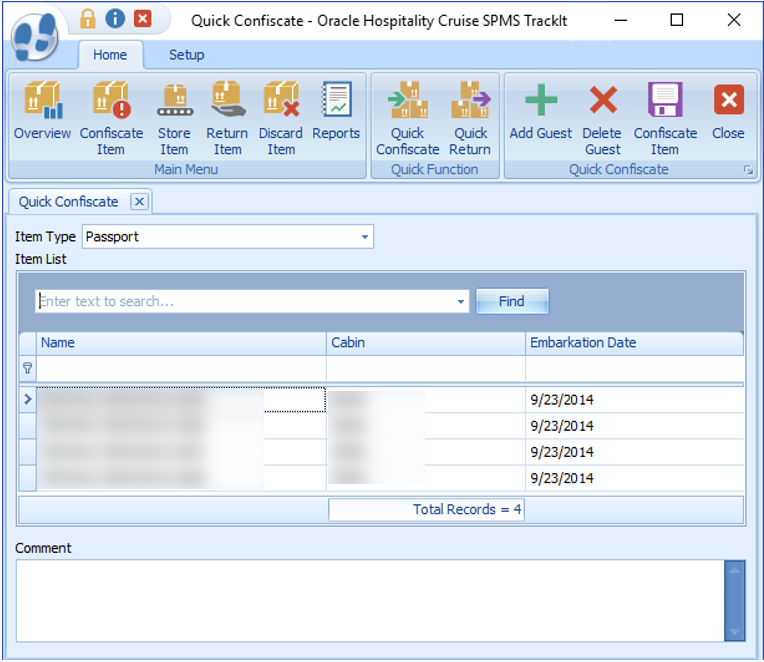
Figure 2-9 Quick Confiscate
-
Click Quick Confiscate button on the ribbon bar.
-
Select the Item Type from the drop-down list.
-
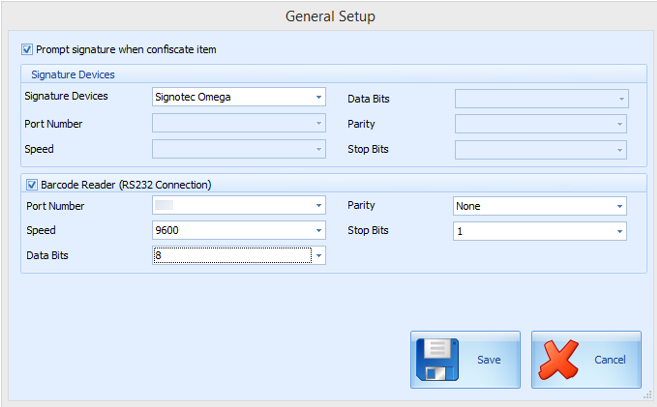
Click the Add Guest button. This opens the Multiple Accounts Selection window.
Figure 2-10 Quick Confiscate Multiple Account Selection Window
-
Use the available options to filter the list of passengers:
-
Status: Refers to the reservation status either Checked-In or Reservation.
-
Account Type: Refers to the type of accounts such as Guest, Crew, Group, or System Account.
-
Pre-Selection: Refers to the Quick Posting Templates setup in Administration module. For Example: filter all passenger with nationality = US.
-
-
Account matching the selection is shown in the Non-Selected Accounts list. Click Add All or select the account from the grid, click Add to transfer the accounts to the Selected Accounts window.
-
Click OK to confirm return to Quick Confiscate window.
-
Click the Confiscate Item button.
-
At the confirmation prompt, click Yes to complete the process. The system does not print the item receipt for such instance.
Returning / Checking Out Items by Batch
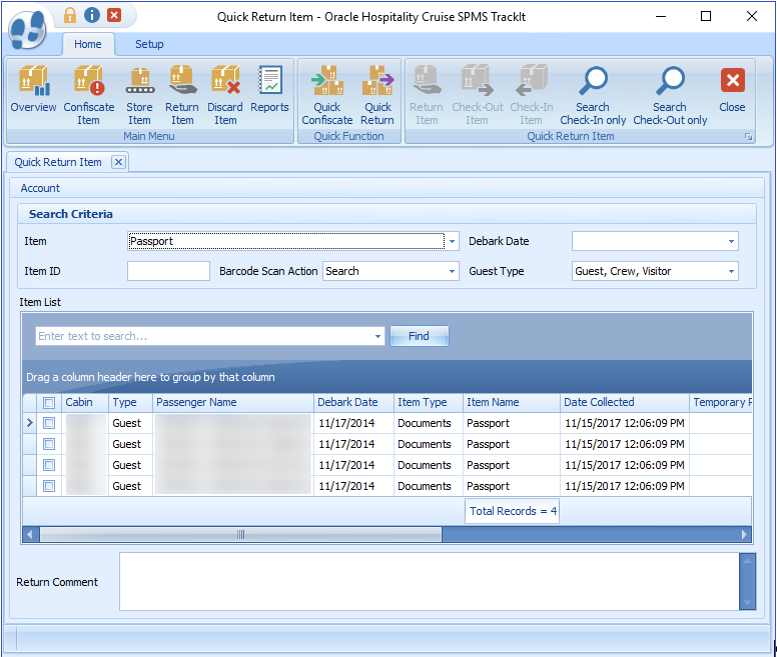
Figure 2-11 Quick Return Item
-
Click the Quick Return button on the ribbon bar.
-
Select an item from the Item drop-down list.
-
Click the Search Check-In Only or Search Check-Out Only to display all the confiscate items base on checked-in/out status and the selected item.
-
You may also narrow down the search using the Debark Date or Guest Type.
-
Select the guest by checking the check boxes besides the Cabin column and insert a comment in the Return Comments text box.
-
Click the Return Item and click OK to confirm the total number of items returned. This updates the Date Returned/Discarded column with the actual process date/time.
-
To perform a mass check-out of the selected item, click the Check-Out Item button. This process updates the Temporary Returned Date column with the item check out date/time.
-
To return/check-out the item using a barcode scanner in Quick Return function, choose either the Auto Check-in/Out or Auto Return from the Barcode Scan Action menu, then scan the barcode label, and click OK to confirm the date/time of the returned item.
Discarding Confiscated Items
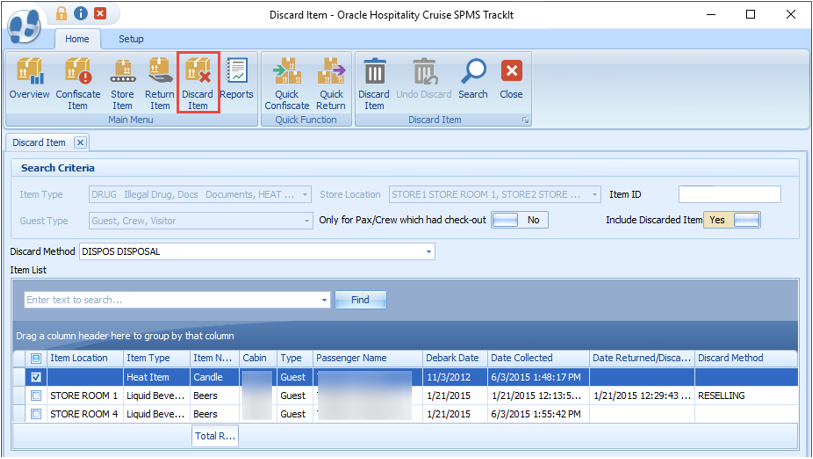
Figure 2-12 Discard Item
-
Click the Discard Item on the ribbon bar to list all confiscated items exceeded the maximum storage duration.
-
In the Search Criteria section, select one of the following options and click the Search button.
-
Select the type of information to display using the Item Type, Store Location, or Guest Type
. -
Slide the Only for Pax/Crew which had check-out to “Yes” to only show the passenger that has to check out.
-
To search the item with a barcode, enter the barcode in the Item ID field. To include items that were already discarded in the Item List, slide the Include Discarded Item to “Yes”.
-
-
Select the Discard Method from the drop-down list.
-
Choose the item to discard, and click the Discard Item button.
-
At the confirmation prompt, click Yes to confirm.
-
Click OK to confirm the number of item(s) being discarded.
-
The Date Returned/Discarded and Discard Method columns are time stamped with actual date/time when system discards the items.
-
To undo a discarded item, select a discarded item from Item List.
-
Click the Undo Discard button.
-
Click Yes to confirm and click OK to confirm the total number of discarded items. This removes the timestamp in the Date Returned/Discarded and Discard Method columns from the selected item
Viewing, Printing, and Exporting Reports
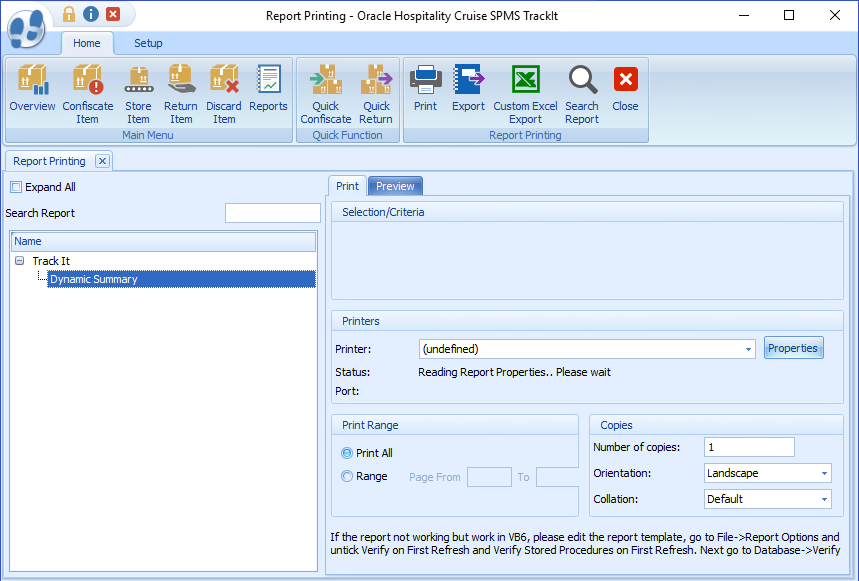
Figure 2-13 Report Dialog Window
-
To view the available reports, click Reports.
-
To print a report, select the report, and click Print.
-
To view a report, select the report, and click Preview tab.
-
To export the report, select the report, and click Export.