1 EONE Interface
The following section describes the parameters available to the EONE Interface, setup and usage of the EONE Interface, communication messages, and the use of keypair and certificate.
Parameters Settings
For EONE Interface to work seamlessly, there are two parameter groups that you need to configure:
-
System Parameter-EONE: This is set up in OHC Administration, System Setup menu, Database Parameter menu.
-
Interface Parameter: This is set up in EONE Interface, Settings tab, EONE.
Table 1-1 Parameter Group EONE
| PAR Name | PAR Value | Description |
|---|---|---|
|
Backup Days |
0 |
This parameter defines the number of days that older reservation records will be deleted. The default value is 0 You can also set this value in EONE Interface Parameter, ‘Delete reservation Data older than’. |
Setting Up Message Queues
- Ensure the Microsoft Message Queue (MSMQ) server features are turned on.
- Go to Control Panel, Administration Tools, and Computer Management.
- In Computer Management, expand the Services and Applications tree view and click Message Queuing.
- Right-click the Private Queues and select New. Private Queue.
- Enter the Queue name and check the Transactional check box.
- Click OK to save.
- Repeat steps 4 to 6 for Outgoing Message Queue.
Contingency Reason Code
- Login to the OHC Administration module.
- Go to System Codes option and select EONE Enable Contingency Mode Reason Code or EONE Disable Contingency Mode Reason Code.
- Right-click the left pane of the setup window and select Add New.
- Enter a short code, description and comments. For example, COMM for Communication Issue.
- The Enabled check box is checked by default. Removing the check mark will disable the code.
- Click Apply to save.
- To enter more codes, repeat the above steps.
Supported Message Type from JDE E1
The SPMS supports nine (9) different types of messages from JDE E1 system, and they are listed below.
Table 1-2 Supported Message Type from JDE E1
| Message Type | Description |
|---|---|
|
CrewPrimaryManifest |
This manifest is provided by the JDE E1 system and it contains the master crew data. SPMS must receive these mandatory data before you can transfer other message types for the same crew. JDE E1 system produces the employee/crew ID and it MUST be unique across all fleet. JDE E1 must send a valid OPO_ID (from ship SPMS database). Messages with invalid ID received will not be processed and is return with a failure message. |
|
CrewScheduleChange |
This message contains the crew's scheduled embarkation details, consisting of all the mandatory information for the embarkation process. There are three (3) schedule types that SPMS accept: SRA
SRON
SROF
|
|
CrewSignOn |
This is a crew check-in request from JDE E1 to SPMS to check-in the crew in reference. |
|
CrewSignOff |
This is a crew check out request from JDE E1 to SPMS to check out crew members. |
|
CrewAddress |
This message updates the crew’s address details from JDE E1 to SPMS. Only the home address is updated. |
|
CrewEffects |
This message will add/append the effects belonging to the crew. |
|
CrewImmigration |
Updates Immigration Data consisting of 4 types of data, the master Passport/travel document, Seaman Document data, Brazilian and Mexican Visa information. |
|
CrewAddressEmergency |
This message updates the crew’s emergency contact address details into SPMS. |
Supported Message from SPMS to JDE E1
Table 1-3 Supported Message from SPMS to JDE E1
| Message Type | Description |
|---|---|
|
Success Message |
EONE interface will send a successful message to JDE E1 when the message received is processed successfully. |
|
Failure Message |
A failure message is sent from the JDE E1 interface for any of the messages that it cannot process. |
|
Contingency On/Off Message |
A message is sent from the JDE E1 interface when the contingency mode changes. |
Creating Shipboard Keypair and Certificate
The shipboard keypair is used for messages destined for the shipboard. The data sent from the shore system is encrypted with the shipboard public key and is decrypted by the ship system using a shipboard private key.
There are many ways to create a keypair and certificate. Here, we will be creating a keypair with a self-signed certificate using the .NET 2.0 “makecert.exe” utility, provided in MS .NET Framework 2.0 SDK. On one of the shipboard server nodes, the command to run is:
makecert -r -pe -n "CN= BizTalk Shipboard XX" –sr localmachine -ss My –sky exchange
You are to replace the “XX” with the 2-digit shipcode.
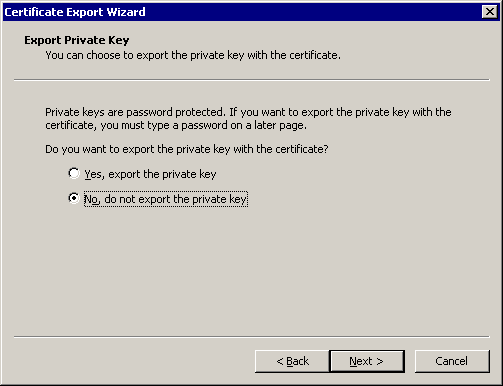
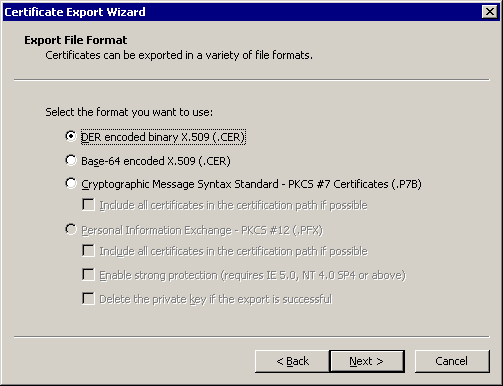
You can also create the PFX file on any machine and import it into the local machine. See Exporting Shipboard Keypair and Importing Shipboard Keypair (Once Per Ship BIZ02 Engine) for steps to export/import a keypair.
There are other things you can do with the makecert utility, including directly outputting the certificate to a file. However, generating a PFX file directly is not one of these functions. If you need to automate the entire process, the alternative is to create a pvk file with the “sv” tag along with the cer file, then using cert2spc to convert the .cer file to an spc file, then using “pvkimport –pfx” to merge the spc and pvk files into a PFX file.
Below are the explanation of tags:
-
-r – Creates a self-signed certificate, issuer will be the same as the CN.
-
-pe – Marks the private key as exportable when inserted into the OS Key Container
-
-n – Specified the X.500 standard subject certificate name.
-
-sr – The subject certificate store location. Options here are “localmachine” for machine-level keys, or “currentuser” (default) for the current user.
-
-ss – The subject certificate store name. Using “My” makes the certificate go into the “Personal”
-
-sky – The subject keytype. This can be “signature” or “exchange”. If you are sending messages, this MUST be “exchange”.
When opening the MMC for “Local Computer” certificates, you should see something similar to below. Notice the Certificates (Local Computer) / Personal / Certificates is showing the new certificate.
Figure 1-1 Console Root Window
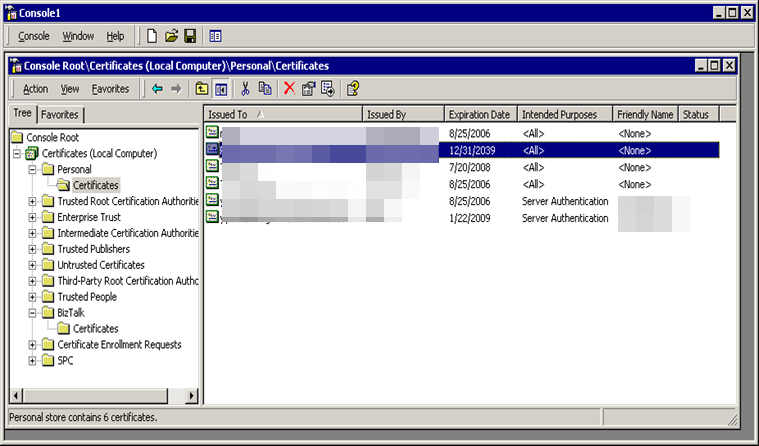
When opening up the details of the certificate, you can see at the bottom, “You have a private key that corresponds to this certificate.” This means the OS Key Container public/private keypair is associated with the certificate in the Certificate Store and we are all good to decrypt items as they come into this “BizTalk” Node.
Importing Shipboard Keypair (Once Per Ship BIZ02 Engine)
Importing Shipboard Certificate (Once Per Shore Node)
- Copy the CER file to the node you are working on.
- At the
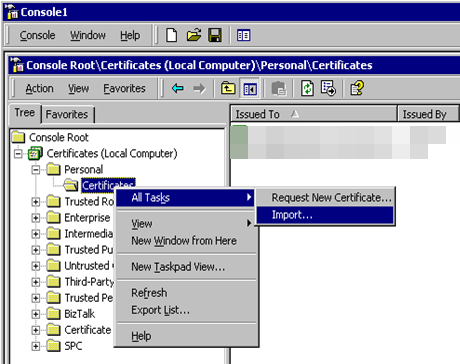
Console Root\Certificates (Local Computer), right-click the “Other People” folder. - Select All Tasks, then Import.
- When specifying the file to import, change the “Files of Type” to “X.509 Certificate (*.cer;*.crt)” and select the “BizTalk Shipboard XX.cer” file.
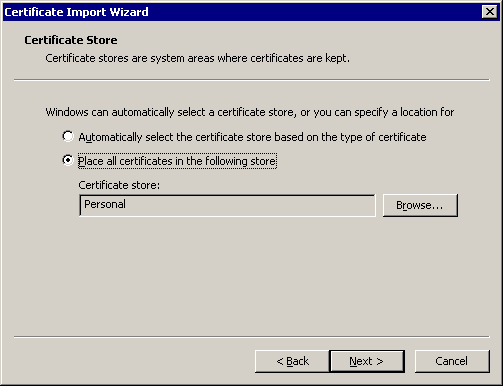
- At the Certificate Import Wizard, choose “Place all certificates in the following store” and use the default Other People store, then click Next.
- Copy and paste the certificate to the local computer, trusted root certification authorities folder in the snap-in.
