8. Funding
8.1 Introduction
At this stage of the Lease origination process, the application has been entered into Oracle Financial Services Lending and Leasing and approved manually by an underwriter or by the system. The next step is to view and complete the contract information and make a funding decision to finance or reject the application. This is accomplished by using the Funding screen.
This chapter explains how to:
- Load an application on the Funding screen
- Change the status of the application to begin funding process
- Verify the applicant information
- View the credit pull and underwriting information
- Verify the collateral
- Add comments and tracking attributes
- Complete the Contract screens
- View an application’s contract edits
- Audit changed fields and status history
- Change the status at the end of the funding process.
8.2 Funding (an overview)
In Oracle Financial Services Lending and Leasing, the funding process follows these basic steps:
- Open the Funding screen and load the application you want to work with.
- In the Funding screen’s Applications master screen, Change the status of the application to Approved - Verifying.
- Using the Funding screen’s Applicants link, view and verify information about the applicant (data recorded from the Application Entry screen). This includes verifying the applicant’s actual address and employment information.
- Using the Funding screen’s Decision link, view and verify information supplied during the credit bureau pull and underwriting process. This is display only information and cannot be edited.
- Using the Funding screen’s Collateral link, view and verify information regarding the collateral for the application.
- Using the Funding screen’s Contract link, complete the truth-in-lending information.
- In the Funding screen’s the Applications master screen, change the status to Final Document Check.
- Using the Funding screen’s Verification link, view any errors and warnings that prevent the status change.
- Make changes to the application data that correct the errors until you can change the status.
When the system changes the status of the application to Final Document Check, it sends the application to a supervisor or Lease officer queue where it is viewed and verified. After this, the application’s status is changed to Approved - Verified. If the supervisor/ Lease officer decides to fund the Lease, he or she will change status of the application to Approved - Funded.
Loading an Application on the Funding screen
The first step in the funding process is to open the Applications form and manually or automatically load the application you want to work with. You can manually select an application using the Search tab’s Criteria and Results screens. If your system is configured to load applications based on work queues, use the Queue field in the Quick Search section.
Refer the chapter Searching for Application for more information on the following:
- Using Search Criteria screen
- Using Quick Search section
- Using Result screen
- Loading an application
8.3 Funding Screen’s Master Screen
The Funding screen’s master screen displays information from the Application Entry and Underwriting screens, such as the application number, product and producer. It also contains the Status field that allows you to change the status/sub status of the application and begin the funding process.
For details on this screen refer Applications section in Underwriting chapter.
After opening the Funding screen and loading the application you want to work with, you must change its status to Approved - Verifying before you can begin the funding process. This allows you to begin working with the application.
To change the status and begin work on the application on the Funding screen
- Open the Funding screen and load application you want to verify.
- In the Funding screen’s Applications master screen, use the Status field to select APPROVED - VERIFYING.
- Click Save on the Funding screen.
You can now begin making changes to the application.
Funding an Application
After you have verified the application, entered the contract information and completed the contract edits, the application is ready to be funded. Applications can be approved automatically or manually. To manually fund an application, change the status to Approved - Funded.
After an application is funded, the Lease origination cycle is over. The system moves the application to the Lease servicing module (Customer Service form) where it receives an account number. The system also automatically creates a check requisition for the funded account.
Funding tasks
- Load the application on the Funding form
- Change the status and initiate Funding process
- Verify the applicant information
- Complete Contract (5) details
- Verify the documents
- Generate letters
- Attempt to change the application status
- Verify edits
- Complete Funding
After you approve the application, the information on the Decision tab is unavailable. The application remains in this status of Approved - Verified until a user (usually a supervisor) changes the status to Approved - Funded. When the status is changed to Approved - Funded, the account is created.
8.4 Summary Tab
The summary screen provides a unified view of the application details without navigating to the respective screens/ sub-tabs.
Using this screen, the user can view the applicant details, asset details, ratios (only for Primary Applicant), trade-In, requested details, approved details, itemization, decision history, alerts, comments, and checklist details in the respective section.
To view the Summary
- Open the Funding screen and load the application you want to work with.
- Click Summary.
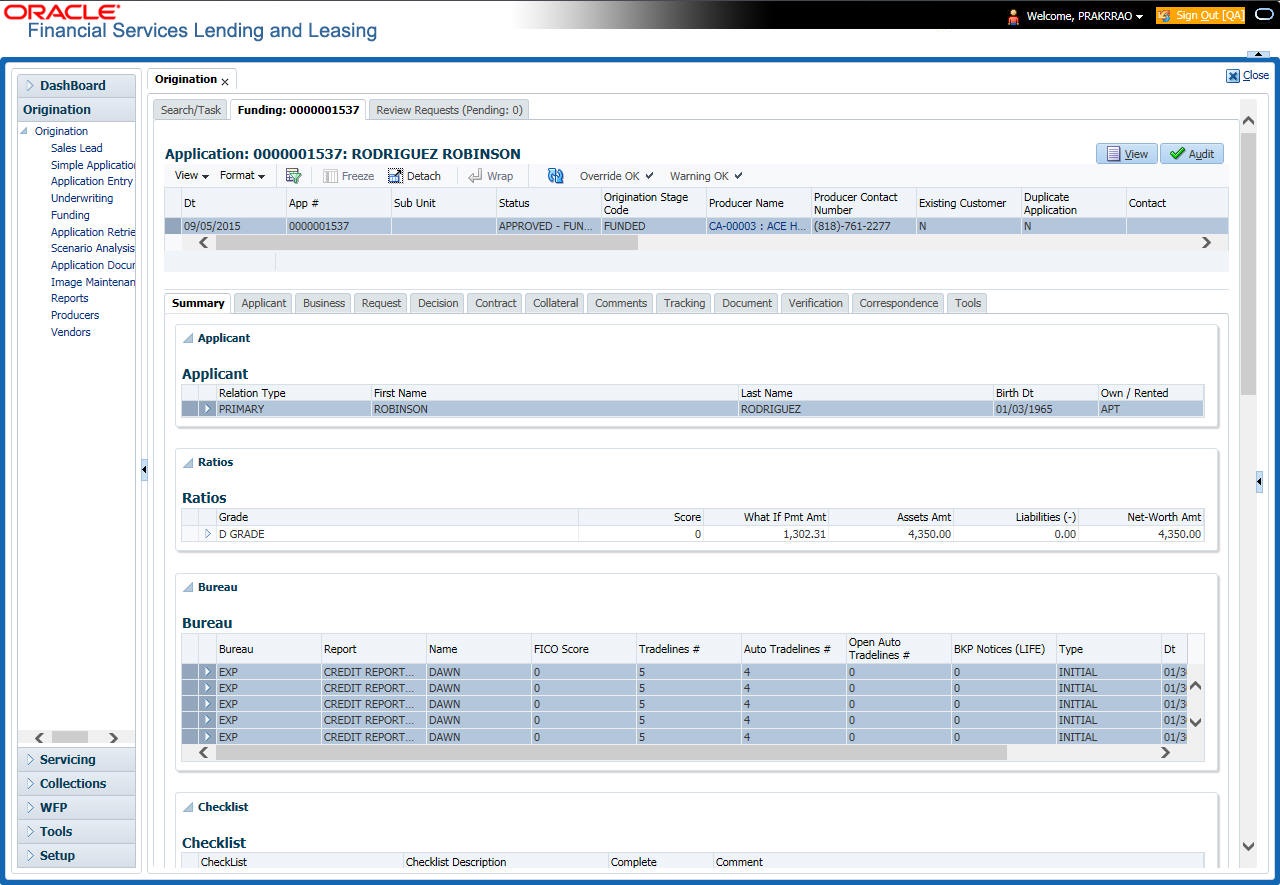
For details on this screen refer Summary Tab section in Underwriting chapter.
8.5 Applicants Tab
Having selected and loaded an application, you can use the Applicants link to view information about the applicant (s). This is information that was recorded on the Application Entry screen or gathered during the credit pull. You can edit the data from the Application Entry screen at anytime in the following steps. Remember to save your work with each change. Information from the credit bureau pull is available to view only.
To verify information about an applicant
- Open the Funding screen and load the application you want to work with.
- In the Funding tab, click Applicants.
- In the Applicants Details section, select the applicant you want to verify and click Edit.

For details on this screen refer Applicant Tab section in Underwriting chapter.
8.6 Business tab
If this application is an SME Lease (defined in the Applications section Class field as small business), the Business Applicant link appears on the Funding link bar. This link displays the small business information recorded on the application entry process. You can edit the Funding screen at anytime in the following steps. Remember to save your work with each change.
If there is no business information associated with the application, the Business Applicant link is unavailable.
For more information about the individual fields in this section, see the Application Entry chapter.
To verify business information from the Business Applicant link
- Open the Funding screen and load the application you want to work with.
- Click Business Applicant.

For details on this screen refer Business Tab section in Underwriting chapter.
8.7 Request Tab
System displays the calculated Payment, Interest Rate, Term and Lease Amount in the Request tab.
For details on this screen refer Request Tab section in Underwriting chapter.
8.8 Decision Tab
With the Decision tab, the system displays information gathered during the underwriting process. Depending on the type of application you are working with, system displays Lease information. On Clicking Calculate, the user can calculate the Lease amount, rate, term, and payment.
The fields on the Decision screens and sub screens are described in detail in the Underwriting chapter.

For details on this screen refer Decision Tab section in Underwriting chapter.
8.9 Customer Credit Limit tab
This tab displays the customer credit limit details captured during the underwriting process and is validated during application funding. Depending on the type of application you are working with, system displays Lease information.

For details on this tab, refer Customer Credit Limit tab section in Underwriting chapter.
8.10 Master Account tab
The Master Account tab in Origination screen facilitates to categorize the current application to be considered as ‘Master Account’ after funding or link the current application to another existing master account in the system.
To define Master Account Details
- Open the Underwriting screen and load the underwriting application you want to work with.
- Click ‘Master Account’ tab.
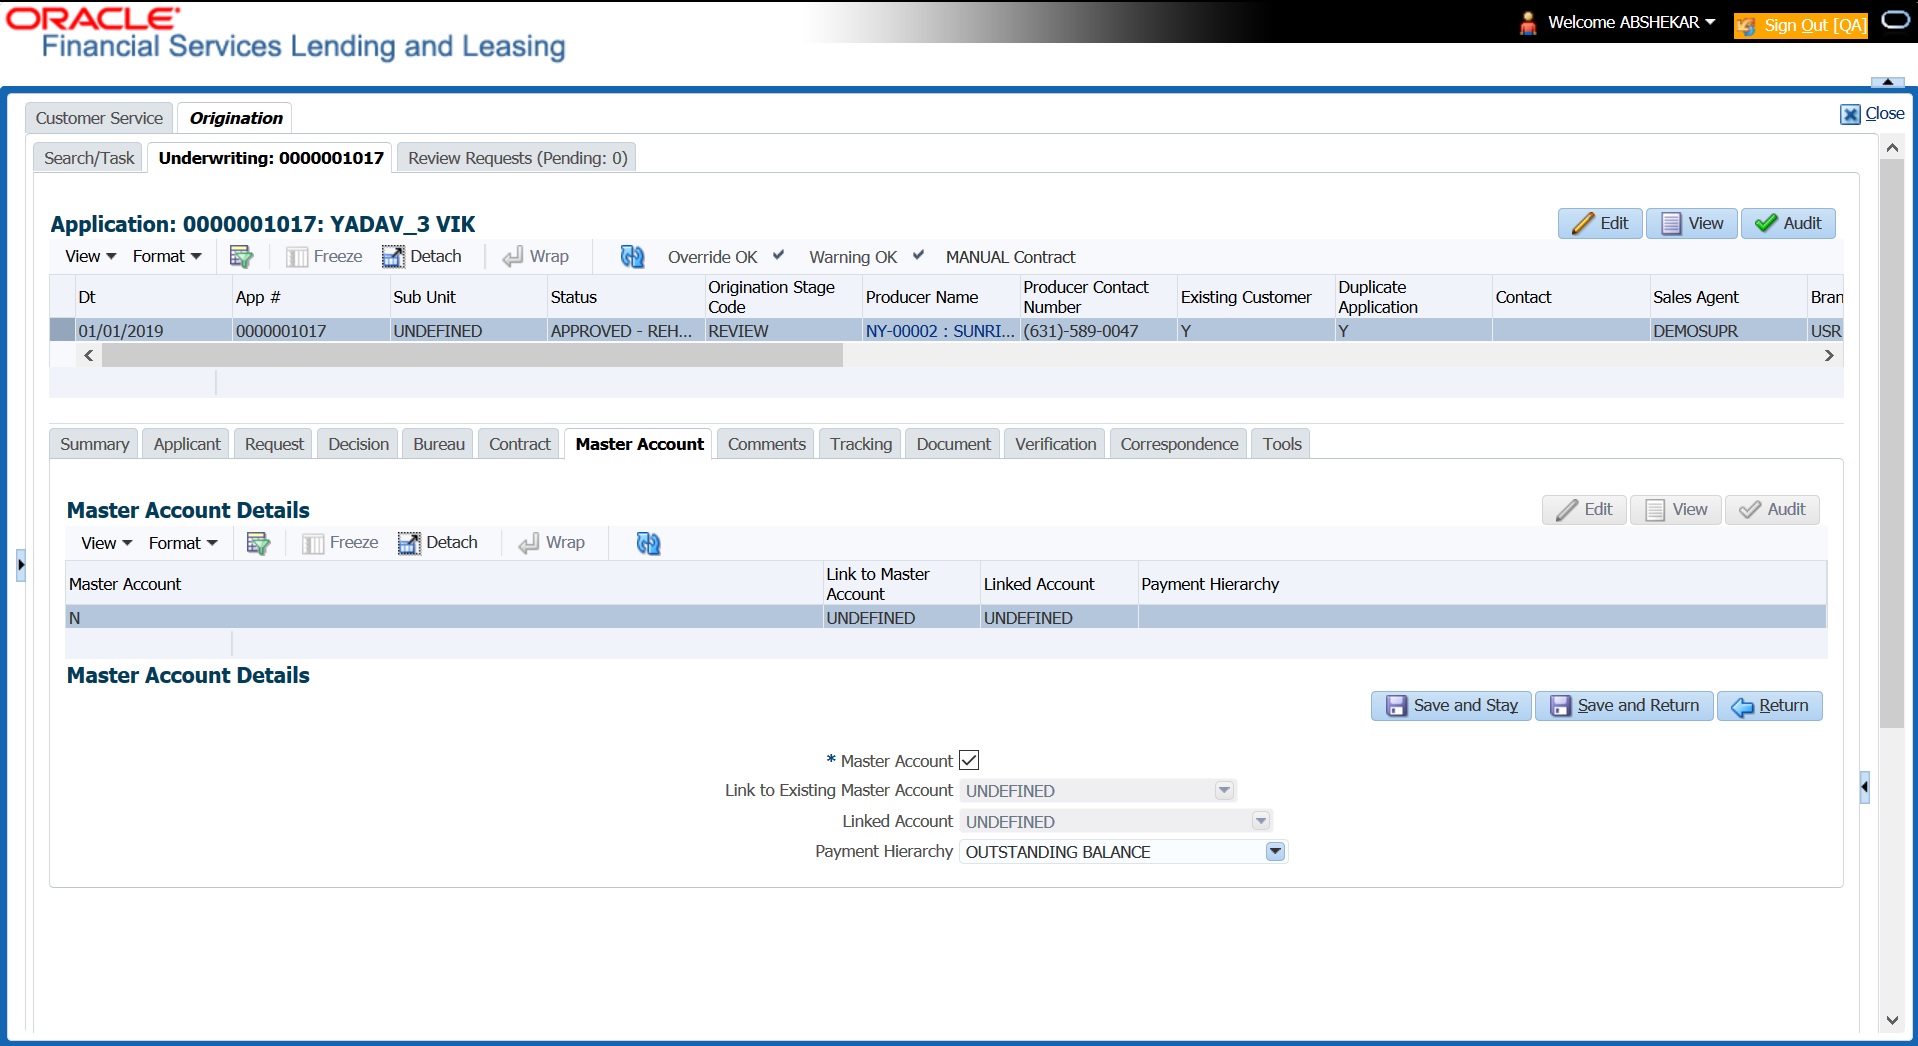
For details on this screen refer Master Account tab section in Underwriting chapter.
8.11 Bureau Tab
The Bureau tab displays the credit report (if pulled) for an applicant. If there is a need for another pull for any applicant, it can be done here manually using the New Request section.
To verify the credit bureau data using the Bureau tab
- Open the Funding screen and load the underwriting application you want to work with.
- Click Bureau

For details on this screen refer Bureau Tab section in Underwriting chapter.
8.12 Contract Tab
The screens associated with the Contract link are the core of the funding process. They allow you to perform the important task of completing the truth-in-lending details. These screens include information mandated by Regulation Z; information about the financed amount, the payment schedule, the total of these payments, the finance charge, the resulting annual percentage rate (calculated according to Federal/Central bank guidelines; that is, within 125% of the Treasury OCC calculated APR) for the conventional Lease, and internal rate of return for Islamic Lease. Use the Lease packet to supply the required information.
In completing the truth-in-lending details on the Contract link, you will enter Lease information. The truth-in-lending details must be completed before a Lease can be funded.
The tabs opened from the Contract link share the following sub tabs:
- Contract (2)
- Repayment
- Itemizations
- Trade-In
- Subvention
- Insurances
- ESC
- Escrow
- Compensation
- Proceeds
- Disbursement
- Fees
- ACH
- Coupons
- PDC
- References
- Real Estate
You can use the quick calculator provided with the drop-down list adjacent to the ‘Calculate’ button to calculate the required Lease parameters. You can also use the calculator available in Tools section for completing this step. For detailed information on using the Calculator tools, refer “Tools” chapter in the document.
While working with the Contract tab for Lease applications, you can either enter the contract details manually or make use of the ‘Suggest’ option which auto populates the contract and payment details.
On clicking the ‘Suggest’ option,
- System loads the details of 1st instrument available in Instrument drop-down list.
- Updates the contract date as current GL post date using which all the payment calculations are done.
- Populates decision level contract parameters and ‘Verified By’ field with User Code.
- Calculates the payment amount and Sales Tax (if the COMPANY parameter XSL_TAX_INTERFACE is INTERNAL). However, the ‘Suggest’ option is not available for external interface (VERTEX) since the calculation is handled outside the system.
Since in one click all the required contract information is populated to fund the application, this option helps to improve operational efficiency. But however, this option is not available for ‘Rental’ based lease applications and if the contact instrument is already loaded.
To enter the contract details
- Open the Funding screen and load the application you want to work with.
- On the Funding screen, click the Contract tab.
- If the application you opened is for a Islamic Lease, the Lease screen appears.
- Using the information in the contract packet, complete the Contract section.

(The system calculator may used when completing this section. For more information, see the Tools chapter.)
- In this section, you can perform any of the Basic Operations mentioned in Navigation chapter.
A brief description of the fields is given below:
Field: |
Do this: |
Contract section |
|
Contract Dt |
Specify the contract date. |
Instrument |
Select the required instrument from the drop down list and click on Load Instrument Details. |
Amt Due at Signing |
Enter the prepaid amount. |
Total of Pmts (Estimated) |
Enter the estimated total of payments. |
Due Day |
Specify the due day. |
1st Pmt Dt |
Specify the first payment date. |
Maturity Dt |
Specify the maturity date. |
Index |
Select the applicable index type from drop-down list. Note: If the lease calculation method is selected as ‘Rent Factor’, then Flat Rate Index type is applicable by default. |
Index Rate |
Specify the approved index rate. |
Contract Margin Rate |
Specify the contract margin rate. |
Contract Rate |
Specify the contract rate. |
Balloon Method |
View the balloon payment method. Note: This field is displayed only if the lease calculation method is ‘Interest Rate’. |
Balloon Amt |
Specify the balloon amount. Note: This field is displayed only if the lease calculation method is ‘Interest Rate’. |
Security Deposit |
Specify the security deposit amount. |
Gross Capitalized Cost |
Enter the gross capitalized cost. |
Capitalized Cost Reduction (-) |
Enter the cap cost reduction. |
Adjusted Cap Cost (=) |
Enter the adjusted cap cost. |
Residual % |
View the residual percentage. |
Residual Value (-) |
Enter the residual value. |
Depreciation Value (=) |
Specify the depreciation value. |
Rent Charge (+) |
Enter the rent. |
Rent Factor |
View the rent factor. Note: This field is applicable only if the lease calculation method is selected as ‘Rent Factor’. |
Total of Base Pmts (=) |
Enter the total of payments. |
Lease Term (/) |
Enter the term. |
Base Payment (=) |
Enter the payment amount. |
Estimated Sales Tax (+) |
Enter the sales tax amount. |
Sales Tax |
View the sales tax percentage. |
Estimated Pmt (=) |
Enter the payment amount percentage. |
Rcvd Dt |
Specify the date on which deposit is received. |
Verified Dt |
Specify the contract verification date. |
Verified By |
View the user id who verified the contract. |
Depreciation section The depreciation details defined in Setup > Contract > Lease screen are auto populated in this section and can be modified as required. The same is used for asset depreciation calculation when the batch job TAMDEP_BJ_121_01 (DEPRECIATION RATE PROCESSING) is executed. |
|
Depreciation Start Dt |
System auto populates the contract date as the default date for Depreciation Start Date. You can enter the required depreciation start date from the adjoining calendar. Ensure that date selected is not earlier than lease contract date or greater than account maturity date. Depreciation accounting is done from this date onwards and is calculated till the time asset is associated with this Account. |
Depreciation Method |
View / Select the asset depreciation method to be used for calculation as one of the following from the drop-down list. - FLAT RATE: This method is used to depreciate the asset over a fixed time using a fixed rate. This method of calculation is similar to Written Down Value Method (Diminishing Balance Method / Reducing Installment Method). On selecting this option, the details specified in Contract Setup screen for the following fields - Base Rate, Adjusting Rate and Bonus Rate are considered for calculation. - LIFE BASED: This method is used to depreciate the asset over a fixed time using the specified rates. This method of calculation is similar to Straight Line Method (Original Cost Method / Fixed Installment Method). On selecting this option the details specified in ‘Depreciation Rate Schedule’ sub tab of Contract Setup screen is considered for calculation. |
Depreciation Convention |
View / Select the frequency at which the leased account should be updated with depreciation details from the drop-down list. The list is populated with frequency details (i.e. monthly, weekly, and so on) maintained in ‘FIRST_LAST_YEAR_CONVENTION_CD’ lookup code. |
Payment Caps |
|
Max Pmt Increase / Year |
The maximum payment that can be increased for the year. |
Max Pmt Increase / Life |
The maximum payment that can be increased in the life of an application. |
Instrument Details – An instrument is a contract with specific rules tied to it. An instrument associated with the application indicates OFSLL of the type of contract being used for the approved lease. Items defined in the contract are “locked in” when you select the instrument from drop down list and click on "Load Instrument". These values cannot be changed on the funding screen. Any changes to the instrument in account will be handled by monetary/non-monetary transactions. The system loads all the rules established by the company that are required at the time of funding; for example, the accrual method, billing method, type of billing, tolerance, due dates, extensions and so on. |
|
Accrual Method |
View the accrual calculation method. |
Start Dt Basis |
View the accrual start basis. |
Base Method |
View the accrual base method. |
Bill Method |
View the billing method. |
Bill Type |
View the billing type. |
Time Counting Method |
View the time counting method. |
Calendar Method |
View the Calendar Method. |
Installment Method |
View the installment methods. |
Stop Accrual Days |
View the accrual stop days. |
Lease Type |
View the type of lease such as Direct Finance or Operating Lease. |
ACH Fee Ind |
Indicates that the ACH fee should be applied or not. Depending on the status of check box, the ACH fee is applied based following conditions: - When the check box is selected and the fee amount is ZERO, system will not apply the ACH fee. - When the check box is selected and the fee amount is BLANK, system will apply the ACH fee from Contract setup. - When the check box is selected and the fee amount is specified, system will apply the specified amount and overrides the ACH fee amount mentioned in Contract Setup. - When the check box is not selected, system will apply the ACH fee amount mentioned in Contract Setup. |
Billing section |
|
Multiple Billing Asset Rate |
Check this box to indicate if multiple asset rates are applicable for one billing period. System considers billing period from current due date to the next due date. Multiple rates are fetched only when rate end date (rate start date + rate frequency) ends one or more cycle(s) before the next due date i.e. current rate record does not cover the entire billing period. |
Tax section |
|
Sales Tax Method |
View the sales tax method used for tax calculation. |
Sales Tax Mode |
View the sales tax mode. |
Tax Life |
View the tax life. |
Ads Life |
View the ads life. |
Tax Salvage Value |
View the tax salvage value. |
EOT Value |
View the EOT value. |
Tax Book Type |
View the tax book type. |
Early Termination section |
|
Allowed To Terminate |
If checked, indicates that early termination of lease contract is allowed. |
Billed Term |
View the total billed amount on the lease contract. |
Lease Amt Recovered % |
View the percentage of lease amount recovered against the lease contract amount during early termination. |
Residual Details section |
|
Minimum Residual % |
View the minimum residual percentage valid with lease contract. |
Maximum Residual % |
View the maximum residual percentage valid with lease contract. |
Residual Value In Final Bill |
If checked, indicates that residual amount (if exist) can be included in the final bill. |
Residual Valuation |
View the type of residual valuation method. |
PDC section |
|
PDC Ind |
If selected, indicates that the customer has opted for PDC. |
PDC Security Ind |
If selected, indicates that the customer has submitted the PDC as a security. |
Rate Caps and Adjustments section Note: This section is displayed for ‘Interest Rate’ type of lease calculation method. |
|
Increase Per Year |
View the maximum rate increase allowed in a year. |
Increase Max Lifetime |
View the maximum rate increase allowed in the life of the Lease. |
Increase Floor |
View the rate cap (minimum). |
Increase Ceiling |
View the rate cap (maximum). |
Decrease Per Year |
View the maximum rate decrease allowed in a year. |
Decrease Max Lifetime |
View the maximum rate decrease allowed in the life of the Lease. |
# of Adjs / Year |
View the maximum number rate changes allowed in a year. |
# of Adjs / Life |
View the maximum number of rate changes allowed in the life of the Lease. |
Post Maturity section Note: This section is displayed for ‘Interest Rate’ type of lease calculation method. |
|
Default Rate |
If selected, indicates the default rate is available. |
Index |
Select the post maturity index. |
Post Margin Rate |
Specify the past maturity rate. |
Recourse Details |
|
Recourse |
View the recourse indicator. If selected, it indicates that there is a recourse associated with the Lease and the following recourse details can be specified. |
Recourse Type |
Select the recourse type as either 'Partial' or 'Full' from the drop-down list. |
Recourse Reason |
Depending on the type of recourse selected, you can select the following type of recourse reason from the drop-down list. For recourse type as 'Partial', system defaults the recourse reason as ‘Partial’. For recourse type as 'Full', you can select one of the following options: - Fraud - Titles - Fraud and Titles - Full - Full and Titles |
Recourse Max % |
Specify the maximum percentage of recourse allowed. Ensure that the specified amount does not exceed 100% or the amount defined at Contract. Note: You can specify the recourse either in percentage or as flat amount in the below field. |
Recourse Amt |
If ‘Recourse Max %’ is not specified, you can specify a flat amount to be allowed for recourse. |
Others |
|
Rent Collection Method |
View the type of rent collection method as either Advance or Arrears. For ‘Interest Rate’ type of lease calculation, both Advance and Arrears are applicable. For ‘Rent Factor’, only Advance method is applicable. |
Contract Expiry Letter Days |
View the total number of days the lease contract is valid after the contract expiry. |
Payment Mode |
Select the type of repayment mode to indicate if it is ‘Autopay/Direct Debit or not’ using any of the following option from the drop-down list. The list is populated from REPAYMENT_PMT_MODE_CD lookup code. - INSTITUTION DRAFT / CHECK (default) - AUTOPAY (ACH) - AUTOPAY (CREDIT CARD) - AUTOPAY (DEBIT CARD) - POST DATED CHECKS For an AUTO PAY type of Payment Mode, ensure that at least one active ACH record exist and for CHECK type of Payment Mode, there are NO active ACH records. |
Statement section This section allows to define the preferences for Mock Statement generation at Master Account level. Generating a Mock Statement helps to mock the asset billing process with a future date and to get an upfront statement indicating future dues of Master and Associated Accounts. In ‘Vacation Ownership’ industry, such statements are required to forecast future dues based on current ‘Timeshare’ holdings. The default populated preference here are propagated from Setup > Administration > Products > Contract screen when the instrument is loaded. Note: These fields are enabled only for Master Account, i.e. only if the ‘Master Account’ check box is selected in Origination > Master Account tab. If the option is unchecked even at a later point, system refreshes these fields making them as ‘Read-Only’. |
|
Stmt Preference Mode |
Select the account statement preference mode as either Email or PHYSICAL from the drop-down list. |
Mock Statement Req |
Select this check box to indicate if the account is to be included in Mock statement Generation. Note: Based on this selection, others fields related to Mock Statement below are enabled and becomes mandatory for providing details. |
Mock Start Month |
Select the start month of Mock Statements period from the drop-down list. |
Mock Statement Cycles |
Select the total number of billings (between 1-12) that are to be generated post Mock Statement Start Date. |
Mock Pre Statement Days |
Specify the number of Pre bill days for Mock Statements generation. |
Capitalization section This section displays the capitalization parameters pre-defined at Setup > Contract screen and allows you to modify only the ‘Grace Days’ value for balance capitalization. |
|
Capitalize |
If selected, indicates that the capitalization of balances is enabled while funding the application. |
Frequency |
View the capitalization frequency defined at Contract level. After funding, all the account balances are capitalized to principal in the same frequency except for ‘Balance Frequency’ where different frequency may be defined for each balance type. |
Capitalization Start Basis |
View the capitalization start date as either Contract Date or First Payment Date on which capitalization next date is calculated. |
Grace Days |
View or Modify the grace days allowed in the frequency (minimum 0, maximum 31) before capitalizing the balances to account. This is also the deciding factor for executing the capitalization batch job which is based on Capitalization Frequency + Grace Days. However, note that Grace Days are not accounted for Month End type of capitalization frequency and is ignored even if specified. |
Cap Tolerance Amt |
View the capitalization tolerance amount which is the minimum amount to qualify for capitalization. |
Promotion Details – If applicable, enter information regarding any promotion associated with the application in the Promotion section. The Promotion details maintained in Setup > Products > Promotions are populated here. |
|
Promotion |
Select the promotion. |
Type |
View the promotion type. |
Dlq Days |
View the delinquency days. |
Period Type |
View the period type. |
Period |
View the promotion period. |
Tolerance Amt |
View the tolerance amount (displays only). |
Index |
View the promotion index (displays only). |
Index Rate |
View the promotion index rate (displays only). |
Promotion Margin Rate |
View the promotion margin rate (displays only). |
Promotion Rate |
View the promotion rate. |
- Perform any of the Basic Actions mentioned in Navigation chapter.
- Quick Calculate
In the ‘Contract Information’ section, there is a drop-down list adjacent to the ‘Calculate’ button with following options to auto calculate different Lease parameters based on the data provided. Select the required option from the drop-down list and click ‘Calculate’:
Lease Type |
Calculate Option |
Rent Factor |
Calculate Payment Calculate Residual Percent Calculate Gross Capitalized Cost |
Interest Rate |
Calculate Payment Calculate Interest Rate Calculate Term Calculate Lease Amount |
The system displays the requested calculation in the respective field.
- Click Calculate Tax. System calculates the ‘Lease Sales and Usage tax’ for upfront category which is billed during application funding. For more details, refer to Sales Tax Calculation at Origination section in Appendix chapter.
8.12.1 Contract (2) Sub Tab
The Contract sub screen records the application’s servicing branch and collector. It also displays additional information regarding the contract not covered on the Lease screen, such as the tolerance, delinquencies, due dates, billings, and extensions.
To complete the Contract sub tab
- Open the Funding screen and load the application you want to work with.
- Click the Contract > Contract sub tab.
- In this section, you can perform any of the Basic Operations mentioned in Navigation chapter.
A brief description of the fields is given below:
Field: |
Do this: |
Servicing Branch |
Select the servicing branch for the contract. |
Collector |
Select the collector for the contract. |
Funder |
If you are acting as a proxy for a Funder, then you can select the Funder’s name from the adjoining options list. The list displays all the associated Funders, Funding Supervisors, and Funding Managers. However, this is not mandatory and can be used while auctioning an application on behalf of another Funder. |
Misc section |
|
Statement Consolidation |
By default this check box is selected indicating that system generates consolidated billing statement at Master Account level along with details of all the associated accounts with same Billing cycle and due day. You can uncheck this option to generate billing statement to only current account. After funding, the option selected here is propagated to Servicing > Account Details and Contract (2) tabs. For more information, refer to Master Account tab section. |
Link To Existing Customer |
Select to link the application to the existing customer. |
Anniversary Period |
View the anniversary term. |
Default Pmt Spread |
View the spread. |
HMDA section |
|
Lien Status |
Select the lien status. |
HOEPA |
Select the home owner equity protection act (HOEPA) code. |
Rate Spread |
Specify the rate spread. You can calculate this spread from a tool on the Home Mortgage Disclosure Act (HMDA) website. |
Others section |
|
1st Pmt Deduction |
View the first payment deduction indicator. If selected, the first payment deduction is in use. |
Days |
View the first payment deduction days. |
1st Pmt Refund |
View the first payment refund indicator. If selected, the first payment refund is in use. |
Days |
View the first payment refund days. |
Pre-Pmt Penalty |
View the prepayment penalty indicator. If selected, a prepayment penalty can be applied. |
% of Term for Penalty |
View the prepayment penalty percentage of term. |
Pay Off Fee |
View the payoff fee indicator. If selected, a payoff fee can be applied to the Lease. |
Rebate section |
|
Rebate Method |
View the rebate calculation method. |
Rebate Term Method |
View the rebate term method. |
Rebate Min Fin Chg Method |
View the rebate minimum finance charge calculation method. |
Rebate Min Fin Chg Value |
View the minimum finance charge value. |
Acquisition Charge Amt |
View the acquisition charge amount. |
Tolerance section - This section displays the tolerance details as defined in Setup > Products > Contract screen. |
|
Refund Allowed |
View the refund allowed indicator. If selected, the refund policies in this section are in use. |
Refund Tolerance |
View the refund tolerance amount. |
Pmt Tolerance Amt |
View the payment tolerance amount. |
Pmt Tolerance% |
View the payment tolerance percentage. |
Promise Tolerance Amt |
View the ‘Promise to Pay’ tolerance amount. |
Promise Tolerance % |
View the ‘Promise to Pay’ tolerance percentage. |
Writeoff Tolerance |
View the write-off tolerance amount. |
Delinquency section |
|
Late Charge Grace Days |
View the late charge grace days. |
Delq Grace Days |
View the delinquency grace days. |
Delq Category Method |
View the delinquency category method. |
Time Bar Years |
View the total number of years allowed to contact the customer starting from the first payment date as defined in Setup > Products > Contract screen. |
Cycle Based Fees - If the ‘Cycle Based Fees’ assessment is enabled for the selected instrument, the details of the defined parameters in Setup > Contract screen are propagated into this section. On funding the application, system automatically calculates the late charges at individual account level based on threshold value. For more information, refer to Setup > Contract details. |
|
Cycle Based Collection Late Fee |
If selected, indicates that Cycle Based Collection Late Fee is assessed on the account. |
Cycle Based Late Fee |
If selected, indicates that Cycle Based Late Fee is assessed on the account. |
Cycle Based Collection Late Fee Grace Days |
Indicates the number of grace days allowed before cycle based fee is assessed on the account. |
Cycle Based Late Fee Grace Days |
Indicates the number of grace days allowed before cycle based late fee is assessed on the account. |
Due Date section |
|
Max Due Day Change Days |
View the maximum due days. |
Min Due Day |
View the minimum due day. |
Max Due Day |
View the maximum due day. |
Max Due Day Change Year |
View the maximum due day changes allowed (year). |
Max Due Day Change Life |
View the maximum due day changes allowed (life). |
Fee Consolidation - This section displays the status of Fee Consolidation indicators propagated from Setup > Contract screen. If enabled, indicates that system is allowed to consolidate that particular late fee at Master Account level. |
|
Late Charge at Master Account |
If selected, indicates that system is allowed to consolidate the late charge assessment at master account level. |
Cycle Based Collection Late Fee at Master Account |
If selected, indicates that system is allowed to consolidate the cycle based collection late fee assessment at master account level. |
Cycle Based Late Fee at Master Account |
If selected, indicates that system is allowed to consolidate the cycle based late fee assessment at master account level. |
Extension section |
|
Max Extn Period / Year |
View the maximum extension allowed (year). |
Max Extn Period / Life |
View the maximum extension allowed (life). |
Max # Extn / Year |
View the maximum number of extensions allowed (year). |
Max # Extn / Life |
View the maximum number of extensions allowed (life). |
Minimum # Payments |
View the minimum number of payments. |
Extension Gap in Months |
View the extension gap in months. |
Usage / Rental Details |
|
Agreement Type |
View the Agreement Type if the current application belongs to any of the below category. Else, the same is displayed as UNDEFINED. - USAGE - RENTAL - USAGE RENTAL |
Ever Green Details This section displays the Evergreen lease parameters for the selected instrument that are pre-defined in Setup > Contract screen. These parameters are required for system to decide if the contract is eligible and automatically put the account on Evergreen mode on maturity. For more information, refer to ‘Contract’ section in setup guide. |
|
Auto Post On Maturity |
If selected, indicates that system is allowed to auto post evergreen lease transaction on maturity date + evergreen grace days. |
Number of Unpaid Bills |
View the total number of unpaid bills exempted to auto renew contract to evergreen lease. |
Unpaid Bills % |
View the percentage of total unpaid bills exempted to auto renew contract to evergreen lease. System uses the greater of these two values i.e. Number of Unpaid Bills and Unpaid Bills % |
Pmt Amount Method |
View the payment amount method used for billing on auto renewal of contract to evergreen lease. |
Value |
View the value used to derive the asset usage billing amount based on Payment Amount Method. |
Grace Days |
View the total number of grace days allowed after maturity for system to consider for auto renewal of contract to evergreen lease |
Evergreen Term |
View the new extension term which is the agreed term between customer and financial institution. |
- Perform any of the Basic Actions mentioned in Navigation chapter.
8.12.2 Repayment Sub Tab
The Repayment sub screen records the application’s advance information, repayment schedule, and skipped repayment months for variable rate Lease.
To complete the Repayment sub tab
- Open the Funding screen and load the application you want to work with.
- Click the Contract > Repayment sub tab.
- In this section, you can perform any of the Basic Operations mentioned in Navigation chapter.
A brief description of the fields is given below:
Field: |
Do this: |
Repayment section: |
|
Flexible Repayment Allowed |
If this display only check box is selected, then the flexible repayment functionality is set up and allowed for this application's product type. |
Type |
Select the flexible repayment schedule you want to use from the following: SKIP PERIOD, USER DEFINED, UNDEFINED. If you select the repayment schedule type of SKIP PERIOD, you then select the months for which borrower won't make any payments in the Skip Months section. If you select the repayment schedule type of USER DEFINED, you then enter the repayment schedule requested by borrower in the Schedule section; for example, $300.00 for first 12 months, $350.00 for next 18 months, and so on. Note: The borrower may not provide a complete repayment schedule with the contract. Provisions are available with the system to compute the repayment schedule for remaining periods at a later time, if borrower provides partial repayment schedule. |
Skip Months section |
|
Jan |
If selected, indicates that repayment is skipped for January. |
Feb |
If selected, indicates that repayment is skipped for February. |
Mar |
If selected, indicates that repayment is skipped for March. |
Apr |
If selected, indicates that repayment is skipped for April. |
May |
If selected, indicates that repayment is skipped for May. |
Jun |
If selected, indicates that repayment is skipped for June. |
Jul |
If selected, indicates that repayment is skipped for July. |
Aug |
If selected, indicates that repayment is skipped for August. |
Sep |
If selected, indicates that repayment is skipped for September. |
Oct |
If selected, indicates that repayment is skipped for October. |
Nov |
If selected, indicates that repayment is skipped for November. |
Dec |
If selected, indicates that repayment is skipped for December. |
Extendable Balloon section |
|
Max Term |
Specify maximum number of payments. |
- Perform any of the Basic Actions mentioned in Navigation chapter.
- In the Repayment Schedule section, click View.
- View the following information:
Repayment Schedule section
Note: Complete the Schedule section only if you have entered USER DEFINED in the Repayment section’s Type field. Click Add to make new entries.
Seq
Specify the sequence number of the repayment schedule.
Pmt Amt
Specify the repayment amount borrower agreed to pay during the schedule.
# of Pmts
Specify the number of payments borrower agreed to pay for stated repayment amount during this schedule.
Generated
If selected, indicates that the schedule is system generated.
Enabled
If selected, indicates that the schedule is enabled.
- In the Payment Change Schedule section, click View.
- View the following information:
Payment Change Schedule section
Seq
Specify the payment sequence number.
Option Type
Select the option type.
Frequency
Specify the payment change frequency.
Period
Specify the period.
# of Adj
Specify the number of adjustments.
Value
Specify the adjustment value.
8.12.3 Itemizations Sub Tab
The system lists the distribution of the Lease proceeds on the Itemizations sub screen when you choose Select Instrument on the Contract link. It lists amounts paid to the borrower directly, amount paid to the borrower’s account, and amount’s given on the borrower’ behalf to third parties. Itemizations are categorized according to advances, finance fees, prepaid fees, producers or escrows. If you have entered itemization amounts during application entry or underwriting, you will see these values in the Amount or Approved Amt columns.
The Itemizations sub screen offers the option of computing the values for itemization according to a itemization formula associated with the selected instrument based on system setup.
If you require any new itemizations, you can add them using the Setup menu Products command. (For more information, see the Products chapter in the Setup Guide.)
To complete the Itemizations
- Open the Funding screen and load the application you want to work with.
- Click the Contract > Itemizations sub tab.
- In this section, you can perform any of the Basic Operations mentioned in Navigation chapter.
A brief description of the fields is given below:
Field: |
Do this: |
Itemization |
View the itemization. |
+/- |
View whether the itemization is added or subtracted. |
Amount |
View the amount. |
Approved Amt |
View the approved amount. This is information recorded on the Underwriting screen. |
Discount Rate |
Specify the discount rate. |
Tax |
View whether the itemization is taxable (Sales) if box is selected. |
Slr |
View the seller payment. |
Itemization Formula |
View the itemization type. |
Itemization Type |
View the itemization type. |
Prefunding Status |
View the prefunding status. |
Pmt Dt |
View the payment date. |
Pmt Ref # |
View the payment reference number. |
Comment |
Specify additional comments, if any. |
- Choose the option button for the type of itemization you want to use: Advance, Financed Fees, Pre-Paid Fees, Producer or Escrow.
- In the Amount column, enter the amount corresponding with what is listed in the Itemization column.
- If the Itemization Formula field contains an entry other than UNDEFINED, you can choose Compute to auto-compute the value in the Amount field using a predefined itemization formula.
Itemization formulas are created on the Product Setup screen’s Origination Fees screens. (For more information, see the Org. Fees tab section of the Products chapter in the Setup Guide.)
To ensure you create the correct computed value, choose Compute after entering values for all base itemizations; that is, values of all such itemizations with an Itemization Formula of undefined.
You can also manually enter amounts for auto-computed itemizations.
If you click Initialize, the system sets the values of auto-computed itemizations to 0 (zero).
- If you choose, use the Comment field to add remarks.
- Perform any of the Basic Actions mentioned in Navigation chapter.
8.12.4 Trade-In Sub Tab
If there is any information regarding an itemized trade-in, use the Trade-In sub screen to enter the details in the system (This sub screen might already contain information supplied during the underwriting process.)
To complete the Trade-In sub screen
- Open the Funding screen and load the application you want to work with.
- Click the Contract > Trade-In sub tab.
- In this section, you can perform any of the Basic Operations mentioned in Navigation chapter.
A brief description of the fields is given below:
Field: |
Do this: |
Trade In section |
|
Asset Type |
Select the asset type. |
Asset Sub Type |
Select the asset sub-type. |
Year |
Specify the year of the asset. |
Make |
Specify the make of the asset. |
Model |
Specify the model of the asset. |
Identification # |
Specify the identification number. |
Body |
Specify the body of the asset. |
Description |
View the asset description. |
Valuations section |
|
Wholesale Amt |
Specify the wholesale amount. |
Base Retail Amt |
Specify the retail amount. |
Addons Amt (+) |
Specify the add ons amount. |
Payoff Amt (-) |
Specify the payoff amount. |
Total Amt = |
View the total amount. |
Valuation Dt |
Specify the valuation date. |
Source |
Select the valuation source. |
Valuation Supplement |
Specify the valuation supplement. |
Edition |
Specify the valuation edition. |
- Perform any of the Basic Actions mentioned in Navigation chapter.
8.12.5 Subvention Sub Tab
With the Subvention sub screen, you can enter the subvention information and calculate the subvention amount, as well as override the calculated subvention amount. The participant’s information is automatically populated based on the selected subvention plan.
To use the Subventions sub screen
- Open the Funding screen and load the application you want to work with.
- Click the Contract > Subventions sub tab.
- In this section, you can perform any of the Basic Operations mentioned in Navigation chapter.
- A brief description of the fields is given below:
Field:
Do this:
Subvention section:
Plan
Select the subvention plan code.
Description
View the subvention plan description
Sub Plan
Select the sub plan.
Sub Plan Description
Select the subvention sub plan.
Subvention Type
View the subvention type
Subvention Amount
View the subvention amount for the plan.
Include
If selected, indicates that the subvention is included.
- Click View in the Subvention Details section.
View the following:
Participants section: |
|
Participant |
View the participant. |
Participant Type |
View the participant type |
Collection Method |
View the collection method. |
Rate |
View the subvention rate. |
Rent Factor |
View the subvention rent factor. |
Calculation Method |
View the subvention calculation method. |
Factor |
View the factor. |
Calculated Amount |
View the calculated subvention amount. |
Subvention Amount |
Specify the subvention amount. |
Total Subvention Rate |
View the total subvention rate. |
Total Subvention Amount |
View the total subvention amount. |
Include |
If selected, indicates that the subvention is included. |
- Click Initialize to reset the subvention amount to zero.
- Click Calculate to calculate the subvention amount.
- Perform any of the Basic Actions mentioned in Navigation chapter.
8.12.6 Insurance Sub Tab
If there is any information regarding an itemized insurance amount, enter the details on the Insurance sub screen. The Insurance sub screen also enables you to calculate the commission if there is a commission rule defined during Contract setup.
To complete the Insurance sub tab
- Open the Funding screen and load the application you want to work with.
- Click the Contract > Insurance sub tab.
- In this section, you can perform any of the Basic Operations mentioned in Navigation chapter.
A brief description of the fields is given below:
Field: |
Do this: |
Insurance Plan |
Select the insurance plan associated with the financed insurance product. |
Insurance Type |
View the insurance type associated with the insurance plan. |
Sub Type |
Select the insurance sub type offered under the insurance plan. |
Insurance Company |
Specify the insurance company associated with the insurance plan. The system populates the default insurance plan defined during product setup. |
Policy # |
Specify the insurance policy number. |
Effective Dt |
Specify the insurance effective date. |
Term |
Specify the insurance term. |
Expiry Dt |
Specify the insurance expiry date. |
Commission Rule |
View the insurance premium amount. |
Premium Amt |
Specify the insurance premium amount. |
Commission Amt |
View the insurance commission amount. |
Phone |
Specify the insurance company’s primary phone number. |
Extn |
Specify the insurance company’s primary phone extension. |
Phone |
Specify the insurance company’s alternate phone number. |
Extn |
Specify the insurance company’s alternate phone extension. |
Beneficiary section |
|
Primary |
Specify the primary beneficiary of the insurance. |
Secondary |
Specify the secondary beneficiary of the insurance. |
Cancellation/Refund section |
|
Cancellation Refund Allowed |
If selected, a refund is allowed. A selected box indicates that the insurance premium can be rebated to the customer in case of early payoff. |
Grace Days |
View the number of grace days allowed for cancellation without charging a cancellation fee. |
Calculation Method |
View the insurance premium refund/rebate calculation method to be used when insurance is cancelled. |
Grace Days Cancellation Fee Allowed |
If selected, indicates that cancellation fees during grace is allowed. |
Cancellation Fee |
View the amount of the cancellation fee to be charged when the insurance is cancelled. |
Deduct Fee From |
View the option defined in setup screen (Setup > Administration > Products > Insurances) to deduct the cancellation fee. ‘Premium Amount’ indicates fee is deducted upfront before computation and ‘Rebate Amount’ indicates fee is deducted after computation. |
- If you click the Calculate button, the system computes the commission based on the commission method in the Cancellation/Refund section.
The commission appears in the Commission Rule and Commission Amt fields of the Policy Information section.
It also appears on the Itemizations sub screen.
You can overwrite the suggested value if you choose.
- Perform any of the Basic Actions mentioned in Navigation chapter.
8.12.7 ESC Sub Tab
If there is information regarding an itemized extended service contract or warranty amount, enter the details on the ESC sub screen.
To complete the ESC (extended service contracts) sub tab
- Open the Funding screen and load the application you want to work with.
- Click the Contract > ESC sub tab.
- In this section, you can perform any of the Basic Operations mentioned in Navigation chapter.
- A brief description of the fields is given below:
Field:
Do this:
Warranty Information section
Service Contract
View the extended service contract type.
Policy #
Specify the ESC number.
Effective Date
Specify the ESC effective date.
Term
Specify the ESC term.
Expiration Dt
Specify the ESC expiry date.
Premium Amt
View the ESC premium amount
Commission Amt
View the commission amount.
Commission Rule
View the commission rule.
Warranty Company
Specify the ESC company’s name.
Comment
Specify comment if any.
Phone No
Specify the ESC company’s primary phone number.
Extn
Specify the ESC company’s primary phone extension.
Phone No
Specify the ESC company’s alternate phone number.
Extn
Specify the ESC company’s alternate phone extension.
Cancellation/Refund
Allowed
Check this box to allow cancellation/refund.
Method
Specify the method of cancellation/refund.
- In the Cancellation/Refund section, view the following information.
- If the Allowed box is selected, a refund is allowed. A selected box indicates that the ESC premium can be rebated to the customer in case of early payoff.
- The Method field displays the refund method.
- If you click the Calculate button, the system computes the commission based on the commission method in the Cancellation/Refund section.
The commission appears in the Commission Rule and Commission Amt fields of the Warranty Information section.
It also appears on the Itemizations sub screen.
You can overwrite the suggested value if you choose.
- Perform any of the Basic Actions mentioned in Navigation chapter.
8.12.8 Escrow Sub Tab
If there is escrow information selected on the Itemization sub screen, enter information about it on the Escrow sub screen. The Escrow sub screen records escrow details regarding disbursement, insurance, and property tax -- information that is parsed to the Customer Service screen on the Customer Service (2) master tab, where it is available for maintenance.
This sub tab is available if escrow is allowed for the instrument selected on the Lease screen.
The Escrow Analysis screen enables you to view and perform the initial escrow analysis. You can perform multiple analyses; however, the system records only the most recent analysis.
To complete the Escrow sub screen
- Open the Funding screen and load the application you want to work with.
- Click the Contract > Escrow sub tab.
- The Escrow Information section displays information regarding the escrow recorded on the Itemization sub screen. In this section, you can perform any of the Basic Operations mentioned in Navigation chapter.
A brief description of the fields is given below:
Field: |
View: |
Escrow |
The escrow itemization code and description. |
Escrow Type |
The escrow type. |
Escrow Sub Type |
The escrow sub type. |
Advance Amt |
The amount that’s been approved for the Item in the itemization screen under the escrow. |
Required Escrow |
If selected, indicates that this is mandatory itemization and customer can not opt out of this escrow item. |
Cushion Allowed |
If selected, indicates that cushion is allowed. |
- Select the Opt Out box only if you want to ignore this particular escrow.
- In the Disbursement section, enter the following information:
Field:
Do this:
Rule
Select disbursement rule.
Yearly Amt
Specify yearly disbursement amount.
Account #
Specify reference account number for vendor.
Note: If the organizational parameter UIX_HIDE_RESTRICTED_DATA is set to Y, this appears as a masked number; for example, XXXXX1234.
Vendor
Specify the vendor name.
Maturity Dt
Specify the maturity date, if one exists.
- If this escrow involves an insurance, use the Insurance section to enter the following information:
Field:
Do this:
Coverage Type
Specify the coverage type.
Coverage Term
Specify the coverage term.
Policy #
Specify the policy number.
Coverage Amt
Specify the coverage amount.
Effective Dt
Specify the effective date.
Expiration Dt
Specify the expiration date.
- If this escrow involves a tax, use the Tax section to enter the following information:
Field:
Do this:
Property Tax Type
Specify property tax code.
Comment
Specify a comment.
- Perform any of the Basic Actions mentioned in Navigation chapter.
8.12.9 Compensation Sub Tab
The Compensation (Lease) sub tab records and displays the terms of compensation between the finance company and the dealer for Lease transactions.
To complete the Compensation (Lease) sub screen
- Open the Funding screen from the Origination master tab’s Funding bar link and load the application you want to work with.
- Click the Contract > Compensation sub tab.
- On the Compensation sub screen’s Compensation section, select in the Compensation Plan section the compensation plan you want to use.
- Click Load.
The system loads the following information on the Compensation sub screen:
Field: |
Do this: |
Compensation section |
|
Compensation Plan |
View the compensation plan. |
Disbursement Method |
View the compensation payment method. |
Calculation Method |
View the compensation calculation method. |
Chargeback section |
|
Paid Calc Method |
View the charge back calculation method (early payoff). |
Paid % |
View the percentage of charge back paid. |
Paid Basis |
View the charge back paid basis. |
Paid Term |
View the charge back paid term. |
Paid Days |
View the charge back paid days. |
Charge off Calc Method |
View the charge back calculation method (charge off). |
Charge off % |
View the charge back percentage (charge off). |
Charge off Basis |
View the charge back basis (charge off). |
Charge off Term |
View the charge back term (charge off). |
Days |
View the charge back days (charge off). |
Calculation section |
|
Spread Formula |
View the compensation spread formula. |
Buy Rate |
Specify the buy rate. |
Buy Rent Factor |
View the compensation buy rent factor. |
Factor |
View the compensation factor. |
Addl Factor |
View the additional compensation factor. |
Max Spread |
View the maximum spread allowed. |
Max Markup Or Percent |
View the maximum compensation Markup. |
Flat Amt |
View the flat amount. |
Compensation Amt |
View the compensation amount. |
- Make any necessary changes in the Buy Rate field.
- Click Calculate.
The system displays the details and amounts for this compensation plan.
8.12.10 Proceeds Sub Tab
The Proceeds sub screen displays the payment amount due to the dealer, based on the Compensation and Itemization sub screens. It is a view only sub screen, though you can record comments.
To use the Proceeds
- Open the Funding screen and load the application you want to work with.
- Click the Contract > Proceeds sub tab.
- In this section, you can perform any of the Basic Operations mentioned in Navigation chapter.
A brief description of the fields is given below:
Field: |
Do this: |
Itemization |
View the proceed itemization. |
+/- |
View whether the itemization is added to or subtracted from the total proceeds. |
Amount |
Specify the amount. |
Currency |
Specify the currency of the proceed. |
Comment |
Specify a comment. |
Total Amount |
View the total amount. |
- Perform any of the Basic Actions mentioned in Navigation chapter.
8.12.11 Disbursement Sub Tab
The Disbursement sub screen records how the Lease payment is disbursed and records payments to third parties such as the Department of Motor Vehicles. This sub screen needs to be completed if there is an itemized disbursement.
To complete the Disbursement sub screen
- Open the Funding screen and load the application you want to work with.
- Click the Contract > Disbursement sub tab.
- In this section, you can perform any of the Basic Operations mentioned in Navigation chapter.
A brief description of the fields is given below:
Field: |
Do this: |
Disbursement section |
|
Validate Payee |
Check this box to validate payee. |
Description |
View the disbursement description. |
Number |
Specify the disbursement party’s number. |
Payment Mode |
Select the payment mode. |
Name |
Specify the company name. |
Account # |
Specify the account number. Note: If the organizational parameter UIX_HIDE_RESTRICTED_DATA is set to Y, this appears as a masked number; for example, XXXXX1234. |
Amount |
View the payment amount. |
Currency |
Specify the currency. |
ACH Account Type |
Specify the account type. |
Account # |
Specify the ACH account number. Note: If the organizational parameter UIX_HIDE_RESTRICTED_DATA is set to Y, this appears as a masked number; for example, XXXXX1234. |
ACH Bank |
Specify the bank number. |
ACH Routing # |
Specify the routing number. |
BIC |
Select the Business Identifier Code from the drop-down list. The list displays the BIC codes defined in the system. |
IBAN |
Specify the IBAN (International Bank Account Number). IBAN is used for identifying bank accounts across national borders with a minimal of risk of propagating transcription errors. Ensure that value entered satisfies the check-digit validation based on modulo 97. On save, system automatically validates the IBAN number length based on country code, characters, white spaces, and checksum. Validation is also done during posting non-monetary transaction (ACH Maintenance). You can maintain the IBAN length and other details required as per the country code in the user defined table (Setup > Administration > System > User Defined Tables). Note: IBAN for 'NL' country code (IBAN_FORMAT_NL) is defined by default with length of IBAN as 18. |
Comment |
Specify a comment. |
Country |
Select the country. |
Address Line 1 |
Specify the address line 1. |
Address Line 2 |
Specify the address line 2. |
Zip |
Specify the zip code. For non US country, you have to enter zip code. |
City |
Specify the city. |
State |
Select the state. |
Phone 1 |
Specify the primary phone number. |
Extn |
Specify the primary phone extension. |
Phone 2 |
Specify the alternate phone number. |
Extn |
Specify the alternate phone extension. |
- Perform any of the Basic Actions mentioned in Navigation chapter.
Disbursement tab will display the records only if a third party itemization is maintained during contract setup.
8.12.12 Fee Sub Tab
The Fee sub screen is a view-only table displaying what fees on the Lease instrument are in use, based on the contract.
To view the Fee
- Open the Funding screen and load the application you want to work with.
- Click the Contract > Fee sub tab.
- In the Fee sub screen, view the following display only information:
Field:
Do this:
Fee
View the fee type.
Fee Calc Method
View the fee calculation method.
Txn Amt From
View the minimum transaction amount.
Gross Capitalized Cost From
View the minimum value of gross capitalization cost.
Percent
View the maximum percentage.
Threshold Amt
View the threshold amount beyond which system is allowed to calculate and post late fee on the account. This is applicable only for Cycle Based Collection Late Fee and Cycle Based Late Fee and the value is propagated from defined in Setup > Contract > Fees tab.
Min Amt
View the minimum fee amount.
Max Amt
View the maximum fee amount.
Enabled
If selected, the fee rule is enabled.
8.12.13 ACH Sub Tab
The ACH sub screen records details about automatic clearing house, if this is a direct deposit payment account; otherwise, it remains empty. This information is used to receive payments, primarily when working with the Payments screen.
To complete the ACH
- Open the Funding screen and load the application you want to work with.
- On the Funding screen, click the Contract tab, then choose the ACH sub tab.
- In this section, you can perform any of the Basic Operations mentioned in Navigation chapter.
A brief description of the fields is given below:
Field: |
Do this: |
Bank Name |
Specify the bank name. |
Routing # |
Specify the routing number. |
Payment Mode |
For an active Recurring ACH record, the payment mode selected in Contract tab is automatically populated. If not, select the type of repayment mode to indicate the type of ‘Autopay/Direct Debit’ using any of the following option from the drop-down list. The list is populated from REPAYMENT_PMT_MODE_CD lookup code. - AUTOPAY (ACH) - AUTOPAY (CREDIT CARD) - AUTOPAY (DEBIT CARD) For an AUTO PAY type of Payment Mode, ensure that at least one active ACH record exist and for CHECK type of Payment Mode, there are NO active ACH records. |
Status |
Select the required ACH status from the drop down list. By default, the ACTIVE status is selected. |
Default |
By default, this check box is selected indicating that the current ACH is the default one. If not, you need to uncheck the same. |
Start Dt |
Specify the ACH start date. By default the first payment date of the contract is auto populated and can be edited. |
End Dt |
Specify the ACH end date. |
Account Type |
Select the account type. |
Account # |
Specify the account number. Note: If the organizational parameter UIX_HIDE_RESTRICTED_DATA is set to Y, this appears as a masked number; for example, XXXXX1234. |
BIC |
Select the Business Identifier Code from the drop-down list. The list displays the BIC codes defined in the system. |
IBAN |
Specify the IBAN (International Bank Account Number). IBAN is used for identifying bank accounts across national borders with a minimal of risk of propagating transcription errors. Ensure that value entered satisfies the check-digit validation based on modulo 97. On save, system automatically validates the IBAN number length based on country code, characters, white spaces, and checksum. Validation is also done during posting non-monetary transaction (ACH Maintenance). You can maintain the IBAN length and other details required as per the country code in the user defined table (Setup > Administration > System > User Defined Tables). Note: IBAN for 'NL' country code (IBAN_FORMAT_NL) is defined by default with length of IBAN as 18. |
Pmt Day |
Specify the payment day. By default the payment due day specified for the contract is auto populated and can be edited. |
Pmt Amt |
Specify the payment amount. By default the payment amount decided for the contract is auto populated and can be edited. Note: If the payment amount is specified as ZERO, system will automatically consider the EMI amount. |
Pmt Amt Excess |
Specify the additional payment (if any). This is the additional amount over and above the regular EMI. Appropriation of this amount is based on the ‘Spread’ defined in the contract. |
Pmt Freq |
Select the payment frequency. By default the bill cycle frequency defined for the contract is auto populated and can be edited. |
- Perform any of the Basic Actions mentioned in Navigation chapter.
- If there are more than one ACH banks and an optional End Date, click Add and repeat steps 3 through 5.
8.12.14 Coupon Sub Tab
The Coupon sub screen enables you to order (or re-order) new coupon books. This sub screen is only available if the bill type for this application is a coupon payment, not a statement.
To complete the Coupon
- Open the Funding screen and load the application you want to work with.
- Click the Contract > Coupon sub tab.
- In this section, you can perform any of the Basic Operations mentioned in Navigation chapter.
A brief description of the fields is given below:
Field: |
Do this: |
Order |
Select to order coupon book. |
Order Dt |
Specify the coupon book order date. |
Ordered By |
Select the user id of the user who ordered the coupon book. |
# of Coupons |
Specify the number of coupons. |
First Pmt Dt |
Specify the first payment date. |
Coupon Starting # |
Specify the starting number of the coupon book. |
- Perform any of the Basic Actions mentioned in Navigation chapter.
8.12.15 References Sub Tab
The References link enables you to enter any number of people as a reference on the application.
To complete the Reference screen (Contract link)
- Open the Funding screen and load the application you want to work with.
- Click the Contract > References link in this section, you can perform any of the Basic Operations mentioned in Navigation chapter.
A brief description of the fields is given below:
Field: |
Do this: |
Relationship |
Select the reference type. |
Name |
Specify the reference name. |
Status |
Select the status of the reference from the drop-down list. |
Years |
Specify the number of years. |
Months |
Specify the number of months. |
Comment |
Specify a comment. |
Country |
Select the country. |
Address Line 1 |
Specify the address line 1. |
Address Line 2 |
Specify the address line 2. |
State |
Select the state. |
Zip |
Select the zip code. For non US country, you have to enter zip code. |
Zip Extn |
Specify the zip extension. |
City |
Specify the city. |
Phone 1 |
Specify the reference’s primary phone number. |
Extn |
Specify the reference’s primary phone extension. |
Permission to call |
Check this box if customer has provided permission to contact through the specified phone number. When selected, system auto validates this option against the phone number specified. Atleast one phone number should have the permission to call for successful pre-qualification of the application. Else, an error message is displayed. |
Permission to Text |
Check this box if customer has provided permission to contact through text message. |
Phone 2 |
Specify the reference’s secondary phone number. |
Extn |
Specify the reference’s secondary phone extension. |
Permission to call |
Check this box if customer has provided permission to contact through the specified phone number. When selected, system auto validates this option against the phone number specified. Atleast one phone number should have the permission to call for successful pre-qualification of the application. Else, an error message is displayed. |
Permission to Text |
Check this box if customer has provided permission to contact through text message. |
- Perform any of the Basic Actions mentioned in Navigation chapter.
If you want to add another reference, click Add and repeat steps 3 and 4.
8.12.16 Real Estate Sub Tab
The Real Estate Fields screen records additional information regarding manufactured home Lease.
To complete the Real Estate Fields screen
- Open the Funding screen and load the application you want to work with.
- Click the Contract > Real Estate.
- In this section, you can perform any of the Basic Operations mentioned in Navigation chapter.
A brief description of the fields is given below:
Field: |
Do this: |
Note Transmittal Number |
Specify the note transmittal number. |
Deed Transmittal Number |
Specify the deeding transmittal number. |
Cancel/Cashout Transmittal Number |
Specify the deeding cancel/cash out transmittal number. |
Deed Input Date |
Specify the deed input date. |
Deed Recording Date |
Specify the deed recording date. |
Deeding Book Number |
Specify the deeding book number. |
ConDeeding Page Number |
Specify the condeeding page number. |
Mortgage Recording Date |
Specify the mortgage recording date. |
Mortgage Book Number |
Specify the mortgage book number. |
Mortgage Page Number |
Specify the mortgage page number. |
- Perform any of the Basic Actions mentioned in Navigation chapter.
8.12.17 PDC Sub Tab
The PDC sub screen displays any post dated checks associated with the contract.
To complete the PDC
- Open the Funding screen and load the application you want to work with.
- Click the Contract > PDC sub tab.
- In this section, you can perform any of the Basic Operations mentioned in Navigation chapter.
A brief description of the fields is given below:
Field: |
Do this: |
PDC Ind |
If selected, indicates that this account involves a post dated check as a method of repayment. |
PDC Type |
Select the post dated check type, Security checks or post dated checks for payment. |
Account # |
Specify the account number, on which the cheque is drawn. |
Routing # |
Specify the routing number of the cheque. It is the number printed on the cheque, also called MICR number (Magnetic Ink Character Recognition). |
Account Type |
Specify the type of the account |
Bank Name |
Specify the bank name of the customers cheque |
Branch Name |
Specify the Branch name of the customers cheque |
Docket # |
Specify the docket number where post dated checks are supposed to be stored. |
Check # |
Specify the starting cheque number. |
Check Dt |
Select the check date. In case there are multiple checks being deposited that have sequential serial numbers, the date of the first cheque in the series would be entered in the date field. The remaining cheque dates would be anniversary dates based on the frequency set up. For example, the cheque range could be from 111 to 180. If the date on the first cheque-111 is October 12, 2003 and the frequency is set to Monthly, the next cheque would be picked up for processing on November 12, 2003. |
Check Amt |
Specify the appropriate cheque amount. |
No of Checks |
Specify the total number of checks in the range. |
Billing Cycle |
Select the frequency at which the checks are to be sent for collection. |
Comments |
Specify any remarks for the details. |
- Click Generate.
- In the PDC Table section, select the record you want to work with and enter, view or edit the following information:
Field:
View this:
Select
If selected, indicates that this is the current record.
PDC Type
The type of post dated check in use.
Account #
The account number of the post dated check.
Bank Name
The bank name of the post dated check.
Check #
The check number of the post dated check.
Status
The status of the post dated check.
Check Dt
The check date of the post dated check.
Check Amt
The check amount of the post dated check.
Account Type
The account type of the post dated check.
- Perform any of the Basic Actions mentioned in Navigation chapter.
8.13 Collateral tab
Having selected and loaded an application, you can view the information about the collateral of the Lease.
The Collateral link opens screens with information regarding any collateral associated with an account. Depending on the type of Lease, collateral can be a vehicle, home, or something else, such as major household appliances. The Collateral link is unavailable if this is an unsecured Lease.
A detailed explanation of the fields found on the Collateral link’s screens and sub screens can be found in the Application Entry chapter.
To verify information about the collateral
- Open the Funding screen and load the application you want to work with.
- Click the Collateral link.
Depending on the type of collateral, information about the vehicle, home or other type of collateral appears.
- Verify the information regarding the collateral and its sub screens. (This is information that was recorded during the application entry process or gathered during the credit pull.)
If the collateral is a vehicle, the Collateral link displays information about the vehicle.

If the collateral is a home, the Collateral link displays information about the home.

If the collateral is anything other than a vehicle or home, the Collateral link displays information about the other type of collateral.

For details on this screen refer Collateral Tab section in Underwriting chapter.
8.14 Comments Tab
When using the Underwriting screen, you can add comments to an application at any time in the underwriting process by using the Comments screen.
Whenever an application is funded by a proxy user, a system generated comment with timestamp is inserted in the comments tab in the format ‘<User 1> actioned as proxy for Funder <User2>’. Here, User 1 refers to the logged in user who has acted on behalf of User2, who is the concerned Funder. The concerned Funder’s name will also be selected in Contract Tab > 'Funder' field.
To add comments to an application
- Open the Funding screen and load the application you want to work with.
- Click Comments.

For details on this screen refer Comments Tab section in Underwriting chapter.
8.15 Tracking Tab
When using the Funding screen, you can add tracking attribute information to an application at any time in the underwriting process by using the Tracking Attributes screen.
To enter the tracking attributes for an application
- Open the Funding screen and load the application you want to work with.
- Click the Tracking tab.

For details on this screen refer Tracking Tab section in Underwriting chapter.
8.16 Document tab
The Document Maintenance link allows you to view documents attached to an application in the form of GIF files, PDF files, DOC files, XLS files, and TXT files and add comments regarding a selected document.
For more information, see the chapter Document Management in this User Guide.
To view a document attached with an application
- Open the Funding screen and load the application you want to work with.
- Click Document.

For details on this screen refer Document Tab section in Underwriting chapter.
8.17 Verification Tab
The system can be configured to automatically validate portions of an application when you attempt to change its status. The results of this data check appear on the Verification link’s Edit screen as an Error, a Warning or an Override.
If it is an Error, the system will not allow you change the application’s status and approve the Lease until you fix all the errors.
If it is a Warning, the system enables you to change an application’s status without correcting the matter. While you should still investigate the problem, Warning messages are of a lesser importance than Error messages.
If it is an Override, the system displays a dialog box informing you that an override is needed; your responsibility level does not have the authority required to process this step. (Choose Yes on the dialog box to move the application to the queue of the user with the required authority.)
The system can be configured to verify different sets of information; for example, the system could check one set of data when checking application entries for completeness and another when approving auto Lease. Each one of these “edit types” has its own set of “edit details.”
Note
The Edit Details section’s errors and warnings are created during the setup process.
To complete the Verification tab
- Open the Funding screen and load the application you want to work with.
- In the Edit Type drop-down list, select 'Application Approval Edits' and click on 'Check Edits' button.
Edit details are displayed in the table below along with the result, expected value, actual value and the override responsibility. This is based on the product and contract set up details that is done initially.
For more information, refer to Configuring Lending and Leasing setup guides.
- Specify all the information associated with the application on the Funding screen.

- If there are edits with 'Error' entries, verify and correct the data in the respective tabs and repeat step 2 until the 'Error' entries are cleared.
- When there are only 'Warnings' left you can choose to change the status of the application to the next stage in the Origination cycle.
- When you are finished entering data, on the Funding link bar, click Verification.
For details on this screen refer Verification Tab section in Underwriting chapter.
8.18 Correspondence Tab
Ad-hoc correspondence enables you to include information from applications in document templates you create yourself without manually transferring the data. Ad-hoc documents can be generated as either Microsoft Word or PDF files.
Ad-hoc correspondence can be viewed on the Correspondence link’s Correspondence screen when you have opened an account. The screen enables you to generate a new letter or view a previously generated letter.
To generate an ad hoc correspondence
- Open the Funding screen and load the application you want to work with.
- Click Correspondence.

For details on this screen refer Correspondence Tab section in Underwriting chapter.
8.19 Escrow Analysis Tab
If escrow is allowed for the selected instrument, the Escrow Analysis link is available on the Contract drop-down link. This screen enables you to view and perform the initial escrow analysis. When you are satisfied with the analysis, complete the Approval Dt field in the Approval section and save your entry.
The escrow payment for the Lease account starts on the 1st date of the Lease payment month. The disbursement happens on the 10th of the month (as per the disbursement rules). The escrow analysis lasts for a year (12 months) irrespective of the Lease term.
You can perform multiple analysis; however, the Escrow Analysis screen only records the last analysis performed. No record of any earlier analysis is currently available.
To complete the Escrow Analysis screen
- Open the Funding screen and load the application you want to work with.
- On the Funding screen, Click Escrow Analysis tab.

- In the Escrow Analysis section, view or enter the following information:
Field:
View:
Escrow
The escrow item.
Disbursement Rule
The escrow disbursement rule.
Yearly Amt
The escrow disbursement yearly amount.
- Click Analyze.
- Information on the Analysis Details screen is based on expected cash flow from contract and escrow disbursement setup. Payments received appear before escrow disbursement in any given month. Click View in Escrow Analysis section.
- In the following section, enter, view, or edit the following information:
Field:
View:
Parameters section
Date
The date.
From Dt
The FROM date for the escrow activity.
To Dt
The TO date for the escrow activity.
Opening Bal (Act)
The opening balance actual amount.
Opening Bal (Est)
The opening balance estimated amount.
Calculation: cushion amount + low required balance
Cushion Type
The cushion type.
Cushion Value
The cushion value.
Cushion Amt
The cushion amount.
Calculation: as per the shortage /cushion Rule maintenance
Results section
Std Pmt Amt
The standard payment amount.
Escrow Pmt Amt (+)
The escrow payment amount.
Calculation: Yearly Amount/12.
Spread Pmt Amt (+)
The spread payment amount.
Calculation: Surplus amount / 12
Other Pmt Amt (+)
The other payment amount.
New Pmt Amt =
The new payment amount.
Calculation: standard payment amount + escrow payment amount + spread payment amount + other payment amount
Surplus section
Surplus /<Shortage Amt>
The surplus shortage amount.
Calculation: escrow account balance - opening balance
Refund Amt
The refund amount.
- Click View in the Analysis Details section.
- On the Analysis Details sub screen, view the following information:
Field:
View:
Txn Dt
The transaction date.
Transaction
The escrow transaction.
Vendor
The vendor name.
Txn Amt
The amount of the transaction.
Balance Amt (Est)
The estimated amount of balance.
Balance Amt (Act)
The actual amount of balance.
Information on the Analysis Details sub screen is based on expected cash flow from contract and escrow disbursement setup. Payments received appear before escrow disbursement in any given month.
- If you want to re-analyze the escrow analysis, change the escrow information on the Contract link’s screen and sub screens.
If you want to approve the escrow analysis, complete the following information fields on the Approval section:
Field: |
View: |
Approval section |
|
Approval Dt |
The approval date. |
Approved By |
The person who approved the Lease. |
- Click Save on the Funding screen.
8.20 Tool Tab
The Tools tab calculates the payment amount, term, interest rate, Lease amount, amortization schedule and allows for the printing of a report.
For detailed information on using the tools, refer “Tools” chapter in the document.
8.21 Review Request
The Review Request tab facilitates to flag an Application for the attention of another Oracle Financial Services Lending and Leasing user and ask for review / feedback. It allows the system users to send and receive requests (including e-mail) commenting on a specific account or application. The Review Request tab supports iterative review of selected Application and also to process the review with multiple reviewers.
For detailed information on using this feature, refer to ‘Review Request’ section in Underwriting chapter of the document.