4. Customer Service
4.1 Overview
Customer Service is an enhanced interface provided in OFSLL using the Oracle JavaScript Extension Toolkit (Oracle JET) frame work. This is an additional interface supported from OFSLL to the existing Customer Servicing Dashboard screen and both intended to coexist in the system till further updates.
The Oracle JET frame work is a complete yet modular JavaScript development toolkit for building and providing a powerful, state-of-the-art capable user interfaces. For more information on deploying this framework, refer to Installation Manuals.
The Customer Service screen gives a snapshot of various aspects of the account like Total due, Payoffs, Change Request, Delinquency information, Outbound call history, Work orders, Alerts, conditions, Collateral information, Customer details, Account details and timeline views.
4.2 Pre-requisites
In order to access the Customer Service screen from the User Interface Servicing menu link:
- Enable the following system parameters:
- FLL_SER_JET_ACC_DASHBOARD_URL (JET ACCOUNT DASHBOARD URL)
- FLL_CMN_JET_JWT_ENABLED_IND (JET JWT TOKEN ENABLE INDICATOR )
- FLL_CMN_JET_JWT_TOKEN_URL (JET JWT TOKEN GENERATION URL )
- Ensure the following Menu and FLL access keys are enabled:
- FLL.SER.JET.SIMPLEACCOUNTCREATE.MENU
- FLL.SER.JET.ACCOUNTDASHBOARD.MENU
- FLL.SET.JET.INTELLIGENTSEGMENTATION.MENU
For more information, refer to system parameters section in setup guides.
4.3 Navigation
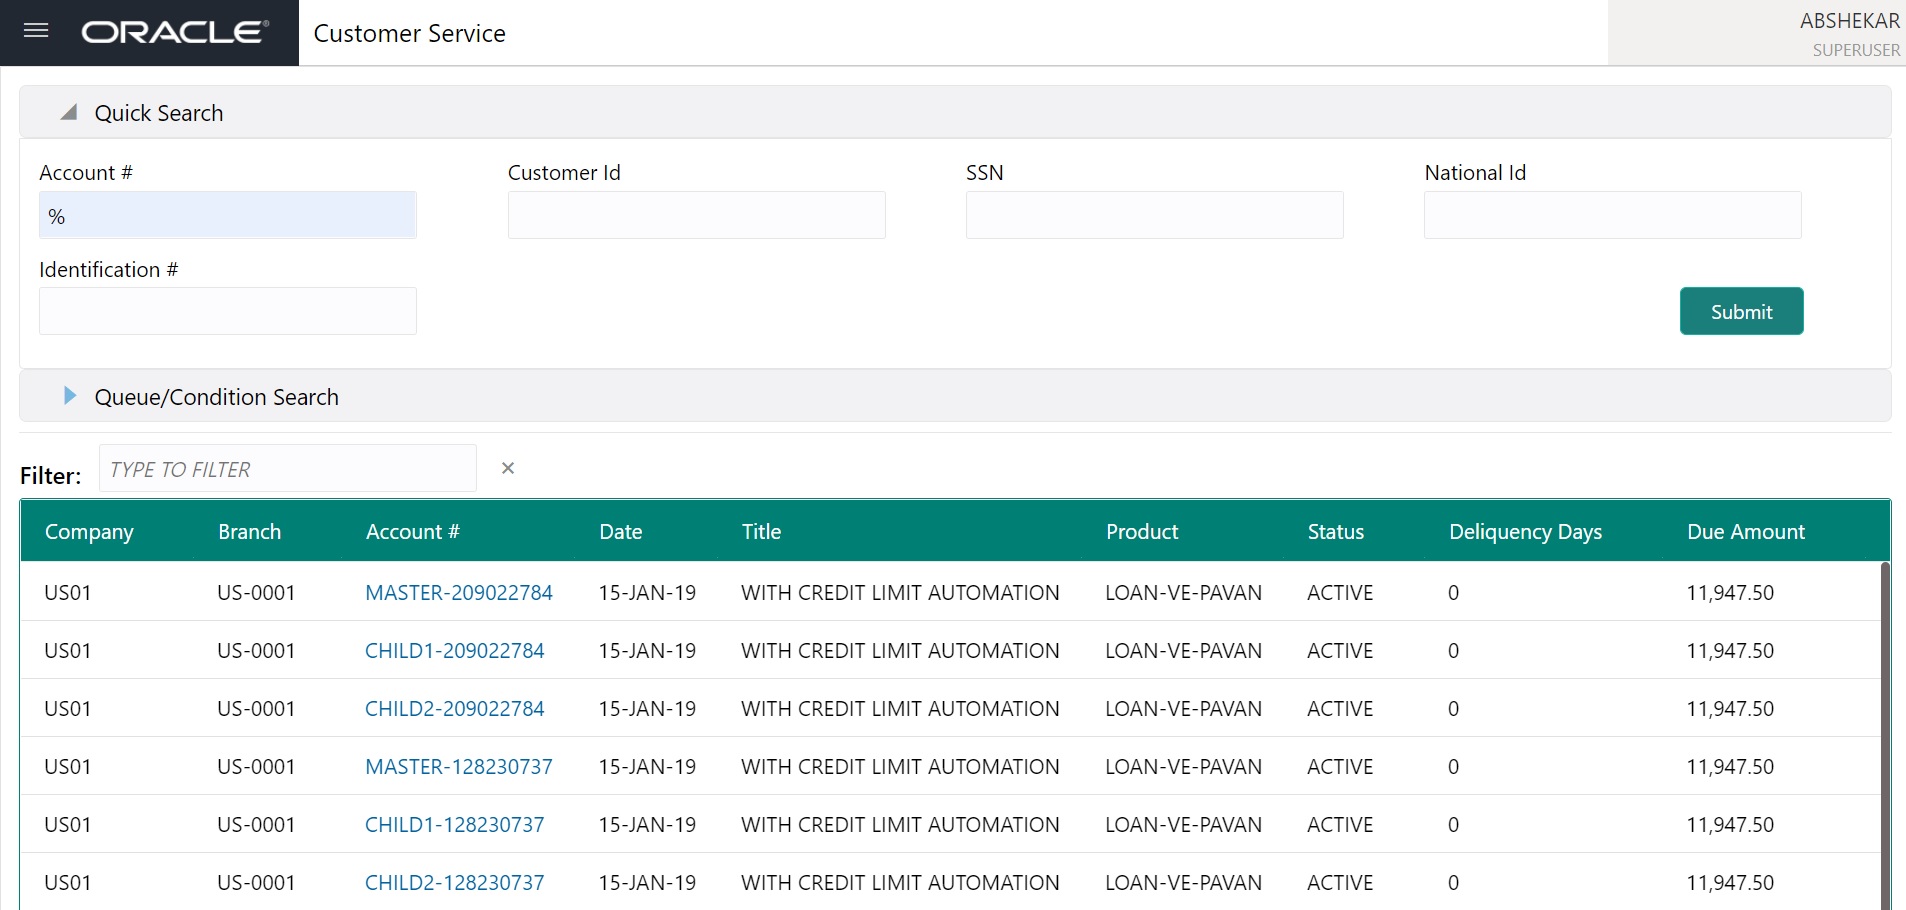
A new menu link “Customer Service” is available in LHS menu to launch the new dashboard screen.
4.3.1 Quick Search
Below search options are provided to search the account:
Field Name |
Description |
Type |
Comments |
Account # |
Account Number |
Text |
|
Customer Id |
Customer Identification Number |
Text |
|
SSN |
Social Security Number |
Text |
|
National Id |
National Identity Number |
Text |
|
Identification# |
Identification Number |
Text |
|
On click of Submit, the results are displayed in below section.
4.3.2 Queue/Condition Search
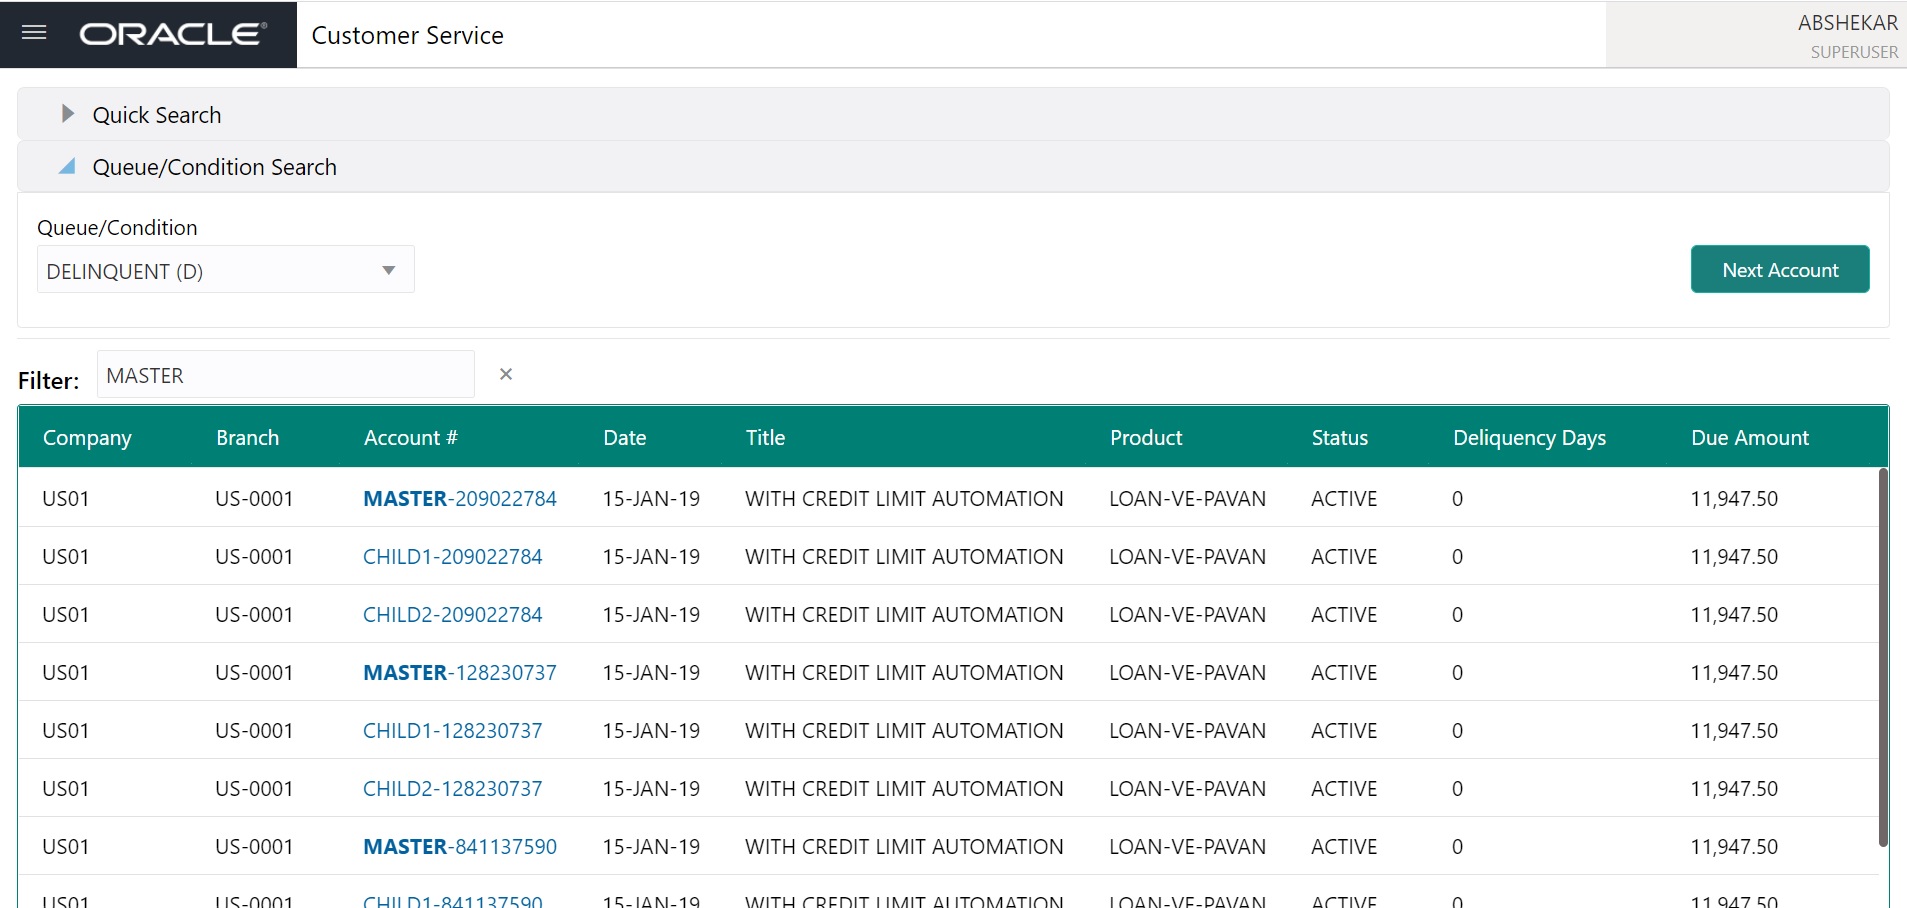
- In Queue/Condition search, select the required option from drop-down list.
- You can further use filter option to dynamically filter the displayed results.
- Click on 'Next Account’ to view the next account details in the results section.
4.3.3 Process Train
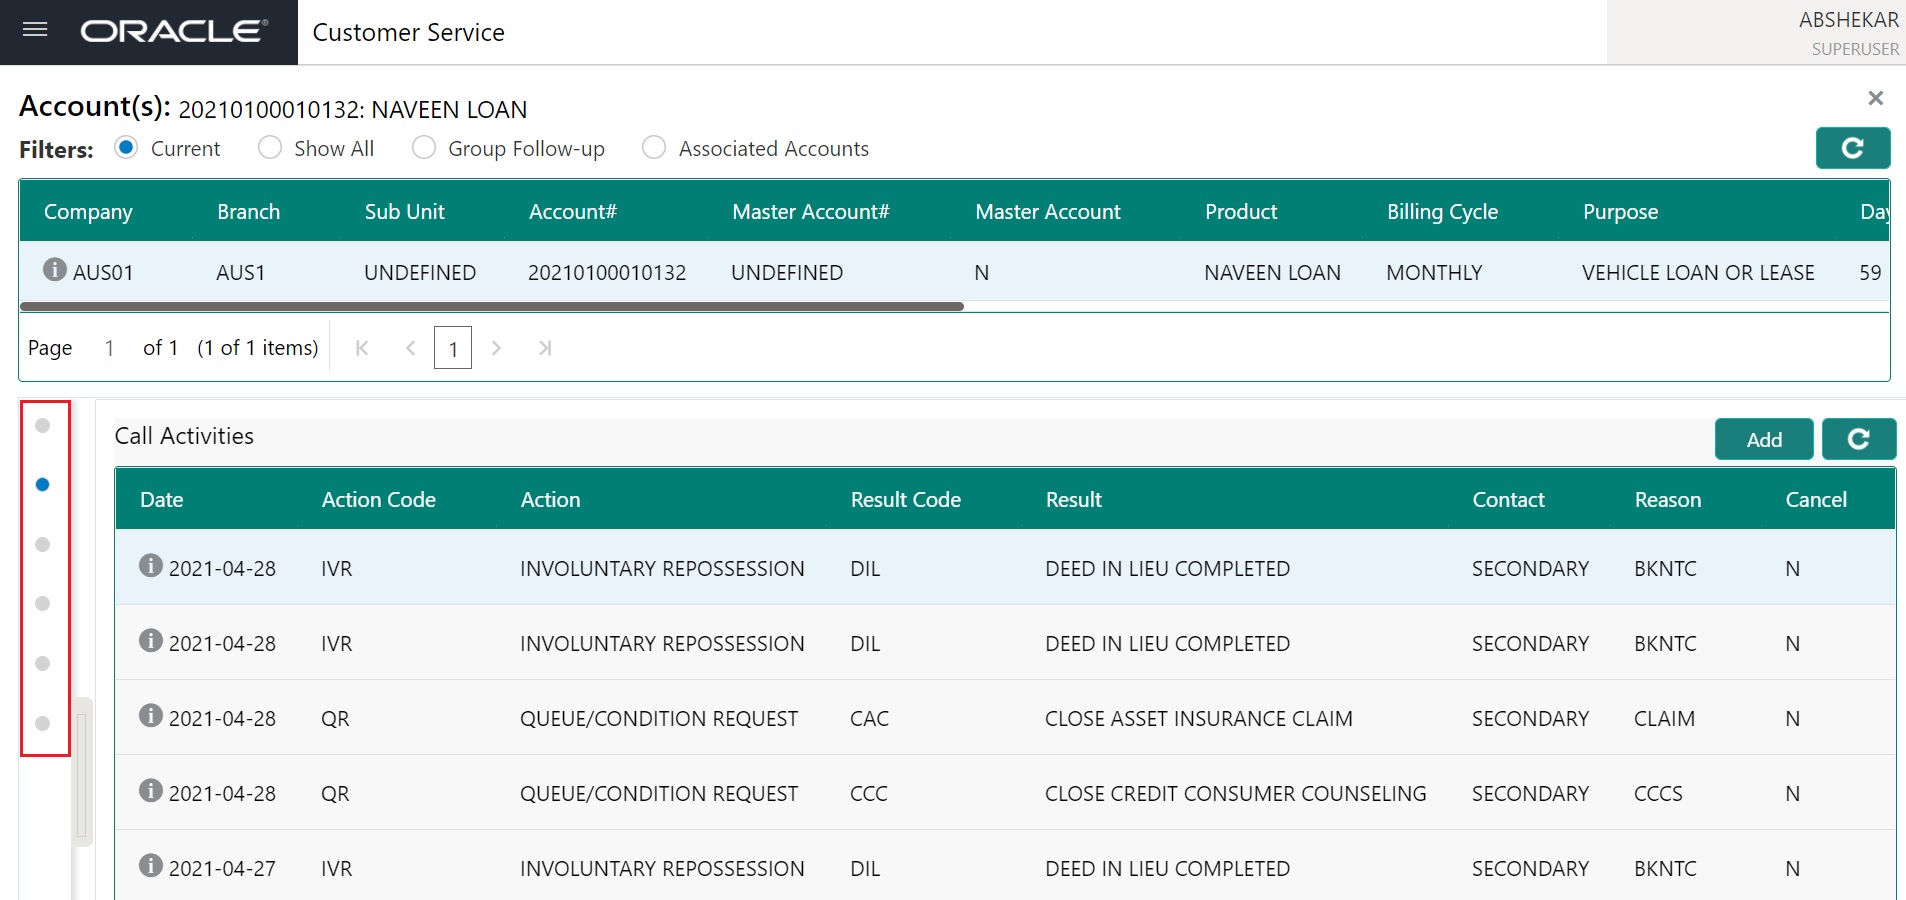
- Process train shows the following screens in a particular order:
- Summary
- Customer Service
- Account Details
- Customer Details
- Collateral
- Transaction History
- A button is provided on the process train to collapse and open the process train.
- Once the train is collapsed, the process train buttons are only shown and on mouse hover on each button, screen name is shown.
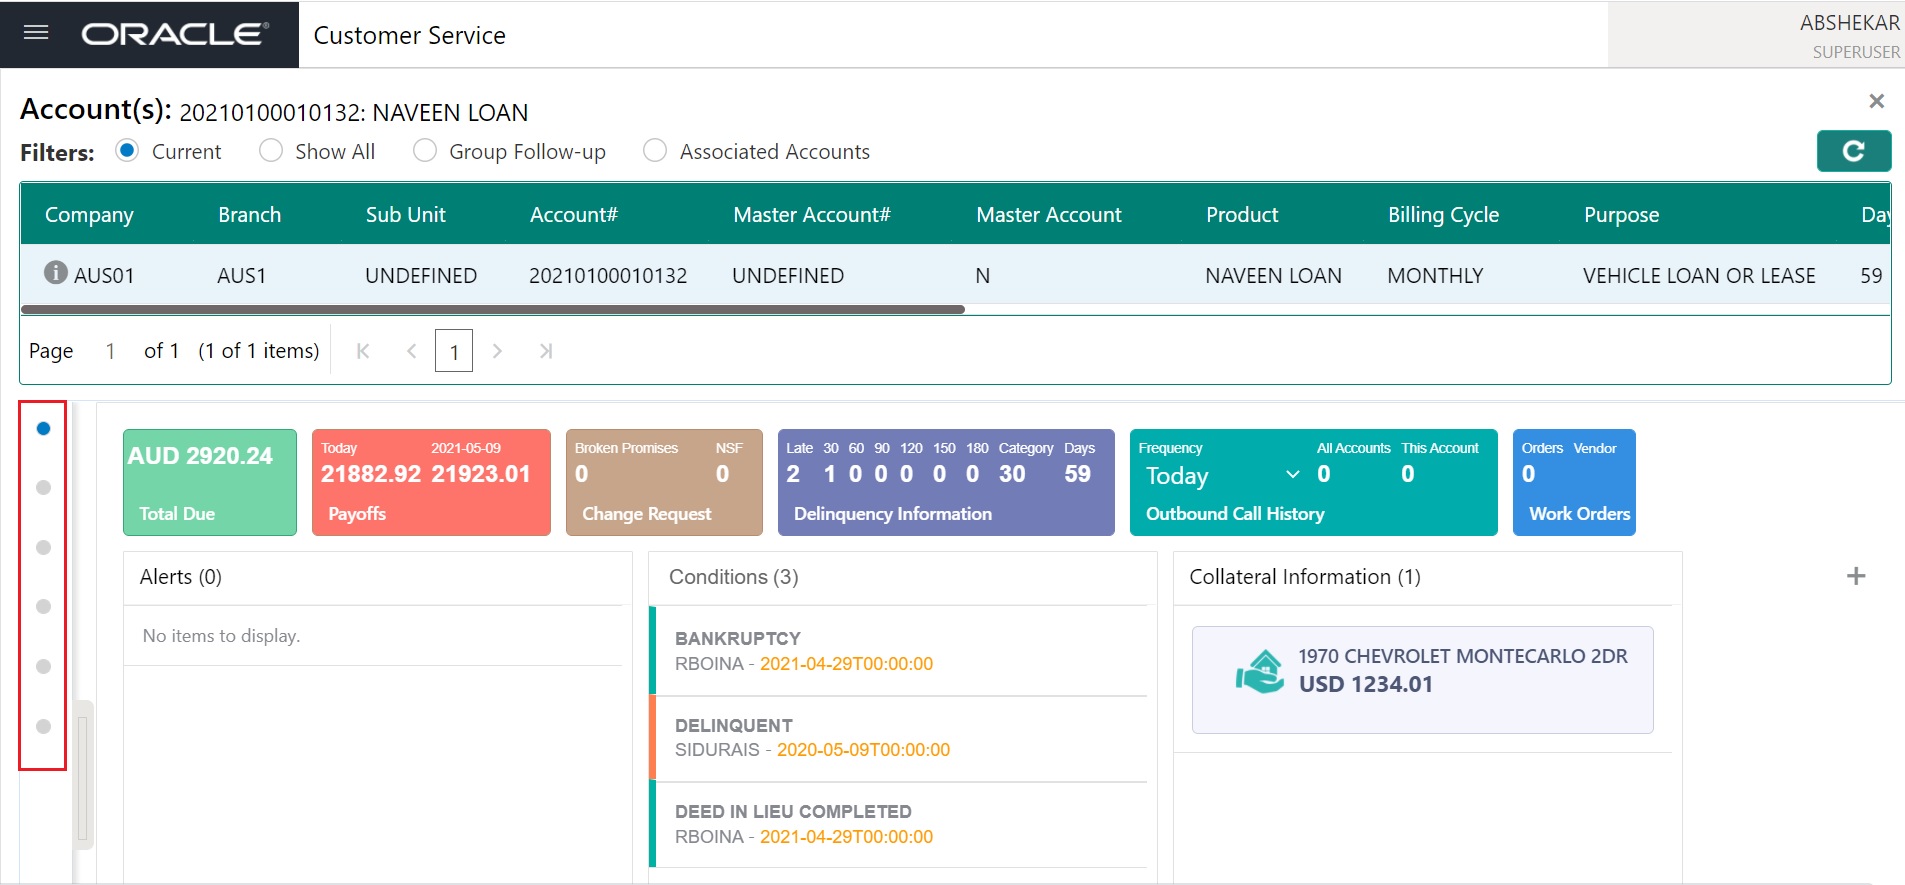
- Once a particular screen is fully filled and user moves to the next screen, the color of the buttons on the train is updated to blue.
4.4 Customer Service Summary
Once the account is fetched, details are displayed as indicated below:
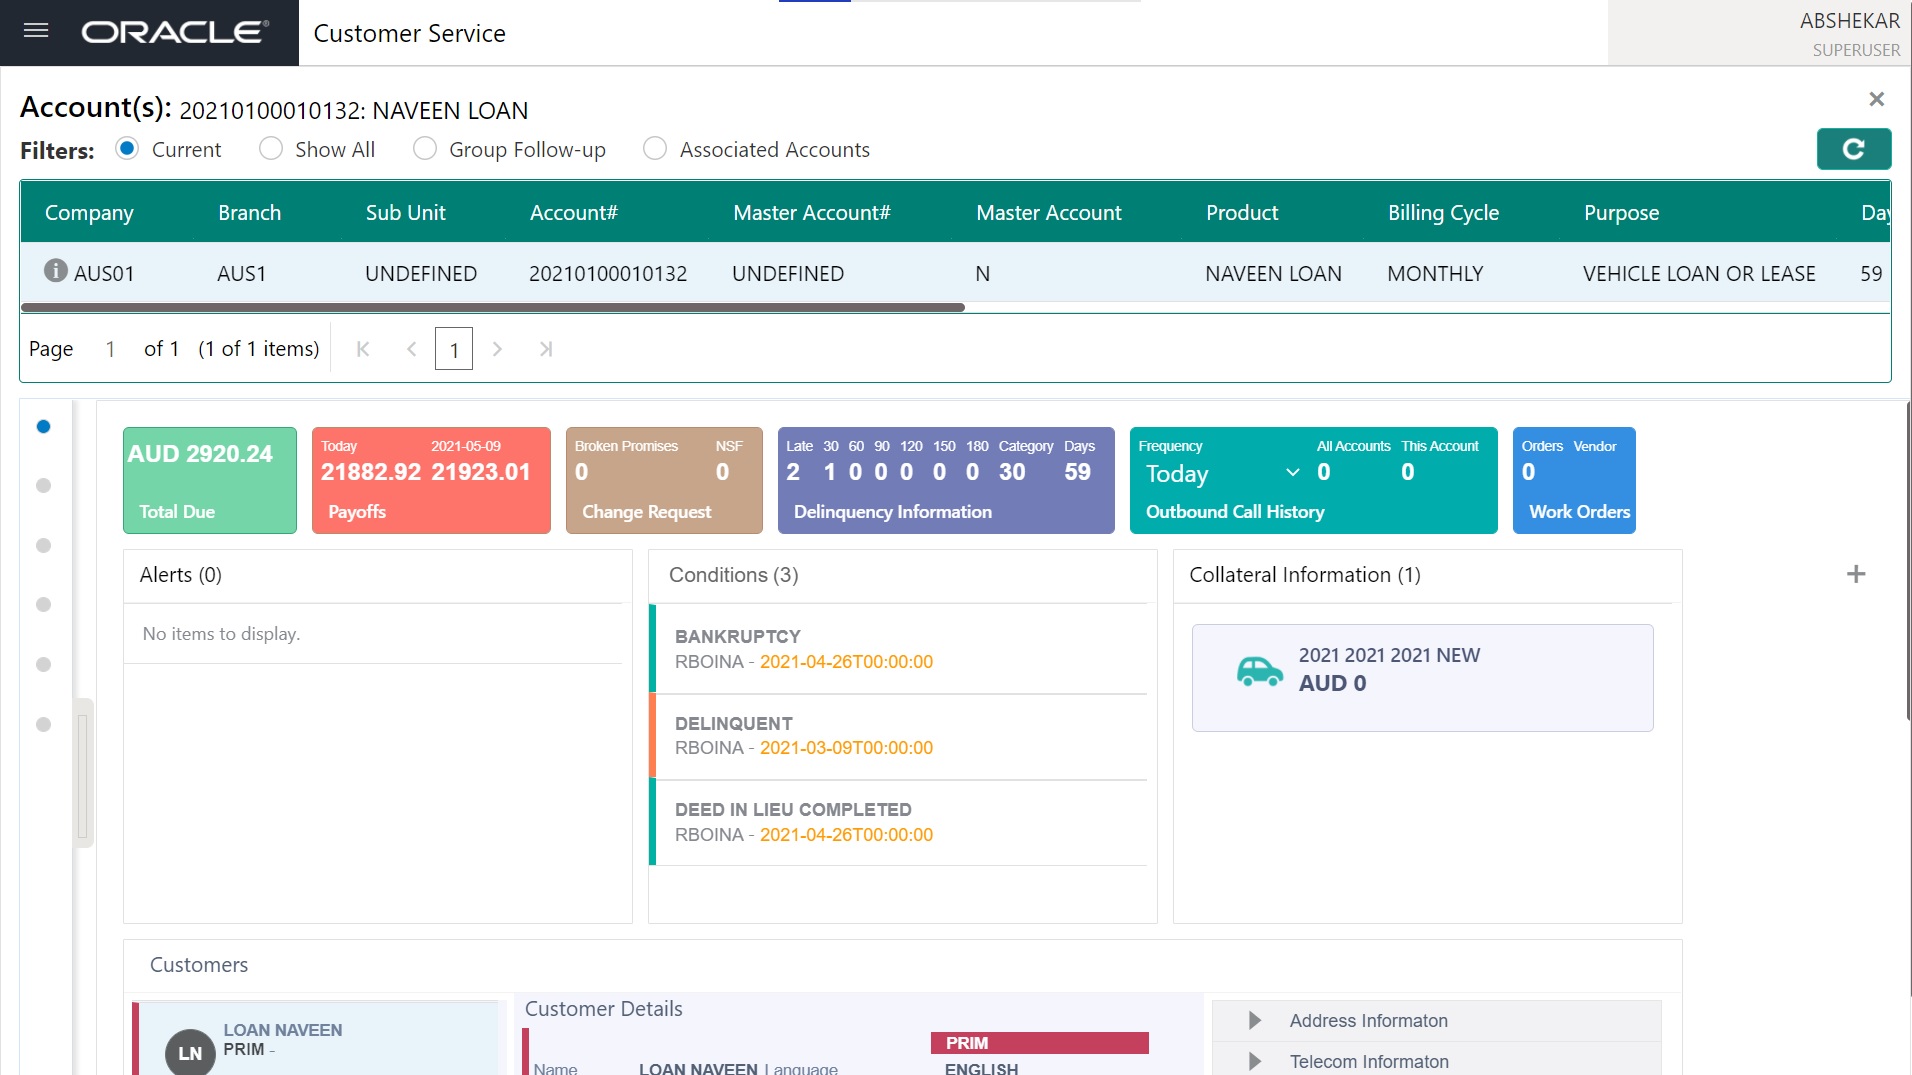
The Customer Service Summary screen consists of the following elements:
- Filters
- Account Details Header
- Cards
- Widgets
4.4.1 Filters
You can filter the data displayed using the following options. System filters and displays information based on your selection:
Command Button: |
Action Performed: |
Current |
Displays the current searched account only. It does not matter how that account was searched like using account search screen or selected a queue from drop-down and pressed ‘Next’ button or account number was directly entered in Acc# search field and pressed Submit button.This is the default option. |
Show All |
Displays the related accounts based on current selected customer’s customer Id or list of enabled business accounts matching with 'Tax Number' of current selected business. To view the details of account number(s) other than current account, select the account in Account(s) section. |
Group Follow-up |
Displays the set of accounts that share same account condition as the selected account and bear same Customer/Business Id. Other than having same account condition and Customer/Business Id, the queue currently selected should have the Group Follow-up Indicator enabled in queue setup and follow-up date should fall in range of organization level system parameter UCS_GROUP_FOLLOWUP_DAYS. |
Associated Accounts |
Displays all the Associated Accounts if the selected account is a Master Account. This option is not selected by default. Following are the other combinations on how system displays the accounts: - If the selected account is a Master Account, selecting this option displays all Associated Accounts (if exists) of the Master Account including the Master Account. - If the selected account is an Associated Account linked to a Master Account which also has other Associated Accounts, then system displays all Associated Accounts of the Master Account including the Master Account. - If the selected account is not linked to any Master Account, then system displays only the current selected account. - If the selected account is the only Associated Account linked to a Master Account, then system displays the current selected account and its Master Account. However, on selecting individual account record, system displays the respective account details in all Servicing > Account tabs. |
4.5 Account Details Header
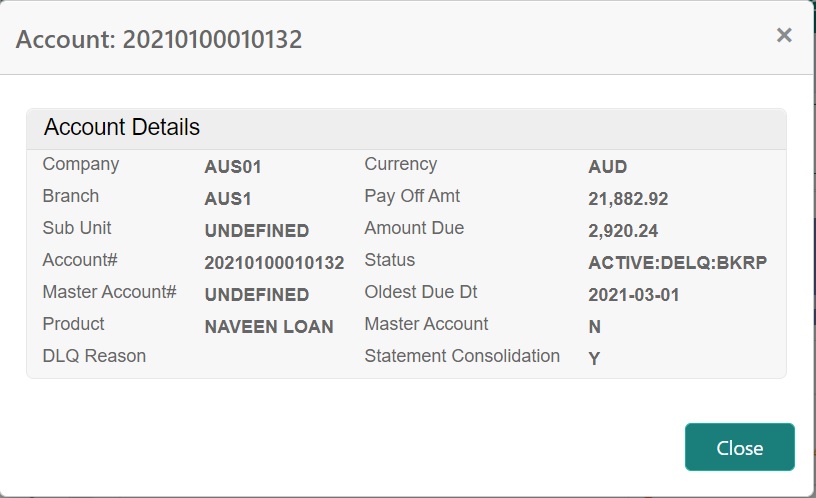
The Account Details Header consists of the following details:
In this field: |
View this: |
Company |
The company of the account. |
Branch |
The branch of the account. |
Sub Unit |
View the Sub Unit associated with the company/branch combination. System automatically displays the Sub Unit mapped in Setup > User > Companies > Branch Definition screen. |
Account # |
The account number. Note: This can also be the external reference number in case of conversion accounts if the value of system parameter AUTO_GEN_ACC_NBR_CONV is set to ‘N’. |
Master Account # |
View the Master Account number of the customer. During the funding process, an application can either be marked as ‘Master Account’ or ‘Linked to Existing Master Account’ in the Master Account tab of Origination screen. - If marked as Master Account, system populates the Master Account # which is same as Account #. - If Linked to Existing Master Account, system populates the selected Master Account #. - If the Application is neither marked as ‘Master Account’ nor ‘Linked to Existing Master Account’, then this field is displayed as UNDEFINED. |
Master Account |
View the Master Account indicator value propagated from Origination on funding an application. ‘Y’ indicates that the current account is a Master Account and ‘N’ indicates its not. |
Product |
The product for the account. |
Billing Cycle |
The billing frequency. |
Purpose |
The purpose the account is created. |
Days Past Due |
The total number of days elapsed past due date. |
Currency |
The currency for the account. |
Pay Off Amt |
The current payoff amount for the account. |
Amount Due |
The current delinquent amount due for the account. |
Status |
The account’s status. |
Oldest Due Dt |
The oldest due date. |
DLQ Reason |
The delinquency reason that gets auto updated by the system as one of the following when the account is marked delinquent. - 1st Payment Delinquency, when the first payment is delinquent. - NSF Delinquency, when the payment amount on due date results in NSF (non sufficient funds) in the account. - Matured Delinquency, when account reaches the ‘Maturity Date’ with some delinquency amount. Note: System automatically removes the delinquency reason on the account if the payment is received. However, if the same payment is reversed, the conditions are posted back. |
Class |
Customer’s class type. |
Statement Consolidation |
View the statement Consolidation indicator propagated from Origination > Funding screen or updated by posting Master Account - Statement Consolidation Indicator Maintenance non monetary transaction. If checked, indicates that system generates consolidated billing statement at Master Account level along with details of all the associated accounts. If unchecked, system generates billing statement to only current account. |
Clicking on ‘i’ button displays the details in a pop-up window.
4.5.1 Cards Data
Following details are displayed in horizontal sequence of Cards.
Sl No |
Card Name |
1 |
Total Due |
2 |
Payoffs |
3 |
Change Request |
4 |
Delinquency Information |
5 |
Outbound Call History |
6 |
Work Orders |
4.5.1.1 Total Due
The ‘Total Due’ card shows the following details on a glance.
Sl No |
Field name |
Type |
Comment |
1 |
Total Due |
Text |
Card Name |
2 |
Currency |
Text |
Shows the currency of the account |
3 |
Total Due Amount |
Integer |
Total due excluding current due |
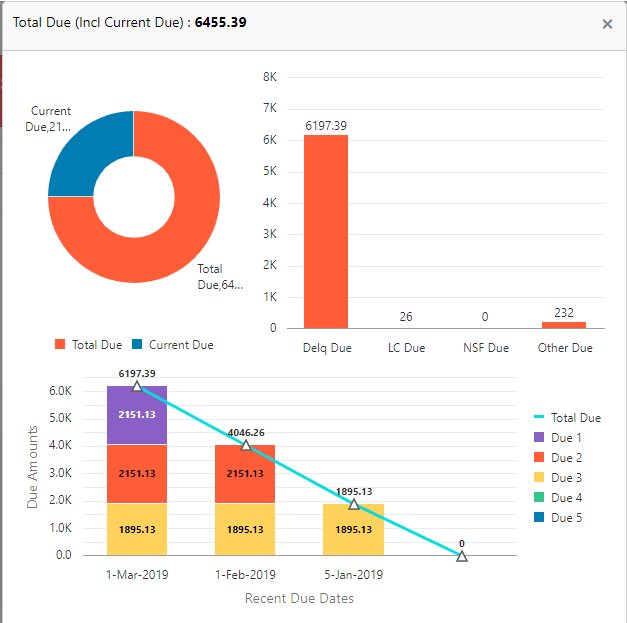
Below details are shown on click of the card:
Sl No |
Details |
Comment |
1 |
Total Due (Including Current Due) |
|
2 |
Pie chart showing Current due and Total Due |
1. Pie chart of Current Due and Total Due. 2. On hover over each pie, it shows the details |
3 |
Bar graph showing due amounts with 5 recent due dates and each bar showing the amount due on that date with previous dues if any. |
1.Graph between Due Amounts and Recent Due Dates 2. On hover over each graph, it shows the details |
4 |
Bar graph showing amounts for different type of dues: Delq Due LC Due NSF Due Other Due |
1.Graph Between Due Type and Due Amount 2. On hover over each graph, section, it shows the details |
4.5.1.2 Payoffs
The ‘Payoffs’ card shows the following details on a glance.
Sl No |
Field name |
Type |
Comment |
1 |
Payoffs |
Text |
Card Name |
2 |
Today |
Integer |
Today’s payoff amount |
3 |
Future Date |
Integer |
Future Payoff Amount |
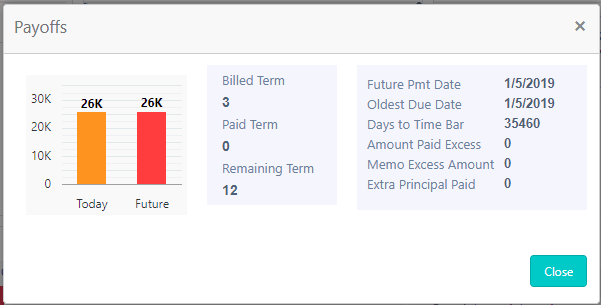
Below details are shown on click of the card.
Sl No |
Details |
Type |
Comment |
1 |
Bar graph showing Today’s and Future payoff amount |
Graph |
Graph between Payoff Amounts and Dates |
2 |
Billed Term |
Number |
Shows the Billed term |
3 |
Paid term |
Number |
Shows the Paid Term |
4 |
Remaining Term |
Number |
Shows the remaining Term |
5 |
Future Pmt Date |
Date |
Shows the Future Pmt Date |
6 |
Oldest Due Date |
Date |
Shows the Oldest Due Date |
7 |
Days to Time Bar |
Number |
Shows the no of days to time bar |
8 |
Amount Paid Excess |
Integer |
Shows the excess amount paid |
9 |
Memo Excess Amount |
Integer |
Shows the memo excess amount |
10 |
Extra Principal Paid |
Integer |
Shows the extra principal paid |
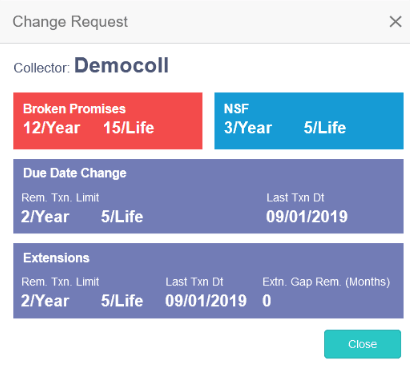
4.5.1.3 Change Request
The ‘Change request’ card shows the following details on a glance.
Sl No |
Field name |
Type |
Comment |
1 |
Change Request |
Text |
Card Name |
2 |
Broken Promises |
Integer |
Count of Broken Promises |
3 |
NSF |
Date |
Count of NSF |
Below Details are shown on Click of the card.
Sl No |
Details |
Type |
Comment |
1 |
Collector Name |
Text |
Shows the name of the collector |
2 |
Broken Promises Per Year |
Number |
Shows the count of broken promises per year |
3 |
Broken Promises Per Life |
Number |
Shows the count of broken promises per life |
4 |
NSF Per Year |
Number |
Shows the count of NSF per year |
5 |
NSF Per Life |
Number |
Shows the count of NSF per life |
6 |
Due Date Change Details |
Text |
Header |
6.1 |
Remaining Txn Limit per year |
Number |
Shows the remaining txn limit per year |
6.2 |
Remaining Txn Limit per life |
Number |
Shows the remaining txn limit per life |
6.3 |
Last Txn date |
Date |
Shows the last txn date |
7 |
Extensions details |
Text |
Header |
7.1 |
Remaining Txn Limit per year |
Number |
Shows the remaining txn limit per year |
7.2 |
Remaining Txn Limit per life |
Number |
Shows the remaining txn limit per life |
7.3 |
Last Txn date |
Date |
Shows the last txn date |
7.4 |
No of Extensions |
Number |
Shows the no of extension |
7.5 |
Gap Remaining(Months) |
Number |
Shows the gap |
4.5.1.4 Delinquency Information
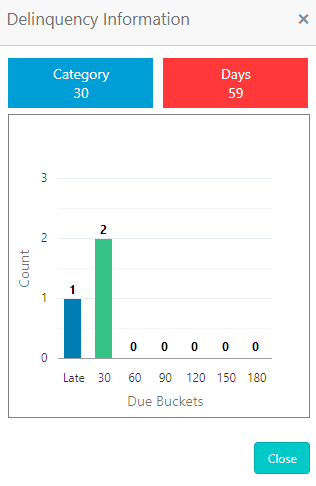
The ‘Delinquency Information’ card shows the following details on a glance.
Sl No |
Field name |
Type |
Comment |
1 |
Delinquency Information |
Text |
Card Name |
2 |
Delinquency Bucket Info |
Text |
It shows the count of each delinquency bucket |
3 |
Category |
Number |
Shows the category of the account |
4 |
Days |
Number |
Show the Delinquency Days |
Below details are shown on click of the card:
Sl No |
Details |
Type |
Comment |
1 |
Bar graph showing shows the due buckets (L,30,60,90, 120,150,180) and the number of times the account was in each bucket |
Graph |
Graph between Count and Due buckets |
2 |
Category |
Number |
Shows the Category |
3 |
Days |
Number |
Shows the Delinquency Days |
4.5.1.5 Outbound Call History
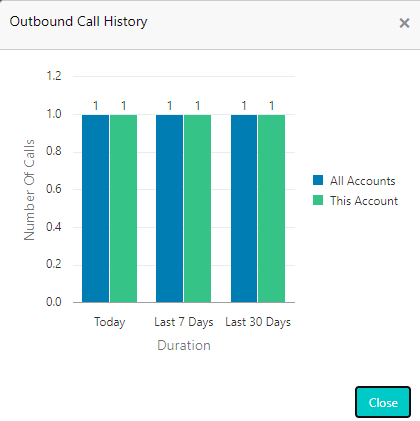
The ‘Outbound Call History’ card shows the following details on a glance.
Sl No |
Field name |
Type |
Comment |
1 |
Outbound Call History |
Text |
Card Name |
2 |
Frequency |
Text |
It has 3 options: Today Last 7 days Last 30 days |
3 |
All Account |
Number |
Count of outgoing call made to the customer for all its accounts |
4 |
This Account |
Number |
Count of outgoing call made to the customer for the current account |
Below details are shown on click of the card.
Sl No |
Details |
Type |
Comment |
1 |
Bar graphs depicting the no of outgoing calls made for all the accounts of the customer and for the current account today, in last 7 days and in last 30 days. |
Graph |
Graph between No of calls and Duration |
4.5.1.6 Work Orders
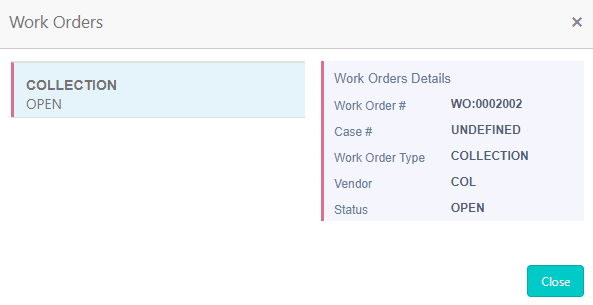
The ‘Work Order’ card shows the following details on a glance.
Sl No |
Field name |
Type |
Comment |
1 |
Work Orders |
Text |
Card Name |
2 |
Orders |
Text |
Count of all the work orders associated with the account |
3 |
Vendor |
Number |
Name of the vendor of the WO which was last updated |
Below details are shown on the click of the card.
Sl No |
Details |
Type |
Comment |
1 |
Open Work Oder Type on left pane |
Text |
WO type and status |
2 |
Work Order Details on Right pane |
Text |
On click of Open Work Order Type on Left menu, this detail is shown |
2.1 |
Work Order# |
Text |
Shows the work order# of the selected WO type |
2.2 |
Case# |
Text |
Shows the Case# of the selected WO type |
2.3 |
Work Order Type |
Text |
Shows the work order type of the selected WO type |
2.4 |
Vendor |
Text |
Shows the Vendor of the selected WO type |
2.5 |
Status |
Text |
Shows the Status of the selected WO type |
4.5.2 Widgets
Following details are displayed in vertically aligned Widgets.
Sl No |
Widget |
1 |
Alerts |
2 |
Conditions |
3 |
Collateral Information |
4 |
Customers |
5 |
Account Information |
6 |
Customers |
7 |
Account Details |
8 |
Timeline View |
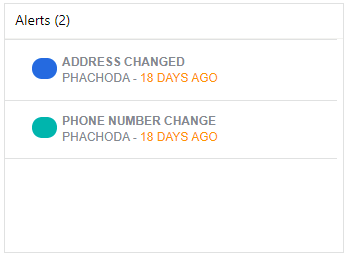
4.5.2.1 Alerts
The ‘Alert’ widget shows the following details:
Sl No |
Details |
Type |
Comment |
1 |
Alerts() |
Text |
Widget name with count of Alert available in the account |
2 |
Alert details |
Text |
Comment which is marked as Alert |
3 |
User Name |
Text |
Shows the user which has posted the alert |
4 |
Days |
Text |
Shows how many days ago the alert was posted |
4.5.2.2 Condition
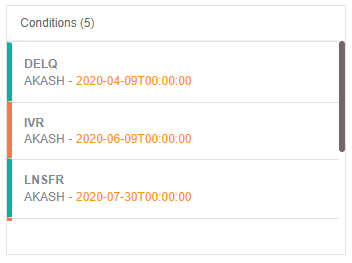
The ‘Condition’ widget shows the following details:
Sl No |
Details |
Type |
Comment |
1 |
Condition() |
Text |
Widget name with count of Alert available on the account |
2 |
Condition |
Text |
Shows all the condition which are available on the account |
3 |
User Name |
Text |
Shows the user which has posted the condition |
4 |
Time Stamp |
Date |
Shows the time stamp on which it has been posted |
4.5.2.3 Collateral Information
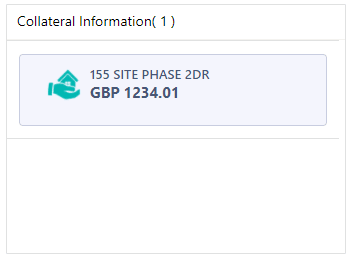
The ‘Collateral Information’ widget shows the following details:
Sl No |
Details |
Type |
Comment |
1 |
Collateral Information() |
Text |
Widget name with count of Collateral available on the account |
2 |
Collateral Details |
Text |
Shows all the Collateral which are available on the account |
3 |
Year |
Text |
Shows the Year of the collateral |
4 |
Make |
Text |
Shows the make of the collateral |
5 |
Model |
Text |
Shows the model of the collateral |
6 |
Total Amount |
Integer |
Shows the value of the collateral |
7 |
Currency |
Text |
Shows the currency |
Below details are shown on click of the collateral details:
Sl No |
Details |
Type |
Comment |
1 |
Collateral Description |
Text |
Header |
2 |
Collateral Details |
Text |
Shows the Collateral description, amount, currency |
3 |
Primary |
Text |
Shows if the asset is Primary |
4 |
Identification# |
Text |
Shows the identification# |
5 |
Year |
Number |
Shows the year of the asset |
6 |
Asset Class |
Text |
Shows the class if the asset |
7 |
Asset Type |
Text |
Shows the type of the asset |
8 |
Sub Type |
Text |
Shows the sub tye of the asset |
9 |
Status |
Text |
Shows the status of the asset |
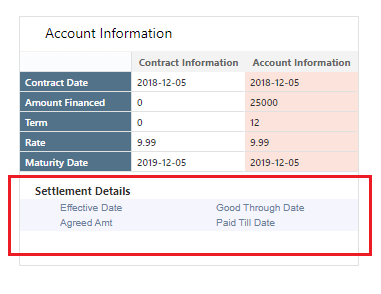
4.5.2.4 Account Information
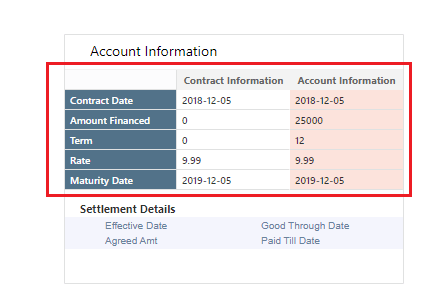
The ‘Account Information’ widget shows the following details for Contract and Account.
Sl No |
Details |
Type |
Comment |
1 |
Contract Date |
Date |
Shows contract date |
2 |
Amount Financed |
Integer |
Shows the amount financed |
3 |
Term |
Number |
Shows the Term |
4 |
Rate |
Integer |
Shows the Rate |
5 |
Maturity Date |
Date |
Shows the maturity date |
Settlement Details
Sl No |
Details |
Type |
Comment |
1 |
Effective Date |
Date |
Shows Settlement agreement start date |
2 |
Good Through Date |
Date |
Shows Settlement agreement expiry date |
3 |
Agreed amount |
Integer |
Shows Settlement amount agreed by customer to the lender |
4 |
Paid Till Date |
Integer |
During the agreed period (between effective date and Good through date), total amount paid by the customer and allocated to account balances |
4.5.2.5 Customers
The ‘Customers’ widget shows the following details:
1st Pane
Sl No |
Details |
Type |
Comment |
1 |
Customer Name |
Text |
Shows the Customer Name |
2 |
Relationship Type |
|
Shows the relation of the customer with account |
3 |
Customer Initials |
Text |
Shows the initials of the customer name |

2nd Pane
Below details are shown on click of each customer in the 1st Pane
Sl No |
Details |
Type |
Comment |
1 |
Relationship Type |
Text |
Shows the relation of the customer with account on the top right |
2 |
Name |
Text |
Shows the Name of the customer |
3 |
Customer# |
Number |
Shows the Customer# of the customer |
4 |
SSN |
Number |
Shows the SSN of the customer |
5 |
National ID |
Number |
Shows the National ID of the customer |
6 |
Birth Date |
Date |
Shows the Date of Birth of the customer |
7 |
Gender |
Text |
Shows the Gender of the customer |
8 |
Text |
Shows the Email of the customer |
|
9 |
Language |
Text |
Shows the Language of the customer |
10 |
Marital Status |
Text |
Shows the Marital Status of the customer |
11 |
Disability |
Text |
Shows if the Disability is Yes or No |
12 |
Skip |
Text |
Shows if the Skip is Yes or No |
13 |
Stop Correspondence |
Text |
Shows If the stop correspondence is Yes or No |
14 |
Active Military Duty |
Text |
Shows if the customer is on Active Military Duty |
15 |
Timezone |
Text |
Shows the Timezone of the customer |

3rd Pane
Below details are shown in contracted mode on click of each customer in the 1st Pane
- Address Information
- Telecom Information
- Employment Information

Below details are shown on click of each details
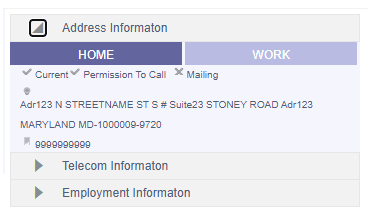
Address Information
Shows all the address available for the customer
Sl No |
Details |
Type |
Comment |
1 |
Address Information |
Text |
Header |
2 |
Address Type |
Text |
Shows the address type |
3 |
Current Indicator |
Text |
Shows if the address is the current address |
4 |
Permission to Call |
Text |
Shows if permission to call is allowed |
5 |
Mailing |
Text |
Shows if this is the mailing address |
6 |
Address |
Text |
Shows the full address |
7 |
Phone Number |
Text |
Shows the phone number |
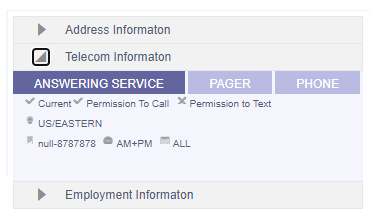
Telecom Information
Shows all the telecom details available for the customer
Sl No |
Details |
Type |
Comment |
1 |
Telecom Information |
Text |
Header |
2 |
Telecom Type |
Text |
Shows the telecom type |
3 |
Current |
Text |
Shows if this is the current telecom details |
4 |
Permission to Call |
Text |
Shows if permission to call is allowed |
5 |
Permission to Text |
Text |
Shows if permission to text is allowed |
6 |
Timezone |
Text |
Shows the timezone |
7 |
Phone Number |
Number |
Shows the phone number along with extension |
8 |
Best time to call |
Time |
Shows the best time to call |
9 |
Best day to call |
Text |
Shows the best day to call |
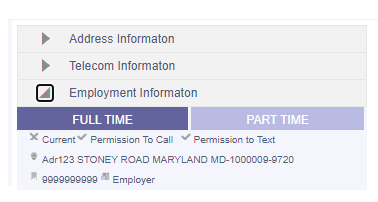
Employment Information
Shows all the employment details available for the customer
Sl No |
Details |
Type |
Comment |
1 |
Employment Information |
Text |
Header |
2 |
Employment Type |
Text |
Shows the employment type |
3 |
Current |
Text |
Shows if this is the current telecom details |
4 |
Permission to Call |
Text |
Shows if permission to call is allowed |
5 |
Permission to Text |
Text |
Shows if permission to text is allowed |
6 |
Address |
Text |
Shows the full address |
7 |
Phone Number |
Number |
Shows the phone number |
8 |
Employer |
Text |
Shows the employer |
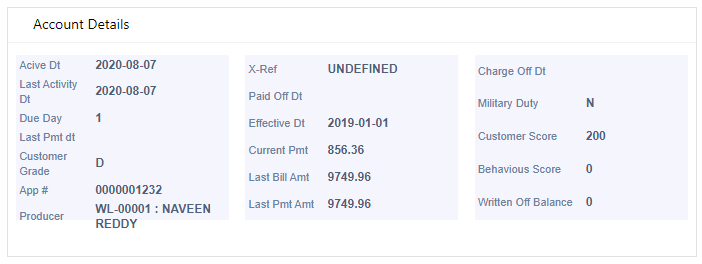
4.5.2.6 Account Details
The ‘Account Details’ widget shows the following details:
Sl No |
Details |
Type |
Comment |
1 |
Active Date |
Date |
Shows the active date of the account |
2 |
Last Activity Dt |
Date |
Shows the last activity date of the account |
3 |
Due Day |
Number |
Shows the Due day of the account |
4 |
Last Pmt Dt |
Date |
Shows the last payment date of the account |
5 |
Customer Grade |
Text |
Shows the customer grade of the account |
6 |
App# |
Number |
Shows the App# of the account |
7 |
Producer |
Text |
Shows the Producer# and Producer Name |
8 |
X-Ref |
Number |
Shows the X-Ref of the account |
9 |
Paid Off Dt |
Date |
Shows the Paid off date of the account |
10 |
Effective Dt |
Date |
Shows the Effective date of the account |
11 |
Current Pmt |
Integer |
Shows the Current Pmt of the account |
12 |
Last Bill Amt |
Integer |
Shows the last Bill Amt of the account |
13 |
Last Pmt Amt |
Integer |
Shows the last Pmt Amt of the account |
14 |
Charge off Dt |
Date |
Shows the Charge Off date of the account |
15 |
Military Duty |
Text |
Shows the Military duty is active or not |
16 |
Customer Score |
Number |
Shows the customer score |
17 |
Behaviour Score |
Number |
Shows the behaviour score |
18 |
Written Off Balance |
Integer |
Shows the write off balance |
4.5.2.7 Timeline View
The ‘Timeline View’ widget shows the following details:
Below Radio buttons have been provided to filter Transactions/ Call Activity
- Monetary – Displays all Good Monetary Transactions

- Non-Monetary – Displays all Non-Monetary Transactions
- Payments – Displays all Good Payments
- Call Activity
- Display Call Activities (Action/Result) with Right person contact flag as YES
- Display Call Activities which will result in condition/Queue Change on the Account
- Display PTP (Promise to Pay) Events.
- All – Displays Monetary, Non-Monetary, Payments and Call Activities
- In case of transactions, Transaction Description and Date are displayed.
- In case of Call Activities, Action/Result description and date in time line are displayed.
4.6 Customer Service
The Customer Service section consists of the following sub-sections under it.
4.6.1 Call Activities
Call activity section includes calls from customer, calls you make regarding the account or changes to the condition of the account. Entries in the Call Activities section are listed in reverse chronological order of follow-up date.
Each action and result has a code and description. The code for the call action and call result is what appears on the Call Activity sub screen. The Call activity action codes (Action field) and call activity results codes (Results field) are user-defined.
4.6.1.1 Recording Call Activity
- To record a call activity, click ‘Add’ in Call Activities section. System displays the following screen.
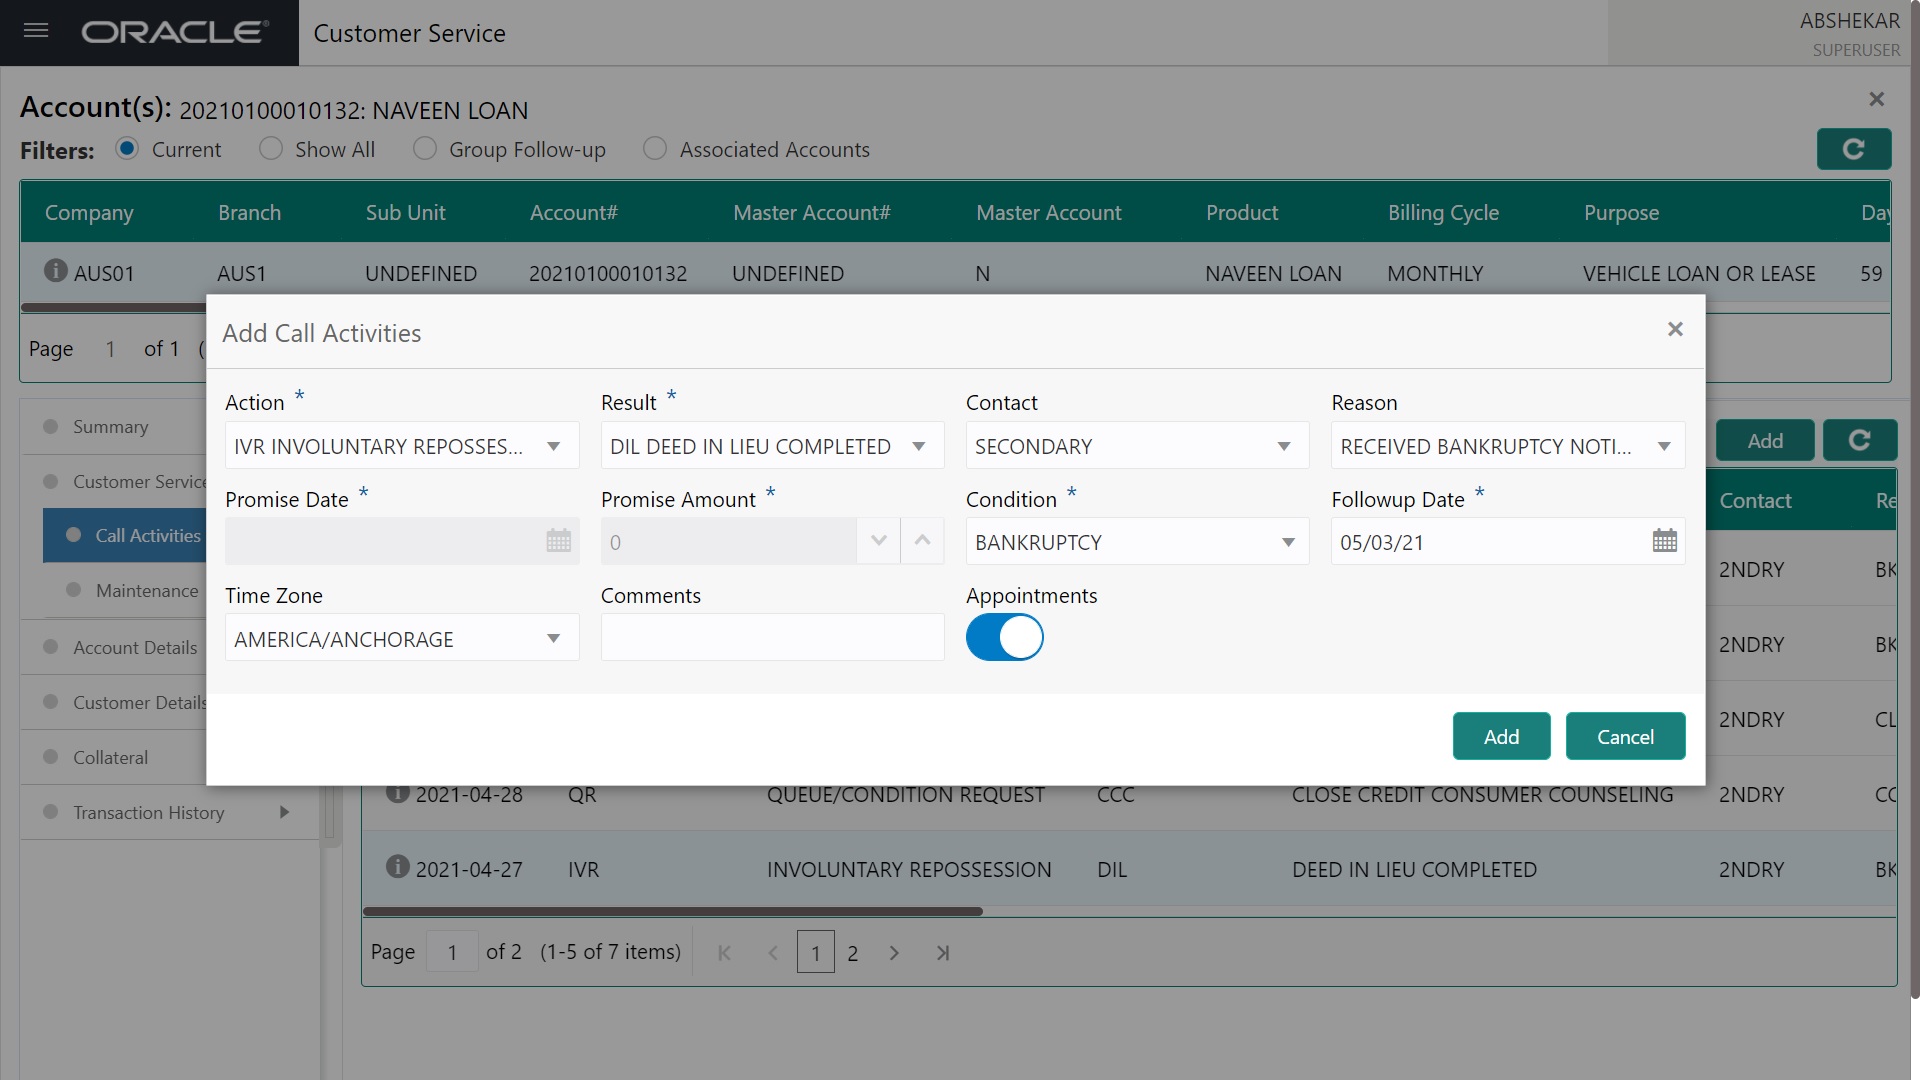
- Populate the required details in the following fields:
In this field:
Do this:
Action
Select the action performed from the drop-down list.
Result
Select the result of the action from the drop-down list. Depending on the action selected, filtered results are displayed for selection.
Contact
Select the person contacted from the drop-down list.
Reason
Select the reason for the communication from the drop-down list.
Promise Date
Select the promise date from the adjoining calendar.
Promise Amount
Specify the promise amount.
Condition
Select the condition or queue type from the drop-down list.
The list displays a combination of all the possible conditions depending on the action and result selected along with any open conditions applicable on the account. You can select ‘None’ if there are no specific conditions.
Followup Date
Specify the next follow-up date. Based on this date, system automatically adds the account in queue for follow-up.
Time Zone
Select the time zone of the customer.
Comment
Specify additional information of the call activity, if any.
Appointment
Check this option to take an appointment.
If Appointment is checked, then system allows you to select date and appointment time as per customer request. If appointment flag is not checked, then you can only enter the date with date picker.
- Click ‘Add’ to update the details.
- You can cancel a recorded call activity using the Edit option. Scroll toward the ‘Comments’ column and select the Edit option as indicated below.

- In the ‘Edit Call Activities’ dialog, select the Cancel option and provide the reason as a comment.
4.7 Account Details
The Account Details section consists of the following sub-sections under it.
4.7.1 Account Details
This screen displays the various account related details in Account Information section in View mode.
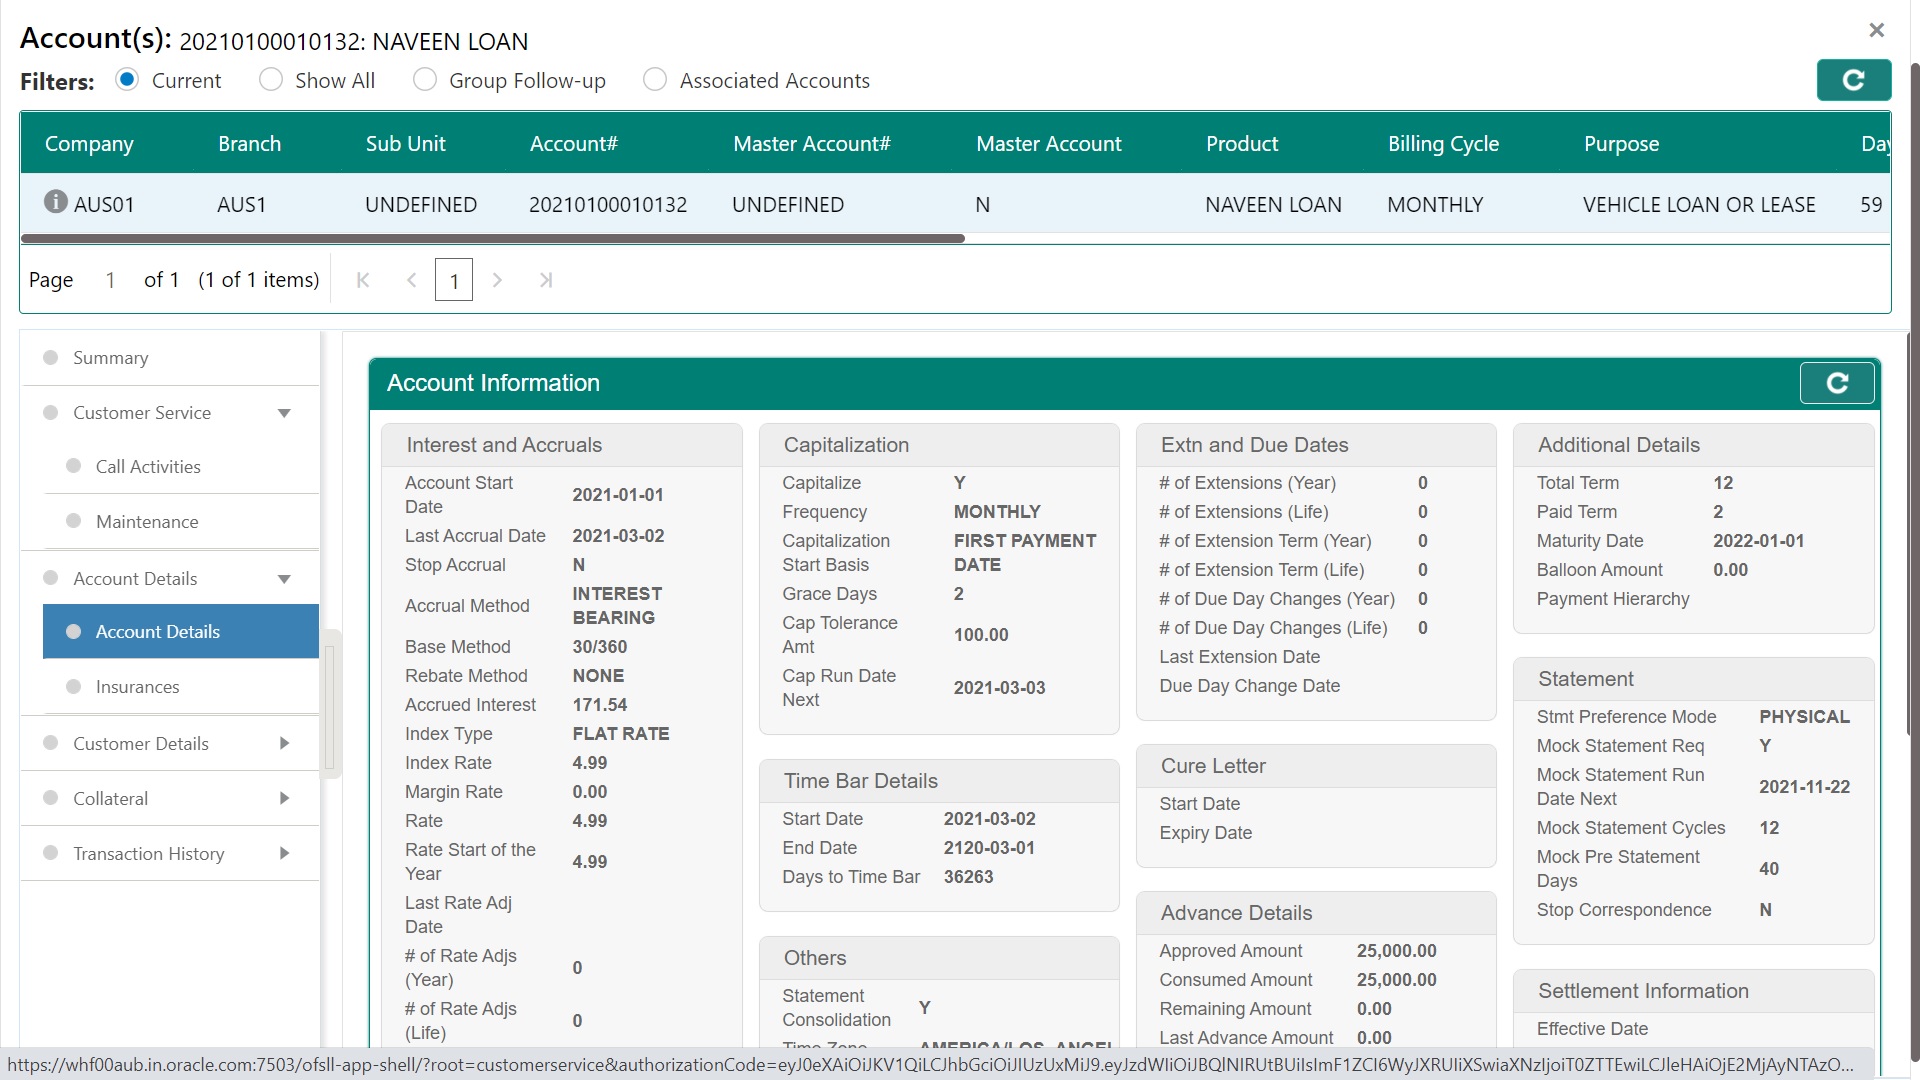
View the following information.
4.7.2 Insurances
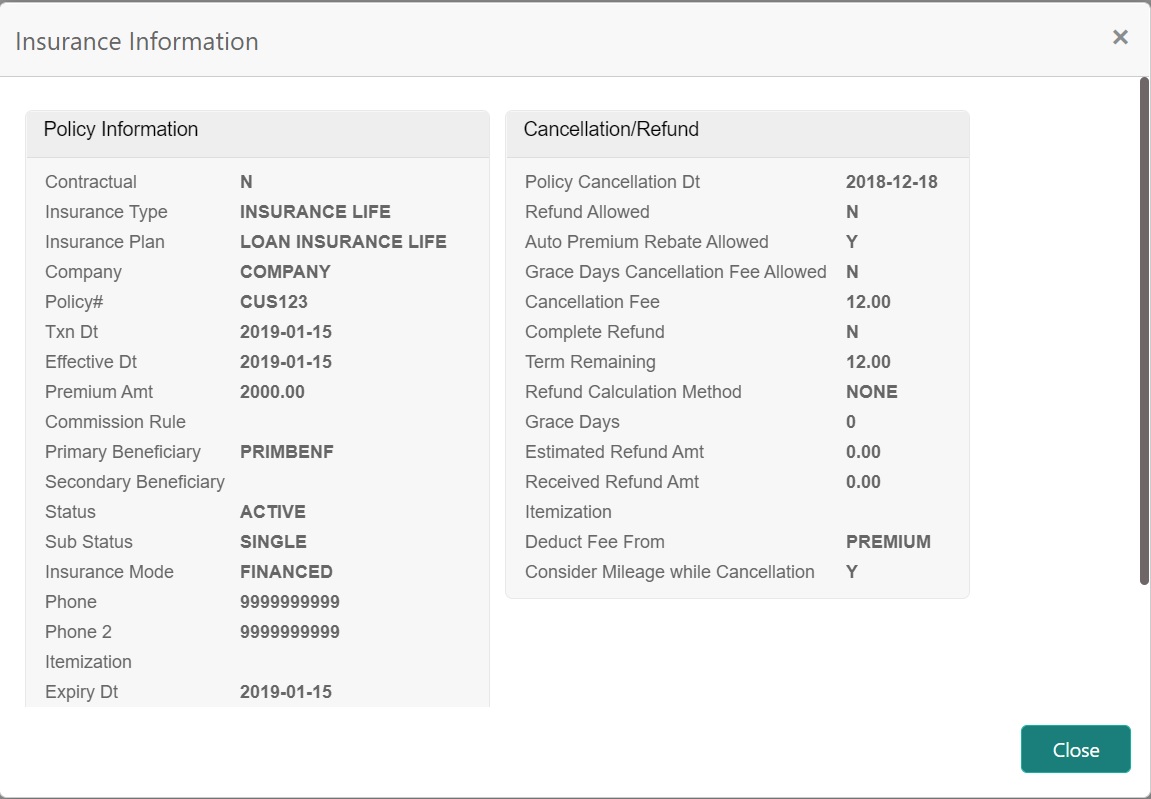
This section displays the Insurance Information details that was entered while funding an application during origination. The Insurance Information screen displays the details of all financed insurances, including cancellation and refund information whenever applicable.
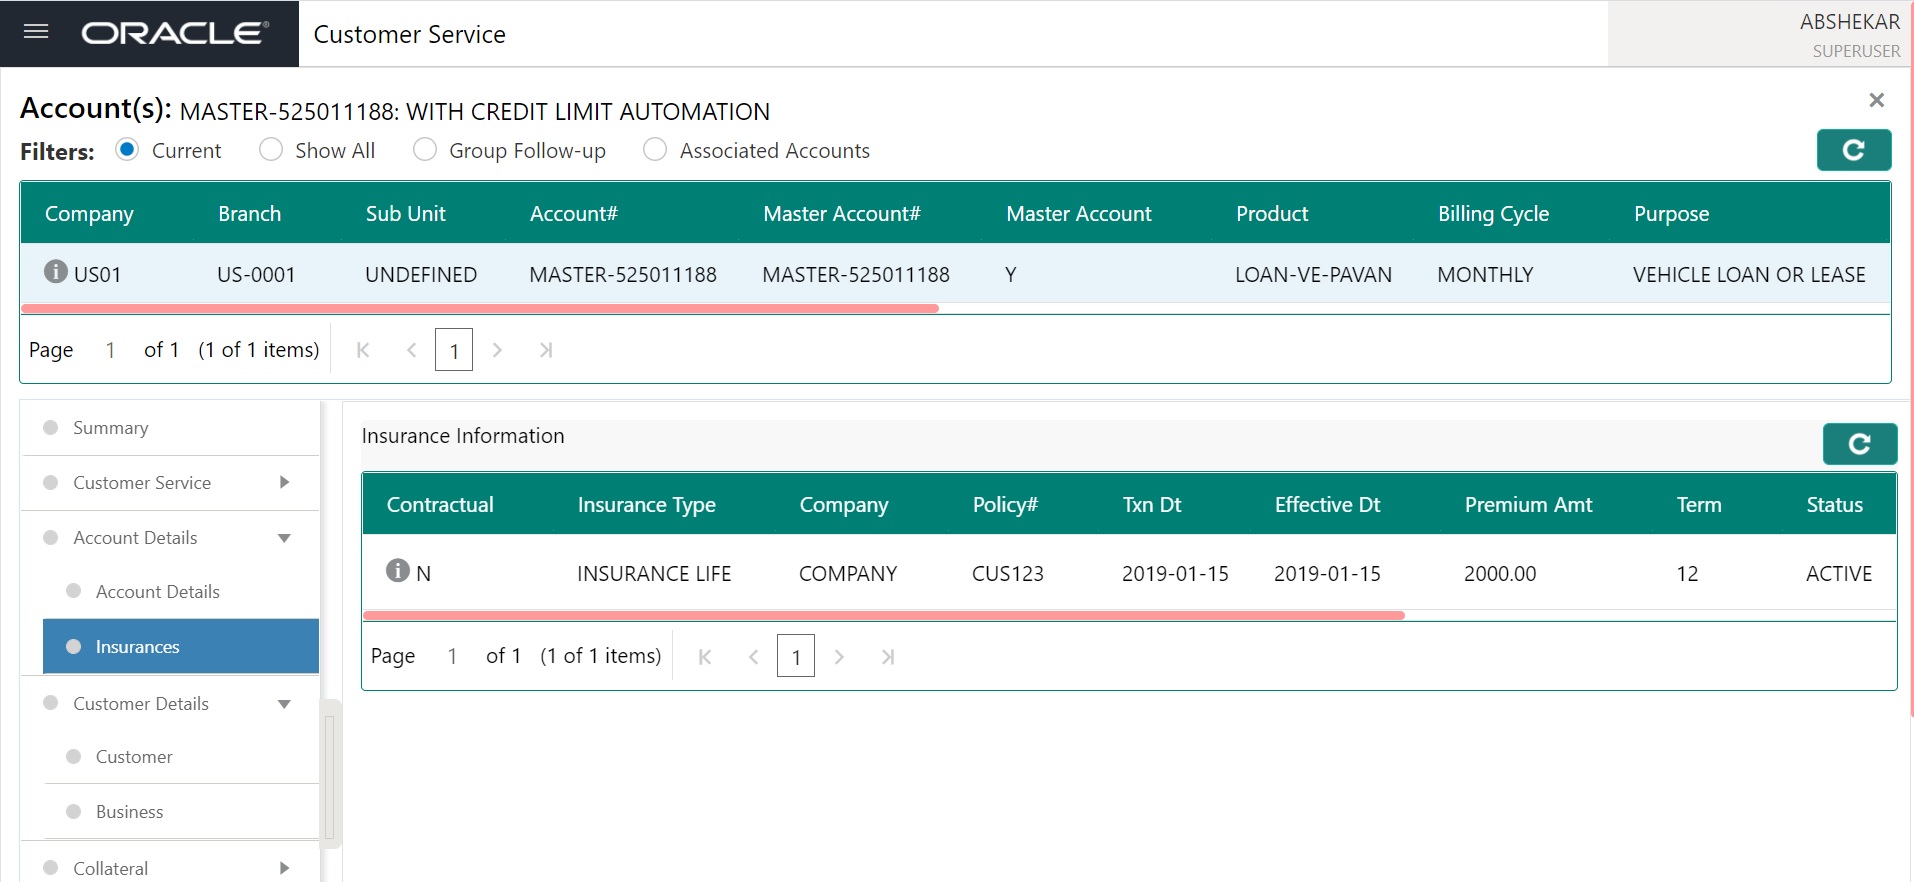
View the following information:
In this field: |
View: |
Contractual |
If selected, indicates that the insurance policy is required by contract. |
Insurance Type |
The insurance type. |
Insurance Plan |
The insurance plan. |
Company |
The insurance company. |
Policy# |
The insurance policy number. |
Txn Dt |
The transaction date. |
Effective Dt |
The insurance effective date. |
Premium Amt |
The insurance premium amount. |
Term |
The insurance term. |
Status |
The insurance status. |
Deduct Fee From |
View the option defined in setup screen (Setup > Administration > Products > Insurances) to deduct the cancellation fee. ‘Premium Amount’ indicates fee is deducted upfront before computation and ‘Rebate Amount’ indicates fee is deducted after computation. |
Auto Premium Rebate Allowed |
Indicates if Auto Premium Rebate is allowed. |
Clicking on ‘i’ button, the insurance details are displayed in popup window:
4.7.2.1 Create Tracking
You can define and maintain the insurance tracking parameters in the Create Tracking section.
- In the Insurance Information section, scroll to the right and select ‘Create Tracking’ from more options menu. However note that, Create Tracking option is available only for first time and later you can View and Edit the created tracking parameters.

- The Create Tracking window displays Sub-Parameter, Parameter and Value fields. Update the ‘Value’ for required parameters and click Add.
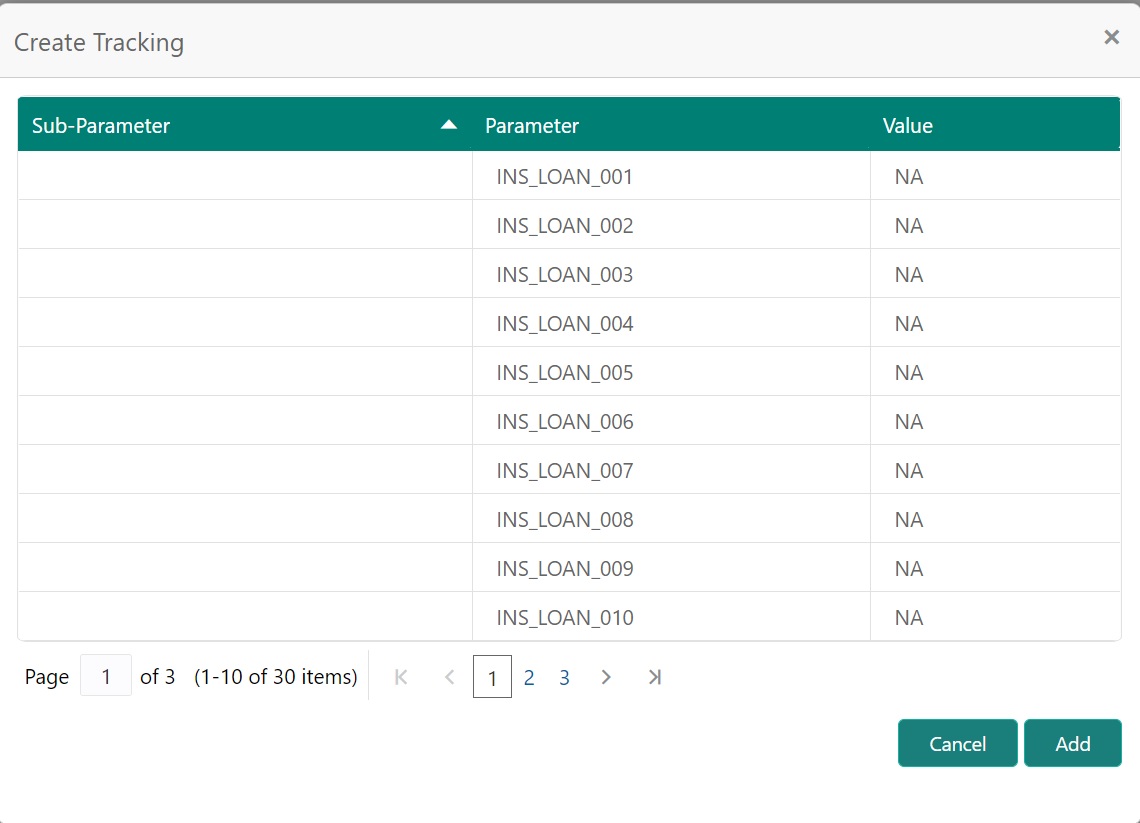
- Once done, click ‘refresh’ button to update the tracking details.
4.8 Customer Details
The Customer Details screen facilitates to view and maintain Customer and Business related information associated to the account.
This screen consists of two sub tabs:
- Customer
- Business
If the selected account belongs to an individual Customer, this tab is displayed as ‘Customer Details’ and if there is no customer linked and only a business is involved in the account such as commercial leasing, this tab is displayed as ‘Business Details’. In case both Customer and Business are involved in the account, this is still displayed as ‘Customer Details tab’ and both the sub tabs ‘Customer’ and ‘Business’ are displayed.
Using the Customer sub tab, you can view and update the existing Customer/Business details. When an existing record is updated and saved, the same becomes the current/primary details of the customer and the current indicator is set to ‘Y’ by default. In such a case, the previous customer/business details are disabled (set to N), you can select the ‘Show All’ check box in Customer Information section to view the disabled records along with current record.
4.8.1 Customer
Customer Details screen displays the information gathered on application entry process regarding the customer and customer’s address, employment data, phone numbers and credit score. Using this screen, you can update or add to a customer’s address, employment information, or phone listing. Whenever you add or edit the details, a system generated comment will be posted in the account to keep record of old and new details.
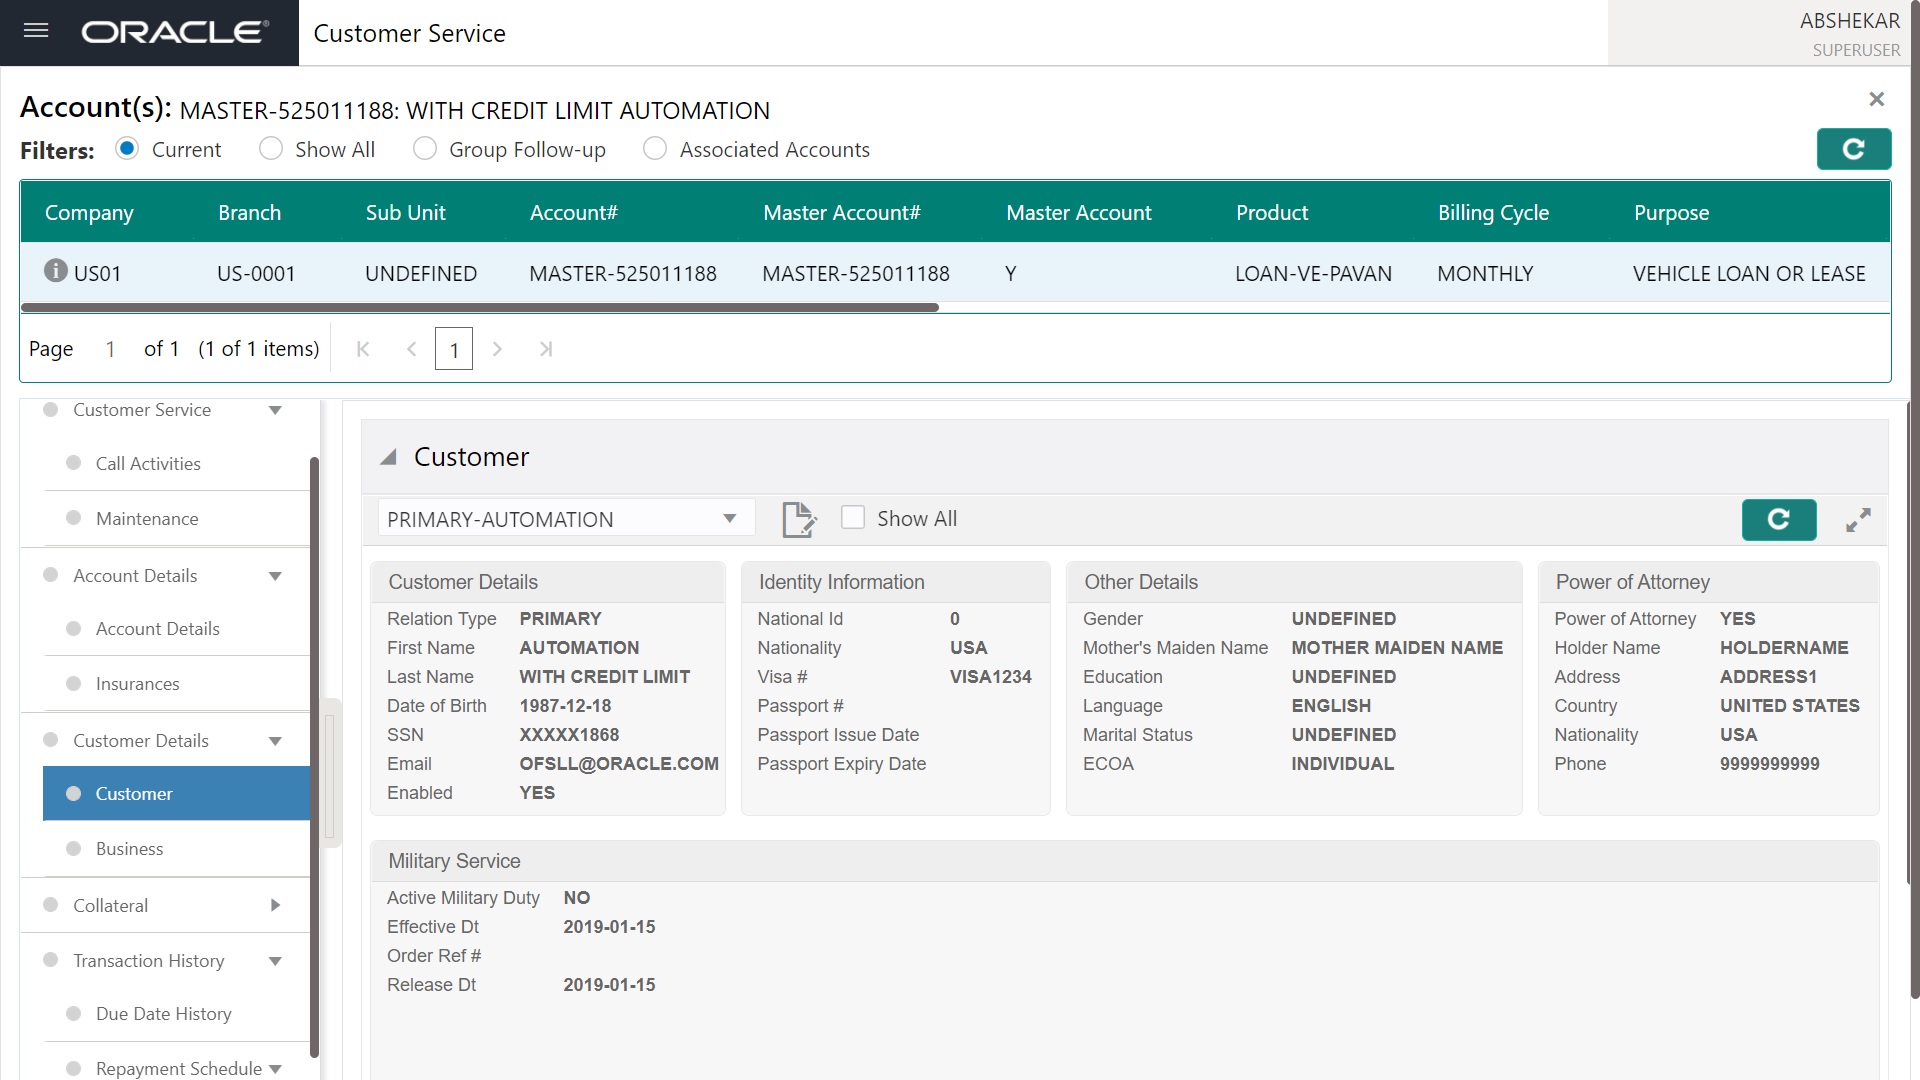
In the Customer section, you can view the following fields information:
In this field: |
View this: |
Customer Details section |
|
Relation Type |
The account relation type which are attached to account and are enabled (excluding deceased customer relations). |
First Name |
Customer’s first name. |
Last Name |
Customer’s last name. |
Date of Birth |
Customer’s date of birth. |
SSN |
Customer’s social security number. If the organizational parameter UIX_HIDE_RESTRICTED_DATA is set to Y, this appears as a masked number; for example, XXX-XX-1234. |
Email address details. |
|
Enabled |
Indicates if customer record is enabled. |
Identity Information section |
|
National ID |
Customer’s national identification. |
Nationality |
Customer’s nationality. |
Visa # |
Customer’s visa number. |
Passport # |
Customer’s passport number. |
Passport Issue Date |
Passport issue date. |
Passport Expiry Date |
Passport expiry date. |
Gender |
The customer’s Gender |
Mother’s Maiden Name |
Mother’s maiden name |
Education |
Customer’s Education |
Language |
Customer’s language |
Marital Status |
Customer’s marital status |
ECOA |
The Equal Credit Opportunity Act code. |
Power of Attorney section |
|
Power of Attorney |
The POA indicator |
Holder Name |
The holder’s name |
Address |
Attorney holder’s address |
Country |
Attorney holder’s country |
Nationality |
Attorney holder’s nationality |
Phone |
Attorney holder’s Phone |
Military Service |
|
Active Military Duty |
Active military duty indicator. If selected, indicates that customer is on active military duty and may qualify for rates in accordance with the Service members Civil Relief Act of 2003 (SCRA). |
Effective Dt |
Active Military Duty effective Date |
Order Ref# |
Active Military Duty Order ref# |
Release Dt |
Active Military Duty release Dt |
4.8.1.1 Address Information
This section indicates the Address details of the customer. For more details on the section, refer to ‘Address Information’ section.
4.8.1.2 Telecom Information
This section indicates the Telecom details of the customer. For more details on the section, refer to ‘Telecom Information’ section.
4.8.1.3 Employment Information
This section indicates the Employment information details of the customer. For more details on the section, refer to ‘Employment Information’ section.
4.8.1.4 Credit Score Information
This section indicates the following Credit Score Information details of the customer.
Credit Limit Details section |
|
Max Limit |
View the maximum credit limit amount sanctioned for this customer. |
Total Utilized Amt |
View the total credit limit amount utilized. |
Available Amt |
View the credit limit available amount from the sanctioned limit. |
Hold Amt |
View the credit limit amount on Hold. |
Suspended Amt |
View the credit limit amount suspended. |
Grade |
View the grade of the customer. |
Max Late Charge |
View the maximum amount of late charge that can be levied for this customer. However, there is no system validation performed based on the amount specified. |
Limit Expiry |
View the credit limit expiry date. |
Limit Next Renewal |
View the date when credit limit has to be renewed. |
Utilization Details |
|
% of Utilization |
View the percentage of credit limit used to fund the account against the customer. |
Utilization Amount |
View the amount of credit limit contribution of customer towards Account current balance. |
4.8.2 Business
If this is a SME or Business account, information gathered on the application entry process regarding the business and business’s address, partners data, affiliates data, phone numbers and business credit score appears on the Customer Service screen’s Business sub tab.
Using the Business sub tab, you can add new business details to an account and/or update the existing business’s address, partners and affiliates information, or phone listing. New business details can be added even after an account is created and is usually done in case when the existing business is taken over by another business.
On adding a new business, the Business # is auto generated by the system and other details such as business’s Addresses, Telecoms, Partners, credit score and so on are to be manually updated. Also, if there is a pre-defined Customer Credit Limit allocation to an existing business, the same is reinstated to new business automatically.
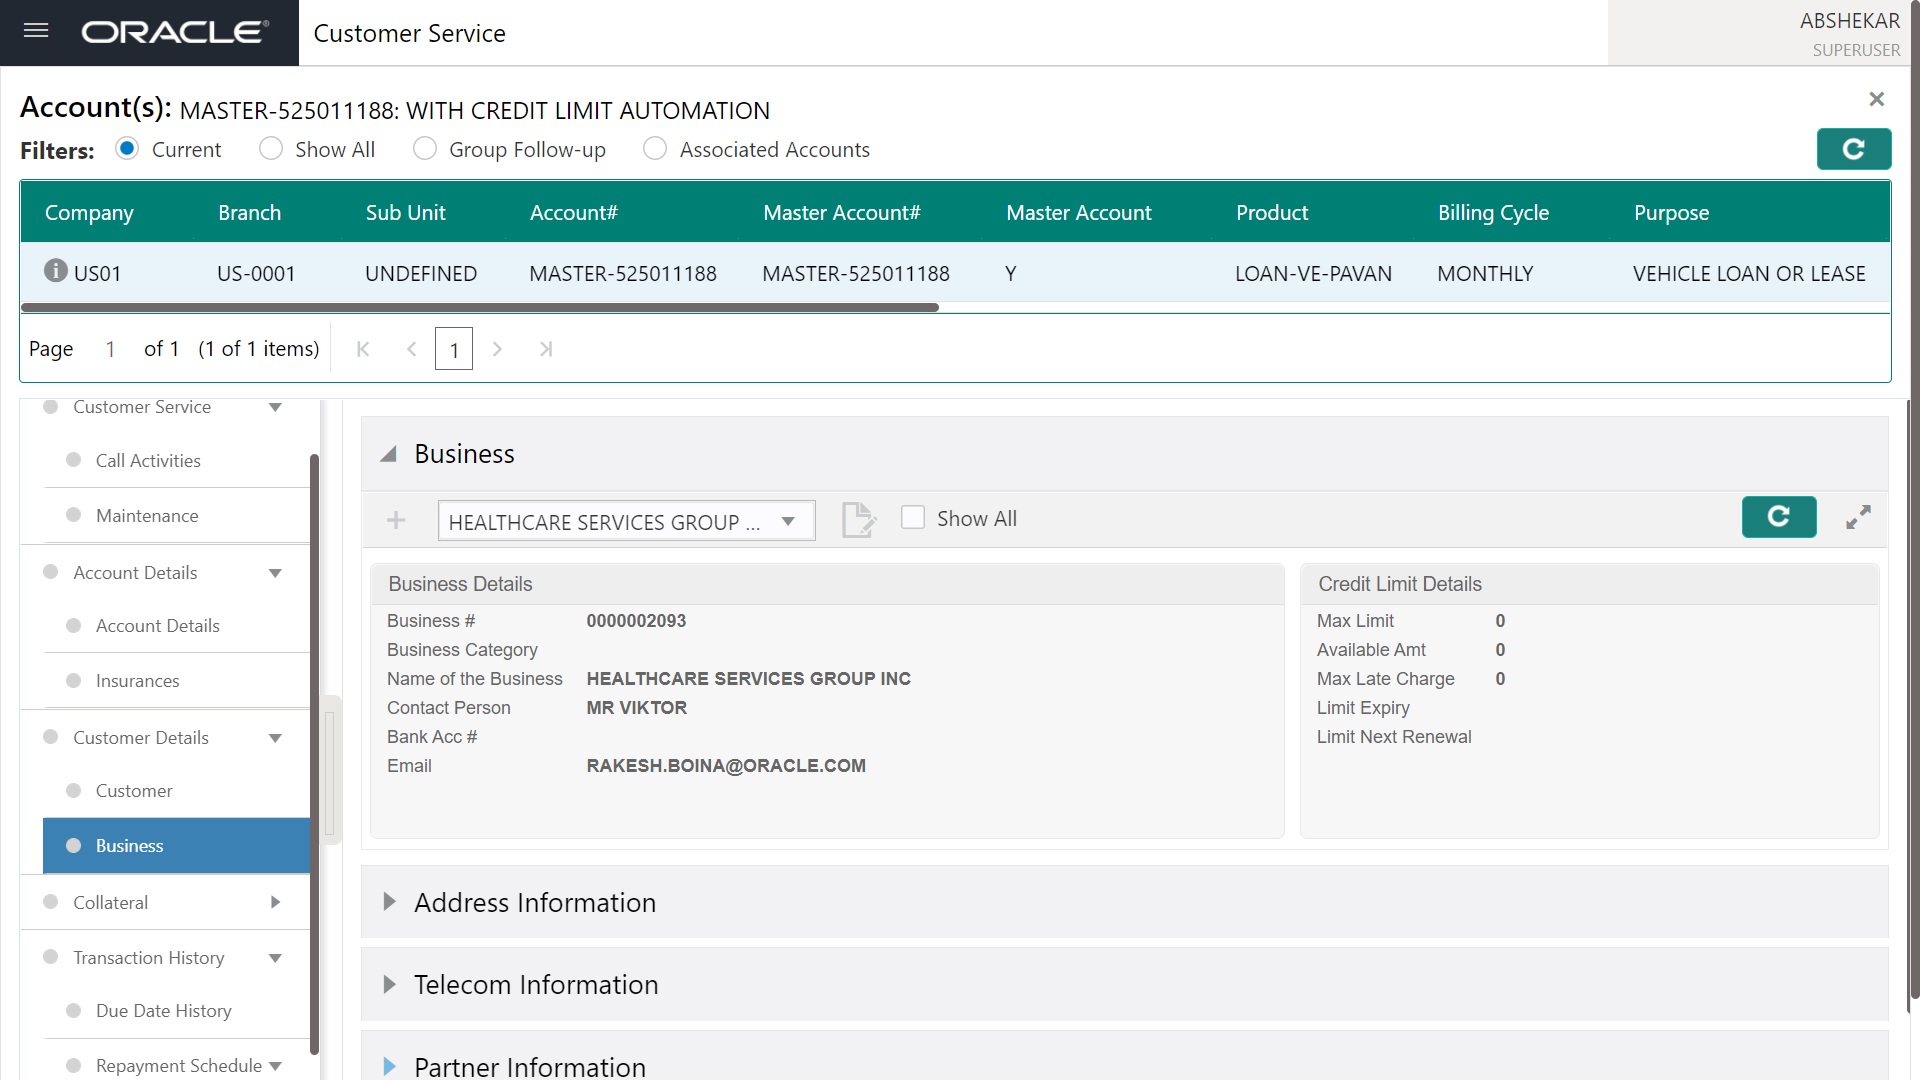
In the Business Details section, you can add and view the following details. A brief description of the fields are given below:
In this field: |
View this: |
Business # |
View the system generated business number. This field is displayed only while you update existing Business details. |
Business Category |
Select the Business category from the drop-down list. |
Name of the Business |
Specify the name of business. |
Contact Person |
Specify the contact person at the business. |
Bank Acc # |
Specify the bank account number of the business. |
Avg Checking Balance |
Specify the average checking balance. |
Business’s e-mail address. |
|
Credit Limit Details section |
|
Max Limit |
View the maximum credit limit amount sanctioned for this customer. |
Total Utilized Amt |
View the total credit limit amount utilized. |
Available Amt |
View the credit limit available amount from the sanctioned limit. |
Max Late Charge |
View the maximum amount of late charge that can be levied for this customer. However, there is no system validation performed based on the amount specified. |
Limit Expiry |
View the credit limit expiry date. |
Limit Next Renewal |
View the date when credit limit has to be renewed. |
4.8.2.1 Address Information
This section indicates the Address details of the Business. For more details on the section, refer to ‘Address Information’ section.
4.8.2.2 Telecom Information
This section indicates the Telecom details of the Business. For more details on the section, refer to ‘Telecom Information’ section.
4.8.2.3 Partner Information
- This section indicates the partner details of the Business and displays the following information::
In this field:
View this:
Current Permission to Text
Check this box if customer has provided permission to contact through text message.
Phone
Partner’s phone.
SSN
Partner’s social security number.
4.8.2.4 Affiliates sub tab
This section indicates the In Business Affiliates information. A brief description of the fields are given below:
In this field: |
View this: |
Name of the Business |
Affiliate’s business name. |
Legal Name |
Affiliate’s legal name. |
Ownership (%) |
Affiliate’s percentage of ownership. |
4.8.2.5 Business score
Business score or business credit score is a numeric summary of business credit history compiled by the three major credit bureaus - Equifax, Trans Union, and Experian. This is obtained during Credit bureau pull and is one of the indicator for a business account in the entire credit report.
The Business Score tab displays all the business score data maintained in the system. Though the business score is recorded while funding, the same can be captured and updated regularly during the life cycle of business account to get a snapshot of credit score movements in recent history.
The business score can be updated on required intervals by posting ‘Business Credit Score Update’ non monetary transaction and the data is populated into this screen. For more information, refer to Customer / Business Credit Score Update section.
A brief description of the fields are given below:
In this field: |
View this: |
Score Received Dt |
View the date when business score was received from credit bureau. |
Source |
View the name of credit bureau from where the credit score is received. |
Score |
View the business credit score value. |
4.9 Collateral
Collateral Management enables the user to record a new collateral, evaluate it, and re-evaluate the existing collateral.
Collateral Management System helps to minimize the frauds which involve the same collateral being pledged for different mortgage.
This screen consists of the following:
- Home / Vehicle
- Seller
4.9.1 Home / Vehicle
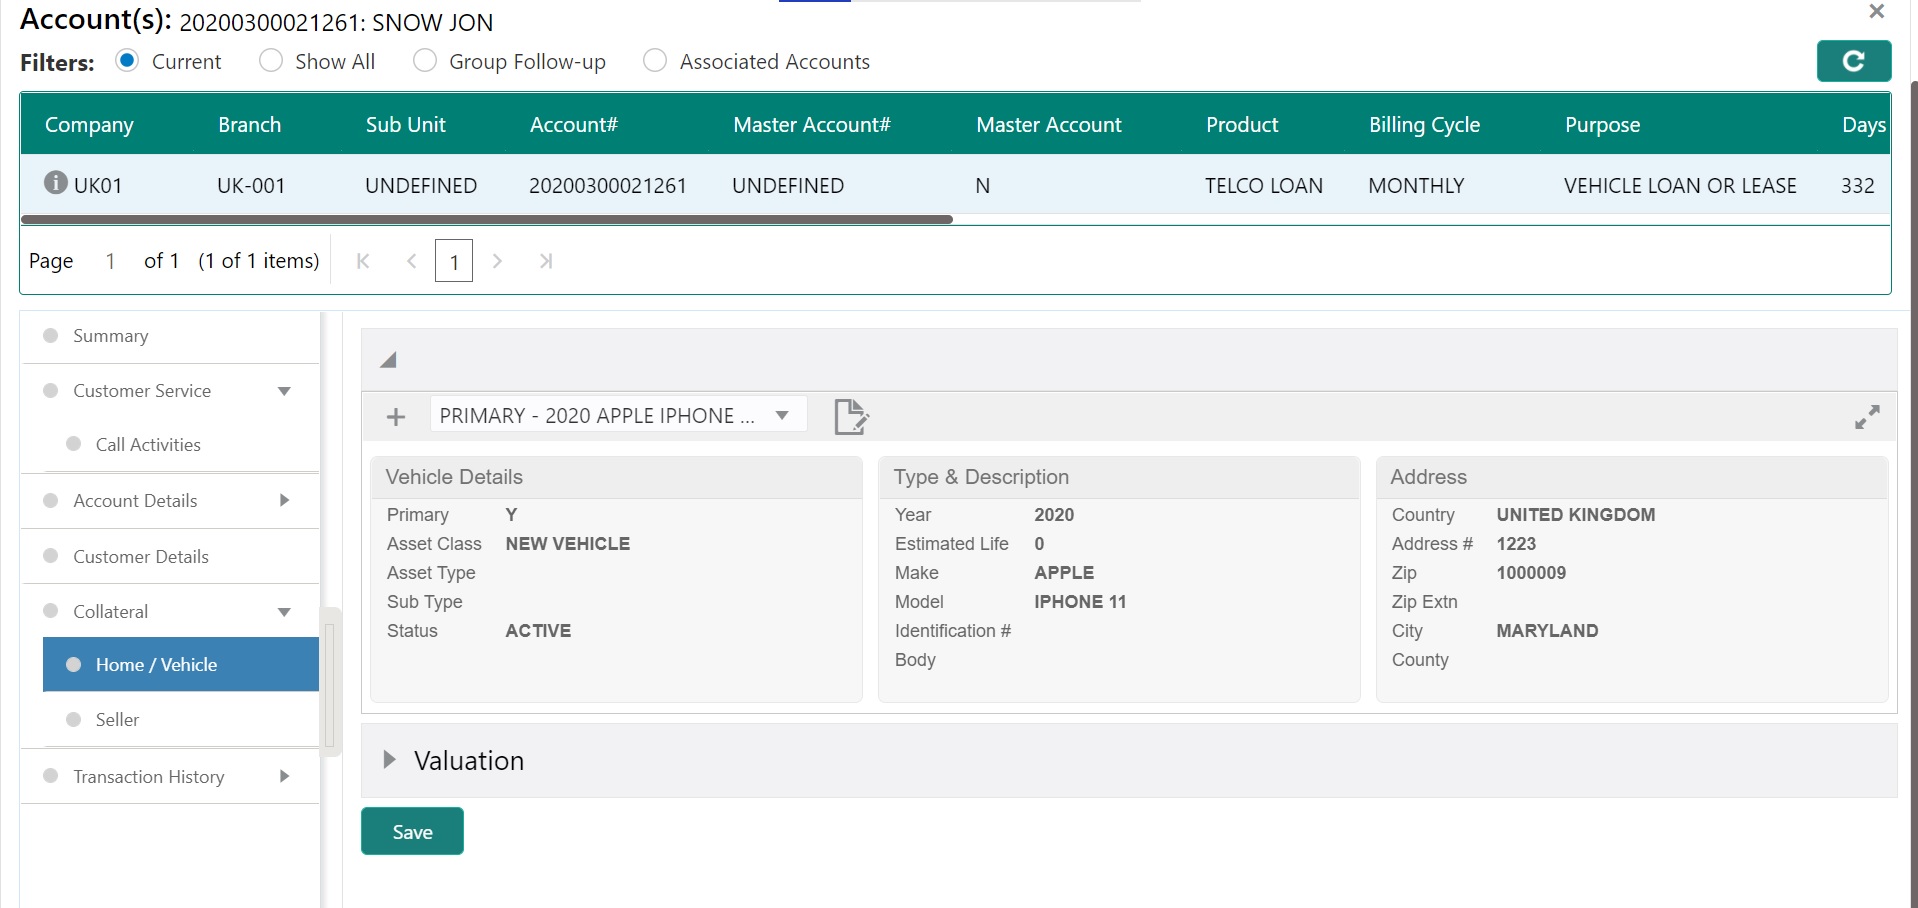
If the account’s collateral is a vehicle, the Collateral screen opens at Vehicle tab:
If account’s collateral is a home, the Collateral screen opens at the Home tab:
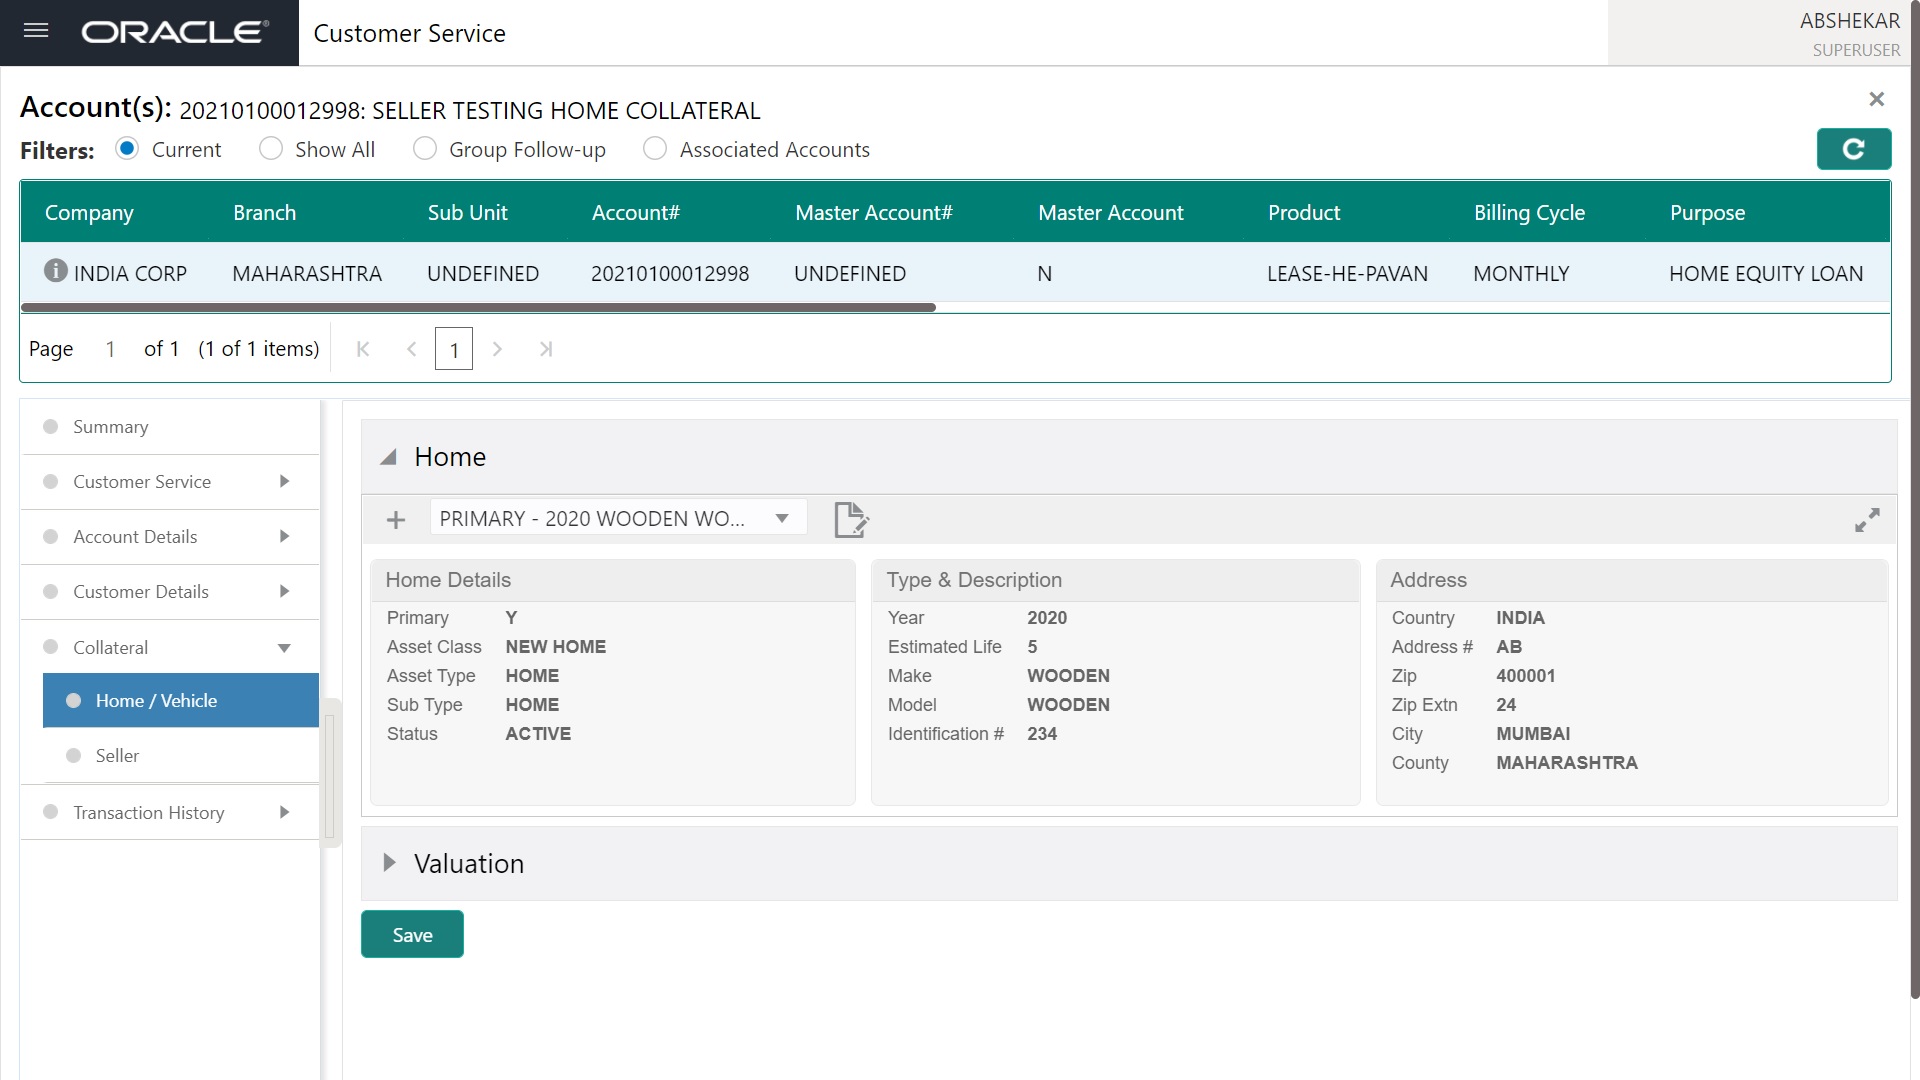
Click ‘+’ to add the Home / Vehicle collateral details:
4.9.1.1 Vehicle Details
In this field: |
View this: |
Primary |
If selected, then this asset is the primary collateral. |
Substitution |
Select this option to allow collateral substitution. |
Asset Number |
View the asset number which is automatically generated. |
Asset Class |
Select the asset Class from the drop-down list. |
Asset Type |
Select the asset type. |
Sub Type |
Select the asset sub type. |
Status |
Select the vehicle status. |
4.9.1.2 Type & Description
In this field: |
View this: |
Select Make and Model |
Select the Make and Model number of asset from the drop down list. |
Year |
Specify the year of the vehicle. |
Estimated Life |
Specify the estimated life of the asset. |
Make |
Specify the make of the vehicle. |
Model |
Specify the model of the vehicle. |
Identification # |
Specify the vehicle identification number. |
Description |
Specify the description of the asset. |
Condition |
Select the condition of the asset from drop-down list. |
4.9.1.3 Lien Details
In this field: |
View this: |
Lien Status |
Select the type of Lien action. |
Lien Event Dt |
Select the lien event date from the calendar. |
Second Lien Holder |
Specify the name of second lien holder. |
Comments |
Specify additional details if any. |
Lien Release Entity |
Select the lien release entity from the drop-down list. The list displays the following values: - Customer - Producer - Others - Business Note: If ‘Others’ is selected as the Lien Release Entity, ensure that the Entity Name and Address details are updated correctly since the same is not auto-validated with the data maintained in the system. |
Entity Name |
If you have selected the lien release entity as ‘Customer’ or ‘Producer’, system automatically filters entity name list with corresponding customer accounts or producer. Similarly, if the lien release entity is selected as ‘Business’ system displays the Business name if the asset is linked to Business account. Select the required entity name from the drop-down list. If you have selected the lien release entity as ‘Others’ specify the entity name. |
4.9.1.4 Address
In this field: |
View this: |
Country |
Select the country. |
Address # |
Specify the address number. |
Address Line 1 |
Specify the first address line. |
Address Line 2 |
Specify the second address line. |
Zip |
Select the zip code. |
Zip Extn |
Specify the zip extension. |
City |
Specify the city. |
State |
Select the state. |
County |
Select the county. |
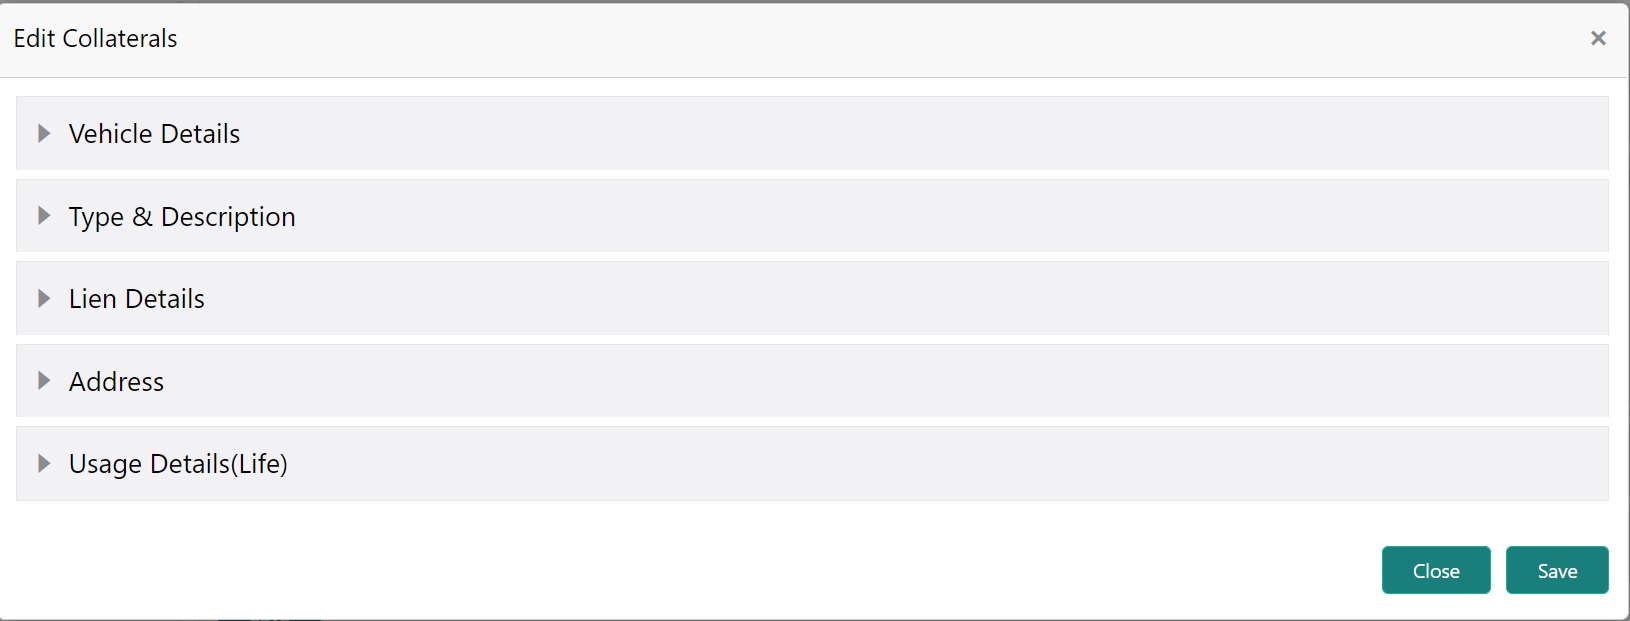
4.9.1.5 Usage Details(Life)
The details maintained in this section is used to calculate ‘EXCESS USAGE FEE’ in payoff quote and termination transactions.
In this field: |
View this: |
Start |
View/specify the start unit of asset usage. |
Base |
View/specify the base units. |
Extra |
View/specify the extra usage units. |
Total |
View/specify the total usage units. |
Clicking Edit option allows to edit the following details:
4.9.1.6 Valuation Details
The Valuation sub section contains information about the value of the asset. The Values section enables you enter the value of the asset. The Addons sub tab records information about any add ons associated with the collateral.
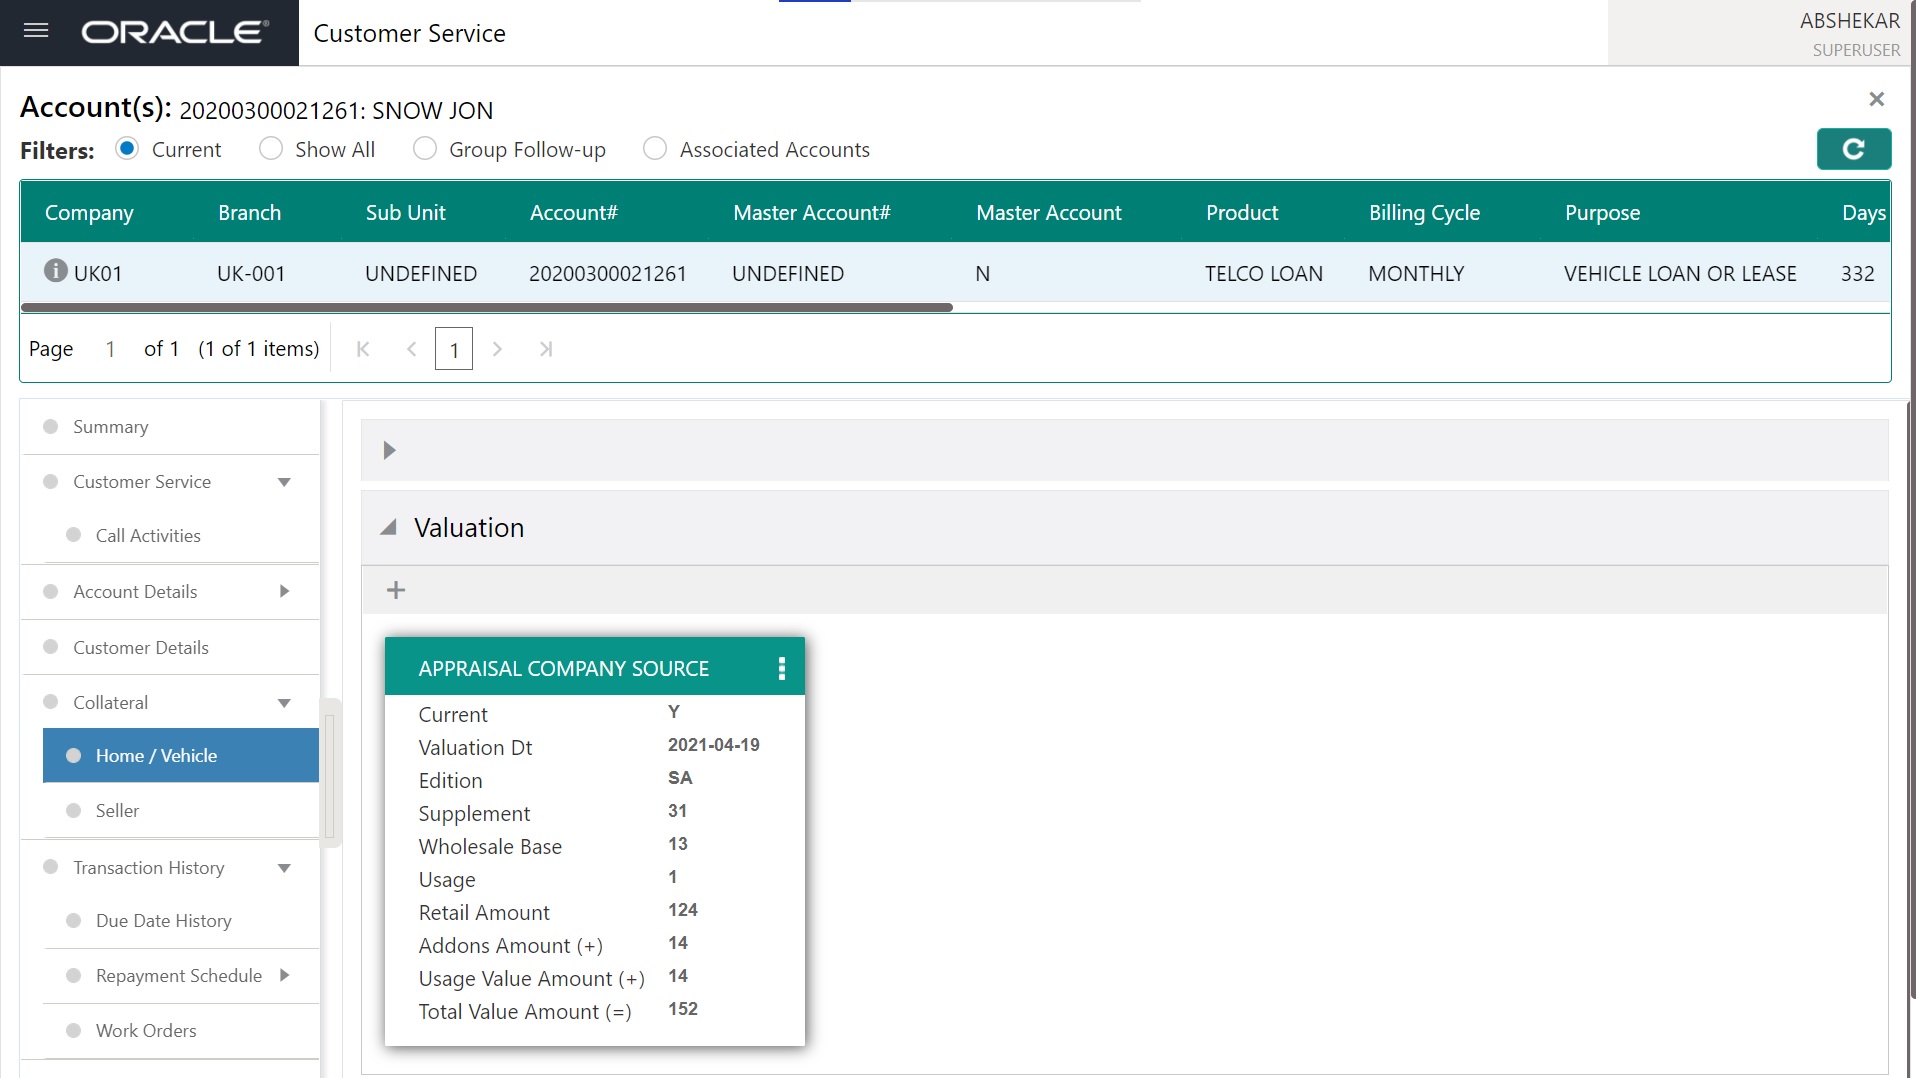
A brief description of the fields is given below:
Field: |
Do this: |
Valuations section |
|
Current |
Select if this is the current valuation. |
Valuation Dt |
Specify the valuation date. |
Source |
Select the valuation source. |
Edition |
Specify the valuation edition. |
Supplement |
Specify the valuation supplement. |
Wholesale |
|
Wholesale Base |
Specify the wholesale value. |
Usage |
Specify the usage value; that is, the monetary effect that current mileage has on the value of vehicle. |
Retail |
|
Retail Amount |
Specify the retail value. |
Addons + |
View the add-ons value. |
Usage Value + |
Specify the usage. This pertains to product and usually is entered as the current mileage on vehicle. |
Total Value = |
View the total value. |
4.9.1.7 Addons
The Addons sub tab records information about any add ons associated with the collateral.
From the options menu, select Addons as indicated below:
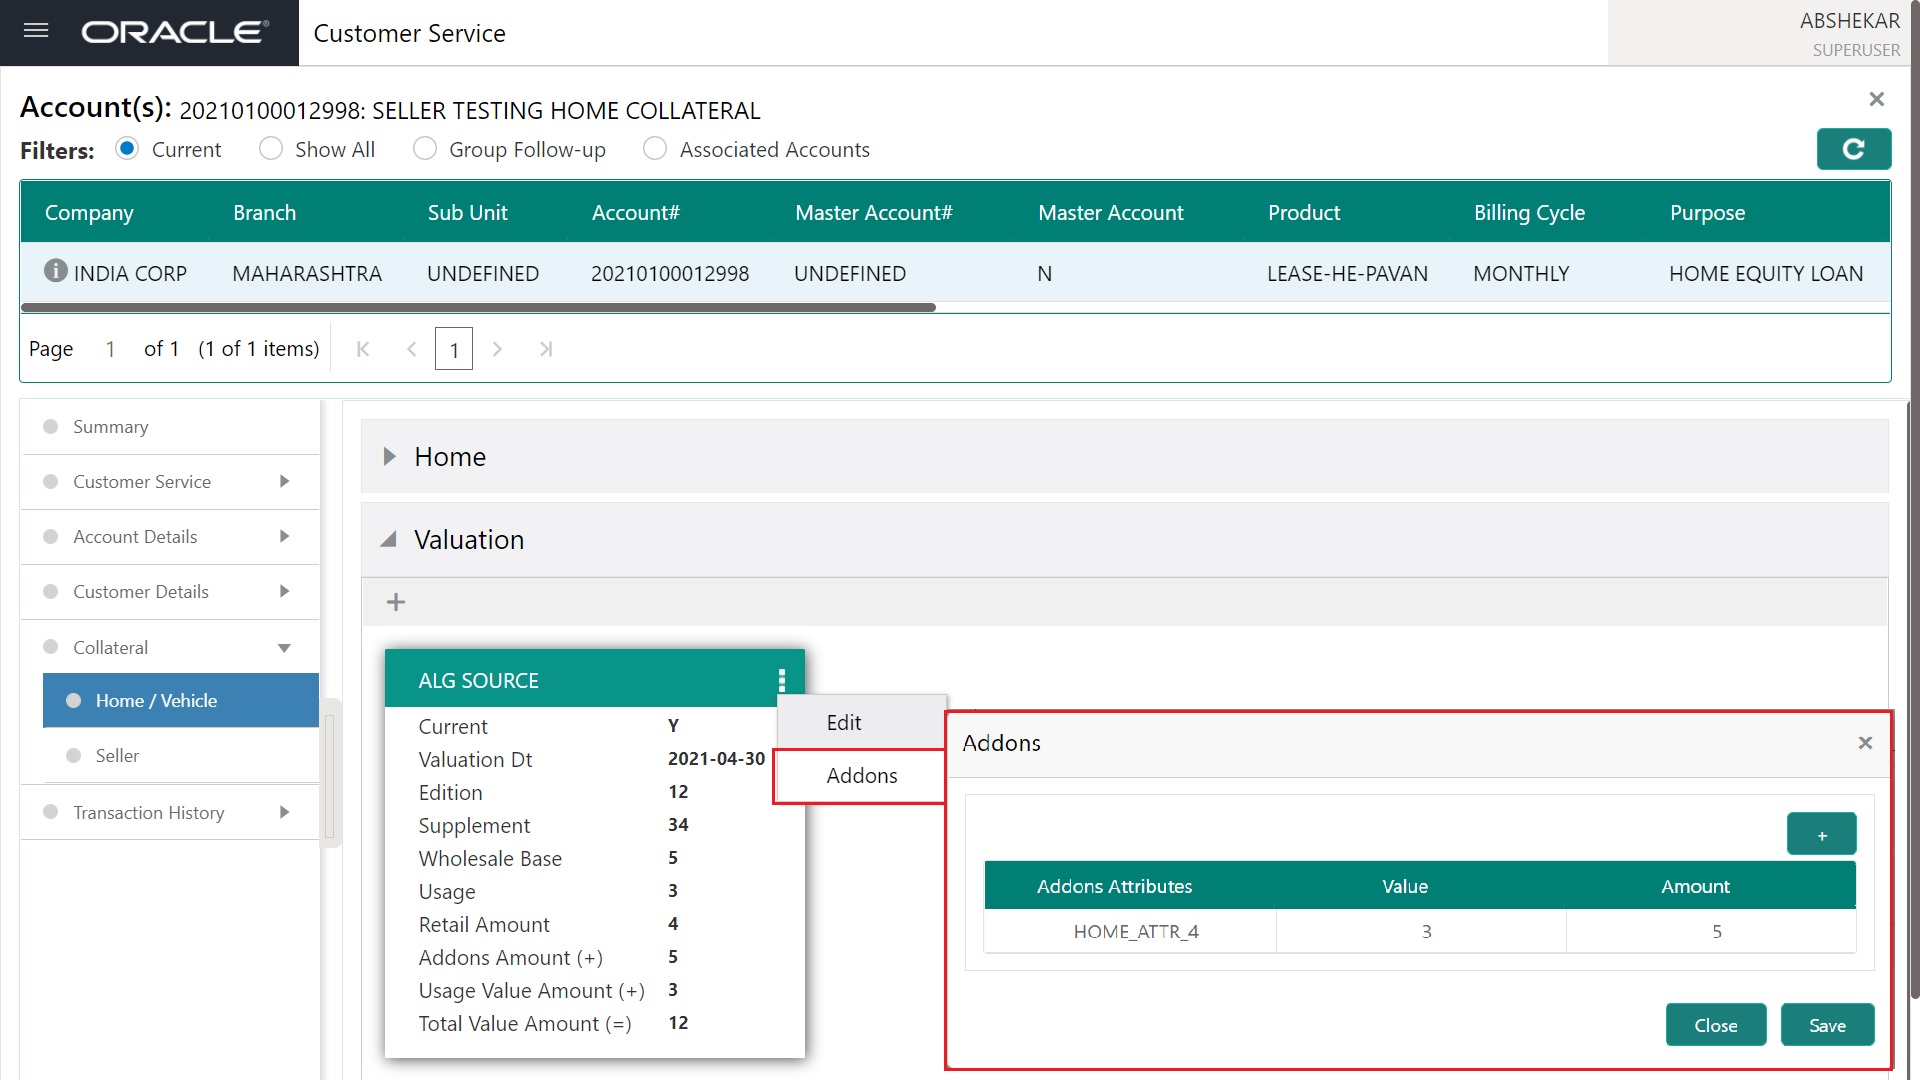
Click + to create new addon. A brief description of the fields is given below:
Field: |
Do this: |
Addons Attributes |
Select the Addons Attributes from the drop-down list. |
Value |
Specify the value of the addon attribute. |
Amount |
Specify the addon amount. |
4.9.1.8 Usage Charge Matrix
The Usage Charge Matrix sub tab allows you to define and maintain different chargeable slabs based on the combination of Billing Cycle and Charge Type. The details maintained here are used for billing calculation based on a particular asset usage.
For more information on how OFSLL handles Usage based leasing, refer to Appendix - Usage Based Leasing chapter and for Rental based leasing, refer to ‘Rental Agreement’ section in Lease Origination User Guide.
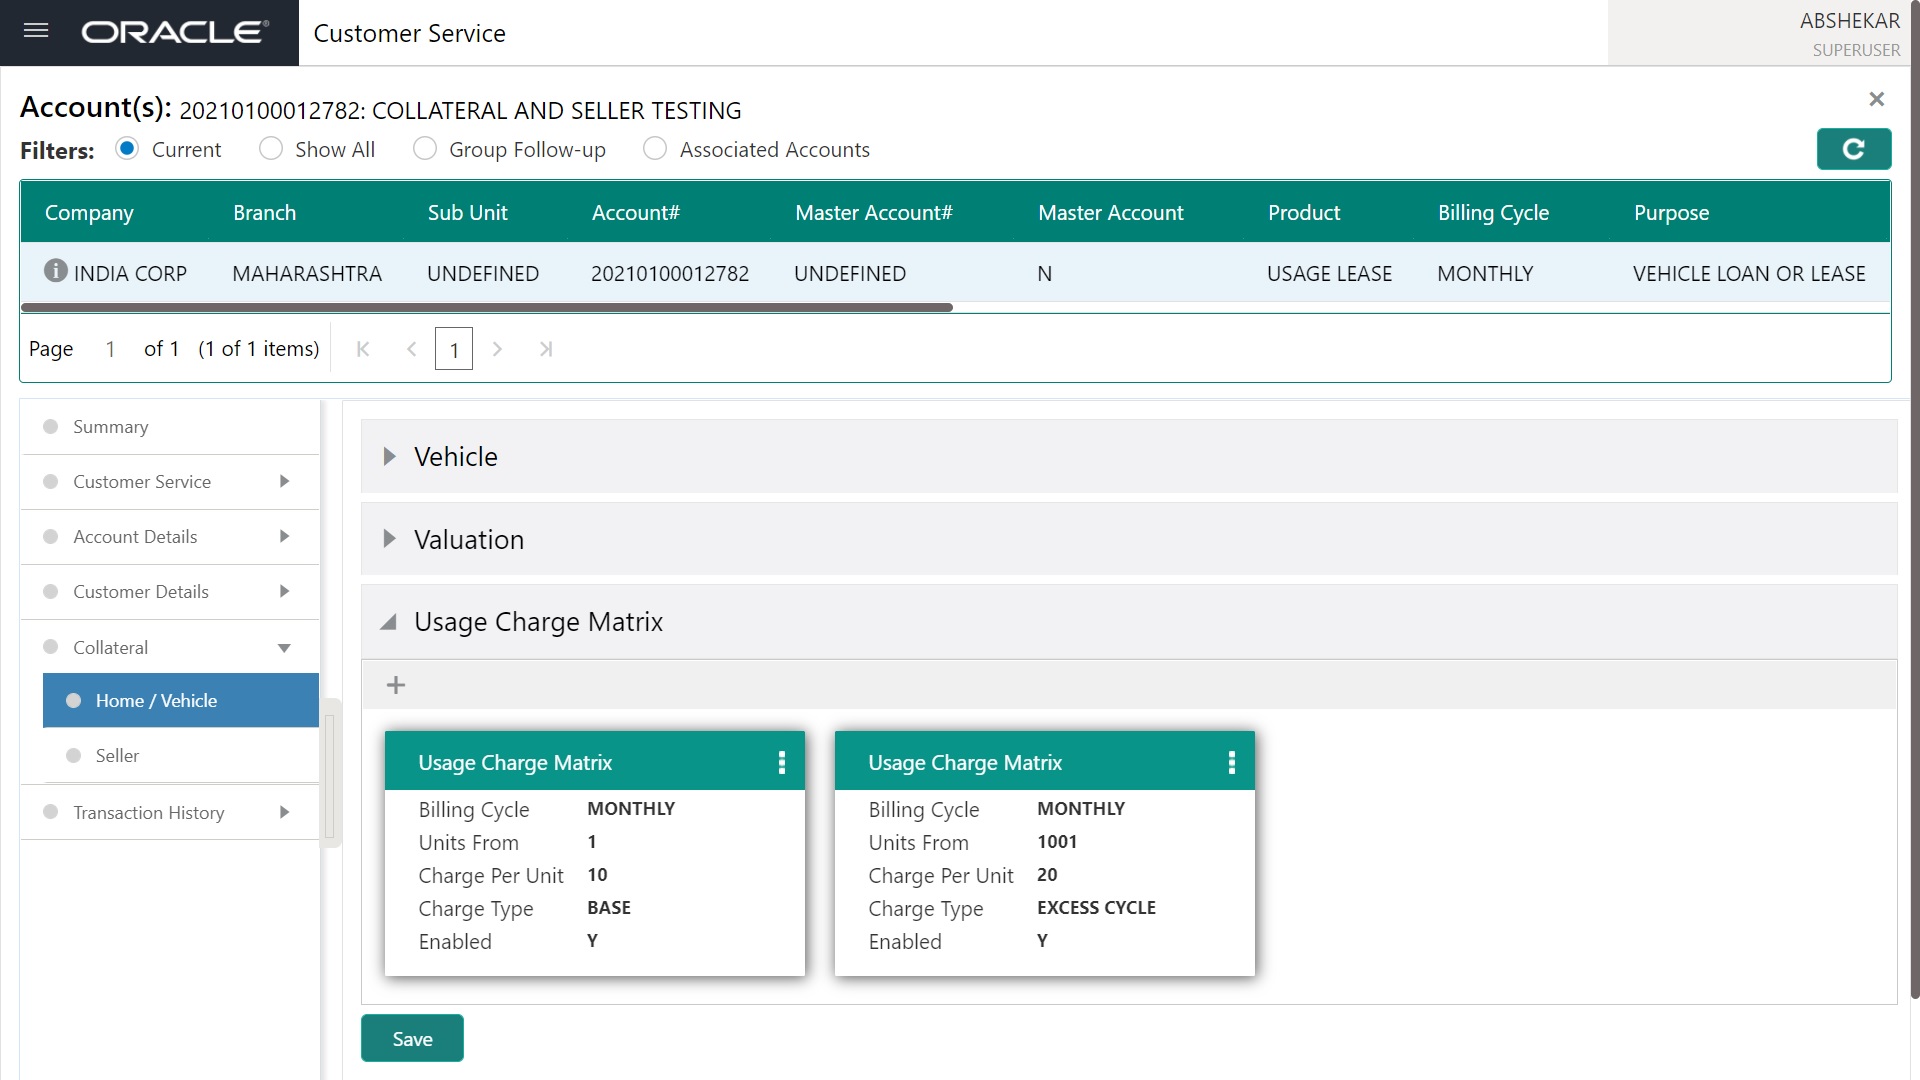
In the ‘Usage Charge Matrix’ section, you can view, add and edit the asset usage details.

Click Add, to add the following information A brief description of the fields is given below:
In this field: |
View this: |
Billing Cycle |
Select the frequency of the billing cycle for the asset from the drop-down list. |
Units From |
Specify the minimum number of units from which the current usage charge matrix is applicable. |
Charge Per Unit |
Specify the amount to be charged for every unit. |
Charge Type |
Select the Charge Type as one of the following from the drop-down list. The list is displayed based on CHARGE_TYPE_CD lookup. - BASE (Units considered as base and chargeable at base rate) - EXCESS CYCLE (Units beyond base units and chargeable considering excess cycle) - EXCESS LIFE (Units exceeding the total contracted units and chargeable considering excess life cycle) Excess life is not applicable for Rental agreement type. |
Enabled |
Check this box to enable the charge matrix for usage calculation. |
You can click ‘Edit’ to update the Usage Charge Matrix details:

4.9.2 Seller
The Seller section enables you to view seller details of the collateral. You can also view the address of the seller but cannot edit or modify details of the seller.
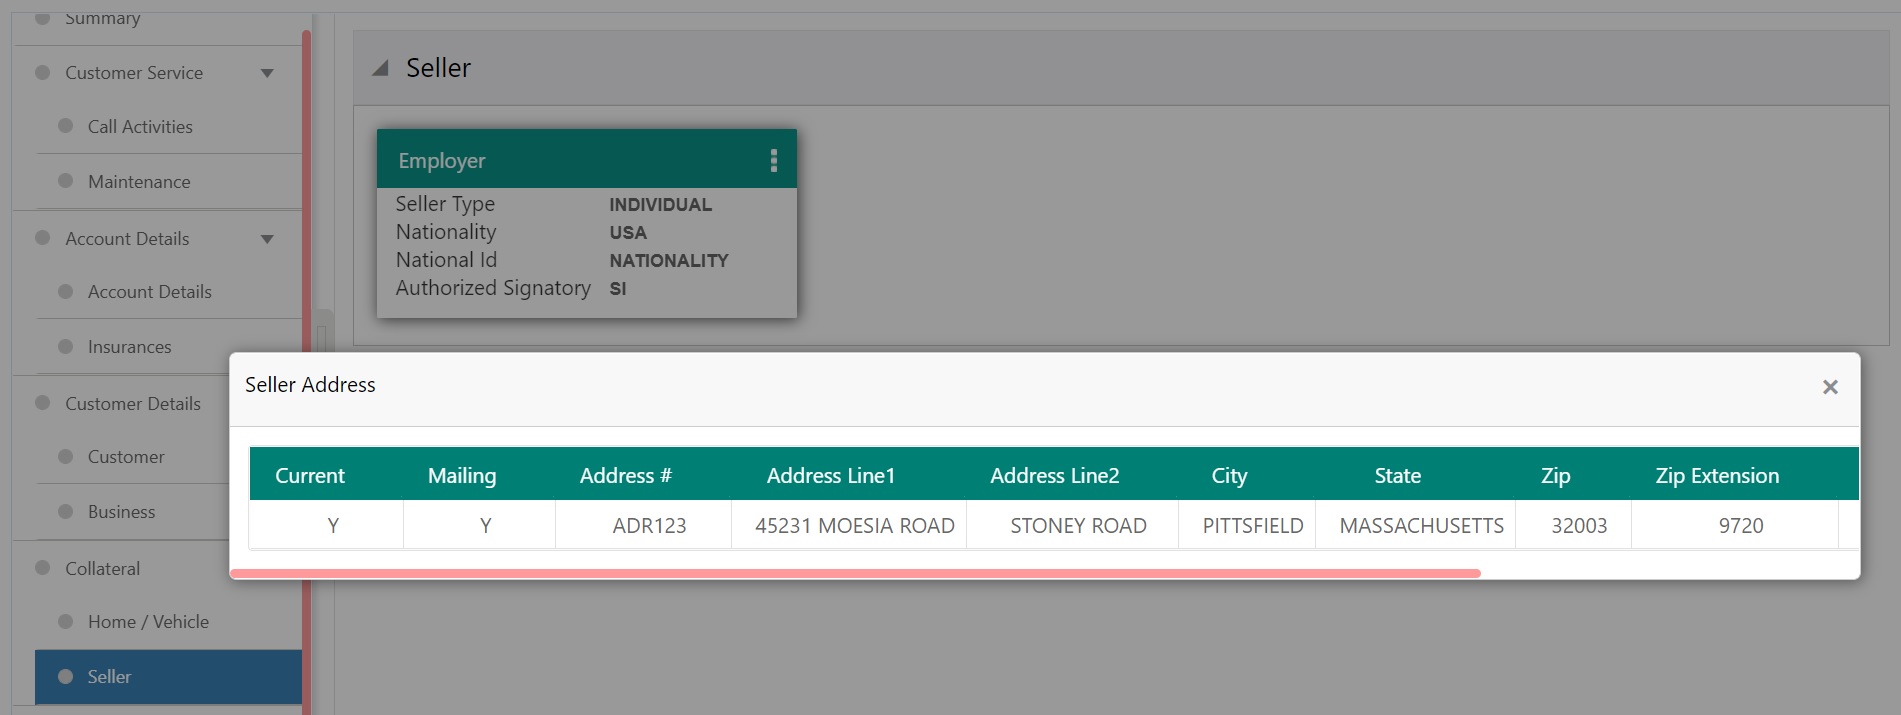
- In Seller Details section, click View and view the following:
In this field:
View this:
Seller Details
Seller Type
The seller type.
Seller Name
The seller name.
Nationality
The nationality of the seller.
National Id
The national Id of the seller.
Authorized Signatory
The authorized signatory of the seller.
- In Seller Address section click View and view the following:
Seller Address
Mailing
If selected, indicates that this address is the mailing address.
Current
If selected, indicates that this address is the current address.
Country
The seller’s country name.
Address #
The seller’s address.
City
The seller’s city name.
State
The seller’s state name.
4.10 Transaction History
The Transaction History screen displays the list of payment related records associated with the account.
The Transaction History screen consists of the following:
- Due Date History
- Repayment Schedule
- Work Orders
4.10.1 Due Date History
The Due Date History section provides a delinquency history, payment, by displaying a history of all due dates, along with when actual payment was made for that due date and the subsequent balance. If a payment was delinquent, Due Date History section displays the number of days the customer was delinquent against each due date.
Due Date History sub tab displays all the dues that have crossed the system date and also the history that is currently available in Transaction History > Due Date History sub tab.
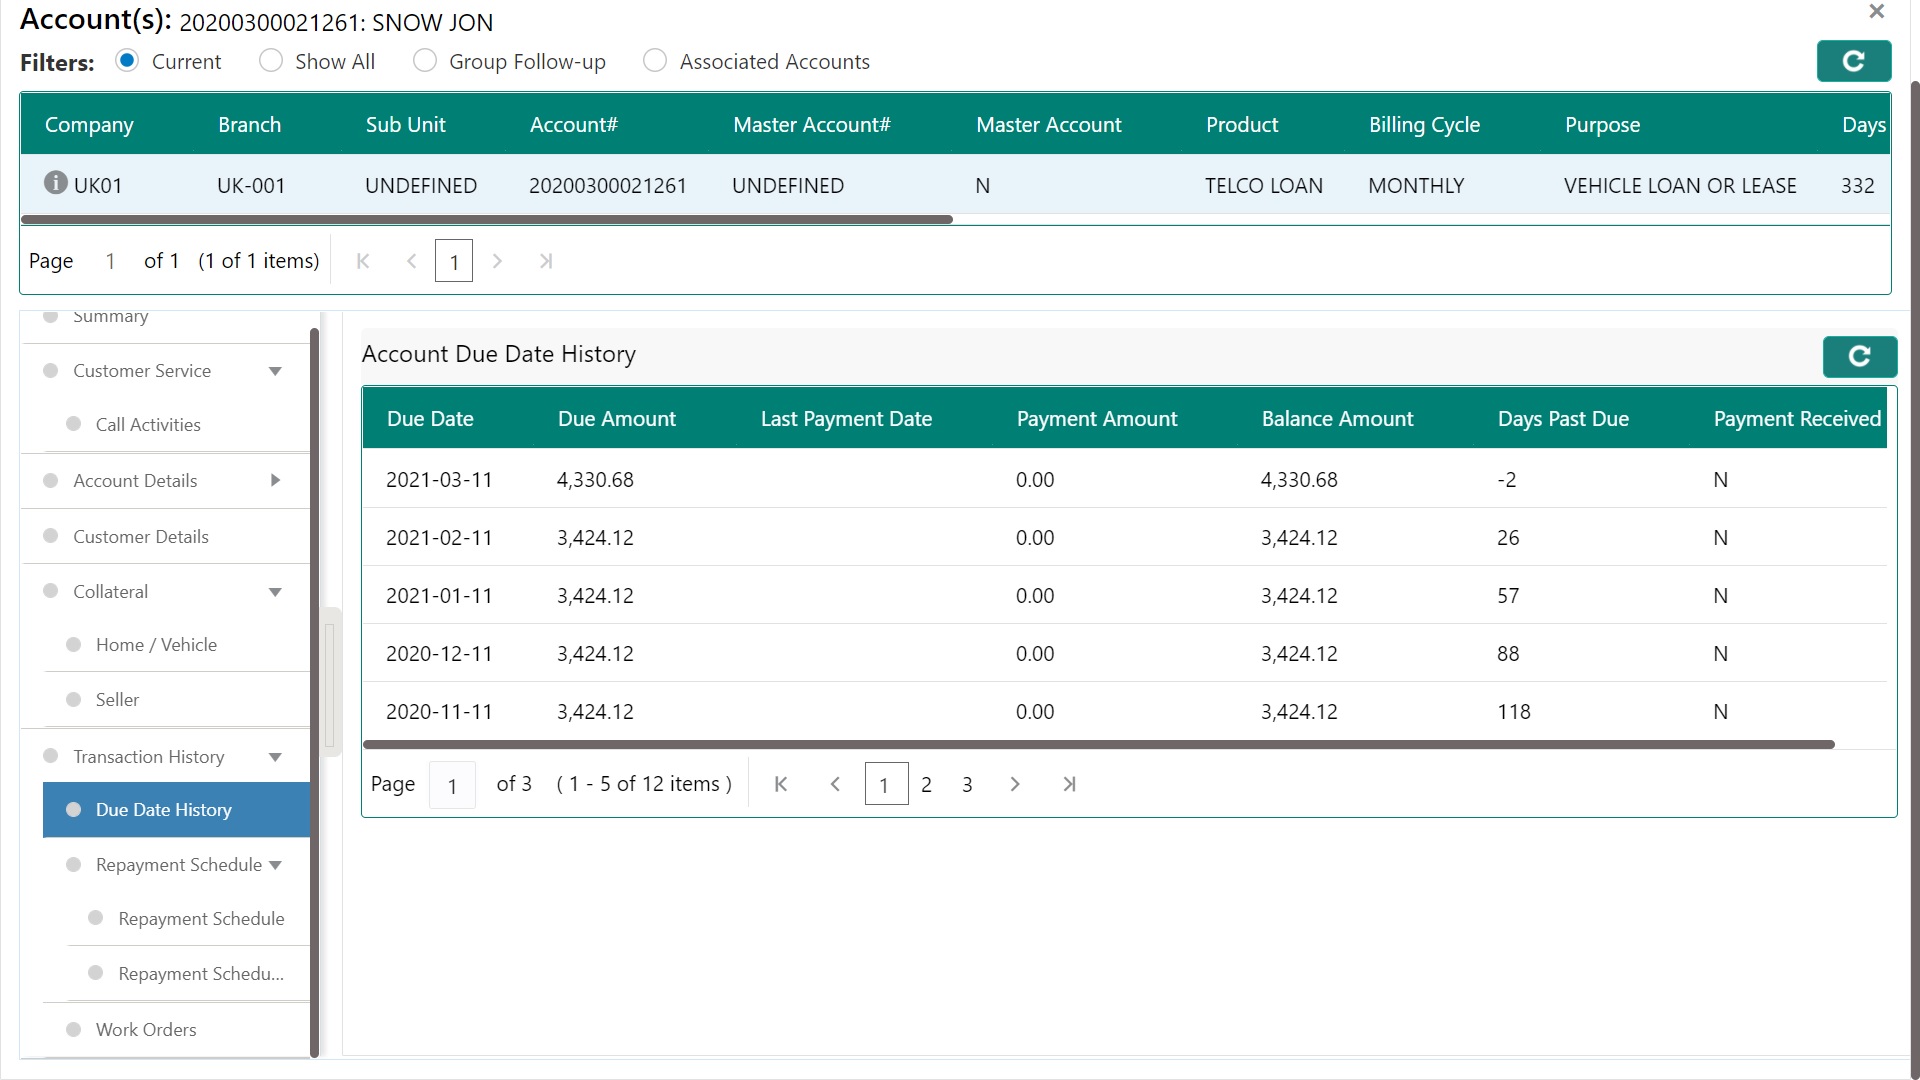
In Due Date History section, view the following:
In this field: |
View this: |
Due Date |
The due date. |
Due Amount |
The due amount. |
Last Payment Date |
The last payment date. |
Payment Amount |
The payment amount. |
Balance Amount |
The balance amount. |
Days Past Due |
The days past due. |
Payment Received |
If ‘Y’, indicates the payment was received. Else indicated as ‘N’. |
4.10.2 Repayment Schedule
The Repayment Schedule section contains information about schedule of repayment.
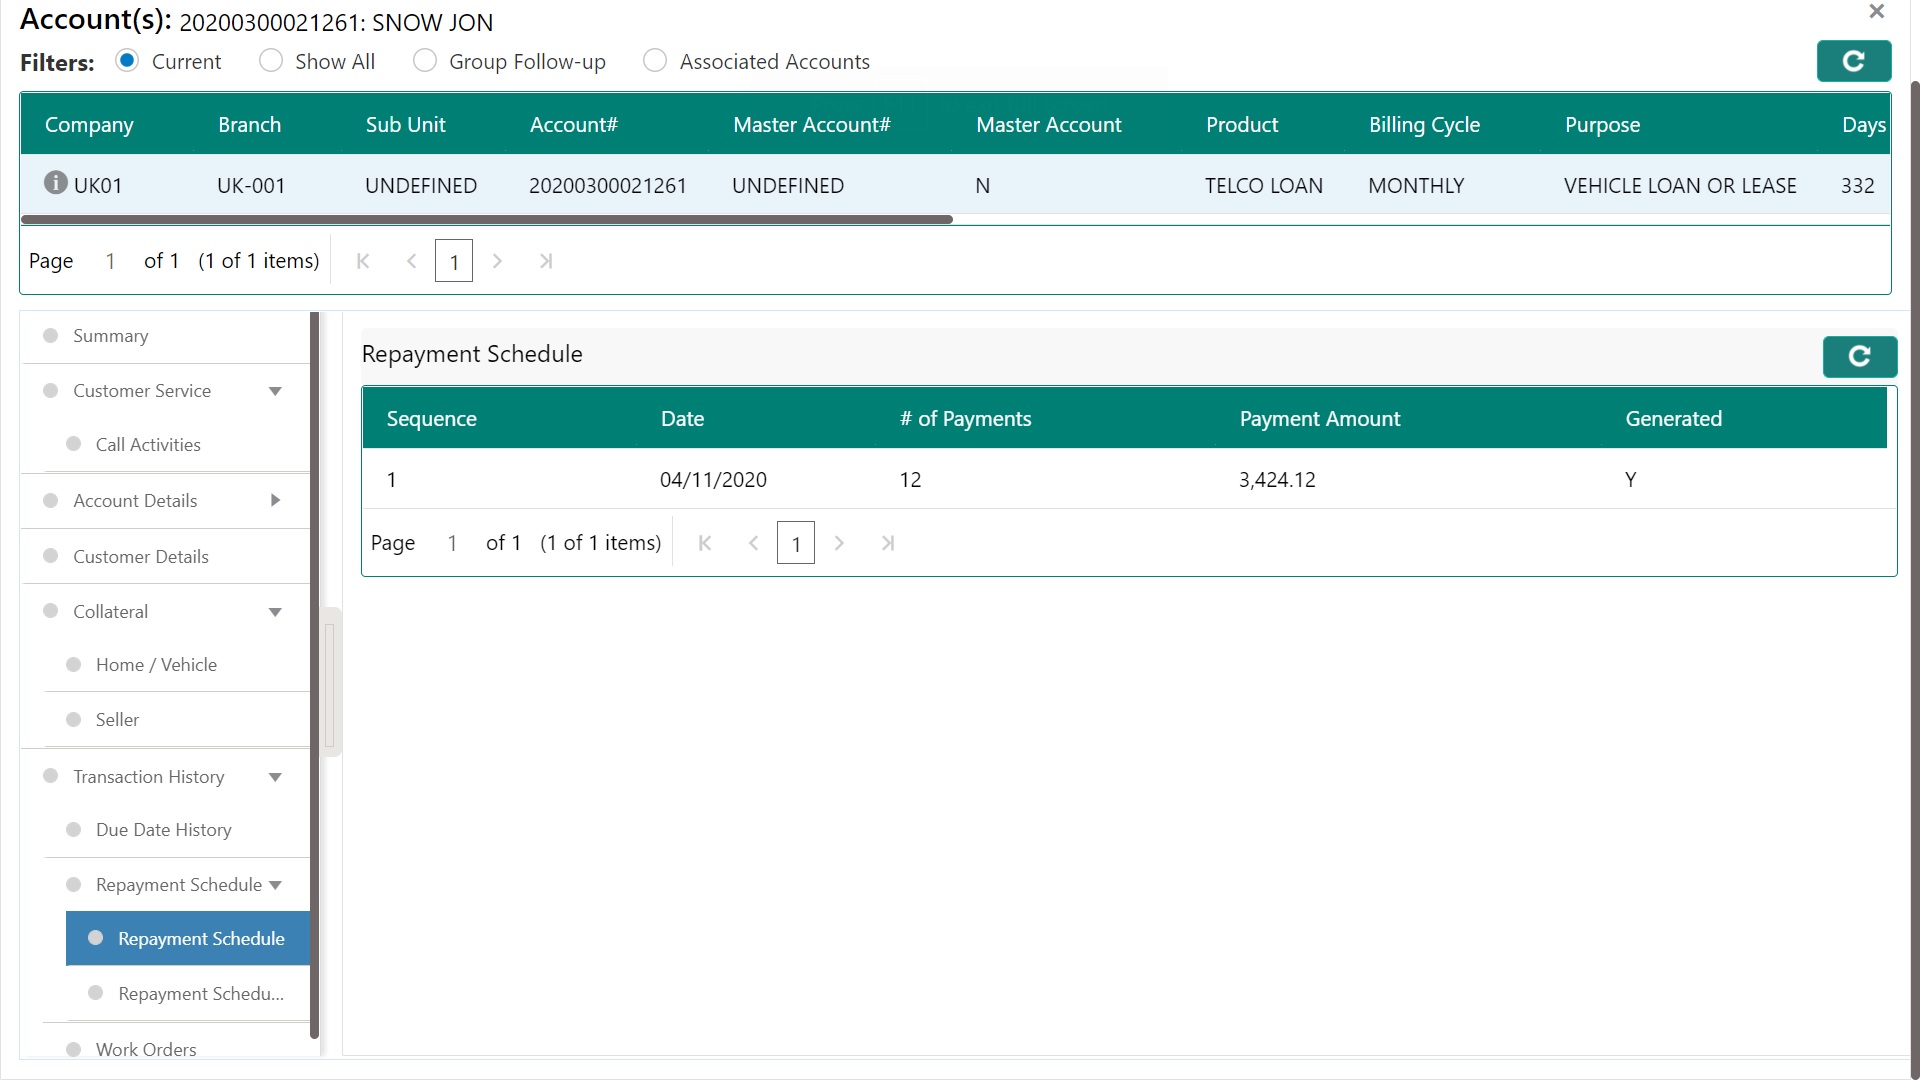
In the Repayment Schedule section, view the following information:
In this field: |
View this: |
Sequence |
The payment sequence number. |
Date |
The repayment date. |
# of Payments |
The number of payments. |
Payment Amount |
The payment amount. |
Generated |
If selected, indicates that the repayment schedule has been generated. |
4.10.2.1 Repayment Schedule Details
The Repayment Schedule Details section contains the schedule of repayment such as the date and payment amount.
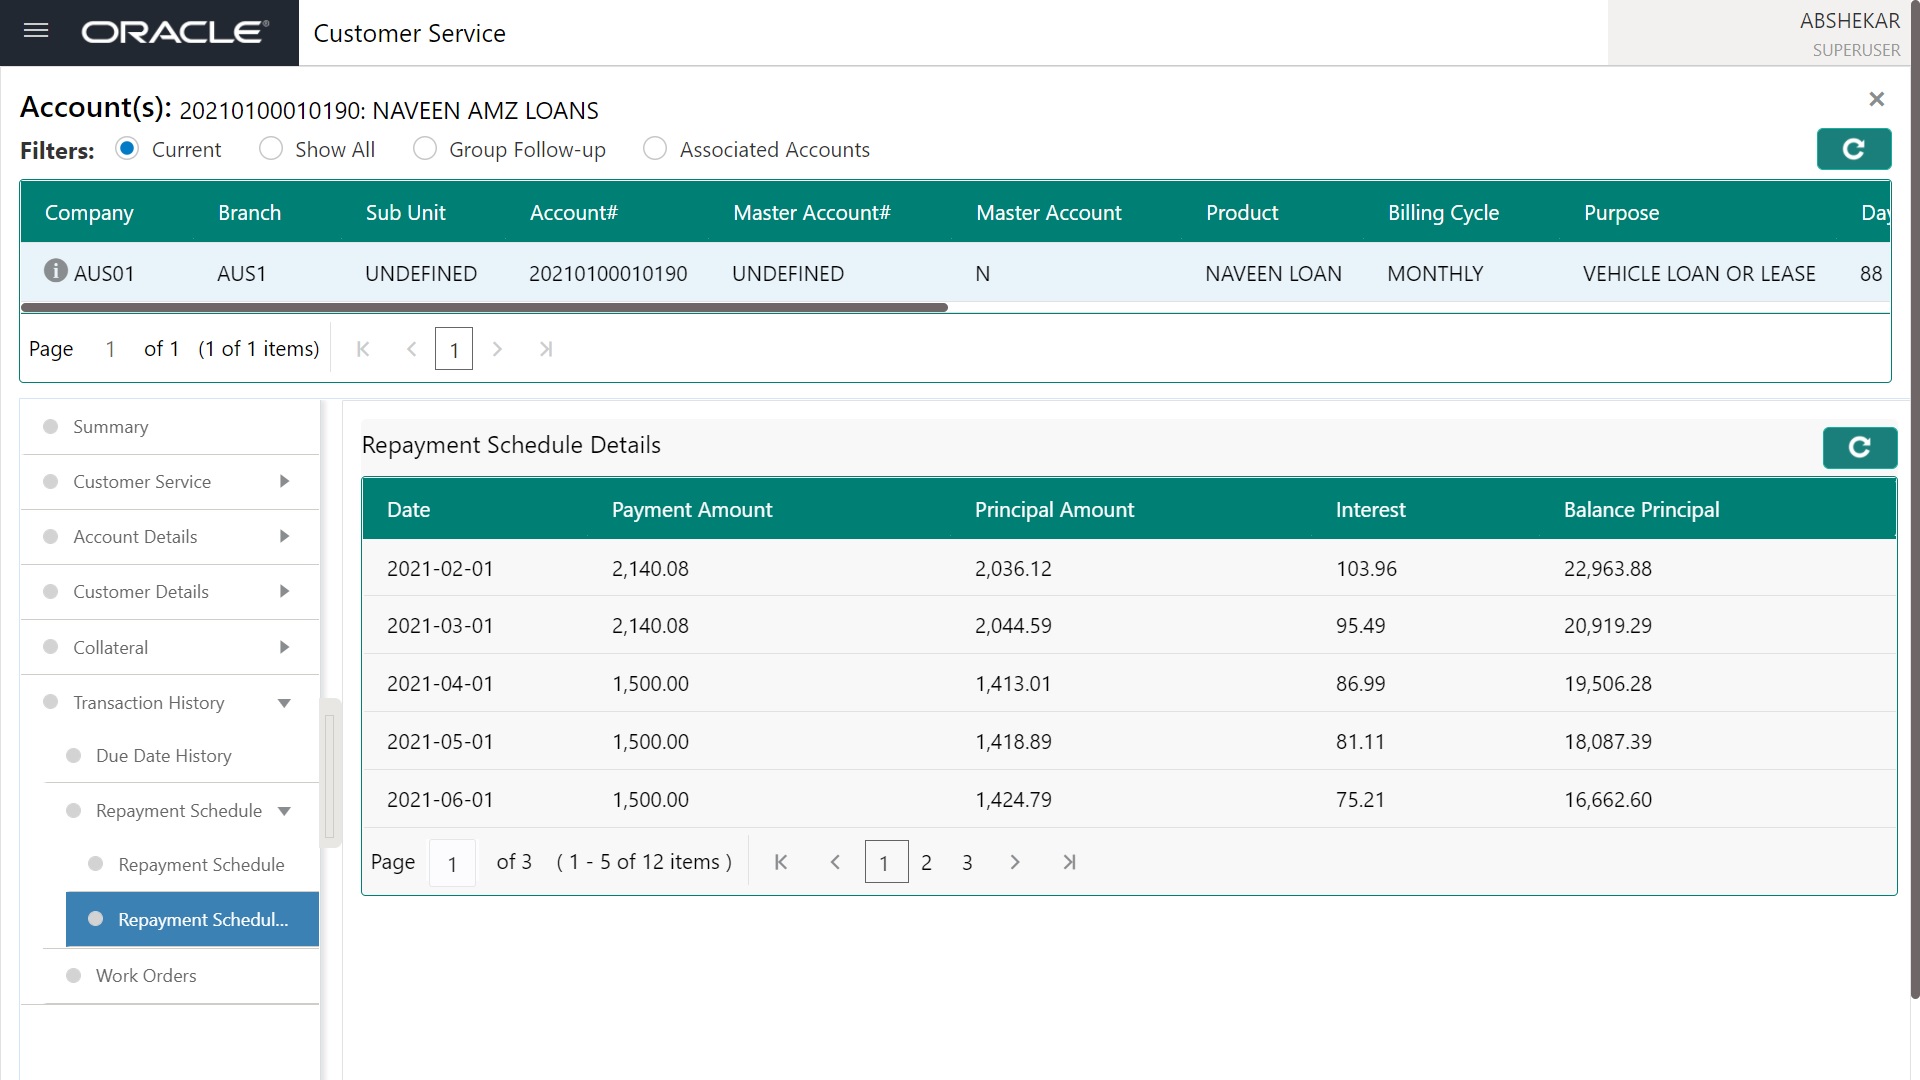
In the Repayment Schedule Details section, view the following information:
Repayment Schedule Details section |
|
Date |
The repayment date. |
Payment Amount |
The payment amount. |
Principal Amount |
The amount paid to principal. |
Interest |
The amount paid to interest. |
Balance Principal |
The balance of the principal. |
4.10.3 Work Orders
The Work Orders link allows you to assign an account to a vendor for a service that the vendor provides, view the history of work order changes and define tracking attributes.
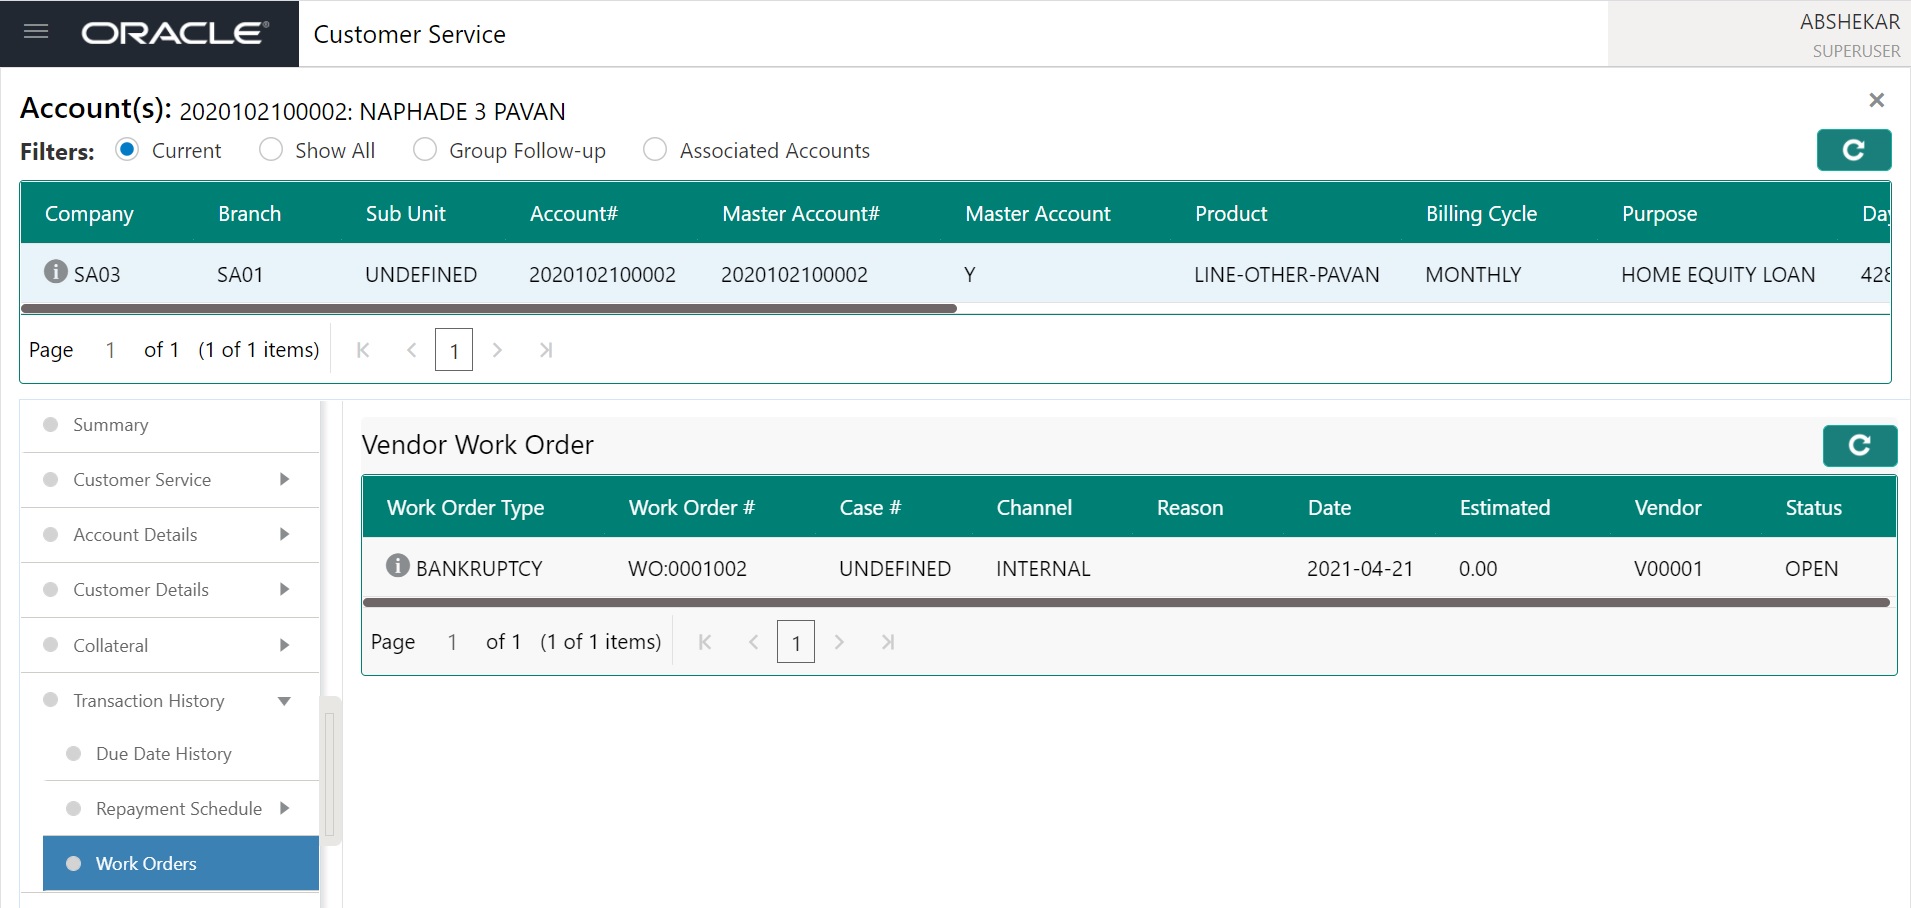
A brief description of the fields is given below:
In this field: |
View this: |
Company |
The company of the account. |
Branch |
The branch of the account. |
Sub Unit |
View the Sub Unit associated with the company/branch combination. System automatically displays the Sub Unit mapped in Setup > User > Companies > Branch Definition screen. |
Account # |
The account number. Note: This can also be the external reference number in case of conversion accounts if the value of system parameter AUTO_GEN_ACC_NBR_CONV is set to ‘N’. |
Master Account # |
View the Master Account number of the customer. During the funding process, an application can either be marked as ‘Master Account’ or ‘Linked to Existing Master Account’ in the Master Account tab of Origination screen. - If marked as Master Account, system populates the Master Account # which is same as Account #. - If Linked to Existing Master Account, system populates the selected Master Account #. - If the Application is neither marked as ‘Master Account’ nor ‘Linked to Existing Master Account’, then this field is displayed as UNDEFINED. |
Master Account |
View the Master Account indicator value propagated from Origination on funding an application. ‘Y’ indicates that the current account is a Master Account and ‘N’ indicates its not. |
Product |
The product for the account. |
In the Vendor Work Order view the following information:
Field: |
Do this: |
Work Order Type |
Select the work order type from the drop-down list. |
Work Order # |
Displays the work order number. |
Case # |
Displays the case number received from third party vendor interface. |
Channel |
Select the OFSLL interfaced channel from the drop-down list. If the channel is selected as ‘GENERIC RECOVERY INTERFACE’, the work order is processed through an external system. For more information, refer to Appendix chapter - ‘Generic Recovery Interface (GRI)’. |
Reason |
This field is enabled only if the status of work order is selected as PENDING ON HOLD, RELEASED or PENDING CLOSE. You can select the appropriate reason from the drop-down list. |
Date |
Displays the date when work order was created. |
Estimated |
Displays the estimated amount, which is the sum of all the services added to the work order. |
Vendor |
Select vendor who will service the work order from the drop-down list. The list of vendors are displayed based on the selected Channel, Work Order Type, and Account. |
Status |
Select the work order status from the drop-down list. If the status is selected as ‘SEND TO GRI’, the work order is processed through an external system. For more information, refer to Appendix chapter - ‘Generic Recovery Interface (GRI)’. |