3 Financial Setup
In the Financial Setup function, you can create and manage the Ship's accounting codes, ensuring the daily revenues/expenses are correctly mapped to the codes configured. A greater financial reporting can be achieved through a well thought out system of accounts. It is highly recommended for shore side accounting personnel to play a key role in creating/developing the accounts and to revisit this setup from time to time. Configuration of these codes is under the responsibility of the System Administrator, Chief Purser, and Accounting Purser.
Department Codes
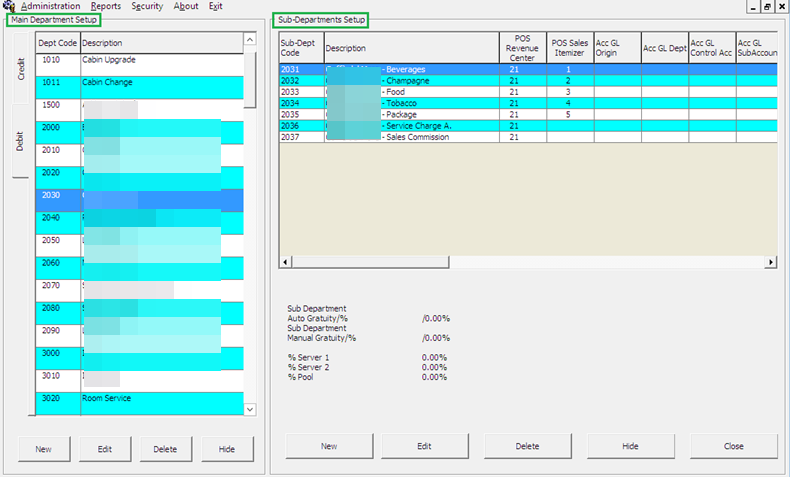
The Department Codes is where all debit and credit posting codes are stored, and codes entered are mapped to the Back Office Accounting System using the General Ledger (GL) ID. These codes are sub-divided into several codes within a Main Group.
Figure 3-1 Main/Sub-Department Setup

Main Department
The Main Department code is the higher level of grouping of the approved Chart of Account and in this instance, the revenue or cost centers. The Main Department Setup is comprised of two tabs: a Debit and Credit tab. In general, the Debit departments are the revenue centers and outlets, while the Credit department represents the payment methods accepted by the Ship. All codes are entered through Administration, Financial Setup, Department Codes.
Sub-Department
You can only add a Sub-Department when the the Main Department code is present. The information required in a debit sub-department code defers from the credit sub-department code, although the process to create them is similar.
Table 3-2 Debit Sub-Department Field Definitions
| Field Name | Description |
|---|---|
|
Type of Posting |
System coded posting type: Posting Department (D) or Tax Department (DX). |
|
Department Code |
Department Code in numeric characters only. |
|
Description |
Description of the code. |
|
Other Description |
Additional description of the code, if any. |
|
Department Grouping |
Code use to group certain department codes for reporting purposes. |
|
POS Revenue Center |
Revenue Center code defined in POS System, use in Interface mapping. |
|
POS Sales Itemizer no |
Sales Itemizer number defined in POS system. |
|
POS Sales Period |
Sales Period defined in POS. |
|
POS Revenue C.Desc |
Revenue center description from POS System. |
|
D.Code for Gratuities M. |
Manual Service Charge Department Code. |
|
D.Code for Gratuities A. |
Auto Service Charge Department Code. |
|
D.Code for Taxes |
Department code for taxes, use in Interface mapping. |
|
Gratuity Typ |
Not in Use. |
|
Gratuity/Service Tax Department |
Not in Use. |
|
PBX Call Type |
Call charge type from PBX System, use in Interface mapping. |
|
Max. Daily Limit |
Maximum Daily Limit allowable for this code. |
|
Service Charge Dept. |
Service Charge Department for Casino postings. |
|
Service Charge |
Service Charge Value. |
|
Max. Cruise Limit |
Maximum Cruise Limit allowable for this code. |
|
Req. Signature During Folio Payout |
Define whether signature is required on folio payout. |
|
Guest/Crew Discounts Dept. |
Applicable discount department code. |
|
Dept. Security Level |
Defined User Security Access Level 1 – 9. |
|
Eligible Department |
Check box that determines the department is not eligible for refund. |
|
Origin |
General Ledger codes defined in Chart of Accounts. |
|
VAT Tax Class |
Classification of VAT Tax. |
|
Casino Department |
Determines whether the department code belongs to Casino. |
|
Exclude from Revenue Overview |
Revenue to be excluded from Revenue Overview function in Management. |
Table 3-3 Credit Sub-Department Field Definitions
| Field Name | Description |
|---|---|
|
Payment Type |
The payment type of this code. For example, Cash, Foreign Currency, Credit Card, Check, Cabin Charge, City Ledger. |
|
Department Code |
Department Code in numeric characters only. |
|
Description |
Description of the code. |
|
Other Description |
Additional description of the code, if any. |
|
Department Grouping |
Code used to group certain department codes for reporting purposes. |
|
Credit Card Digits |
Acceptable credit card digits associated with the type of credit card. |
|
Credit Card ID |
Short code of credit card type. |
|
Credit Card Internal ID |
Internal credit card ID preset by the system. |
|
Credit Card Merchant ID |
Card Merchant ID. |
|
Foreign Currency Code |
ISO Currency codes. Refer to Typ_Cur when the payment type=CF Foreign Currency. |
|
Floor Limit |
Maximum limit allowed in guest account for this card type. |
|
Crew Floor Limit |
Maximum limit allowed in Crew account for this card type. |
|
Minimum Authorization Value |
Minimum amount to obtain from card merchant. |
|
Commission Department |
Department code for chargeable commission. |
|
Commission Rate |
Percentage of applicable commission or value defined if 'Commission is fix value' is checked. |
|
Daily Limit |
Daily Posting limit. |
|
Debit Card No Commission |
Commission is exempted if checked. |
|
Commission is fixed value |
Applicable commission is value based instead of percentage. |
|
Auto Balance (Interface) |
Auto Balance function for cash/credit card posting via interface. |
|
Rewards Card |
Denotes Rewards Card if checked. |
|
Gift Card |
Denotes Gift card if checked. |
|
POS Tender Type No. |
Tender Media Number defined in POS System. |
|
System Account No. |
The Account Number defined in System Account. |
|
Incentives Payout Group |
Incentive payout group setup from Crew Incentive. |
|
External Department ID |
External Department ID for payment from 3rd party system. |
|
External Itemizer ID |
External Itemizer ID from third–party system. |
|
Allow Posting to Guest Cabin |
Posting allowed by Micros POS System. |
|
Allow Posting to Crew Cabin |
Posting allowed by Micros POS System. |
|
Allow Posting to Gift Card |
Posting allowed by Micros POS System. |
|
G.Ledger Id. |
General Ledger codes in Chart of Accounts. |
|
Eligible Department |
If the check box is checked, the department is not eligible for refund. |
|
Dept. Security Level |
Defined User Security Access Level 1 – 9. |
|
Req. Signature During Folio Payout |
Define whether signature is required on folio payout. |
|
Credit Card Disclaimer Note |
Disclaimer note to print on invoice when payment is by credit card. |
|
Department for routing |
Payment Type allowed for routing. |
Currencies
The Currencies functionality enables you to input the currency rate used in the Currency Exchange module. You can also update the exchange rates from the Currency Exchange module. The feature uses the Currency Codes configured in Credit Sub-Department.
Adding Currency Rate
- From the Financial Setup menu, select Currencies.
- In the All Currencies section, right-click and select Add Rate.
- Navigate to the Setup Exchange Rates section and select the currency code from Currency/Check drop-down list.
- Enter the Valid From date, Minimum Denomination (Buy/Sell) and select the Rate Calculation method from the drop-down list.
- Selecting the Disable From check box disables the currency from appearing in the Currency Exchange module from the date specified. Disabled currency is marked with an asterisk *.
- Enter the Available Notes, if any. If you specify Available Notes, the system uses the Available Notes for calculation and ignore the Minimum Denomination setup.
- Enter the Exchange Rates and Commission % or Min. Commission, then click OK to save.
Merchant Details
- From the Financial Setup menu, select Credit Card Merchant Setup.
- On the left pane of the setup screen, right-click and select Add New.
- Select the Credit Card Type and Currency from the drop-down list.
- Enter the Terminal ID, Bank ID, Decimal, IP Port, Merchant Login ID and Merchant Password.
- Click OK to save.
- Repeat the above steps for other credit card types accepted by the merchant.
Pre-Selection Groups
- From the Financial Setup menu, select the Department Groups Setup.
- On the left pane of the setup screen, right-click and select Add Department Group.
- In the Department Groups section, enter the Description of the group and the Department Codes.
- Click OK to save.
Stateroom Upgrade Setup
Discount Templates
- From the Financial Setup menu, select Discount Templates.
- On the left pane of the setup screen, right-click and select Add New.
- Navigate to the Fidelio Department section and then click Add. This launches the Discounts window.
- In the Discounts window, enter the Percentage, number of count to apply in the How Much section. When the Percentage check box is deselected, the discount becomes a value based discount. If the Apply Count field is blank, the discount is unlimited.
- Select the applicable Department Code and then click OK to apply.
Quick Posting Template
- From the Financial Setup menu, select Quick Posting Templates.
- On the left panel of the setup screen, right-click and select Add New.
- Enter the short code and description in the Description field and then insert the criteria in the Comments field.
- Click OK to save.
Import Credit Card Bin
- From the Financial Setup menu, select Import Credit Card Bin file.
- At the bottom of the screen, select the BIN file to import.
- By default, all the check boxes are selected. Click Import to save the information into the BIN table.
- Click Close to exit.
Disallow Manual Posting Applications
- From the Financial Setup menu, select Disallow Manual Posting Applications.
- Right-click on the left pane and select Add New.
- Enter a short code and the application name in the Description field.
- Click Apply to save.
Department Grouping
- From the Financial Setup menu, select Department Grouping.
- Right-click the left pane and select Add New.
- Enter a short code and description in the Description Field and then click OK to save.
VAT Handling
-
VAT Tax Class.
-
VAT Tax Rate.
VAT Tax Class
- From the Financial Setup menu, select VAT Tax Class.
- On the left pane of the setup screen, right-click and select Add New.
- Enter the short code and the application name in the Description Field and click Apply to save.
VAT Tax Rate
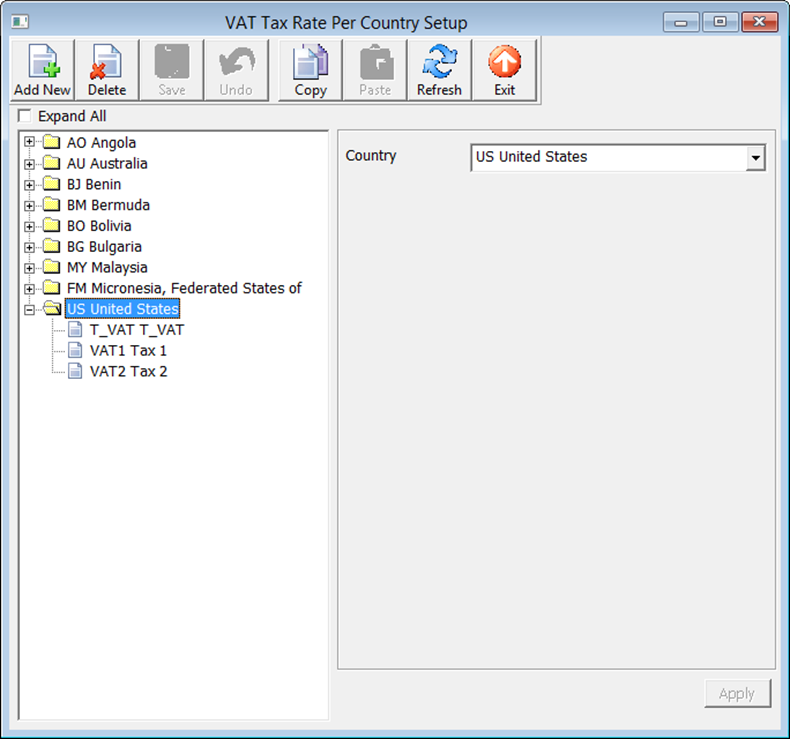
Figure 3-2 VAT Tax Rate Per Country Setup

- From the Financial Setup menu, select VAT Tax Rate.
- Click Add New at the ribbon bar and then select the Country code from the drop-down list.
- Click Save.
- Expand the Country container and select the Tax Class.
- Insert the tax rate in the VAT Tax Rate field and select the Tax Department code from the drop-down list.
- Click Save to save the changes.
Activating a Tax Rate
- From the Financial Setup menu, select Activate Tax Rate.
- Select the country tax to activate from the drop-down list and then click OK.
- At the confirmation prompt, select Yes to activate.
VAT Tax Reminder
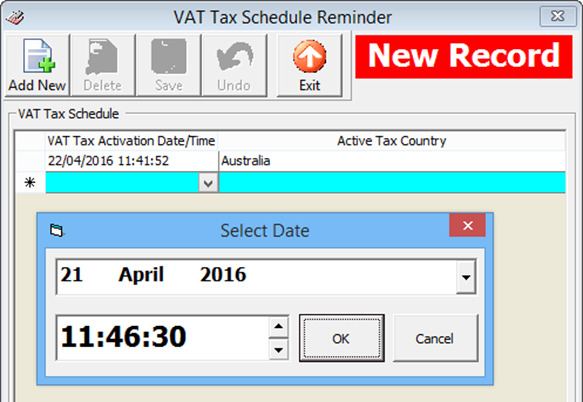
Figure 3-3 VAT Tax Reminder

- From the Financial Setup menu, select VAT Tax Reminder.
- Click Add New at the ribbon bar, and then select the Date and Time from the drop-down list.
- From Active Tax Country, select the Country in which the tax is to be activated.
- Click Save to save and exit.