Using Report Books
This section provides an overview of report books and describes how to:
Define report books.
Run report books.
Set type and output options.
Run multiple report books.
You can group multiple report requests into a single report book. Report book features include:
An interface to Process Scheduler Manager.
Using a browser, you schedule a group of reports to run using a Process Scheduler request. Your reports are executed on the server in the format that you select, and you can run the entire report book with the same output type and format without changing any individual component requests. You can also schedule your report books to run at a particular time on a regular basis.
An effective status associated with each request in the report book.
You can set individual report requests within a report book as inactive. Inactive report requests remain part of the report book but are not run as part of a request.
Security associated with each request in the report book.
Each individual report request in a report book has its own security setting that allows it to be accessed by specific users and groups or by the public.
A method for individual report requests to inherit dates from the report book.
You can run an entire report book using the same as of date, without changing any individual component requests.
Multiple nVision sessions can be scheduled on a single report server.
Each nVision session is associated with its own Excel executable. This enables you to maximize use of your report server without requiring multiple report servers for multiple report books.
Robust batch processing of message logging.
You can generate an entire set of reports without the process being interrupted due to an error condition.
Note: Date and time variables are resolved based on the calendar being used by the PS/nVision report server that runs the report.
Use the Report Books page (IC_NVSBOOK) to create a report book. Before creating a report book, make sure you have report requests defined for all the reports you want to include in the book. The report book is a list of requests, not a substitute for the request. You might also want to review the requests you plan to use to ensure they use the desired scope and layout, and ensure that you have access to all the reports you want to include in the report book.
Navigation
Select
From the Define Report Book page, search for an existing report book or create a new one.
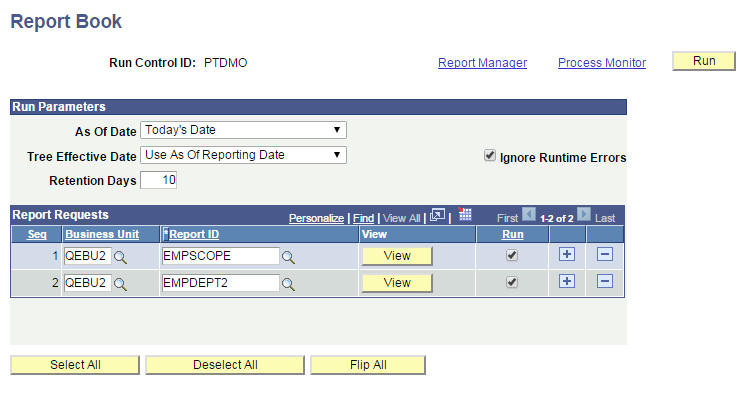
Image: Report Book page
This example illustrates the fields and controls on the Report Book page. Definitions for the fields and controls appear following the example.
|
Field or Control |
Definition |
|---|---|
| As Of Date |
Available options are:
|
| Tree Effective Date |
Available options are:
|
| Ignore Runtime Errors |
Select to keep the entire Report Book from stopping if one of the reports encounters an error. Note: In such a case, the completion status will be Success, even though one or more reports may have had errors. |
| Retention Day |
If the report has the output type set to Web, enter the number of retention days. Note: This field is not available when the output type of the report is not Web. The value of retention days set at the Distribution Detail page overrides the value of retention days set at the Report Book page. The value of retention days set at the Report Book level overrides the value set at the individual report request that are attached to the Report Book. When the value of retention days is not set at the Report Book level, the value set at the Report Request level is used. See “Using the Retention Day in the nVision Web Output Page” in Setting Up Report Requests. |
| View |
Click to launch another browser window displaying the report request. |
| Business Unit |
Select the business unit of the report requests for this report book. To reorder your entries, insert or delete rows as necessary. |
| Report ID |
Select the report ID of the report requests for this report book. To reorder your entries, insert or delete rows as necessary. |
| Run |
Click the Run button for all reports you want to run when this book is requested. For example, you might define a book of reports to be run at month end, and include a report that is only run quarterly, but select its Run button indicator only at quarter end. |
 |
Click the Add icon to add a new blank row, and you are enable to enter a new report request. Note: You cannot add a report request to a report book if you do not have access to the report book. |
 |
Click the Delete icon to delete the current row. |
| Select All |
The Select All button selects all reports in the Report Book to be “Run”, i.e. for all the Report Requests on the Report Book, all the Run check boxes are selected. |
| Deselect All |
The Deselect All button deselects all reports in the Report Book to be “Run”, i.e. for all the Report Requests on the Report Book, all the Run check box are deselected. |
| Flip All |
The Flip All button flips the status of all the Reports in the Report Book to be “Run”, i.e. if the current status of the Run check box is set as “True” (selected), then by clicking on the Flip All Button, the Run check box is set to “False” (deselected) and vice-versa. |
Access the Report Book page (PRCSRQSTDLG) by selecting In the Report Book page, you can run all the reports in a group or select specific reports by selecting their check boxes in the Run column.
Note: If the report book contains secured report requests to which you do not have access, these report requests appear inactive and you are not able to select them.
Report books are run through Process Scheduler Request page. However, when the report begins to run, you are returned to the Report Book page. If you want to check the status of your job, click the Process Monitor link. If you want to view a list of reports that you have access to, click the Report Manager link.
If you run all report requests in a report book that contains secured report requests, only those requests to which you have access are run. If you run reports that you do not have access to, those processes are not success and an error message appears in the error log.
To select type and output options for nVision reports:
Select
From the Define Report Book page, search for an existing report book or create a new one.
Click the Run Report button.
Select the Default option in the Type and Format menus to use the options specified in the report book, or override the report book by making new choices.
See Running Reports.
To define your process server to handle multiple report book jobs:
Select
Search for the server name that you are using for your report books.
In general, your server name is PSNT. However, a list of available servers appears for your selection.
In the process type named nVision–Report Book, ensure that the Max Concurrent field is set to the required number.
This setting allows multiple report book jobs to run concurrently.