Defining User Preferences
This section describes how to establish user preferences.
PeopleSoft applications enable you to personalize your application based on your daily needs, style of work, language preference, preference for the mouse or the keyboard, and so on. Users of PeopleSoft applications include casual users and power users.
Casual users work with PeopleSoft applications only occasionally because these applications are not an integral part of their daily job. For example, casual users might use the PeopleSoft self-service applications only occasionally to maintain their employee information, to enroll in benefits, and so on.
Power users, on the other hand, use the PeopleSoft system as a part of their daily job. They do a great deal of data entry, moving quickly from one transaction page to the next, entering data as they go. A power user might be an accounts payable clerk, a human resources benefits manager, a purchasing manager, or an order entry clerk.
Note: Your security administrator determines what personalization options are available for you to customize. You may see options documented in this topic that you do not see in your My Preferences interface.
To define general user preferences, access the My Preferences - General Settings page.
Navigation
Image: My Preferences - General Settings: General Options section
This example illustrates the fields and controls on the My Preferences - General Settings: General Options section. You can find definitions for the fields and controls later on this page.
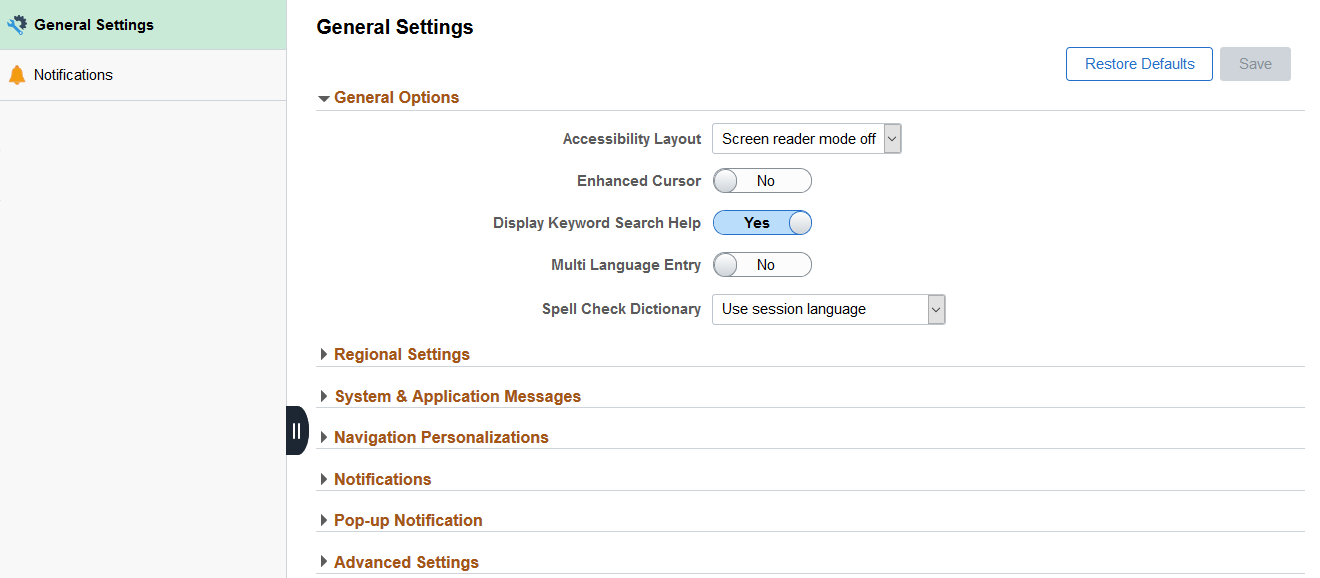
General Options
Expand this section to specify signon and other general options.
|
Field or Control |
Definition |
|---|---|
| Display Keyword Search Help |
When a component is keyword search enabled, show help for enhanced search. The default option is Yes. |
| Enhanced Cursor |
This accessibility feature provides bold highlighting of page elements that have focus. The enhanced cursor feature is available in Classic mode only. |
| Multi Language Entry |
Select Yes to be able to enter data in the language you specify in the Data Language list in pages where multiple language entry is available. The default option is No. |
| Accessibility Layout |
Select one of the following options to specify the accessibility layout to use:
Note: Keyboard-only navigation features are available to all users and do not require users to enable accessibility features. |
| Spell Check Dictionary |
Select the language to use as your spell check dictionary from the list. Note: Use session language is the default option, which selects the dictionary associated with your signon language as specified on the Manage Installed Languages page. See Using Spell Check. |
Saving Your Preferences
Click the Save button to save any updated preference settings. The changes take effect the next time you login.
To revert all preference settings back to their default values, click Restore Defaults button.
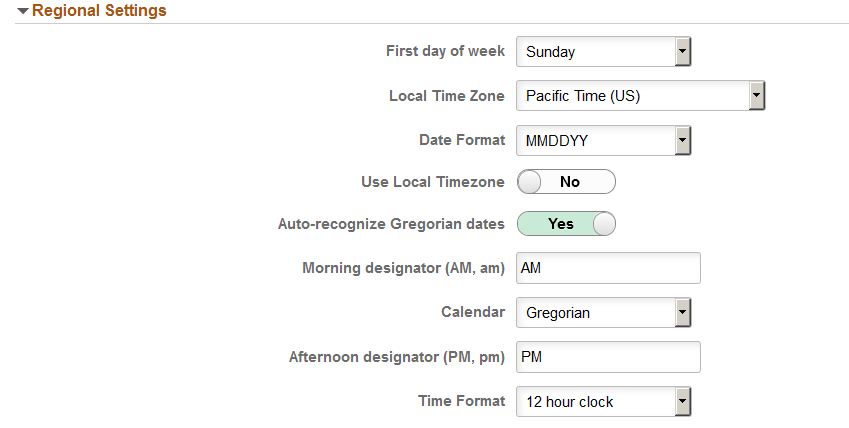
Regional Settings
Expand this section to specify your preferred date, time, and calendar related settings.
Image: My Preferences - General Settings: Regional Settings section
This example illustrates the fields and controls in the Regional Settings section of the My Preferences - General Settings page. Details about these options are described following the example.
|
Field or Control |
Definition |
|---|---|
| First day of week |
Select the day to use as the first day of the week. The default value is Sunday. |
| Local Time Zone |
Select your local time zone. This option determines which time zone is used when the Use Local Timezone option is set to Yes. The default value is Pacific Time (US). |
| Date Format |
Select the format to use for date fields. MMDDYY is the default value. |
| Use Local Timezone |
Select Yes to use your local time zone rather than the server time zone. The default value is No. |
| Auto-recognize Gregorian dates |
When this option is set to Yes , if your calendar preference is set to use a non-Gregorian calendar, a date entered with a year between 1800 and 2300 will be assumed to represent a Gregorian date. Once entered and saved, the date will still be displayed using your selected calendar. The default value is Yes. |
| Morning designator (AM, am) |
Select the format for designating morning when using a 12 hour clock. The default value is AM. |
| Calendar |
Select the type of calendar. This setting takes effect for all date entry and display fields. The Gregorian calendar is the primary calendar used by international business. Other supported calendars include the Thai Buddhist calendar and the Islamic Hijri calendar. The default value is Gregorian. |
| Afternoon designator (PM, pm) |
Select the format for designating afternoon when using a 12 hour clock. The default value is PM. |
| Time Format |
Select the format to use for time fields. Determines whether time will be displayed in civilian (8:05:00 PM) or military (20:05:00) time format. The determination of whether seconds and microseconds are displayed is made at the field level, and is not a personalization. The default value is 12 hour clock. |
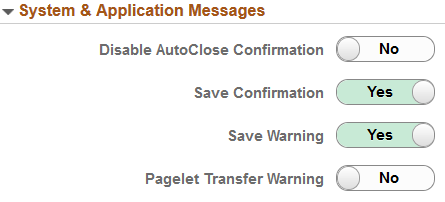
System & Application Messages
Expand this section to specify your preferences for displaying several system warnings and confirmation messages.
Image: My Preferences - General Settings: System & Application Messages section
This example illustrates the fields and controls in the System & Application Messages section of the My Preferences - General Settings page. Details about these options are described following the example.
|
Field or Control |
Definition |
|---|---|
| Disable AutoClose Confirmation |
Enable this option to prevent confirmation messages from automatically closing. This option is required for WCAG 2.0 standards, so that accessibility users have adequate time to read confirmations. When set to Yes, you must close a message to dismiss it; it will not disappear automatically. No is the default value. |
| Save Confirmation |
Enable this option to display a message to the user indicating that a save request completed successfully. Yes is the default value. |
| Save Warning |
Enable this option to display a warning when transferring from a page that has unsaved changes. Yes is the default value. |
| Pagelet Transfer Warning |
Enable this option to display a warning in screen reader mode when transferring from a pagelet (homepage or dashboard) to another object. No is the default value. |
Navigation Personalizations
Expand this section to specify keyboard navigation preferences. For example, suppose you always prefer to type the date into a date field and then press tab to move quickly to the next field rather than opening the calendar prompt, selecting the date, and then closing the prompt. If you enable the Tab over Calendar Button, when you navigate with the tab key your cursor focus will never rest on a calendar button.
Image: My Preferences - General Settings: Navigation Personalizations section
This example illustrates the fields and controls in the Navigation Personalizations section of the My Preferences - General Settings page. Details about these options are described following the example.
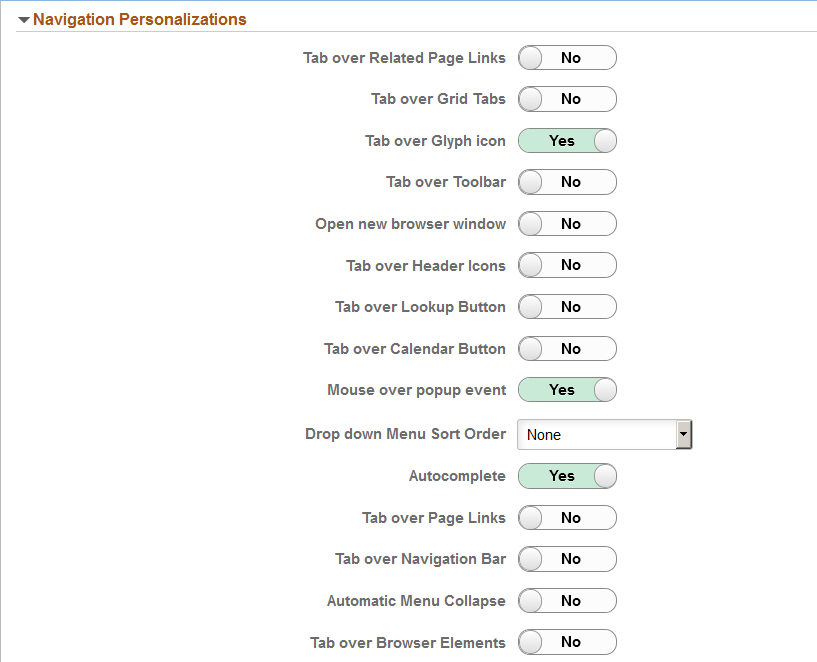
Select Yes to enable a navigation option. The following options are enabled by default, and must be set to No to disable them:
Tab over Glyph icon.
Mouse over pop-up event.
Autocomplete.
|
Field or Control |
Definition |
|---|---|
| Tab over Related Page Links |
Enable this option to skip over the icon that takes you to a list of related links when using the Tab key to move through page objects. |
| Tab over Grid Tabs |
Enable this option to skip grid tabs when using the Tab key to move through page objects. Grid Tabs appear at the top of a grid. |
| Tab over Glyph icon |
Enable this option to skip glyph icons when using the Tab key to move through page objects. A glyph icon displays the related contextual menu for a field. |
| Tab over Toolbar |
Enable this option to skip the toolbar when using the Tab key to move through page objects. The toolbar is located at the bottom of a page and contains standard operations that are needed to work with the transaction, such as Save and Return to Search. |
| Open new browser window |
Enable this option to open a new page in a new browser window, even when the browser setting is set to open in a new tab. |
| Tab over Header Icons |
When enabled, activates a Skip to Main Content link at the top of transaction pages. The link appears when you initially access a page, and focus is set on the link. Press Enter or click the link to jump to the first active field on the page. The link disappears after the focus moves to an active field. Press Ctrl+Alt+S to make the Jump to Main Content link reappear. |
| Tab over Lookup Button |
Enable this option to skip lookup button controls when using the Tab key to move through page objects. A lookup button is the magnifying glass icon following fields that have a defined list of valid values. |
| Tab over Calendar Button |
Enable this option to skip calendar button controls when using the Tab key to move through page objects. A calendar button is the icon next to date fields that can be used to display a calendar for date selection. |
| Mouse over popup event |
Enable this option to enable popup events when you mouse over items on a page. Mouse over pop-ups are enabled for some fields and will display a popup page with related information on it when you hover the mouse pointer over those fields. |
| Drop down Menu Sort Order |
Select the order in which menu items appear in drop-down menus.
|
| Autocomplete |
Enable this option to have the system do a prompt lookup as you type to suggest appropriate values. Applicable only for fields with defined prompt edit values. |
| Tab over Page Links |
Enable this option to skip page links when using the Tab key to move through page objects. Page Links are the hyperlinks at the bottom of a page in a multi-page component. |
| Tab over Navigation Bar |
Enable this option to skip navigation bars when using the Tab key to move through page objects. A navigation bar appears at the top of grids and scroll areas, and controls which rows appear. |
| Automatic Menu Collapse |
Enable this option to cause the menu to automatically collapse when a transaction is selected. You can expand the menu either by using Ctrl+Y or the show menu icon. |
| Tab over Browser Elements |
Enable this option to skip over browser elements when using the Tab key to move through page objects, to restrict tabbing to PeopleSoft elements in the page. Depending on your browser, it can sometimes appear as if the focus is lost, when it is actually on a browser element, such as the URL address field. By setting this to yes, you can avoid this browser issue. |
Notifications
Expand this section to enter a phone number to receive text messages.
Image: My Preferences - General Settings: Notifications section
This example illustrates the fields and controls on the My Preferences - General Settings: Notifications section.

Enter your phone number in international phone number format (known as E.164), which is a number of up to fifteen digits in length starting with a +. Do not include any other non-numeric characters such as spaces, dashes, periods, or parenthesis. For example:
+15555550100Pop-up Notification
Expand this section to specify preferences for pop-up notifications.
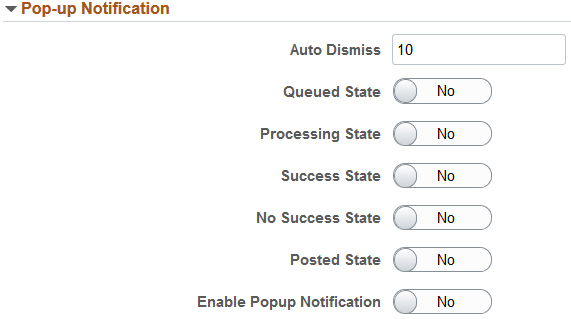
Image: My Preferences - General Settings: Pop-up Notification section
This example illustrates the fields and controls on the My Preferences - General Settings: Pop-up Notification section. You can find definitions for the fields and controls later on this page.
|
Field or Control |
Definition |
|---|---|
| Auto Dismiss |
Enter the duration for pop-up notifications. The value you enter determines the number of seconds that a pop-up notification remains displayed. For example, if the value is set to 5, then a pop-up notification will be displayed for 5 seconds, after which it will automatically disappear. |
| Queued State |
Select Yes to receive pop-up notifications when a process status changes to Queued. This option is disabled by default. |
| Processing State |
Select Yes to receive pop-up notifications when a process status changes to Processing. This option is disabled by default. |
| Success State |
Select Yes to receive pop-up notifications when a process status changes to Success. This option is disabled by default. |
| No Success State |
Select Yes to receive pop-up notifications when a process status changes to No Success. This option is disabled by default. |
| Posted State |
Select Yes to receive pop-up notifications when a process status changes to Posted. This option is disabled by default. |
| Enable Popup Notification |
Select Yes to activate pop-up notifications. This option is disabled by default. Important! This option must be set to Yes for pop-up notifications to be displayed. When it is set to No, even if a specific pop-up notification type has been enabled, it will not appear. |
Advanced Settings
Expand this section to specify preferences for grouplet updates and page cache duration.
|
Field or Control |
Definition |
|---|---|
| Grouplet Live Update |
Select Yes to have grouplets update automatically. When set to No, grouplets update only when you refresh the page. |
| Time page held in cache |
Enter the amount of time, in seconds, that a page is held in cache memory. The default value is 900. |
Use the Notifications page of My Preferences to personalize the channels on which you receive notifications as well as the number of items displayed in the Notification window.
Navigation
Image: My Preferences - Notifications page
This example illustrates the fields and controls on the My Preferences - Notifications page. You can find definitions for the fields and controls later on this page.
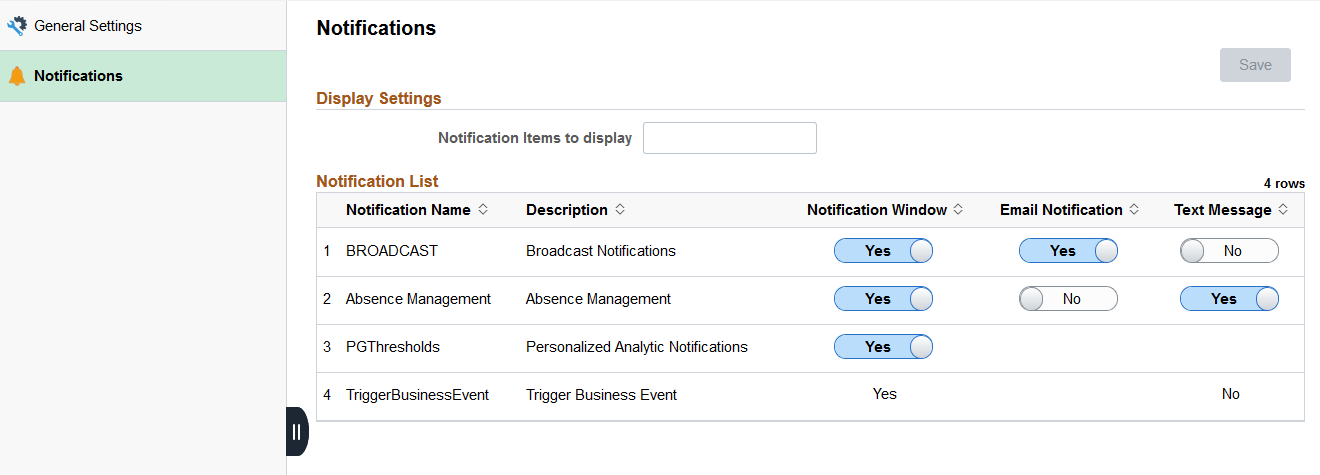
When you personalize your notifications, you can select among the notification channels that have been configured for each notification category. When the options are available, you can select to receive notifications in the Notification window, in email, or by text message.
|
Field or Control |
Definition |
|---|---|
| Notification Items to display |
Enter the number of notification items to display in the Notification window. If no value is entered here, the system-wide default value remains in effect. See Managing System Settings for the Notification Window. |
| Notification List |
For each listed notification category, select which channels you wish to receive notifications on. Note: Some notification categories do not allow personalization; these categories always appear at the bottom of the list. In addition, other categories may be defined as mandatory, meaning you must retain at least one channel as selected. See Defining Notification Configurations for Events. |
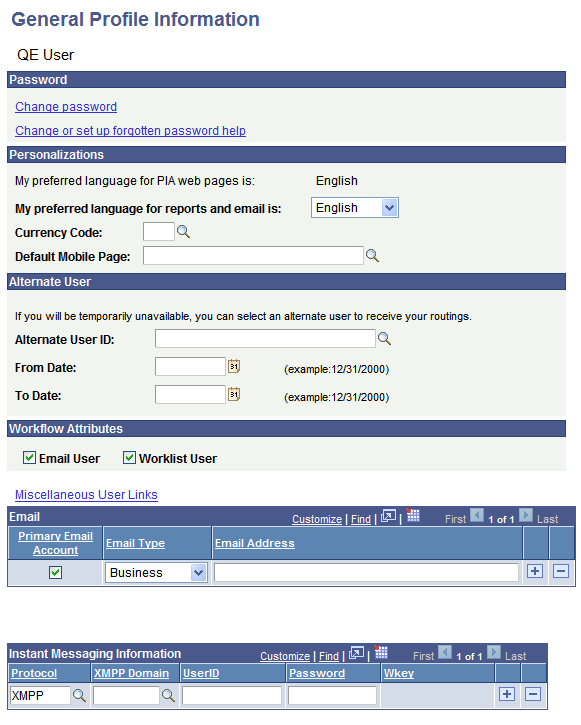
Access the General Profile Information page (from Home, select My System Profile).
Image: General Profile Information page
This example illustrates the fields and controls on the General Profile Information page.
|
Field or Control |
Definition |
|---|---|
| Password |
Click one of the following links, which are self-service options related to passwords:
|
| Personalizations |
This region lists your current language preference for web pages and your preferred language for reports and email. You can change the language setting for your reports and email on this page. You can also select the currency code for the currency symbol that will appear on pages when you enter currency values. Note: The decimal placement is a property of the currency code; two decimal places is standard. Select the mobile homepage that should appear after you sign on to a mobile device. PeopleSoft Mobile Agent is a deprecated product. These features exist for backward compatibility only. Note: For more personalizations options, open the My Personalizations page. |
| Alternate User |
If you are going to be on vacation or some other type of temporary leave, you can add the user ID of a colleague who is looking after your tasks in your absence. Select the alternate user ID and enter the dates during which you want the alternate ID to be active. After that time has passed, your tasks are automatically routed back to you. Note: When applying an alternate user ID in your workflow settings, note that the system only sends workflow routings to the immediate alternate user ID. The system does not send routings down multiple levels of alternate user IDs. For example, assume user A specifies user B as the alternate user ID while user A is out of the office. Also assume that user B is out of the office at some time during user A’s absence, and user B specifies user C as an alternate user ID. In this case, the system does not send workflow routings originally intended for user A to user C. |
| Workflow Attributes |
Select one or more check boxes. The available options are determined by the workflow setup at your site. These settings affect how you receive ad hoc workflow routings through your workflow system. An email user receives notifications through email, while a worklist user receives notifications through worklists. |
| Miscellaneous User Links |
Follow this link to view other security links. These links are controlled by the security configuration of your system. Contact your system administrator for more information. |
|
Use the Email grid to edit your current email address or enter additional email types, such as home or Blackberry. You can enter one address of each Email Type. |
|
| Instant Messaging Information |
Use the Instant Messaging Information grid to edit your current instant messaging information. You can initiate an outbound chat with a customer using instant messaging networks. This functionality enables an external user to participate in a business transaction through instant messaging. PeopleSoft MultiChannel Framework enables instant messaging through XMPP instant messaging servers. |