6 Oracle Database Appliance仮想化プラットフォームのプロビジョニング

Oracle Database Applianceには、システムを再イメージ化し、アプライアンスを仮想化プラットフォームとして構成するオプションがあります。

ノート:

Standard EditionおよびStandard Edition 2のOracle Real Application Cluster (Oracle RAC)データベースをプロビジョニングできますが、Oracle Database Appliance上の仮想化プラットフォームでOracle VM仮想化を使用し、サーバー・ライセンスごとに単一ソケットの制限に従う必要があります。単一ソケットの制限とは、サーバー当たり最大18個のコアを2の倍数で使用できることを意味します。残りのコアはアプリケーションに使用できます。

システムが仮想化OSイメージで構成されているかどうかの確認

Oracle Database Applianceに仮想プラットフォームをデプロイする前に、システムに仮想化OS ISOイメージがあるかどうかを確認します。

Oracle Database Applianceには、工場出荷時にベア・メタルISOイメージがインストールされています。仮想化機能を使用するには、仮想化OS ISOイメージを使用してシステムを再イメージ化する必要があります。

ベア・メタル・システムでは、odacliコマンドとodaadmcliコマンドを使用します。仮想化システムでは、oakcliコマンドを使用します。

次のステップを実行し、Oracle Database Applianceを再イメージ化して仮想化プラットフォームのISOイメージをインストールする必要があるかどうかを判断します。

  1. rootとしてログインします。
  2. システムが仮想化プラットフォームであることを確認するには、コマンドoakcli show env_hwを入力します。次に例を示します。
    # oakcli show env_hw 
    VM-ODA_BASE ODA X7-2-HA

    コマンドが有効な場合、システムは仮想化システムとして構成され、先頭に文字列VM-ODA_BASEが付いた出力が返されます。たとえば、このコマンドの出力は、プラットフォームが仮想マシン環境(VM-ODA_BASE)で構成され、ハードウェア・プラットフォームを特定することを示しています。

    システムがベア・メタル・プラットフォームとして構成されている場合は、コマンドoakcli show env_hwが無効になります。

仮想化プラットフォームの設定

両方のノードでdom0仮想化オペレーティング・システムを設定し、初期パブリック・ネットワークを構成します。

仮想化されたオペレーティング・システム・イメージは、両方のノードで同時にプロビジョニングするか、順番にプロビジョニングする必要があります。
  1. Oracle Database Appliance 19.13仮想化OS ISOイメージをダウンロードします。
    1. 外部クライアント・マシンからMy Oracle Supportにログオンします。
    2. Oracle Database Appliance仮想化OS ISOイメージのパッチを見つけます。パッチ番号については、Oracle Database Applianceリリース・ノートを参照してください。
    3. リリース19.13のパッチ・バージョンを選択します。
    4. 「Download」をクリックして、zipファイルを外部クライアントにダウンロードします。外部クライアントでzipファイルを解凍して、ISOイメージを取得します。
  2. ブラウザを開き、Node0のOracle Integrated Lights Out Manager (ILOM)にrootとして接続します。
    「Summary」ホームページが表示されます。
  3. リモート・コンソールを起動します。
    1. 左側のナビゲーションで「Remote Control」を開きます。
    2. 「Redirection」タブをクリックします。
    3. 「Launch Remote Console」をクリックします。
      コンソールのページに表示される内容は、システムの状態によって異なります。
  4. 仮想化OS ISOイメージを追加します。
    1. 「Devices」タブをクリックし、「CD-ROM」を選択します。
      ローカル・クライアントのファイル・ブラウザが開きます。
    2. Oracle Database Appliance仮想化OS ISOイメージを参照し、このイメージを強調表示して「Open」をクリックします。
  5. 次の起動デバイスとしてCD-ROMを構成します。
    1. 「ILOM Remote Console」タブの左側のメニューで「Host Management」を開きます。
    2. 「Host Control」をクリックします。
    3. 「Next Boot Device」メニューから「CDROM」を選択し、「Save」をクリックします。
  6. システムの電源を再投入します。
    1. 「Host Management」メニューで「Power Control」をクリックします。
    2. 「Power Cycle」を選択します。

    電源の再投入後にノードが戻ると、再イメージ化が自動的に開始されます。

    再イメージ化には数時間かかる場合があります。「Running Post-Install scripts」ページは静的ページであるため、再イメージ化プロセスが進行していないという印象を与える場合があります。再イメージ化中のインストール後プロセスは、ミラー化された2つのローカル・ハード・ディスクのパーティション間の同期が完了するまで待機します。この処理は、完了までに15分から20分かかることがあります。

    再同期の進捗を確認するには、[ALT]キーと[F2]キーの組合せを押して2番目のコンソールを開き、次のコマンドを入力します。

    # cat /proc/mdstat

    再同期が完了すると、再イメージ化が完了し、マシンが再起動します。

  7. Node1に対してステップ1から6を繰り返します。
    再イメージ化はノードに固有です。両方のノードを再イメージ化する必要があります。両方のノードを同時に再イメージ化できます。
  8. コンソールのホスト名がNode0でoak1、Node1でoak2であることを確認します。
    ホスト名がoak1またはoak2以外である場合は、ノードを再起動します。再起動が複数回必要になる場合があります。
    両方のノードでイメージが完了すると、画面にNode0 (sc0)のoak1が表示されます。

    ノート: 再起動中に両方のノードのノード番号を指定してください。最初のノードのノード番号0、2番目のノードのノード番号1を指定します。

  9. コマンドoakcli configure firstnetを使用して、localまたはglobalネットワークを構成します。ローカル・ネットワークの場合は、両方のノードでコマンドを実行します。グローバル・ネットワークの場合は、任意の1つのノードでコマンドを実行します。
    グローバル構成では、Oracle Database Appliance上の両方のノードの初期パブリック・ネットワークが設定されるため、デプロイメント・ソフトウェアをアプライアンスにダウンロードできます。
    # oakcli configure firstnet
    Configure the network for the node(s)(local, global) [global]: 
    The network configuration for both nodes:
    Domain Name: example.com
    DNS Server(s): Primary Dns Server: 192.0.2.18 
                         Secondary Dns Server: 192.0.2.19
                         Tertiary Dns Server: 
    Node Name Host Name
    0 node1
    1 node2
    Choose the network interface to configure (net1, net2) [net1]: 
    Configure DHCP on net1 (yes/no) [no]: 
    INFO: You have chosen static configuration on net1
    Enter the IP address for net1 on Node 0: 192.0.2.18
    Enter the IP address for net1 on Node 1: 192.0.2.19
    Netmask for net1: 255.255.252.0
    Gateway Address for net1 [192.0.2.18]: 
    INFO: Plumbing the IPs now on Node 0 ...
    INFO: Restarting the network now on Node 0 ...
    Determining if ip address 192.0.2.18 is already in use for device net1...
    :::::::::::::::::::::::::::::::::::
    INFO: Plumbing the IPs now on Node 1 ...
    INFO: Restarting the network now on Node 1 ...
    :::::::::::::::::::::::::::::::::::
    
  10. コマンドoakcli show firstnetを使用して、ノードへのIPアドレスを確認します。次に例を示します。
    # oakcli show firstnet
    Node: 0
    Host Name: hostname1
    Domain Name: example.com
    Network BootProto IP Address Subnet Gateway
    ------------------------------------------------------------------------------------
    net1 static 192.0.2.18 255.255.252.0 192.0.2.1
    ------------------------------------------------------------------------------------
    Node: 1
    Host Name: hostname2
    Domain Name: example.com
    Network BootProto IP Address Subnet Gateway
    ------------------------------------------------------------------------------------
    net1 static 192.0.2.18 255.255.252.0 192.0.2.1
    ------------------------------------------------------------------------------------
    DNS Address: 192.0.2.18,192.0.2.19

仮想化プラットフォーム・ソフトウェアのインストールとアプライアンスのデプロイ

仮想化プラットフォームのODA_BASEドメインをデプロイしてから、アプライアンスをデプロイします。

  1. テンプレート・ファイルをダウンロードし、dom0 (ノード0)の/OVSディレクトリにコピーします。
    1. 外部クライアント・マシンからMy Oracle Supportにログオンし、Oracle Database Appliance VMテンプレートをダウンロードします。
    2. メニューから最新バージョンを選択します。
    3. 各zipファイルの「Download」をクリックして、現在のOracle Database Applianceテンプレートを外部クライアントにダウンロードします。
  2. テンプレート・ファイルをノード0 (oak1-dom0)の/OVSディレクトリにコピーします。
    1. Secure Copy (scp)コマンドまたはUSBストレージ・デバイスを使用して、ODA_BASEテンプレートを外部クライアントからノード0のdom0にコピーします。ノード0 (test0-dom0)の/OVSディレクトリをターゲットの場所として使用します。

      ノート:

      USBドライブを使用してファイルを転送する場合は、まずファイルをFAT32ext3またはext4としてフォーマットします。NTFSファイル・フォーマットはサポートされていません。

    2. Oracle Database Applianceのノード0でrootとしてdom0にログインします。dom0にログインした状態のままで、このタスクの残りのステップを完了してください。
    3. /OVSディレクトリから、unzipコマンドを使用してzipファイルを抽出します。
      unzip p16186172_19.13.0.0.0_Linux-x86-64_1of4.zip
      unzip p16186172_19.13.0.0.0_Linux-x86-64_2of4.zip
      unzip p16186172_19.13.0.0.0_Linux-x86-64_3of4.zip
      unzip p16186172_19.13.0.0.0_Linux-x86-64_4of4.zip
      oda_base_19.13.0.0.0.gz01oda_base_19.13.0.0.0.gz02oda_base_19.13.0.0.0.gz03およびoda_base_19.13.0.0.0.gz04ファイルが抽出されます。
    4. catコマンドを使用して、ファイルを単一ファイルに連結します。
      ファイル名はバージョンによって決定されます。ダウンロードから正しいファイル名を使用してください。ファイル名を変更しないでください。
      cat oda_base_19.13.0.0.0.gz01 oda_base_19.13.0.0.0.gz02 oda_base_19.13.0.0.0.gz03 oda_base_19.13.0.0.0.gz04 > oda_base_19.13.0.0.0.tar.gz
      ファイル名と場所を書き留めます。次のステップで、/OVS/oda_base_19.13.0.0.0.tar.gzを指定する必要があります。
  3. (オプション)仮想ローカル・エリア・ネットワーク(VLAN)を定義し、/opt/oracle/oak/bin/ディレクトリからODA_BASEをデプロイします。プロンプトが表示されたら、前のステップで作成したテンプレート・ファイルの絶対パスとファイル名、コア・ライセンス、基本ドメインのメモリー割当てを入力します。
    deploy oda_baseオプションは、両方のノードでODA_BASEをデプロイします。
    使用可能なCPUコアの数やデフォルト・メモリーなどの値は、Oracle Database Appliance仮想化プラットフォームのハードウェア・プラットフォームによって異なります。次の抜粋は、bond0インタフェースを使用してvlanIDが200のv1200という名前のVLANを作成する例です。この例では、20個のCPUコアを定義しています。これは、各ノードで合計40個のCPUコアのうち20個のCPUコアがライセンスされ、デフォルト・メモリーが使用されることを意味します。
    # /opt/oracle/oak/bin/oakcli create vlan vl200 -vlanid 200 -if bond0
    Created vlan vl200
    
    # /opt/oracle/oak/bin/oakcli deploy oda_base
    Enter the template location: /OVS/oda_base_19.13.tar.gz
    Core Licensing Options:
      1. 2 CPU Cores
      2. 4 CPU Cores
      3. 6 CPU Cores
      4. 8 CPU Cores
      5. 10 CPU Cores
      6. 12 CPU Cores
      7. 14 CPU Cores
      8. 16 CPU Cores
       9. 18 CPU Cores
     10. 20 CPU Cores
     11. 22 CPU Cores
     12. 24 CPU Cores
     <continued ...>
       Selection[1 .. 37] (default 74 CPU Cores): 10
    INFO: Using the 20 cores
        DA base domain memory in GB(min 16, max 244)[default 244]: 244
    INFO: Using default memory size i.e. 244 GB
    Additional vlan networks to be assigned to oda_base ? (y/n) [n]:
    INFO: Deployment in non local mode
    INFO: Verifying active cores on local node
    INFO: Verified active cores on local node
    INFO: Verifying active cores on remote node
    NFO: Verified active cores on remote node
    INFO: Running the command to copy the template /OVS/oda_base_19.13.tar.gz to remote node 1
    
    oda_base_19.13.tar.gz    100% 7475MB 62.8MB/s   01:59
    INFO: Spawned the process 17728 in the deployment node 0
    INFO: Spawned the process 17729 in the node 1
    INFO: Validating LSI HBA PCI Cards on node 0
    INFO: Validating LSI HBA PCI Cards on node 0
    INFO: Validating LSI HBA PCI Cards on node 1
    INFO: Validating LSI HBA PCI Cards on node 1
    INFO: Deployment in local mode
    INFO: Deployment in local mode
    templateBuild-2017-02-14-23-51/swap.img
    templateBuild-2017-02-14-23-51/swap.img
    templateBuild-2017-02-14-23-51/System.img
    templateBuild-2017-02-14-23-51/System.img
    templateBuild-2017-02-14-23-51/u01.img
    templateBuild-2017-02-14-23-51/u01.img
    INFO: Extracted the image files on node 1
    INFO: The VM Configuration data is written to /OVS/Repositories/odabaseRepo/VirtualMachines/oakDom1/vm.cfg file
    INFO: Running /sbin/losetup /dev/loop0 /OVS/Repositories/odabaseRepo/VirtualMachines/oakDom1/System.img command to mount the image file
    INFO: Mount is successfully completed on /dev/loop0
    INFO: Extracted the image files on node 0
    INFO: Validated dom0 and odabase version
    INFO: Making change to the /OVS/Repositories/odabaseRepo/VirtualMachines/oakDom1
    /tmpmnt/boot/grub/grub.conf file
    INFO: Assigning IP to the second node...
    INFO: The VM Configuration data is written to /OVS/Repositories/odabaseRepo/VirtualMachines/oakDom1/vm.cfg file
    INFO: Running /sbin/losetup /dev/loop0 /OVS/Repositories/odabaseRepo/VirtualMachines/oakDom1/System.img command to mount the image file
    INFO: Mount is successfully completed on /dev/loop0
    INFO: Created oda base pool
    INFO: Validated dom0 and odabase version
    INFO: Making change to the /OVS/Repositories/odabaseRepo/VirtualMachines/oakDom1
    /tmpmnt/boot/grub/grub.conf file
    INFO: Assigning IP to the first node...
    INFO: Created oda base pool
    INFO: Starting ODA Base...
    INFO: Starting ODA Base...
    Using config file "/OVS/Repositories/odabaseRepo/VirtualMachines/oakDom1/vm.cfg"
    .
    Started domain oakDom1 (id=1)
    INFO: Storing the odabase configuration information
    Using config file "/OVS/Repositories/odabaseRepo/VirtualMachines/oakDom1/vm.cfg"
    Started domain oakDom1 (id=1)
    INFO: Storing the odabase configuration information
    #
    ODA_BASEの設定が完了しました。
  4. ODA_BASEのデプロイメントが有効で、ODA_BASEが構成されていることを確認します。
    • コマンドxm listを実行して、ODA_BASEが構成されていることを確認します。適切にデプロイされている場合、oakDom1が構成済のメモリーおよびvCPUとともに出力に表示されます。
      # xm list
      Name                                        ID   Mem VCPUs      State   Time(s)
      Domain-0                                     0  4096    40     r----- 482672.4
      oakDom1                                      2 32768     4     -b---- 132134.6
      
      
    • コマンドoakcli show oda_baseを実行します
      # /opt/oracle/oak/bin/oakcli show oda_base
      ODA base domain
      ODA base CPU cores      :2
      ODA base domain memory  :32
      ODA base template       :/OVS/oda_base_19.13.tar.gz
      ODA base vlans          :[ 'priv1', 'eth1']
      ODA base current status :Running
  5. (オプション) oda_baseのデプロイ後に、ODA_BASEのCPUまたはメモリーを変更する場合は、oakcli configure oda_baseを実行します。
    # oakcli configure oda_base
    Core Licensing Options:
            1. 2 CPU Cores
            2. 4 CPU Cores
            3. 6 CPU Cores
            4. 8 CPU Cores
            5. 10 CPU Cores
            6. 12 CPU Cores
            7. 14 CPU Cores 
            8. 16 CPU Cores 
            Current CPU Cores :10 
            Selection[1 .. 8](default 16 CPU Cores) : 5 
            ODA base domain memory in GB(min 16, max 244)(Current Memory 160G)[default 160] : 100 
    Additional vlan networks to be assigned to oda_base ? (y/n) [n]: n 
    Vlan network to be removed from oda_base ? (y/n) [n]: n 
    Configure VNC password for oda_base ? (y/n) [n]: y
    Please input your password: 
    Please confirm your password: 

    変更がシステムに反映されるようにするには、oakcli restart oda_baseコマンドを実行します。

  6. dom0ホスト名およびポート5900 (test0-dom0:5900)を使用し、vncviewerまたはvncsessionを使用してODA_BASEに接続します。
  7. oakcli configure firstnetを使用して、最初のノード(ノード0)で初期パブリック・ネットワークを構成し、ODA_BASEのデプロイメントを完了します。
    1. test0-dom0から192.168.16.27へのssh
    2. ルート・ユーザーとしてログインします。
    3. /opt/oracle/oak/oakcliディレクトリからコマンドoakcli configure firstnetを実行します。ODA_BASE (ノード0)ネットワーク情報を入力します。

      このコマンドでは、対話型スクリプトを使用し、ネットワークの構成に必要な情報の入力を求められます。環境要件に基づく値を入力してください。

      ネットワーク・ノードの構成を求めるプロンプトが表示されたら、ログオンしたノードでネットワークを構成するlocalオプションを選択します。

      eth1をネットワーク・インタフェースとして構成します。

      # /opt/oracle/oak/bin/oakcli configure firstnet
      Select the Interface to configure the network on (eth1 eth2) [eth1]:
      Configure DHCP on eth1 (yes/no) [no]:
      INFO: You have chosen Static configuration 
      Enter the IP address to configure : ip_odabase_node
      Enter the Netmask address to configure : ip_netmask
      Enter the Gateway address to configure : ip_gateway 
    IPアドレスがplumbされ、ネットワークがローカル・ノードで再起動されます。
  8. 次のコマンドを使用して、両方のノードのファームウェア・バージョンを確認します。
    [root@test0 ~]# oakcli show version -detail
  9. すべてのコンポーネント・バージョンが最新でないか、上位バージョンではない場合、両方のノードでパッチ・バンドルを解凍します。
    [root@test0 tmp]# oakcli unpack -package patch_number
  10. oakcli updateコマンドを使用して、ディスク、ILOM、BIOS、ファームウェアなどのサーバー・コンポーネントを更新します。
    [root@test0 tmp]# oakcli update -patch release_number --server
    INFO: DB, ASM, Clusterware may be stopped during the patch if required
    INFO: Both Nodes may get rebooted automatically during the patch if required
    Do you want to continue: [Y/N]?: y
    INFO: User has confirmed for the reboot
    INFO: Patch bundle must be unpacked on the second Node also before applying the patch
    Did you unpack the patch bundle on the second Node? : [Y/N]? : y
    INFO: All the VMs except the oda_base will be shutdown forcefully if needed
    Do you want to continue : [Y/N]? : y
    INFO: Running pre-install scripts
    INFO: Running prepatching on node 0
    INFO: Running prepatching on node 1
    oakcli update -patch release_number --storage
    [root@test0 ~]# oakcli update -patch release_number --storage
    WARNING: OAKD is not running in foreground mode.
    INFO: Cannot determine if VMs or shared repos are running.
    INFO: Patching may not shutdown all VMs/repos before patching
    Do you want to continue: [Y/N]?: y
    INFO: Proceeding with patching...
    INFO: DB, ASM, Clusterware may be stopped during the patch if required
    INFO: Both Nodes may get rebooted automatically during the patch if required
    Do you want to continue: [Y/N]?: y
    INFO: User has confirmed for the reboot
    Please enter the 'root' password :
    Please re-enter the 'root' password:
    INFO: Setting up the SSH
    ............Completed
    INFO: Running pre-install scripts
    ............Completed
    INFO: Running prepatching on node 0
    INFO: Running prepatching on node 1
    INFO: Completed pre-install scripts
    INFO: Shared Storage components need to be patched
    INFO: Patching storage on node 192.168.16.28
  11. ファームウェアのパッチ適用が完了したら、適切なすべてのコンポーネントが更新されていることを確認します
    # oakcli show version -detail
  12. Oracle Grid InfrastructureおよびOracle Databaseソフトウェアをアプライアンスにデプロイします。
    1. VNC接続を使用して、xtermセッションを開始し、/opt/oracle/oak/binディレクトリに移動し、コマンドoakcli deployを実行してOracle Database Appliance Managerコンフィギュレータを起動します。
      # xinit /usr/bin/xterm
      # /opt/oracle/oak/bin/oakcli deploy
      The Oracle Appliance Manager Welcome window is displayed.
      X11トンネリングを使用して、ソフトウェアをデプロイすることもできます。X11対応デスクトップから、次のコマンドを実行します。
      # ssh -g -Y ODA_BASE IP -l root
      sshセッション内で、次のコマンドを実行します。
      # /opt/oracle/oak/bin/oakcli deploy
  13. Oracle Appliance Managerの「Welcome」ウィンドウで「Next」をクリックします。
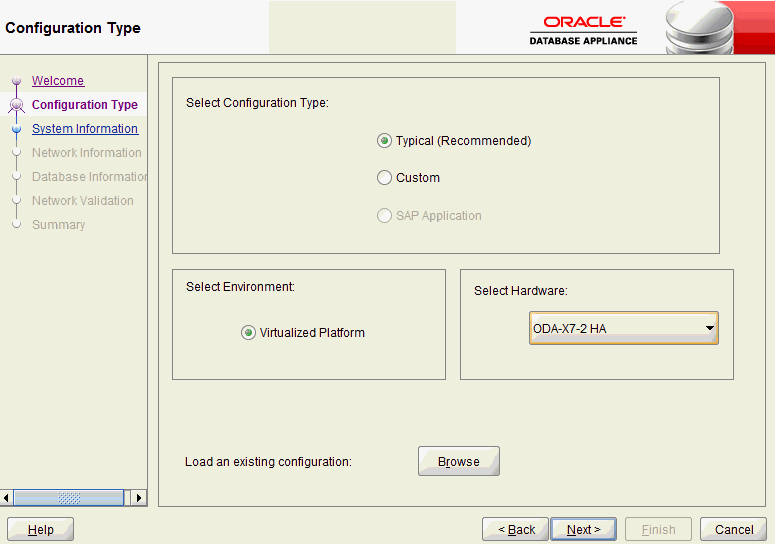
  14. 構成タイプを完了します。
    • このバージョンのコンフィギュレータを使用して以前に作成した構成ファイルを使用する場合は、「Browse」をクリックして、クライアント上でファイルを検索します。「Next」をクリックします。
    • 構成ファイルがない場合は、「Custom」構成タイプを選択し、メニューからハードウェア・モデルを選択します。「Next」をクリックします。
  15. システム、ネットワークおよびデータベース情報の構成の詳細を入力または確認します。
  16. 「Summary」ページで構成オプションを確認し、構成をデプロイします。
    1. (オプション)「Save」をクリックして、構成ファイルを保存します。
    2. 「Install」をクリックして、構成をデプロイします。
    デプロイメントの完了には1時間かかる場合があります。インストールの進捗を監視します。デプロイメントが完了したら、次のステップに進みます。
  17. ODA_BASE (ノード0)でoakcli show version -detailコマンドを実行して、デプロイメントを検証します。
    # /opt/oracle/oak/bin/oakcli show version -detail
    出力には、各コンポーネントのシステム・バージョン、コンポーネント名、インストール済バージョンおよびサポートされているバージョンが表示されます。
  18. ASRを構成した場合は、Node0で次のコマンドを実行して、デプロイメントを確認します。
    # oakcli test asr