1 Papagena Format
The following section describes the setup and usage of Credit Card Transfer for PAPAGENA Handling.
Prerequisites, Supported Systems, and Compatibility
Compatibility
SPMS version 20.3 or later. For customer operating on version below 20.3, database upgrade to the recommended or latest version is required.
Prerequisites, Supported Systems, and Compatibility
This section describes the minimum requirements for PAPAGENA Credit Card handling and supported peripherals.
-
Credit Card Transfer.exe
-
Tools.exe
-
SPMS parameters
-
SPMS DLL
-
MTIPADLIB.dll
-
IPADLIB.dll
-
SPMS Parameters
This section describes the parameters available to the Credit Card Transfer module which are accessible from Administration module, System Setup, Parameter function.
Table 1-1 PAR _GROUP General
| PAR Name | PAR Value | Description |
|---|---|---|
|
Enable Signature Capture for Credit Card |
0 or 1 |
Prevent the credit card registration without a signature when enabled. 0 - Disable Signature Capture for Credit Card. 1 - Enable Signature Capture for Credit Card. |
|
Disable C/Card and Posting when auth is decline |
0 or 1 |
0 - No credit card deactivation and no posting disable. 1 - Deactivate the credit card followed by the posting if there are no other active credit cards. 2 - Deactivate the credit card. Posting remains enabled. |
|
Top Up Percentage |
<value> |
Specify top up percentage to be calculated with the total authorized amount. For example, Total Auth Amount=1000 * 15% = 1150 as New Auth Amount. |
|
Test Auth Amount |
<value> |
Specify PAPAGENA test authorization amount for both online and offline mode. |
|
Card Track Data not Stored |
<BLANK> |
List of card types that should not store or track data in the database. Format (‘Card Type 1’,’Card Type 2’). For example, ('DS','DI','JC','DC'). |
|
Allow Manual Card Entry for Papagena |
0 or 1 |
0 - Do not allow manual entry when card swipe fail. 1 – Allow Manual Entry when card swipe fails. |
Table 1-2 PAR_GROUP Interfaces
| PAR Name | PAR Value | Description |
|---|---|---|
|
Batch CCard Processing Format |
PAPAGENA |
Specify the message format to be generated by Credit Card Transfer program. |
|
Merchant ID |
<character> |
Defines the Merchant ID for the authorization file. |
|
CC Auth/Settlement Folder |
Folder path |
Repository location for authorization/settlement files generated by OHC Credit Card Interface. Note: To avoid adverse impact on your system, please abstain from using the following folder path:
|
System Configuration
This section describes the setup of various system codes required by PAPAGENA handling. These codes are set up in Administration module, Financial Setup, Department.
Department Setup
For charging and posting, a debit and credit department code for each credit card type accepted by the ship must be configured in SPMS.
-
Log in to the Administration module and select Financial Setup, Department Setup from the drop-down list.
-
Click New to create a Sub-Department code.
-
Under the Main Department section, enter the credit/debit card information such as Payment Type, Department Code, and Description.
-
In the Payment Type Details section,
-
Enter the first two digits of the first set of credit card number in the Credit Card digits.
-
Enter the Credit Card ID. For example, MC - MasterCard, VI - Visa, and others.
-
Select the corresponding Credit Card Internal ID from the drop-down box.
-
Enter the Credit Card Merchant Number provided by the Service Provider.
-
Set the Minimum Authorized Value to 0.
-
Select the Commission Department from the drop-down list and update the Commission Rate in percentage.
-
Check the Debit Card No Commission charge if the commission is not applicable to debit card.
-
-
In the Department Security access, select the appropriate security level from the drop-down box.
-
Select the Payment Type in Payment Department Type. Options are: Both Credit and Debit card, Credit card, or Debit card.
-
Click OK to save.
Receipt Setup
You can generate a receipt upon payment, which requires setting up a report template. A Standard Credit Card receipt template is available in Administration module, System Setup, Report Setup, Receipts Group. Contact Oracle Hospitality Cruise Support if you would like to configure a customized receipt format.
Registration of Credit Card
The SPMS program does not allow credit card registration without a signature if the Enable Signature Capture for Credit Card parameter is enabled, and a signature device is configured in the hardware option setup.
-
Log in to the Management module and select Guest from the Cashier Menu.
-
Select a checked-in guest and click the Get Credit Card button.
-
The system prompts to swipe a card through a reader.
-
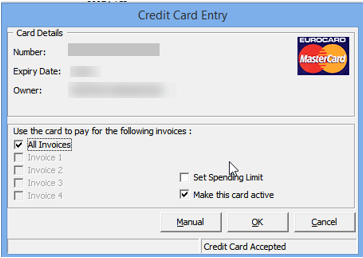
After you swipe the credit card, the credit card details, validity and status of the card populates onto the Guest Handling, Credit Card Entry screen. If the card is valid, the card status shows Credit Card Accepted.
Figure 1-1 Credit Card Entry Screen
-
Click OK to proceed with payment card registration or click Cancel to terminate the payment card registration process.
-
When you click OK, the system prompts a signature screen for the card holder to sign and activates when the Enable Signature Capture for Credit Card parameter is enabled and a Signotec LCD Signature Pad Omega is installed.
-
Allow the cardholder to place the signature on the Signotec Signature pad and press the green check mark to complete the credit card registration. To capture a new signature, press the Refresh icon to clear the screen.
-
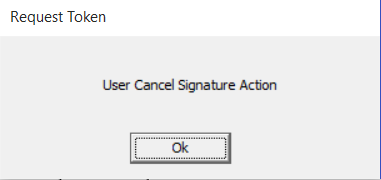
After the registration is successful, this set offs a confirmation prompt. Click OK to confirm. If the ‘X’ is clicked, this cancels the token request.
Figure 1-2 Credit Card Screen — Credit Card Registration is Complete
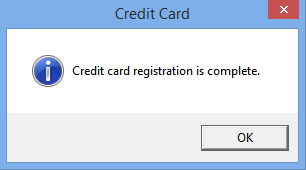
Figure 1-3 Signature Screen — User Cancel Signature Action
-
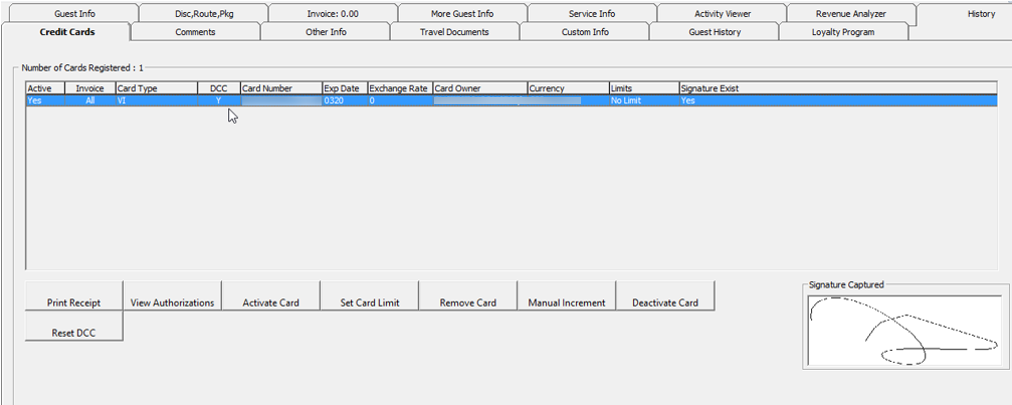
The credit card information and signature captured are stored in the Guest Handling Credit Card tab.
Registering Credit Card in Advance Quick Check-In (AQCI)
-
Start the AQCI program and select a checked-in passenger.
-
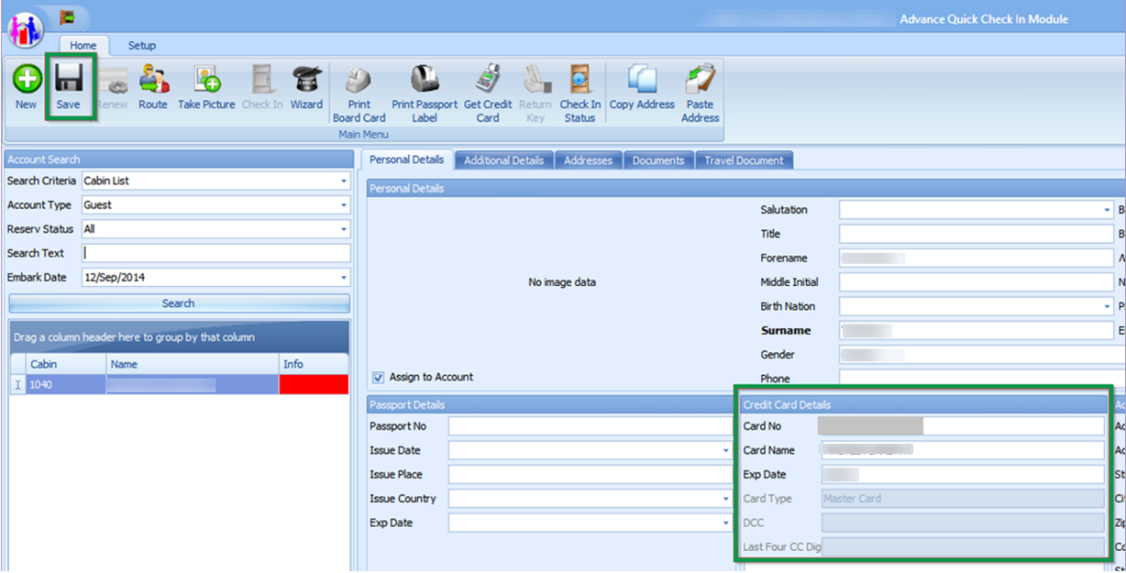
Click the Get Credit Card button at the ribbon bar. Both devices prompt ‘Please Swipe card’. At the Request Token prompt, swipe the credit card through a card reader device.
-
The detailed from the swiped credit card populate under Credit Card Details field. Click Save at the ribbon bar to save the information and this activates the signature screen on the Signotec Signature pad if the device is installed.
Figure 1-4 Advance QCI Credit Card Section
-
Click Save to proceed with the registration process. The signature screen prompts when the Enable Signature Capture for Credit Card parameter is enabled and the Signotec Signature Pad is installed.
-
The registered credit card details are stored in the Guest Handling, Credit Card tab.
Credit Card Transfer Interface
Table 1-3 Credit Card Transfer Interface Functions
| Authorization | Settlement |
|---|---|
|
|
-
Start the Credit Card Transfer Interface and select the Authorization menu.
-
Select the Test File option from the drop-down menu.
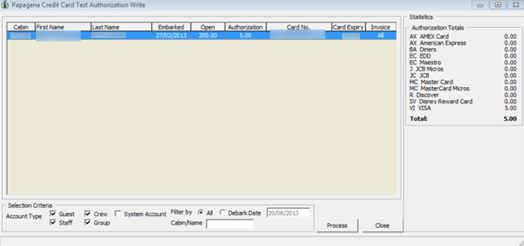
-
All payment cards requiring authorization are listed in the Test Authorization screen, with the exception of credit card registered with a token.
Figure 1-5 Credit Card Transfer — Test Authorization Screen
-
Click Process to generate the Test Authorization. The amount shown in the Test Authorization is the value set within the Test Auth Amount parameter.
-
Repeat step 1 of Creating Test Authorization File and then select New Authorization File from the drop-down menu.
-
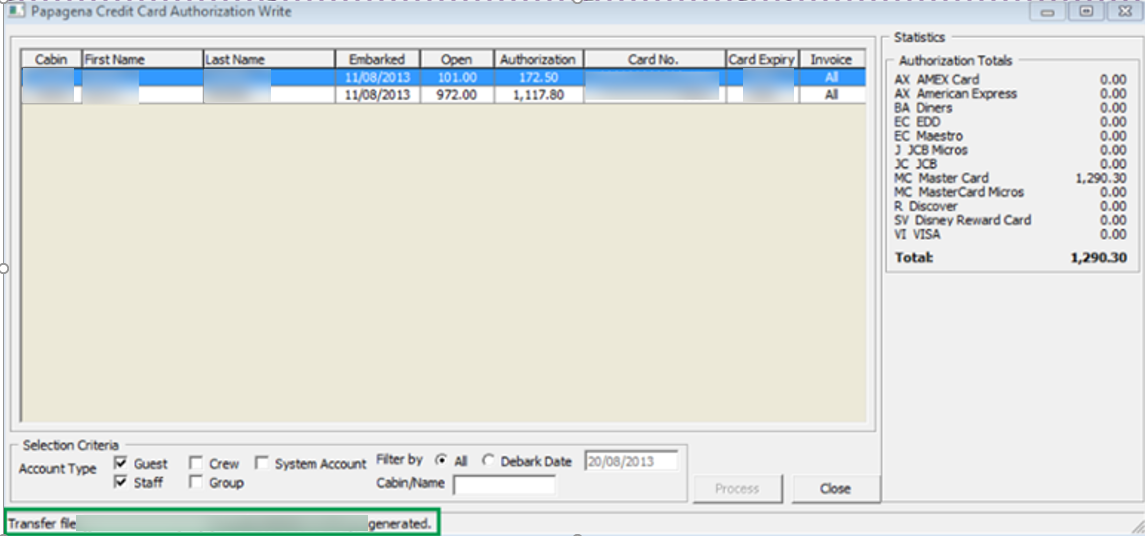
All payment cards requiring an incremental authorization are listed in the PAPAGENA Credit Card Authorization Write screen.
Figure 1-6 Credit Card Transfer — New Authorization Screen
-
The initial authorization can be generated only when the Test Authorization is approved. Following are the validation prompts during the Test Authorization when generating an initial authorization:
-
Credit Card registered without Test Authorization or No Test Authorization - The system prompts ‘There is Test Authorization not created yet’.
-
Credit Card registered with Test Authorization has status Outstanding or Declined - The system prompts ‘‘There is Test Authorization without response or declined response’
-
-
Click the Process button to generate the Initial Authorization file. After the incremental authorization file is created, the screen displays the location of the saved file. A sample of the incremental file is illustrated in Figure 1‑10 - Sample Authorization File
Figure 1-7 Sample Authorization File

-
The authorization status of the card appears as Outstanding in the Management module, Guest Handling, Credit Card tab, View Authorization function.
Reading Authorization File
-
Repeat step 1 of Creating Test Authorization File and select Read Authorization File from the drop-down menu.
-
On the PAPAGENA Credit Card Authorization Read screen, select Open to locate the response file returned by the merchant.
-
Click the Process button to process the information on file. The screen displays a progress status.
Figure 1-8 Credit Card Transfer — PAPAGENA Credit Card Authorization Read

-
At the end of the process, the system updates the payment card status to Authorized. You can verify the status by logging into the Management module, Guest Handling, Credit Card tab, View Authorization function.
Figure 1-9 Management - Authorization Screen
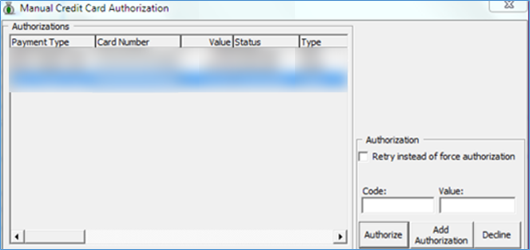
The above process also updates the CRD_TOKEN field followed by CCT_TOKEN field in the database, if the settlement record is created before running the Read Authorization.
Creating Incremental File
When an account balance exceeds the initial authorization amount, you must obtain an additional authorization value to allow postings to flow through the account.
The process for obtaining additional authorization is the same as the steps in Creating Initial Authorization File and Reading Authorization File.
Obtaining Manual Authorization
-
In the Management module,Guest Handling function, select the guest account.
-
Navigate to the Credit Card tab and click View Authorization.
-
In the Authorization screen, select Add Authorization.
-
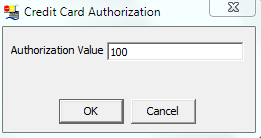
Enter the value including the initial authorized value in the Credit Card Authorization screen when prompted and click OK to save.
Figure 1-10 Management — Add Authorization Screen
-
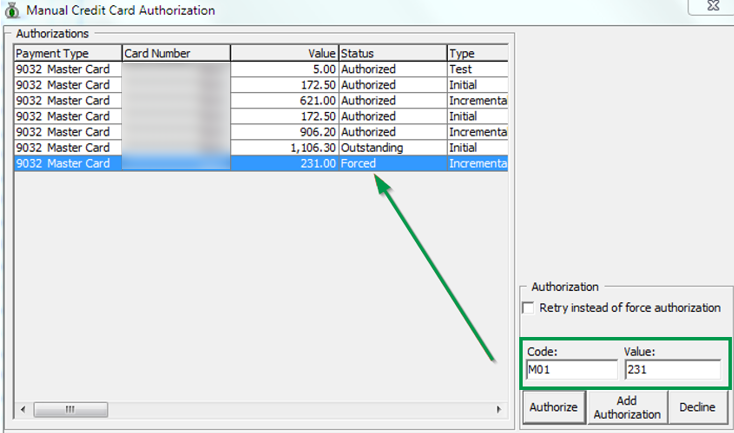
An additional authorization is added to the Authorization grid with its status shown as Outstanding. Select the line item from the grid, enter the code and value obtained, and then click Authorized. This process overwrites the existing value and changes the authorization status to Forced, and writes the authorization code into the Settlement file as the last authorization code.
Figure 1-11 Management — Manual Authorization
Creating Settlement File
-
At the Credit Card Transfer Interface, select the Settlement menu, and select New Settlement File from the drop-down menu.
-
The settlement file can only be generated when the Test Authorization is approved. Below is the validation prompt during the Test Authorization when generating an initial authorization for:
-
Credit Card registered without Test Authorization or No Test Authorization - the system prompts: “There is Test Authorization not created yet”.
-
Credit Card registered with Test Authorization has status as Outstanding or Declined. The system prompts the following message: “There is Test Authorization without response or declined response.”
If the Settlement has Test Authorization as Outstanding or Declined, this settlement only shows in the Settlement Write screen and it does not write into the Settlement File.
If the Settlement does not have an authorization and
CCT_TOKENthe settlement is then written into the Settlement File withCC|ORDER
-
-
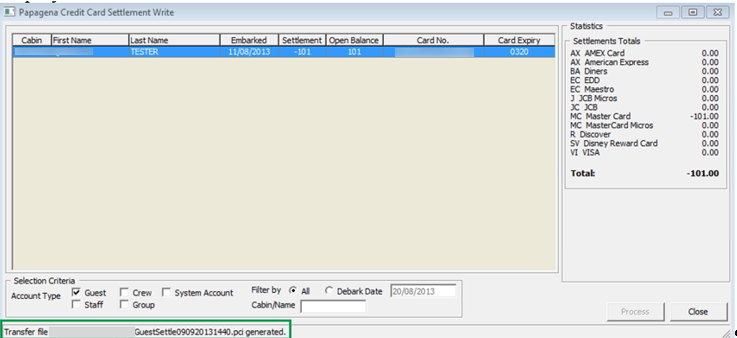
Click the Processbutton to generate the Settlement File. After the Settlement file is created, the location of the saved file is displayed on the screen.
Figure 1-12 Credit Card Transfer — Settlement Write Screen
Reading Settlement File
-
From the Settlement drop-down menu, select Read Settlement File.
-
On the PAPAGENA Credit Card Settlement Read screen, click the Open File button to locate the Settlement Response file.
-
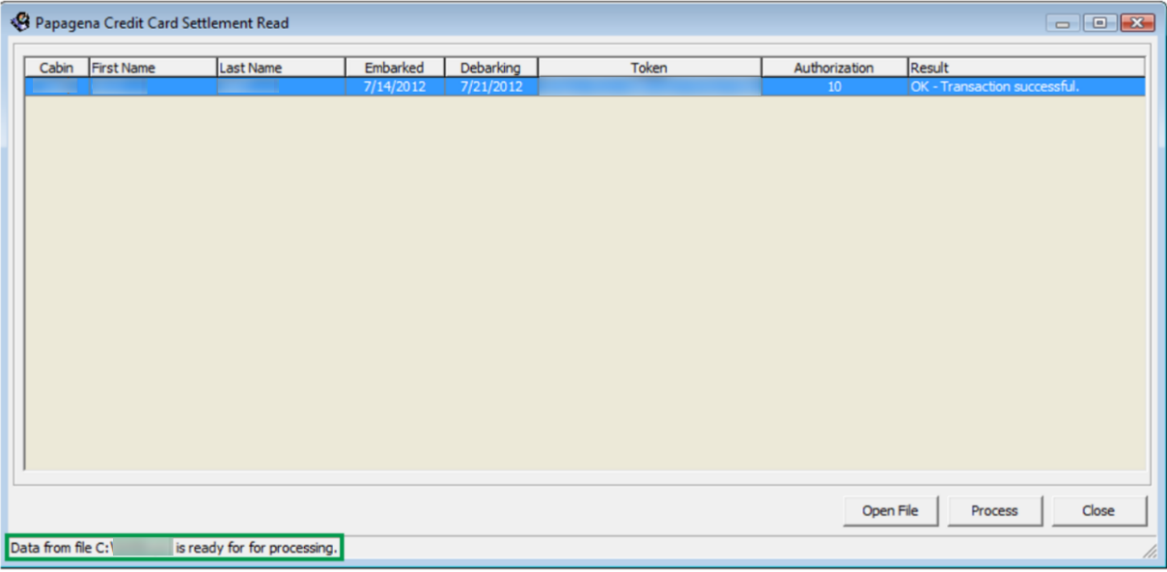
The status of the process is displayed on the Settlement Read screen. Click the Process button to read and update the Settlement record.
Figure 1-13 Credit Card Transfer — Settlement Read Screen (Ready to Process)
Troubleshooting
This section describes the troubleshooting steps for resolving some known issues encountered in PAPAGENA Handling across various modules.
Tools
Table 1-4 Tool Known Issue and Solution
| Known Issue | Solution |
|---|---|
|
Error — ‘Key unable to upload’ |
Register |
|
Error — ‘License Key has not been set’ |
Register |
Credit Card Transfer Interface
Table 1-5 Credit Card Transfer Interface Known Issue and Solution
| Known Issue | Solution |
|---|---|
| Credit Card Transfer does not reflect correct desired credit card format | Check the credit card format setup in Administration module, System Setup, Database Parameter, ‘Interfaces’, ’Batch CCard Processing Format’. |
PAPAGENA Mapping Fields
This section describes the mapping fields used in PAPAGENA Credit Card format.
File name format
The file naming format for PAPAGENA is explained in the following table, for example: GuestTransfer071020161138.pci
Table 1-6 PAPAGENA File Format
| Name | Description |
|---|---|
|
Guest |
The first word of the file name represents the Account Type base on the filter used to generate the authorization file. Guest - GuestTransfer#######.pci Crew - CrewTransfer#######.pci Group - GroupTransfer#######.pci Staff - StaffTransfer#######.pci All filter - <Blank>Transfer#######.pci |
|
Transfer |
The second word of the file name represents the type of transfer. TestTransfer = test authorization file Transfer = Authorization transaction file Settle = Settlement transaction file |
|
071020161138 |
The date/time format of the authorization file: DDMMYYYYHHMM |
|
pci or pcr |
The file format extension of the authorization file pci = request file pcr = response file |
Request File Format
The following tables describes the field definitions for a Request File for Authorization and Settlement.
Table 1-7 Request File Format
| Field | Type | Size | Definition |
|---|---|---|---|
|
Header |
|||
|
Head |
Varchar |
4 |
Fixed value: “HEAD” |
|
data-source |
Varchar |
30 |
File sender name, example “MV SHIP” |
|
Date |
Int |
12 |
Format: YYMMDDHHMMSS, 111019130712 |
|
file-number |
Int |
12 |
Counter for the file, example 42 |
|
Version |
Varchar |
4 |
The version string of our batch file, example 1.0 |
| Batch Record | |||
|
MerchantID |
Varchar |
20 |
Merchant ID. For example HOTEL |
|
Paytype |
Varchar |
10 |
“CC” - for VI, MC “EDD” - for EC “TO” - for if token with value |
|
Trxtype |
Varchar |
12 |
|tstauth|incauth|capture|refund tstauth: Test authorization, it is a mandatory authorization prior to generating an initial authorization. incauth: Incremental authorization increases amount of an existing authorization. Input has to be the total amount (initial+additional amount). capture: Book a pre-authorization. Capture amount has to be less than or equal to the authorized amount. refund: Refund an amount only valid for an existing order. |
|
TransID |
Varchar |
50 |
Unique transaction identification number in ASCII. Does not support special characters. |
|
TransID reference |
Varchar |
50 |
Reference to the original unique transaction where necessary. For example, capture, refund, incauth for an already existing transaction. |
|
Amount |
Int |
9 |
Always in the smallest currency unit (in cent for Euro and so on, example 100 for 1 Euro), empty if Trxtype=register |
|
Currency |
Varchar |
3 |
Currency code according to ISO 4217 for this transaction, for example, EUR,USD, or follow the Ship’s currency. |
|
Description |
Varchar |
27 |
Note to Payee in text for Employment Development Department (EDD) Debit Card or other Payment Method. |
|
AppCodeTel |
Int |
6 |
Special authorization code obtained manually through telephone for an authorization from an acquirer. |
|
Customer |
Varchar |
27 |
Customer name. |
|
CD_customerid |
Varchar |
16 |
Customer ID in Customer Relationship Management System. |
|
CD_customertype |
Varchar |
12 |
Type of customer, for example crew, passenger, staff, and others. |
|
CD_orderid |
Varchar |
16 |
Unique order-id. |
|
CD_paxid |
Varchar |
16 |
Customer unique id. |
|
CD_cruiseid |
Varchar |
10 |
Travel number. |
|
CD_accountid |
Varchar |
12 |
On-board account number. |
|
CD_roomid |
Varchar |
6 |
Cabin number. |
|
CD_invoiceid |
Varchar |
12 |
Account number. |
|
Reference |
Varchar |
30 |
Additional reference. |
|
Token |
Varchar |
30-40 |
UUID, ex. ed4bdf30-4ac4-102f-991a-000bcd838e00. Reference for a payment account, either from pre-registration (manifest) or earlier batch reply. Token usage is mandatory. |
|
CC_brand Varchar |
Varchar |
10 |
Credit card brand MasterCard, VISA, AMEX, DC, JCB. |
|
CC_cardowner |
Varchar |
27 |
Card owner. |
|
EDD_accountowner |
Varchar |
27 |
Bank account owner. |
|
Track1enc |
Varchar |
256 |
For future use. |
|
Track2enc |
Varchar |
256 |
For future use. |
|
Track3enc |
Varchar |
256 |
For future use. |
|
KSN |
Varchar |
32 |
For future use. |
|
TransID reference |
Varchar |
50 |
Reference to the original unique transaction where necessary. For example, capture, refund, incauth for an already existing transaction. |
|
Amount |
Int |
9 |
Always in the smallest currency unit (in cent for Euro and so on, example 100 for 1 Euro), empty if Trxtype=register |
|
Currency |
Varchar |
3 |
Currency code according to ISO 4217 for this transaction, for example, EUR,USD, or follow the Ship’s currency. |
|
Description |
Varchar |
27 |
Note to Payee in text for Employment Development Department (EDD) Debit Card or other Payment Method. |
|
AppCodeTel |
Int |
6 |
Special authorization code obtained manually through telephone for an authorization from an acquirer. |
|
Customer |
Varchar |
27 |
Customer name. |
|
CD_customerid |
Varchar |
16 |
Customer ID in Customer Relationship Management System. |
|
CD_customertype |
Varchar |
12 |
Type of customer, for example crew, passenger, staff, and others. |
|
CD_orderid |
Varchar |
16 |
Unique order-id |
|
CD_paxid |
Varchar |
16 |
Customer unique id |
|
CD_cruiseid |
Varchar |
10 |
Travel number. |
|
CD_accountid |
Varchar |
12 |
On-board account number. |
|
CD_roomid |
Varchar |
6 |
Cabin number. |
|
CD_invoiceid |
Varchar |
12 |
Account number |
|
Reference |
Varchar |
30 |
Additional reference. |
|
Token |
Varchar |
30-40 |
UUID, ex. ed4bdf30-4ac4-102f-991a-000bcd838e00. Reference for a payment account, either from pre-registration (manifest) or earlier batch reply. Token usage is mandatory. |
|
CC_brand Varchar |
Varchar |
10 |
Credit card brand MasterCard, VISA, AMEX, DC, JCB. |
|
CC_cardowner |
Varchar |
27 |
Card owner. |
|
EDD_accountowner |
Varchar |
27 |
Bank account owner. |
|
Track1enc |
Varchar |
256 |
For future use. |
|
Track2enc |
Varchar |
256 |
For future use. |
|
Track3enc |
Varchar |
256 |
For future use. |
|
KSN |
Varchar |
32 |
For future use. |
Response File Format
The following table describes the field definition for a Response File for Authorization and Settlement.
Table 1-8 Response File Format
| Field | Type | Size | Definition |
|---|---|---|---|
|
Head |
Varchar |
4 |
Fixed value: “HEAD”. |
|
data-source |
Varchar |
30 |
File sender name, example “MV SHIP”. |
|
Date |
Int |
12 |
Format: YYMMDDHHMMSS, 111019130712. |
|
file-number |
Int |
12 |
Counter for the file, for example 42. |
|
Version |
Varchar |
4 |
The version string of our batch file, example 1.0 . |
|
Response Record |
|||
|
TransID |
Varchar |
50 |
unique transaction id. |
|
Token |
Varchar |
40 |
Token, UUID for this payment account. Only if the payment account (credit card or EDD) is valid. |
|
Return-code |
Varchar |
10 |
00000000 (8 zeros for OK) NNNNNN (for Error. For example. 23055310). |
|
Status |
Varchar |
10 |
The textual representation of return code, “OK“, “Error“. |
|
Description |
Varchar |
255 |
Description for Status. |
|
Reference |
Varchar |
30 |
Additional reference (same as input parameter). |
|
CD_customerid |
Varchar |
16 |
Customer number from CRM. |
|
Approvalcode |
Int |
6 |
Approval-code for this transaction. |
|
EPAref |
Int |
9 |
EPA-Reference for this transaction, only used for Accounting. |
|
auth_time |
Varchar |
20 |
Server time stamp for the single transaction, format YYYY-MM-DDTHH:MM:SS as UTC Time. |
|
Footer |
|||
|
Foot |
Varchar |
4 |
Fixed value: “FOOT“. |
|
Counter |
Int |
9 |
Total number of records. |