Closing an Account with Close Posting
- Retrieve the account and navigate to the Invoice tab.
- Ensure all invoices are 0.00 balance. You will receive a notification prompt when the balance is not zero. Click OK to return to the previous window.
- If the account is balanced, click Close Postings.
- Select Yes when the system prompts you for a response. If you select No, you are returned to the Invoice tab without closing the postings.
- Select the Hide Posting button on the Invoice tab to hide all closed postings.
More Crew Info Tab
The More Crew Info tab stores additional information such as Other Related Information, Visa/Customs Info and Live Picture update from the main reservation and Crew Info tab.
Figure 3-48 More Info Tab
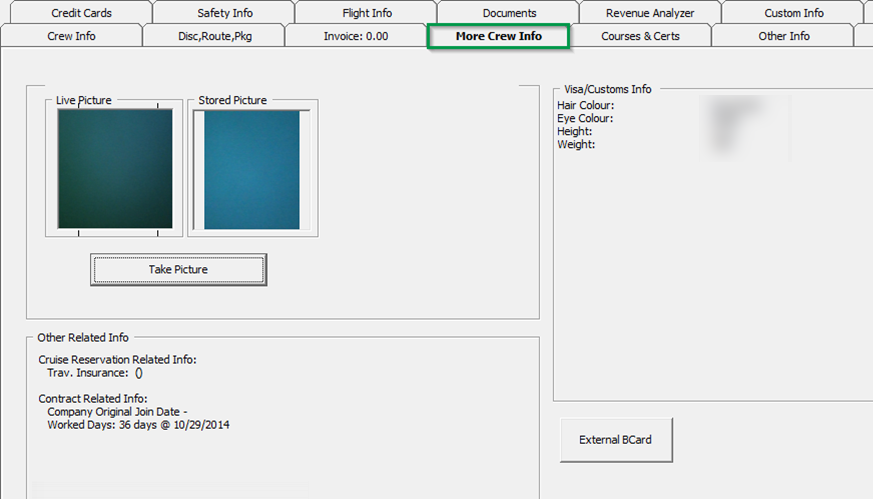
Take Picture Option
The Take Picture option captures the current crew picture and share it with other modules, enabling other users to easily recognize the crew when dealing with them. The supported picture file format is .jpg or .bmp.
Cruise Reservation Related Info
The Other Related Info section displays the Crew Travel Insurance Number and the number of days worked from the original joined date.
Courses & Certs
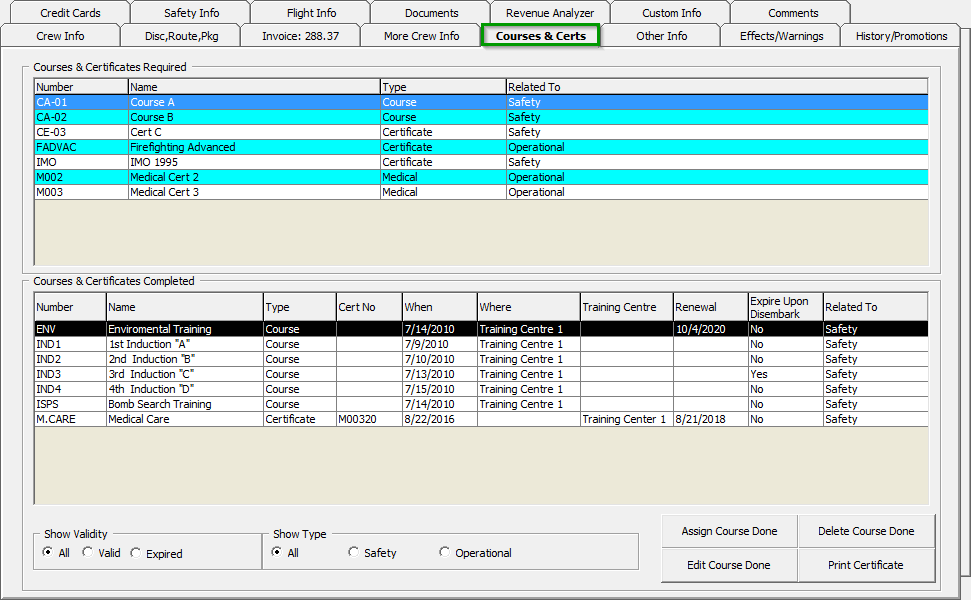
All crew members are required to complete the safety and operational courses throughout their tenure, and these courses are recorded the in Course & Certs tab. The required courses/certificates are listed at the top section and completed course in the bottom section of the tab.
Figure 3-49 Courses & Certificates Tab
Assigning Course Done
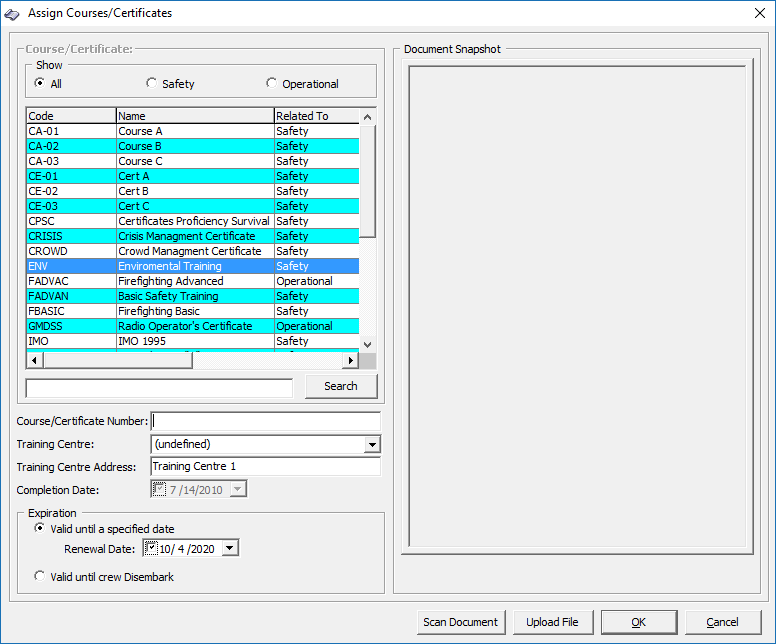
Figure 3-50 Course/Certificate Assignment Window
-
Select the course name from Courses & Certificates Completed section.
-
Click Assign Course Done.
-
In the Assign Courses & Certificates form, enter the Course/Certificate number and select the Training Center from the drop-down list.
-
Update the completion date and select the expiration date accordingly.
-
Once you update the completion date, you cannot change it.
-
Select either Scan Document or Upload File to store a copy of the certificate.
-
Click OK to update the course details.
Editing Course Done
-
Select the course name from the Courses & Certificates Completed section and click Edit Course Done.
-
In the Assign Course/Certificates form, update the necessary information.
-
Click OK to save.
Deleting Course Done
You can delete a completed course from the grid if you have access rights #740 assigned.
-
Select the course to delete and click Delete Course Done.
-
At the confirmation prompt, click Yes to complete the deletion.
Other Info Tab
In the Other Info tab, the crew medical certificates and uniform inventory are stored. You can also enable/disable the cabin telephone from here, this only work with an interface.
Assigning/Editing Medical Certificates
-
Retrieve the account navigate to the Other Info tab.
-
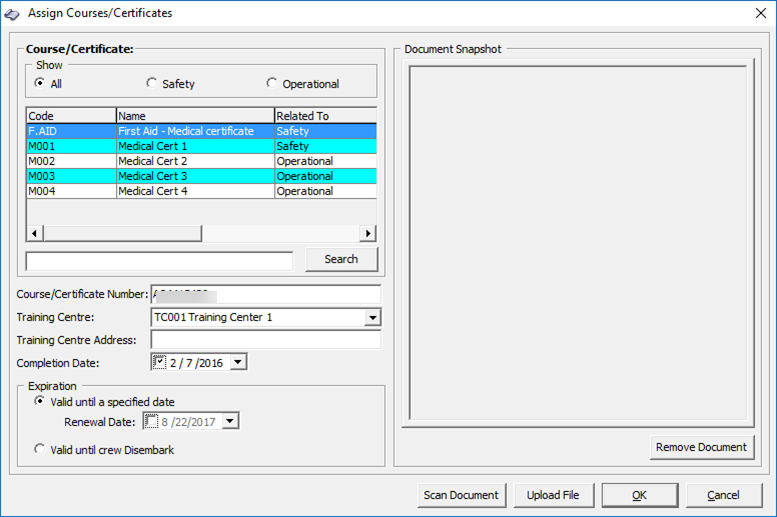
Click Assign to open the Courses/Certificates window.
Figure 3-51 Assign Course/Certificates
-
Select the type of Course/Certificate to show or use the Search field to search for a specific course/certificate.
-
Select the item from the courses displayed.
-
Enter the Course/Certificates Number, Training Centre and the center’s address, if any.
-
Select the Completion Date using the date-editor.
-
In the Expiration section, select the validity of the certificate.
-
Click the Upload File to upload a copy of the certificate or use the Scan Document feature to scan a copy of the certificate, if any. This functionality requires an installed scanner.
-
Click OK to complete the process.
-
To edit the certificate, select the certificate from the list and click Edit.
-
Change the necessary information and click OK to save.
Uniform Inventory
This functionality records uniforms issued to/returned by the crew. The function buttons are enabled depending on the type of transaction to show.
Adding/Returning Uniform
Figure 3-52 Crew Uniform Inventory

To add or return a uniform:
-
Retrieve the account and navigate to the Other Info tab.
-
Under the Uniform Inventory section, select Show Uniform and the transaction type to enable the function buttons.
-
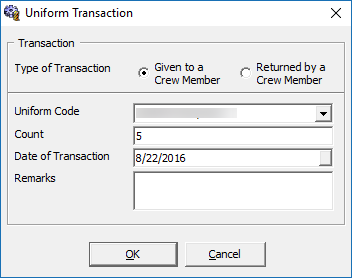
Click Add Uniform to open the Uniform Transaction window.
Figure 3-53 Assign Course/Certificates
-
Select the type of transaction and the uniform code from the drop-down list.
-
Enter the Count and select a date from Date of Transaction.
-
Click OK to save the transaction.
Editing Uniform Inventory
This function allows you to edit the transaction record, for example the count and date of transactions. However, you are not allowed to edit the transaction type.
Deleting Uniform Inventory
When a transaction type is entered incorrectly, you must first delete the transaction before entering the correct transaction.
Adding/Returning Uniform Items
The function of this feature is the same as Uniform Inventory, except that it records the inventory at the item level.
Figure 3-54 Item Inventory
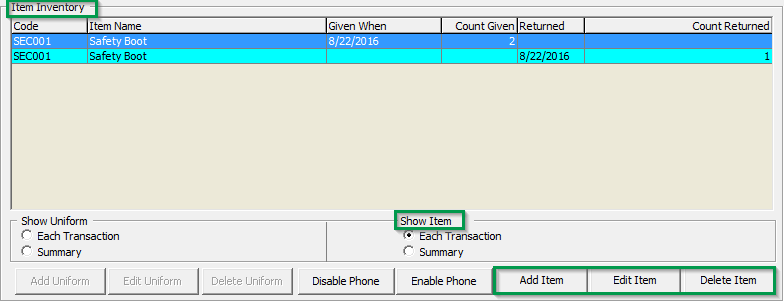
To enter an item, repeat the steps of Adding/Returning Uniform and select Show Item to enable the function buttons.
Effects/Warnings
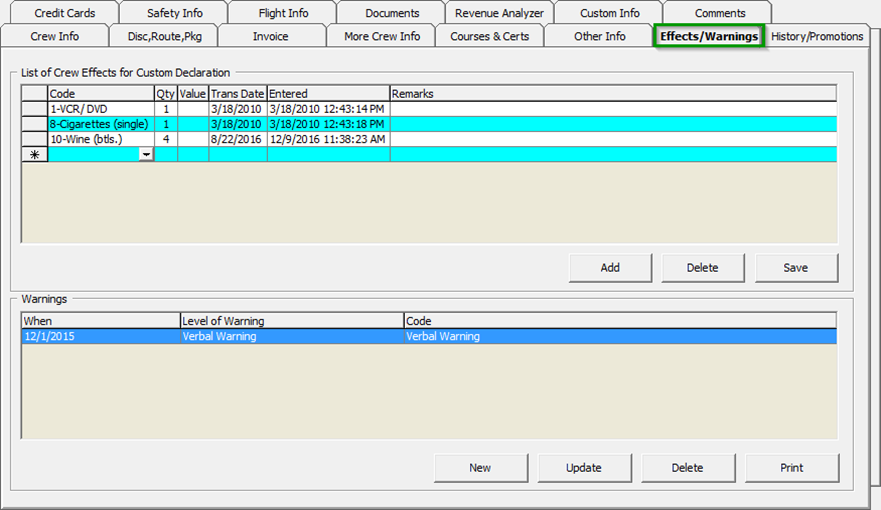
In the Effects/Warning function, any items that are prohibited, confiscated, or submitted for Customs Declaration are recorded, including warnings issued to the crew.
Figure 3-55 Effects/Warning Tab
Effects Item
Figure 3-56 List of Crew Effects

- Retrieve the account and navigate to the Effects/Warning tab.
- Under the List of Crew Effects for Custom Declaration section, click Add.
- At the Code field, select the item from the drop-down list, enter the quantity, and enter the transaction date.
- Click Save to save the record.
- To delete an item, select the transaction and click Delete.
- At the confirmation prompt, select Yes to complete the deletion.
Warnings
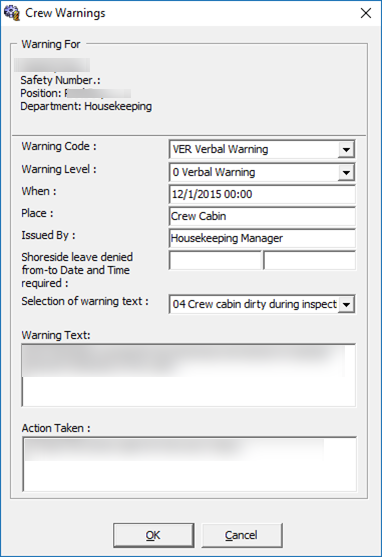
The Warnings function enables the Ship operator to record any warnings given to the crew, be it verbal or written and by severity.
Figure 3-57 Crew Warning
Adding A Warning
- Retrieve the account and navigate to the Effects/Warning tab.
- Under the Warnings section, click New.
- At the Crew Warning window, select the Warning code , and the Warning level and enter When, Place, and Issued By information in the respective fields.
- Insert a Shoreside leave denied period from/to, if any.
- Select the warning type from the drop-down list and enter the warning text and action taken against the crew.
- Click OK to save the record.
- To update a warning record, double click the item and update the necessary information, and click OK to save the changes.
- To delete a warning, select the line item, click Delete, and click Yes at the confirmation prompt.
History/Promotion Tab
Figure 3-58 History/Promotion Tab
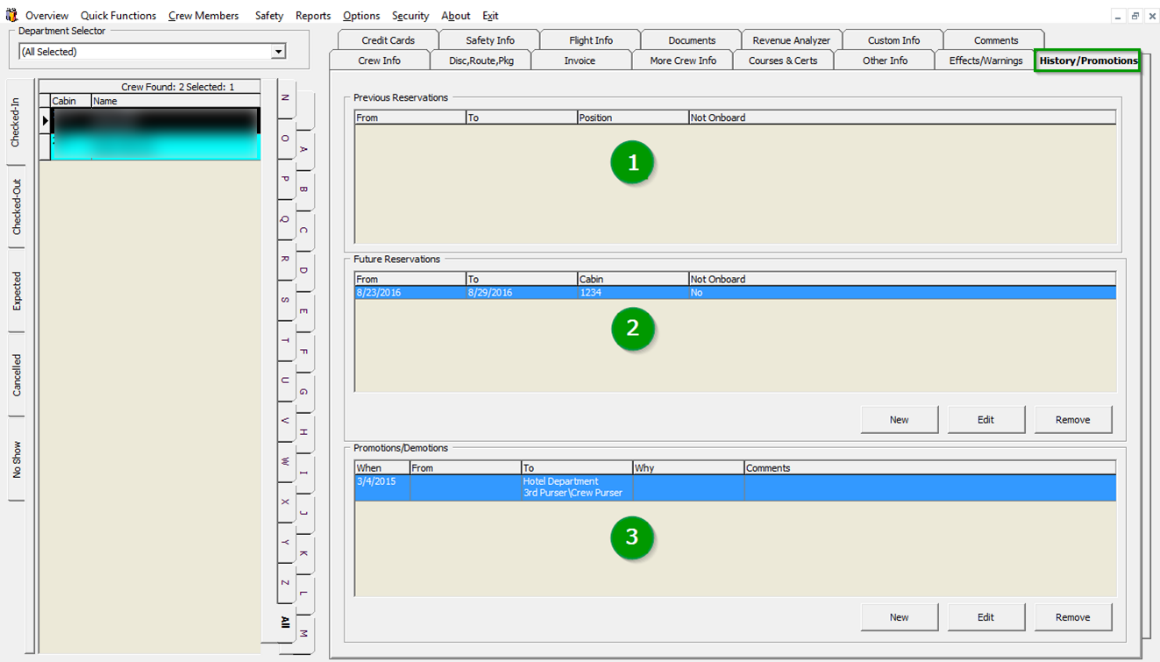
Table 3-19 Field Definition of History Tab
| Field | Description |
|---|---|
|
1 |
This section stores previous reservations by date, cabin number, notes and overall stay duration. Records are captured once the crew checks out. |
|
2 |
This section stores the future reservations. During System Date Change, the system checks the future reservations records for expected embarkation that falls on the next system date and automatically renews them to Expected Arrival. |
|
3 |
This section stores promotion/demotion history of crew during their employment. |
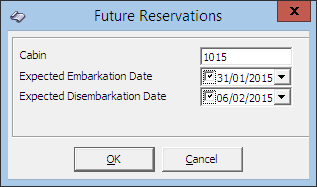
Creating Future Reservation
- Click New to open the Future Reservations form.
- Enter the Cabin Number and select the Expected Embarkation/Disembarkation Date.
- Clicking OK to save and insert the record in the Future Reservation section.
Figure 3-59 Creating Future Reservation
Editing Future Reservation
- Enter the Cabin number.
- Select the Expected Embarkation Date and the Expected Disembarkation Date using the drop-down list.
- Click OK.
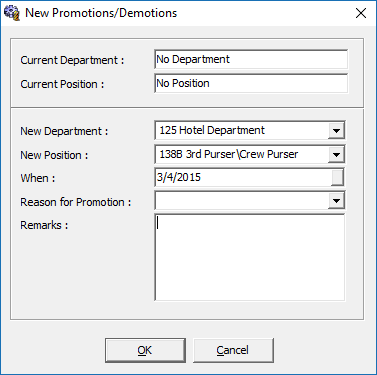
Adding Promotion/Demotion
-
In the Promotions/Demotions section of the crew, click New.
Figure 3-60 Adding Promotions / Demotions
-
In the New Promotions/Demotions form, select the New Department, New Position, When date, and Reason for Promotion from the drop-down list.
-
Insert a remark if any, and click OK to save.
Get Credit Cards Function
Similar to Get Credit function in Management module, this function enables you to update the crew’s credit card details by swiping the card through the magnetic card reader.
Updating Credit Card Details
-
In the Search Panel, search for the crew, then click the Get Credit Card in the Crew Handling window to open the blank Credit Card Entry form.
-
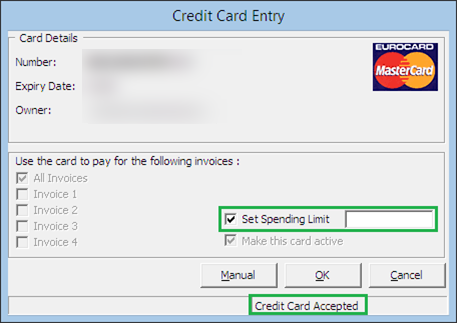
In the blank Credit Card Entry form, swipe the credit card through the magnetic card reader, and the system auto populates the credit card details.
Figure 3-61 Setting Credit Card Spending Limit
-
Select the Set Spending Limit to enter the credit limit of the card.
Manual Update of Credit Card Details
-
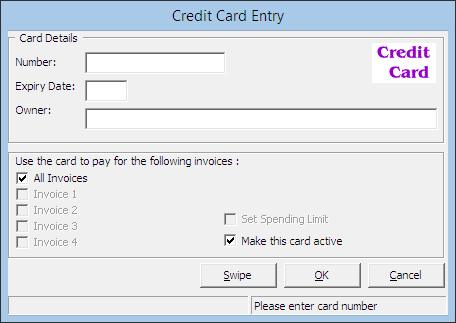
In the blank Credit Card Entry form, click Manual.
-
Manually enter the card information: credit card number, expiry date, and cardholder’s name, and click OK to save.
Figure 3-62 Manual Credit Card Entry Form
-
Click Yes at the CC Check prompt to update the credit card details on the crew account.
-
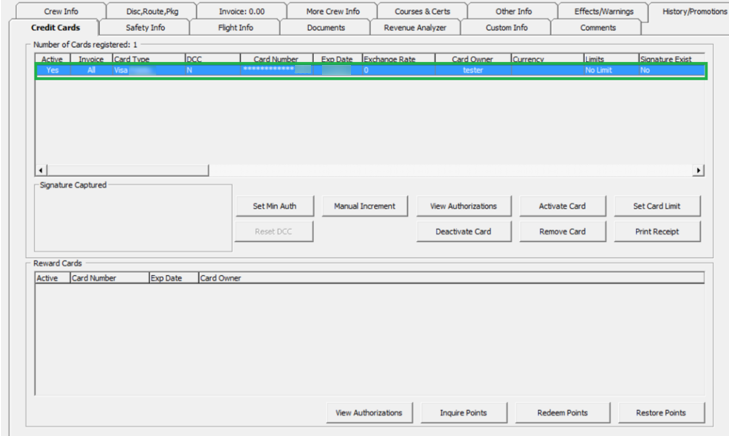
You can view the stored credit card details in the Credit Card tab.
Figure 3-63 Crew Handling Credit Card Tab
Registering Multiple Credit Card
-
Repeat steps 1 to 3 of Updating Credit Card Details.
-
You will receive a prompt asking for confirmation to register more than one car. Select Yes at the CC Check prompt.
Activating Credit Card for a Particular Invoice
-
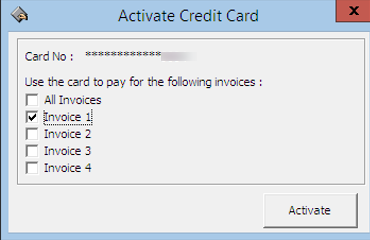
In the Credit Card tab, select the card to activate, and click Active Card.
Figure 3-64 Activating Credit Card by Invoice
-
Select the invoice at the Activate Credit Card prompt and click Activate to activate the card.
-
The selected invoice appears in the Invoice column, and the card is set as Active.
Figure 3-65 Multiple Credit Card Assignment

Capturing a Signature with Signature Device
Safety Info
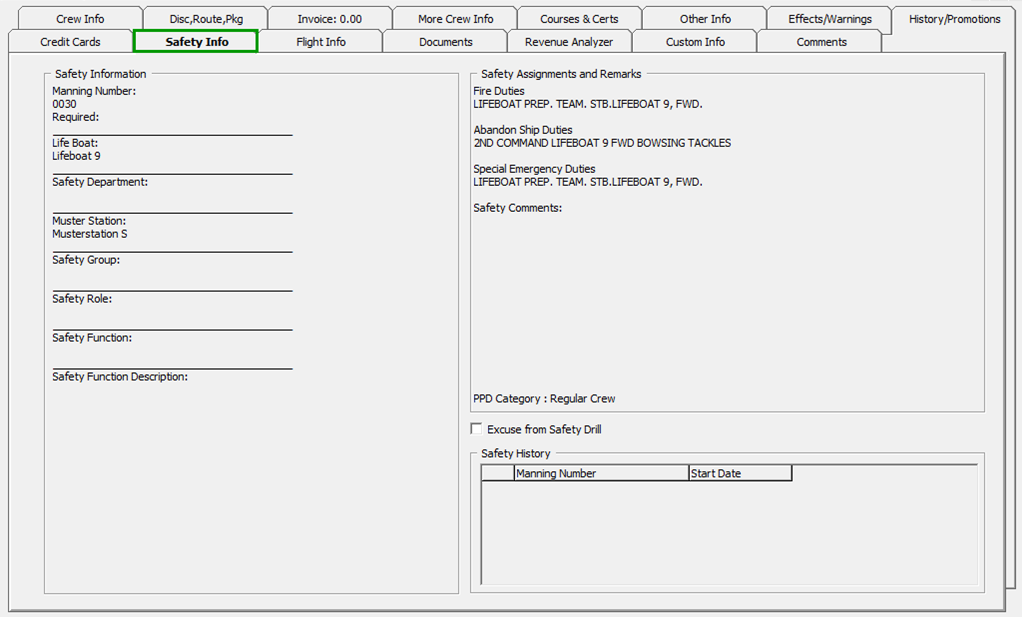
The Safety Info tab provides a view of the assigned Safety assignment of a crew member. All the information shown in this tab is updated through the Muster List Assignment function.
Figure 3-66 Safety Info Tab
Flight Info Tab
The Flight Info tab stores the crew flight assignment and home airport location, enabling you to schedule their flights and transfers closer to home airports.
Flight Assignment
You can enter the Arrival/departure flight information and transfer arrangements in the Flight Assignment section.
Figure 3-67 Flight Assignment in Other Info Tab
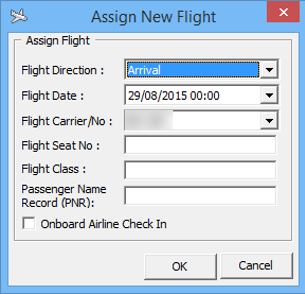
To Add an Arrival / Departure Flight Details
-
In the Flight info tab, Flight Assignment section, click Add.
-
Select the Flight Direction, Flight Date, and Flight Carrier/No from the drop-down list, and enter the Flight Seat No, Flight Class, and Passenger Name.
-
Click OK to save the record.
You can only use the Edit assignment to edit the transfer price, number of bags, bag label or seat number.
Figure 3-68 Edit Flight Assignment
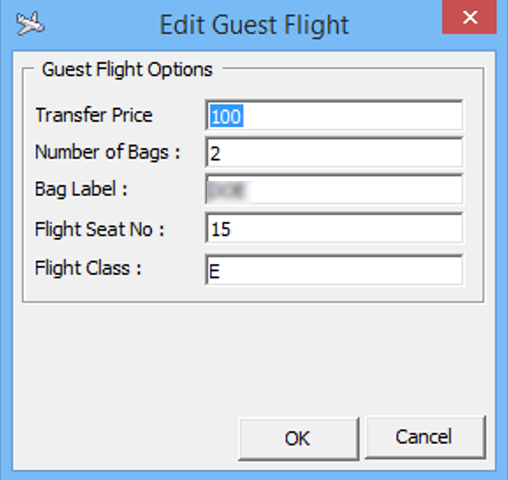
To add a Home Airport
-
At the Home Airport section, click the Airport field.
-
Select the code from the drop-down list for each field, and enter the validity of the home airport.
Documents Tab
The system stores details of the crew passport, identification or any travel documents captured through the passport/ID scanning device in this tab. The information is purged at the end of the cruise or according to the policy defined by the Ship.
Figure 3-69 Travel Documents Tab
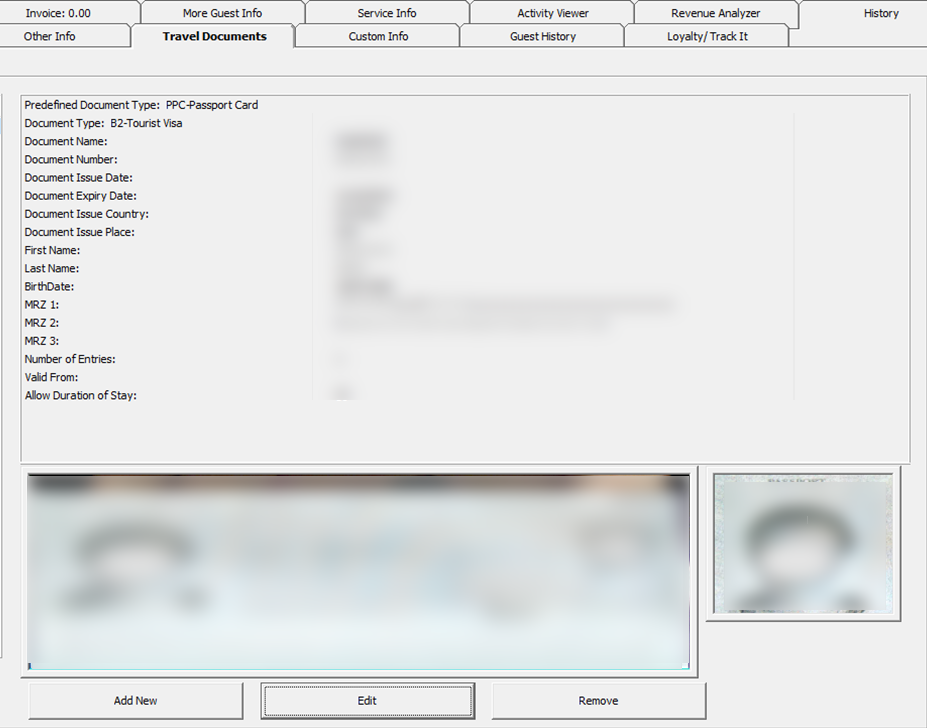
Table 3-20 Field Definition of Travel Documents
| Field | Description |
|---|---|
|
Predefined Document Type |
Document type configured in Administration Module, For example, passport, identification card. |
|
Document Type |
Type of Visa. |
|
Document Name |
Document type. |
|
Document Number |
Passport or ID number. |
|
Document Issue Date |
Document issue date. |
|
Document Expiry Date |
Document expiry date. |
|
Document Issue Country |
Country document were issued. |
|
Document Issue Place |
Document issued place. |
|
First Name |
First Name. |
|
Last Name |
Last Name. |
|
Birthdate |
Crew Birthdate. |
|
Code MRZ1 |
Machine Reader Track 1. |
|
Code MRZ2 |
Machine Reader Track 3. |
|
Code MRZ3 |
Machine Reader Track 3. |
|
Number of Entries |
Number of entries allowed. |
|
Valid From |
Validity of document. |
|
Allow Duration of Stay |
Allowed duration of stay on each visit. |
Adding / Editing a Travel Document
Figure 3-70 Travel Document Add/Edit Window
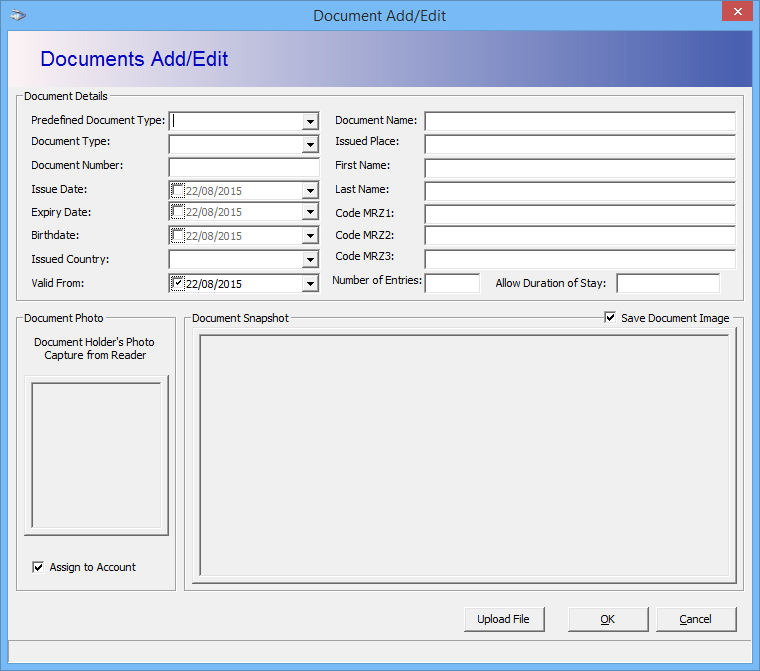
- In the Documents tab, click Add New to open the Document Add/Edit form.
- Select all applicable information from the list or manually enter the information.
- Click Upload File to upload the picture or scanned document.
- Click OK to save the travel document.
- To edit, click Edit, update the relevant information, and click OK to save.
Revenue Analyzer Tab
The Revenue Analyzer provides you an analysis of the selected crew by date, department, and transaction number order. It comprises two tabs: Department Details and Item Details. By default, information displayed on the window is imploded and only the transaction date, net total and gross total appear. To view detailed information, select the Expand All check box or manually click the ‘+/-‘ key to show/hide the column. You can also click the arrow down key on the header to further expand the information in the respective column. This feature is also available in the Management, Guest Handling function.
Figure 3-71 Revenue Analyzer Viewer Window
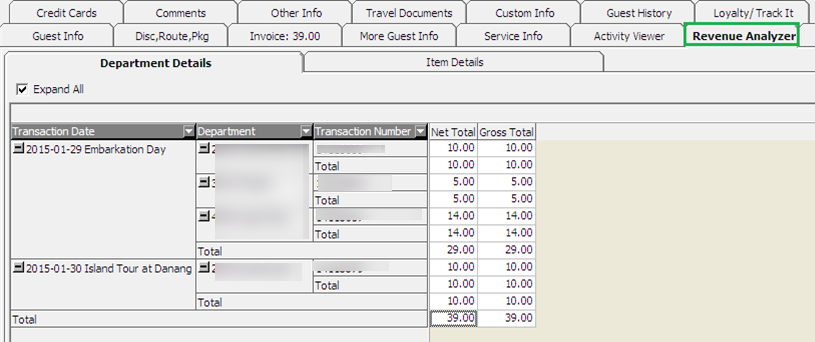
Table 3-21 Field Definition of Revenue Analyzer
| Field | Description |
|---|---|
|
Transaction Date |
Date transaction posted. |
|
Department |
Financial Department. |
|
Transaction Number |
System generated transaction ID. |
|
Total |
Sub-total of each Financial Department. |
|
Net Total |
Total Net amount (Total value excluding discount). |
|
Gross Total |
Gross amount (Total value before discount). |
Custom Info Tab
The Custom Info tab is a user definable fields that allows you to customize fields according to the operational requirements. The field names are defined in Administration, User Definable Field Setup.
Comments Tab
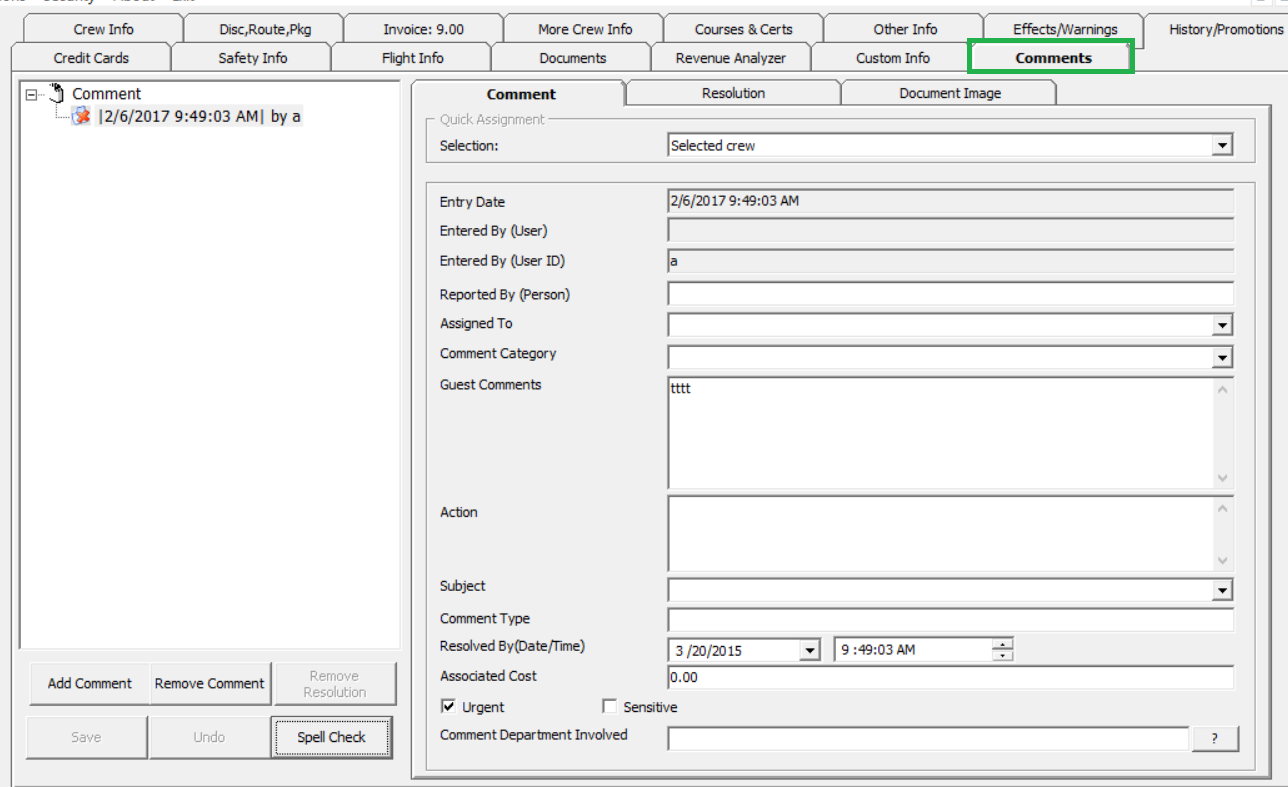
Figure 3-72 Comments Tab
Adding a Comment/Sub-comment
- Click the Add Comment.
- In the Comment tab, select the appropriate fields from the drop-down list.
- Enter the Reported By, Assigned To, Comment Category, Comment, and Associated Cost and check the urgency and sensitivity, if any.
- Click Save to save the record, which adds a Red Cross indicator on the Comment tab.
- When you select a Comment and click the Add Comment, it creates a sub-comment with the Comment Category and Comment Description being defaulted to the main comment. The Comment Category and Comment Description are not editable.
Attaching Image File
-
Select a comment and navigate to the Document Image tab.
-
Click Scan Document or Upload File if you are uploading an image from a storage location.
-
Click Save to save the image to the database.
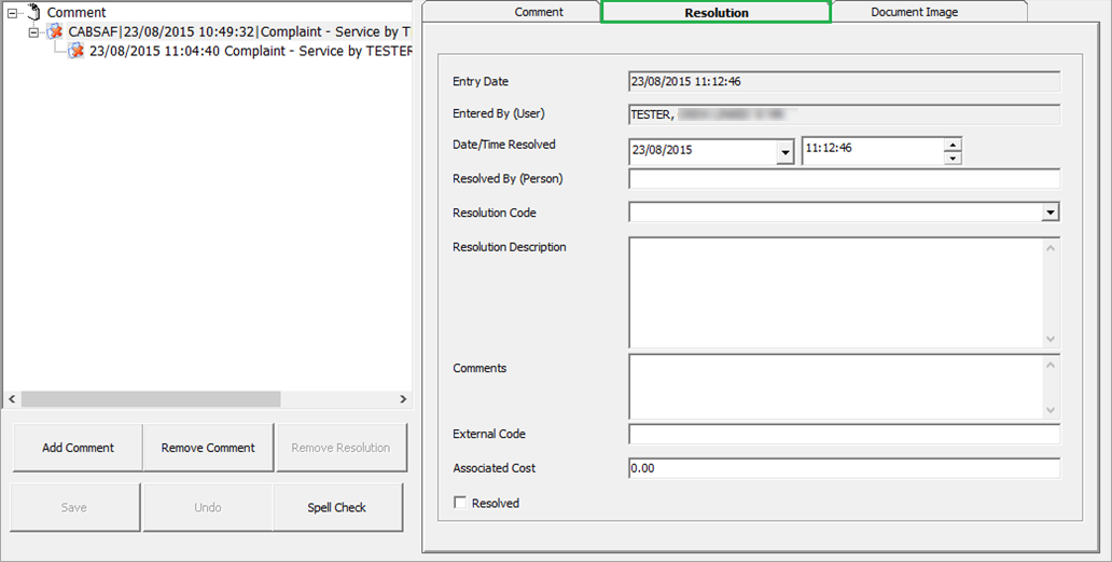
Resolving a Comment
-
Select the main comment and navigate to Resolution tab.
-
Enter the Resolved by (Person) and Resolution Description, and select the Resolved check box.
-
Click Save to save the resolution and place a check mark next to the comment (s).
-
Select the Resolved check box to set all sub-comments as resolved.
Figure 3-73 Comment Resolution Tab
Renew Reservation Function
-
Navigate to the Check Out tab in the Search Panel.
-
By default, the date is set to System Date in the Search Panel. Change the date to the passenger checked-put date.
-
Enter the crew’s Last Name or use the alphabets tab to search for the last name. Select the ALL tab to list all passengers departed on the date specified.
-
Click the Re-New Reservation located in the Crew Handling window.
-
At the New Crew Reservation prompt, select Yes to renew the reservation.
-
Click Edit Information to change the expected arrival date and any other required information.
Check In Function
Crew joining the cruise are expected to checked-in to the system prior to boarding, and these reservations are categorized under the Expected tab.
-
Retrieve the reservation from the Search Panel, Expected tab and click Check In.
-
At the Check In prompt, select Yes to check in the reservation and print the key card at the same time.
Check Out Function
At the end of the voyage, all crew accounts must be checked-out from the system. This is to ensure all accounts are in balance before performing a System Cruise Change.
To check out a crew,
-
Retrieve the reservation from the Search Panel, Check In tab and click Check Out.
-
At the Check Out prompt, select Yes to check out the reservation.
-
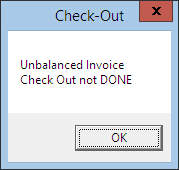
If the account is unbalanced, you will be prompted to settle the invoice before proceeding. Click OK to return to the crew account.
Figure 3-74 Unbalanced Invoice
See Pay Invoice section for steps on how to settle an account.
Print Board Card Function
-
Retrieve the reservation from the Search Panel and click the Print Board Card.
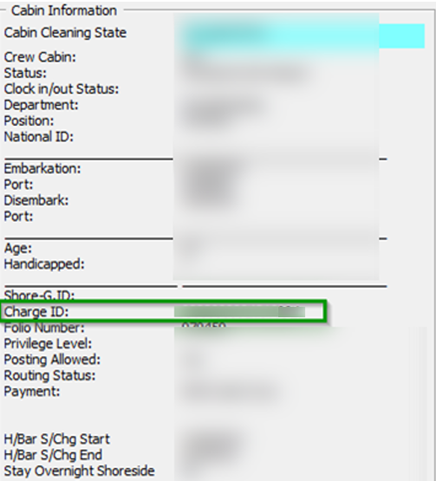
Figure 3-75 Board Card Number in Crew Info Tab
-
The process increases the Board Card number shown in the Crew Info tab, and the last digit of the board card denotes the number of times the board card was re-printed. The first printed card always ends with zero.
-
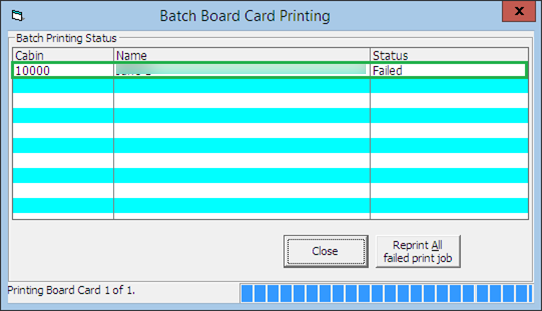
The Status of the printed card is reflected in the Batch Board Card Printing window. If the card status is failed, clicking the Reprint All failed print job will reprint it.
Figure 3-76 Batch Board Card Printing
-
If the board card fails to print, check the Interface or Printer connectivity.