4 Shift Balancing

Maintaining a balanced accounts and floats on each shift is essential, and this function describes the steps used to reconcile all transactions posted by each shift cashiers. To use this feature, you must enable the parameter Cashier, Use Full Cashier in Administration, System Setup.

Open Cashier Session

At the beginning of each shift, as a designated cashier, you must open your cashier session by registering the available float amount into the cashier session. There are two (2) options to open the cashier sessions:
  • Open Session (Empty) — Opens a cashier session for the selected unit.

  • Open Session (Linked) — Opens a cashier session and links the previous closing balances to the Opening Amount.

Open Session (Empty)

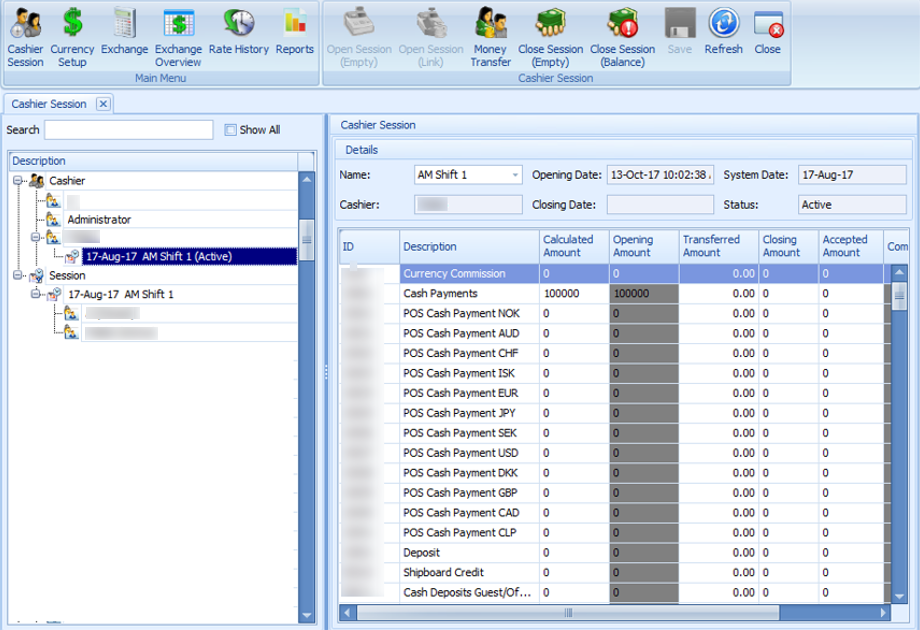
  1. At the ribbon bar, select Cashier Session.
  2. Expand the Cashier container by clicking the “+” symbol.
  3. Select the user name, and click Open Session (Empty) at the ribbon bar.

    Figure 4-1 Exchange Transactions with Cashier Session (Open Session)


    This figure shows the Exchange Transactions with Cashier Session (Open Session)
  4. At the Details section, select the Name from the drop-down list.
  5. In the Opening Amount field, enter the amount for the department code. Use the Tab key to navigate.
  6. Click Save at the ribbon bar. This changes the cashier session from Opening to Active and is reflected in the Sessioncontainer.

Open Session (Linked)

The steps to open a linked cashier session is the same as Open Session (Empty). Instead of selecting Open Session (Linked), select Open Session (Linked).

Exchange Transactions with Cashier Session

All currency exchange transactions performed are stored in the cashier session. Enabling the Cashier, Show on-board currency parameter with the On-board currency Financial Department displays the currency in the cashier session.

When performing an exchange by cash, the system captures the cash transaction as onboard currency by default. To show the currency by the specified department, a parameter is required to record in Calculated Amount column of the cashier session. For example, consider a guest exchange of £200 to ship currency (US$) at the exchange rate of $1.50 with a commission of percent, and the opening balance set at 200 respectively. In this instance, a Buy transaction is used and the payout to the guest is $65.36 (£200 / 1.5 minus 2% commission charge - $130.72)

Hence the amount reflected in the cashier closing in Calculated Amount is:

Cash Currency Exchange: $69.28 (Opening balance $200 minus pay out $130.72)

British Pound: £400.00 (Opening balance £200 plus amount exchanged of £200)

Note that the Commission Charge is not included in the Cashier Session.

Figure 4-2 Exchange Transactions with Cashier Session (Balance)
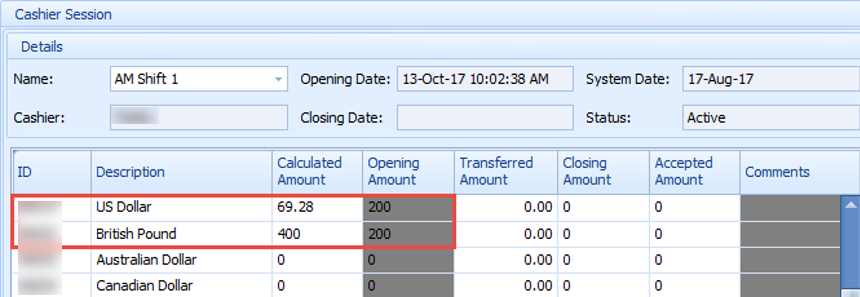

This figure shows the Exchange Transactions with Cashier Session (Balance)
Close Cashier Session

At the end of each shift, you must balance and close your shift postings and submit a report of your collection to the Finance Department.

Close Session (Balance)

  1. At the Cashier Session, expand the Session container by clicking the “+” symbol.
  2. Expand the date and select the active user session.
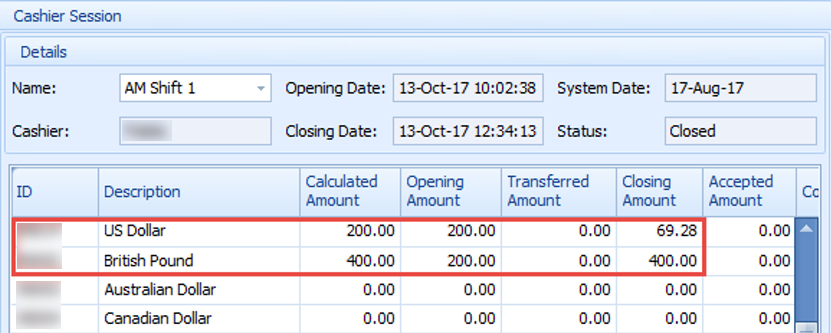
  3. Click Close Session (Balance) at the ribbon bar. The Closing Amount is calculated automatically.
  4. Click Save to confirm closing.

    Figure 4-3 Closed Session (Balance)


    This figure shows the Closed Session (Balance)

Close Session (Empty)

  1. Repeat steps 1 and 2 above.
  2. Select the active user session and then click Close Session (Empty) at the ribbon bar.
  3. Select the shift period from the drop-down list.
  4. Enter the counted amount in the Closing Amount column and click Save.
  5. If there is a discrepancy between the calculated and reported value, the system prompts an error. Selecting Yes sets the session Status to Discrepancy, allowing you to research the imbalance and close the session later.
  6. Once the imbalance is found, you must close the session:
    1. Select the session as Close Session (Balance).

    2. Enter the correct amount in Accepted Amount.

    3. Click Save to accept the balance.

    4. Print the Closing report at the final stage of closing.