2 Medical Module
The Medical module records medical services or medicines prescribed to the passenger/crew during the cruise.
Quick Posting
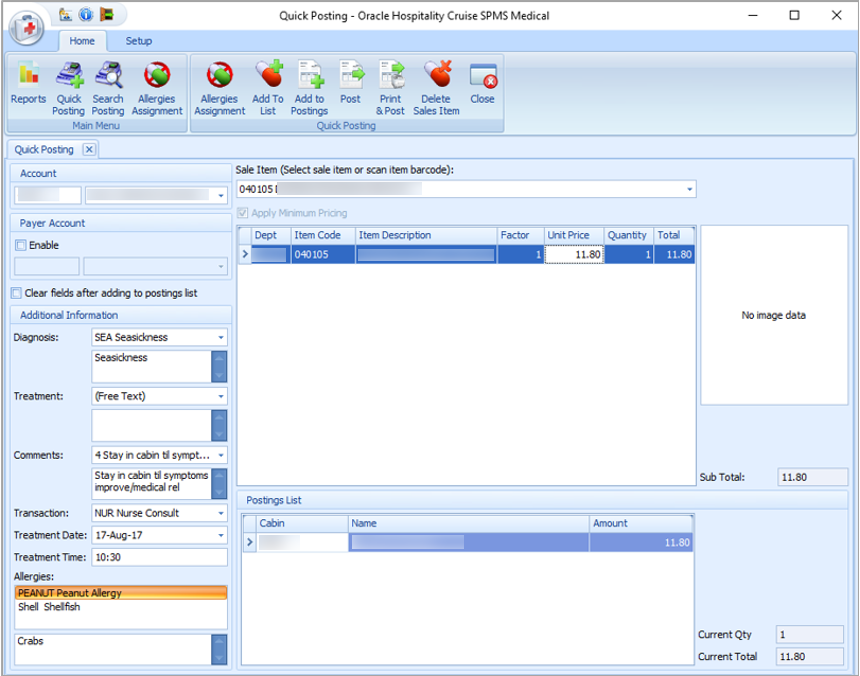
The Quick Posting function enables you to post a charge to an account. If a minimum pricing is set up, the “Apply Minimum Pricing” check box is selected by default. The system posts the minimum price when the value of the posting is lower than the amount defined. For example, if the minimum price defined is $1 and the item is priced at $0.50, the system will post $1.00.
Figure 2-1 Quick Posting

-
Click Quick Posting on the ribbon bar.
-
Select an account from the Account field.
-
In the Additional Information section, select from the drop-down list the predefined code/comment or manually enter the information in each section by selecting the (Free Text) code, and enter the comments in the next section.
-
Click the Allergies Assignment to assign the allergies, if any. This opens the Allergies Assignment screen. Select the respective allergy code(s) or manually insert the description in the Allergies Remarks field, and click Save.
-
Select the Sale Item using the drop-down list or scan the item using a barcode scanner.
-
In the item list, edit the Factor, Unit Price, and Quantity if needed, and click Add to List at the ribbon bar.
-
Repeat step five to add Sale Item.
-
Click the Add to Postings on the ribbon bar to transfer the charge to Postings List.
-
To remove a Sale Item before posting, select the item in the Posting List grid and click Delete Posting.
-
To confirm the posting, click the Post or Print & Post on the ribbon bar.
-
Click Close to exit the Quick Posting function..
Posting without Minimum Pricing
-
Repeat steps 1 – 4 from the above.
-
Under the Sale Item section, deselect the check mark for Apply Minimum Pricing”.
-
Select the Sale Item using the drop-down list or scan the item using a barcode scanner.
-
In the item list, edit the Factor, Unit Price, and Quantity if needed, and click Add to List at the ribbon bar.
-
Repeat step three to add more to Sale Item.
-
Click the Add to Postings at the ribbon bar to post the charge.
-
Click Post or Print & Post on the ribbon bar to confirm posting..
Search Posting
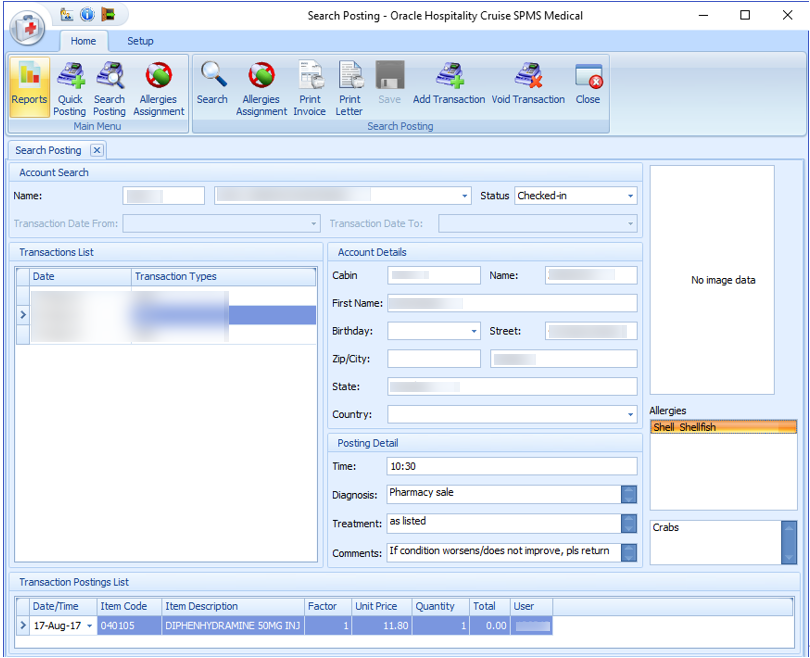
The previous posted transactions are searchable using the Search Posting function. Besides searching for past transactions, you can add or void a transaction, print an invoice/letter or search for allergies assigned to passengers/crew.
Figure 2-2 Search Posting

Searching for a Transaction
-
Click the Search Posting button on the ribbon bar.
-
Enter a cabin number or an account name in the Name field. The default status to display is Checked-In. Changing the status to Checked-out enables you to search for transactions of past bookings.
-
Click the Search button on the ribbon bar. A list of transactions appears on screen.
-
Select a transaction from the list to display the details of the posting.
Adding a Transaction
Click Add Transaction on the ribbon bar to open the Quick Posting screen. To add a posting, see Quick Posting
Voiding a Transaction
-
Select a transaction from the Transaction list.
-
Click the Void Transaction button on the ribbon bar.
-
At the Void Posting Reason prompt, enter the Void reason.
-
Click OK to complete the void.
-
Click Close to exit the search function.
Printing an Invoice
-
Repeat steps 1 – 3 on Searching for a Transaction.
-
Select an item to print from the Transaction List section. You can print multiple records on an invoice using CTRL+ to select the items.
- Click the Print Invoice button on the ribbon bar.
Printing a Medical Letter
-
Repeat steps 1 – 3 of Searching for a Transaction.
-
Select an item to print from the Transaction List section.
-
Click the Print Letter button on the ribbon bar.
Allergies Assignment
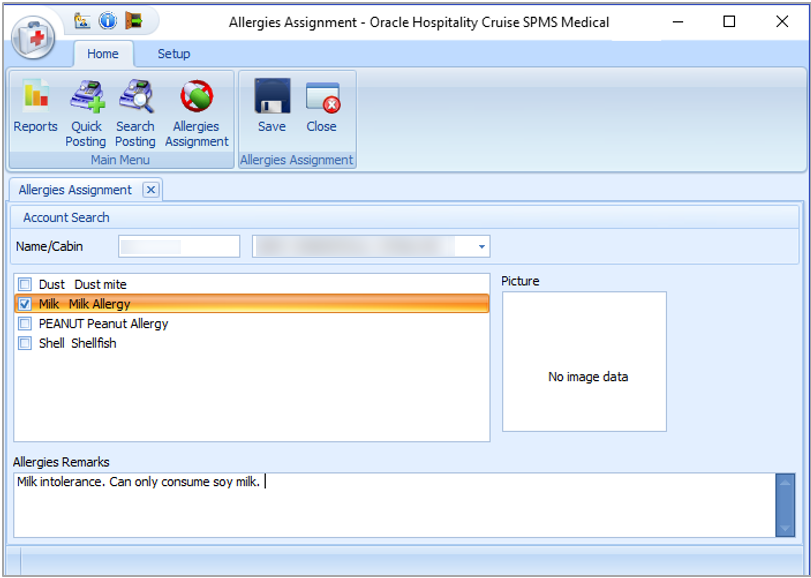
A person might be allergic to a certain product, food, or medicine, and it is important to add such information to the guest/passenger record.
Figure 2-3 Allergies Assignment

-
Click the Allergies Assignment at the ribbon bar.
-
Select an account from the name/cabin field.
-
Check the predefined allergies type or manually enter the allergies in the Allergies Remarks field.
-
Click Save to save the record.
-
Click Close to exit the screen.
-
Repeat from step 1 to edit the record.