3 Bookable Tours
In the Setup menu of the Shore Excursion, configurations such as Parameters, Vendors, Language Module, Ticket Language Template Setup, Bookable Templates Setup, Bookable Tours Setup, Packages Setup, Tour Transportation Sharing, Tour Categories, Package Combination Types, Tour Reporting Categories, Tour Reporting Tags, Tour Reporting Difficulty Levels, Tour Transfer Locations, Tour Cost Item Types are defined.
You can set up the type of tours available per cruise and the criteria for each tour by cruise day with these functions. It is advisable that you create a Tour Template for repetitive tours. Before you set up a Bookable Tour and when creating a template, ensure you have all the Financial Posting codes available.
Setting up Tour Codes
Before you set up the Tour Templates for bookings, the system Tour codes listed in the Tour Code and Description table below are required, depending on the Ship’s operations.
Table 3-1 Tour Code and Description
| Tour Code | Description |
|---|---|
|
Tour Transportation Sharing |
Link bookable tours that share the same transportation. |
|
Tour Categories |
Tour category that every tour is assigned. |
|
Package Combination Types |
Link Package Tours to provide multiple tour choices from the booked package. |
|
Tour Reporting Categories |
Group of tour category. |
|
Tour Reporting Tags |
Tag used for reporting. |
|
Tour Reporting Difficulty Levels |
The difficulty level of the tour are: easy, moderate, or difficult. |
|
Tour Transfer Locations |
The pick-up location for the Transfer Tours. |
Once configured, they are available for selection in Template Setup and Bookable Tours Setup.
-
Select the option from the Setup menu.
-
Right-click to select Add New.
-
Key in the Description code and name and additional information in the details section.
-
Click Apply to save the code.
-
To remove, right-click on the code and select Remove.
Vendors
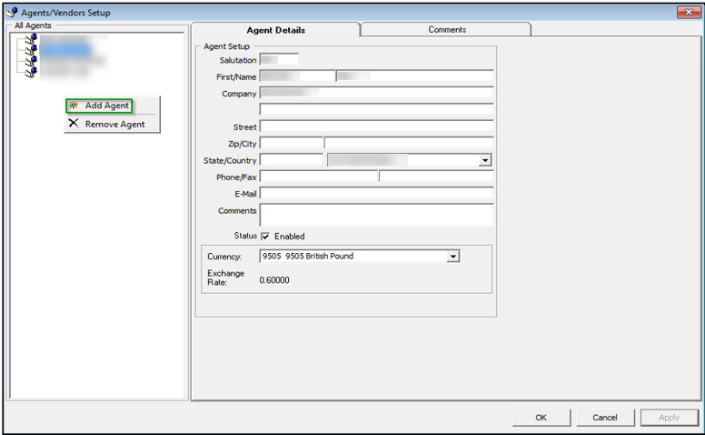
The Vendors Setup is used to store contact details of vendors fulfilling the ground arrangements, supplying equipment or other services for the tours.
Figure 3-1 Vendor/Agent Setup
-
From the Agents/Vendors Setup window, right-click and select Add Agent.
-
Enter the agent’s details and then navigate to Comments tab to add an additional comment or document image.
-
In the Comments tab, select Add Comment to enter a new comment by inserting the relevant details.
-
Navigate to the Document tab to upload, scan or export an image file and then click Save.
-
Click OK to save the agent details.
Language Module Setup
The Language Module Setup is activated with the Use Language Module parameter. It allows you to link to and print on tickets the comments/tour requirements template described in other languages. This function works with Use Free Text Tour Comments/Recommended Clothes parameter set to “1”. This setting also changes the window layout in General tab, Tour Template Setup, and Bookable Tours Setup to only display/print information in other languages if the setup has Tour Languages defined in the Linking tab.
-
From the Setup menu, select Language Module Setup.
-
Select the Default Language and select the Activate Language Module.
-
Click OK to confirm and close the window.
Ticket Language Template Setup
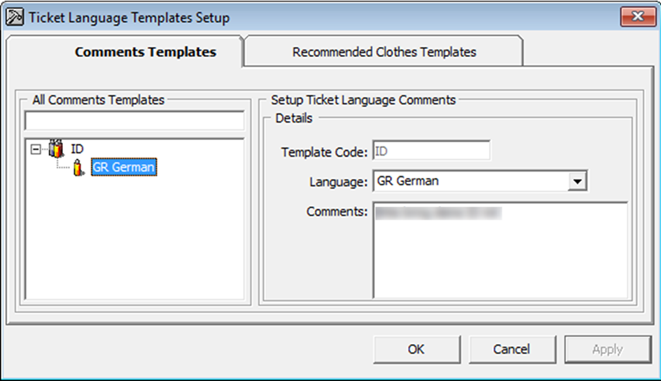
The Ticket Language Template Setup allows you to create comment templates and the recommended clothing templates used in Shore Excursion in different languages. This function only works when the Language Module Setup is activated. Once enabled and if no language is selected during booking, the system will use the default language.
Figure 3-2 Ticket Language Templates Setup
-
From the Setup menu, select Ticket Language Template Setup.
-
Select either the Comments Templates or the Recommended Clothes Templates tab.
-
Right-click and select Add Template.
-
At the Code field, enter the code ID and comments, and click Apply.
-
Right-click the newly created code and select Add Language.
-
At the form, select the Language from the drop-down list and enter the comments and click Apply.
Tour Templates
A Tour Template enables you to create a base for recurring tours instead of creating the tour individually.
Tour Templates Tabs and Descriptions
Figure 3-3 Tour Templates General Tab
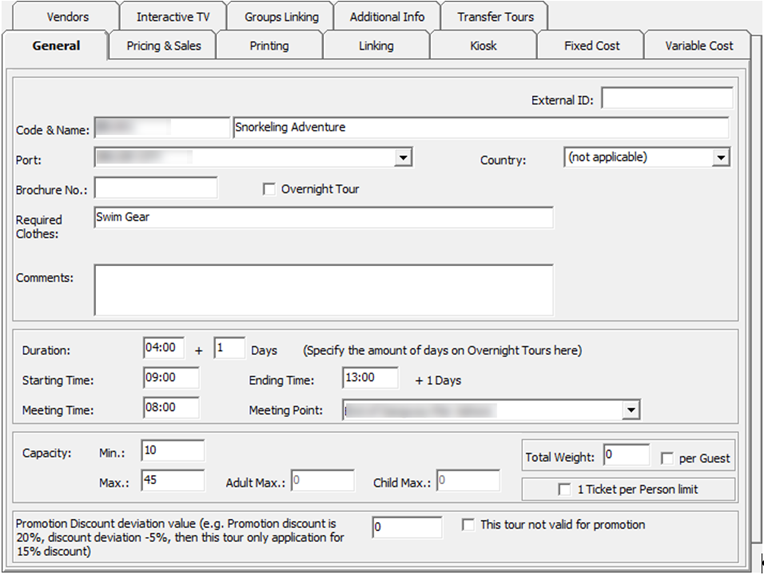
Table 3-2 Field Description of Tour Templates General Tab
| Field Name | Description |
|---|---|
|
External ID |
External ID. |
|
Code & Name |
Short Code and Name of the tour. |
|
Port |
Port of the tour, selectable from the drop-down menu. |
|
Country |
Country of the tour, selectable from the drop-down menu. |
|
Brochure No. |
Brochure Number in the cruise catalogue number. |
|
Overnight Tour |
Sets the tour as an overnight tour when selected. |
|
Required Clothes/ Comments |
Additional information to be printed on tour ticket. |
|
Duration & Times |
Duration of the tour, Starting/Ending Time/ Meeting Time and Meeting Point of the tour. |
|
Capacity |
Max/ Min seat capacity of the tour. |
|
Adult/ Child Max |
Max seat capacity for an adult/ child of the tour. |
|
Total Weight |
Max total weight allowed for the tour. |
|
Total Weight per guest |
Sets the max weight per guest allowed for the tour when selected. |
|
1 Ticket per person limit |
Sets the purchase to allow one ticket per person after selected. |
|
Promotion discount deviation value |
Discounts deviation value for the tour. |
|
This tour not valid for promotion |
Disables the tour from promotional sale when selected. |
Figure 3-4 Tour Template Pricing and Sales Tab
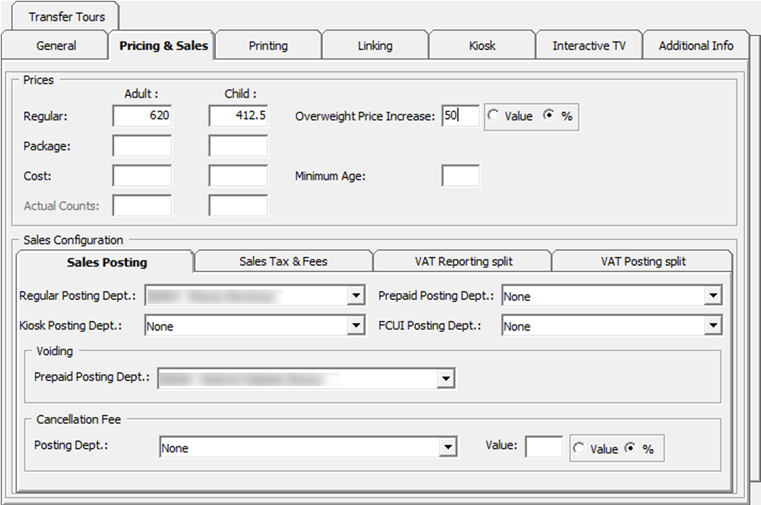
Table 3-3 Field Description of Tour Templates Pricing and Sales Tab
| Field Name | Description |
|---|---|
|
Regular Adult/Child Price |
Tour selling price for an adult/ child. |
|
Package Adult/Child Price |
Tour package selling price for an adult/ child. |
|
Cost Adult/Child |
Tour costs for the adult/ child. Cost prices text boxes are disabled in order to display-only. This field gets updated automatically when adding a new booking or voiding an existing one based on the variable cost applied. |
|
Actual Counts Adult/ Child |
Actual Tour counts for an adult/ child for the tour. |
|
Overweight Price Increase |
Value or percent to increase if overweight occurs. |
|
Minimum Age |
The minimum age allowed for the tour. |
|
Posting Departments |
Reference to Financial Setup, Department Code setup. |
|
Voiding Departments |
Reference to Financial Setup, Department Code setup. |
|
Cancellation Department & value |
Cancellation fee definable in value or percentage. Reference to Financial Setup, Department Code setup for posting code. |
|
Sales Tax & Fees |
Sales Tax & Fees Tab:
Reference to Financial Setup, Department Code setup for posting code. |
|
VAT Reporting Split |
VAT Reporting Split Tab: For reporting purposes. Use of different VAT percentages resulting from the selling of excursion in order to produce a report where the respective VAT classes. The four ype of VAT categories are user definable. You can change the label name from Administration module, System Setup, Label Setup. |
|
VAT Posting Split |
VAT rate in percentage or price used for posting. |
Figure 3-5 Tour Template Printing Tab

Table 3-4 Field Description of Tour Templates Printing Tab
| Field Name | Description |
|---|---|
|
Default Ticket Report |
Default ticket report used for ticket printing for the tour, selectable from the drop-down menu. |
|
Print Ticket & Ticket Summary |
After selected, ticket and ticket summary are printed upon posting of the tour. |
Figure 3-6 Tour Template Linking Tab
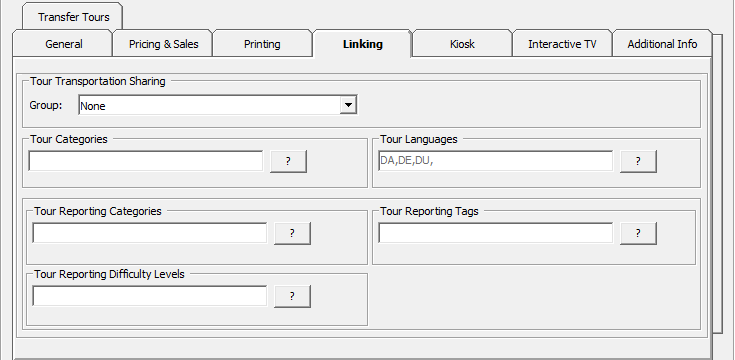
Table 3-5 Field Description of Tour Template Linking Tab
| Field Name | Description |
|---|---|
|
Tour Transportation Sharing |
Link tour transportation sharing for the tour, selectable from the drop-down menu. In Bookings window, all the bookable tours boxes have the tour transportation sharing code with the yellow background. |
|
Tour Categories & Languages |
Link tour categories and languages for the tour, selectable from the drop-down menu. See Language Module Setup and Ticket Language Template Setup for more information |
|
Tour Reporting Categories, Tags & Difficulty levels |
Link tour reporting categories, tags, and difficulty levels for the tour, selectable from the drop-down menu. |
Figure 3-7 Tour Templates Kiosk Tab
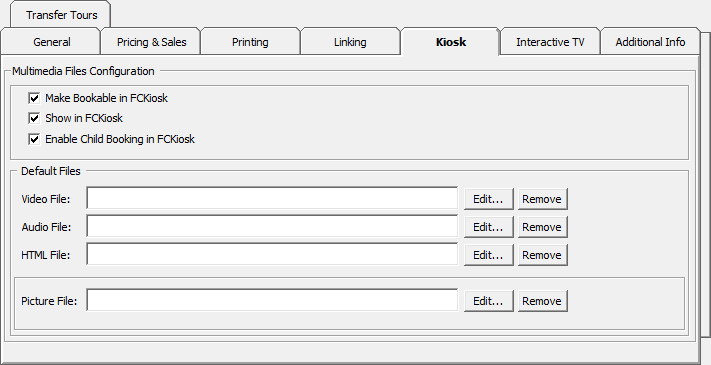
Table 3-6 Field Description of Tour Templates Kiosk Tab
| Field Name | Description |
|---|---|
|
Make Bookable in Kiosk. |
Sets this tour as available for booking by using the Kiosk |
|
Show in Kiosk |
Sets this tour as visible in the Kiosk. |
|
Enable Child Booking in Kiosk |
Sets this tour as available for child booking by using the Kiosk. |
Figure 3-8 Tour Templates Interactive TV
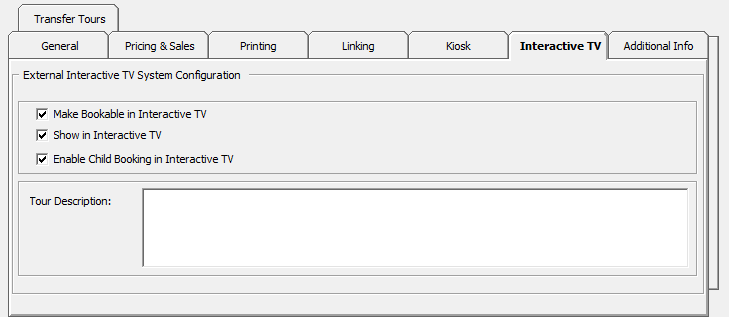
Table 3-7 Field Description of Tour Templates Interactive TV
| Field Name | Description |
|---|---|
|
Make Bookable in Interactive TV. |
Sets this tour as bookable in Interactive TV. |
|
Show in Interactive TV. |
Sets this tour visible in Interactive TV. |
|
Enable Child Booking in Interactive TV. |
Sets this tour available for child booking in Interactive TV. |
|
Tour Description |
Additional details for the tour. The "custom comment" is user definable in Administration module, System Setup, Label Setup. |
Figure 3-9 Tour Templates Transfer Tours
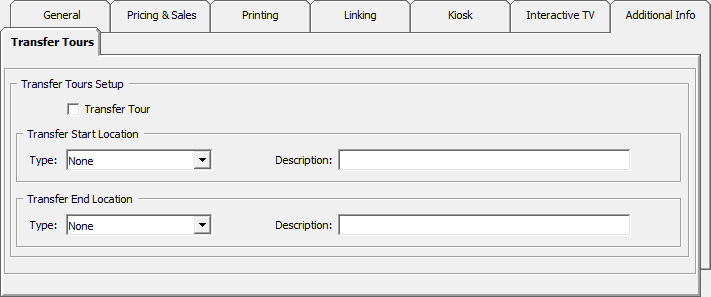
Table 3-8 Field Description of Tour Templates Transfer Tours
| Field Name | Description |
|---|---|
|
Transfer Tours |
Select the check box to mark the tour as a transfer tour. |
|
Transfer Start Location |
The start location of the tour. |
|
Transfer End Location |
The end location of the tour. |
-
Select Transfer Tour if the tour is a transferred tour.
-
Select Transfer Start Location type, for example, Airport, Hotel, Train station.
-
Enter Transfer start location description.
-
Select Transfer End Location type and enter the description.
Setting up Tour Templates
A Tour Template enables you to create a base for recurring tours instead of creating the tour individually.
In addition to the General, Pricing & Sales, Printing, Linking, Kiosk, Interactive TV and Additional Info, tabs such as Fixed Cost Variable, Vendors and Group Linking are visible after you return to the template.
New Tour Template
-
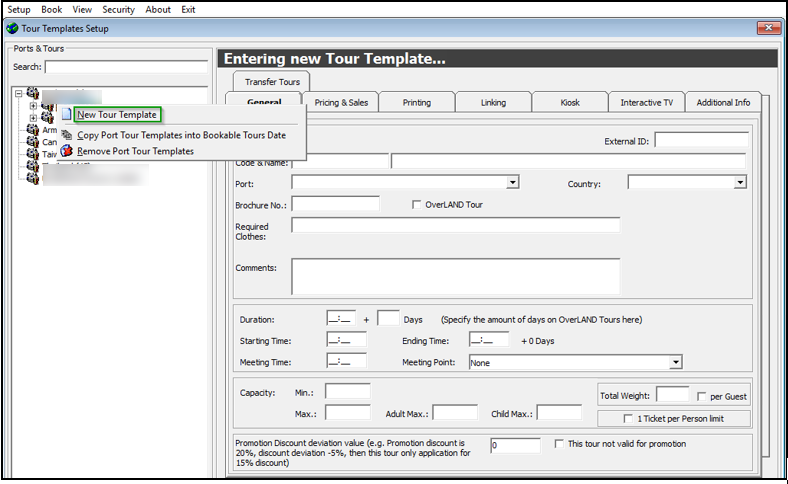
From the Setup menu, select Tour Template Setup.
-
Expand the Country tree view and select the country the template resides. These are grouped by the field selection in General Tab, Port or Country.
-
Right-click and select New Tour Template.
Figure 3-10 Tour Templates Setup
-
At Tour Template window, in the respective tabs, insert all the relevant information such as price, meeting time/location, weight/clothing/equipment requirement, and transport arrangements. See Table 3-2 for a description of the available fields.
-
Click Apply to save the template and close the form.
Fixed Cost Tab
This tab defines the cost price per excursion, regardless of the number of attendees.
-
Click the Add button to open the Fixed Code Configuration window.
-
Select the Item Type, which references the Tour Cost Item Types.
-
Select the Vendor. See Vendors.
-
Enter the Price and Quantity.
-
The Total auto populates based on the price and quantity defined.
-
You can edit or remove the Fixed Cost.
Variable Cost Tab
The Variable Cost tab allows you to specify the number of attendees with a corresponding price. For example:
Range 20
Adult Cost Price $80
Child Cost Price $50
Range 40
Adult Cost Price $70
Child Cost Price $40
With the above setting, the Tour prices for up to 20 attendees is at $80 / $50 respectively. The price reduces when it reaches the 21 to 40 range.
-
Click the Add button to open the Variable Code Configuration window.
-
Enter the Range, Adult Cost and Child Cost.
-
You can edit or remove the Variable Cost.
-
The cost reflects in the Cost field of Bookable Tour Setup. The price is adjusted when a booking is made or Void reaches the range defined.
Vendors Tab
To add a vendor, select a vendor from drop-down list and then click Add Vendor. To remove the vendor, select the vendor from the grid and click the Remove Vendor. See Vendors for more information.
Group Linking Tab
The group linking tab links certain excursion to a particular group. For example, Tour A is linked to Group A. Tour B is linked to Group B. When Guest 01 from Group A makes a booking, only Tour A is shown.
To link a group, select the group account created in Management module, Group handling and then click Add Group.
Setting up Tour Template with VAT Split
The VAT Tax Split feature enables different tour elements to have different VAT Tax assignments.
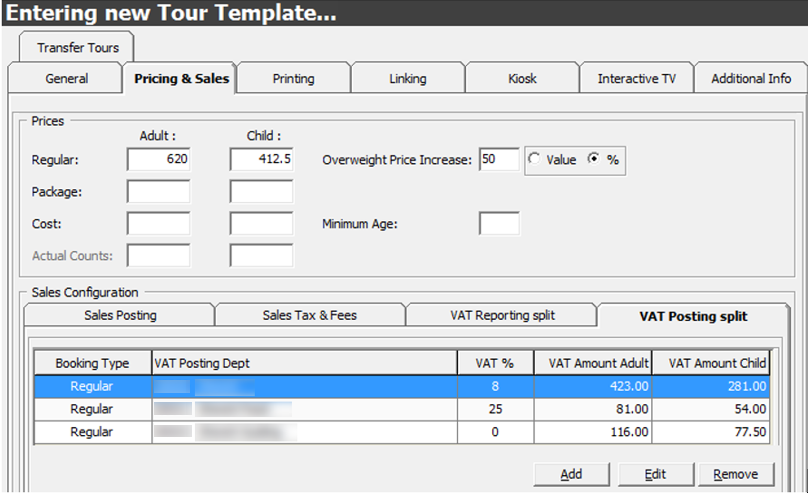
In the following example, assume the tour is priced at $620 and comprises three elements that have different VAT Tax and pricing:
Table 3-9 Example Of Price and VAT Breakdown
| Item | Cost | VAT% |
|---|---|---|
|
Excursion |
$423 |
8% |
|
Food |
$81 |
25% |
|
Guiding |
$116 |
0 |
-
At the Financial Setup window, create the Department Code and associate the corresponding VAT Tax Class.
-
At the Tour Template Setup, navigate to Pricing & Sales, VAT Posting Split tab.
-
Click Add to add the VAT Department.
-
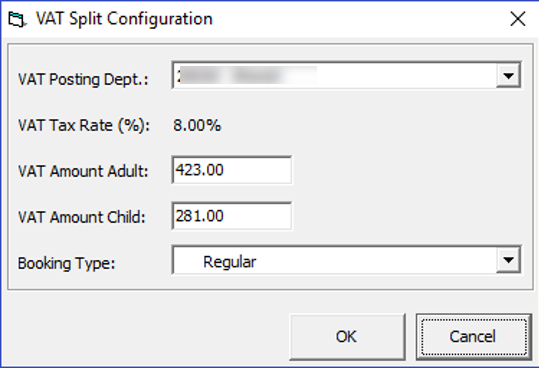
At the VAT Split Configuration window, select the Posting Department from the drop-down list, enter the Amount for Adult/Child and select the Booking Type.
Figure 3-11 VAT Split Configuration Window
-
Click OK to save and repeat the steps above for the other elements.
Figure 3-12 VAT Posting Split in Pricing and Sales
-
When copying the template from Port Tour Template into Bookable Tours Date or Tour Template into Bookable Tour, it copies the VAT Posting Split setup to the selected port date. The same applies when copying using Copy Date Bookable Tours into another Date in Bookable Tours Setup.
The formula to calculate the VAT Posting Split is: Total - round (Total / (1+VAT_RATE)/100).
Copying Port Tour Templates into Bookable Tours Date
Once the Tour Template is available, you can copy the templates into Bookable Date individually or by batch. Upon clicking the Apply button to save the new Tour Template, the additional setting will be visible. See Figure 3-3.
Copy Template by Batch
-
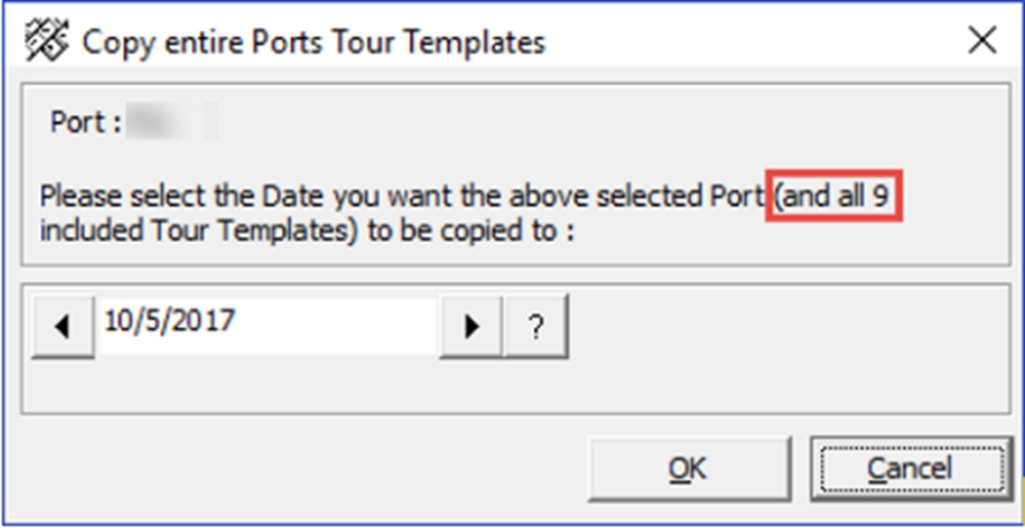
At the Tour Templates Setup, expand the tree view and select the port. The total number of templates linked to the port is shown in a bracket ( ).
-
Right-click and select Copy Port Tour Templates into Bookable Tours Date.
-
At the Copy entire Ports Tour Templates window, select the desired date using the date editor.
Figure 3-13 Copy Port Tours Templates
-
Do note the number of templates to copy across before proceeding. Click OK to confirm or Cancel to abort.
Copy Template Individually
-
At the Tour Templates Setup window, expand the tree view until you see the template name or codes.
-
Right-click and select Copy Tour Templates into Bookable Tours Date.
-
At the Copy selected Tour Template window, select the desired date using the date editor.
-
Click OK to proceed or Cancel to abort.
Create Multiple Bookable Tours
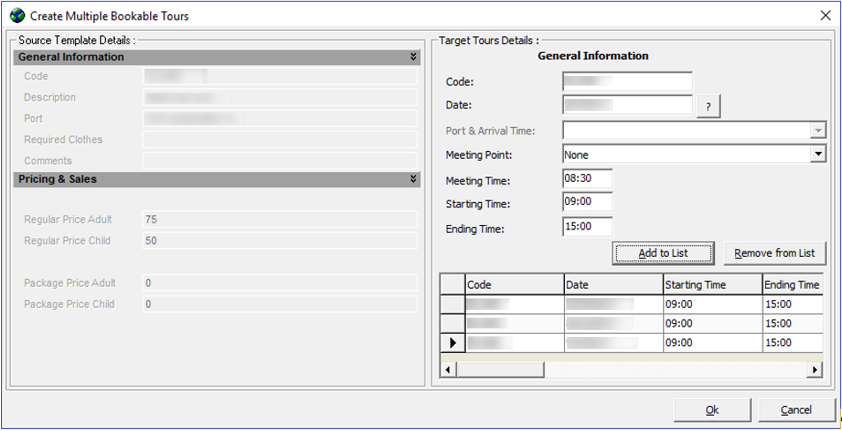
The Create Multiple Bookable Tours enables you to create a tour from a single template across multiple dates.
Figure 3-14 Create Multiple Bookable Tours
-
Repeat step 1 of Copy Template Individually.
-
Right-click and select Create Multiple Bookable Tours.
-
At the Target Tour Details section, select a date and click Add to List.
-
Repeat until you have all the dates.
-
Click OK to confirm.
Removing Port Tour Templates
When a Port Tour template(s) is no longer required, you can remove a single template or all from a port using the Remove Port Tour Templates or Remove Tour Templates, depending on the selection at the tree view.
-
At the Tour Templates Setup window, expand the tree view.
-
Right-click on the selected Port and select Remove Port Tour Templates or further expand the tree view to select a template.
-
At the Remove selected Port window, click OK to confirm or Cancel to abort.
Package Setup
New Package
You can create a bookable package using the available tours for the cruise.
-
Select Packages Setup from the Setup menu.
-
At the System Cruises & Packages panel, right-click and select New Package.
-
Select a cruise from the Cruise drop-down list.
-
Select Last Sales Date.
-
Enter the Package code and name in the Code & Name field.
-
Select a port from the Port drop-down list.
-
Enter the Brochure No, Comments, and select the respective check boxes under Comments.
-
Click Apply to enable the Packages Tours tab.
-
For the Link to Package Combination Type, the package tours shown in the Combination Type column are the combined package.
Figure 3-15 Package Tours Link

-
Navigate to the tab and click Assign Bookable Tours to assign the bookable tours.
Figure 3-16 Assign Bookable Tours to Package

-
Select the date and tour to assign.
-
Click Apply and select another tour to add to the package.
-
Click OK to return to the previous window.
-
Define the price per adult/child in the grid.
Remove Cruise Packages
You can remove a cruise package that you no longer need by right-clicking the package name and select Remove Cruise Package. However, you cannot remove it if the package has a booking linked.
Setting up Bookable Tours
Once a Tour Template is available, you can make these tours available for booking by date. You can also create an ad-hoc tour from this function.
Adding new Bookable Tour
-
From the Setup menu, select Bookable Tours Setup.
-
At the Bookable Tours Date editor, right-click the desired date and select New Bookable Tour.
-
Fill in all the required the details of the tour in each of the tabs.
-
Click Apply to save.
Copy Bookable Tour to another Date
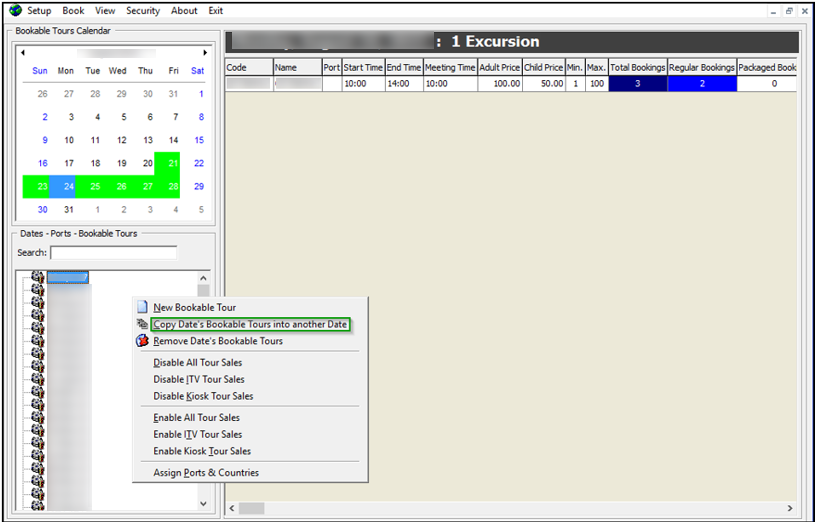
Instead of creating a tour from scratch, you can copy the same Bookable Tour information into another date with this function.
Figure 3-17 Copy Bookable Date to another Date
-
At the Date editor, select the date to copyin the tour from.
-
Right-click and select the Copy Date’s Bookable Tours into another Date option.
-
At the Copy Entire Bookable Tours Date window, select a new date to copy to.
-
Click OK to proceed. Note that only the non-existing tours are copied.
Remove Date’s Bookable Tours
This function removes all tours on the selected date. You cannot remove a tour if it has booking attached.
-
At the Date editor, select the desired date and right-click to select Remove Date’s Bookable Tours. This removes all bookable tours from the date, except tours that are booked.
-
At the Remove current Bookable Tours Date window, click OK to proceed or Cancel to abort.
-
Alternatively, you can remove the individual tour by expanding the tree view and select the tour to remove.
-
Right-click and select the Remove Bookable Tour option and then click OK.
Disable All Tour Sales, ITV Tour Sales and Kiosk Sales
The Disable All Tour Sales, ITV Sales and Kiosk Sales options disable all tours of selected date and hide them from the booking window.
-
At the Date editor, select the desired dateand right-click to select Disable All Tour Sales.
-
At the Disable All Sales for Selected Bookable Tours Date window, click OK to proceed or Cancel to abort.
-
To enable the tours at a later stage, repeat step 1 and select Enable All Tour Sales instead.
-
Repeat the above steps to enable/disable the tour sales from ITV or Kiosk.
Assign Ports and Countries
This function allows you to assign port and country to tours.
-
Select the desired date from the Date editor, and right-click to select Assign Ports & Countries.
-
At the Assign Ports & Countries window, select the Port and Country from the drop-down list.
-
Click OK to proceed or Cancel to abort.