1 Setup
This section describes the setup required for the Ticket module and its functionality. The majority of the required department codes are configured in the Setup tab. A good practice is to set up the Locations, Price Categories, Account Groups & Types, and Event Template, followed by the Bookable Event Setup.
Location Setup
Locations
Event Locations can be set up by clicking the Locations button on the ribbon bar, entering all the required information and clicking Save.
Table 1-1 Field Description of Location Details
| Field Name | Description |
|---|---|
|
Code |
A short code for the location. |
|
Name |
The name of the location. |
|
Description |
A description of the location. |
|
Comments |
Comments about the location. |
|
Deck |
Location of the deck linked to TYP_DEK |
|
Picture File |
Stores the file path of attached picture file. |
|
Availability |
Function that controls whether the location is to show in the Overview screen. |
|
Overlap Book |
Function that controls the system to warn when booking exceeds the maximum number specified. |
Deleting Event Location
To delete a location, select the location from the list and click the Delete button.
Locations Layout Setup
-
Layout Template Details
-
Layout Level Details
Layout Template Details
-
At the Setup tab, click Locations Layout Setup.
-
Click Add New Template to create a new template.
-
Enter all the information and click Save Template and then Close.
Layout Level Details
Figure 1-1 Layout Level Details

-
Select a layout template that you created earlier.
-
Click the Add New Level button.
-
Enter the Layout Level Details consisting of Level Code, Level Name, Hybrid, Open Seating Capacity, Layout Image File, and Layout View.
-
Click Save Level to save.
Creating Layout Template
Figure 1-2 Layout Template
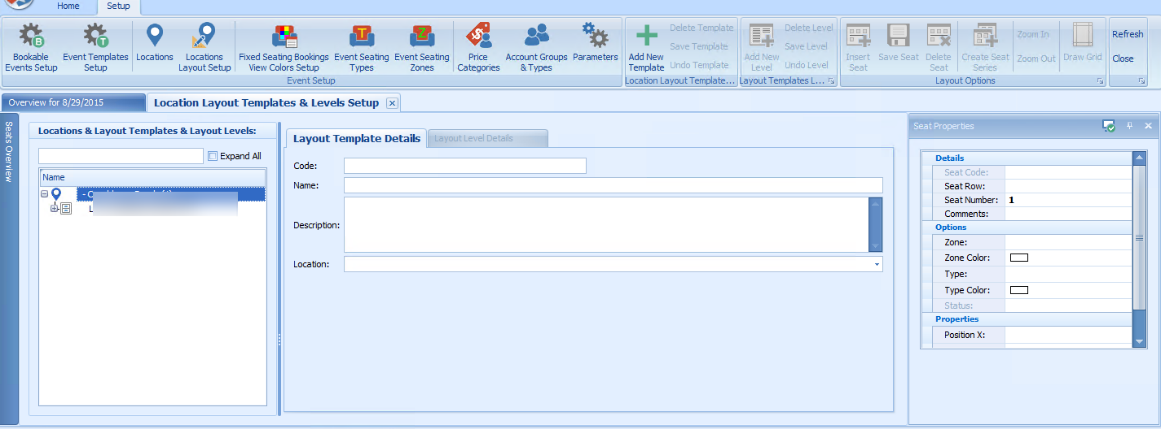
You can add a template, delete, save or undo the previous change made on the template. After creating the location template, add a new level for the template or define the seating zones by location.
-
One location can have multiple templates.
-
One template can have multiple layouts.
Table 1-2 Field Definition of Layout Template
| Field Name | Description |
|---|---|
|
Hybrid |
An open space for people to stand. |
|
Open Seating Capacity |
Defines the number of hybrid for that level. |
|
Seat Counts |
Total number of fixed seats for that level, display field and auto-populate whenever a new seat is created for that level. |
|
Layout Image File |
Attached layout for that level (image file for example .jpg, .png, .bmp, and .gif) |
|
Clear |
To clear the saved image for that level Layout View radio button. |
Adding Seats to Layout
The seat button toggles between both options, Insert Seat/Stop Insert Seat, when clicked.
-
Click Insert Seat button.
-
Point to the layout the location of the seat.
-
Go to the Seat Properties window and update the seat row, number and all other relevant information per the following:
-
Seat Code: Seat Row and Seat Number (auto populated).
-
Comments: Enter comments for that specific seat.
-
Zone and Type: Select Seating Zone and Seating Type.
-
Position X & Y: Allows you to change the seat position X & Y in the layout.
-
Rotation: Option to rotate the seat.
-
Fixed Seating Bookings Color
Creating a Series of Seats
You can create a series of seats starting with a seat number, number of seats, and orientation with this option.
To create, clicking the Create Seat Series button, enter all the relevant information, and click Apply.
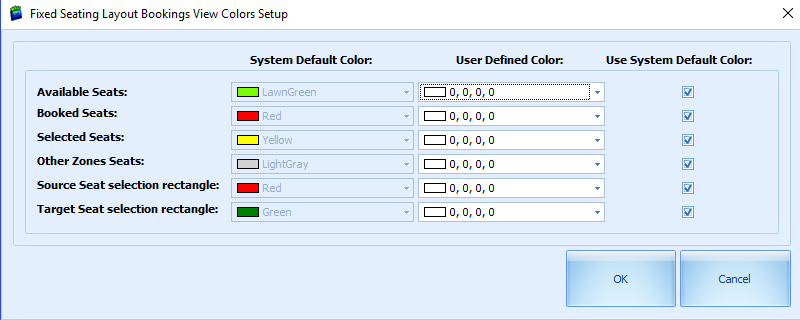
Figure 1-3 Fixed Seating Booking Color
-
Click the Setup tab.
-
Click the Fixed Seating Bookings View Colors Setup button.
-
By default, the User System Default Color check box is selected. To define a color of your choice, deselect the check box and select the color from the drop-down list under User Defined Color.
Event Seating Zones
Figure 1-4 Event Seating Zones

This function allows you to define the zone for use in seating plan setup.
-
At the Setup tab, select Event Seating Zones.
-
Click Add New to add a new zone.
-
At the Seating Zones form, enter the code, name and select a color and location from the drop-down list.
-
Click Save.
Account Groups and Type
-
Click the Account Group and Types on the ribbon bar.
-
Click Add New to add a new pricing for the required category.
-
Enter all the required information and click Save.
-
To delete a specific pricing category, move the mouse pointer over to the required description and click Delete.
-
Click Close to close this window.
Price Categories
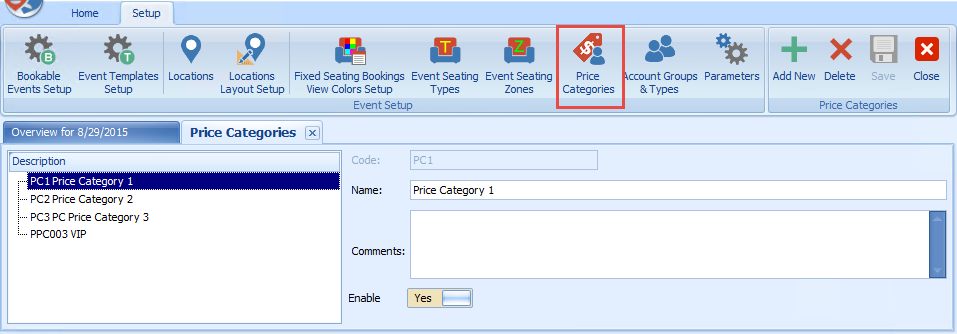
Use Price Categories to categorize the event by price, sales type, seating zones, and others.
Figure 1-5 Price Categories
-
Click Price Categories.
-
Click Add New to add a new pricing for the required category.
-
Enter a Code, Name, and Comment in the respective fields.
-
Click Save.
-
To delete a specific pricing category, move the mouse pointer over the required description, and click Delete.
-
Click Close to close this window.
Note:
If the Enable option is deselected, this will also disable the pricing categories from the Edit Template-Pricing Categories configuration tab.Event Templates Setup
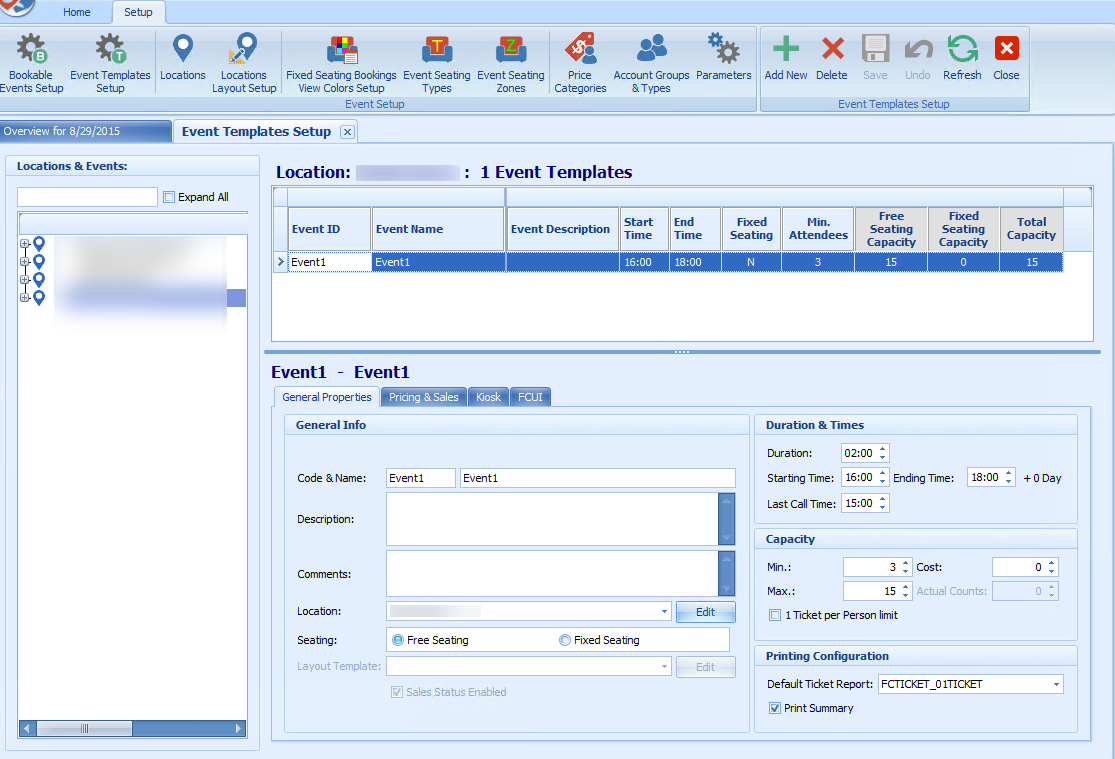
You can set up a template as a base for Bookable Events Setup.
Figure 1-6 Event Templates Setup Details
-
Locations & Events: Displays the location name and type of events within the location.
-
Location Details for the Event ID: Displays the number of events templates created for the location with information such as Event ID, Event Name, Event Description, Start/End Time, Seating Type, Min/Max Attendees, Seating plan, Layout Template, and so on.
-
Event ID and Event Name Details: This section has four tabs: General Properties, Pricing & Sales, Kiosk, and FCUI, and Details of each tab are listed below.
- General Properties Tab
-
General Info section: Code & Name, Description, Comments, Location, and Seating.
-
Duration & Times section: Duration, Starting Time, Ending Time, and Last Call Time.
-
Capacity section: Min, Max, and Cost.
-
Printing Configuration: Default Ticket Report.
-
- Pricing & Sales Tab
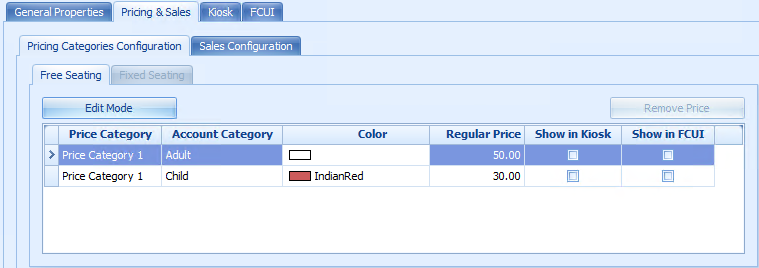
Figure 1-7 Bookable Event Setup — Pricing and Sales
-
Pricing Categories Configuration: Free Seating – Price Category, Account Category, Color, Regular Price, Show in Kiosk, Show in FCUI.
-
Sales Configuration: Sales Posting, Voiding Departments, Sales Tax and Cancellation Fee.
Note:
Use the Remove Price to remove the price category or the Edit Mode to add the required price category.
-
- Kiosk
-
Kiosk Sales enables you to define whether the ticket can be booked through the Kiosk or only to show the information. In the Multimedia Files Configuration, you can attach a video, audio or HTML file.
-
- FCUI
-
FCUI Sales Configuration enables you to define whether the ticket can be booked through the interface or only display the information as displayed in FCUI.
-
- General Properties Tab
Creating New Event Template
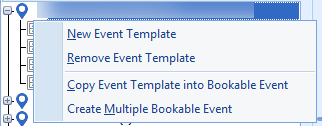
Figure 1-8 New Event Template Options
-
Select Event Templates Setup.
-
Right-click the navigation tree and select New Event Template.
-
Enter all the required information in each of the tabs.
-
If are using a Fixed Seating plan, you can attach a Layout Template to the event. See Creating Layout Template
Removing an Event Template
-
At the navigation tree, right-click and select Remove Event Template.
-
At the system prompts “Are you sure you want to remove the selected Event Template?”, click OK to continue.
Copying an Event Template into Bookable Event
-
At the navigation tree, right-click the event you wish to copy.
-
Select Copy Event Template into Bookable Event.
-
At the dialog prompts “Please specify the Date you want the selected Event template to be copied to:”, select the new date and click OK to proceed.
Creating Multiple Bookable Events
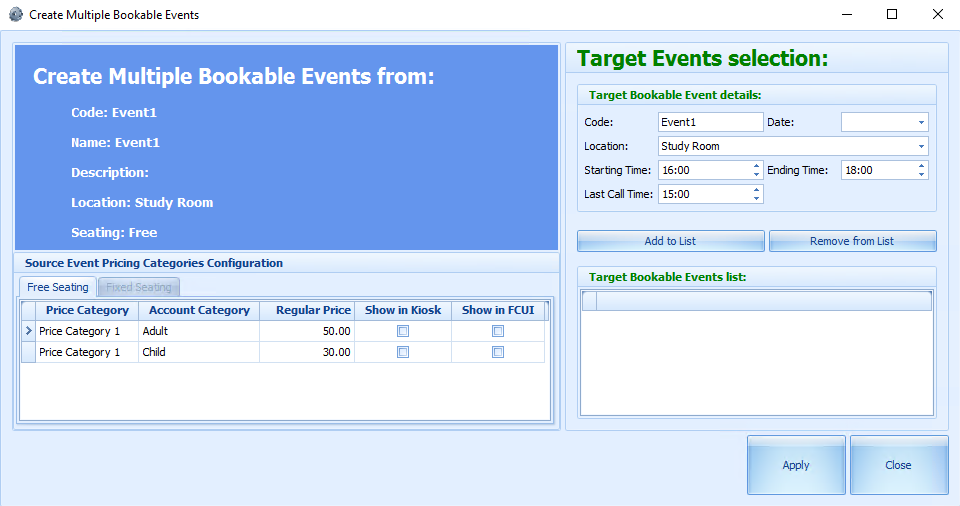
Figure 1-9 Create Multiple Bookable Events Form
-
The bookable event appears in the Code field.
-
In the drop-down list, select for Date, Location, Starting Time, Ending Time, and Last Call Time.
-
Click Add to List. Use Remove from List to remove unwanted events.
-
Click Apply to create.
Bookable Event Setup
The ticket booking for an event can be set up by date, location, and event level.
Ticketing By Date
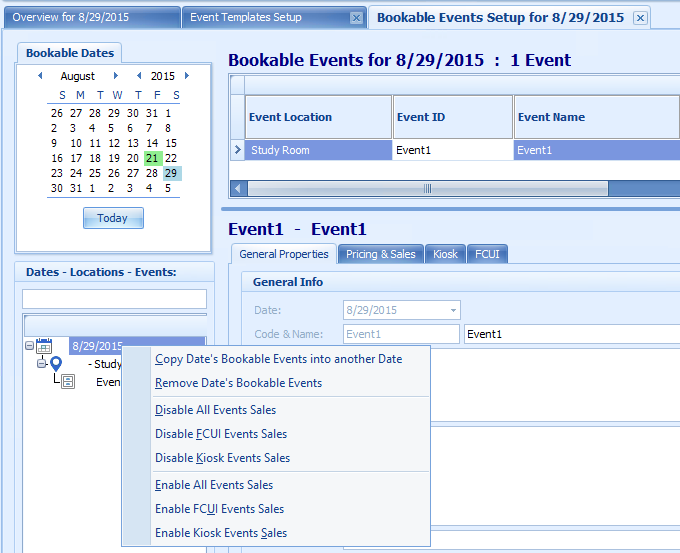
Figure 1-10 Ticketing by Date Level
-
Copy Date’s Bookable Events into another Date.
-
Remove Date’s Bookable Events.
-
Disable All Events Sales.
-
Disable FCUI Events Sales.
-
Disable Kiosk Events Sales.
-
Enable All Events Sales.
-
Enable FCUI Events Sales.
-
Enable Kiosk Events Sales.
-
Right-click on the event date.
-
Select the option from the menu.
-
At the confirmation prompt, read the message prompt before clicking OK to proceed or Cancel to terminate.
Copy Date’s Bookable Events into Another Date
When copying a bookable event into another date, you will receive a prompt to confirm to whether to copy the entire series of the event or not. From the drop-down list, select the date to copy and click OK to confirm.
Ticketing By Location
Figure 1-11 Ticketing by Location Level
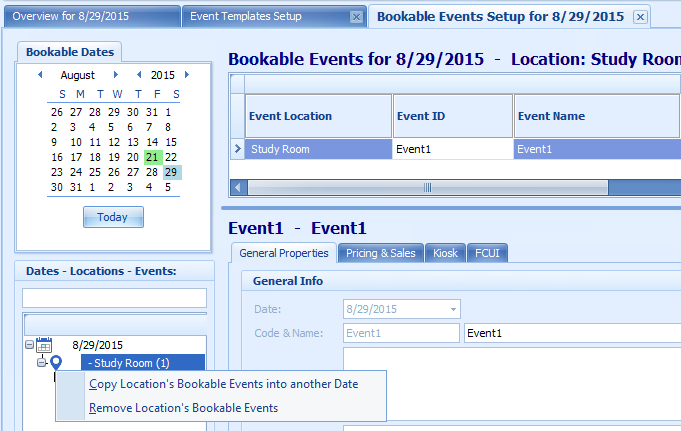
-
Copy Location’s Bookable Events into another Date.
-
Remove Location’s Bookable Events.
-
At the navigation panel, expand the date and right-click the event location.
-
Select the desired option. If you are copying the location to another date, select the new date when prompt.
-
At the confirmation prompt, click OK to proceed.
Ticketing by Event
To copy or remove the bookable event in Ticketing by Event Level, see steps for Ticketing by Location and select the event instead of the location.
Parameters
Below is the list of Parameters available to Ticket module and they are editable.
Table 1-3 Parameters
| PAR Name | PAR Value | Description |
|---|---|---|
|
Allow posting 0 price Tickets to the Disabled accounts |
0 or 1 |
1 - Allow posting zero price Tickets to Disabled accounts in Bookings screen. 0 - Don't allow searching for Disabled Accounts and post anything to them. |
|
Cancel Fees Default Dept |
Dept number, for example, 1234 |
Use Debit Department when posting Cancellation Fees when voiding normal Event Bookings in OHCTICKET. |
|
CancellationFees Default Value |
0.00 or % |
Default Value or Percentage (if % sign exists) for Cancellation Fees. |
|
Default Ticket Report |
for example, OHC_Ticket_01Ticket |
Default Ticket Report for OHCTICKET (REP_FILENAME). |
|
Default value for Sales Tax |
0.00 or % |
Default Value or Percentage (if % sign exists) for Sales Tax. |
|
Display Time Fields in 24Hour format |
0 or 1 |
1 - Enable Displaying time fields in 24–hour format 0 - Enable Displaying time fields in 12–hour a.m./p.m. format. |
|
Enable Multiple Bookings |
0 or 1 |
1 - Enable Multiple Bookings functionality in Bookings screen. 0 - Disable this functionality, This option allows booking the same set of Events for multiple Accounts in one-step. Useful for small group postings. |
|
Enable NOPRINT for Event Voids |
0 or 1 |
1 - Enable setting Event Voids to "NO PRINT" to hide them on the accounts. 0 - Disable setting Event Voids to "NO PRINT" in order to show them on the accounts. |
|
Enable Shoreside Refunds for Prepaids |
0 or 1 |
1 - Enable Refunding Prepaid Bookings Shoreside (System Account) when applying Discounts on Prepaid Bookings. 0 - Disable Refunding Prepaid Bookings Shoreside (System Account) and allow only Onboard (Guest Account). |
|
Enable Voiding Bookings on Checked-Out Accounts |
0 or 1 |
1 - Enable Voiding Bookings on Checked-Out Accounts with Voided Transaction posted into Internal Error System Account. 0 - Disable Voiding Bookings on Checked-Out Accounts. |
|
Enable Voiding Crew Bookings from previous Cruises |
0 or 1 |
1 - Enable Voiding of Crew Bookings that belong to previous Cruises or have been closed. 0 - Disable Voiding of Crew Bookings that belong to previous Cruises or have been closed. |
|
Exporting Tickets |
0 or 1 |
1 - Exporting Tickets is in progress - Do not allow any other process to start 0 - No Exporting Tickets process detected - allow this process to start. |
|
OHCTICKET Posting Department Code Include Sales Tax in Price |
Dept number, for example, 1234 |
OHCTicket Default Posting Department. |
|
Include Sales Tax in Price |
0 or 1 |
1 – Include Sales Tax from Event Price on screen. 0 – Exclude Sales Tax from Event Price on screen. |
|
Notify for Overlapping Events |
0 or 1 |
1 – Enable Overlapping Events checking and notification during Booking process. 0 – Disable Overlapping Events checking and notification during Booking process. |
|
Onboard Refund for Prepaids |
0 or 1 |
1 - Onboard refunding when voiding Prepaid Booking. 0 - Shoreside refunding when voiding Prepaid Booking. |
|
PrePaid CancelFee Default Dept |
Dept number, for example, 1243 |
Debit Department to be used when posting Cancellation Fees when voiding PrePaid Event Bookings in OHCTICKET. |
|
PrePaid Voids Default Dept |
Dept number, for example, 1243 |
Debit Department to be used when posting Cancellation Fees when voiding PrePaid Event Bookings in OHCTICKET. |
|
Prepaid Events Default Pos Department |
Dept number, for example, 1243 |
Debit Department to be used when posting Voids when voiding PrePaid Event Bookings in OHCTICKET. |
|
Prepaids Refund Confirmation |
1 |
1 - Require Confirmation when Refunding Prepaids during voiding. |
|
Print + Post Summary |
0 or 1 |
0 - Do not print summary after printing tickets in Print+Post. 1-Print. |
|
Print Event Tickets |
0 or 1 |
0 - Do not print Event Tickets after click Post. 1 - Print Event Tickets after click Post. |
|
Print Events Summary |
0 or 1 |
0 - Do not print summary. 1 - Print. |
|
Print Void Summary |
0 or 1 |
0 - Do not print summary after voiding tickets. 1 - Print. |
|
Require Waitlist Confirmation |
0 or 1 |
0 - No confirmation when adding Booking into Waitlist. 1 - Display confirmation with Waitlist No. |
|
Unposted Bookings Posting |
0 or 1 |
1 - Unposted Bookings posting is in progress - Do not allow any other process to start 0 - No Unposted Bookings posting process detected - allow this process to start |
|
Use Cancellation Fees |
0 or 1 |
1 - Enable / 0-Disable use of Cancellation Fees when voiding Event Bookings in OHCTICKET. |
|
Use Event Waitlists |
0 or 1 |
1 - Enable / 0 - Disable use of Event Waitlists. |