1 OHC Tools Functionality
The OHC Tools is an application that manages the data security, credit card data encryption, and database password change, and has an added database import/export functionality.
Figure 1-1 Functions in OHC Tools Home Tab

Figure 1-2 Functions in OHC Tools Import/Export Tab

Change Database Encryption Key
The Change Database Encryption Key allows you to secure and protect important data such as credit card information and user passwords stored in the database using an encryption method compliant with PA-DSS policy.
Creating an Encryption Passphrase
-
Log in to the OHC Tools application and select Change Database Encryption Key from the ribbon bar.
-
In the Encryption Key Manager window, enter the Passphrase1 and Passphrase 2, Old Password, New Password, and Confirm New Password.
-
Click Apply to proceed. The system prompts you with a message: “Please ensure there is no application currently running in order to prevent data corruption later”.
-
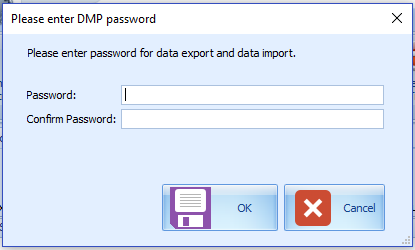
If Transparent Data Encryption (TDE) is used, the system performs a database backup, allowing you to restore at a later stage. This requires a password for the DMP file. If an error were to occur during the backup, you will be prompted to enter the same password that must be identical.
Figure 1-3 DMP Password
-
Click OK to continue, and the program prompts a request to stop running applications, if any.
-
When the Change Encryption Key begins, program performs a backup process on tables that need to be re-encrypted.
-
If corrupted data is found during the encryption process, the system continues the process and prompts a warning at the end of the process before generating an error log.
Figure 1-4 Encryption Failed Warning

-
At the error prompt, select Yes to continue replacing the encryption key or No to roll back the process by restoring the backup.
-
The passphrase is saved in OHCSecurity.par and is valid for one year from the date of encryption.
Verify Encrypted Database Data
The Verify Database Encrypted Data function verifies the encrypted data and confirms that encryption can be change before performing the Change Encryption Key.
-
In the Tools application, select Verify Database Encrypted Data from the ribbon bar.
-
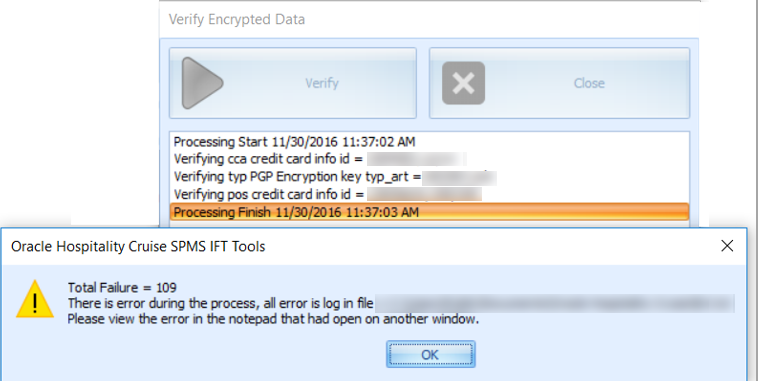
In the Verify Encrypted Data window, click Verify.
-
The Verify Database Encryption Data verifies data in the User login credentials, Parameter, Reservation, POS Information, (PGP Key), Credit Card Registration, Transfer, and Authorization
-
If the verification returns a failed message, possibility due to invalid data, correct the error and repeat the process.
Figure 1-5 Verify Encrypted Database
-
Click Close when the process finishes.
Change Password
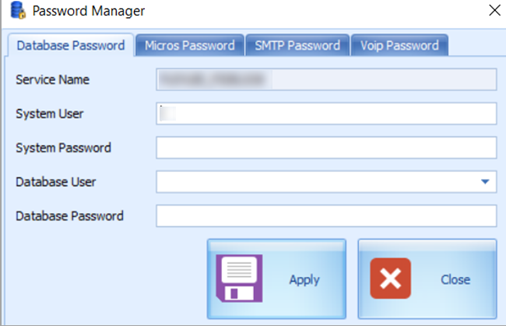
The Change Password function changes the database password, including the MICROS, SMTP, and VOIP password and prevents you from changing the passwords directly from external database tools.
You are not allow to change the Ship’s DB password when the Quick Check In (QCI) Sync application is running and must have Database privileges granted before you can proceed.
Figure 1-6 Password Manager Window
-
In the Tools window, select Change Password from the ribbon bar.
-
In the Password Manger window, enter the system User, System Password, Database User, and Database Password (the password must fulfil the password specification).
-
Click Apply to update the database password and save the encrypted password to OHCSecurity.par.
-
Repeat the steps above to change the password for MICROS, SMTP, and VOIP.
Important:
Before you change any of the Database Password and if SPMS REST API Server is installed, you must shutdown the Oracle Hospitality Cruise SPMS Platform API service. Once the Database Encryption Key/DB Password has been changed, you must uninstall the Cruise Property Management application and reinstall after the password change.
Upload PGP Key
The Upload PGP Key function is used to upload the Public Key (.pkr) and Private Key (.skr), a key pair for function that requires a Pretty Good Privacy (PGP) Key, for example, Payroll, Credit Card, DGS Resonline and Data Import handling. You can only generate a key pair using a third party tools such as PortablePGP and FileAssurity OpenPGP. See PA-DSS 3.2 Implementation Guide for more information.
For Credit Card processing, the Ship sends the public key to the credit card provider and in return receives a public key from the provider.
Figure 1-7 PGP Key Uploader

-
In the Tools window, select Upload PGP Key from the ribbon bar.
-
In the PGP Key Uploader window Credit Card tab, click the Browse button next to Public Key and select a .pkr file to upload. To upload a Private Key, click the Browse button next to Private Key to select an .skr file.
-
Enter the Key Passphrase if the key is generated with a specific passphrase.
-
Click Upload to upload the keys. The system prompts you with “Key upload is done successfully” when upload completes and stores both of the encrypted keys in
TYP_PGPtable. -
For DGS Credit Card handling, a key version is required.
Note:
The PGP Key has an expiry date and you must generate a new PGP Key and re-upload to the database once you receive a reminder. The program does not allow you to reuse the same PGP Key.
Copy System Account
The Copy System Account function copies the System Account from one database to another database.
-
In the Tools window, select Copy System Account from the ribbon bar.
-
In the Copy System account window, select the source database from the Server drop-down list and enter the User password.
-
At the end of the ribbon bar, click Connect under the Copy System Account group. The system accounts shall populate if the connection is successful.
Figure 1-8 Copy System Account

-
Check the Delete All Destination System Account to add or remove the account in the destination database. This is only possible when no posting exists in the account during the copy process.
-
Click Copy to complete the process.
Change Log Trigger
The following function creates a Database Trigger that logs changes made to selected fields. Values from the selected fields are stored the log in the Payroll Audit Trail table.
-
In the Tools window, select Change Log Trigger from the ribbon bar.
-
In the Create Change Log Trigger window, check the table on the left pane and then navigate to the Monitor Column on the right pane.
-
In the Monitor Column, select the required change fields to log into the Payroll Audit Trail table and then navigate to the Acc ID Column tab.
-
In the Acc ID Column tab, select the field to write into Payroll Contract Account ID.
-
Click Create Change Log Trigger at the ribbon bar to create the trigger.
-
Repeat the above steps to add more table field.
Delete Log Trigger
This function creates a Database Trigger that logs data deletion activities of the selected fields. Values deleted from the selected fields are logged into the Audit Trail Deletion table.
-
In OHC Tools, select Delete Log Trigger from the ribbon bar.
-
From the Create Deletion Log Trigger window, navigate to the the Description column
-
Under the Description column, select all the fields so that their changes are logged into the SDR table
-
Navigate to the Acc ID column tab.
-
In the Acc ID Column tab, select the fields that will be written into the SDR_ACC_ID
-
Click Create Deletion Log Trigger on the ribbon bar to create the database trigger.
-
The system prompts a number of database triggers that track created/deleted/uploaded fields. Click OK to continue.
-
Repeat the steps above to add more table fields.
Insert Log Trigger
This function creates a Database Trigger that logs dthe ata insertion activities of the selected fields. Values added from the selected fields are logged into the Audit Trail Insertion table.
-
In the Tools window, select Insertion Log Trigger from the ribbon bar.
-
In the Create Insertion Log Trigger window, select the table on the left pane by selecting the check box and then navigate to the Description Column on the right pane.
-
In the Description Column, select the fields logged into the Audit Trail Insertion table.
-
Navigate to the Acc ID Column tab, and select the field to write into the Audit Trail Insertion Account ID.
-
Click Create Insertion Log Trigger on the ribbon bar.
-
The system prompts a number of database triggers that tracks created/deleted/uploaded fields. Click OK to continue.
-
Repeat the above steps to add more table fields.
Serial Port Reader
The Serial Port Reader is a tool to test the reader connection with the barcode or card reader COM port.
Figure 1-9 Serial Port Reader Setting

-
Connect the device to the PC and click Serial Port Readeron the ribbon bar.
-
In Serial Port reader window, select the Com Port, Parity, Baud Rate, Data Bit, and Stop Bit.
-
Select the Show Result as Hex checkbox to show read results in Hexadecimal format.
-
Click Connect. The connection indicator turns to green if the device is successfully connected.
-
Press any button on the device to start reading a barcode. The result shown in the text field.
-
Click Clear All Text to clear the field.
Credit Card Token Handling
This function fixes the credit card data before transferring it from a non-token authorization to token handling. This special tool is used to ensure all existing Credit Card Authorizations (CCA) and Credit Card Settlement (CCT) records are process before changing the credit card format to SERVEBASE Tokenization handling.
-
In the Tools window, select Credit Card Token Handling from the ribbon bar.
-
At the Credit Card Token Handling prompt “By doing this, you are agreeing to use credit card tokenization handling”, select Yes to agree or No to return to the main menu.
-
In the Oracle Hospitality Cruise SPMS Credit Card Tokenization window, click Process and select Yes to implement the credit card handling.
-
When you click Yes, credit card verification begins based on the following criteria:
-
Parameter ‘Not Specified’, ‘CC Transfer Format’ is not ‘SERVEBASE’.
-
No outstanding status for CCA record, where status is = 0
-
No outstanding status for CCT record, where status is =0
-
-
If the above criteria are not met, the change token handling will not proceed and the following message appears: “There are some authorizations still pending”..
-
Check and correct the CCA and CCT records and the repeat the above steps when ready.
-
When the Process completes successfully, the system prompts a message: “Credit card token handling is implemented”. The parameter ‘Not Specified’, ‘CC Transfer Format’ is updated to SERVEBASE and all credit card records are deactivated.
Manual activation is not allowed and the system prompts: “Settlement or reversal is done for this card, please get credit card again”.
Verify Embarkation Data
This function validates and lists all VARCHAR2, CHAR fields that haves ASCII value of more than 127. For example: €, ‡, Œ, Ž, ¢, ©, ®. The verification validates the reservation fields used in the Advanced Quick Check In application such as CAB, RES, CRD, SEC, SIG, USR, UXP, VIS_BLOB, VIS_TEXT.
-
In the Tools window, select Verify Embarkation Data from the ribbon bar.
-
In the Verify Embarkation Data window, select the relevant options and Include Check In if you want to include check-ins.
-
Click Verify Data to proceed with verification. Below are the sample results shown in the verification window:
-
The Non-ASCII code size less than 18 characters will have status as OK.
-
The Non-ASCII code size that are more than 18 will have status shown as Not OK and listed with “There is potential x problem(s) found, please review the log file VERIFYDATA_yyymmdd.txt”.
Figure 1-10 Verify Embarkation Data

-
Export Database
The Export Database function enables you to export certain data tables from the database. The export function only exports table, data, index, and trigger and does not export the view or sequence.
-
In the Tools Import/Export tab, select Export Database from the ribbon bar.
-
In the Export Database window, enter the 16–digit Encryption Key for the dump file.
-
Select the table to export individually or click Select All at the ribbon bar for all tables.
-
Click Backup on the ribbon bar to compress and encrypt the data table. The system prompts ‘File had been backup to
‘C:\<FilePath>\<Filename>’when the export is ready.If Transparent Data Encryption (TDE) applies, the backup file is stored as
DATA_PUMP_DIRin the Oracle Database directory instead. You are prompted to enter the DMP Password and Filename. - Click OK to confirm and close the window.
Import Database
The Import Database function only imports the data table of the dump file exported using the Export Database function.
Figure 1-11 Import Database

-
In the Tools Import/Export tab, select Import Database from the ribbon bar.
-
In the Import Database window, enter the Encryption Key of the dump file. The encryption key must match the key entered during database export in the Tools application, Export Database function.
-
Click the Select Dump File on the ribbon bar and browse the file to import.
-
If the Encryption Key does not match, you are prompted with this message, “Padding is invalid and cannot be removed. This could mean the encryption key is wrong.”
If TDE applies, you are prompted to enter the DMP file name and password mentioned in step 4 of Export Database. If the destination database is on another server, copy the DMP file from the source database server to the destination server first before proceeding to step 5.
-
A list of tables populates on the window once the dump file decompresses and is decrypted successfully. This does not apply if TDE is used. Select the table to import.
The tables that do not exist in the dump file are marked with the comment “table does not exist in dump file” in the comment column. The system drops and re-imports all existing tables during this process.
-
Click Import Database on the ribbon bar. You are prompted to close all applications before continuing.
-
Click Yes to stop the running instance and proceed with the import. During the import routine, the system drops the database tables and re-imports all existing tables.
-
Once import completes, you are prompted with this message:“Import Database Completed, the log file will be show.”
-
Close the prompt to exit the application.
Export Safety Setup
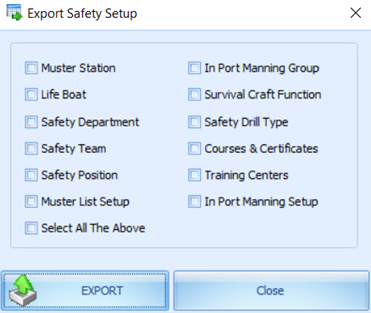
This function exports all of the Safety setup from one ship to another. We recommend that you to use this tool with the new Muster List, In Port Manning, and Safety Drill setup.
Figure 1-12 Export Safety Setup
-
In the Tools Import/Export tab, select Export Safety Setup from the ribbon bar.
-
In Export Safety Setup window, select the desired Safety setup and then click Export to export. Files are exported to
C:\Users\Public\Documents\Oracle Hospitality Cruise\SafetySetup_v8.xxx_yyymmdd.xml.’
Import Safety Setup
This function is similar to the Import Database function with the exception that it only imports Safety Setup that are exported from Export Safety Setup in the Tools application.
-
In the Tools Import/Export tab, select Import Safety Setup from the ribbon bar.
-
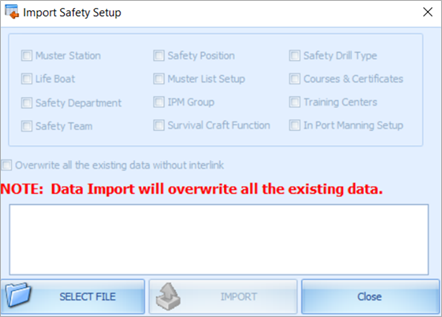
In the Import Safety Setup window, click Select File to browse to the XML file from the Public Document folder.
Figure 1-13 Import Safety Setup
-
Select Overwrite all the existing data without interlink if you wish to overwrite existing data without interlink. The system does not overwrite data that has an inter link to other tables and prompts the following message if inter link data is found “System notified that there are some inter link tables. System is not going to overwrite existing data. Import Failed.”
Completed course and certificate (COU) are not imported into database if the record is found in Require Course and Certificate (REQ), Require Substitution Courses (RQS), and Require Course and Certificate for each operation position (RER). The same applies to Muster List setup.
-
Click Import and select Yes when prompted with “There are existing data in either of this table (xxx,xxx). Are you sure want to overwrite?”.
-
At the message prompt “Import of Safety Setup Completed.”, click Close to exit.
Export Package Template
This function duplicates the package plan template from one ship to another.
-
At the Tools Import/Export tab, select Export Package Template from the ribbon bar.
-
At the Export Package Template setup, select the Package Plan Template to export.
-
Click Export and browse the location to save the XML file.
-
Click OK when message prompts “Export of Package Template Completed.”
Import Package Template
This function imports the package plan template exported from the Export Package Template function in the Tools application.
-
In the Tools Import/Export tab, select Import Package Template from the ribbon bar.
-
In the Import Package Template window, click Select File to browse the XML file.
-
Select the template you wish to import from the Selected column.
-
Click Import to begin import.
-
At the message prompt “Some of the template already exists in the DB, do you want to overwrite it?”, click Yes to continue, and then click OK to close the window.
Import Barcode for Simphony
This function imports the menu item barcode into the Simphony database. It requires a connection to Simphony System setup in Administration, System Setup, Parameter ‘PROMO’, ‘Micros Server Name = ‘hostname of Simphony database / Simphony’, and a username. The database password entered uses the Change Password function in the MICROS Password Tools application.
When importing the barcode and the system prompts a message “The Micros DB is not Simphony or the DB is offline.”. This is due to the Simphony, Micros Simphony Property Number parameter that is used to copy the DB being invalid.
-
At the Tools Import/Export tab, select Import Barcode for Simphony from the ribbon bar and select the revenuer center under the Locations section.
-
Click Load from CSV file. Samples in the CSV file format are:
-
Field 1 = menu item object number
-
Field 2 = menu item name (for reference only)
-
Field 3 = barcode
-
-
You can select to import from Parent, Property ID or in Revenue Center.
-
When importing from the Parent group, the Child group will follow. However, changes made to the Child group do not affect the Parent record. All new records will not have any status shown in the status column.
-
Click Import to proceed, and the system prompts a message “x record(s) imported, x record (s) failed to imported’” when the import completes. The program only imports valid items and non-duplicated item.